


1974 Raleigh Grand Prix Rehab...Part 5...Frame Alignment
 05-16-20, 02:53 PM
#1

Senior Member
Thread Starter

Join Date: Jun 2018
Location: The Urban Shores Of Michigami
Posts: 1,749
Bikes: ........................................ .....Holdsworth "Special"..... .......Falcon "Special".......... .........Miyata 912........... ........................................
Mentioned: 11 Post(s)
Tagged: 0 Thread(s)
Quoted: 702 Post(s)
Liked 672 Times
in
420 Posts
1974 Raleigh Grand Prix Rehab...Part 5...Frame Alignment
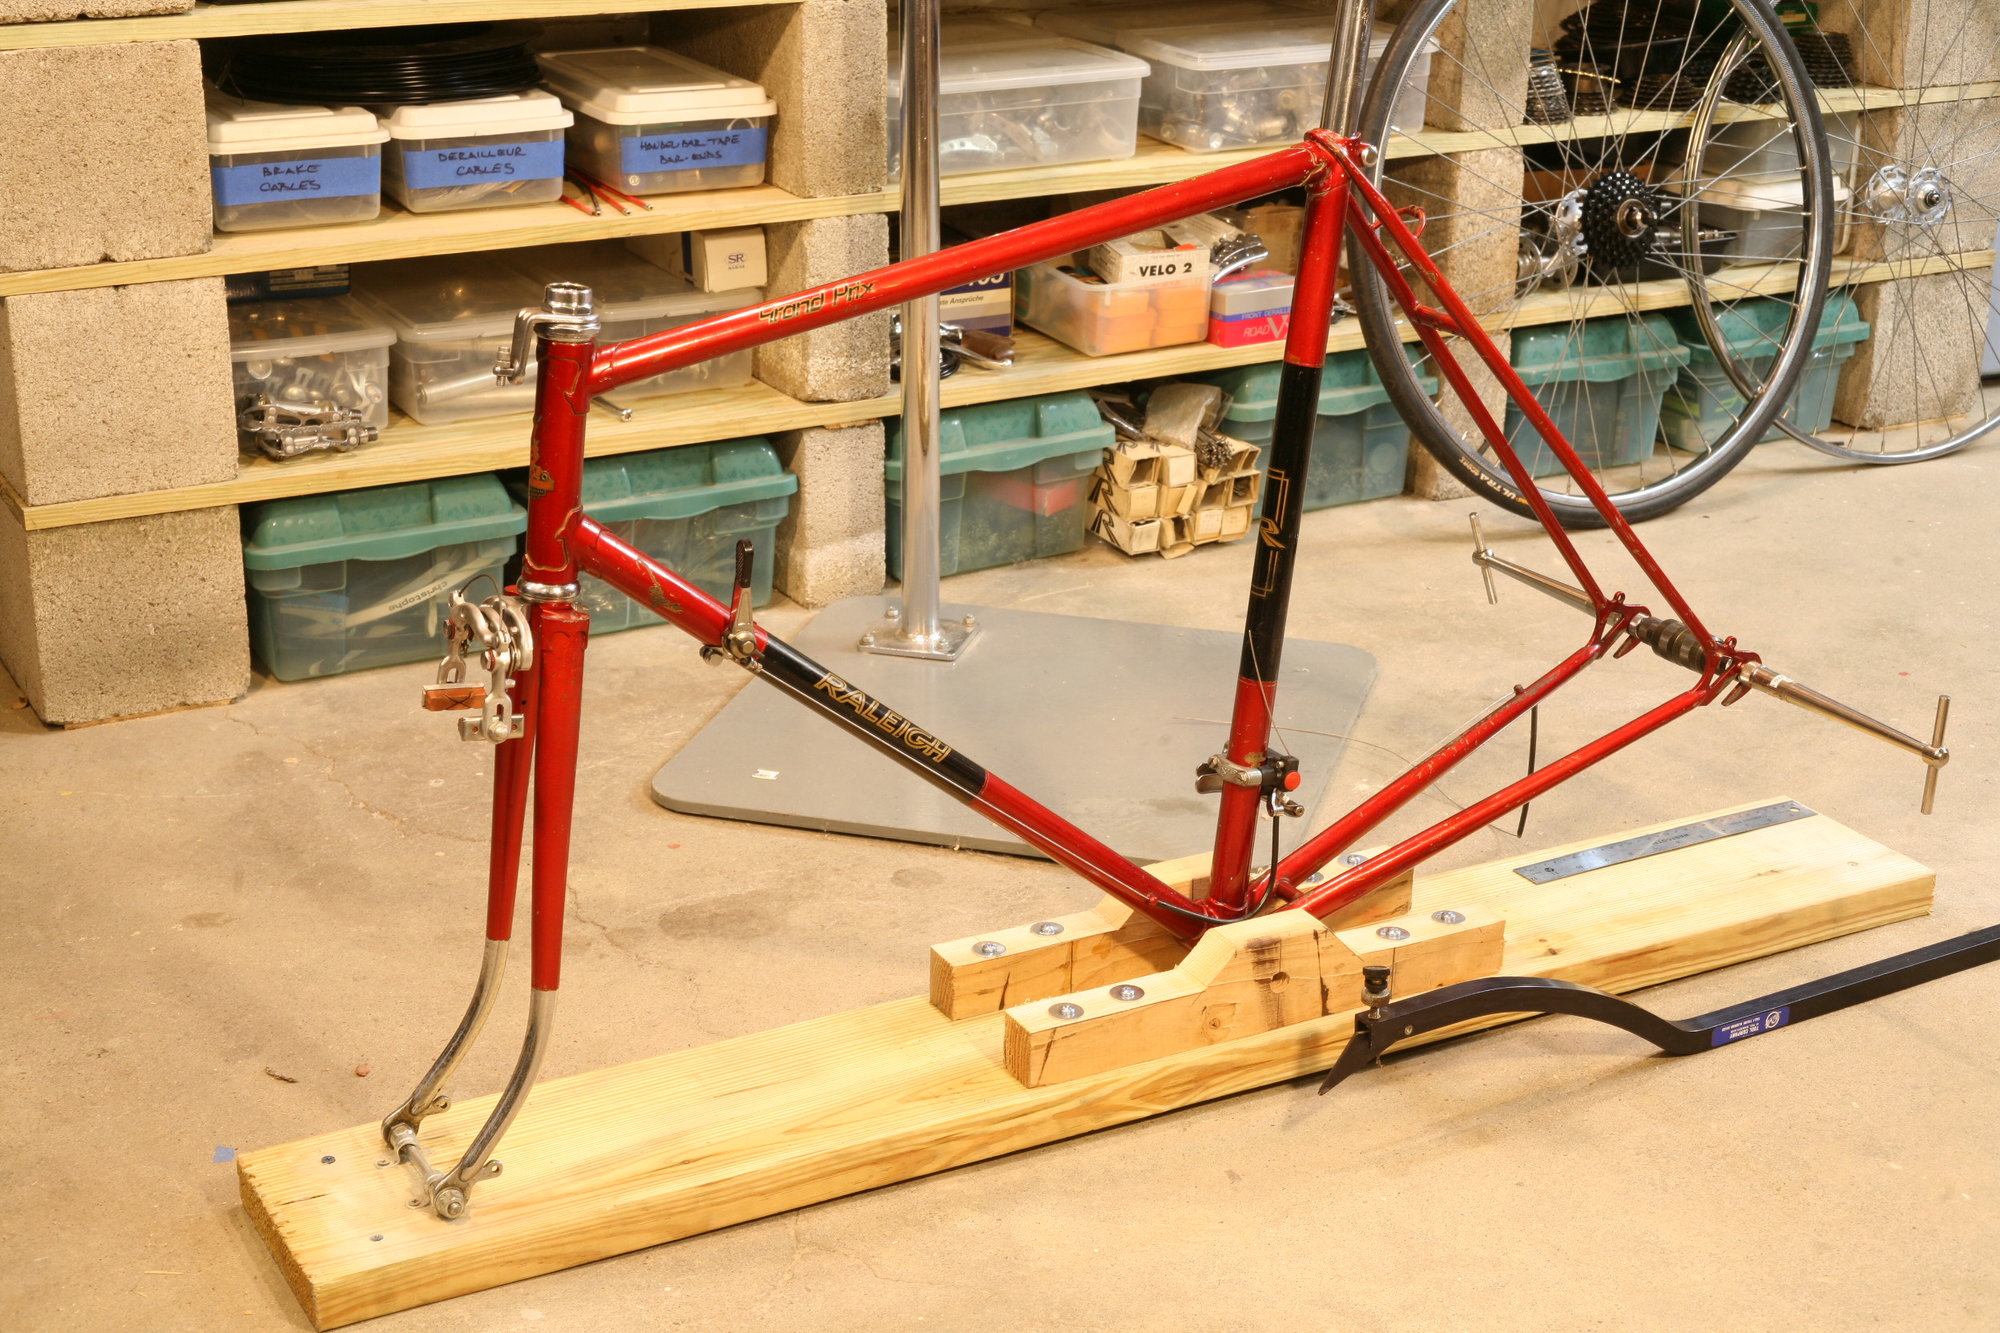
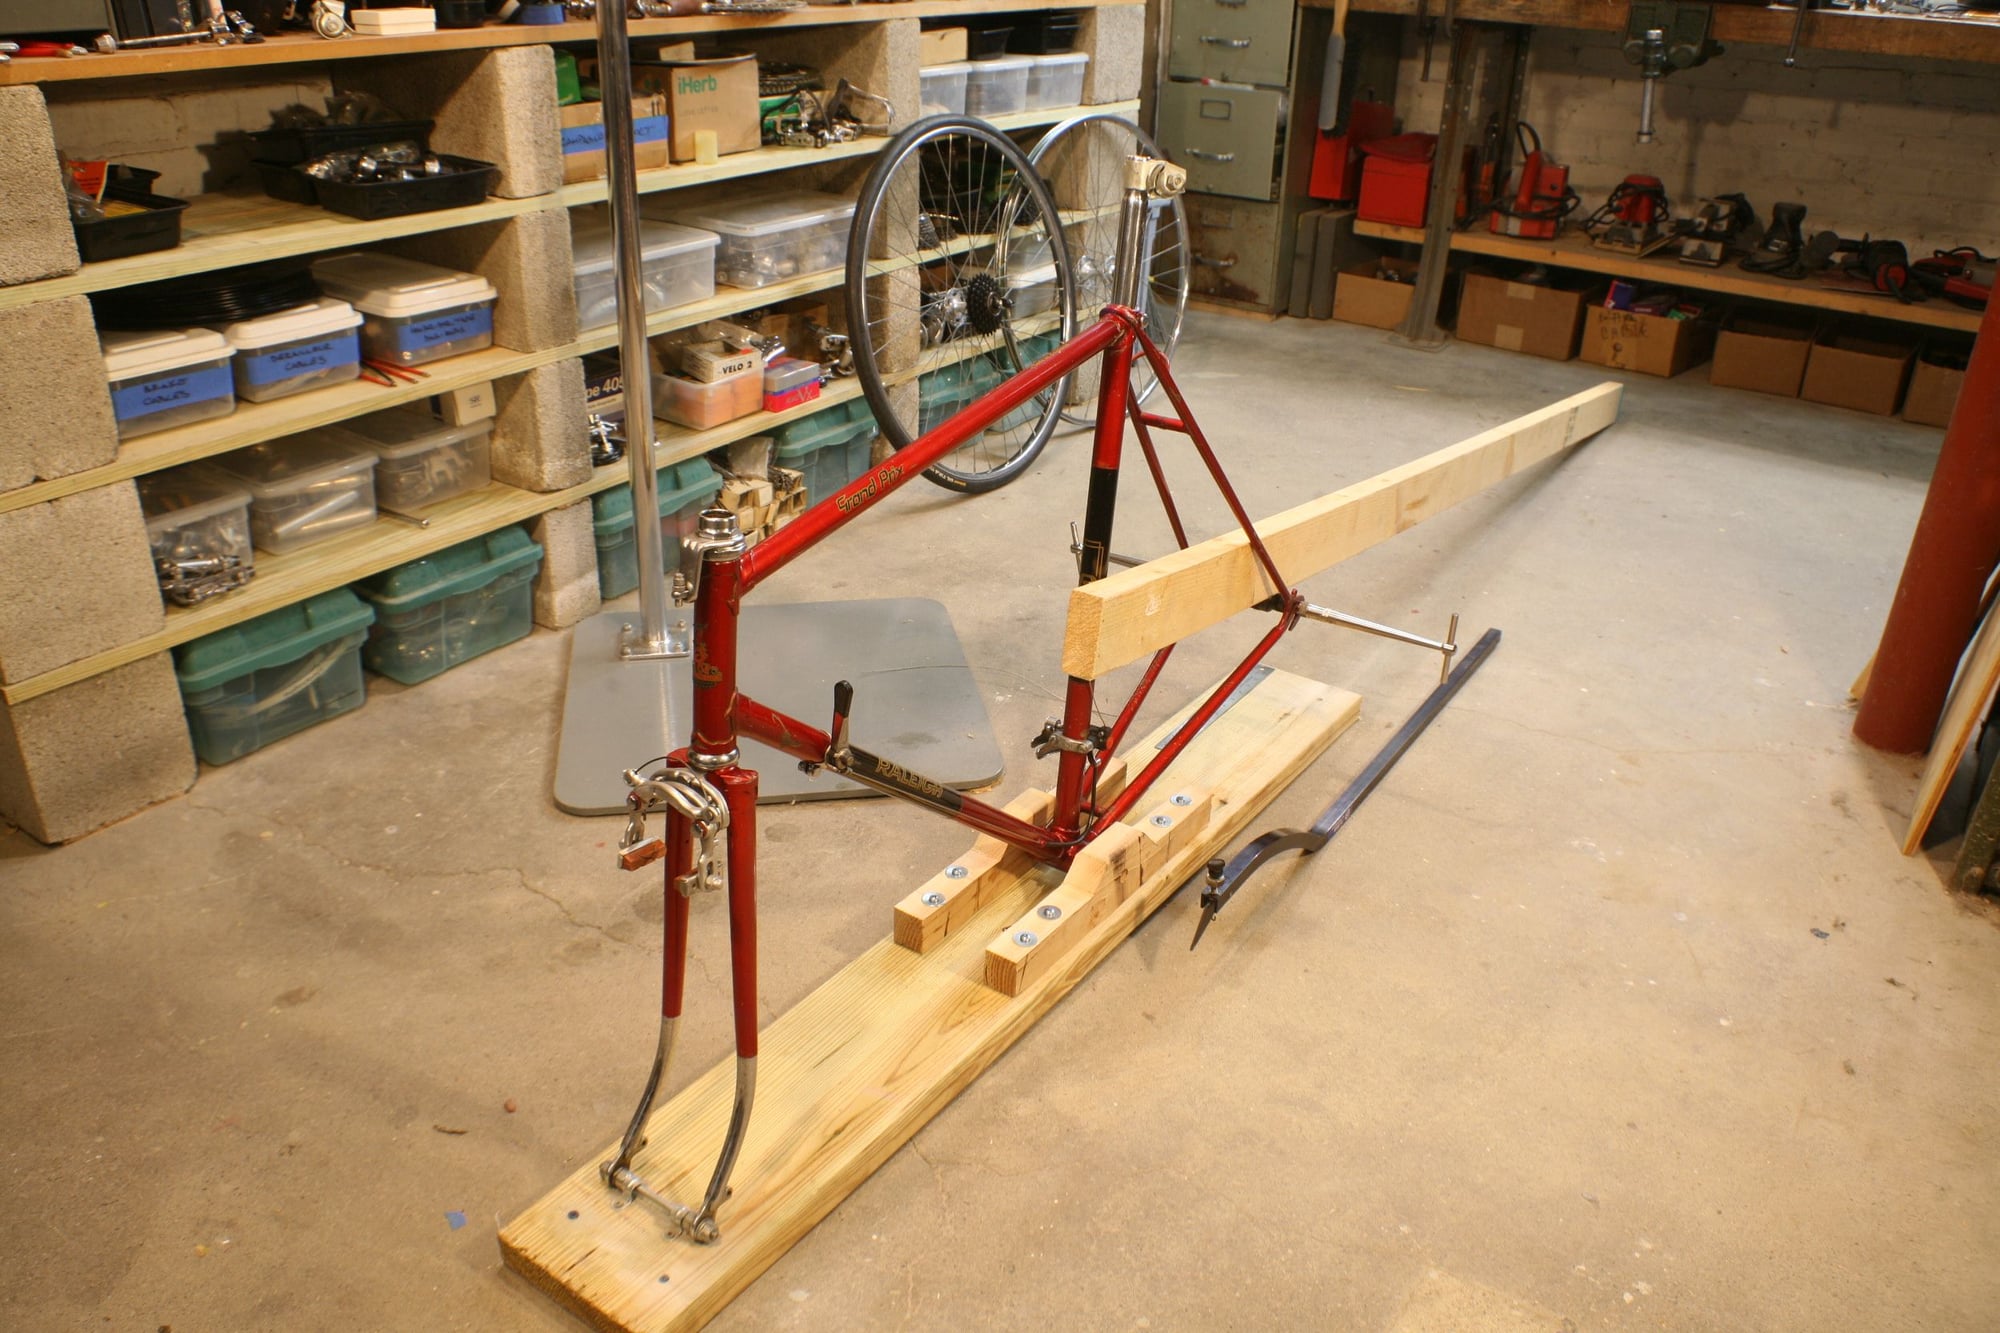
I started assembling the bike today and got the derailleurs working great. When I tried to install the rear brake pads, I could not get the wheel centered in the seat stays. Checking the frame with a Park Frame Alignment Tool, I could see that the stays were off-center by 1/4". So with some scrap lumber I built this fixture to hold the frame securely while I wrenched the stays over with a 8 foot long 2x4. The fixture being attached to the floor proved to be very effective.
Last edited by branko_76; 05-16-20 at 03:33 PM.
 05-16-20, 02:58 PM
#2
Senior Member
Thread Starter
Join Date: Jun 2018
Location: The Urban Shores Of Michigami
Posts: 1,749
Bikes: ........................................ .....Holdsworth "Special"..... .......Falcon "Special".......... .........Miyata 912........... ........................................
Mentioned: 11 Post(s)
Tagged: 0 Thread(s)
Quoted: 702 Post(s)
Liked 672 Times
in
420 Posts

 05-16-20, 03:30 PM
#3

Senior Member
Join Date: Dec 2005
Posts: 17,155
Mentioned: 481 Post(s)
Tagged: 0 Thread(s)
Quoted: 3809 Post(s)
Liked 6,684 Times
in
2,609 Posts
Nice setup! When I've done that job, I install a couple of bottom bracket cups that I'm not terribly fond of and then place the frame in my vise, holding it by the cups.
05-16-20, 03:32 PM
#4
Senior Member
Thread Starter
Join Date: Jun 2018
Location: The Urban Shores Of Michigami
Posts: 1,749
Bikes: ........................................ .....Holdsworth "Special"..... .......Falcon "Special".......... .........Miyata 912........... ........................................
Mentioned: 11 Post(s)
Tagged: 0 Thread(s)
Quoted: 702 Post(s)
Liked 672 Times
in
420 Posts
I thought of doing that but my work bench is so cluttered that it was faster (and more fun) to just build this thing.
05-17-20, 12:19 PM
#5
Senior Member
Join Date: Aug 2007
Location: Evanston, IL
Posts: 5,093
Bikes: many
Mentioned: 63 Post(s)
Tagged: 0 Thread(s)
Quoted: 1444 Post(s)
Liked 1,392 Times
in
760 Posts
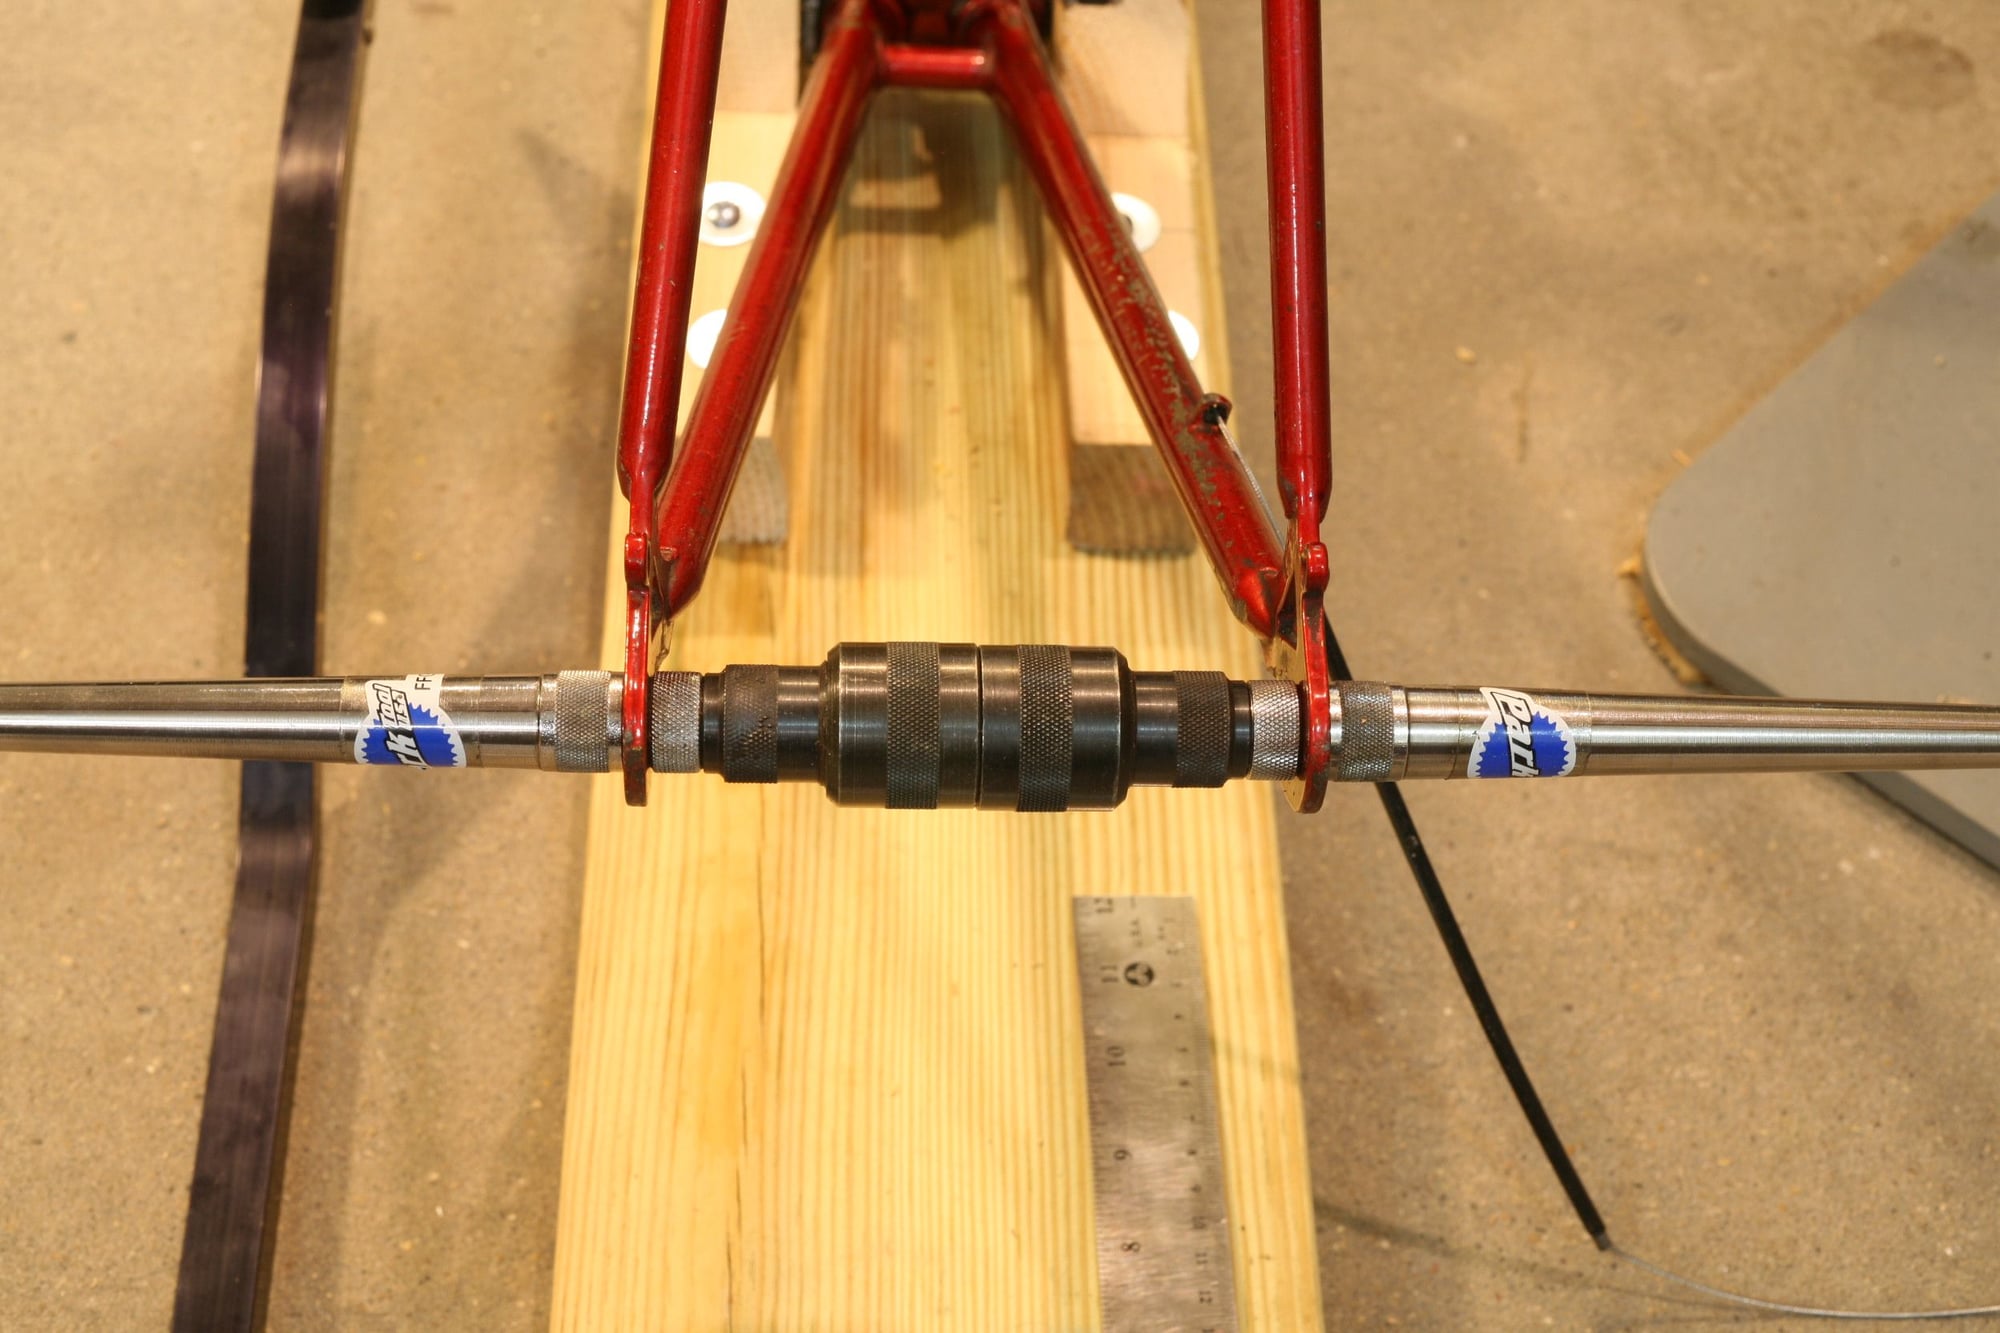
Interesting. I see conduit clips securing the dummy front axle. How is the bottom bracket shell secured, just the bottom bracket spindle riding in the two holes?
05-17-20, 12:45 PM
#6
Senior Member
Thread Starter
Join Date: Jun 2018
Location: The Urban Shores Of Michigami
Posts: 1,749
Bikes: ........................................ .....Holdsworth "Special"..... .......Falcon "Special".......... .........Miyata 912........... ........................................
Mentioned: 11 Post(s)
Tagged: 0 Thread(s)
Quoted: 702 Post(s)
Liked 672 Times
in
420 Posts
05-18-20, 10:27 PM
#7
Senior Member
Thread Starter
Join Date: Jun 2018
Location: The Urban Shores Of Michigami
Posts: 1,749
Bikes: ........................................ .....Holdsworth "Special"..... .......Falcon "Special".......... .........Miyata 912........... ........................................
Mentioned: 11 Post(s)
Tagged: 0 Thread(s)
Quoted: 702 Post(s)
Liked 672 Times
in
420 Posts
Aligning the seat and chain stays did not help. The wheel was still offset to the non-drive side by 3/8". Although not evident in the photo, I could see that the wheel was not parallel to the seat tube.
05-18-20, 10:37 PM
#8
Senior Member
Thread Starter
Join Date: Jun 2018
Location: The Urban Shores Of Michigami
Posts: 1,749
Bikes: ........................................ .....Holdsworth "Special"..... .......Falcon "Special".......... .........Miyata 912........... ........................................
Mentioned: 11 Post(s)
Tagged: 0 Thread(s)
Quoted: 702 Post(s)
Liked 672 Times
in
420 Posts
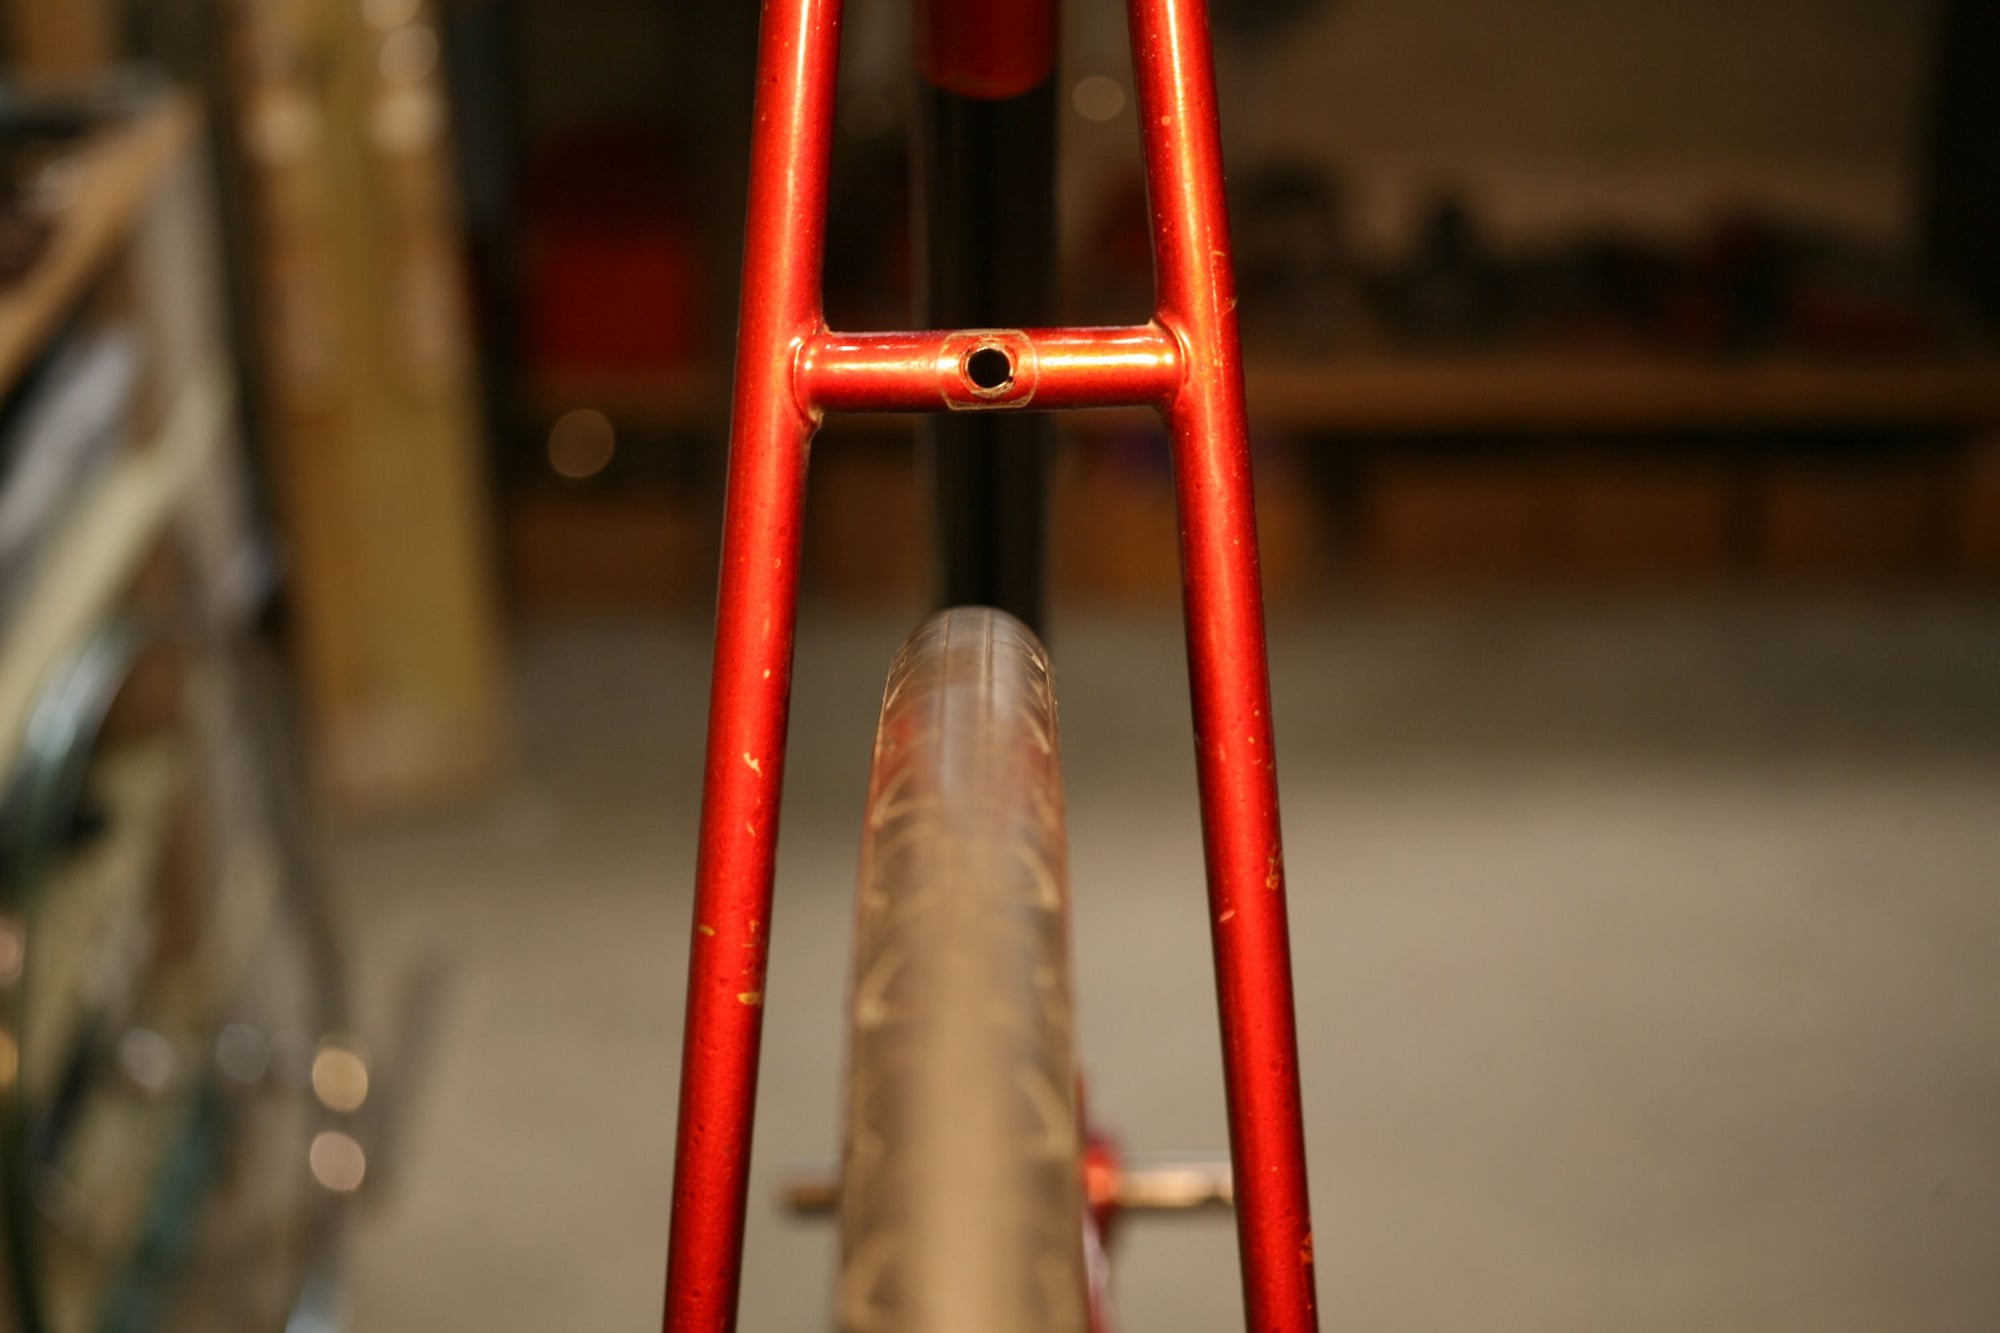
I almost gave up but after giving it a day to sink in, I took some measurements and found that the non-drive side seat and chain stays were slightly longer than the other side. With the help of AutoCAD, I input the wheel radius, the axle length between the dropouts and the amount of offset. Using the "alignment" command, I was able to get the exact measurement that the axle needed to drop on the drive-side to center the wheel.
Using a fresh "flat bastard" file, I took off about 1.5mm from the inner bottom of the drive-side dropout.
*remember kiddies, files only cut on the push stroke, dragging a file across the work surface on the return stroke will only shorten the life of the file...

Using a fresh "flat bastard" file, I took off about 1.5mm from the inner bottom of the drive-side dropout.
*remember kiddies, files only cut on the push stroke, dragging a file across the work surface on the return stroke will only shorten the life of the file...
Last edited by branko_76; 05-18-20 at 10:44 PM.
Likes For branko_76:
05-18-20, 10:39 PM
#9
Senior Member
Thread Starter
Join Date: Jun 2018
Location: The Urban Shores Of Michigami
Posts: 1,749
Bikes: ........................................ .....Holdsworth "Special"..... .......Falcon "Special".......... .........Miyata 912........... ........................................
Mentioned: 11 Post(s)
Tagged: 0 Thread(s)
Quoted: 702 Post(s)
Liked 672 Times
in
420 Posts
Since the d.o. has no integral derailleur hanger, the hanger attached to the simplex derailleur will position the axle...

05-18-20, 10:41 PM
#10
Senior Member
Thread Starter
Join Date: Jun 2018
Location: The Urban Shores Of Michigami
Posts: 1,749
Bikes: ........................................ .....Holdsworth "Special"..... .......Falcon "Special".......... .........Miyata 912........... ........................................
Mentioned: 11 Post(s)
Tagged: 0 Thread(s)
Quoted: 702 Post(s)
Liked 672 Times
in
420 Posts
The wheel is now centered and is also parallel to the seat-tube...

Likes For branko_76:
05-19-20, 06:21 AM
#11
Senior Member
Well done! I have had many bikes with odd misalignments. You do what you gotta do you make them "right".
Likes For big chainring:
04-10-24, 01:31 PM
#12
Newbie
Join Date: Nov 2021
Posts: 15
Mentioned: 0 Post(s)
Tagged: 0 Thread(s)
Quoted: 13 Post(s)
Likes: 0
Liked 1 Time
in
1 Post
I started assembling the bike today and got the derailleurs working great. When I tried to install the rear brake pads, I could not get the wheel centered in the seat stays. Checking the frame with a Park Frame Alignment Tool, I could see that the stays were off-center by 1/4". So with some scrap lumber I built this fixture to hold the frame securely while I wrenched the stays over with a 8 foot long 2x4. The fixture being attached to the floor proved to be very effective.
Likes For mauin1x:
04-10-24, 05:45 PM
#13

feros ferio

Join Date: Jul 2000
Location: www.ci.encinitas.ca.us
Posts: 21,796
Bikes: 1959 Capo Modell Campagnolo; 1960 Capo Sieger (2); 1962 Carlton Franco Suisse; 1970 Peugeot UO-8; 1982 Bianchi Campione d'Italia; 1988 Schwinn Project KOM-10;
Mentioned: 44 Post(s)
Tagged: 0 Thread(s)
Quoted: 1392 Post(s)
Liked 1,324 Times
in
836 Posts
I envy your amount of workshop space. 
__________________
"Far and away the best prize that life offers is the chance to work hard at work worth doing." --Theodore Roosevelt
Capo: 1959 Modell Campagnolo, S/N 40324; 1960 Sieger (2), S/N 42624, 42597
Carlton: 1962 Franco Suisse, S/N K7911
Peugeot: 1970 UO-8, S/N 0010468
Bianchi: 1982 Campione d'Italia, S/N 1.M9914
Schwinn: 1988 Project KOM-10, S/N F804069
Likes For John E:
04-10-24, 06:18 PM
#14
Senior Member

Join Date: Feb 2013
Location: Alta California
Posts: 14,262
Mentioned: 415 Post(s)
Tagged: 1 Thread(s)
Quoted: 3810 Post(s)
Liked 3,336 Times
in
2,176 Posts
-----
differing effective seat stay lengths is one of the nastier frame alignment problems to solve...
have had a couple frames come through where the unequalness could not be solved by the method you employed
---
on a visit to Bob Freeman on Bainbridge Island (Seattle) to receive a giro of his collezione in September 2001 he showed me his Baines/TJ Cycles Flying Gate
all of that thought/care/planning and use of the very best materials on a bespoke frameset and Trev had constructed it with dissimilar effective seat stay lengths so that the machine's stern round thing sat in there gollywompus
-----
Last edited by juvela; 04-12-24 at 09:50 AM. Reason: addition
Likes For juvela:
04-11-24, 07:19 AM
#15
Senior Member
Join Date: Jan 2019
Location: Toledo Ohio
Posts: 1,494
Bikes: 1964 Huffy Sportsman, 1972 Fuji Newest, 1973 Schwinn Super Sport (3), 1982 Trek 412, 1983 Trek 700, 1989 Miyata 1000LT, 1991 Bianchi Boardwalk, plus others
Mentioned: 21 Post(s)
Tagged: 0 Thread(s)
Quoted: 582 Post(s)
Liked 697 Times
in
393 Posts
Isn’t this about the time someone comments on British manufacturing quality?
Likes For sd5782:
04-11-24, 09:53 AM
#16
Full Member

Join Date: Sep 2020
Location: Sacramento, CA
Posts: 399
Bikes: 2017 Sage Skyline, 2015 Co-Motion Periscope Tandem, 2012 Soma Smoothie, 2006 Kona Jake, 1986 Miyata Nine Twelve, 1977 Peugeot UO18c, 1977 Peugeot PRN10, 1974 Allegro Schweitzermeister Model 76, 1972 Hugo Rickert Spezial
Mentioned: 7 Post(s)
Tagged: 0 Thread(s)
Quoted: 114 Post(s)
Liked 591 Times
in
190 Posts
The brake bridge brazed on a slant sure caught my eye
I�ve always pictured Bike Boom manufacturing to be like that movie scene in �The Court Jester� with Danny Kaye where they compress his knighthood training into one day using a process that normally takes a few months.
Likes For Sactown_Albert:
04-11-24, 11:20 AM
#17
Senior Member
You know, I've taken as many pokes at Bike Boom British quality as most of us. But, at the same time, I am also impressed by my three early '70s Raleighs that are in near daily use that all still look good and ride great, despite being 50 years old. I have few other material possessions that have held up so well for so long.
Likes For daka:
04-11-24, 01:28 PM
#18
Senior Member
Join Date: Jan 2019
Location: Toledo Ohio
Posts: 1,494
Bikes: 1964 Huffy Sportsman, 1972 Fuji Newest, 1973 Schwinn Super Sport (3), 1982 Trek 412, 1983 Trek 700, 1989 Miyata 1000LT, 1991 Bianchi Boardwalk, plus others
Mentioned: 21 Post(s)
Tagged: 0 Thread(s)
Quoted: 582 Post(s)
Liked 697 Times
in
393 Posts
And I will admit that I kinda have a hankering for an early International.
04-12-24, 07:36 AM
#19
Senior Member
Thread Starter
Join Date: Jun 2018
Location: The Urban Shores Of Michigami
Posts: 1,749
Bikes: ........................................ .....Holdsworth "Special"..... .......Falcon "Special".......... .........Miyata 912........... ........................................
Mentioned: 11 Post(s)
Tagged: 0 Thread(s)
Quoted: 702 Post(s)
Liked 672 Times
in
420 Posts
