


How to cinch '82 Miyata Seatpost Bolt
 02-17-19, 09:30 PM
#1
se�or miembro
Thread Starter

Join Date: Dec 2018
Location: Pac NW
Posts: 6,624
Bikes: '70s - '80s Campagnolo
Mentioned: 92 Post(s)
Tagged: 0 Thread(s)
Quoted: 3888 Post(s)
Liked 6,488 Times
in
3,211 Posts
How to cinch '82 Miyata Seatpost Bolt
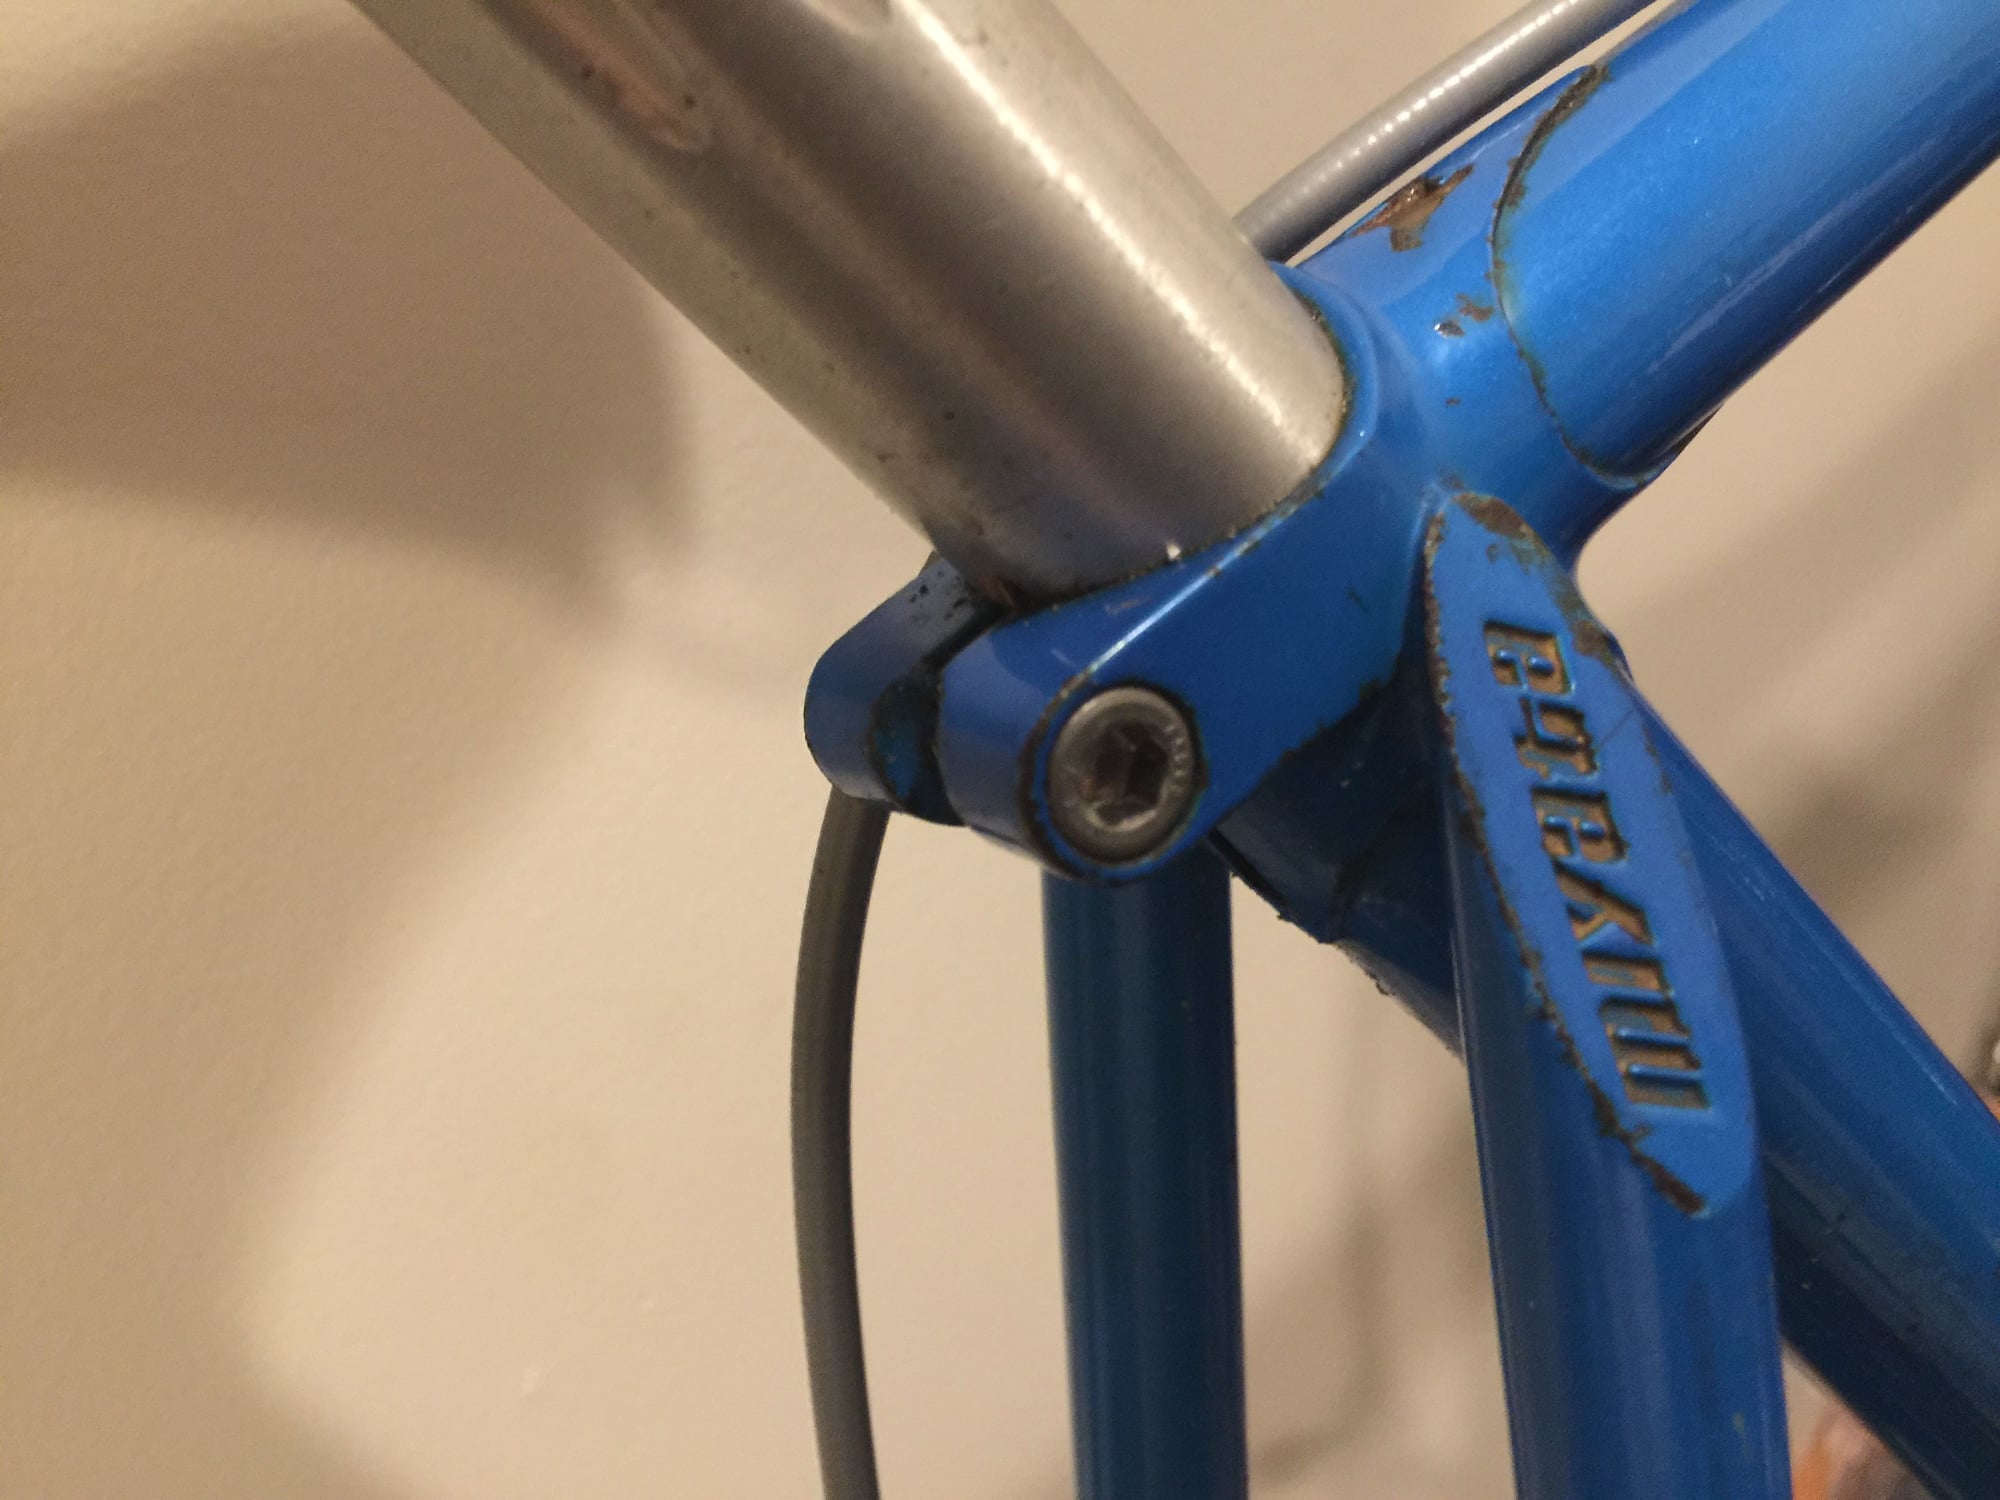
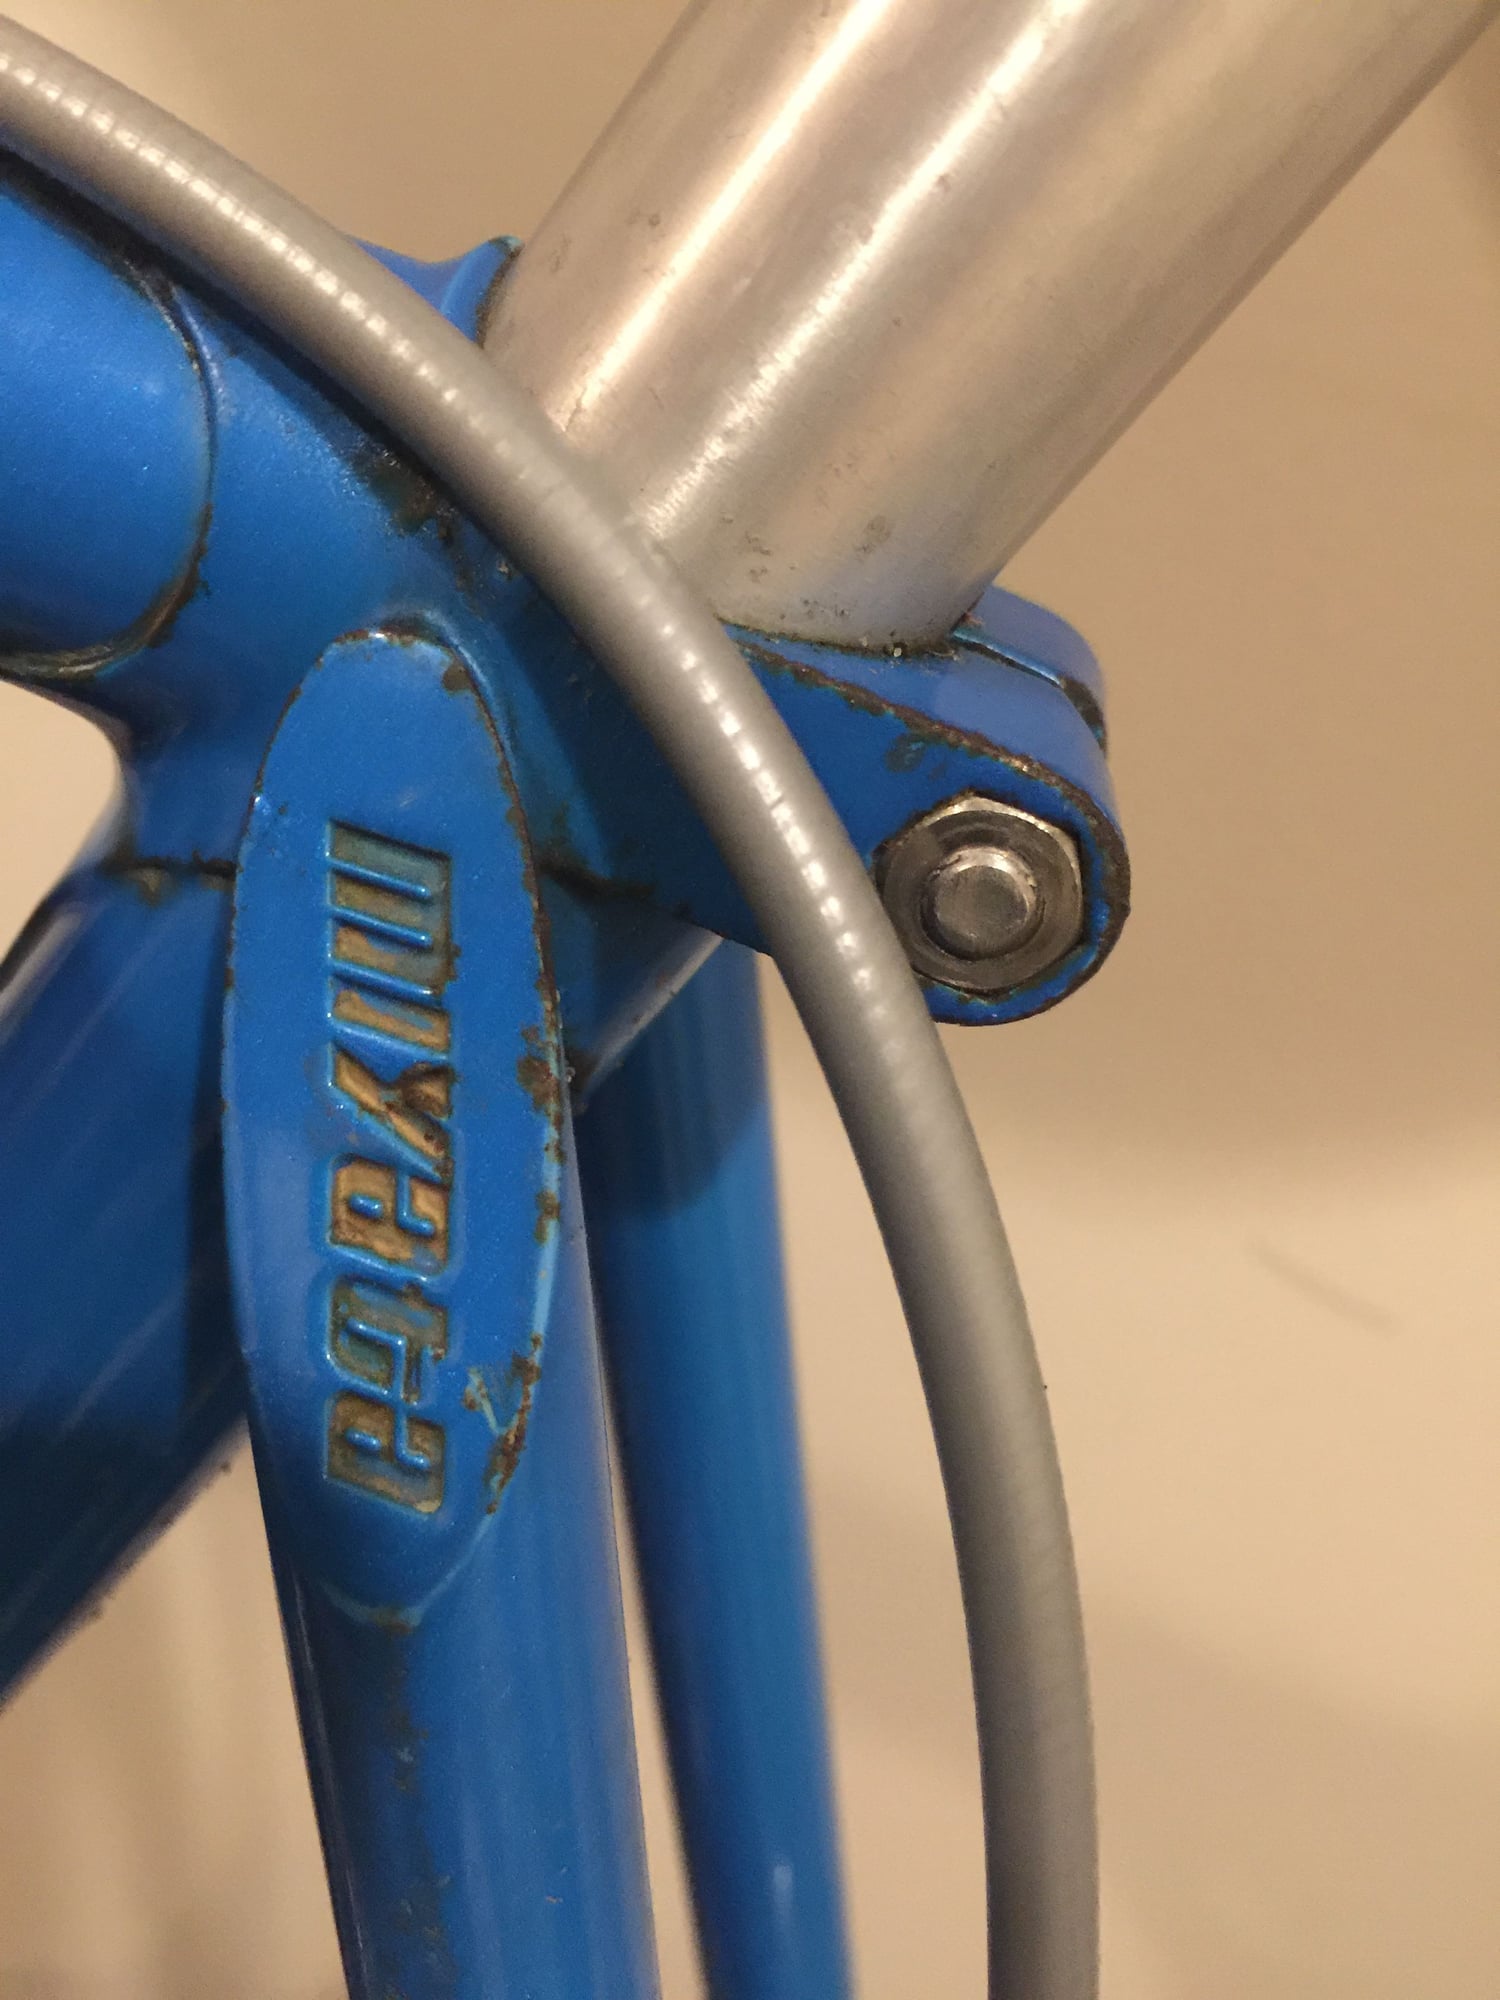
The nut isn't keyed and turns with the bolt. I filed the bolt down in length so I could get a coin on the nut side, but that doesn't work to my satisfaction. And that requires a third hand to hold up the seatpost in the process.
JB Weld?


JB Weld?
 02-17-19, 11:00 PM
#2

Senior Member

Join Date: Nov 2015
Posts: 4,488
Mentioned: 102 Post(s)
Tagged: 0 Thread(s)
Quoted: 1641 Post(s)
Likes: 0
Liked 831 Times
in
540 Posts
Easy, just tape the seatpost in the right position to the seat lug, and you will have two hands to work the bolt with....
Tighten, remove tape, and you are done!
Tighten, remove tape, and you are done!
02-17-19, 11:04 PM
#3
Full Member

That sure looks like a chain ring nut. Perhaps a nut holder for chain rings would work.
02-17-19, 11:25 PM
#4
se�or miembro
Thread Starter
Join Date: Dec 2018
Location: Pac NW
Posts: 6,624
Bikes: '70s - '80s Campagnolo
Mentioned: 92 Post(s)
Tagged: 0 Thread(s)
Quoted: 3888 Post(s)
Liked 6,488 Times
in
3,211 Posts
Two good ideas: tape and a better tool on the nut side. It would be nice to acquire an allen keyed nut, so I could just use two 5mm wrenches.
02-18-19, 12:22 AM
#5
Senior Member

Join Date: Nov 2011
Location: Port Angeles, WA
Posts: 7,922
Bikes: A green one, "Ragleigh," or something.
Mentioned: 194 Post(s)
Tagged: 0 Thread(s)
Quoted: 1627 Post(s)
Liked 630 Times
in
356 Posts
I have a big-ass flat blade screw driver that would be perfect for that application. Chain ring tool would be my second thought/
__________________
● 1971 Grandis SL ● 1972 Lambert Grand Prix frankenbike ● 1972 Raleigh Super Course fixie ● 1973 Nishiki Semi-Pro ● 1979 Motobecane Grand Jubile ●1980 Apollo "Legnano" ● 1984 Peugeot Vagabond ● 1985 Shogun Prairie Breaker ● 1986 Merckx Super Corsa ● 1987 Schwinn Tempo ● 1988 Schwinn Voyageur ● 1989 Bottechia Team ADR replica ● 1990 Cannondale ST600 ● 1993 Technium RT600 ● 1996 Kona Lava Dome ●
● 1971 Grandis SL ● 1972 Lambert Grand Prix frankenbike ● 1972 Raleigh Super Course fixie ● 1973 Nishiki Semi-Pro ● 1979 Motobecane Grand Jubile ●1980 Apollo "Legnano" ● 1984 Peugeot Vagabond ● 1985 Shogun Prairie Breaker ● 1986 Merckx Super Corsa ● 1987 Schwinn Tempo ● 1988 Schwinn Voyageur ● 1989 Bottechia Team ADR replica ● 1990 Cannondale ST600 ● 1993 Technium RT600 ● 1996 Kona Lava Dome ●
02-18-19, 06:02 AM
#6
Senior Member
Join Date: Nov 2013
Location: Near Pottstown, PA: 30 miles NW of Philadelphia
Posts: 2,186
Bikes: 2 Trek Mtn, Cannondale R600 road, 6 vintage road bikes
Mentioned: 83 Post(s)
Tagged: 0 Thread(s)
Quoted: 472 Post(s)
Liked 1,028 Times
in
404 Posts
I've made several such tools by a) creating a bin of odd steel bits "too small to throw away". As in this case pick one that's his third carbon spring steel or an old tool or piece of banding then b) cut to width and grind a notch in each edge, leaving a nub in the center to key into the nut. Sort of a DIY chain ring nut tool.
But ifn it were me, I'd try to find or fit a classic dual ended pinch bolt there. I have found that there is no better design than the dual ended (hex key socket on each end) steel pinch bolt assembly. And regardless of the condition of the key on the NDS end or the notch in the frame, I always use two hex keys. I've seen too many of those notches stripped out by folks only using a hex key on the DS bolt head. I never understood the need for the wee bit of confidence that key/notch idea delivered. Doomed to failure.
But ifn it were me, I'd try to find or fit a classic dual ended pinch bolt there. I have found that there is no better design than the dual ended (hex key socket on each end) steel pinch bolt assembly. And regardless of the condition of the key on the NDS end or the notch in the frame, I always use two hex keys. I've seen too many of those notches stripped out by folks only using a hex key on the DS bolt head. I never understood the need for the wee bit of confidence that key/notch idea delivered. Doomed to failure.
02-18-19, 11:55 AM
#7
se�or miembro
Thread Starter
Join Date: Dec 2018
Location: Pac NW
Posts: 6,624
Bikes: '70s - '80s Campagnolo
Mentioned: 92 Post(s)
Tagged: 0 Thread(s)
Quoted: 3888 Post(s)
Liked 6,488 Times
in
3,211 Posts
^ Thanks for the ideas, guys.
02-18-19, 12:35 PM
#8
Senior Member
A longer bolt, stacked spacers and a standard 8 or 10 mm nut will fix that. Done it a few times on those old Miyatas. Beautiful frames.
02-18-19, 01:14 PM
#9
Senior Member
I've made several such tools by a) creating a bin of odd steel bits "too small to throw away". As in this case pick one that's his third carbon spring steel or an old tool or piece of banding then b) cut to width and grind a notch in each edge, leaving a nub in the center to key into the nut. Sort of a DIY chain ring nut tool.
But ifn it were me, I'd try to find or fit a classic dual ended pinch bolt there. I have found that there is no better design than the dual ended (hex key socket on each end) steel pinch bolt assembly. And regardless of the condition of the key on the NDS end or the notch in the frame, I always use two hex keys. I've seen too many of those notches stripped out by folks only using a hex key on the DS bolt head. I never understood the need for the wee bit of confidence that key/notch idea delivered. Doomed to failure.
But ifn it were me, I'd try to find or fit a classic dual ended pinch bolt there. I have found that there is no better design than the dual ended (hex key socket on each end) steel pinch bolt assembly. And regardless of the condition of the key on the NDS end or the notch in the frame, I always use two hex keys. I've seen too many of those notches stripped out by folks only using a hex key on the DS bolt head. I never understood the need for the wee bit of confidence that key/notch idea delivered. Doomed to failure.
02-18-19, 01:26 PM
#10
Passista
Join Date: Jul 2005
Posts: 7,599
Bikes: 1998 Pinarello Asolo, 1992 KHS Monta�a pro, 1980 Raleigh DL-1, IGH Hybrid, IGH Utility
Mentioned: 5 Post(s)
Tagged: 0 Thread(s)
Quoted: 867 Post(s)
Liked 721 Times
in
396 Posts
Some seatpost nuts have a splined section that is a press fit on the frame.
02-18-19, 02:54 PM
#11
se�or miembro
Thread Starter
Join Date: Dec 2018
Location: Pac NW
Posts: 6,624
Bikes: '70s - '80s Campagnolo
Mentioned: 92 Post(s)
Tagged: 0 Thread(s)
Quoted: 3888 Post(s)
Liked 6,488 Times
in
3,211 Posts
^ Ooh, that would be perfecto.
I like that this bolt all fits inside the lug, so I'm trying to keep that bit of the sleek originality.
In the pic, the nut does look like one used on a chainring. It's not, though, and is far thicker and without a lip.
I like that this bolt all fits inside the lug, so I'm trying to keep that bit of the sleek originality.
In the pic, the nut does look like one used on a chainring. It's not, though, and is far thicker and without a lip.
02-18-19, 05:12 PM
#12
52psi

Join Date: Aug 2013
Location: Tucson, AZ
Posts: 4,015
Bikes: Schwinn Volare ('78); Raleigh Competition GS ('79)
Mentioned: 29 Post(s)
Tagged: 0 Thread(s)
Quoted: 790 Post(s)
Liked 802 Times
in
391 Posts
Had a Univega Super Strada set up the same way. I would tighten it just enough to hold the seatpost in place (it's a fine line) with my left thumb on the bolt and fingers keeping the post more or less in position while the right hand used the hex wrench. Once things were where I needed them to be I switched to a wide screwdriver as mentioned above and was able to tighten appropriately.
It never failed to irritate.
It never failed to irritate.
__________________
A race bike in any era is a highly personal choice that at its "best" balances the requirements of fit, weight, handling, durability and cost tempered by the willingness to toss it and oneself down the pavement at considerable speed. ~Bandera
A race bike in any era is a highly personal choice that at its "best" balances the requirements of fit, weight, handling, durability and cost tempered by the willingness to toss it and oneself down the pavement at considerable speed. ~Bandera
02-18-19, 07:37 PM
#13
se�or miembro
Thread Starter
Join Date: Dec 2018
Location: Pac NW
Posts: 6,624
Bikes: '70s - '80s Campagnolo
Mentioned: 92 Post(s)
Tagged: 0 Thread(s)
Quoted: 3888 Post(s)
Liked 6,488 Times
in
3,211 Posts

 02-18-19, 11:30 PM
#15
se�or miembro
Thread Starter
Join Date: Dec 2018
Location: Pac NW
Posts: 6,624
Bikes: '70s - '80s Campagnolo
Mentioned: 92 Post(s)
Tagged: 0 Thread(s)
Quoted: 3888 Post(s)
Liked 6,488 Times
in
3,211 Posts
 02-19-19, 12:22 PM
#17
se�or miembro
Thread Starter
Join Date: Dec 2018
Location: Pac NW
Posts: 6,624
Bikes: '70s - '80s Campagnolo
Mentioned: 92 Post(s)
Tagged: 0 Thread(s)
Quoted: 3888 Post(s)
Liked 6,488 Times
in
3,211 Posts
02-19-19, 04:23 PM
#18
se�or miembro
Thread Starter
Join Date: Dec 2018
Location: Pac NW
Posts: 6,624
Bikes: '70s - '80s Campagnolo
Mentioned: 92 Post(s)
Tagged: 0 Thread(s)
Quoted: 3888 Post(s)
Liked 6,488 Times
in
3,211 Posts
I used a tiny, tiny bit of JB Weld on the nut, just like i was greasing it. Then waited ten hours. I didn't think it would hold, but it works great. I'm pretty sure I could hammer it out if needed, but I hope it's there for the dur.
09-29-19, 07:46 AM
#19
Senior Member
Join Date: Oct 2011
Location: Long Island, NY
Posts: 647
Mentioned: 2 Post(s)
Tagged: 0 Thread(s)
Quoted: 41 Post(s)
Liked 51 Times
in
33 Posts
I'm encountering the same thing on an '83 Miyata 1200 I recently purchased. How could the factory have been so blind to this? I figured a wide flat tip screwdriver would do the trick also, but the bolt protrudes just enough that that doesn't work.
I'll try spacers, and possibly a lock nut washer if I can find one to fit and see if that works.
I'll try spacers, and possibly a lock nut washer if I can find one to fit and see if that works.
09-29-19, 08:07 AM
#20
weapons-grade bolognium

Join Date: Dec 2008
Location: Across the street from Chicago
Posts: 6,344
Bikes: Battaglin Cromor, Ciocc Designer 84, Schwinn Superior 1981
Mentioned: 44 Post(s)
Tagged: 0 Thread(s)
Quoted: 985 Post(s)
Liked 2,378 Times
in
891 Posts
Maybe you coul sneak a small star washer in there...
09-29-19, 08:39 AM
#22
Senior Member
Join Date: Oct 2011
Location: Long Island, NY
Posts: 647
Mentioned: 2 Post(s)
Tagged: 0 Thread(s)
Quoted: 41 Post(s)
Liked 51 Times
in
33 Posts
UNREAL! You can't make this up.
For whatever reason, in my standard tool box, I kept a new 10'' long piece of rubber vaccuum hose from a 1986 Trans Am I had a looong time ago. After determining it was a bit to wide, I cut off a piece about 1/16'' long. I then cut off about a 1/8'' piece off the circumference and wedged it in so it made a nice tight fit on the nut side.
I then put the bolt through pushing it past the rubber "washer" I made and threaded on the nut. I used a screwdriver in the groves of the nut to hold it in place, and voila!! I nice, tight fit!!! Seatpost is a solid as can be!
Moral of the story...don't throw anything out, lol!!
Fred

