


What tool to remove this bottom bracket? '92 Trek Multitrack 790
 09-20-23, 06:24 AM
#1
Full Member
Thread Starter
Join Date: Jun 2020
Location: San Francisco, CA
Posts: 200
Bikes: 2018 Jamis Renegade Exploit, 1996 Trek 930, mid-90's Dean El Diente, 2010 Scott Addict SL, 1998 Trek 730, Xtracycle EdgeRunner 30D, Xtracycle Swoop, 1992 Trek 790
Mentioned: 0 Post(s)
Tagged: 0 Thread(s)
Quoted: 87 Post(s)
Liked 107 Times
in
62 Posts
What tool to remove this bottom bracket? '92 Trek Multitrack 790
EDIT: found the relevant Park Tool article, I think I'm good.
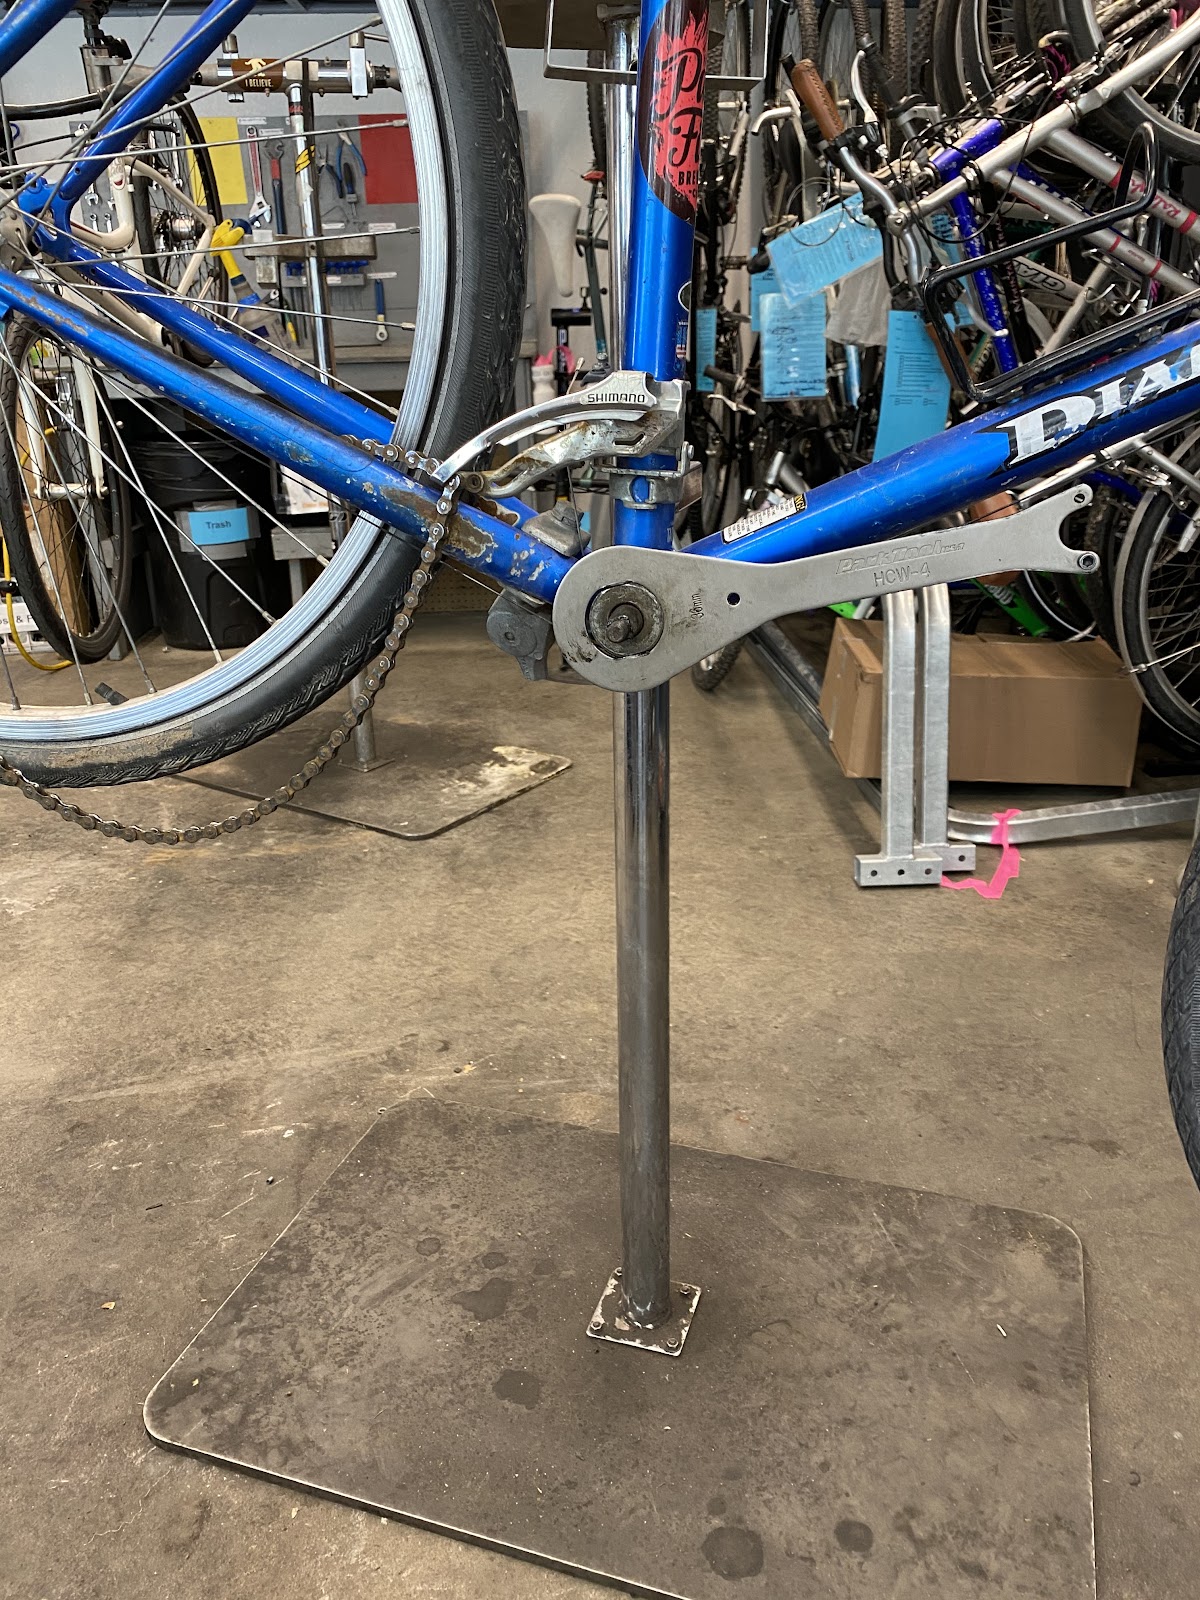
How do I remove the bottom bracket pictured here, from a 1992 Trek Multitrack 790? What tool do I need?
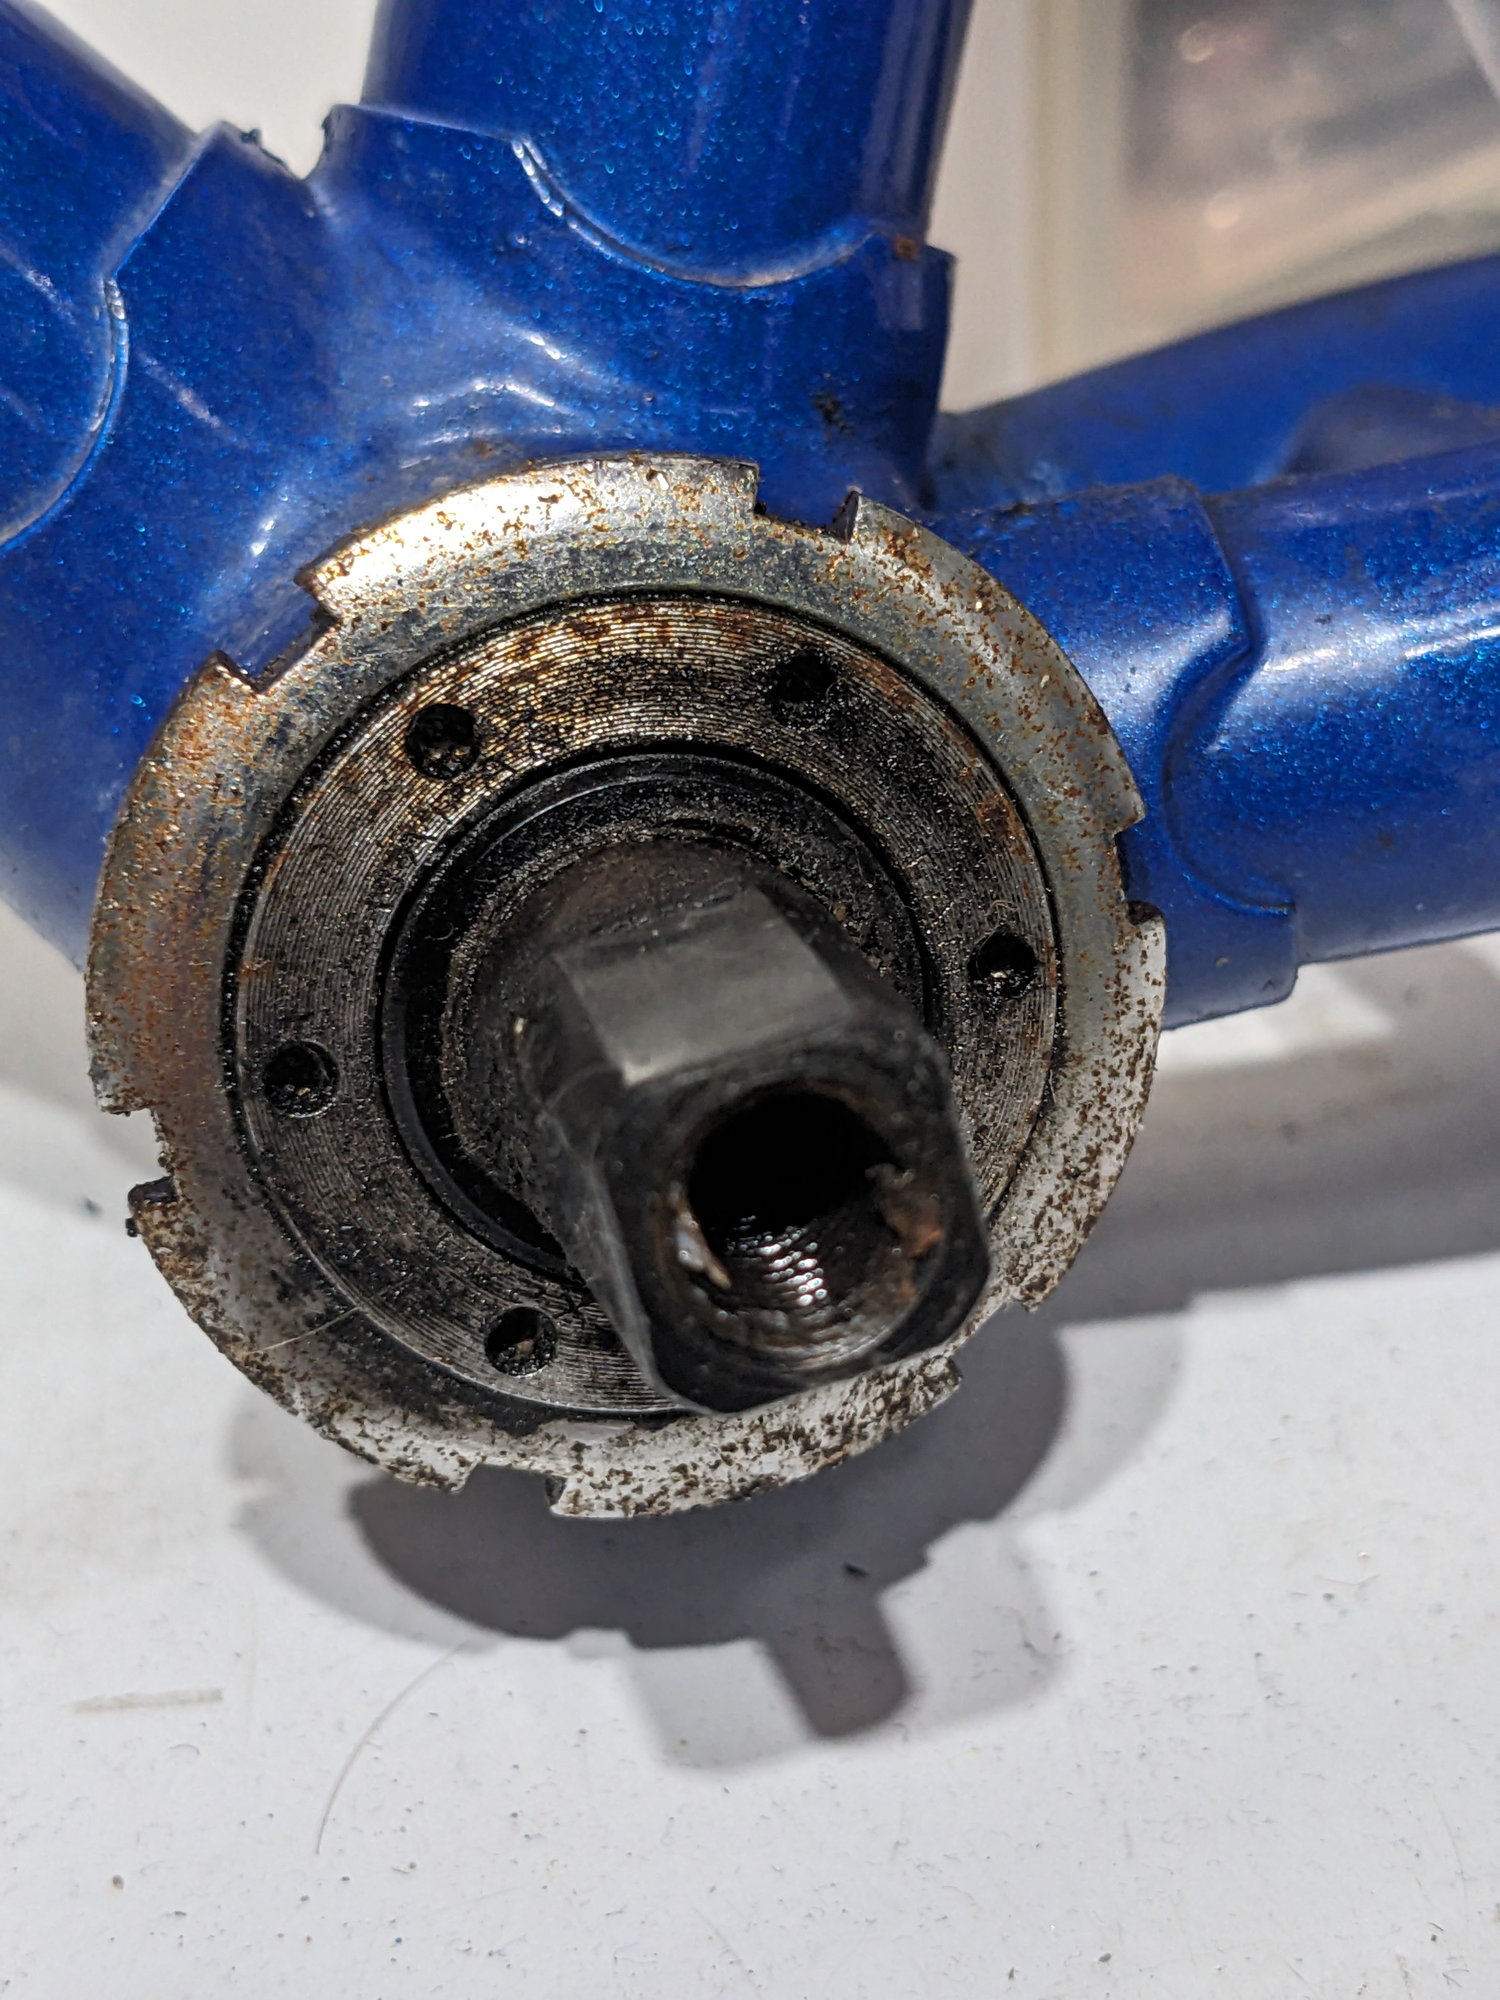
Drive side
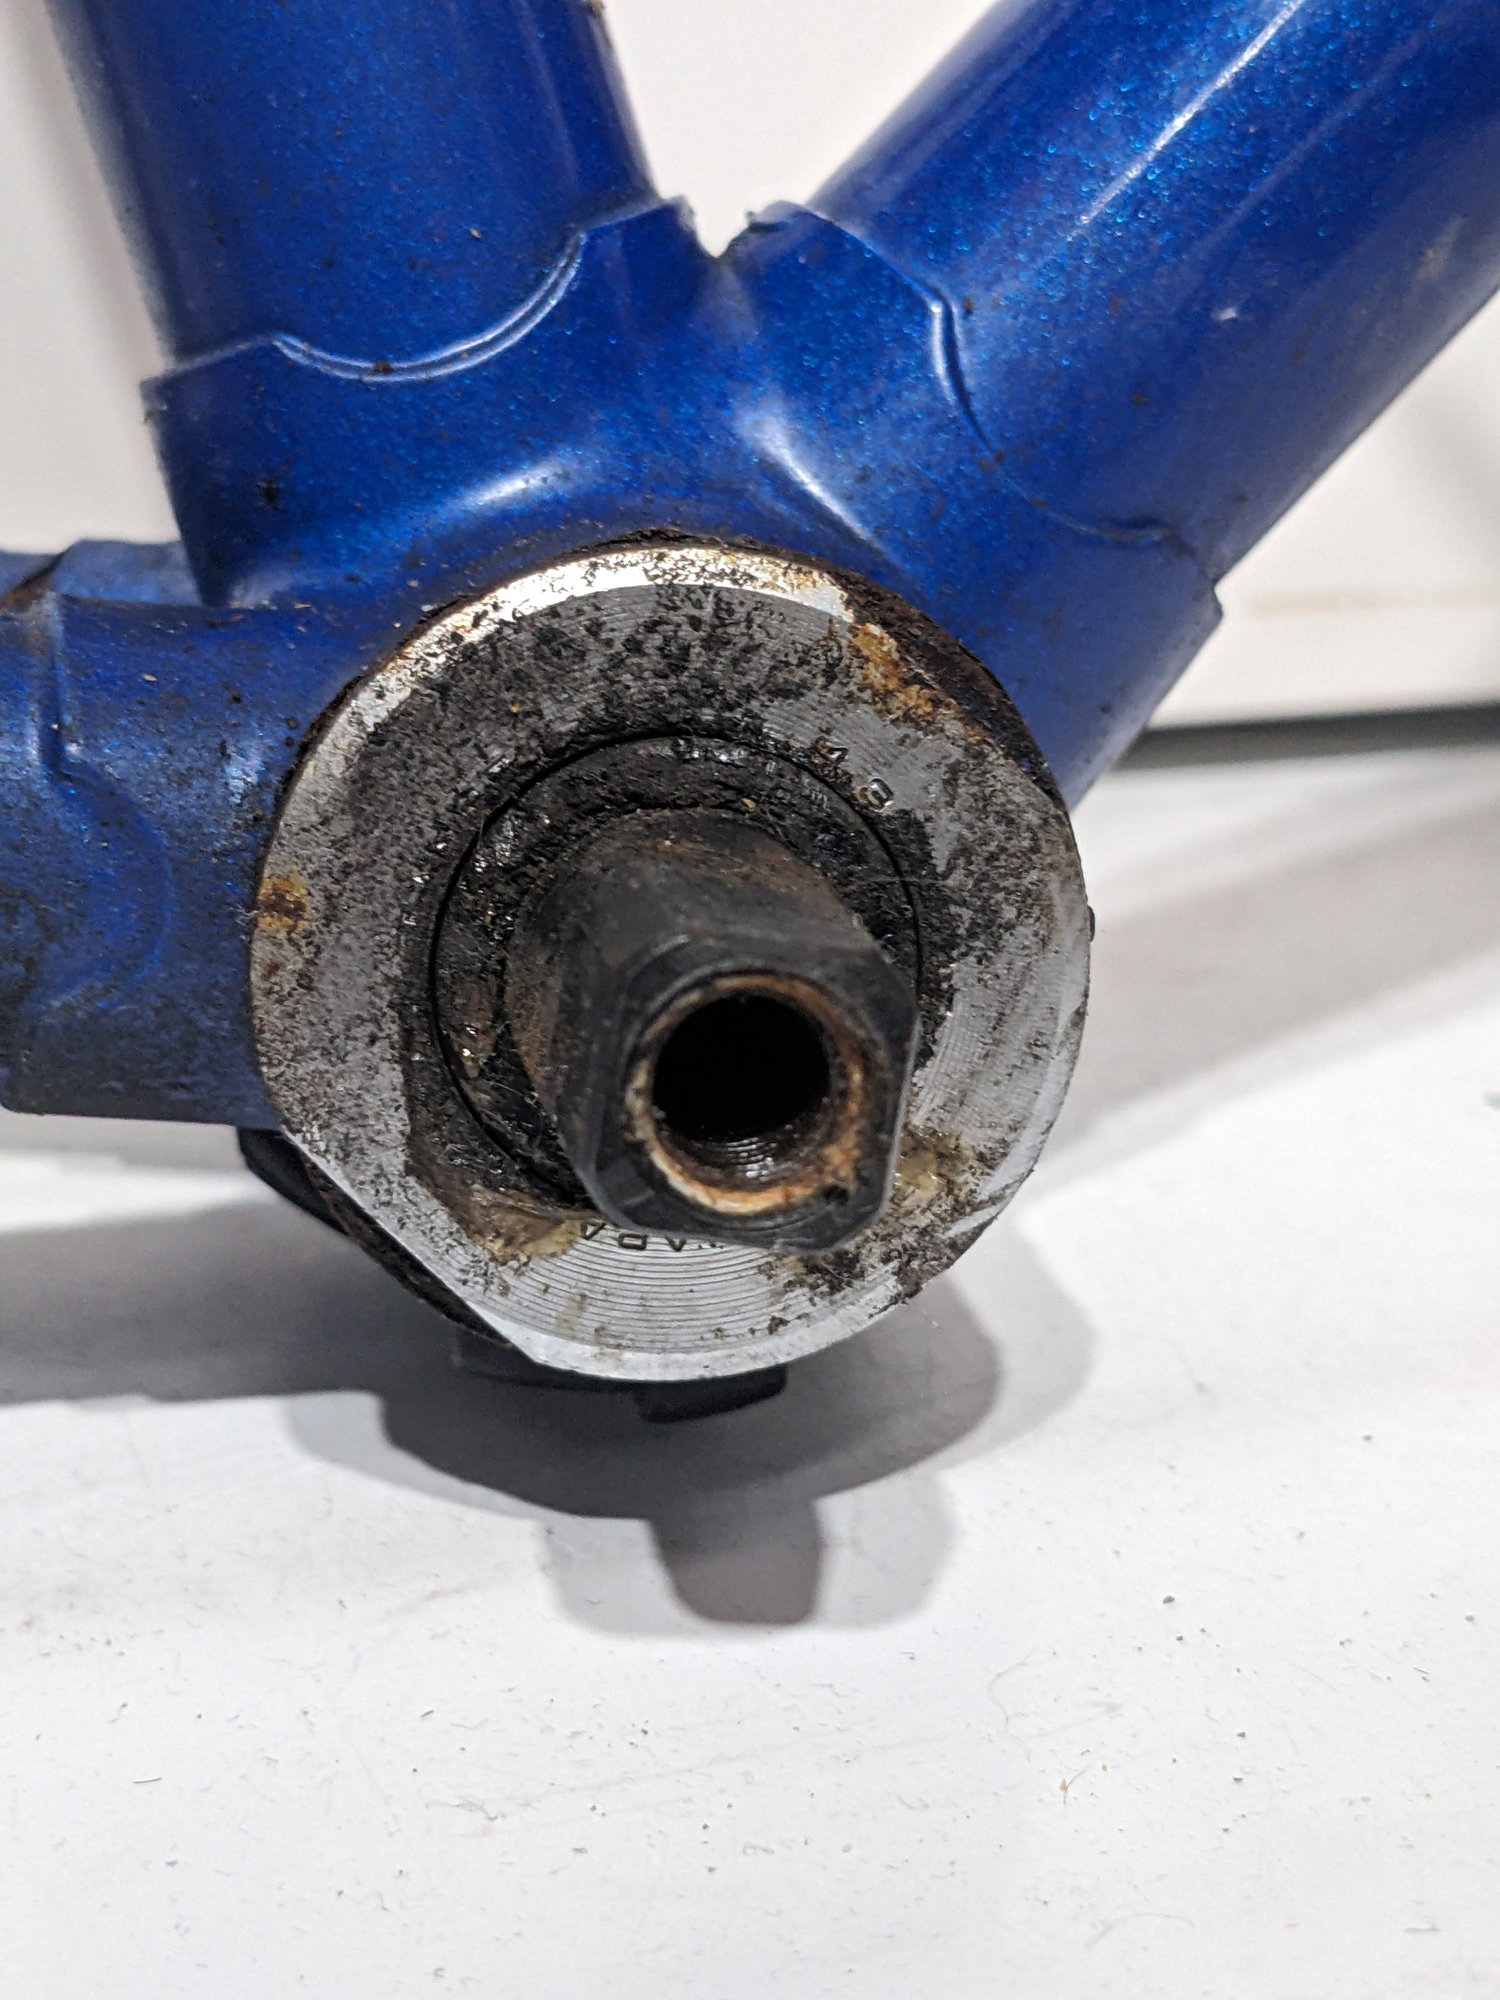
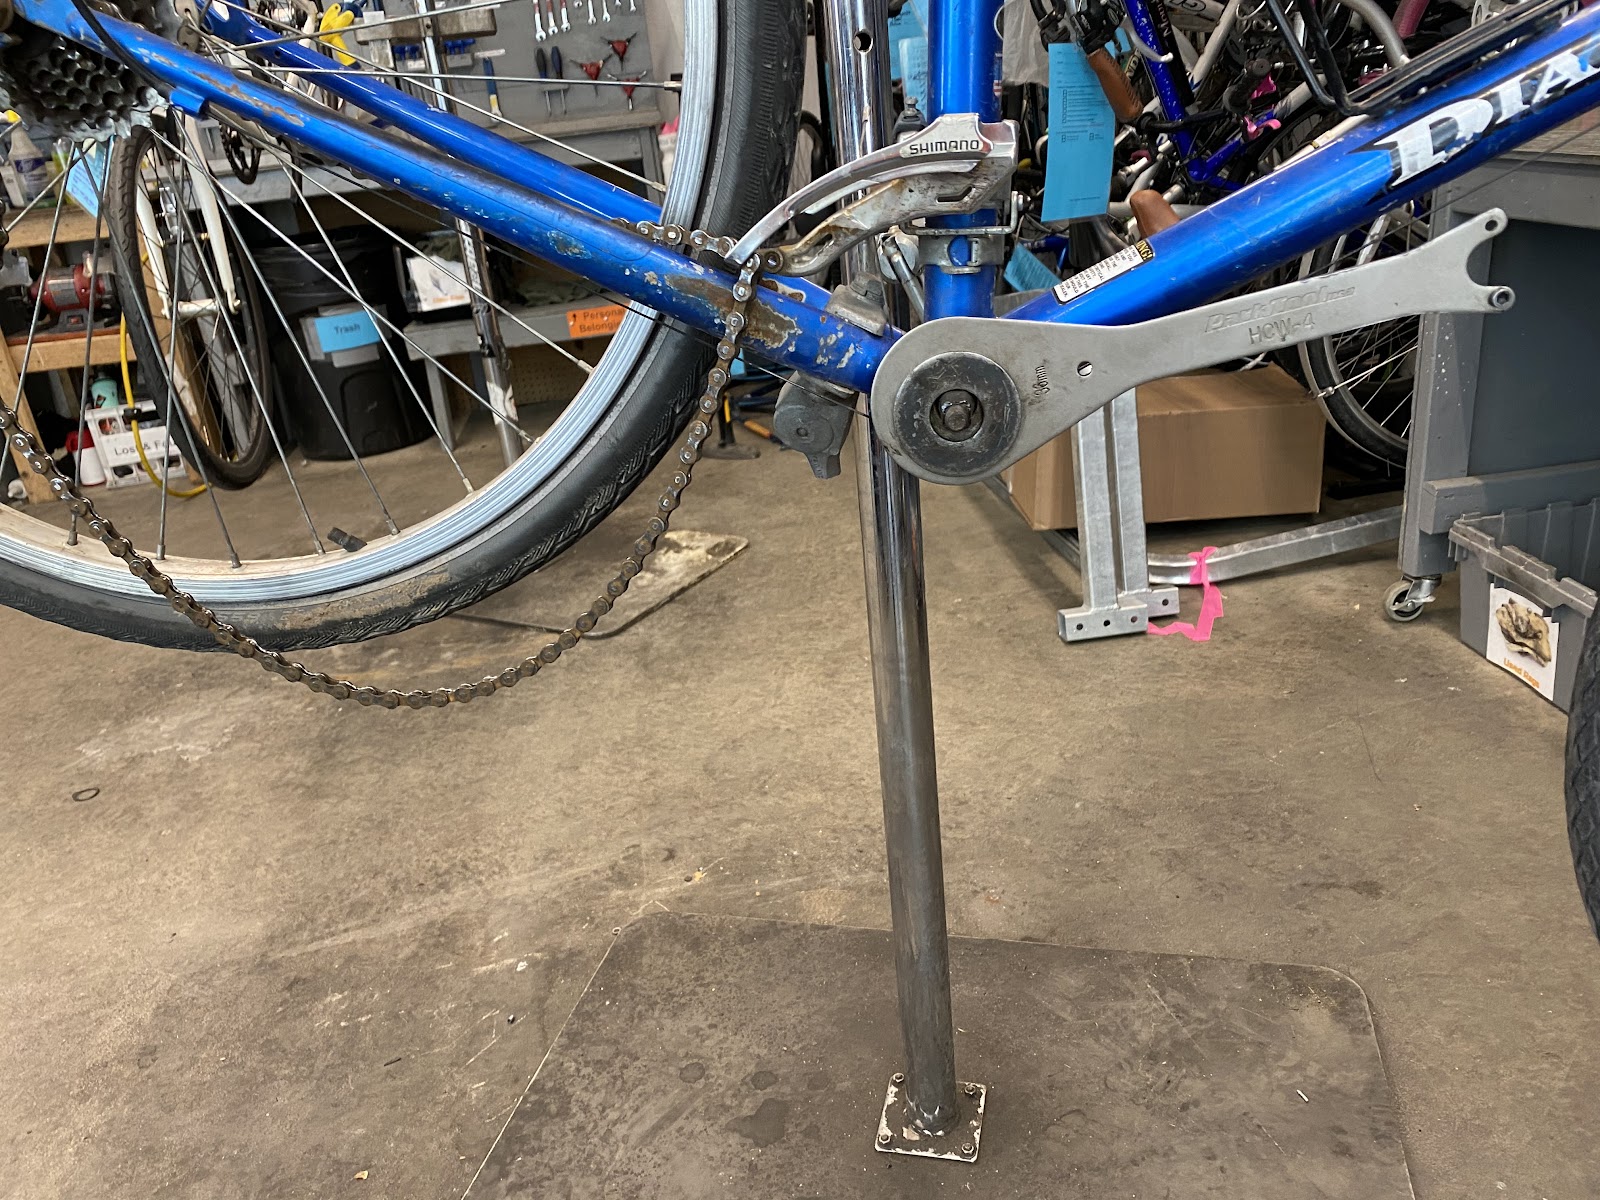
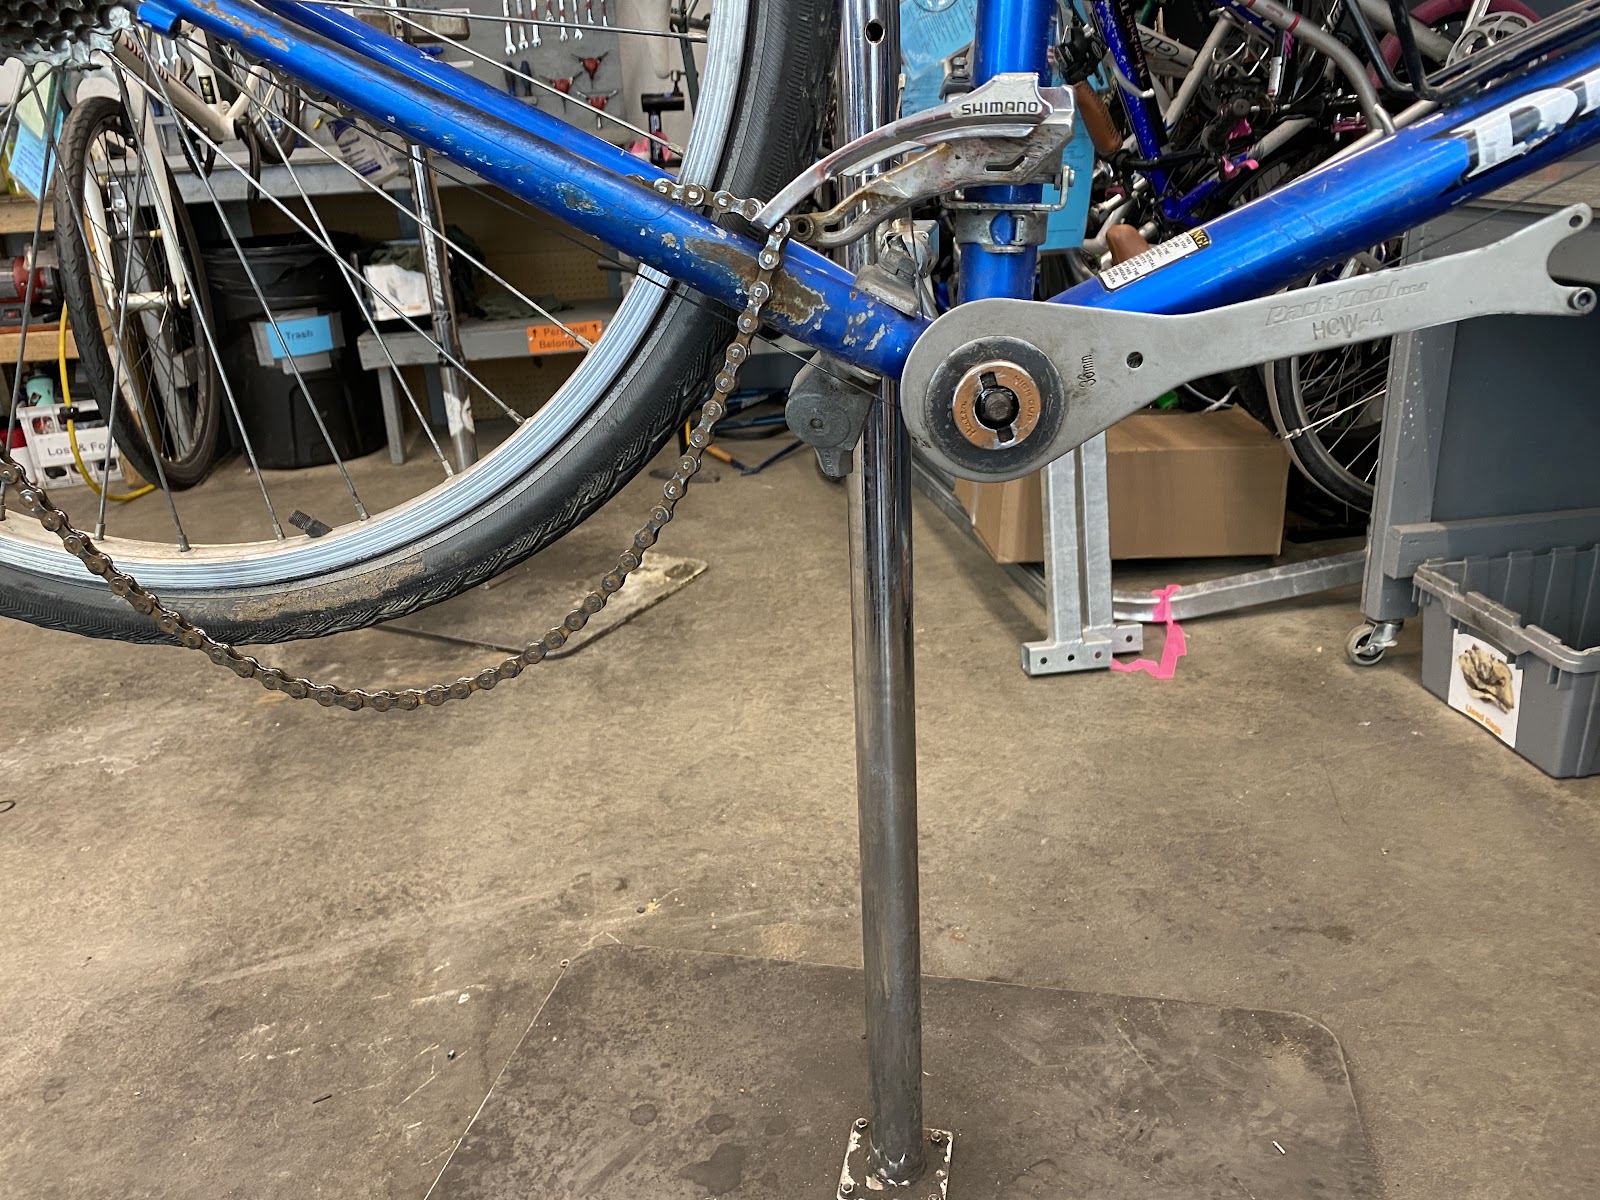
Non drive side
How do I remove the bottom bracket pictured here, from a 1992 Trek Multitrack 790? What tool do I need?
Drive side
Non drive side
Last edited by nathand; 09-20-23 at 06:33 AM. Reason: Did more research
 09-20-23, 07:27 AM
#2
SE Wis
Join Date: Apr 2005
Location: Milwaukee, WI
Posts: 10,517
Bikes: '68 Raleigh Sprite, '02 Raleigh C500, '84 Raleigh Gran Prix, '91 Trek 400, 2013 Novara Randonee, 1990 Trek 970
Mentioned: 40 Post(s)
Tagged: 0 Thread(s)
Quoted: 2747 Post(s)
Liked 3,401 Times
in
2,058 Posts
Lock ring spanner, pin spanner, and fixed cup tool
Likes For dedhed:
09-20-23, 08:03 AM
#3

Junior Member

This is just the standard BB setup as it was for decades. You can probably get the adjustable cup (non-drive) side out with a hammer and punch. Adjustment after reassembly will be frustrating with a punch, but possible.Normal,lefty-loosy threads on that side. The fixed cup (drive side) will be difficult without the proper tool. Possibly a big metal vice will get it done. Remember this side is reverse threaded. Often the fixed cup is just left in the bike when overhauling a BB. Clean it up and shine a flashlight in to inspect the cup. You will almost certainly fail with a large adjustable wrench on the fixed cup. The temptation will be great to use the big Crescent wrench, don't give in!
I like spindle and cup BBs but the parts are getting harder to find. A lot of folks replace them with cartridge types which will require another specific tool to to install. No home mechanic hack for that- you'll need the tool.
If you expect to do a fair amount of vintage bike repair then buying the tools would be good. Someone will probably post some pictures of the various versions of the appropriate tools.
Last edited by robobike316; 09-20-23 at 08:28 AM.
09-20-23, 08:04 AM
#4
Really Old Senior Member

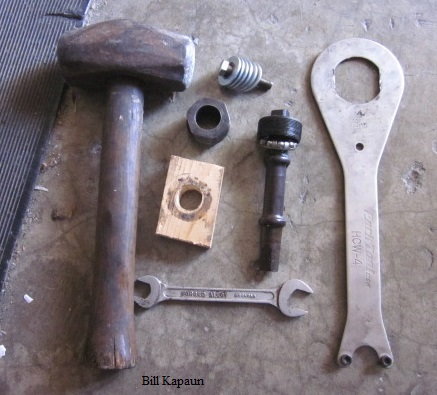
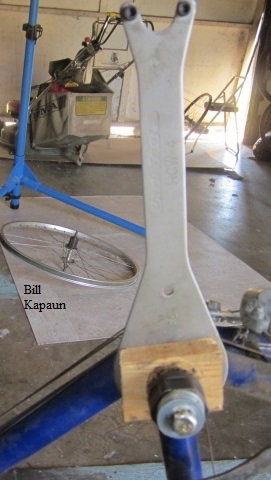
PARK HCW-4
Make do DS retainer.
Make do DS retainer.
Likes For Bill Kapaun:
09-20-23, 11:20 AM
#5
Cantilever believer

Join Date: Nov 2021
Location: Phoenix, AZ
Posts: 1,572
Mentioned: 5 Post(s)
Tagged: 0 Thread(s)
Quoted: 538 Post(s)
Liked 1,846 Times
in
835 Posts
I use something similar with two really big washers and a 5/16 x 4" through bolt. Took off a fixed cup with the setup just yesterday morning.
__________________
Richard C. Moeur, PE - Phoenix AZ, USA
https://www.richardcmoeur.com/bikestuf.html
Richard C. Moeur, PE - Phoenix AZ, USA
https://www.richardcmoeur.com/bikestuf.html
09-20-23, 01:45 PM
#6
Really Old Senior Member
09-20-23, 02:16 PM
#7
Full Member
Join Date: Nov 2022
Location: California's capital
Posts: 467
Bikes: Litespeed Firenze, Spot Acme, Specialzed S Works Pro Race, Davidson Stiletto, Colnago Superissimo
Mentioned: 1 Post(s)
Tagged: 0 Thread(s)
Quoted: 133 Post(s)
Liked 304 Times
in
174 Posts
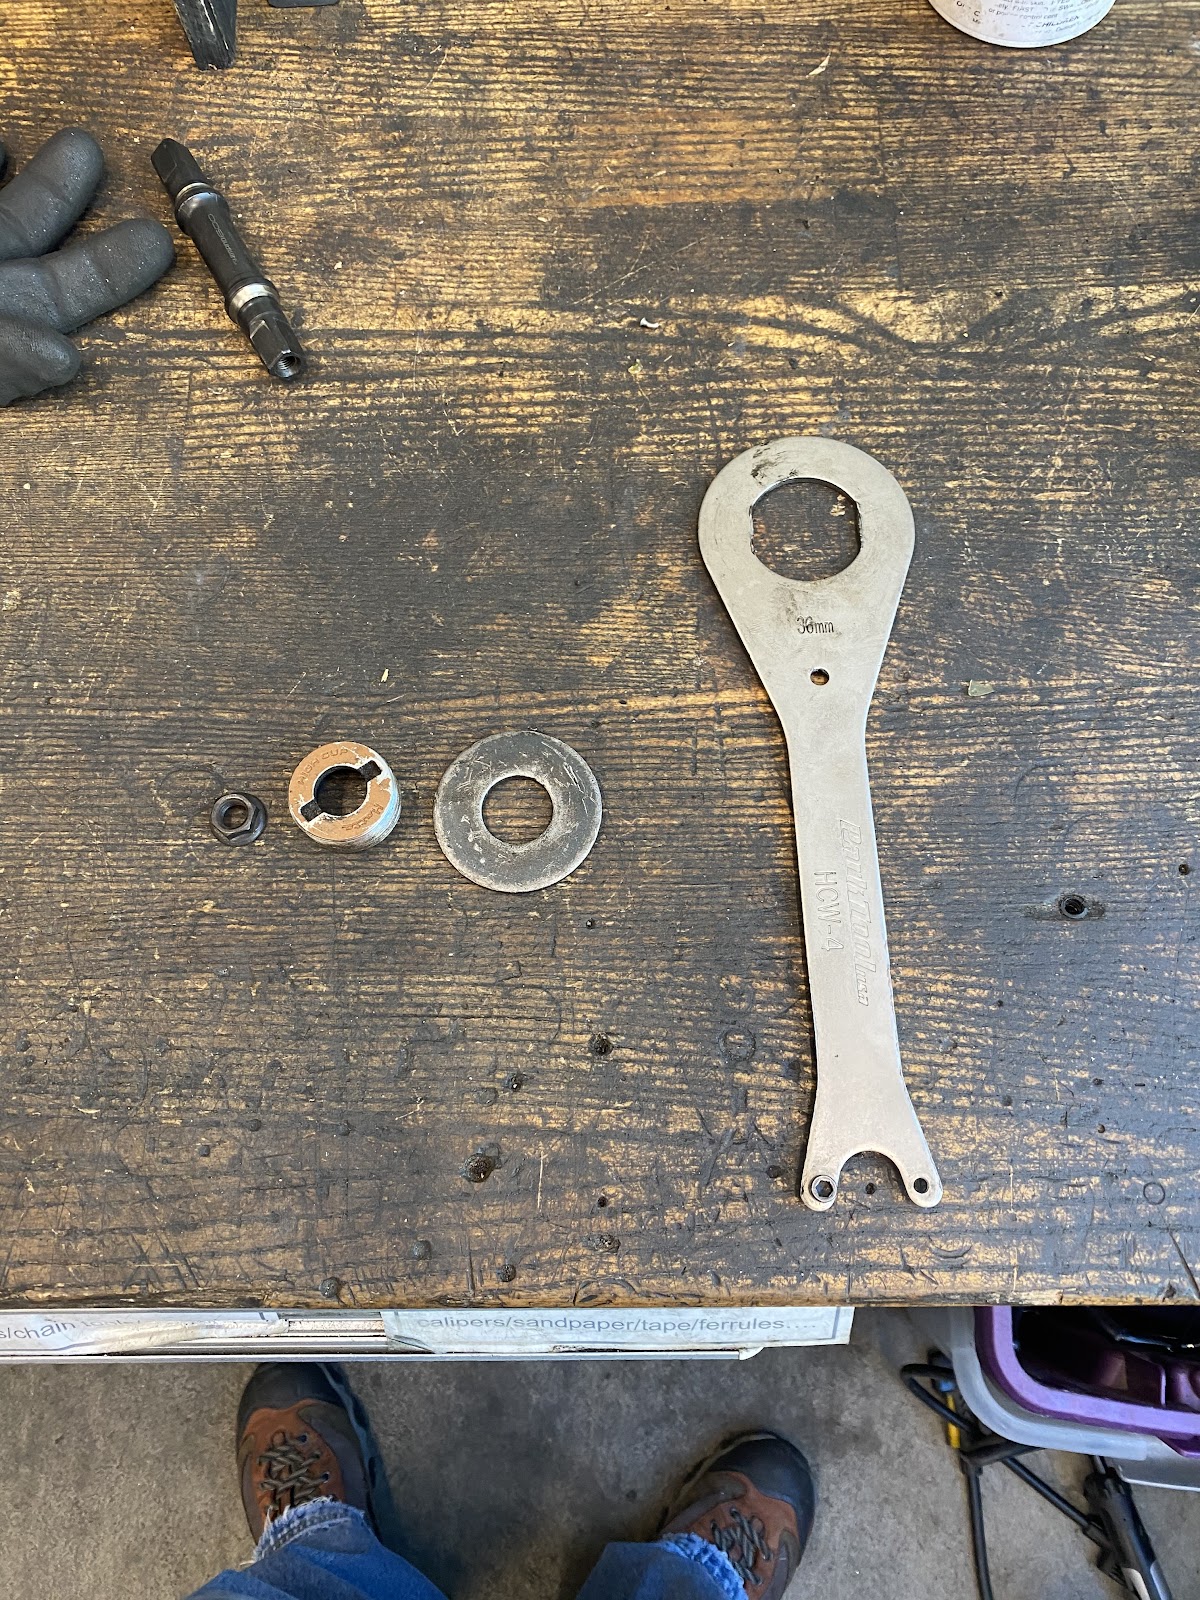
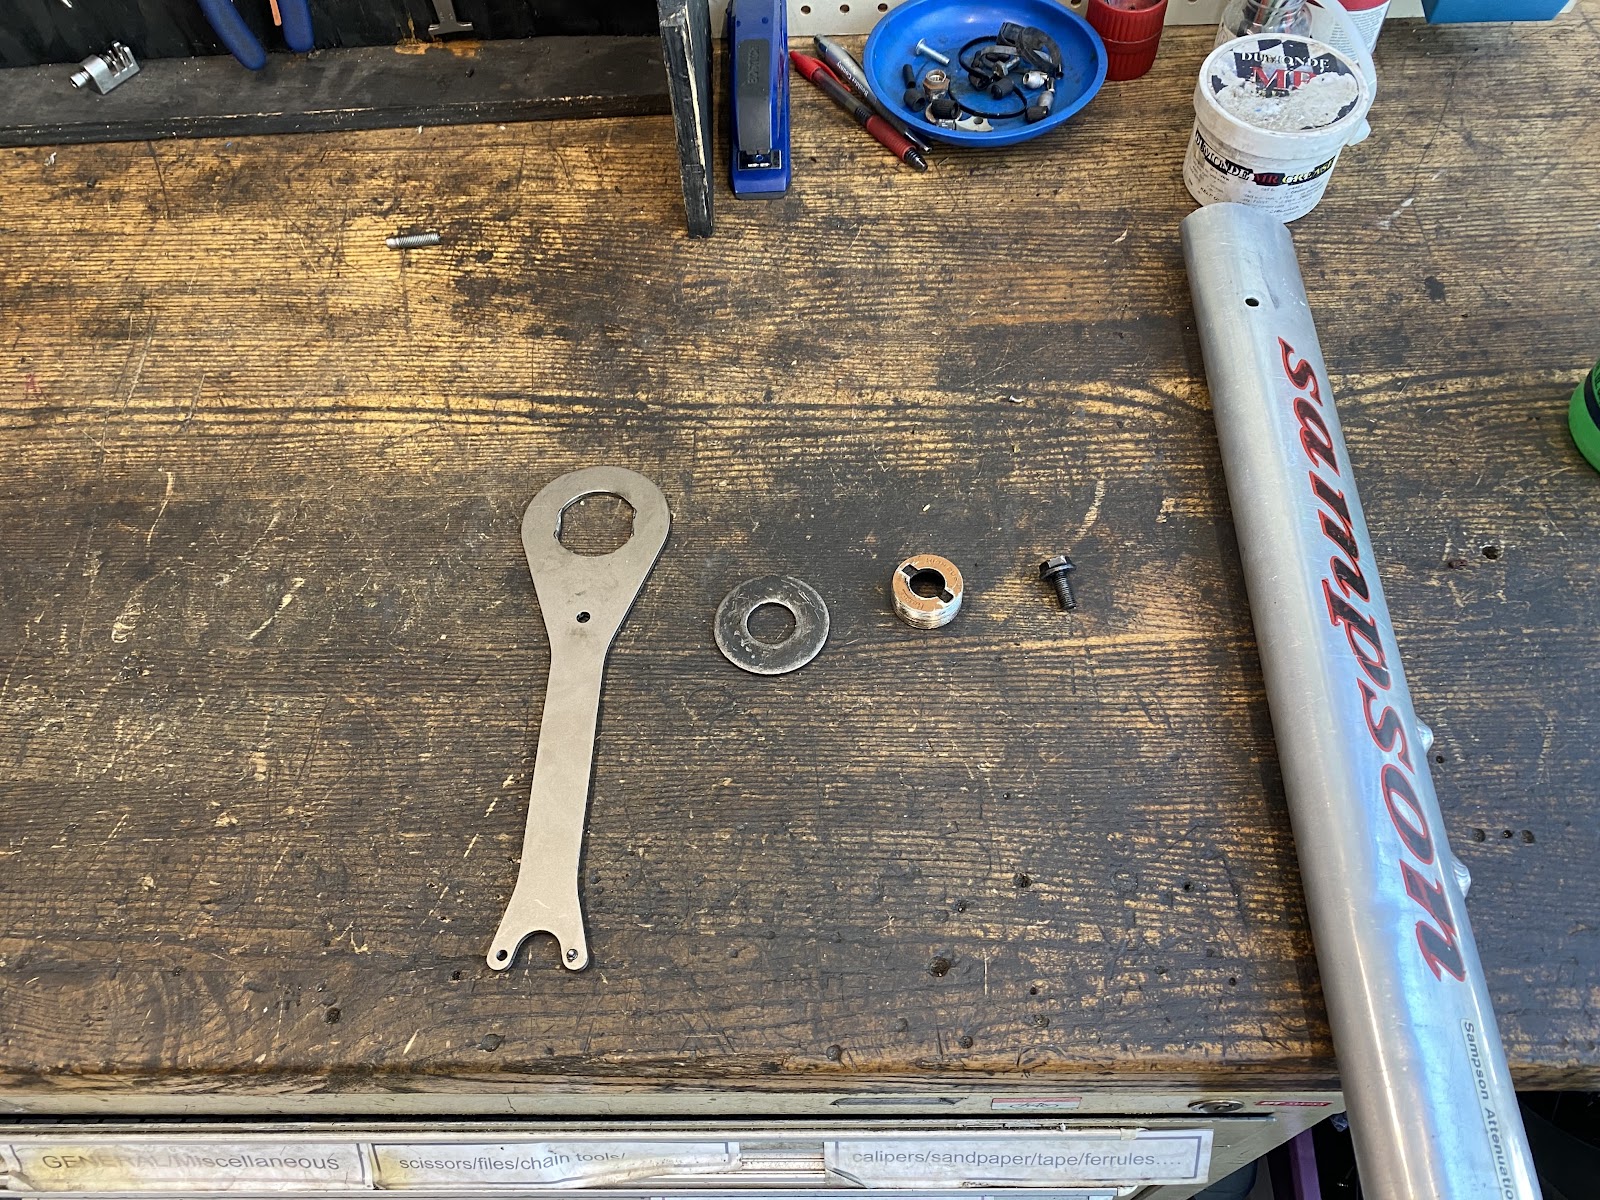
These. Work on a million bikes and worth owning if you do this at all often. Top of the big wrench is for the lock ring, bottom is for the fixed cup, pin wrench for the adjustable cup.
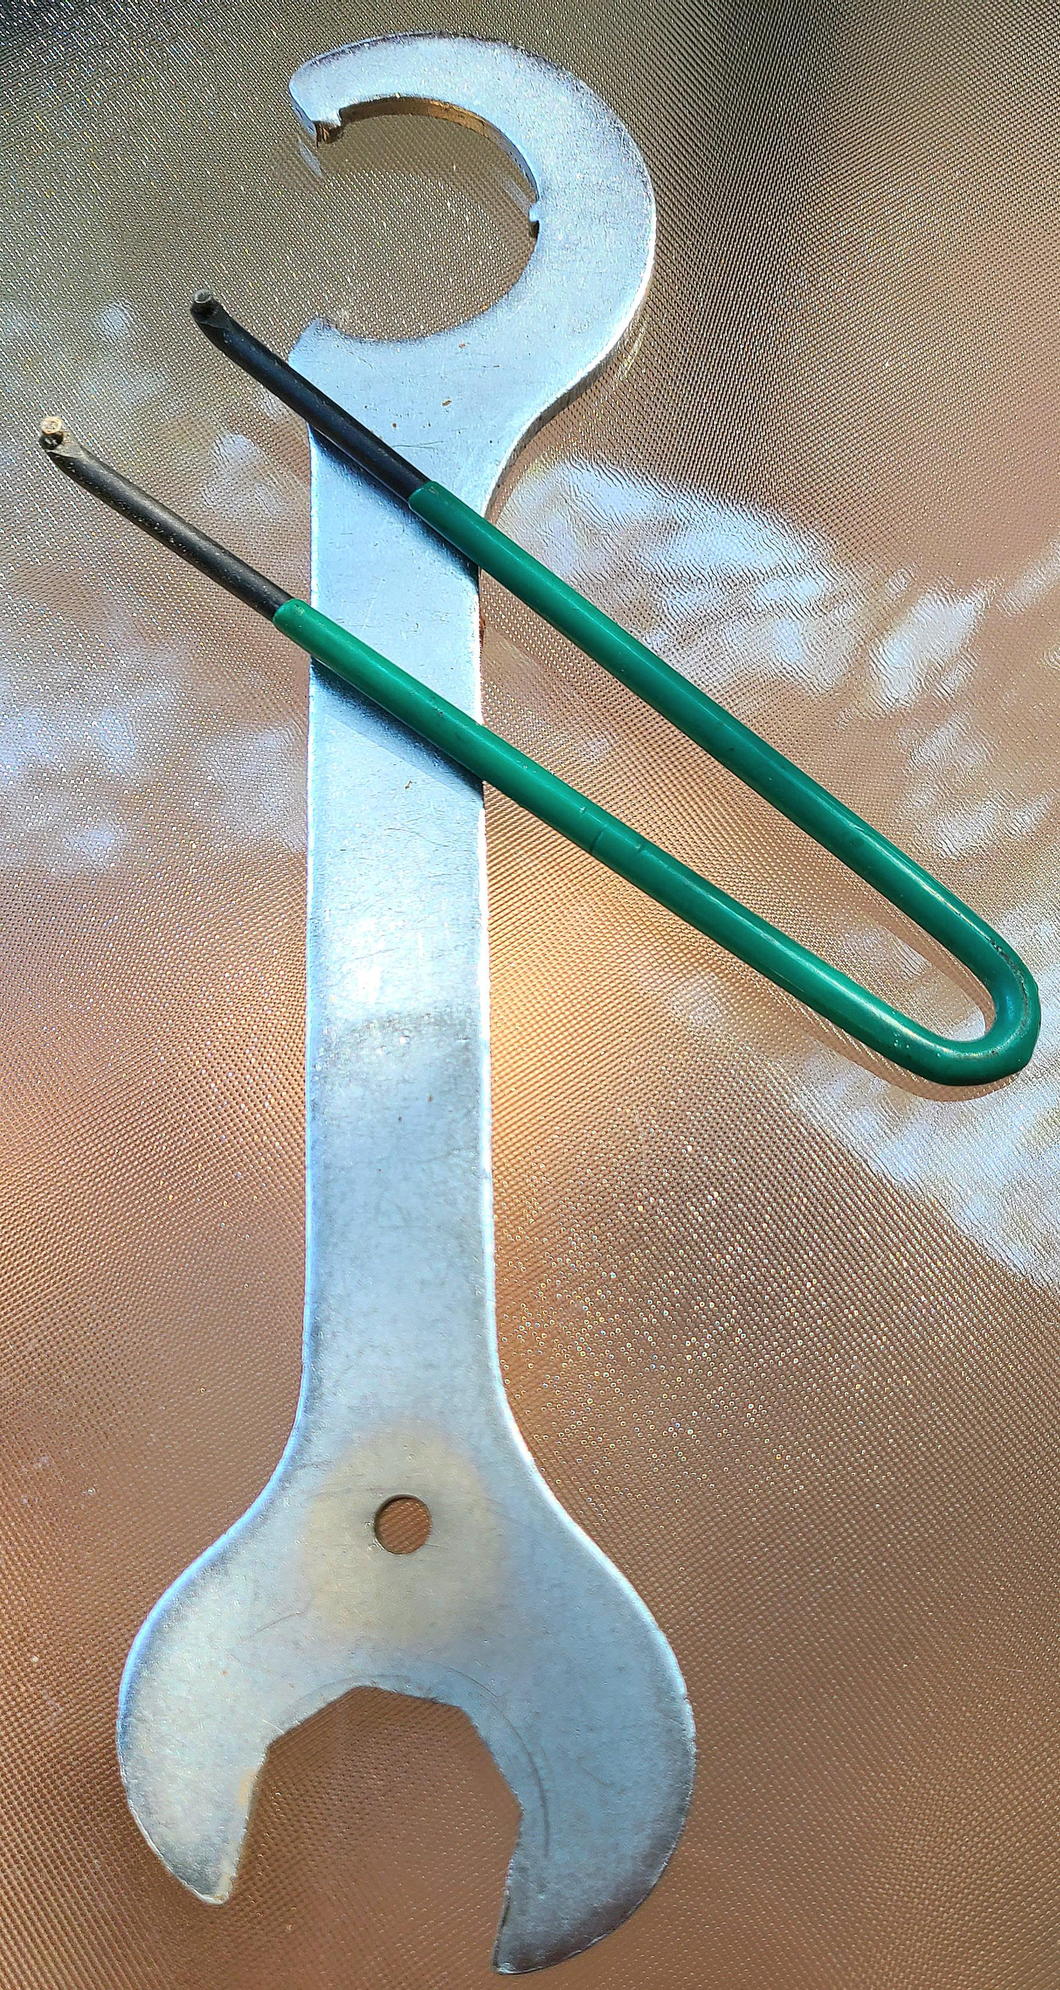
Pin wrench is Park, big wrench generic.
ETA If you can inspect the fixed cup with a light and find it is in good shape, it's possible to clean and grease it w/o bothering to remove it. They can be stubborn!
Pin wrench is Park, big wrench generic.
ETA If you can inspect the fixed cup with a light and find it is in good shape, it's possible to clean and grease it w/o bothering to remove it. They can be stubborn!
Last edited by Rick_D; 09-20-23 at 02:50 PM.
Likes For Rick_D:
09-20-23, 02:24 PM
#8
Cantilever believer
Join Date: Nov 2021
Location: Phoenix, AZ
Posts: 1,572
Mentioned: 5 Post(s)
Tagged: 0 Thread(s)
Quoted: 538 Post(s)
Liked 1,846 Times
in
835 Posts
Why wouldn't it be? I've used it countless times.
__________________
Richard C. Moeur, PE - Phoenix AZ, USA
https://www.richardcmoeur.com/bikestuf.html
Richard C. Moeur, PE - Phoenix AZ, USA
https://www.richardcmoeur.com/bikestuf.html
09-20-23, 02:54 PM
#9
Really Old Senior Member
09-20-23, 03:48 PM
#11
Full Member
Thread Starter
Join Date: Jun 2020
Location: San Francisco, CA
Posts: 200
Bikes: 2018 Jamis Renegade Exploit, 1996 Trek 930, mid-90's Dean El Diente, 2010 Scott Addict SL, 1998 Trek 730, Xtracycle EdgeRunner 30D, Xtracycle Swoop, 1992 Trek 790
Mentioned: 0 Post(s)
Tagged: 0 Thread(s)
Quoted: 87 Post(s)
Liked 107 Times
in
62 Posts
Is it worth trying to save this bottom bracket? It doesn't spin well as is. I'm planning to take it to the local bike co-op which should have the right tools to remove it. I haven't figured out yet how I want to build up this frame, but I was thinking I'd replace the bottom bracket with a modern external-bearing one to match my other bikes, since I already have a spare bottom bracket and 2-piece crank, and ready access to the tools to install them.
09-20-23, 04:12 PM
#12
Mad bike riding scientist

Join Date: Nov 2004
Location: Denver, CO
Posts: 27,369
Bikes: Some silver ones, a red one, a black and orange one, and a few titanium ones
Mentioned: 152 Post(s)
Tagged: 1 Thread(s)
Quoted: 6222 Post(s)
Liked 4,222 Times
in
2,368 Posts
Is it worth trying to save this bottom bracket? It doesn't spin well as is. I'm planning to take it to the local bike co-op which should have the right tools to remove it. I haven't figured out yet how I want to build up this frame, but I was thinking I'd replace the bottom bracket with a modern external-bearing one to match my other bikes, since I already have a spare bottom bracket and 2-piece crank, and ready access to the tools to install them.
As to the removal of the old bottom bracket, I have a different approach from the others suggested.
I�ve come to the conclusion that we have been taught to remove fixed cups wrong for a long time. I, like most everyone, have been taught to remove the adjustable cup first, followed by the fixed cup. We avoid removing the fixed cup because it can be difficult to remove. I realized that I needed to stand the procedure on its head. Remove the fixed cup first since it is the hardest one and the wrench needs the most stabilization. The spindle can be used to hold the tool but it will allow the wrench to turn with the cup so that the tool doesn�t even need to be removed to completely remove the fixed cup.
Since there are 2 types of spindle, the procedure and fastener used will depend on which spindle is present. The nut or bolt used on the spindle can be used to hold everything in place.
Tool Assembly
The parts for the nutted spindle needed are shown here. Most everything can be found in just about any shop. The large fender washer is probably the only thing you�ll have to go to a hardware store for.
A large fender washer, an adjustable cup, and the spindle nut are needed. Another washer may be needed to get the spacing right. The order of assembly follows

From above it should look like this

Turn the wrench as usual. If more leverage is needed, a cheater bar is needed.

For bolted spindles, the order of assembly is the same except a bolt is needed.

This method is much easier to use than other methods I�ve used. The spindle stabilizes the wrench and turns with it much like a cartridge bearing does. It makes it easier to remove the fixed cup and results in less blood spilled.
__________________
Stuart Black
Plan Epsilon Around Lake Michigan in the era of Covid
Old School�When It Wasn�t Ancient bikepacking
Gold Fever Three days of dirt in Colorado
Pokin' around the Poconos A cold ride around Lake Erie
Dinosaurs in Colorado A mountain bike guide to the Purgatory Canyon dinosaur trackway
Solo Without Pie. The search for pie in the Midwest.
Picking the Scablands. Washington and Oregon, 2005. Pie and spiders on the Columbia River!
09-23-23, 01:42 PM
#13
Old fart

Join Date: Nov 2004
Location: Appleton WI
Posts: 24,792
Bikes: Several, mostly not name brands.
Mentioned: 153 Post(s)
Tagged: 0 Thread(s)
Quoted: 3591 Post(s)
Liked 3,401 Times
in
1,935 Posts
Park Tool has an article on servicing that type of bottom bracket:
https://www.parktool.com/en-int/blog...ation-threaded
Keep in mind that unless the fixed cup (drive side) is unusable, or if you're replacing the entire bottom bracket for some reason (e.g. installing a cartridge instead), it's not necessary to remove the fixed cup to properly service the bottom bracket. Remove the non-drive side lockring and cup, and the axle and balls, clean the fixed cup in place using a solvent-soaked toothbrush and rag, and repack with fresh balls and grease.
N.B. there are professional-quality tools for removing a fixed cup if it is really necessary, but usually the DIY method above will work.
09-24-23, 10:43 AM
#14
Senior Member

Join Date: Apr 2007
Location: Thunder Bay, Ontario, Canada - burrrrr!
Posts: 11,674
Bikes: 1958 Rabeneick 120D, 1968 Legnano Gran Premio, 196? Torpado Professional, 2000 Marinoni Piuma
Mentioned: 210 Post(s)
Tagged: 0 Thread(s)
Quoted: 1372 Post(s)
Likes: 0
Liked 1,752 Times
in
939 Posts
To remove a bottom bracket, no special tools are necessary but they are a great help to have.
That bottom bracket non-drive side lock nut can be tapped of with a hammer and a piece of soft metal or even hardwood. The cup can be pulled with a pair of needle none plyers stuck into two opposing holes at once and then twist counter clockwise. No special tools needed. Next...
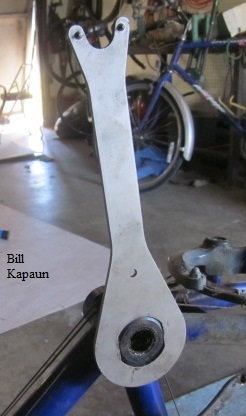
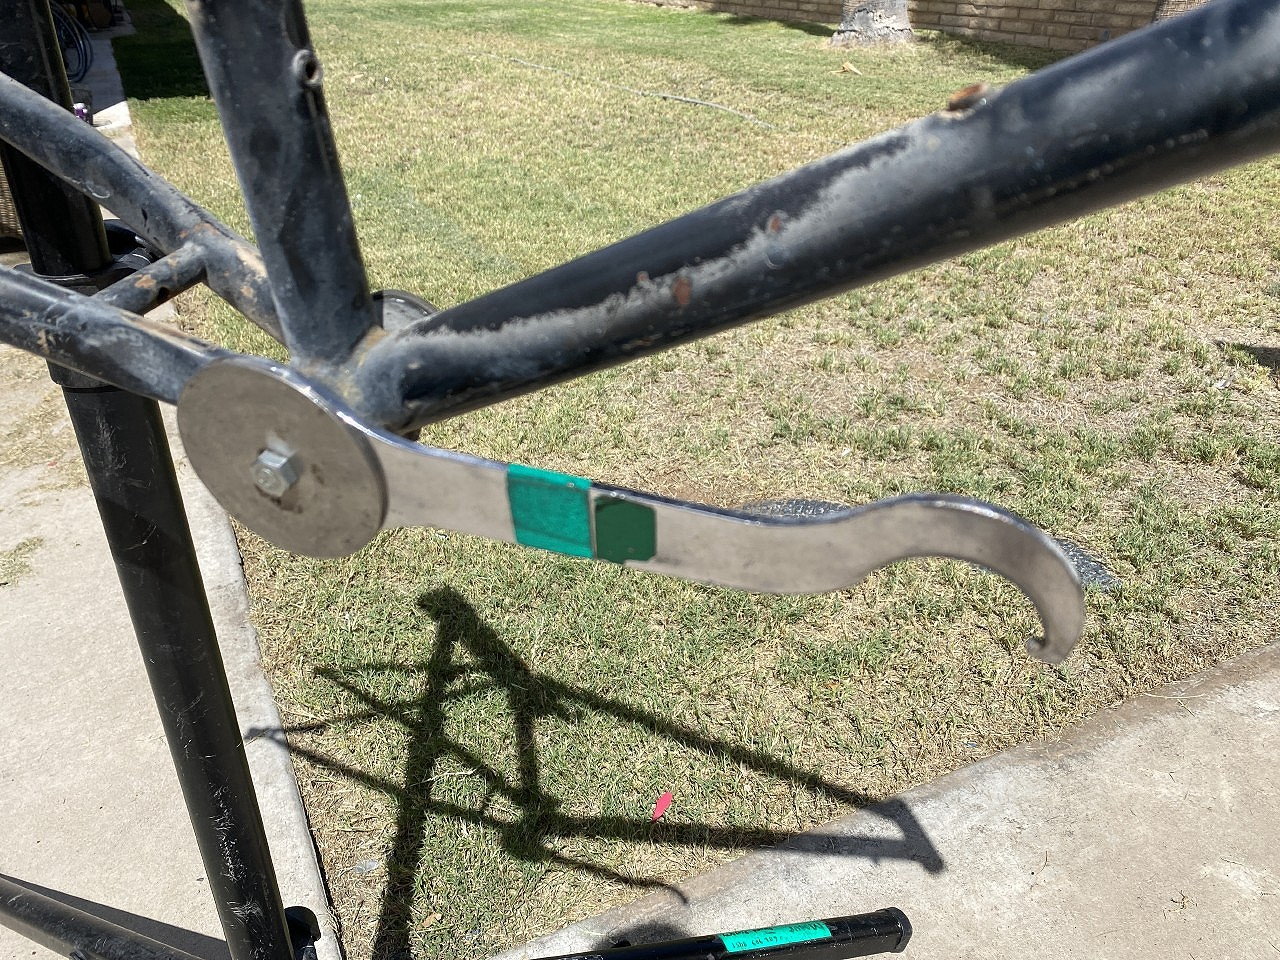
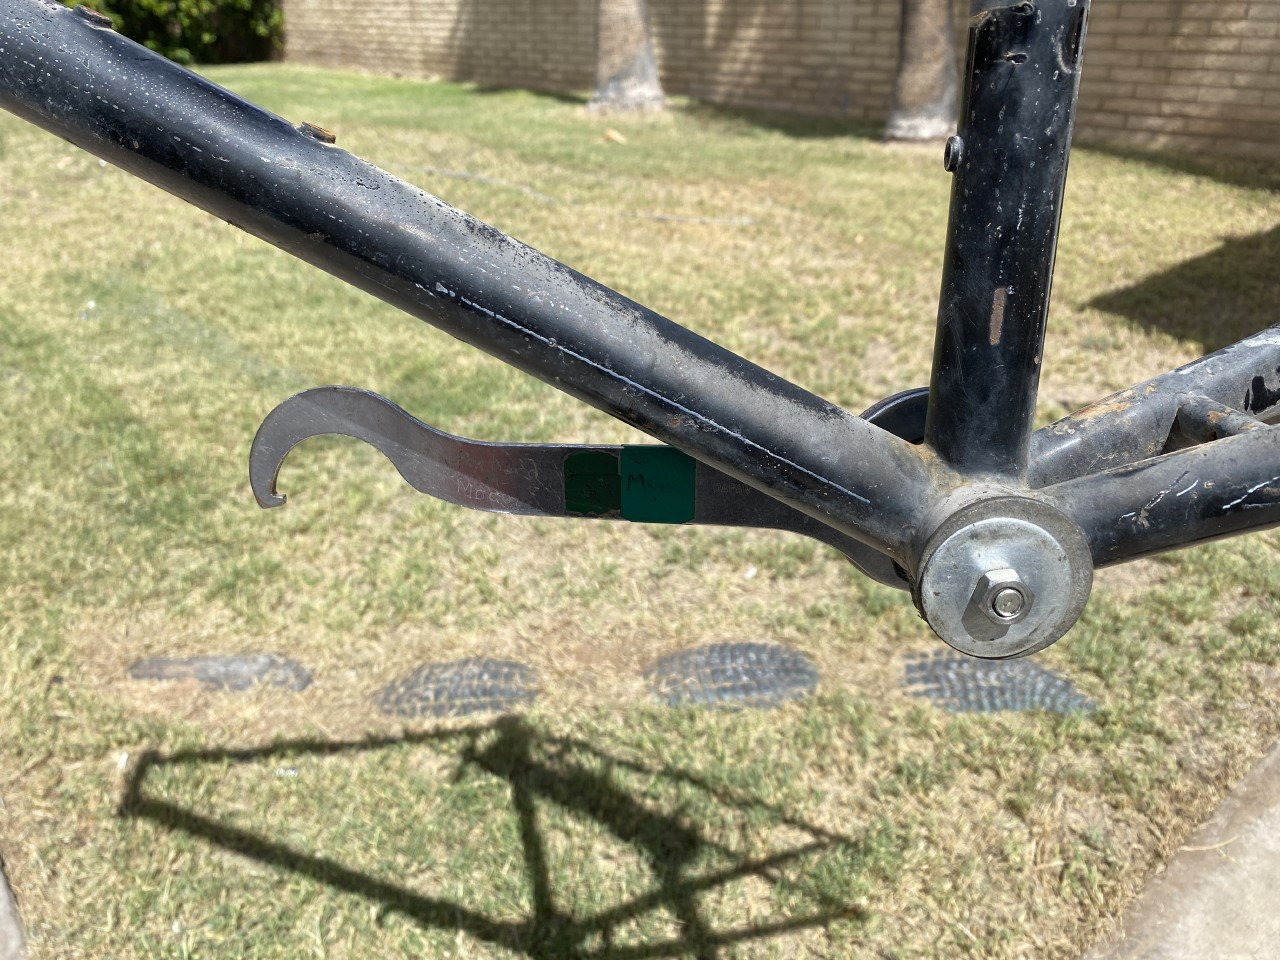
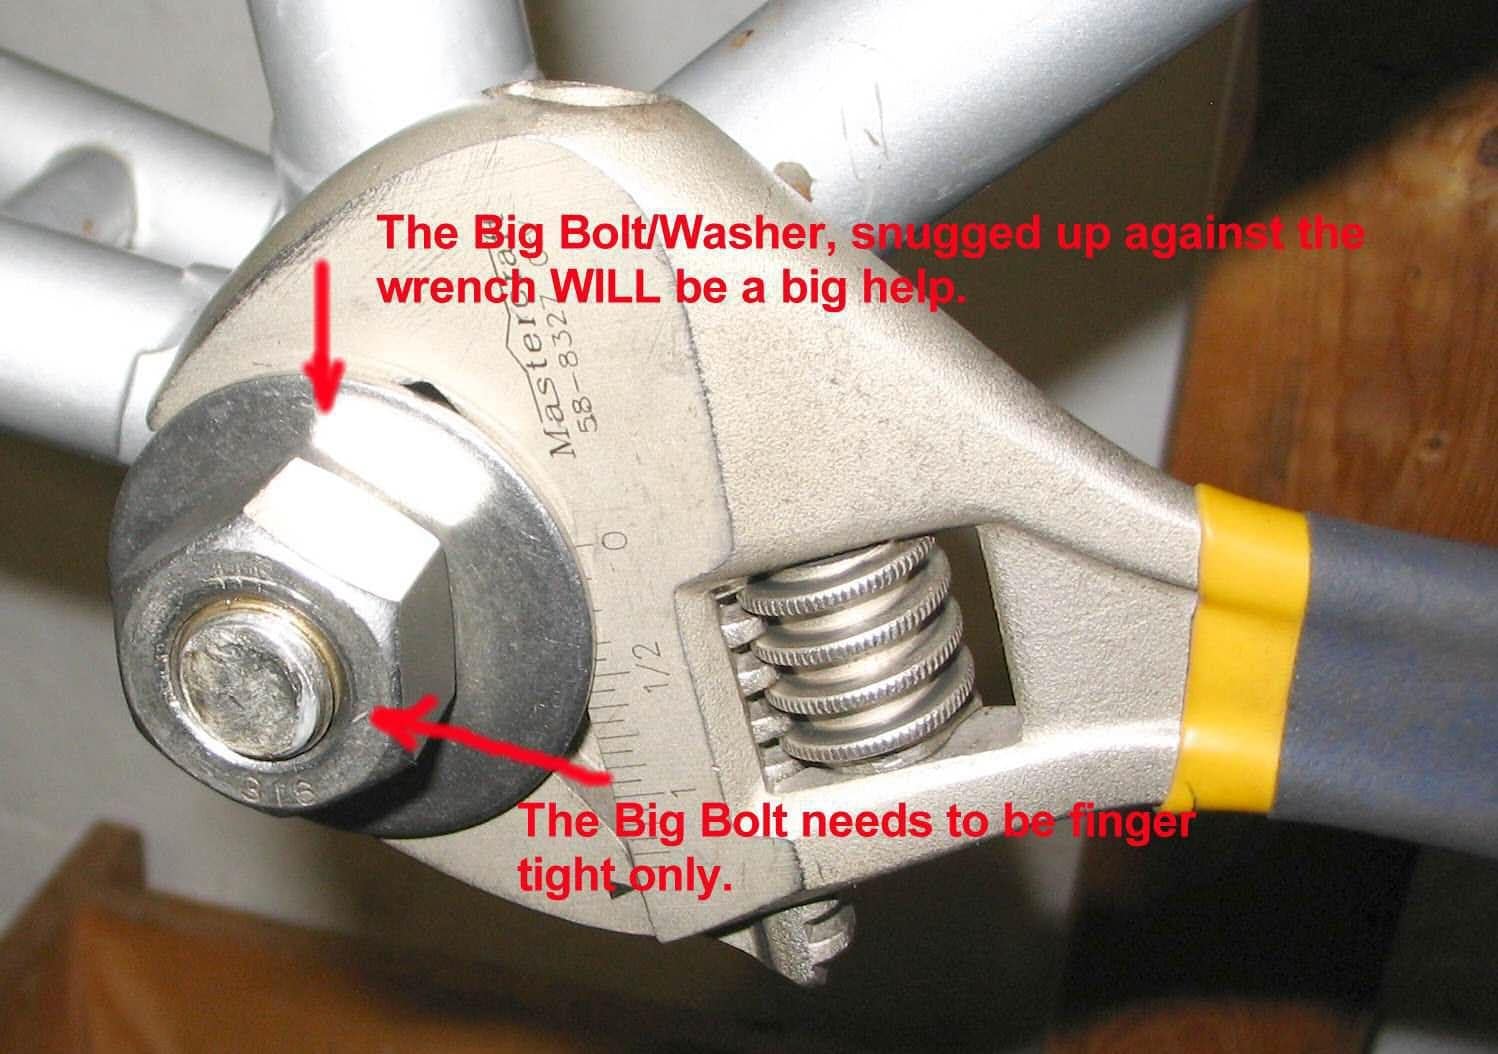
Pull the bottom bracket spindle and bearings, Install the non-drive side cup three quarters of the threaded area into the bottom bracket. Insert a big bolt (mine is 5/8" and coarse threaded). Use a big washer on the drive side end. Then, using a big adjustable wrench (I use a 15" adjustable or even a 12" one, as shown below, will often do the trick). Be wary - this part of a bottom bracket can be right or left hand thread. Snug the 5/8 nut up finger snug, not tight. Crack the cup loose and, before trying to fully unscrew, remove the washer and big bolt. Never failed with this procedure (well, almost never)...
And that is how I do it until I can afford those fancy bike tools.
That bottom bracket non-drive side lock nut can be tapped of with a hammer and a piece of soft metal or even hardwood. The cup can be pulled with a pair of needle none plyers stuck into two opposing holes at once and then twist counter clockwise. No special tools needed. Next...
Pull the bottom bracket spindle and bearings, Install the non-drive side cup three quarters of the threaded area into the bottom bracket. Insert a big bolt (mine is 5/8" and coarse threaded). Use a big washer on the drive side end. Then, using a big adjustable wrench (I use a 15" adjustable or even a 12" one, as shown below, will often do the trick). Be wary - this part of a bottom bracket can be right or left hand thread. Snug the 5/8 nut up finger snug, not tight. Crack the cup loose and, before trying to fully unscrew, remove the washer and big bolt. Never failed with this procedure (well, almost never)...
And that is how I do it until I can afford those fancy bike tools.
__________________
"98% of the bikes I buy are projects".
"98% of the bikes I buy are projects".
09-24-23, 01:51 PM
#15
Mad bike riding scientist
Join Date: Nov 2004
Location: Denver, CO
Posts: 27,369
Bikes: Some silver ones, a red one, a black and orange one, and a few titanium ones
Mentioned: 152 Post(s)
Tagged: 1 Thread(s)
Quoted: 6222 Post(s)
Liked 4,222 Times
in
2,368 Posts
Park Tool has an article on servicing that type of bottom bracket:
https://www.parktool.com/en-int/blog...ation-threaded
Keep in mind that unless the fixed cup (drive side) is unusable, or if you're replacing the entire bottom bracket for some reason (e.g. installing a cartridge instead), it's not necessary to remove the fixed cup to properly service the bottom bracket. Remove the non-drive side lockring and cup, and the axle and balls, clean the fixed cup in place using a solvent-soaked toothbrush and rag, and repack with fresh balls and grease.
N.B. there are professional-quality tools for removing a fixed cup if it is really necessary, but usually the DIY method above will work.
https://www.parktool.com/en-int/blog...ation-threaded
Keep in mind that unless the fixed cup (drive side) is unusable, or if you're replacing the entire bottom bracket for some reason (e.g. installing a cartridge instead), it's not necessary to remove the fixed cup to properly service the bottom bracket. Remove the non-drive side lockring and cup, and the axle and balls, clean the fixed cup in place using a solvent-soaked toothbrush and rag, and repack with fresh balls and grease.
N.B. there are professional-quality tools for removing a fixed cup if it is really necessary, but usually the DIY method above will work.
Honestly I thought the same thing until I developed my method of removing the fixed cup with the spindle. The reason that we don�t remove the cup is because it is difficult without that spindle there. But if you treat it like a cartridge bearing bottom bracket, it�s really fairly simple to remove the fixed cup and it�s easier to pack it if you reuse it.
__________________
Stuart Black
Plan Epsilon Around Lake Michigan in the era of Covid
Old School�When It Wasn�t Ancient bikepacking
Gold Fever Three days of dirt in Colorado
Pokin' around the Poconos A cold ride around Lake Erie
Dinosaurs in Colorado A mountain bike guide to the Purgatory Canyon dinosaur trackway
Solo Without Pie. The search for pie in the Midwest.
Picking the Scablands. Washington and Oregon, 2005. Pie and spiders on the Columbia River!
Likes For cyccommute:
10-27-23, 10:15 PM
#16
Full Member
Thread Starter
Join Date: Jun 2020
Location: San Francisco, CA
Posts: 200
Bikes: 2018 Jamis Renegade Exploit, 1996 Trek 930, mid-90's Dean El Diente, 2010 Scott Addict SL, 1998 Trek 730, Xtracycle EdgeRunner 30D, Xtracycle Swoop, 1992 Trek 790
Mentioned: 0 Post(s)
Tagged: 0 Thread(s)
Quoted: 87 Post(s)
Liked 107 Times
in
62 Posts
I was able to get it apart without clamping the wrench. I removed the non-drive side but the drive side was pretty well stuck. I added a few drops of chain lube around the fixed cup from the inside of the bottom bracket, let it work its way in overnight, and the next day the fixed cup came unscrewed without much trouble. However, the cone of the spindle on the drive side looks like this:
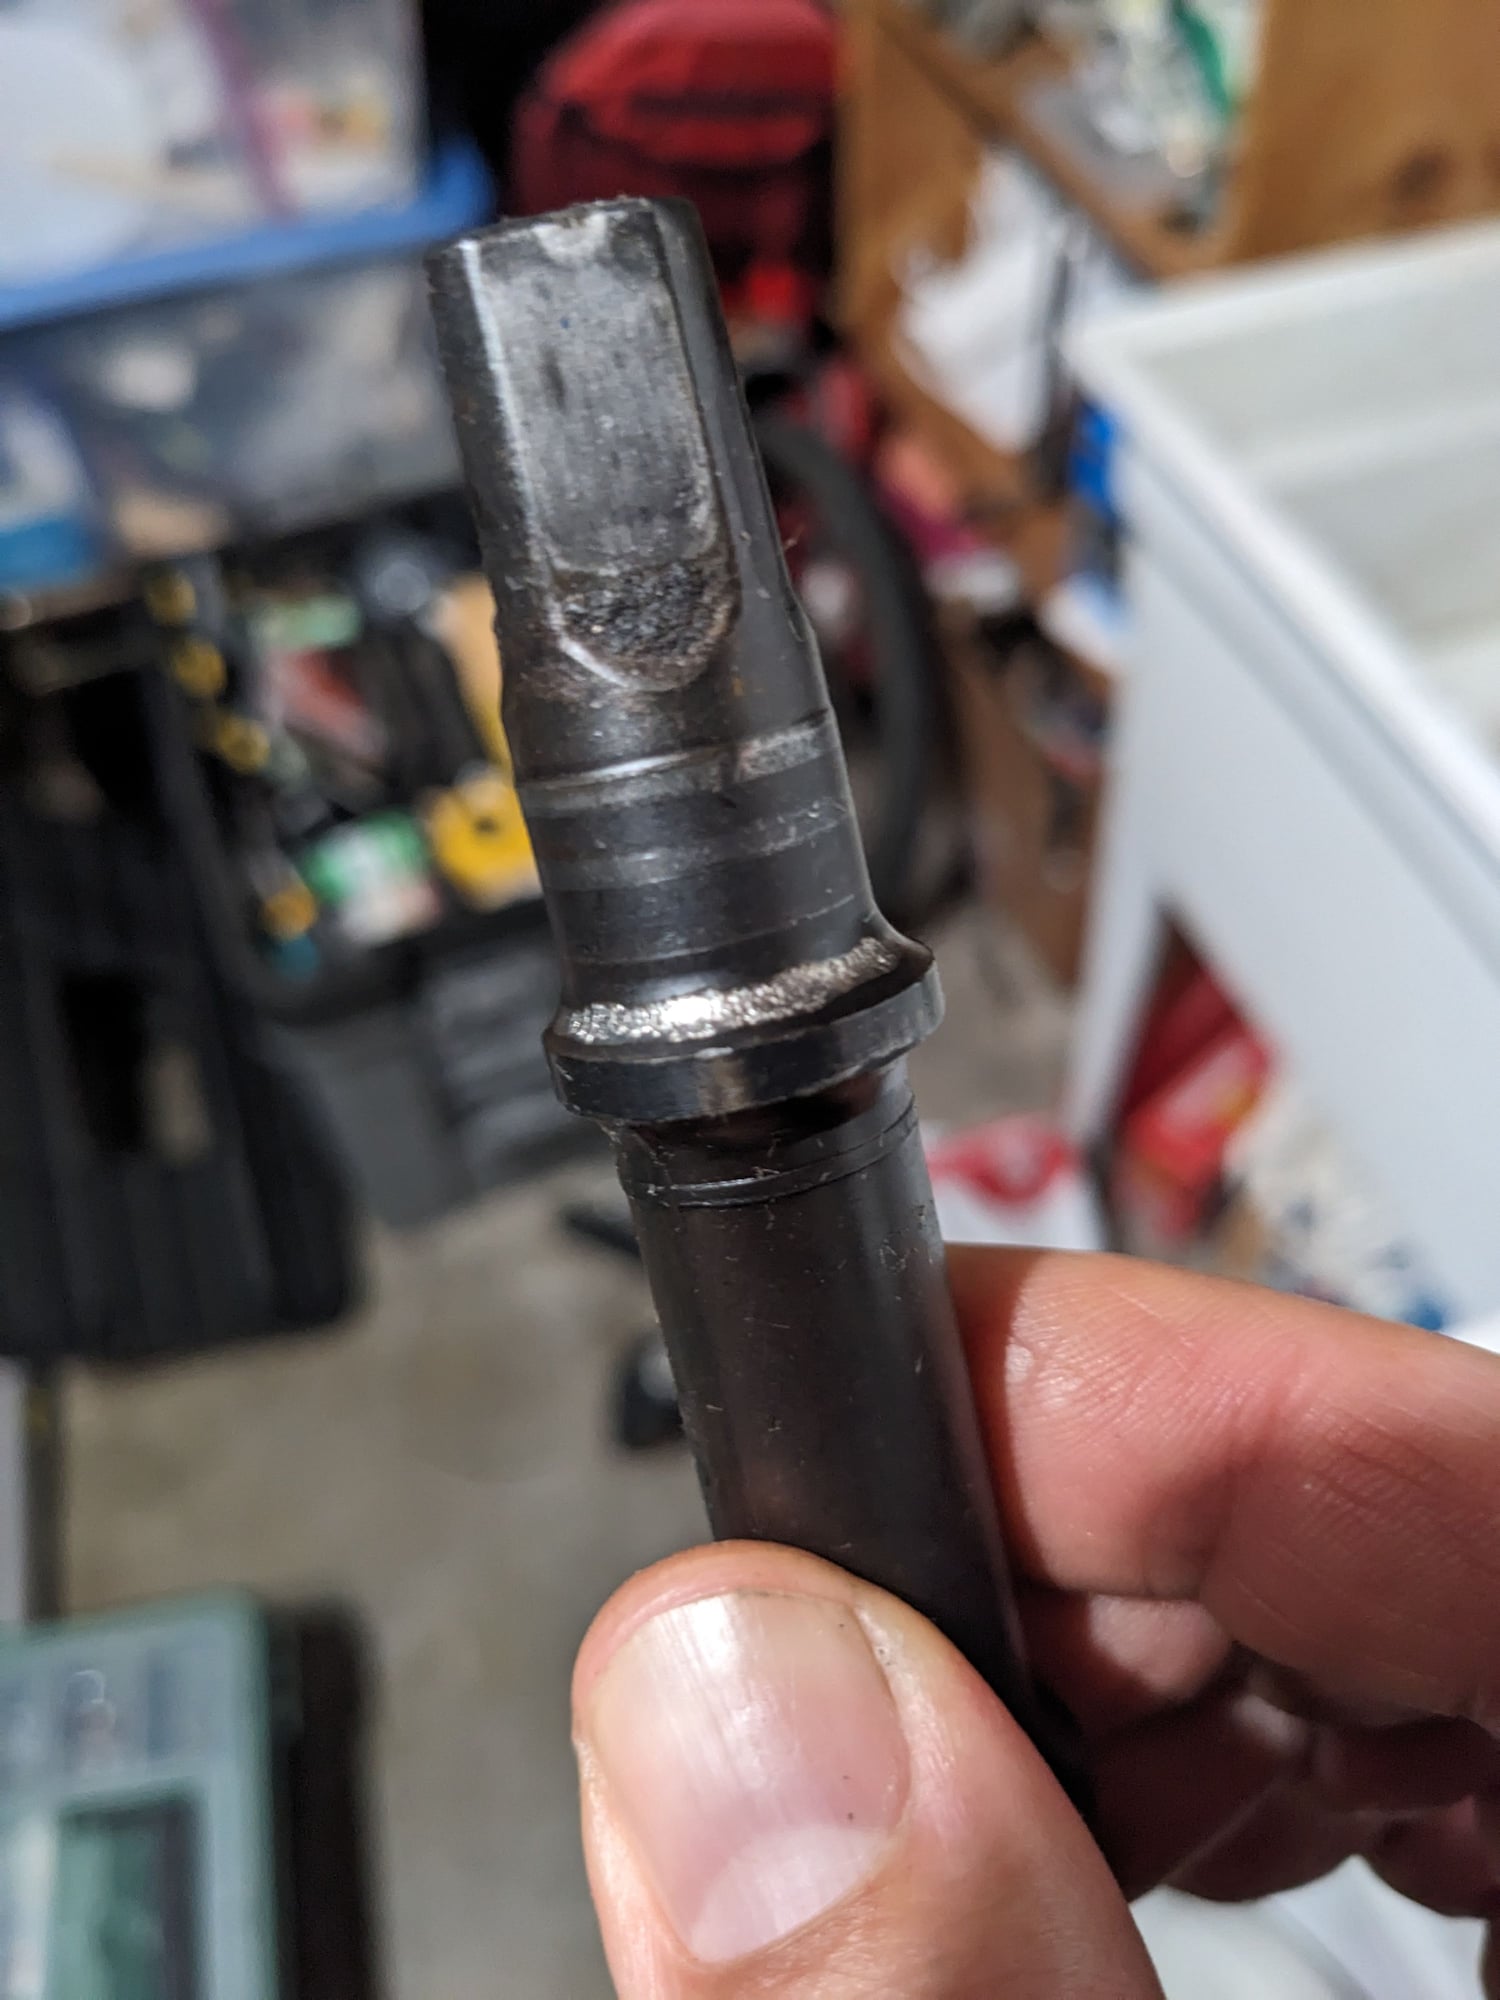
so I'll be replacing the bottom bracket, as it looks like the cost of a spindle is about the same as a new cartridge bottom bracket. Or I'll use the newer Hollowtech bottom bracket I have sitting around depending on which cranks I decide to install.
so I'll be replacing the bottom bracket, as it looks like the cost of a spindle is about the same as a new cartridge bottom bracket. Or I'll use the newer Hollowtech bottom bracket I have sitting around depending on which cranks I decide to install.
10-28-23, 06:57 AM
#17
SE Wis
Join Date: Apr 2005
Location: Milwaukee, WI
Posts: 10,517
Bikes: '68 Raleigh Sprite, '02 Raleigh C500, '84 Raleigh Gran Prix, '91 Trek 400, 2013 Novara Randonee, 1990 Trek 970
Mentioned: 40 Post(s)
Tagged: 0 Thread(s)
Quoted: 2747 Post(s)
Liked 3,401 Times
in
2,058 Posts
Cartridge is the way to go if you decide to stay square taper.
