


Any reason not to use blue Loctite on Hollowtech crank arm bolts?
 12-28-23, 08:45 AM
#1
Senior Member
Thread Starter
Join Date: Apr 2019
Location: UK
Posts: 1,404
Mentioned: 3 Post(s)
Tagged: 0 Thread(s)
Quoted: 682 Post(s)
Liked 453 Times
in
338 Posts
Any reason not to use blue Loctite on Hollowtech crank arm bolts?
I had the joy of my left GRX crank arm departing its axle today mid-ride. Don’t think this crank has been off the bike and properly looked after since I got it 18 months and 5000km (of mostly road riding) ago so only have myself to blame. It’s now got a nice bit of scraping where I had to put my foot down with it dangling off the pedal 
How does the preload bolt come out when that happens? Is it just because it’s plastic so the thread deforms and it can escape?
So when I sort it out later, I was considering augmenting the 14Nm with some blue loctite. Any reason I should avoid that on these bolts, given their pairing and having to balance the two of them?
 12-28-23, 08:55 AM
#2
Senior Member
Join Date: Jan 2009
Location: San Diego, CA
Posts: 3,677
Mentioned: 10 Post(s)
Tagged: 0 Thread(s)
Quoted: 839 Post(s)
Liked 1,064 Times
in
747 Posts
Can't really hurt but IME not necessary if the pinch bolts are tight enough. Use a torque wrench if in doubt and the preload cap won't come off if the bolts are tightened properly.
Likes For Crankycrank:
12-28-23, 09:09 AM
#3

don't try this at home.

Join Date: Jan 2006
Location: N. KY
Posts: 5,940
Mentioned: 10 Post(s)
Tagged: 0 Thread(s)
Quoted: 974 Post(s)
Liked 512 Times
in
352 Posts
I'm guessing it wasn't properly installed and torqued before the arm fell off. Loktite sounds like a bad idea to me.
I use grease on the two bolts and a torque wrench on my road bike Ultegra pinch bolts.
Did you lose or damage the plastic preload threaded cap when the crank arm fell off? You'll need one to set the bearings correctly.
The small Shimano preload tool TL-FC16 is cheap and effective.
Last edited by rm -rf; 12-28-23 at 09:15 AM.
12-28-23, 09:15 AM
#4
Senior Member
Join Date: Oct 2008
Location: Northern NY...Brownville
Posts: 2,575
Bikes: Specialized Aethos, Specialized Diverge Comp E5
Mentioned: 2 Post(s)
Tagged: 0 Thread(s)
Quoted: 242 Post(s)
Liked 456 Times
in
267 Posts
Since you've already admitted the lack of service and maintenance we can get to the solution.
Service and maintenance...Bolts, nuts, etc. can loosen during use due to vibration, etc. and should be checked periodically. If I remember correctly the two bolts on the crank arm come with a bit of 'thread lock' on them when new. Were I you I'd start by removing the crank itself, cleaning/degreasing everything, apply fresh grease and reinstall. The plastic center bit is just to apply the pre-load pressure on the crank arm so use that correctly and do not apply loctite...it's not needed. You can apply blue loctite to the crank arm bolts, just don't overdue it and install/tighten to the recommended nm of force. You should be fine but again periodic service and maintenance is meant to 'prevent' the problem you experienced.
Hoping you learned a valuable lesson...we'll see I guess.

Likes For Kai Winters:
12-28-23, 09:16 AM
#5

Senior Member
Join Date: Oct 2013
Location: Mich
Posts: 7,403
Bikes: RSO E-tire dropper fixie brifter
Mentioned: 0 Post(s)
Tagged: 0 Thread(s)
Quoted: 6 Post(s)
Liked 2,981 Times
in
1,921 Posts
it might hinder tightening it by creating a void if the liquid squishes out before curing. Resulting in it coming loose.
Clean the mating surfaces really well, some light oil on the threads, & follow the install torque procedures.
Clean the mating surfaces really well, some light oil on the threads, & follow the install torque procedures.
__________________
-Oh Hey!
-Oh Hey!
Likes For Troul:
12-28-23, 09:17 AM
#6
Senior Member
Join Date: Jan 2013
Posts: 2,683
Bikes: too many sparkly Italians, some sweet Americans and a couple interesting Japanese
Mentioned: 10 Post(s)
Tagged: 0 Thread(s)
Quoted: 569 Post(s)
Liked 589 Times
in
412 Posts
I agree with Crankycrank on your GRX but I do use it on some of our old square taper cranks as I have found when torqued they need to be checked after many many miles. With blue there is no need for that and when you want to pull it is easy or if stubborn a little heat helps.
Likes For easyupbug:
12-28-23, 09:21 AM
#7
Senior Member
Thread Starter
Join Date: Apr 2019
Location: UK
Posts: 1,404
Mentioned: 3 Post(s)
Tagged: 0 Thread(s)
Quoted: 682 Post(s)
Liked 453 Times
in
338 Posts
Yeah mea culpa. I spent 3 hours yesterday on my son’s bike and zero on mine, maybe should have been the other way round!
Still have the preload bolt (and I have the tool for it). It looked fine and I could tighten it (i.e. it seemed to thread ok) with a finger but conditions weren’t ideal for inspecting it so I’ll know more later.
I have a torque wrench, but clearly not checked these bolts since I took delivery so I’ll try just tightening to spec post clean-up, skip the loctite and see how it goes.
Thanks!
Last edited by choddo; 12-28-23 at 09:25 AM.
Likes For choddo:
12-28-23, 09:51 AM
#8
I'm good to go!
Join Date: Jul 2017
Location: Mississippi
Posts: 15,003
Bikes: Tarmac Disc Comp Di2 - 2020
Mentioned: 51 Post(s)
Tagged: 0 Thread(s)
Quoted: 6199 Post(s)
Liked 4,816 Times
in
3,323 Posts
Make sure you understand the function of the stopper plate that is in the pinch point of the crankarm that the bolts go through. The "preload" that you put on the arm is only to get the arm on far enough to allow the stopper plate to engage. The stopper plate will tell you if you've put enough "preload" on the crank arm to get it on the spindle far enough.
Likes For Iride01:
12-28-23, 09:58 AM
#9
don't try this at home.
Join Date: Jan 2006
Location: N. KY
Posts: 5,940
Mentioned: 10 Post(s)
Tagged: 0 Thread(s)
Quoted: 974 Post(s)
Liked 512 Times
in
352 Posts
Make sure you understand the function of the stopper plate that is in the pinch point of the crankarm that the bolts go through. The "preload" that you put on the arm is only to get the arm on far enough to allow the stopper plate to engage. The stopper plate will tell you if you've put enough "preload" on the crank arm to get it on the spindle far enough.
12-28-23, 10:04 AM
#10
I'm good to go!
Join Date: Jul 2017
Location: Mississippi
Posts: 15,003
Bikes: Tarmac Disc Comp Di2 - 2020
Mentioned: 51 Post(s)
Tagged: 0 Thread(s)
Quoted: 6199 Post(s)
Liked 4,816 Times
in
3,323 Posts
Regardless of which is it's purpose, I think the fact the arm fell off suggests that the stopper plate was not able to be engaged at installation time. Or else the crankarm bolts were grossly under torqued.
Likes For Iride01:
12-28-23, 10:09 AM
#11
Senior Member
Join Date: Oct 2013
Location: Mich
Posts: 7,403
Bikes: RSO E-tire dropper fixie brifter
Mentioned: 0 Post(s)
Tagged: 0 Thread(s)
Quoted: 6 Post(s)
Liked 2,981 Times
in
1,921 Posts
I don't know that keeping the crank arm on is the main purpose. The way they show it's use in the DM's is taken by me as it allows one to tell if the crank arm is on the spindle far enough.
Regardless of which is it's purpose, I think the fact the arm fell off suggests that the stopper plate was not able to be engaged at installation time. Or else the crankarm bolts were grossly under torqued.
Regardless of which is it's purpose, I think the fact the arm fell off suggests that the stopper plate was not able to be engaged at installation time. Or else the crankarm bolts were grossly under torqued.
__________________
-Oh Hey!
-Oh Hey!
12-28-23, 10:21 AM
#12
Senior Member
Join Date: May 2022
Location: USA - Southwest PA
Posts: 3,100
Bikes: Cannondale - Gary Fisher - Giant - Litespeed - Schwinn Paramount - Schwinn (lugged steel) - Trek OCLV
Mentioned: 6 Post(s)
Tagged: 0 Thread(s)
Quoted: 1401 Post(s)
Liked 1,886 Times
in
1,085 Posts
I’ve used a torque wrench on those bolts - and later were loose
Likes For t2p:
12-28-23, 10:48 AM
#13
Senior Member
Thread Starter
Join Date: Apr 2019
Location: UK
Posts: 1,404
Mentioned: 3 Post(s)
Tagged: 0 Thread(s)
Quoted: 682 Post(s)
Liked 453 Times
in
338 Posts
I don't know that keeping the crank arm on is the main purpose. The way they show it's use in the DM's is taken by me as it allows one to tell if the crank arm is on the spindle far enough.
Regardless of which is it's purpose, I think the fact the arm fell off suggests that the stopper plate was not able to be engaged at installation time. Or else the crankarm bolts were grossly under torqued.
Regardless of which is it's purpose, I think the fact the arm fell off suggests that the stopper plate was not able to be engaged at installation time. Or else the crankarm bolts were grossly under torqued.
 ) My LBS are very good mechanics and the person who put this together is a cycling club friend too, I’d be surprised if they fluffed that one.
By the way thanks for explaining that, I’d always rotated it into position but never really understood its purpose.
Last edited by choddo; 12-28-23 at 10:52 AM.
12-28-23, 11:08 AM
#14
I'm good to go!
Join Date: Jul 2017
Location: Mississippi
Posts: 15,003
Bikes: Tarmac Disc Comp Di2 - 2020
Mentioned: 51 Post(s)
Tagged: 0 Thread(s)
Quoted: 6199 Post(s)
Liked 4,816 Times
in
3,323 Posts
Those bolts just don't loosen on their own and properly installed crankarms don't just fall off. The fact it did would have me worried that it's mating surfaces to the spindle are damaged from it wobbling every power stroke as it worked it's way off the spindle.
Incorrect tightening of the bolts could leave one loose and the other too tight.
Likes For Iride01:
12-28-23, 11:32 AM
#15
Senior Member
Thread Starter
Join Date: Apr 2019
Location: UK
Posts: 1,404
Mentioned: 3 Post(s)
Tagged: 0 Thread(s)
Quoted: 682 Post(s)
Liked 453 Times
in
338 Posts
Well someone fluffed something! Otherwise you wouldn't be having an issue with the crankarm coming loose.
Those bolts just don't loosen on their own and properly installed crankarms don't just fall off. The fact it did would have me worried that it's mating surfaces to the spindle are damaged from it wobbling every power stroke as it worked it's way off the spindle.
Incorrect tightening of the bolts could leave one loose and the other too tight.
before in 12 years of using and maintaining this style of crank on maybe 7 bikes and something like 80,000km of riding (although I have seen photos of friends having it happen and always assumed under-tightening). So something odd has happened. I hit a hole hard enough (while standing) to deflate and unseat my tubeless tyre last weekend. Perhaps an aftershock of that. Can’t think of anything else that’s happened or changed. Perhaps more will become clear when I get it on the stand tonight.
12-28-23, 12:39 PM
#16
Senior Member
Join Date: Jan 2009
Location: San Diego, CA
Posts: 3,677
Mentioned: 10 Post(s)
Tagged: 0 Thread(s)
Quoted: 839 Post(s)
Liked 1,064 Times
in
747 Posts
Indeed. So something odd has happened. I hit a hole hard enough (while standing) to deflate and unseat my tubeless tyre last weekend. Perhaps an aftershock of that. Can’t think of anything else that’s happened or changed. Perhaps more will become clear when I get it on the stand tonight.
Likes For Crankycrank:
12-29-23, 06:14 AM
#17
SE Wis
Join Date: Apr 2005
Location: Milwaukee, WI
Posts: 10,517
Bikes: '68 Raleigh Sprite, '02 Raleigh C500, '84 Raleigh Gran Prix, '91 Trek 400, 2013 Novara Randonee, 1990 Trek 970
Mentioned: 40 Post(s)
Tagged: 0 Thread(s)
Quoted: 2747 Post(s)
Liked 3,401 Times
in
2,058 Posts
12-29-23, 06:42 AM
#18
...
Join Date: Oct 2021
Location: Whitestone and Rensselaerville, New York
Posts: 1,519
Bikes: Bicycles? Yup.
Mentioned: 8 Post(s)
Tagged: 0 Thread(s)
Quoted: 482 Post(s)
Liked 1,593 Times
in
739 Posts
choddo , make sure the 2 bolts are loose when you tighten the plastic pre-load cap. Also, when removing the crankarm loosen the bolts before the pre-load cap.
Likes For BTinNYC:
12-29-23, 07:23 AM
#19
Senior Member
Thread Starter
Join Date: Apr 2019
Location: UK
Posts: 1,404
Mentioned: 3 Post(s)
Tagged: 0 Thread(s)
Quoted: 682 Post(s)
Liked 453 Times
in
338 Posts
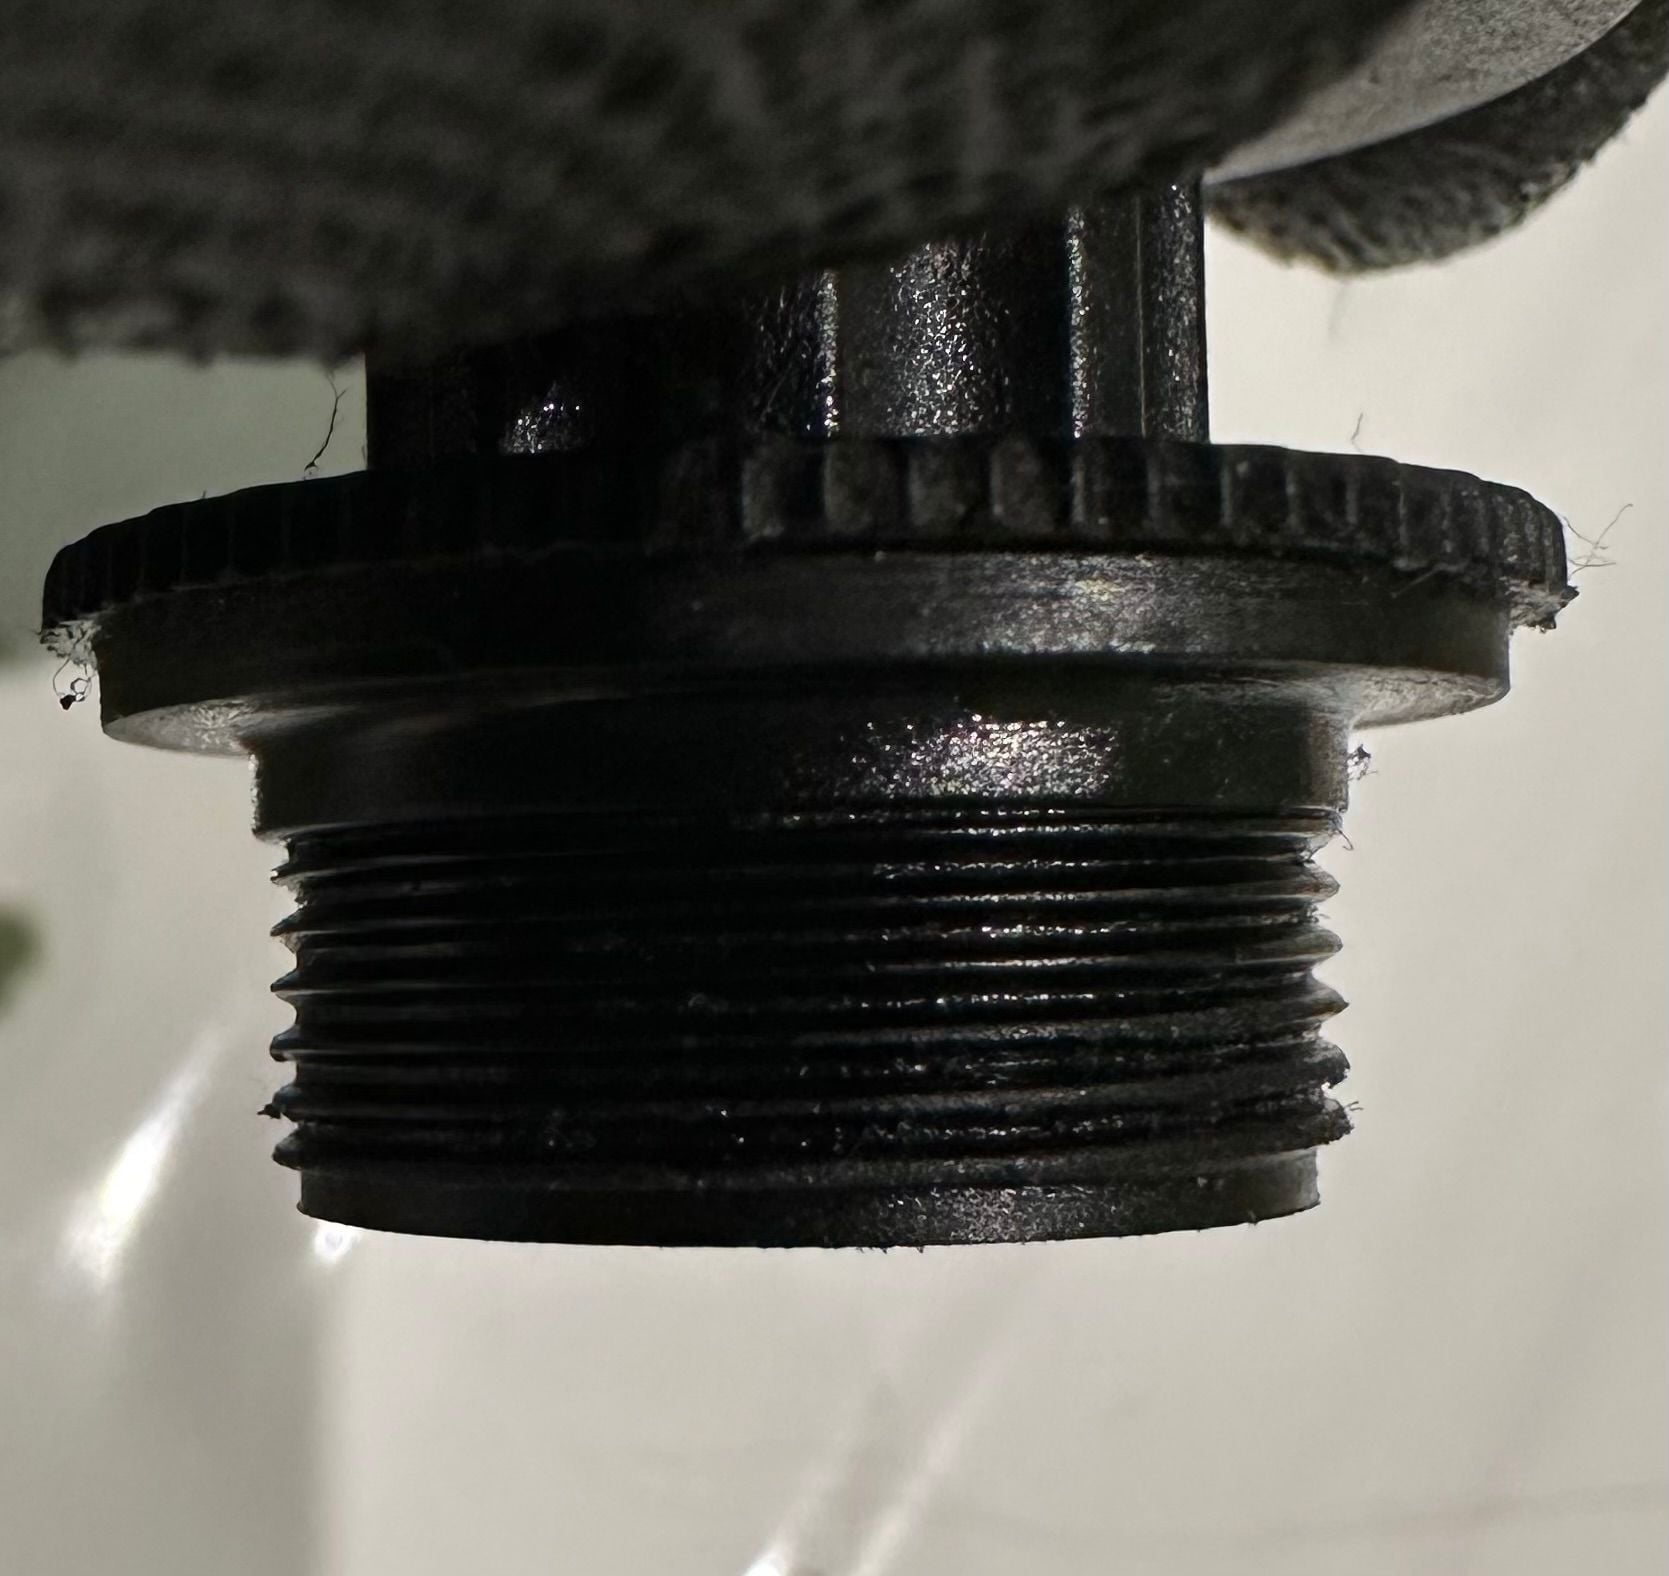
Well for completeness, the preload bolt has definitely seen better days but seems to work ok
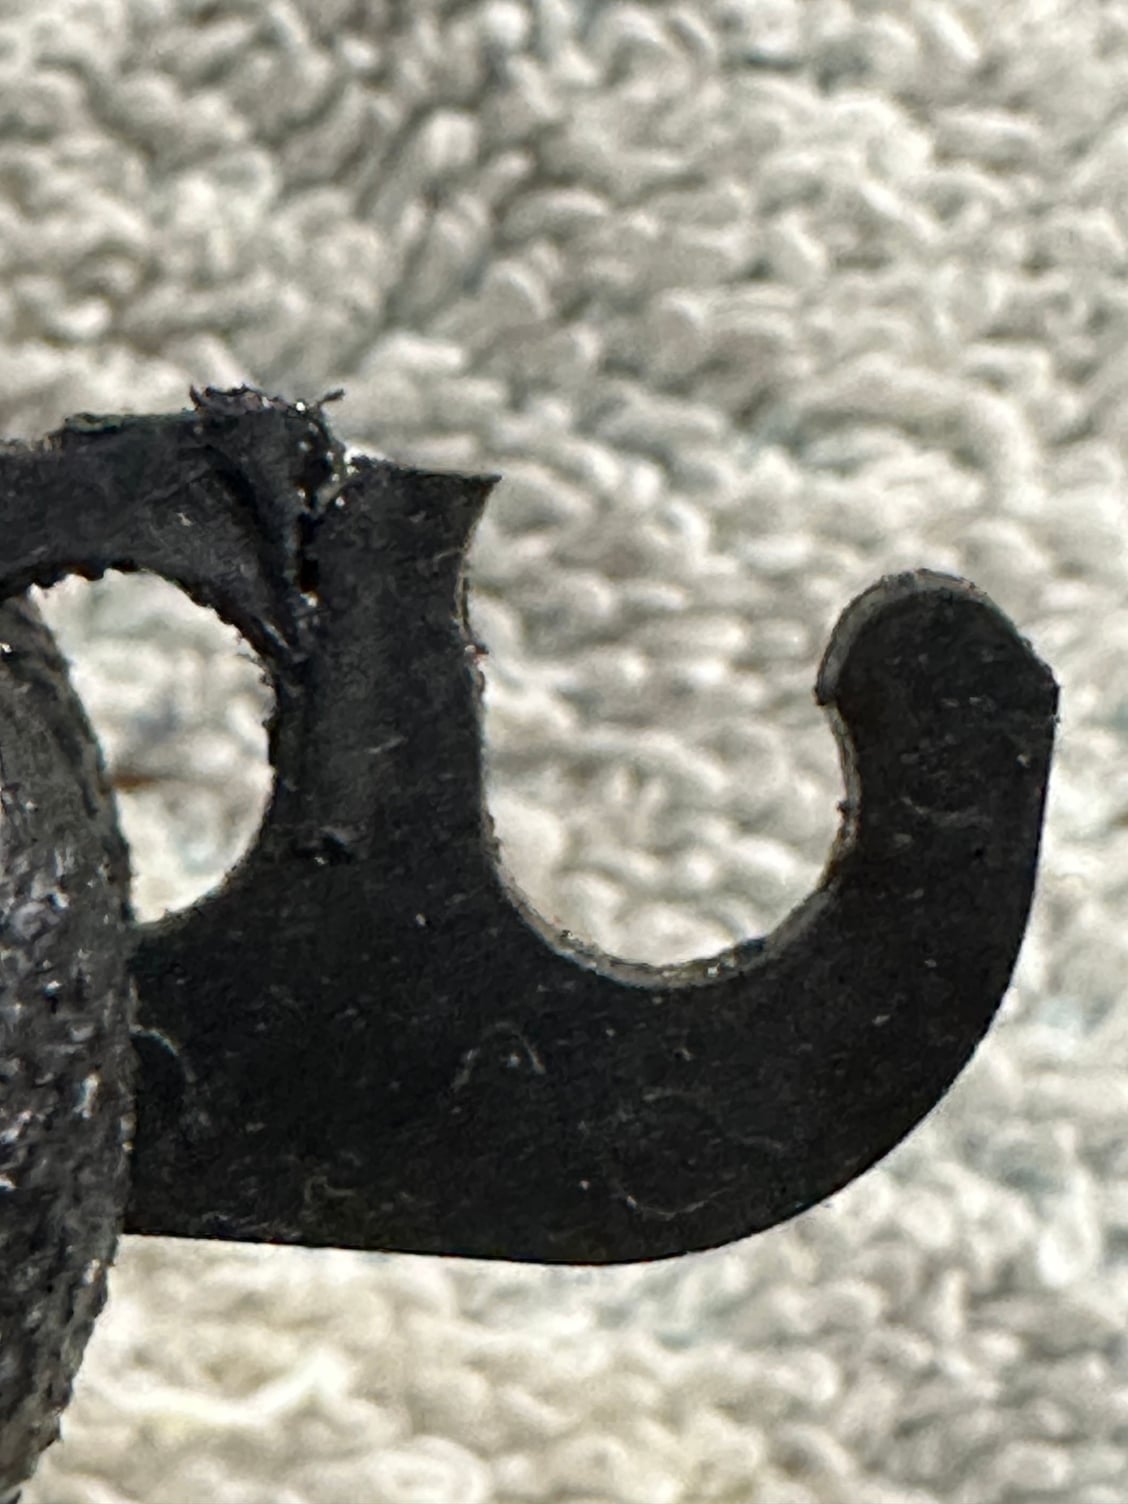
The plate is knackered. Put it in for show but pin has snapped out and had to ensure both cranks were fully flush with the BB by hand/eye.
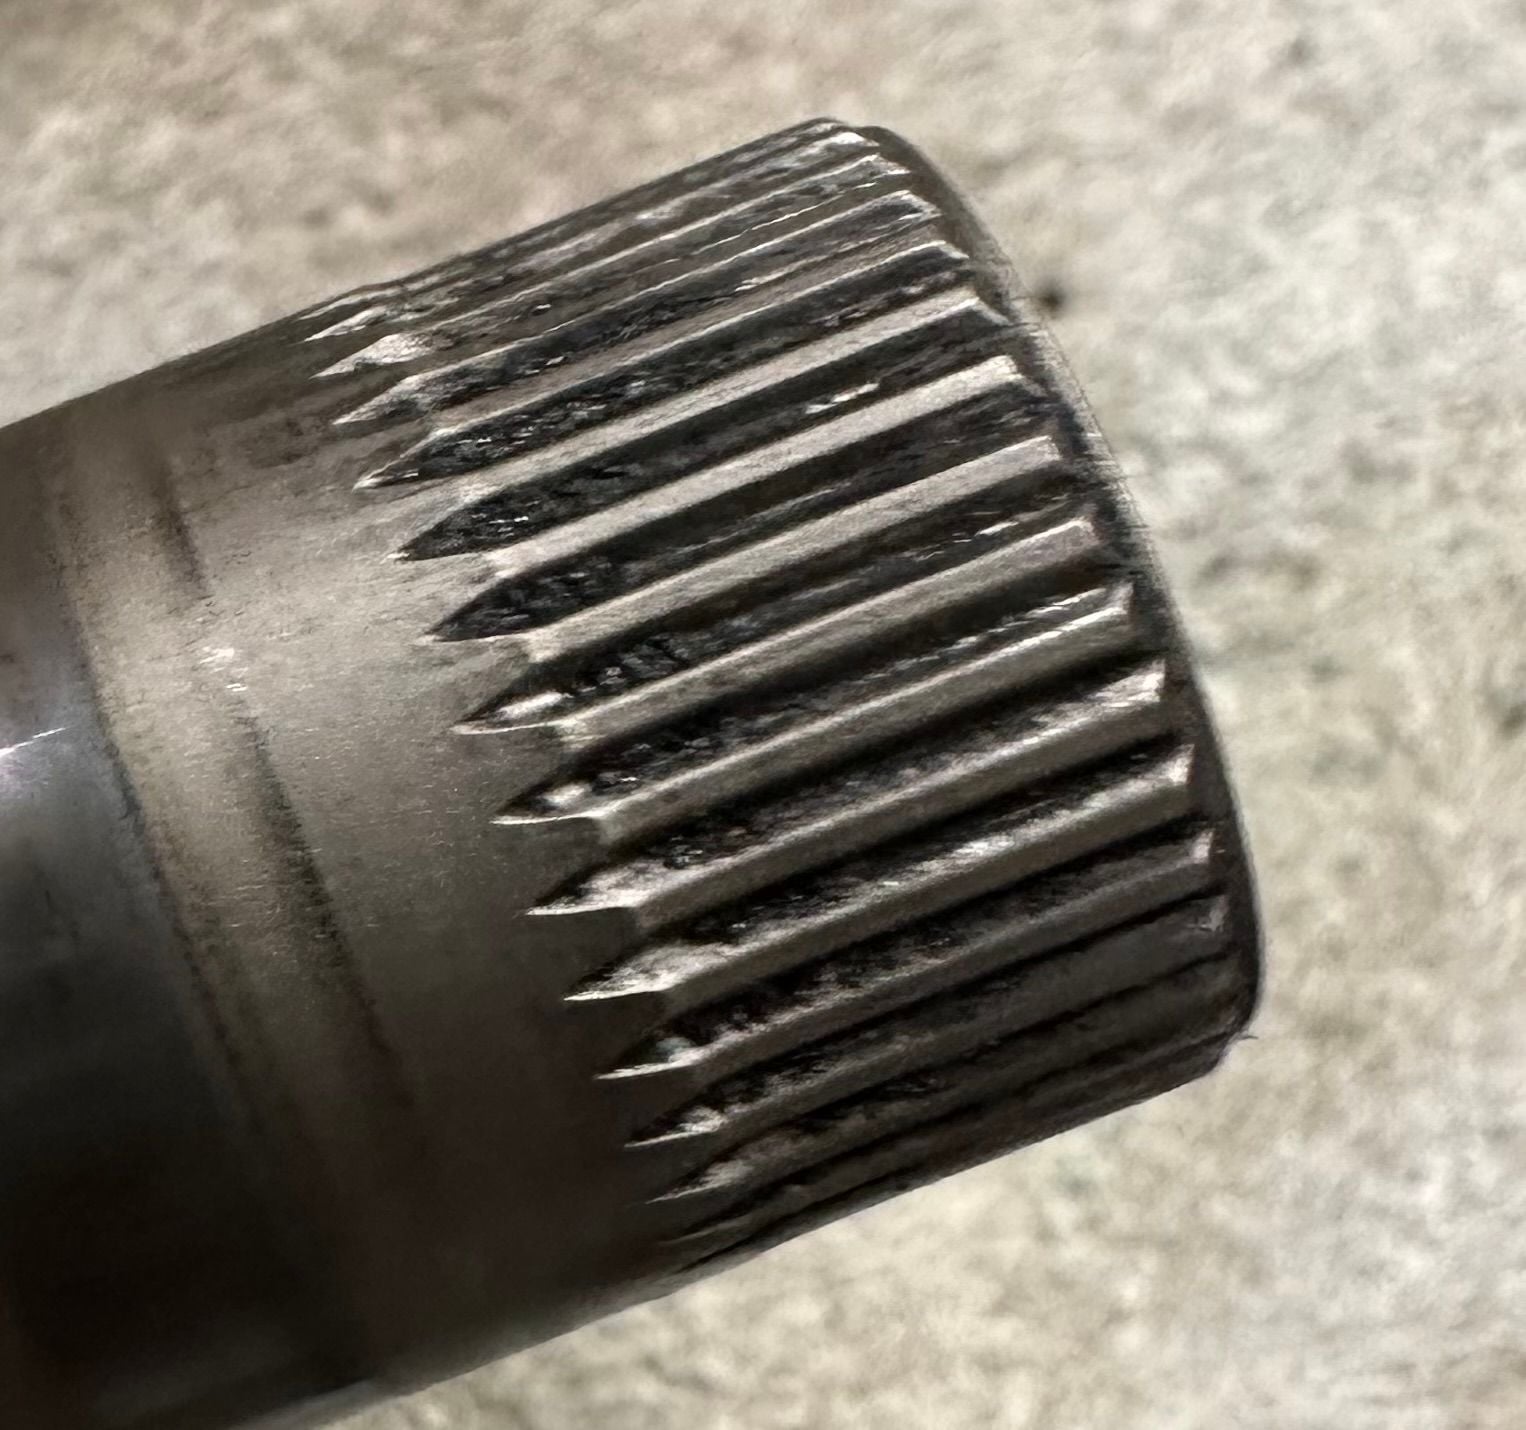
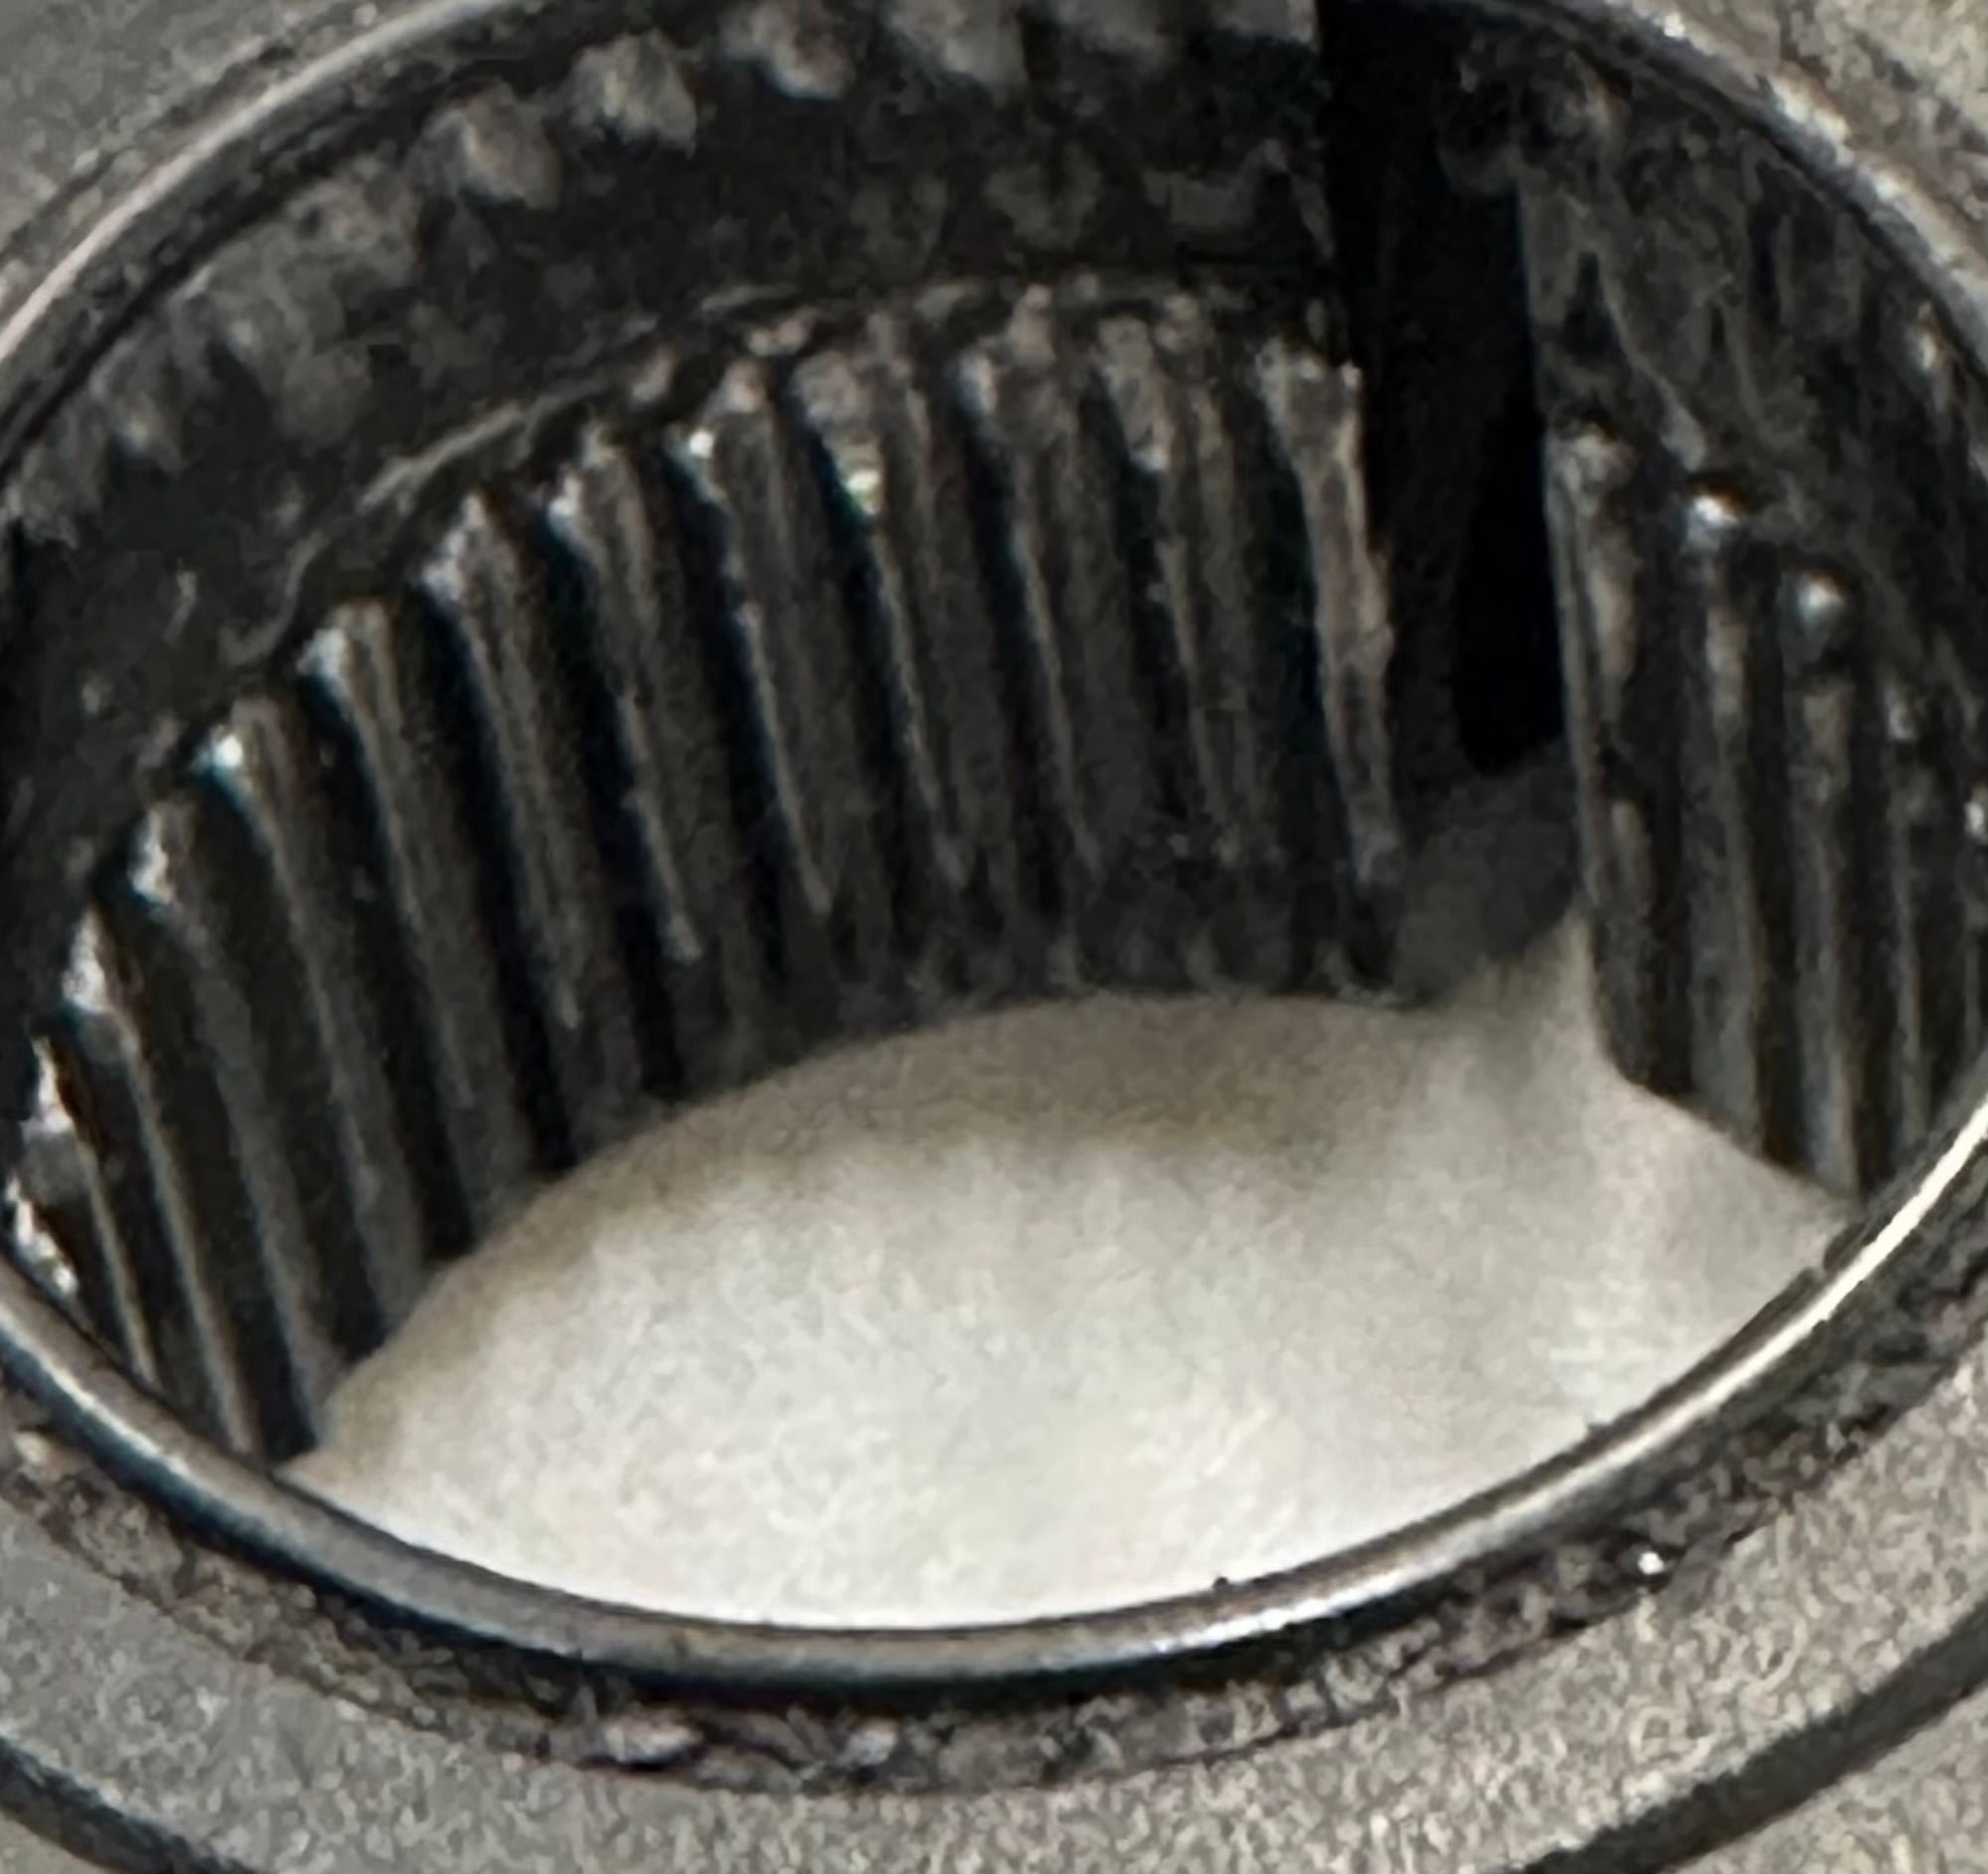
splines generally ok but a little damage inside the arm
All went back on ok and rode this morning for 80k with no further problem. A lesson in looking after the bike properly before something goes wrong.
The plate is knackered. Put it in for show but pin has snapped out and had to ensure both cranks were fully flush with the BB by hand/eye.
splines generally ok but a little damage inside the arm
All went back on ok and rode this morning for 80k with no further problem. A lesson in looking after the bike properly before something goes wrong.
Likes For choddo:
12-29-23, 09:29 AM
#20
I'm good to go!
Join Date: Jul 2017
Location: Mississippi
Posts: 15,003
Bikes: Tarmac Disc Comp Di2 - 2020
Mentioned: 51 Post(s)
Tagged: 0 Thread(s)
Quoted: 6199 Post(s)
Liked 4,816 Times
in
3,323 Posts
I'd get that stopper plate replaced. Any chance that it was knackered from the very start? Perhaps when the crank was installed the plate was pushed in and when the crank didn't push on far enough someone gave the crank a good whack with a mallet. Which then broke off that little tab.
Likes For Iride01:
12-29-23, 10:34 AM
#21
Senior Member
Join Date: May 2021
Posts: 8,462
Mentioned: 12 Post(s)
Tagged: 0 Thread(s)
Quoted: 4422 Post(s)
Liked 4,876 Times
in
3,019 Posts
I check the torque on these crank arm screws at least annually and I have known them to loosen off slightly, especially from new. My Wahoo stationary bike has the same design and those screws worked loose in the first few months of use (crank started creaking). After re-torquing they came slightly loose again after a year of heavy use - started creaking again. Cleaned and re-torqued they have been fine for another year.
So I think it’s just one of those things that requires a periodic torque check. I now do this before any major ride, torque checking all critical components. Screws occasionally loosen and don’t tighten themselves up!
So I think it’s just one of those things that requires a periodic torque check. I now do this before any major ride, torque checking all critical components. Screws occasionally loosen and don’t tighten themselves up!
Likes For PeteHski:
12-29-23, 04:03 PM
#22
don't try this at home.
Join Date: Jan 2006
Location: N. KY
Posts: 5,940
Mentioned: 10 Post(s)
Tagged: 0 Thread(s)
Quoted: 974 Post(s)
Liked 512 Times
in
352 Posts
I'd get that stopper plate replaced. Any chance that it was knackered from the very start? Perhaps when the crank was installed the plate was pushed in and when the crank didn't push on far enough someone gave the crank a good whack with a mallet. Which then broke off that little tab.
It didn't work anyway, since it's plastic and the tiny metal pin pulled out.
It's not for determining that the arm is installed far enough onto the crank axle. The arm is installed correctly if there's a lack of side-to-side play in the crankset after the crank adjuster cap is tightened appropriately. Or if it's too tight, the crankset won't spin freely.
~~~~
From the Shimano dealer manual:
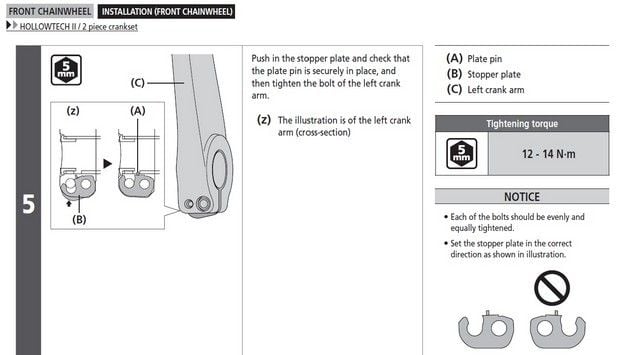
~~~~~~~~~~~~~~~~~~~~~~~~~~~~~~~~~~~~~~~~~~~~~~~~~~~~~~~~~~~~~~~~~~
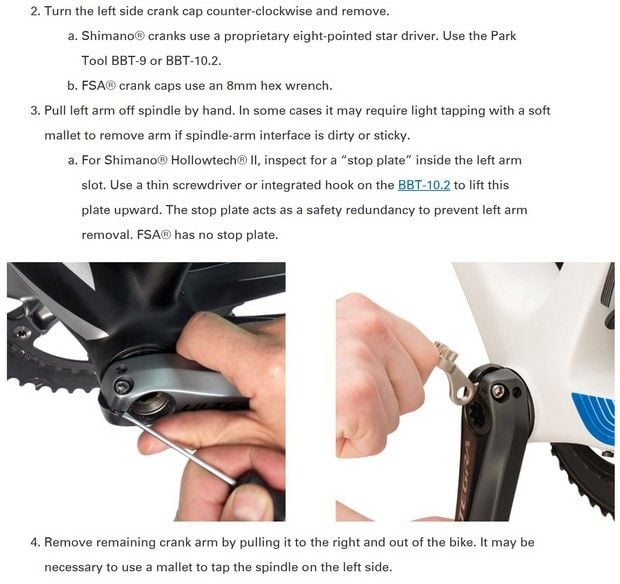
From the useful Park Tool crank removal and install guide. "The plate acts as a safety redundancy"
 12-29-23, 06:20 PM
#23
Senior Member
Join Date: Apr 2011
Posts: 7,086
Mentioned: 41 Post(s)
Tagged: 0 Thread(s)
Quoted: 4420 Post(s)
Liked 1,568 Times
in
1,030 Posts
The plate isn't super important, but if it doesn't close you likely installed the crank wrong.
If the bolts aren't tight (or somehow gets loose), the end cap or plate aren't going to stop the crank from jumping the splines. If you're lucky the splines retain enough metal to engage when tight.
One thing that can cause the bolts to loosen up is not tightening them per the manual - which is very clear that it needs to be more or less simultaneous - alternating between bolts until you get to torque.
I'd just do it right and use grease. Bolts under tension like this really don't benefit from loctite.
12-30-23, 01:44 AM
#24
Senior Member
Thread Starter
Join Date: Apr 2019
Location: UK
Posts: 1,404
Mentioned: 3 Post(s)
Tagged: 0 Thread(s)
Quoted: 682 Post(s)
Liked 453 Times
in
338 Posts
The plate isn't super important, but if it doesn't close you likely installed the crank wrong.
If the bolts aren't tight (or somehow gets loose), the end cap or plate aren't going to stop the crank from jumping the splines. If you're lucky the splines retain enough metal to engage when tight.
One thing that can cause the bolts to loosen up is not tightening them per the manual - which is very clear that it needs to be more or less simultaneous - alternating between bolts until you get to torque.
I'd just do it right and use grease. Bolts under tension like this really don't benefit from loctite.
If the bolts aren't tight (or somehow gets loose), the end cap or plate aren't going to stop the crank from jumping the splines. If you're lucky the splines retain enough metal to engage when tight.
One thing that can cause the bolts to loosen up is not tightening them per the manual - which is very clear that it needs to be more or less simultaneous - alternating between bolts until you get to torque.
I'd just do it right and use grease. Bolts under tension like this really don't benefit from loctite.
12-30-23, 06:54 AM
#25
Newbie
Join Date: Dec 2023
Posts: 1
Mentioned: 0 Post(s)
Tagged: 0 Thread(s)
Quoted: 1 Post(s)
Likes: 0
Liked 0 Times
in
0 Posts
Wondering if there are any drawbacks to using blue Loctite on Hollowtech crank arm bolts. Seeking insights and experiences from the forum community.