


DIY Trackie Stuff (Do It Yourself)
 04-26-17, 02:14 PM
#1


Elitist
Thread Starter

Join Date: Jul 2005
Location: Atlanta, GA
Posts: 15,965
Mentioned: 88 Post(s)
Tagged: 0 Thread(s)
Quoted: 1386 Post(s)
Liked 92 Times
in
77 Posts
DIY Trackie Stuff (Do It Yourself)
A lot of you folks are semi-pro tinkerers and good at making stuff and things that solve your track racing needs. Show us what you got.
 04-26-17, 02:18 PM
#2
Elitist
Thread Starter
Join Date: Jul 2005
Location: Atlanta, GA
Posts: 15,965
Mentioned: 88 Post(s)
Tagged: 0 Thread(s)
Quoted: 1386 Post(s)
Liked 92 Times
in
77 Posts
I ran across this video on the web today. It's home powder coating.
Being that many/most bike parts would fit inside of the toaster oven I wouldn't be surprised if someone tried this using bike parts.
Being that many/most bike parts would fit inside of the toaster oven I wouldn't be surprised if someone tried this using bike parts.
04-26-17, 03:44 PM
#3
Senior Member
Join Date: May 2015
Location: Delaware, USA
Posts: 607
Bikes: Serotta steel track bike, Specialized MTB
Mentioned: 2 Post(s)
Tagged: 0 Thread(s)
Quoted: 99 Post(s)
Likes: 0
Liked 4 Times
in
3 Posts
I have a resin 3d printer(Formlabs Form2), but Ibhave nothing to print for my track related stuff.....
If anyone have an idea, please tell me.
If anyone have an idea, please tell me.
04-26-17, 05:57 PM
#4
Lapped 3x
Made a bike storage "rack" for my basement years ago. Secured an 8ft long 2x6 to the wall. Added 4 pieces of 2ft long 2x4s with a gate hinge on each end. Secured hinge to 2x6. Free end got a vinyl coated storage hook. Bikes hang by the front wheel from the hook and can be folded against the wall to free up space.
 04-26-17, 06:59 PM
#7
Senior Member
Join Date: Nov 2013
Location: Marin County CA, USA
Posts: 68
Bikes: Venge, Koichi San II, Crux Sngl Spd, EVO, Stumpy
Mentioned: 0 Post(s)
Tagged: 0 Thread(s)
Quoted: 32 Post(s)
Likes: 0
Liked 0 Times
in
0 Posts
I have that powder coating tool. Only used it for doing some hovercraft parts. Used Infrared propane heads to do the baking though as the part was big.
I have a 3D printer (RapidLite 200) that I've printed things like a chain guide for my 'cross bike and a holder for my HTC RE. Thinking about CADing up something cool for holding cogs/rings since the nice totes aren't made anymore. A friend designed and printed a RD case that allows an XT clutch to mount to a ultegra Di2 mech (before XTR/XT Di2).
I have a 3D printer (RapidLite 200) that I've printed things like a chain guide for my 'cross bike and a holder for my HTC RE. Thinking about CADing up something cool for holding cogs/rings since the nice totes aren't made anymore. A friend designed and printed a RD case that allows an XT clutch to mount to a ultegra Di2 mech (before XTR/XT Di2).
04-27-17, 01:37 PM
#8
Elitist
Thread Starter
Join Date: Jul 2005
Location: Atlanta, GA
Posts: 15,965
Mentioned: 88 Post(s)
Tagged: 0 Thread(s)
Quoted: 1386 Post(s)
Liked 92 Times
in
77 Posts
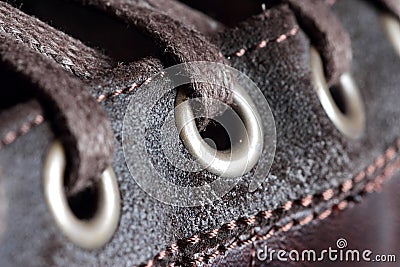
I converted some old velcro/ratchet shoes into lace-ups.
Tools:
- Leather hole punch
- Eyelets
- Eyelet press
- Shoe laces
The first three can be found at any craft or hobby shop for cheap. Shoe laces can be found at any sneaker store. The length you need is determined by the number of holes you punch. More holes = longer string. There is a chart somewhere that shows what you should buy.
Top:


Side:


Notes:
These shoes are old now. I bought them in summer of 2011 and did this conversion soon after purchase. They are size 46. So, if your feet are much smaller, then your eyelet count will likely be smaller.
You will notice where the metal bits used to be that held the bottom 2 straps. Just take some plyers and bend them and dislodge them.
I used to have proper eyelets (notice the rusty circle prints near the holes). A few came loose over time so I removed them all. I would advise using them because they keep the leather from splitting. My eyelets have not split since I removed the metal parts, but it's possible. I could have replaced the eyelets...but I'm lazy
Side:
Notes:
These shoes are old now. I bought them in summer of 2011 and did this conversion soon after purchase. They are size 46. So, if your feet are much smaller, then your eyelet count will likely be smaller.
You will notice where the metal bits used to be that held the bottom 2 straps. Just take some plyers and bend them and dislodge them.
I used to have proper eyelets (notice the rusty circle prints near the holes). A few came loose over time so I removed them all. I would advise using them because they keep the leather from splitting. My eyelets have not split since I removed the metal parts, but it's possible. I could have replaced the eyelets...but I'm lazy
04-27-17, 03:37 PM
#9
Senior Member
Join Date: Nov 2013
Location: Marin County CA, USA
Posts: 68
Bikes: Venge, Koichi San II, Crux Sngl Spd, EVO, Stumpy
Mentioned: 0 Post(s)
Tagged: 0 Thread(s)
Quoted: 32 Post(s)
Likes: 0
Liked 0 Times
in
0 Posts
Nice! I've been looking at the Spezd Sub 6 laceups - but I have wide feet. I might just try this on my Bontrager old MTB broken buckle shoes. So DIY eyelets just don't hold up?
04-27-17, 07:09 PM
#10
Elitist
Thread Starter
Join Date: Jul 2005
Location: Atlanta, GA
Posts: 15,965
Mentioned: 88 Post(s)
Tagged: 0 Thread(s)
Quoted: 1386 Post(s)
Liked 92 Times
in
77 Posts
I'm not really sure what the problem was with the eyelets. Maybe it was user error, cheap eyelets, or the manual press doesn't apply enough pressure.
04-27-17, 10:24 PM
#11
Lapped 3x
Most of the cheap eyelets you'll find are made of mild steel and will rust out from sweaty feet. What you want are aluminum, or better yet, brass eyelets. These will hold out longer.
05-11-17, 10:30 PM
#12
Senior Member
Join Date: Nov 2013
Location: Marin County CA, USA
Posts: 68
Bikes: Venge, Koichi San II, Crux Sngl Spd, EVO, Stumpy
Mentioned: 0 Post(s)
Tagged: 0 Thread(s)
Quoted: 32 Post(s)
Likes: 0
Liked 0 Times
in
0 Posts
Next up was a "Tomity" chain-whip. I had some left-over 30x3mm stainless flat bar and used a K710 chain. Seems to work very nicely even if it's not pretty. I might get to polishing the welds. Might.
Pictured is a 17T cog - about the max it would work on.
Pictured is a 17T cog - about the max it would work on.
05-12-17, 09:12 PM
#13
Lapped 3x

Maybe look into ReGrip for the handle?
https://re-grip.com/products/#re-grip
05-12-17, 09:22 PM
#14
Senior Member
Join Date: Nov 2013
Location: Marin County CA, USA
Posts: 68
Bikes: Venge, Koichi San II, Crux Sngl Spd, EVO, Stumpy
Mentioned: 0 Post(s)
Tagged: 0 Thread(s)
Quoted: 32 Post(s)
Likes: 0
Liked 0 Times
in
0 Posts
I am actually going to make a nicer one next. I will make the head a fork with two prongs so I don't have to grind the cutout.
05-12-17, 10:09 PM
#15
Lapped 3x
They work really well. It's pretty thick, so I'm not sure how well it will "shrink" to something as skinny as your flat stock. I've re-gripped handles on 10# sledge hammer that I've cut the handle down to 12" long. Super durable. I've had one going for three years of at least weekly use on the job with me.
If you use the Plasti-Dip, maybe grind a few notches or drill a few holes into the handle so it doesn't slide off so easily.
If you use the Plasti-Dip, maybe grind a few notches or drill a few holes into the handle so it doesn't slide off so easily.
05-13-17, 03:32 PM
#16
Senior Member
Someday I will make my own tote bag. It seems like an easy item to make (I used to engineer textile devices for aerospace applications).
Currently I'm looking for a small amount of carbon/graphite fiber cloth (around 5 x 12 inches and epoxy for a repair. Anybody have a low cost source for that?
Currently I'm looking for a small amount of carbon/graphite fiber cloth (around 5 x 12 inches and epoxy for a repair. Anybody have a low cost source for that?
05-13-17, 07:15 PM
#17
Lapped 3x
Have you checked hobby stores? The kinds where you go to get remote control cars and model airplanes and trains? We've got one here in Edmonton that keeps a few rolls of different grade composites on hand. Boat/canoe/kayak builders will also sell stuff off the roll to you for pretty much their bulk cost/ft.
07-19-17, 02:36 PM
#19
Elitist
Thread Starter
Join Date: Jul 2005
Location: Atlanta, GA
Posts: 15,965
Mentioned: 88 Post(s)
Tagged: 0 Thread(s)
Quoted: 1386 Post(s)
Liked 92 Times
in
77 Posts
- Those that hold the bike & rider. Strong enough for the rider to push off of. No electronics.
- Those that hold the bike & rider, lock the wheel, and release based on a timer (like we'd see in international competition)
I think the first was a DIY thing.
This would be a great winter project.
07-19-17, 03:20 PM
#20
Senior Member
Join Date: Nov 2013
Location: Marin County CA, USA
Posts: 68
Bikes: Venge, Koichi San II, Crux Sngl Spd, EVO, Stumpy
Mentioned: 0 Post(s)
Tagged: 0 Thread(s)
Quoted: 32 Post(s)
Likes: 0
Liked 0 Times
in
0 Posts
I'd be curious to know how it holds the bike (and the rider?). I've never seen one in person but since I've got a metal shop this definitely would be a fun project.
07-19-17, 08:01 PM
#21
Elitist
Thread Starter
Join Date: Jul 2005
Location: Atlanta, GA
Posts: 15,965
Mentioned: 88 Post(s)
Tagged: 0 Thread(s)
Quoted: 1386 Post(s)
Liked 92 Times
in
77 Posts
https://www.sportaserviss.lv/files/va....600.02-S6.pdf
https://www.swisstiming.com/fileadmin...te_1015_EN.pdf
07-19-17, 08:04 PM
#22
Elitist
Thread Starter
Join Date: Jul 2005
Location: Atlanta, GA
Posts: 15,965
Mentioned: 88 Post(s)
Tagged: 0 Thread(s)
Quoted: 1386 Post(s)
Liked 92 Times
in
77 Posts
Here is an example of a non-electronic one with, what seems like, a brake lever that holds the wheel in place with normal brake calipers and is held/released manually.
From this thread: https://www.bikeforums.net/newreply.p...ply&p=17623784
At our club we have one identical to this; actually think it was built by the same person.
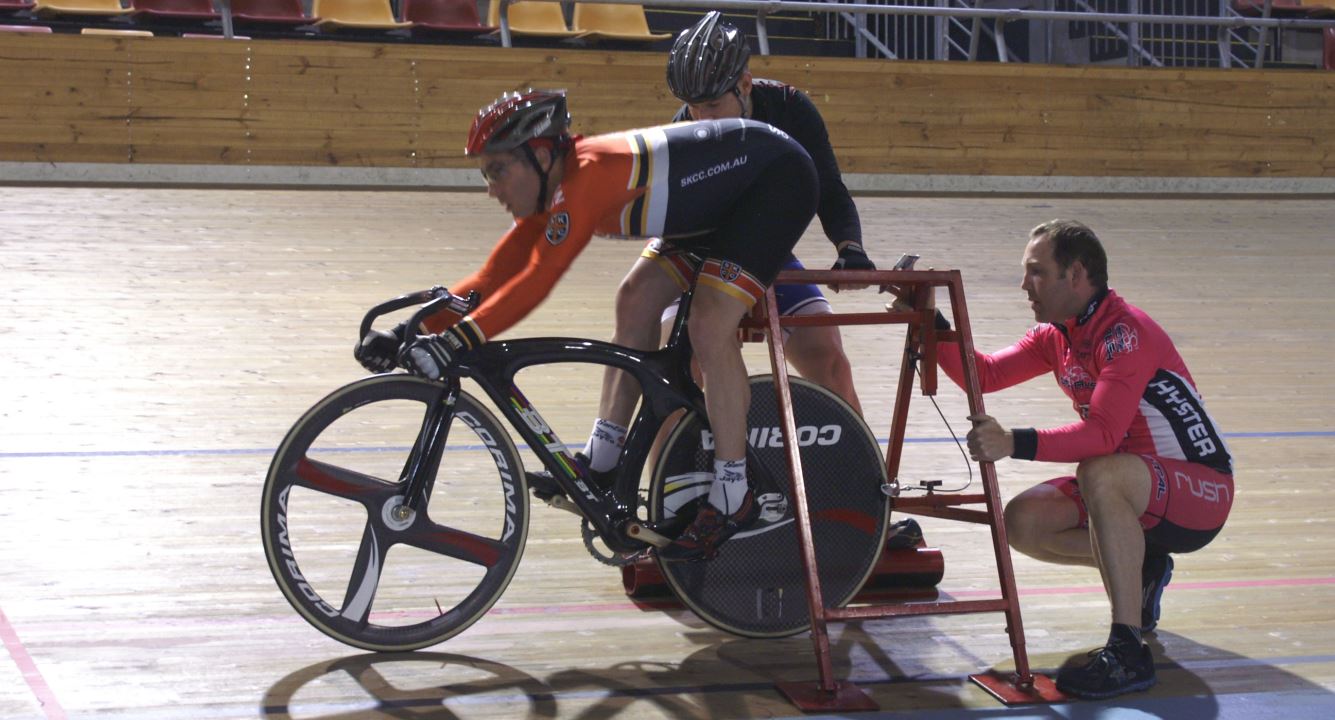
If it helps, I can try and remember to take some photos this Saturday?
As nice as it may be to have a starting gate, I don't think I've seen ours wheeled down onto the track in all the years I've been racing...")
If it helps, I can try and remember to take some photos this Saturday?
As nice as it may be to have a starting gate, I don't think I've seen ours wheeled down onto the track in all the years I've been racing...
07-19-17, 08:11 PM
#23
Elitist
Thread Starter
Join Date: Jul 2005
Location: Atlanta, GA
Posts: 15,965
Mentioned: 88 Post(s)
Tagged: 0 Thread(s)
Quoted: 1386 Post(s)
Liked 92 Times
in
77 Posts
Here's an electronic one who's release mechanism is connected to the central timing system (clock, timing strips, and horn):


Fun fact: The timing can be off with such systems and the release mechanism may be milliseconds late in releasing. So, the countdown clock may read "0" and the go tone will have sounded, and the rider is launching out with a powerful full-gas start, but the machine is still holding the rear wheel.
Paralympians get angry too! Cyclist Jody Cundy has a tantrum worthy of a gold medal after disqualification | Daily Mail Online
The purpose of holding the wheel is to prevent early starts.
07-19-17, 11:46 PM
#24
Senior Member
Fun fact: The timing can be off with such systems and the release mechanism may be milliseconds late in releasing. So, the countdown clock may read "0" and the go tone will have sounded, and the rider is launching out with a powerful full-gas start, but the machine is still holding the rear wheel.
The purpose of holding the wheel is to prevent early starts.
The purpose of holding the wheel is to prevent early starts.