


[Alfine 11 SG-S700] Tools to service?
 03-07-19, 05:09 AM
#1
Senior Member
Thread Starter
Join Date: Aug 2011
Location: Paris, France
Posts: 2,497
Mentioned: 9 Post(s)
Tagged: 0 Thread(s)
Quoted: 573 Post(s)
Liked 118 Times
in
99 Posts
[Alfine 11 SG-S700] Tools to service?
Hello,
After four years of silent use, the Alfine 11 (the original: SG-S700) has been making creaking noises when pedaling.
Since the ball bearing cage of the drive-side ball bearing (part 18) is broken, I suppose the other two ball bearings (13 and 36) might also be worn out by now.
So I need to extract the Alfine core assembly from its hub.
This video
from Dan Burkhart shows how to use the TL-S701 "Cone Removal Tool", but how should I use the two other (TL-S702 Cone Removal Tool and the TL-S704 Mounting Tool) ?
Thank you.
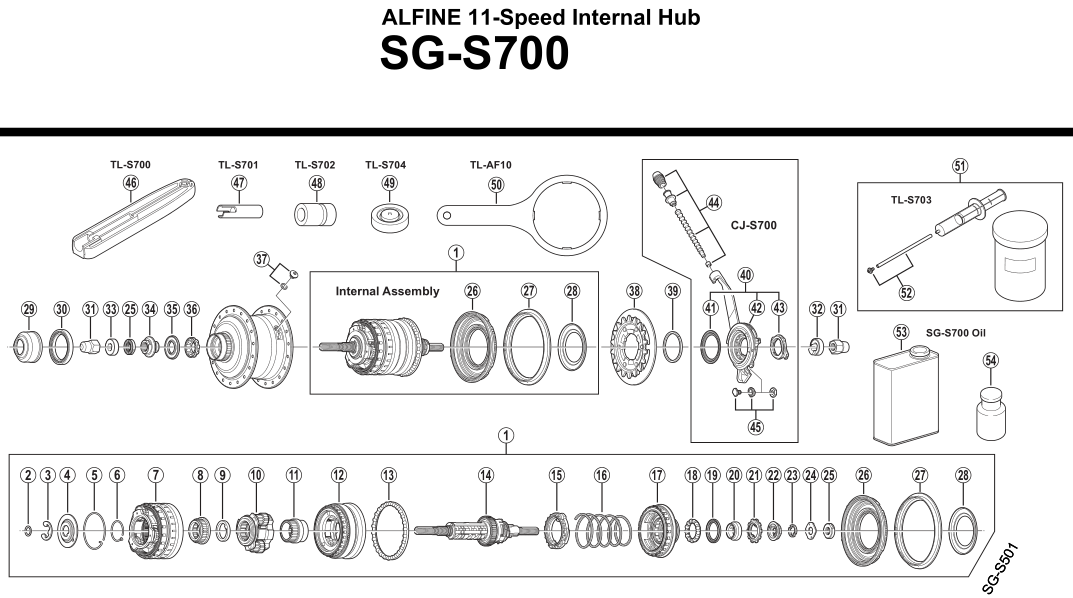
Picture source : EV-SG-S700-3092A.pdf
After four years of silent use, the Alfine 11 (the original: SG-S700) has been making creaking noises when pedaling.
Since the ball bearing cage of the drive-side ball bearing (part 18) is broken, I suppose the other two ball bearings (13 and 36) might also be worn out by now.
So I need to extract the Alfine core assembly from its hub.
This video
Thank you.
Picture source : EV-SG-S700-3092A.pdf
 03-07-19, 06:53 AM
#2

Senior member

Join Date: Oct 2004
Location: Oakville Ontario
Posts: 8,117
Mentioned: 25 Post(s)
Tagged: 0 Thread(s)
Quoted: 943 Post(s)
Liked 658 Times
in
371 Posts
The TLS 701 is the removal tool. The TLS 702 is for setting the drive side cone.
TLS 704 is for setting the seals. This hub is oil bath lubricated and requires special seals that the 8 speed does not need.
TLS 704 is for setting the seals. This hub is oil bath lubricated and requires special seals that the 8 speed does not need.
03-07-19, 09:18 AM
#4
Senior Member
There is a dealer service manual out there about breaking the A11 down to the axle assembly. If you can't find it, I'll be able to upload it tonight.
It assumes basic mechanical competence, but almost nothing else. The directions are very easy to follow.
It assumes basic mechanical competence, but almost nothing else. The directions are very easy to follow.
03-07-19, 08:35 PM
#6
Senior Member
Attached is the dealer manual for the A11. Unlike the 8 speed hubs, the planetaries do not need clocking during a break-down, since they aren't taken apart.
It is rather easy to follow, again, assuming basic mechanical competence.
It is rather easy to follow, again, assuming basic mechanical competence.
03-07-19, 09:11 PM
#7
Senior member
Join Date: Oct 2004
Location: Oakville Ontario
Posts: 8,117
Mentioned: 25 Post(s)
Tagged: 0 Thread(s)
Quoted: 943 Post(s)
Liked 658 Times
in
371 Posts
The eight speed planetaries don't require clocking, or phasing, or timing, or whatever term you wish to use, if the carrier assembly is removed from the axle. That is only required if the carrier assembly is further disassembled which is seldom if ever necessary.
03-08-19, 05:49 AM
#8
Senior Member
Thread Starter
Join Date: Aug 2011
Location: Paris, France
Posts: 2,497
Mentioned: 9 Post(s)
Tagged: 0 Thread(s)
Quoted: 573 Post(s)
Liked 118 Times
in
99 Posts
Thanks a lot for the Overhaul manual !
Pardon my ignorance, but what do you mean with "The eight speed planetaries don't require clocking, or phasing, or timing, or whatever term you wish to use, if the carrier assembly is removed from the axle." ?
Pardon my ignorance, but what do you mean with "The eight speed planetaries don't require clocking, or phasing, or timing, or whatever term you wish to use, if the carrier assembly is removed from the axle." ?
03-08-19, 06:15 AM
#9
Senior member
Join Date: Oct 2004
Location: Oakville Ontario
Posts: 8,117
Mentioned: 25 Post(s)
Tagged: 0 Thread(s)
Quoted: 943 Post(s)
Liked 658 Times
in
371 Posts
On hubs that do not have a removable gear carrier sub assembly, such as a Sachs 7 speed as shown in this video, phasing the planetaries is a critical step in re assembly.
03-08-19, 12:46 PM
#10
Senior Member
Thread Starter
Join Date: Aug 2011
Location: Paris, France
Posts: 2,497
Mentioned: 9 Post(s)
Tagged: 0 Thread(s)
Quoted: 573 Post(s)
Liked 118 Times
in
99 Posts
How IGH's actually work is still beyond my comprehension, but thanks much for the infos :-)
https://www.youtube.com/watch?v=0p_1QSUsbsM
https://www.youtube.com/watch?v=0p_1QSUsbsM
")
 03-20-19, 10:43 AM
#12
Senior Member
Thread Starter
Join Date: Aug 2011
Location: Paris, France
Posts: 2,497
Mentioned: 9 Post(s)
Tagged: 0 Thread(s)
Quoted: 573 Post(s)
Liked 118 Times
in
99 Posts
The bad news: The RHS cone woudn't come out, even after following Shimano's instructions, and
Dan Burkhart's video :
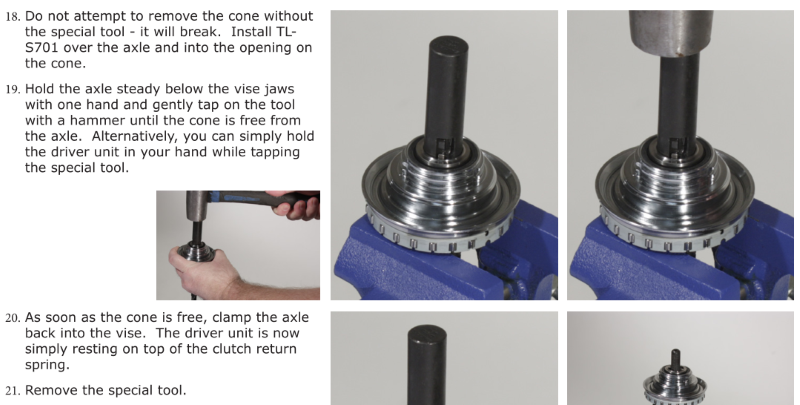

Any idea what it could be?
The good news: Even though 1) the bearing balls are still loose on the RHS since I couldn't replace that part after pyring out its broken race, and 2) the other two bearing races looked in good shape so I left them… for some reason, the creaking noise is gone. Maybe some tiny bits of shrapnel from the RHS bearing cage remained in the assembly, and were removed during this operation.
Thank you.
Dan Burkhart's video :
Any idea what it could be?
The good news: Even though 1) the bearing balls are still loose on the RHS since I couldn't replace that part after pyring out its broken race, and 2) the other two bearing races looked in good shape so I left them… for some reason, the creaking noise is gone. Maybe some tiny bits of shrapnel from the RHS bearing cage remained in the assembly, and were removed during this operation.
Thank you.
03-20-19, 11:00 AM
#13
Senior Member
I can tell you that the first time it needs to come apart, it requires a scary amount of force to drive the assembly through.
If it is damaged beyond repair, PM me. I have a damaged hub with good carriers and new axle assembly that I would part with for a reasonable price.
If it is damaged beyond repair, PM me. I have a damaged hub with good carriers and new axle assembly that I would part with for a reasonable price.
03-20-19, 12:08 PM
#14
Senior Member
Thread Starter
Join Date: Aug 2011
Location: Paris, France
Posts: 2,497
Mentioned: 9 Post(s)
Tagged: 0 Thread(s)
Quoted: 573 Post(s)
Liked 118 Times
in
99 Posts
Thanks. Since Shimano said "gently", I didn't dare hitting it harder, but I'll give it another try.
After almost five years of daily use, the hub works fine otherwise. It looks like I only need to change the RHS ball bearing.
As for the four tools: In Europe, they're available for ~60€ from Bike-Discount in Germany.
After almost five years of daily use, the hub works fine otherwise. It looks like I only need to change the RHS ball bearing.
As for the four tools: In Europe, they're available for ~60€ from Bike-Discount in Germany.
12-06-19, 05:46 AM
#15
Senior Member
Thread Starter
Join Date: Aug 2011
Location: Paris, France
Posts: 2,497
Mentioned: 9 Post(s)
Tagged: 0 Thread(s)
Quoted: 573 Post(s)
Liked 118 Times
in
99 Posts
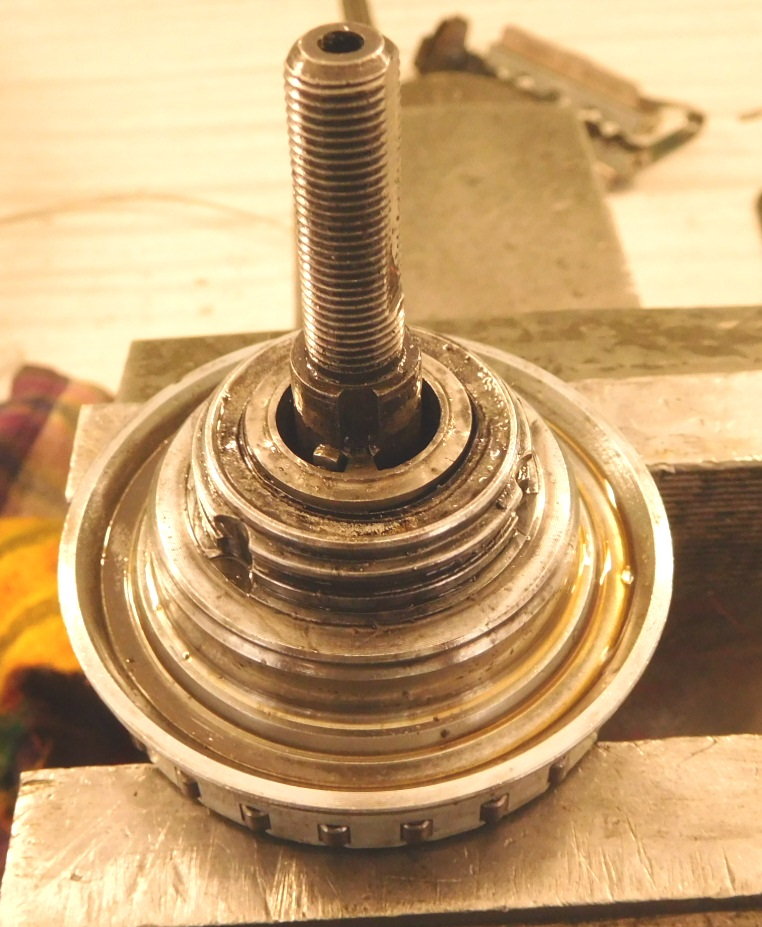
Turns out you do have to hit the right hand cone a bit harder with the TL-S701. I could successfully replace the RHS "Ball Retainer P (3/16" x 13) " (part 18).
Likewise, when putting the cone back using the TL-S702, you must hit it hard enough for the two tabs to show through:

At this point, I have two problems:
Thank you.
https://vimeo.com/377621740
Likewise, when putting the cone back using the TL-S702, you must hit it hard enough for the two tabs to show through:
At this point, I have two problems:
- The wheel has been suffering from sideway play for a few months now. Does the hub look normal to you, especially the "Ball Retainer S (3/16" x 26)" (part 13 in the diagram)?
- Also, after putting everything back together, the cassette joint "dialer" isn't going as far as it used to (about 1/4 of a turn), resulting in a loose shifter cable: I must shift up two or three times before the cable tightens. I did check with the Shimano tool, and the anchor bolt is still at the required 184mm so the issue appears to be in the Alfine somehow.
Thank you.
https://vimeo.com/377621740
12-08-19, 11:20 AM
#16
Senior Member
Thread Starter
Join Date: Aug 2011
Location: Paris, France
Posts: 2,497
Mentioned: 9 Post(s)
Tagged: 0 Thread(s)
Quoted: 573 Post(s)
Liked 118 Times
in
99 Posts
Thanks partly to Dan Burkhart, I'm back in the saddle again.
It appears I didn't hit the drive side cone hard enough with the TL-S702 for the two tabs to show through, which prevented the driver plate from sitting just right. That, in turn, kept the cassette joint from rotating all the way to the left like it should, which made for a loose shifter cable. Not sure there's a way to check for this before putting everything back together, though, so the lesson: Hit it hard, baby.
A small lateral play remains in the wheel which I can't explain since both cones are tight. I'll just live with it.

