


Is the bike junk or no?
 03-30-18, 01:56 PM
#1
Senior Member
Thread Starter
Is the bike junk or no?
I have this World Sport (no laughter please...I like em!) a while back and in getting it ready for the road I noticed that the hole in the break bridge for the caliper is ovalized just enough do that the caliper moves up & down/back & forth (take your pick) during braking, thus no rear brakes to speak of.
It is one of the full cro-moly frames and I like the color, but it's not worth the expense of having a pro install a new brake bridge.
Any suggestions for a fix, or as the title indicates, is it junk?
It is one of the full cro-moly frames and I like the color, but it's not worth the expense of having a pro install a new brake bridge.
Any suggestions for a fix, or as the title indicates, is it junk?
 03-30-18, 02:22 PM
#4
Senior Member
Thread Starter
I tightened it the point I felt I was getting close to torque limit....worked ok on the stand but when riding it moves.
03-30-18, 02:27 PM
#5
Senior Member
Join Date: Apr 2006
Posts: 3,653
Mentioned: 13 Post(s)
Tagged: 0 Thread(s)
Quoted: 380 Post(s)
Likes: 0
Liked 106 Times
in
80 Posts
You take the up and down looseness out by using the 2 nuts on the front of the brake. Loosen then from each other. Tighten the inside one on the brake to take out the slop and wiggles but let it still move freely. Tighten the outside nut so the adjustment doesn't move. Ride the bike. Roger
03-30-18, 02:31 PM
#6
Banned
if you are willing to fabricate DIY, get some steel tubing with a 6mm ID, and fit it through a slightly enlarged hole
you make through the seat stay brace..
Added tube will resist compression because you are squeezing its ends.. not just across the hollow tube..
Physics of braking makes rear brakes not needing super strength because your weight is more on the front ..
https://en.wikipedia.org/wiki/Newton%27s_laws_of_motion
..
03-30-18, 02:42 PM
#7
Senior Member
Join Date: Feb 2011
Posts: 182
Bikes: 86 Nishiki Olympic Sport, 87 KHS Montana Team, 06 Dahon Mariner
Mentioned: 0 Post(s)
Tagged: 0 Thread(s)
Quoted: 17 Post(s)
Likes: 0
Liked 5 Times
in
2 Posts
Yours is a 1987 or 1988 World Sport, and they are great cruising bikes. They were also index-ready. If you haven't already, replace the friction stem shifters with 6-speed Shimano indexed shifters, and the freewheel and Light Action derailleur are compatible and ready to click! These ones are perfect. Previous advice about fixing the brakes are spot-on.
03-30-18, 03:11 PM
#8
Senior Member

Join Date: Nov 2014
Location: Eugene, Oregon, USA
Posts: 27,547
Mentioned: 217 Post(s)
Tagged: 0 Thread(s)
Quoted: 18349 Post(s)
Liked 4,501 Times
in
3,346 Posts
If you have someone that can do a little brazing, then you could braze on some saddle washers, similar to this.
https://www.pegasusautoracing.com/pr...uct=3077%2D002
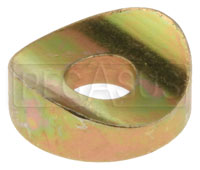
If one had the parts that fit well, then it would be an easy brazing and reaming job.
You could, of course, also ream the back side for a recessed nut too.
https://www.pegasusautoracing.com/pr...uct=3077%2D002
If one had the parts that fit well, then it would be an easy brazing and reaming job.
You could, of course, also ream the back side for a recessed nut too.
03-30-18, 04:53 PM
#9


Senior Member
Join Date: Sep 2014
Posts: 3,893
Mentioned: 20 Post(s)
Tagged: 0 Thread(s)
Quoted: 1062 Post(s)
Liked 665 Times
in
421 Posts
From the pic on the right, it almost looks like the piece that the spring fits into, is cracked.
I have two Schwinn frames of similar vintage, and I love them. They are a great raw material for building up nice classic bikes. One of mine had those old Dia-Compe brakes, and the best thing I ever did for a bike was to replace those with modern Tektro dual pivot brakes. The old brakes were just so mushy. I don't know if was from years of use, or if they were crap brakes all along.
Tektro still makes ones with the non-recessed nuts. You have to research the part numbers a bit to make sure you get the correct reach for your bike.
One thing to do is to tighten the nut with one hand while you force it upward with the other, so it has no further to go when braking force is applied.
03-30-18, 05:23 PM
#10
Mechanic/Tourist
Unless it's really bad I don't see what would cause it to move much, as you only apply the brakes when moving forward. Just pivot it down and tighten well. However, if you do need to fix it here's an idea:
See if you can get a sleeve the right ID to just fit over the center bolt where it goes through the bridge. Cut to length just longer than the brake bridge. Drill out the bridge and fit washers to the same OD as the sleeve, then assemble.
See if you can get a sleeve the right ID to just fit over the center bolt where it goes through the bridge. Cut to length just longer than the brake bridge. Drill out the bridge and fit washers to the same OD as the sleeve, then assemble.
Last edited by cny-bikeman; 03-31-18 at 04:03 PM.
03-31-18, 05:39 AM
#12
Senior Member
Thread Starter
Yours is a 1987 or 1988 World Sport, and they are great cruising bikes. They were also index-ready. If you haven't already, replace the friction stem shifters with 6-speed Shimano indexed shifters, and the freewheel and Light Action derailleur are compatible and ready to click! These ones are perfect. Previous advice about fixing the brakes are spot-on.
If you have someone that can do a little brazing, then you could braze on some saddle washers, similar to this.
https://www.pegasusautoracing.com/pr...uct=3077%2D002
If one had the parts that fit well, then it would be an easy brazing and reaming job.
You could, of course, also ream the back side for a recessed nut too.
https://www.pegasusautoracing.com/pr...uct=3077%2D002
If one had the parts that fit well, then it would be an easy brazing and reaming job.
You could, of course, also ream the back side for a recessed nut too.
From the pic on the right, it almost looks like the piece that the spring fits into, is cracked.
I have two Schwinn frames of similar vintage, and I love them. They are a great raw material for building up nice classic bikes. One of mine had those old Dia-Compe brakes, and the best thing I ever did for a bike was to replace those with modern Tektro dual pivot brakes. The old brakes were just so mushy. I don't know if was from years of use, or if they were crap brakes all along.
Tektro still makes ones with the non-recessed nuts. You have to research the part numbers a bit to make sure you get the correct reach for your bike.
One thing to do is to tighten the nut with one hand while you force it upward with the other, so it has no further to go when braking force is applied.
I have two Schwinn frames of similar vintage, and I love them. They are a great raw material for building up nice classic bikes. One of mine had those old Dia-Compe brakes, and the best thing I ever did for a bike was to replace those with modern Tektro dual pivot brakes. The old brakes were just so mushy. I don't know if was from years of use, or if they were crap brakes all along.
Tektro still makes ones with the non-recessed nuts. You have to research the part numbers a bit to make sure you get the correct reach for your bike.
One thing to do is to tighten the nut with one hand while you force it upward with the other, so it has no further to go when braking force is applied.
Unless it's really bad I don't see what would cause it to move much, as you only apply the brakes when moving forward. However, if you do need to fix it here's an idea:
See if you can get a sleeve the right ID to just fit over the center bolt where it goes through the bridge. Cut to length just longer than the brake bridge. Drill out the bridge and fit washers to the same OD as the sleeve, then assemble.
See if you can get a sleeve the right ID to just fit over the center bolt where it goes through the bridge. Cut to length just longer than the brake bridge. Drill out the bridge and fit washers to the same OD as the sleeve, then assemble.
First, thanks for all the info.
I have spinal stenosis and the first thing I did to the bike was install a riser bar, new brake levers, and a Shimano trigger shifter and compatible drs. Works well for me as to pain, but upright is a terrible way to ride, especially on windy days.
I did check the caliper and it looks like it may be cracked in the photo, but upon close inspection last night it isn't.
Easiest suggested fix is to hold caliper in down position and tighten..makes sense and I will try this first.
Brazing the saddle washers in place also seems like an easy fix and I know someone who may be able to do this. I'm guessing that the caliper should be in place in the correct position while brazing**********
Using a shim sounds like a good idea, could you suggest where I would get something in the size needed?
Again, thanks for all the replies. Maybe I can save this one.
03-31-18, 05:43 AM
#13
Senior Member
Thread Starter
if you are willing to fabricate DIY, get some steel tubing with a 6mm ID, and fit it through a slightly enlarged hole
you make through the seat stay brace..
Added tube will resist compression because you are squeezing its ends.. not just across the hollow tube..
Physics of braking makes rear brakes not needing super strength because your weight is more on the front ..
https://en.wikipedia.org/wiki/Newton%27s_laws_of_motion
..
you make through the seat stay brace..
Added tube will resist compression because you are squeezing its ends.. not just across the hollow tube..
Physics of braking makes rear brakes not needing super strength because your weight is more on the front ..
https://en.wikipedia.org/wiki/Newton%27s_laws_of_motion
..
03-31-18, 09:18 AM
#14
Banned
1) fill the drilled hole the bolt will fit through, (| |) with a liner tube of steel, glue in with epoxy, no burned paint..
2) 'a body in motion tends to stay in motion until affected by an opposing force'
2) 'a body in motion tends to stay in motion until affected by an opposing force'
03-31-18, 09:50 AM
#15
Senior Member
Join Date: Sep 2014
Posts: 3,893
Mentioned: 20 Post(s)
Tagged: 0 Thread(s)
Quoted: 1062 Post(s)
Liked 665 Times
in
421 Posts
First, thanks for all the info.
I have spinal stenosis and the first thing I did to the bike was install a riser bar, new brake levers, and a Shimano trigger shifter and compatible drs. Works well for me as to pain, but upright is a terrible way to ride, especially on windy days.
I have spinal stenosis and the first thing I did to the bike was install a riser bar, new brake levers, and a Shimano trigger shifter and compatible drs. Works well for me as to pain, but upright is a terrible way to ride, especially on windy days.
Brazing the saddle washers in place also seems like an easy fix and I know someone who may be able to do this. I'm guessing that the caliper should be in place in the correct position while brazing**********
Using a shim sounds like a good idea, could you suggest where I would get something in the size needed?
Using a shim sounds like a good idea, could you suggest where I would get something in the size needed?
But I like the idea of a liner tube and epoxy. You can always bore out the tube to a larger diameter if needed. My favorite heavy duty epoxy is JB-Weld, which you can get at the hardware store. The surfaces have to be clean and free of oil. It takes at least overnight to cure, so be patient.
Last edited by Gresp15C; 03-31-18 at 10:05 AM.
03-31-18, 10:15 AM
#16
Banned
Another old thing; an L shaped piece bolted under the brake shoes .. got adjusted so as to hit the frame, when the rear brake flexed a little,
when putting on their rear brake..
when putting on their rear brake..
03-31-18, 11:06 AM
#17
Senior Member
Join Date: Nov 2014
Location: Eugene, Oregon, USA
Posts: 27,547
Mentioned: 217 Post(s)
Tagged: 0 Thread(s)
Quoted: 18349 Post(s)
Liked 4,501 Times
in
3,346 Posts
Ideally one could just use a bolt to hold the washers in place while brazing. The existing holes would help align it. However, I'm not sure how to prevent the brass from sticking to one's bolt. Perhaps one could tack it, then clamp and finish brazing.
It might take a little more research if going with that method.
 03-31-18, 11:21 AM
#18
Let your bike be the tool

Join Date: Jun 2006
Location: NC/SC border
Posts: 938
Bikes: '66 Raleigh Carlton, '70 Ron Cooper, '95 Bianchi CD'I, Zonal Frame with Xenon gruppo, Carbon Frame with Record Gruppo, Columbia Twosome, Terry Classic, Bianchi SX, Gravity SS/FG
Mentioned: 2 Post(s)
Tagged: 0 Thread(s)
Quoted: 336 Post(s)
Liked 313 Times
in
193 Posts
Perhaps I am being silly, but it seems that if the OP rotates the brake as fully down as it will go before tightening the nut and sets the brake shoes with the proper bevel the braking should be fine. One does not, after all, need to brake in reverse, so the rim's pull on the brake should be unidirectional.
__________________
Never try to teach a pig to sing...
Never try to teach a pig to sing...
03-31-18, 11:35 AM
#19
Banned
If brazing, and burning paint, to get bare steel the face pieces can be steel flat washers..
the brass filler melt will go between the round tube and the flat washers..
by the way brass has a harder time bonding with stainless steel , ..
...
the brass filler melt will go between the round tube and the flat washers..
by the way brass has a harder time bonding with stainless steel , ..
...
Last edited by fietsbob; 03-31-18 at 11:38 AM.
03-31-18, 02:54 PM
#20
S'toon trail rider!
Join Date: Jul 2009
Location: Saskatoon, SK
Posts: 451
Bikes: 2011 Norco Mountaineer(XC/Trails), 2011 Jamis Commuter1(commuter)
Mentioned: 0 Post(s)
Tagged: 0 Thread(s)
Quoted: 12 Post(s)
Likes: 0
Liked 0 Times
in
0 Posts
Any chance you could drill the holes a slight bit bigger and source out a new bolt for it?
03-31-18, 03:19 PM
#21
Senior Member
Join Date: Apr 2011
Posts: 6,950
Mentioned: 41 Post(s)
Tagged: 0 Thread(s)
Quoted: 4337 Post(s)
Liked 1,521 Times
in
992 Posts
It sounds like the OP needs to just tighten the mounting bolt on his caliper properly, rather than drill, epoxy, sleeve, braze or anything else. Like wheels, the brakes are not held in place by the size of the hole but by the clamping force of the hardware. An oversized frame hole is no different than a horizontal dropout.
03-31-18, 04:02 PM
#22
Mechanic/Tourist
04-01-18, 05:34 AM
#23
Let your bike be the tool
Join Date: Jun 2006
Location: NC/SC border
Posts: 938
Bikes: '66 Raleigh Carlton, '70 Ron Cooper, '95 Bianchi CD'I, Zonal Frame with Xenon gruppo, Carbon Frame with Record Gruppo, Columbia Twosome, Terry Classic, Bianchi SX, Gravity SS/FG
Mentioned: 2 Post(s)
Tagged: 0 Thread(s)
Quoted: 336 Post(s)
Liked 313 Times
in
193 Posts
04-01-18, 07:47 AM
#24
Senior Member
Join Date: Nov 2014
Location: Saratoga calif.
Posts: 1,049
Bikes: Miyata 610(66cm), GT Vantara Hybrid (64cm), Nishiki International (64cm), Peugeot rat rod (62 cm), Trek 800 Burning Man helicopter bike, Bob Jackson frame (to be restored?) plus a never ending stream of neglected waifs from the Bike exchange.
Mentioned: 28 Post(s)
Tagged: 0 Thread(s)
Quoted: 339 Post(s)
Likes: 0
Liked 631 Times
in
229 Posts
If you haven't yet , check out:
https://www.parktool.com/blog/repair...icle-section-7
the tool, Park OBW-4 , is the one for the job. It's worth picking up.
The whole article is required reading.
If your braking is sub par a set of Kool stop Salmon pads will help.
https://www.parktool.com/blog/repair...icle-section-7
the tool, Park OBW-4 , is the one for the job. It's worth picking up.
The whole article is required reading.
If your braking is sub par a set of Kool stop Salmon pads will help.
04-01-18, 10:23 AM
#25
Senior Member
Join Date: Apr 2011
Posts: 6,950
Mentioned: 41 Post(s)
Tagged: 0 Thread(s)
Quoted: 4337 Post(s)
Liked 1,521 Times
in
992 Posts
If you haven't yet , check out:
https://www.parktool.com/blog/repair...icle-section-7
the tool, Park OBW-4 , is the one for the job. It's worth picking up.
The whole article is required reading.
If your braking is sub par a set of Kool stop Salmon pads will help.
https://www.parktool.com/blog/repair...icle-section-7
the tool, Park OBW-4 , is the one for the job. It's worth picking up.
The whole article is required reading.
If your braking is sub par a set of Kool stop Salmon pads will help.

