


Bent chain segment during installation
 03-03-20, 05:53 AM
#1
Junior Member
Thread Starter
Join Date: Mar 2020
Posts: 16
Mentioned: 1 Post(s)
Tagged: 0 Thread(s)
Quoted: 9 Post(s)
Likes: 0
Liked 1 Time
in
1 Post
Bent chain segment during installation
Hi All, I am new to bike maintenance. When I tried replacing my bike chain at home, the connection rivet was very tight and I wasn't able to loosen it without using a screw driver and force it between the two metal plates. Now the connection rivet is loosened, but I noticed the upper plate is slightly bent, Oh!
My question: is this chain done? Or I am fine riding it with limited time? Or the segment would be durable and I am completely fine?
My question: is this chain done? Or I am fine riding it with limited time? Or the segment would be durable and I am completely fine?
 03-03-20, 06:13 AM
#2
Senior Member
Join Date: Mar 2008
Posts: 8,688
Mentioned: 46 Post(s)
Tagged: 0 Thread(s)
Quoted: 1074 Post(s)
Liked 295 Times
in
222 Posts
If you were able to press the rivet in, I assume you have a chain tool.
All chain(breaker) tools I�ve seen in recent history have had a feature to create slack in a link too.
Apart from that, there�s no way to tell. Your joint might be good enough to last the natural life of the chain. Or it might fail two blocks from home.
All chain(breaker) tools I�ve seen in recent history have had a feature to create slack in a link too.
Apart from that, there�s no way to tell. Your joint might be good enough to last the natural life of the chain. Or it might fail two blocks from home.
03-03-20, 07:28 AM
#3
Senior Member
Join Date: Jan 2015
Posts: 443
Mentioned: 2 Post(s)
Tagged: 0 Thread(s)
Quoted: 131 Post(s)
Likes: 0
Liked 21 Times
in
17 Posts
What chain ? did it come with a quick link ?
Do you have a chain pin removal tool ?
If a link is bent it would not be safe to use.
But if you have a chain pin removal tool, you can remove the link completely and then re-connect on the adjacent links with a quick link. I dont recommend connecting a chain together by a pin because there is little room for error. a quick link is far easier. Especially for a beginner. Just buy a quick link, and the open/close pliers for the quick link, and a chain pin removal tool.
Also you need to be aware of the chain length to match the old chain, and not to shorten it too much.
Last edited by trailflow1; 03-03-20 at 07:36 AM.
Likes For trailflow1:
03-03-20, 08:20 AM
#4
Senior Member
Join Date: Jun 2014
Location: Ontario, Canada
Posts: 4,624
Bikes: iele Latina, Miele Suprema, Miele Uno LS, Miele Miele Beta, MMTB, Bianchi Model Unknown, Fiori Venezia, Fiori Napoli, VeloSport Adamas AX
Mentioned: 16 Post(s)
Tagged: 0 Thread(s)
Quoted: 1324 Post(s)
Liked 927 Times
in
640 Posts
Hi All, I am new to bike maintenance. When I tried replacing my bike chain at home, the connection rivet was very tight and I wasn't able to loosen it without using a screw driver and force it between the two metal plates. Now the connection rivet is loosened, but I noticed the upper plate is slightly bent, Oh!
My question: is this chain done? Or I am fine riding it with limited time? Or the segment would be durable and I am completely fine?
My question: is this chain done? Or I am fine riding it with limited time? Or the segment would be durable and I am completely fine?
How many speeds is the chain for? If greater than 7 then a quick link should be used.
Why did you use a screwdriver on your chain? If a link is tight then you flex the chain at that link by holding the chain and flexing it form one side to the other.
If you did NOT use a chain tool to put the chain back together or use a quick ling then do NOT ride the bike as there's a high risk of the chain coming apart under load such as when starting off from a stop (like at a busy intersection) or sprinting.
Cheers
03-03-20, 08:34 AM
#5
Senior Member

Join Date: Jul 2018
Location: USA
Posts: 2,190
Bikes: Ti, Mn Cr Ni Mo Nb, Al, C
Mentioned: 22 Post(s)
Tagged: 0 Thread(s)
Quoted: 942 Post(s)
Liked 527 Times
in
349 Posts
Sounds like the OP pried the outer plates apart instead of using a chain tool to squeeze them.
03-03-20, 09:10 AM
#6
Senior Member
Join Date: Jun 2014
Location: Ontario, Canada
Posts: 4,624
Bikes: iele Latina, Miele Suprema, Miele Uno LS, Miele Miele Beta, MMTB, Bianchi Model Unknown, Fiori Venezia, Fiori Napoli, VeloSport Adamas AX
Mentioned: 16 Post(s)
Tagged: 0 Thread(s)
Quoted: 1324 Post(s)
Liked 927 Times
in
640 Posts
Cheers
Likes For Miele Man:
03-03-20, 11:13 AM
#7
Senior Member
Join Date: Mar 2013
Location: Tucson Az
Posts: 1,697
Bikes: 2015 Ridley Fenix, 1983 Team Fuji, 2019 Marin Nail Trail 6
Mentioned: 4 Post(s)
Tagged: 0 Thread(s)
Quoted: 343 Post(s)
Liked 243 Times
in
146 Posts
I wouldn�t ride on what you described.
Buy a new chain and a chain tool, then watch a YouTube vid on changing out your chain.
Buy a new chain and a chain tool, then watch a YouTube vid on changing out your chain.
03-03-20, 11:31 AM
#8
Junior Member
Thread Starter
Join Date: Mar 2020
Posts: 16
Mentioned: 1 Post(s)
Tagged: 0 Thread(s)
Quoted: 9 Post(s)
Likes: 0
Liked 1 Time
in
1 Post
Many thanks to you all.😊
It's a $10 schiwinn chain without master link (for 7 speed derailleur). Long story short: the connection rivet does not have snap-off part, it just comes with one end inserted and wait to be driven in by chain tool. The upper plate got squeezed when I guide it through the derailleur (there are some narrow parts). I used a chain tool to squeeze it in.
I can't post pictures as newbie here :-(
Last edited by ka2020; 03-03-20 at 11:43 AM.
03-03-20, 11:38 AM
#9
Junior Member
Thread Starter
Join Date: Mar 2020
Posts: 16
Mentioned: 1 Post(s)
Tagged: 0 Thread(s)
Quoted: 9 Post(s)
Likes: 0
Liked 1 Time
in
1 Post
i posted same title thread "
Bent chain segment during installation
" on bike stack exchange where they allow posting picture as newbie.
03-03-20, 11:42 AM
#10
Senior Member
Join Date: Jun 2014
Location: Ontario, Canada
Posts: 4,624
Bikes: iele Latina, Miele Suprema, Miele Uno LS, Miele Miele Beta, MMTB, Bianchi Model Unknown, Fiori Venezia, Fiori Napoli, VeloSport Adamas AX
Mentioned: 16 Post(s)
Tagged: 0 Thread(s)
Quoted: 1324 Post(s)
Liked 927 Times
in
640 Posts
Many thanks to you all.
#2[/URL] 42729]It's a $10 schiwinn chain. Long story short: the connection rivet does not have snap-off part, it just comes with one end inserted and wait to be driven in by chain tool. The upper plate got squeezed when I guide it through the derailleur (there are some narrow parts).#2[/URL] 42729]
I can't post pictures as newbie here :-(
#1 . go to a bicycle shop when it's not busy, buy the tool and ask them to show you how to use it.
#2 . If there is a bicycle co-op near you go there and get them to show you how to install a chain.
#3 . Buy a chain tool somewhere and watch a You Tube vied or more on how to use the tool.
Caveat. Beware of the ultra-cheap white metal chain tools that have a nasty habit of breaking when used.
Good luck and cheers
03-03-20, 11:59 AM
#11
Junior Member
Thread Starter
Join Date: Mar 2020
Posts: 16
Mentioned: 1 Post(s)
Tagged: 0 Thread(s)
Quoted: 9 Post(s)
Likes: 0
Liked 1 Time
in
1 Post
is there a chain tool that could drive the two metal plates apart? I thought the chain tool is only useful when driving the pin.
I used screw driver to pry the plates apart after the pin is in. now it seems working without jump with the drivetrain.
I used screw driver to pry the plates apart after the pin is in. now it seems working without jump with the drivetrain.
03-03-20, 12:13 PM
#12
Senior Member

Join Date: Nov 2014
Location: Eugene, Oregon, USA
Posts: 27,548
Mentioned: 217 Post(s)
Tagged: 0 Thread(s)
Quoted: 18423 Post(s)
Liked 4,542 Times
in
3,374 Posts
@ka2020's Album:
https://www.bikeforums.net/g/user/513132
https://www.bikeforums.net/g/album/16983952
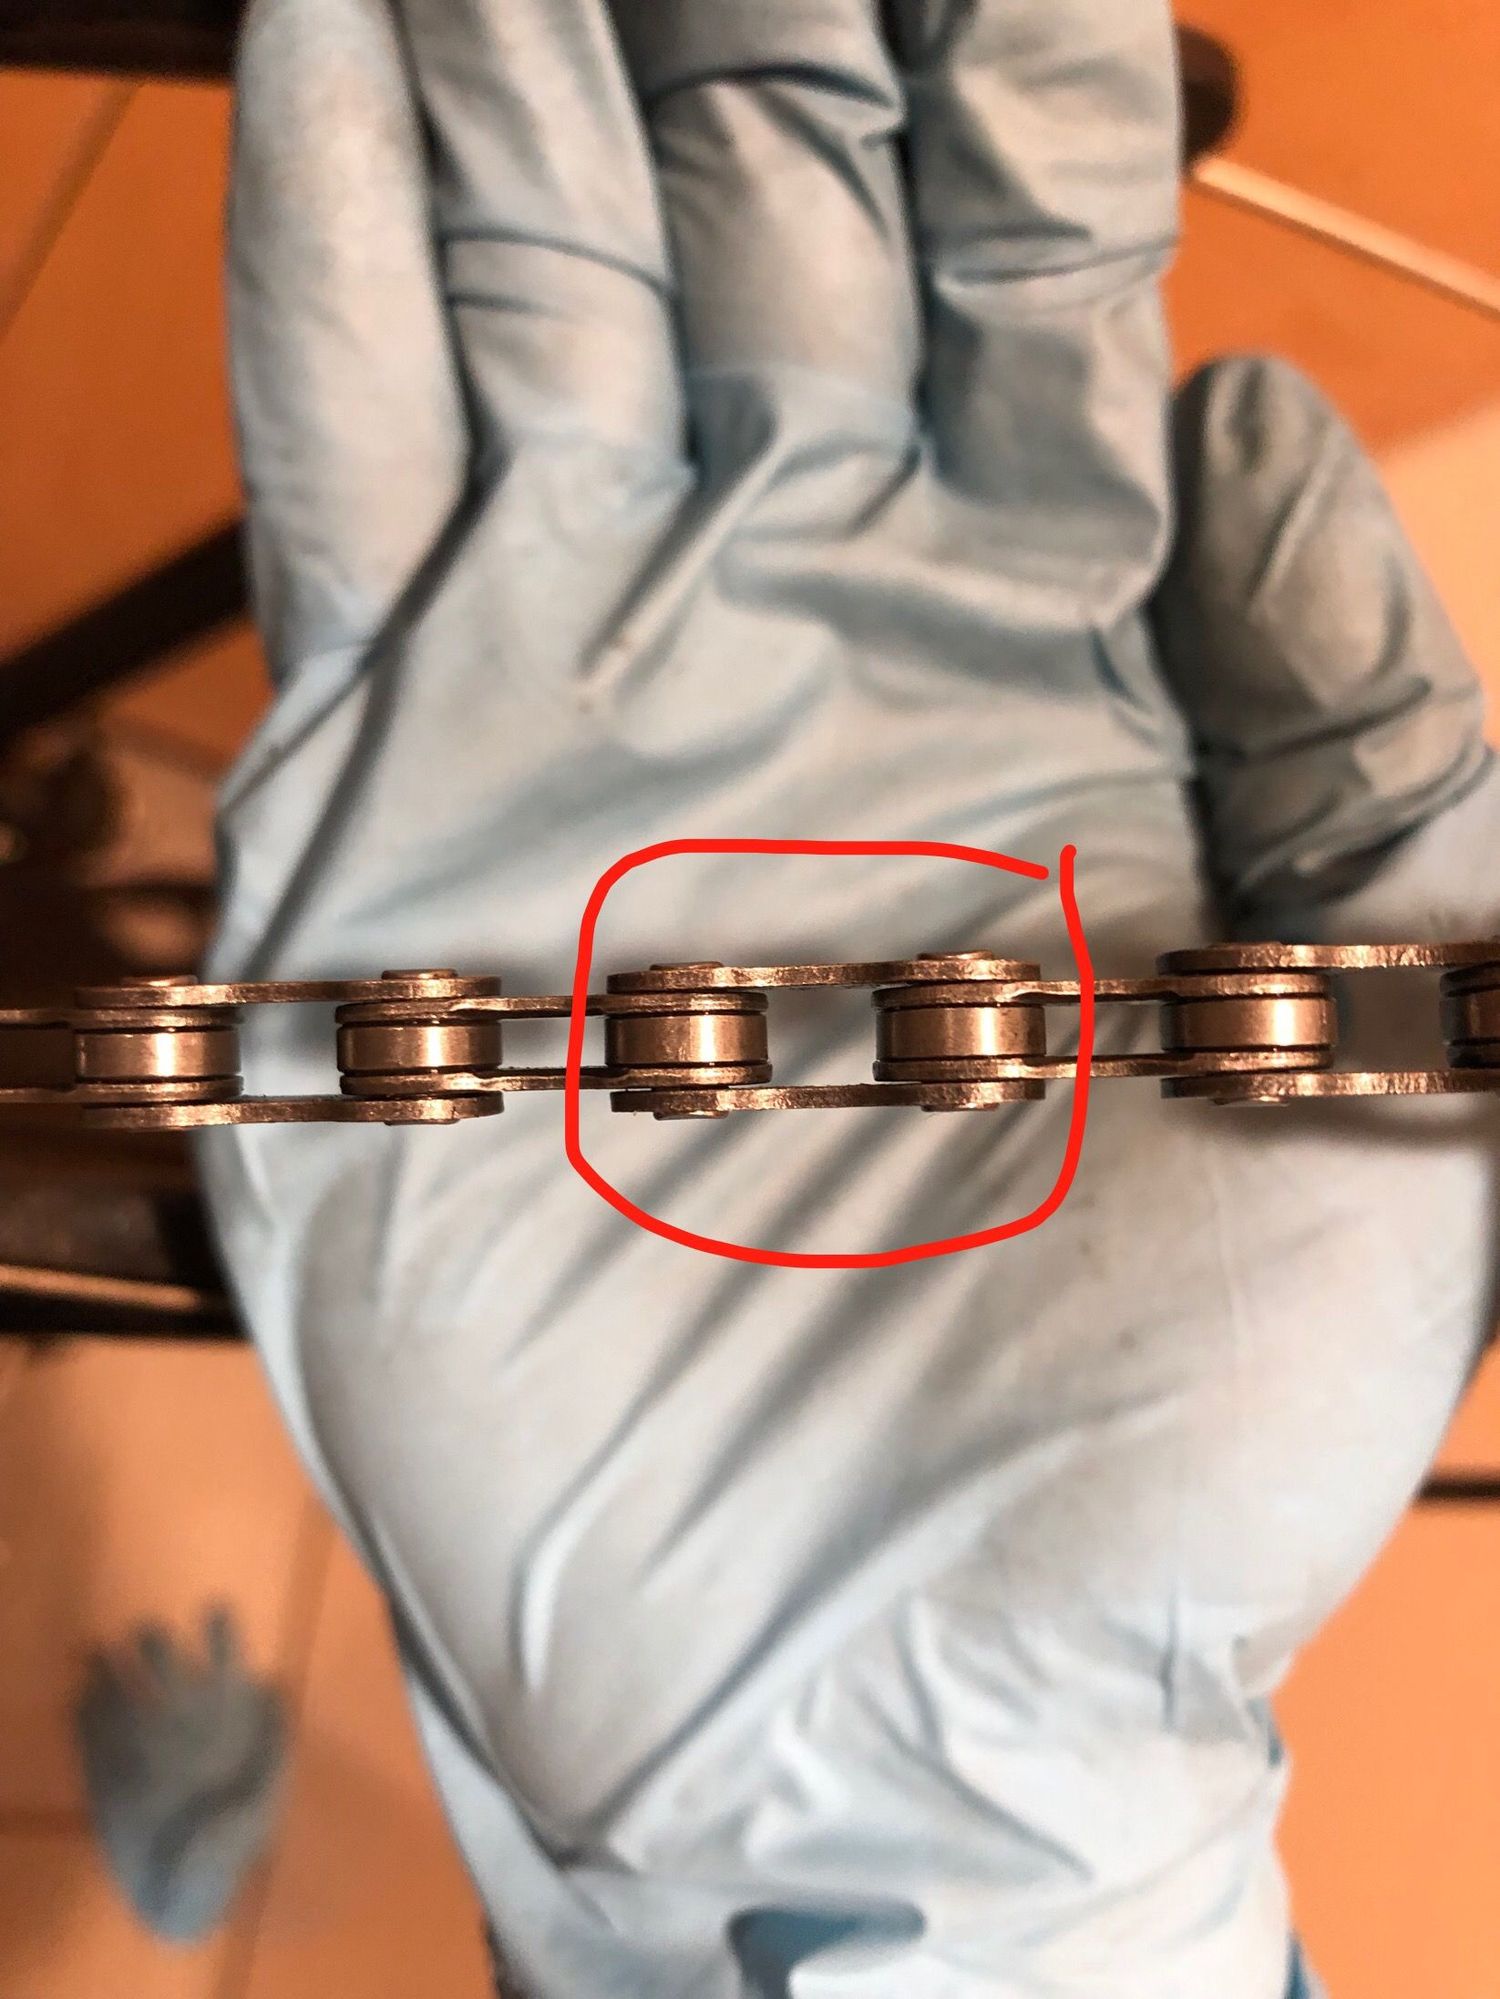
That link circled looks OK. Perhaps a bit better explanation of the concern.
https://www.bikeforums.net/g/user/513132
https://www.bikeforums.net/g/album/16983952
That link circled looks OK. Perhaps a bit better explanation of the concern.
03-03-20, 12:17 PM
#13
Senior Member
Join Date: Nov 2014
Location: Eugene, Oregon, USA
Posts: 27,548
Mentioned: 217 Post(s)
Tagged: 0 Thread(s)
Quoted: 18423 Post(s)
Liked 4,542 Times
in
3,374 Posts
A couple of notes. If you have a chain that comes with a pin sticking out, don't force it through the derailleur. Simply run the other end of the chain without the pin sticking out through the derailleur.
Some of the new chains are peened, and take a bit of pressure to crack the pin loose. Just make sure your chain tool is pressing on the middle of the pin.
The lower shelf on the chain tool to squish the chain together, or push pins out (most frequently used).
The upper shelf on the chain tool to expand tight links.
03-03-20, 12:43 PM
#14
Junior Member
Thread Starter
Join Date: Mar 2020
Posts: 16
Mentioned: 1 Post(s)
Tagged: 0 Thread(s)
Quoted: 9 Post(s)
Likes: 0
Liked 1 Time
in
1 Post
A couple of notes. If you have a chain that comes with a pin sticking out, don't force it through the derailleur. Simply run the other end of the chain without the pin sticking out through the derailleur.
Some of the new chains are peened, and take a bit of pressure to crack the pin loose. Just make sure your chain tool is pressing on the middle of the pin.
The lower shelf on the chain tool to squish the chain together, or push pins out (most frequently used).
The upper shelf on the chain tool to expand tight links.
Some of the new chains are peened, and take a bit of pressure to crack the pin loose. Just make sure your chain tool is pressing on the middle of the pin.
The lower shelf on the chain tool to squish the chain together, or push pins out (most frequently used).
The upper shelf on the chain tool to expand tight links.
03-03-20, 01:13 PM
#15
Senior Member
Join Date: Nov 2014
Location: Eugene, Oregon, USA
Posts: 27,548
Mentioned: 217 Post(s)
Tagged: 0 Thread(s)
Quoted: 18423 Post(s)
Liked 4,542 Times
in
3,374 Posts
I actually like to clean and lube the pulleys whenever I change the chain.
03-03-20, 05:28 PM
#16
Junior Member
Thread Starter
Join Date: Mar 2020
Posts: 16
Mentioned: 1 Post(s)
Tagged: 0 Thread(s)
Quoted: 9 Post(s)
Likes: 0
Liked 1 Time
in
1 Post
it's very relieving to hear from you guys, i would test if the chain is durable, worst case I would use a master link to replace the bent metal plate
03-04-20, 02:08 AM
#17
Junior Member
Thread Starter
Join Date: Mar 2020
Posts: 16
Mentioned: 1 Post(s)
Tagged: 0 Thread(s)
Quoted: 9 Post(s)
Likes: 0
Liked 1 Time
in
1 Post
I am back again. Had to remove another rivet and remount the chain, because I installed it in a wrong way (what a sad day😮
Then I drove back the same rivet use chain tool.
The same problem emerge again, and simple flexing won't make it loose enough.
If not using screw driver, are there any other ways to loosen it?
Am I fine just leave it there? There is a noise when the stiff link goes through derailleur but otherwise the drive train works.
03-04-20, 06:19 AM
#18
SE Wis
Join Date: Apr 2005
Location: Milwaukee, WI
Posts: 10,535
Bikes: '68 Raleigh Sprite, '02 Raleigh C500, '84 Raleigh Gran Prix, '91 Trek 400, 2013 Novara Randonee, 1990 Trek 970
Mentioned: 40 Post(s)
Tagged: 0 Thread(s)
Quoted: 2752 Post(s)
Liked 3,412 Times
in
2,065 Posts
03-04-20, 08:42 AM
#19
Senior Member
Join Date: Feb 2006
Location: Sin City, Nevada
Posts: 2,892
Bikes: Catrike 700, Greenspeed GTO trike, , Linear LWB recumbent, Haluzak Horizon SWB recumbent, Balance 450 MTB, Cannondale SM800 Beast of the East
Mentioned: 19 Post(s)
Tagged: 0 Thread(s)
Quoted: 523 Post(s)
Likes: 0
Liked 231 Times
in
183 Posts
Spread the link - see tutorial
It doesn't look like you actually bent the chain link itself as viewed from your picture. Sometimes when you join a chain that doesn't have a master link, the one link you use to make the joint ends up stiff. It may be just a matter of needing to spread the stiff link. See step 6 in this Instructable tutorial https://www.instructables.com/id/Usi...ke-Chain-Tool/
Note that you use the second set of pins for this. It doesn't take much, maybe an 1/8 turn of the handle. Just back it off, test the link, and try again a bit more it the link is still stiff. I can't think of two greater inventions than a master link chain and an $8-10 master link removal tool. You can buy decent KMC chains online from eBay or Amazon and not have to mess around with the chain pin tool.
Note that you use the second set of pins for this. It doesn't take much, maybe an 1/8 turn of the handle. Just back it off, test the link, and try again a bit more it the link is still stiff. I can't think of two greater inventions than a master link chain and an $8-10 master link removal tool. You can buy decent KMC chains online from eBay or Amazon and not have to mess around with the chain pin tool.
03-04-20, 01:13 PM
#20
Senior Member
Join Date: Oct 2017
Location: Chapel Hill NC
Posts: 1,683
Bikes: 2000 Litespeed Vortex Chorus 10, 1995 DeBernardi Cromor S/S
Mentioned: 4 Post(s)
Tagged: 0 Thread(s)
Quoted: 645 Post(s)
Liked 797 Times
in
446 Posts
I am back again. Had to remove another rivet and remount the chain, because I installed it in a wrong way (what a sad day😮
Then I drove back the same rivet use chain tool.
The same problem emerge again, and simple flexing won't make it loose enough.
If not using screw driver, are there any other ways to loosen it?
Am I fine just leave it there? There is a noise when the stiff link goes through derailleur but otherwise the drive train works.
Then I drove back the same rivet use chain tool.
The same problem emerge again, and simple flexing won't make it loose enough.
If not using screw driver, are there any other ways to loosen it?
Am I fine just leave it there? There is a noise when the stiff link goes through derailleur but otherwise the drive train works.
03-05-20, 02:23 AM
#21
Senior Member
Join Date: Jun 2014
Location: Ontario, Canada
Posts: 4,624
Bikes: iele Latina, Miele Suprema, Miele Uno LS, Miele Miele Beta, MMTB, Bianchi Model Unknown, Fiori Venezia, Fiori Napoli, VeloSport Adamas AX
Mentioned: 16 Post(s)
Tagged: 0 Thread(s)
Quoted: 1324 Post(s)
Liked 927 Times
in
640 Posts
I am back again. Had to remove another rivet and remount the chain, because I installed it in a wrong way (what a sad day😮
Then I drove back the same rivet use chain tool.
The same problem emerge again, and simple flexing won't make it loose enough.
If not using screw driver, are there any other ways to loosen it?
Am I fine just leave it there? There is a noise when the stiff link goes through derailleur but otherwise the drive train works.
Then I drove back the same rivet use chain tool.
The same problem emerge again, and simple flexing won't make it loose enough.
If not using screw driver, are there any other ways to loosen it?
Am I fine just leave it there? There is a noise when the stiff link goes through derailleur but otherwise the drive train works.
Cheers
