


Easy to build spoke tensiometer calibration rig
 12-29-18, 08:27 AM
#1

Ride it like you stole it
Thread Starter

Easy to build spoke tensiometer calibration rig
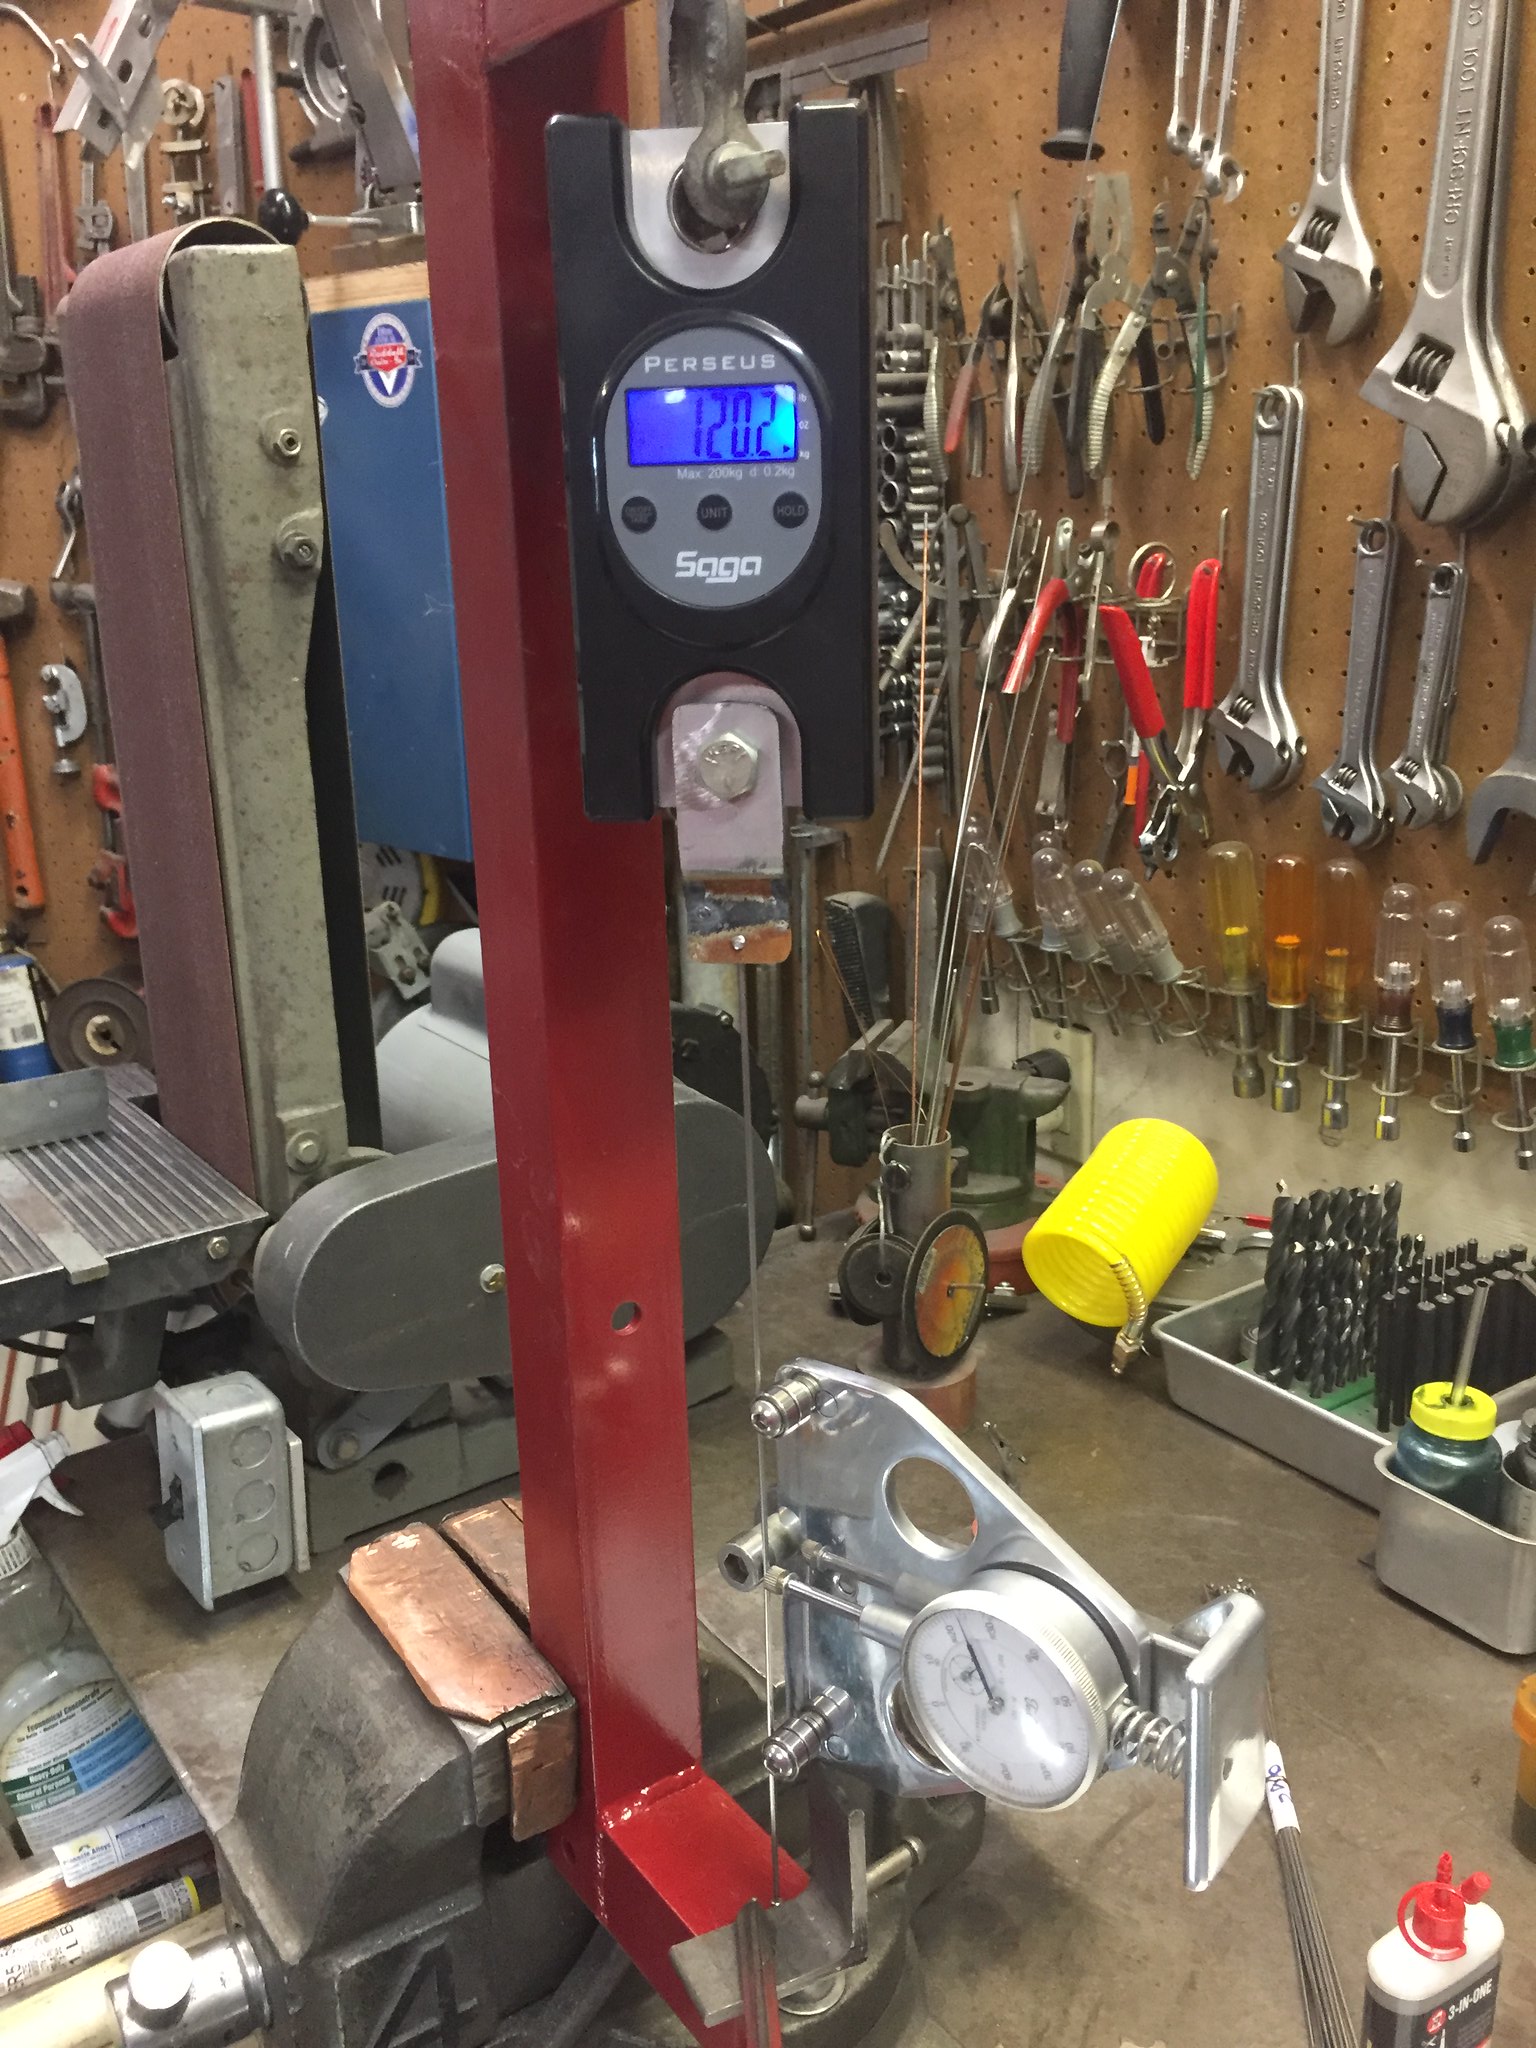
This was originally posted in my thread on 3D printed bike accessories and mounts. I have built a working version of the Spoke Tensiometer Calibration Rig. As pictured it is still missing a part (Thrust Bearing) and there are a couple of things I would change but here it is:

In the picture above the spoke is being pulled with 102.7 kg so the spoke tension is 1000 newtons. I double checked my Park Tool TM-1 chart together with my rarely used TM-1 and it was close. The TM-1 was one marking too low with a 1.8 mm spoke. So here is the parts list.
I have a second design I am working on that replaces the threaded rod with an acme lead screw for smoother operation and uses a base load cell and digital readout.
Here is how I perceive its use. For example you wanted to build a front wheel and your desired outcome is a 1200 N spoke tension:
In the picture above the spoke is being pulled with 102.7 kg so the spoke tension is 1000 newtons. I double checked my Park Tool TM-1 chart together with my rarely used TM-1 and it was close. The TM-1 was one marking too low with a 1.8 mm spoke. So here is the parts list.
- 2 - 2020 Series x 500 mm T-Slot
- 2 - 2020 Series x 200 mm T-Slot
- 4 - 2020 Series Corners (or 3D printed equivalents)
- 4 - 2020 Series Corner Plates (or 3D printed equivalents)
- 24 - M5 x 10 mm Button Head Screws
- 24 - M5 T-Slot Nuts
- 1 - M8 x 35 mm Button Head Screw
- 1 - M8 Washer
- 1 - M8 Flat Thumbscrew
- 1 - M8 x 200 mm Threaded Rod
- 1 - M8 Hex Bolt
- 2 - M8 Acorn Nuts
- 1 - M8 Hex Nut
- 1 - 8 mm Roller Thrust Bearing
- 2 - M8 Clevis Rod Ends
- Small Crane Scale (150 kg or more capacity)
- 1 - Brass Spoke Nipple
- Some 3D Printed Parts
- 8 mm drill bit
- 4 mm drill bit
- 3 mm hex wrench
- 5 mm hex wrench
- 3D printer or equivalent off the shelf parts.
- Time
I have a second design I am working on that replaces the threaded rod with an acme lead screw for smoother operation and uses a base load cell and digital readout.
Here is how I perceive its use. For example you wanted to build a front wheel and your desired outcome is a 1200 N spoke tension:
- Turn on the scale with no spoke attached, this will tare the scale (zero it) with no tension at all.
- Attach spoke you are using for this build into the rig, it should be obvious how.
- Turn the wheel until the Kg scale reads 122.4 Kg. (newtons = kilograms x gravity or conversely 1200 N / 9.80665 = 122.4 Kg in our example)
- Measure your deflection with the tensiometer of your choice.
- Use that deflection to build your front wheel.
- Because I could
- I wanted to share
- I designed my own DT Swiss style clone tensiometer and wanted to check its calibration as well as double check my Park Tools TM-1
__________________
"Never use your face as a brake pad" - Jake Watson
The Reloutionaries @ Shapeways
"Never use your face as a brake pad" - Jake Watson
The Reloutionaries @ Shapeways
Last edited by WheresWaldo; 12-29-18 at 08:30 AM.

Likes For WheresWaldo:
12-29-18, 09:02 AM
#2
On Holiday

Join Date: Apr 2017
Posts: 1,014
Bikes: A bunch of old steel bikes
Mentioned: 14 Post(s)
Tagged: 0 Thread(s)
Quoted: 394 Post(s)
Likes: 0
Liked 14 Times
in
12 Posts
Thanks for posting this. It certainly would work to satisfy the question about whether my Park tool is still on the money. I wonder about the accuracy of some of the cheap chain scales, though.
12-29-18, 10:06 AM
#3
SE Wis
Join Date: Apr 2005
Location: Milwaukee, WI
Posts: 10,509
Bikes: '68 Raleigh Sprite, '02 Raleigh C500, '84 Raleigh Gran Prix, '91 Trek 400, 2013 Novara Randonee, 1990 Trek 970
Mentioned: 40 Post(s)
Tagged: 0 Thread(s)
Quoted: 2745 Post(s)
Liked 3,390 Times
in
2,053 Posts
Are there any provisions on the meters to recalibrate them?
12-29-18, 11:47 AM
#4
Ride it like you stole it
Thread Starter
Some of the scales will let you calibrate them with a known weight. I happen to have a calibration weight set that is 2.5 kg total and I have tested my particular scale and it was on spec, YMMV. I don't remember if this scale allows recalibration as I lost the one page instructions.
That is also why I have a second version in mind that uses a larger load cell and a digital load cell indicator, those have a lot more flexibility in how you verify that the load cell is reading correctly. The problem is I was trying to keep the design under $100 USD, which I did. The load cell and digital indicator raises the price by $40 - $60 USD.
As I mentioned in the OP, My Park TM-1 was reading one mark higher than normal, so if it registered a 21 on the scale the real reading was a 20, that was measuring a few 2.0 / 1.8 / 2.0 double-butted Wheelsmith spokes I had laying around.
__________________
"Never use your face as a brake pad" - Jake Watson
The Reloutionaries @ Shapeways
"Never use your face as a brake pad" - Jake Watson
The Reloutionaries @ Shapeways
Last edited by WheresWaldo; 12-29-18 at 03:17 PM.
12-30-18, 06:59 AM
#5
Senior Member
Before doing all the work involved in building that rig consider sending the tool back to Park. They have calibration service.
12-30-18, 07:44 AM
#6
Banned.

Join Date: Jun 2004
Location: Torrance, CA
Posts: 3,061
Bikes: Homebuilt steel
Mentioned: 18 Post(s)
Tagged: 0 Thread(s)
Quoted: 2193 Post(s)
Liked 425 Times
in
337 Posts
Awesome work! Love it when someone takes on a project like this!
Question: have you checked at lower tensions? The knock against the TM-1 is that the spring force is too high to accurately read at say 60kgf. Also, have you checked the Park app for accuracy when using oval spokes such as CX-Ray's? There chart doesn't match these but Park has an app, but some confirmation would be nice.
Question: have you checked at lower tensions? The knock against the TM-1 is that the spring force is too high to accurately read at say 60kgf. Also, have you checked the Park app for accuracy when using oval spokes such as CX-Ray's? There chart doesn't match these but Park has an app, but some confirmation would be nice.
12-30-18, 08:34 AM
#7
Ride it like you stole it
Thread Starter
@63rickert, you miss the entire point of this project. Of course I could send it back, but why? And now I never have to.
@Nessism, My thought on this is why have a chart at all? And if your tensiometer drifts over time, why fret? The TM-1 lists for $85, remarkably the cheapest tensiometer on the market. Building this turned out under $80. Also my stash of CX-Rays are under a pile of boxes in my garage, so I haven't checked with those yet. I have checked this against some Wheelsmith and DT Swiss round spokes.
Before beginning a wheel build you already have in mind a target spoke tension for front and DS rear wheels. Maybe it is based on experience or maybe it is based on some other limiting factor like rim strength. You may already have the spokes in mind, say Sapim CX-Rays, for example. Just pop a CX-Ray in the device before the wheel build and turn the adjusting wheel and when you reach the desired tension, measure the deflection. That is it, no chart, no wondering if the chart is right, just build. If you went cheap and bought a Chinese clone of the Park TM-1 or a clone of the DT Swiss TETTA or TETTD it won't matter, because basically you are calibrating it for each and every build. It is also much harder to lose a machine like this compared to a chart printed on paper, and no internet access needed to use the online Park application.
Of course most people don't need or want a device like this, that isn't why I did this. Also note that I freely gave all the information away, so there isn't any money making intention here.
About 10 years ago I had two heart attacks while riding my bicycle with my daughter. I passed both off as breathing cold air on the two January rides. My cardiologist at the time was frantic when I came in the following week and the first thing he said after seeing my test results was "you should be dead!" When I asked why I wasn't he specifically told me that all the cycling I was doing is the only thing that saved my life. An every other day stress test that strengthened other areas of my heart. Since I literally (correctly used in this instance) owe my life to cycling, projects like this are my way to give back to the sport that saved my life!
__________________
"Never use your face as a brake pad" - Jake Watson
The Reloutionaries @ Shapeways
"Never use your face as a brake pad" - Jake Watson
The Reloutionaries @ Shapeways
Last edited by WheresWaldo; 12-30-18 at 08:39 AM.
12-30-18, 09:20 AM
#8

Senior member

Join Date: Oct 2004
Location: Oakville Ontario
Posts: 8,117
Mentioned: 25 Post(s)
Tagged: 0 Thread(s)
Quoted: 943 Post(s)
Liked 658 Times
in
371 Posts
@63rickert, you miss the entire point of this project. Of course I could send it back, but why? And now I never have to.
@Nessism, My thought on this is why have a chart at all? And if your tensiometer drifts over time, why fret? The TM-1 lists for $85, remarkably the cheapest tensiometer on the market. Building this turned out under $80. Also my stash of CX-Rays are under a pile of boxes in my garage, so I haven't checked with those yet. I have checked this against some Wheelsmith and DT Swiss round spokes.
Before beginning a wheel build you already have in mind a target spoke tension for front and DS rear wheels. Maybe it is based on experience or maybe it is based on some other limiting factor like rim strength. You may already have the spokes in mind, say Sapim CX-Rays, for example. Just pop a CX-Ray in the device before the wheel build and turn the adjusting wheel and when you reach the desired tension, measure the deflection. That is it, no chart, no wondering if the chart is right, just build. If you went cheap and bought a Chinese clone of the Park TM-1 or a clone of the DT Swiss TETTA or TETTD it won't matter, because basically you are calibrating it for each and every build. It is also much harder to lose a machine like this compared to a chart printed on paper, and no internet access needed to use the online Park application.
Of course most people don't need or want a device like this, that isn't why I did this. Also note that I freely gave all the information away, so there isn't any money making intention here.
About 10 years ago I had two heart attacks while riding my bicycle with my daughter. I passed both off as breathing cold air on the two January rides. My cardiologist at the time was frantic when I came in the following week and the first thing he said after seeing my test results was "you should be dead!" When I asked why I wasn't he specifically told me that all the cycling I was doing is the only thing that saved my life. An every other day stress test that strengthened other areas of my heart. Since I literally (correctly used in this instance) owe my life to cycling, projects like this are my way to give back to the sport that saved my life!
@Nessism, My thought on this is why have a chart at all? And if your tensiometer drifts over time, why fret? The TM-1 lists for $85, remarkably the cheapest tensiometer on the market. Building this turned out under $80. Also my stash of CX-Rays are under a pile of boxes in my garage, so I haven't checked with those yet. I have checked this against some Wheelsmith and DT Swiss round spokes.
Before beginning a wheel build you already have in mind a target spoke tension for front and DS rear wheels. Maybe it is based on experience or maybe it is based on some other limiting factor like rim strength. You may already have the spokes in mind, say Sapim CX-Rays, for example. Just pop a CX-Ray in the device before the wheel build and turn the adjusting wheel and when you reach the desired tension, measure the deflection. That is it, no chart, no wondering if the chart is right, just build. If you went cheap and bought a Chinese clone of the Park TM-1 or a clone of the DT Swiss TETTA or TETTD it won't matter, because basically you are calibrating it for each and every build. It is also much harder to lose a machine like this compared to a chart printed on paper, and no internet access needed to use the online Park application.
Of course most people don't need or want a device like this, that isn't why I did this. Also note that I freely gave all the information away, so there isn't any money making intention here.
About 10 years ago I had two heart attacks while riding my bicycle with my daughter. I passed both off as breathing cold air on the two January rides. My cardiologist at the time was frantic when I came in the following week and the first thing he said after seeing my test results was "you should be dead!" When I asked why I wasn't he specifically told me that all the cycling I was doing is the only thing that saved my life. An every other day stress test that strengthened other areas of my heart. Since I literally (correctly used in this instance) owe my life to cycling, projects like this are my way to give back to the sport that saved my life!
At any rate, it was the use of bladed spokes like CX Rays and DT Aerolites that was the impetus for me to build the fixture.The calibration chart that came with the tension meter showed calibration for spokes that were an approximation of those spokes cross section, and not a very close one at that.

Last edited by Dan Burkhart; 07-11-21 at 07:19 PM.
12-30-18, 09:40 AM
#9
Ride it like you stole it
Thread Starter
Many, if not all of the calibration rigs I have seen bear a remarkable similarity to the one I built about six years ago, and posted a youtube video of the build. Whether I was copied, or the design was so basic and generic that it dawned on several minds independently, I can't say.
At any rate, it was the use of bladed spokes like CX Rays and DT Aerolites that was the impetus for me to build the fixture.The calibration chart that came with the tension meter showed calibration for spokes that were an approximation of those spokes cross section, and not a very close one at that.
At any rate, it was the use of bladed spokes like CX Rays and DT Aerolites that was the impetus for me to build the fixture.The calibration chart that came with the tension meter showed calibration for spokes that were an approximation of those spokes cross section, and not a very close one at that.
I like to consider myself a Maker, and 'Makers make ****!' I also wanted to give back to the community the best way I knew how.
__________________
"Never use your face as a brake pad" - Jake Watson
The Reloutionaries @ Shapeways
"Never use your face as a brake pad" - Jake Watson
The Reloutionaries @ Shapeways
12-30-18, 09:44 AM
#10
Ride it like you stole it
Thread Starter
Updated image

__________________
"Never use your face as a brake pad" - Jake Watson
The Reloutionaries @ Shapeways
"Never use your face as a brake pad" - Jake Watson
The Reloutionaries @ Shapeways
12-30-18, 10:01 AM
#11
Senior Member

Join Date: Feb 2016
Location: Olympic Peninsula, WA
Posts: 645
Bikes: '8? Ciocc Mockba 80, '82 Ron Cooper, '84 Allez, '86 Tommasini Racing, '86? Klein Quantum, '87 Ciocc Designer 84, '95 Trek 5500, '98 Litespeed Classic, '98 S-Works Mtb
Mentioned: 34 Post(s)
Tagged: 0 Thread(s)
Quoted: 226 Post(s)
Liked 309 Times
in
122 Posts
I've been there too.....welded some bits from my scrap pile and used a digital scale that I had purchased for another project.
Dean
IMG_2439
Dean
IMG_2439
__________________
Roll Me Up and Smoke Me When I Die
Roll Me Up and Smoke Me When I Die
 12-30-18, 10:07 AM
#12
Ride it like you stole it
Thread Starter
@Dean51, thats a pretty hefty rig.
Unfortunately for me I don't know how to weld and I had a bunch of spare extrusion from my 3D printer builds, Cycling is just a hobby/passion and I build my own wheels, so this rig was a natural step beyond just owning a tensiometer.
Unfortunately for me I don't know how to weld and I had a bunch of spare extrusion from my 3D printer builds, Cycling is just a hobby/passion and I build my own wheels, so this rig was a natural step beyond just owning a tensiometer.
__________________
"Never use your face as a brake pad" - Jake Watson
The Reloutionaries @ Shapeways
"Never use your face as a brake pad" - Jake Watson
The Reloutionaries @ Shapeways
12-30-18, 10:58 AM
#13
Full Member

I used a cheaper but much less elegant method. Drill a spoke sized hole in a c shaped bit of metal. Attach the other end (assume a J spoke) to a piece of metal with a spoke sized hole (I used a stainless metal ruler with a hole) and suspend from something about chest high and solid using a strong clamp (I used my fire escape stairs). From the C shaped metal, attach a large bucket. Fill with some bricks, measure tension and weigh the bucket. Repeat by adding more bricks (or water, or metal or your kid sister - anything) and graph the results. It does not matter on the weight as long as you plot the results and get a repeatable plot of force vs tension.
12-30-18, 01:44 PM
#14
Banned
Amateur builder,, as an individual , tension of 1 spoke , relative to all the others in the wheel , ought to be adequate
unless you feel a need to use a tension data number, dictated from outside authorities to need to have a standardized calibration reference
Like doing an engine overhaul from a service manual that states the importance of bolt torque values , for fitting the Cylinder, head to engine block..
Guitar player, wheel building relative pitch was enough (a 30 + year old wheel set still OK)
...
12-30-18, 02:43 PM
#15
Senior Member
Join Date: Jan 2013
Location: Llano Estacado
Posts: 3,702
Bikes: old clunker
Mentioned: 13 Post(s)
Tagged: 0 Thread(s)
Quoted: 684 Post(s)
Likes: 0
Liked 105 Times
in
83 Posts
Most people perceive that a number on a screen is absolutely correct, while in actuality digital readouts accrue more errors than other methods. Without timely regular recalibration of the scale to traceable standards the posted method really can't tell much.
There is a past thread here detailing a much simpler calibration fixture using known weights to load the spoke, which can easily give much better results.
There is a past thread here detailing a much simpler calibration fixture using known weights to load the spoke, which can easily give much better results.
12-30-18, 05:04 PM
#16
Banned.
Join Date: Jun 2004
Location: Torrance, CA
Posts: 3,061
Bikes: Homebuilt steel
Mentioned: 18 Post(s)
Tagged: 0 Thread(s)
Quoted: 2193 Post(s)
Liked 425 Times
in
337 Posts
This place kills me sometimes. Dude creates a super cool piece of kit and the peanut gallery invents ways to put it down.
12-30-18, 06:57 PM
#17
Senior Member
Join Date: Feb 2016
Location: Olympic Peninsula, WA
Posts: 645
Bikes: '8? Ciocc Mockba 80, '82 Ron Cooper, '84 Allez, '86 Tommasini Racing, '86? Klein Quantum, '87 Ciocc Designer 84, '95 Trek 5500, '98 Litespeed Classic, '98 S-Works Mtb
Mentioned: 34 Post(s)
Tagged: 0 Thread(s)
Quoted: 226 Post(s)
Liked 309 Times
in
122 Posts
12-30-18, 09:38 PM
#19
Ride it like you stole it
Thread Starter
I really don't mind the absurdity of the naysayers, really. This place is much better than RBR. If all I wanted was to be stoked, I would have asked my wife instead.
Besides, an absolute number is not what it important, as all the cynics here will tell you, it is repeatable results with a modicum of accuracy that is important. At least the rig is repeatable.
Besides, an absolute number is not what it important, as all the cynics here will tell you, it is repeatable results with a modicum of accuracy that is important. At least the rig is repeatable.
__________________
"Never use your face as a brake pad" - Jake Watson
The Reloutionaries @ Shapeways
"Never use your face as a brake pad" - Jake Watson
The Reloutionaries @ Shapeways
Last edited by WheresWaldo; 12-30-18 at 09:41 PM.
12-31-18, 10:55 AM
#21
Full Member
Join Date: May 2008
Location: Tampa
Posts: 311
Bikes: Gunnar Sport 105/UDi2, previous: Lambert, Giant FCR3, Cannondale Synapse Carbon 105, Specialized Roubaix SL4 Comp UDi2
Mentioned: 0 Post(s)
Tagged: 0 Thread(s)
Quoted: 29 Post(s)
Likes: 0
Liked 18 Times
in
11 Posts
12-31-18, 03:11 PM
#22
Senior Member
Join Date: Jan 2013
Location: Llano Estacado
Posts: 3,702
Bikes: old clunker
Mentioned: 13 Post(s)
Tagged: 0 Thread(s)
Quoted: 684 Post(s)
Likes: 0
Liked 105 Times
in
83 Posts
Among others there's:
There's an easy way to calibrate a spoke tensionmeter. Hang a spoke vertically, and hang a various known weights from the bottom to establish an test tension loads, then take readings and calibrate accordingly.
Two considerations,
1- the known weights should tension the spoke within the working range that you wish to measure in the future, so the maximum accuracy will be in the target tension range.
2- don't forget that while gauge doesn't affect tension, it does affect the tension readings because most tension meters do not correct for the diameter of the spoke in taking the reading, that means you'll ned to create a separate conversion chart for every spoke diameter you plan to test.
BTW- sound, while useful for comparing tension is useless for determining tension because the pitch varies with both tension and mass (or gauge). Thinner spokes will resonate at a higher pitch than thicker spokes at the same tension.
01-01-19, 08:13 AM
#23
On Holiday
Join Date: Apr 2017
Posts: 1,014
Bikes: A bunch of old steel bikes
Mentioned: 14 Post(s)
Tagged: 0 Thread(s)
Quoted: 394 Post(s)
Likes: 0
Liked 14 Times
in
12 Posts
while in actuality digital readouts accrue more errors than other methods.
Without timely regular recalibration of the scale to traceable standards the posted method really can't tell much.
We all must frequently recalibrate our tools for communication.
01-01-19, 01:25 PM
#24
Senior Member
Join Date: Jan 2013
Location: Llano Estacado
Posts: 3,702
Bikes: old clunker
Mentioned: 13 Post(s)
Tagged: 0 Thread(s)
Quoted: 684 Post(s)
Likes: 0
Liked 105 Times
in
83 Posts
Really? I doubt that very much. I'd say that most people believe the number to be reasonably accurate but not absolutely correct (unless you're talking about a bathroom scale, which most people believe to be wrong on the high side).
What do you mean by this? Any measurement device will have some error, but how can a single device accrue errors?
"Timely" to me means "opportune". What does it mean to you in this context?
We all must frequently recalibrate our tools for communication.
What do you mean by this? Any measurement device will have some error, but how can a single device accrue errors?
"Timely" to me means "opportune". What does it mean to you in this context?
We all must frequently recalibrate our tools for communication.
01-01-19, 01:31 PM
#25
Disco Infiltrator

Join Date: May 2013
Location: Folsom CA
Posts: 13,446
Bikes: Stormchaser, Paramount, Tilt, Samba tandem
Mentioned: 72 Post(s)
Tagged: 0 Thread(s)
Quoted: 3126 Post(s)
Liked 2,105 Times
in
1,369 Posts
In a business making nice hardware, things that measure are calibrated on a schedule.
(and a junior design engineer can get in trouble for having a privately purchased caliper on his desk. DAMHIK)
In the thread in the wheel and tire forum on MTBR about making UHMW Dyneema spokes, we were speculating how to get a good tensiometer calibration without a rig like this. The pluck method is not going to be great I think.