


DIY Painting Stand
 04-19-23, 06:37 PM
#26

blahblahblah chrome moly

Join Date: Apr 2009
Location: Seattle
Posts: 2,002
Mentioned: 92 Post(s)
Tagged: 0 Thread(s)
Quoted: 1185 Post(s)
Liked 2,584 Times
in
1,083 Posts
Good point. I resisted getting a respirator as long as I was spraying single component paints. Once I got one (I was shooting 2K paint), I realized that I was a cheapskate idiot for not getting it sooner. Now I use it whenever I paint. If it is aerosol, I use it. I learned how to take it apart, clean it and replace the filters as well. I'm also glad that I got it pre-COVID, since the shortage caused the price to rise substantially.
Best $$ I've spent.
Best $$ I've spent.
Mark B
 04-19-23, 08:50 PM
#27
Senior Member
Join Date: Dec 2016
Location: Long Island, NY
Posts: 2,123
Bikes: Trek 800 x 2, Schwinn Heavy Duti, Schwinn Traveler, Schwinn Le Tour Luxe, Schwinn Continental, Cannondale M400 and Lambert, Schwinn Super Sport
Mentioned: 14 Post(s)
Tagged: 0 Thread(s)
Quoted: 813 Post(s)
Liked 1,033 Times
in
671 Posts
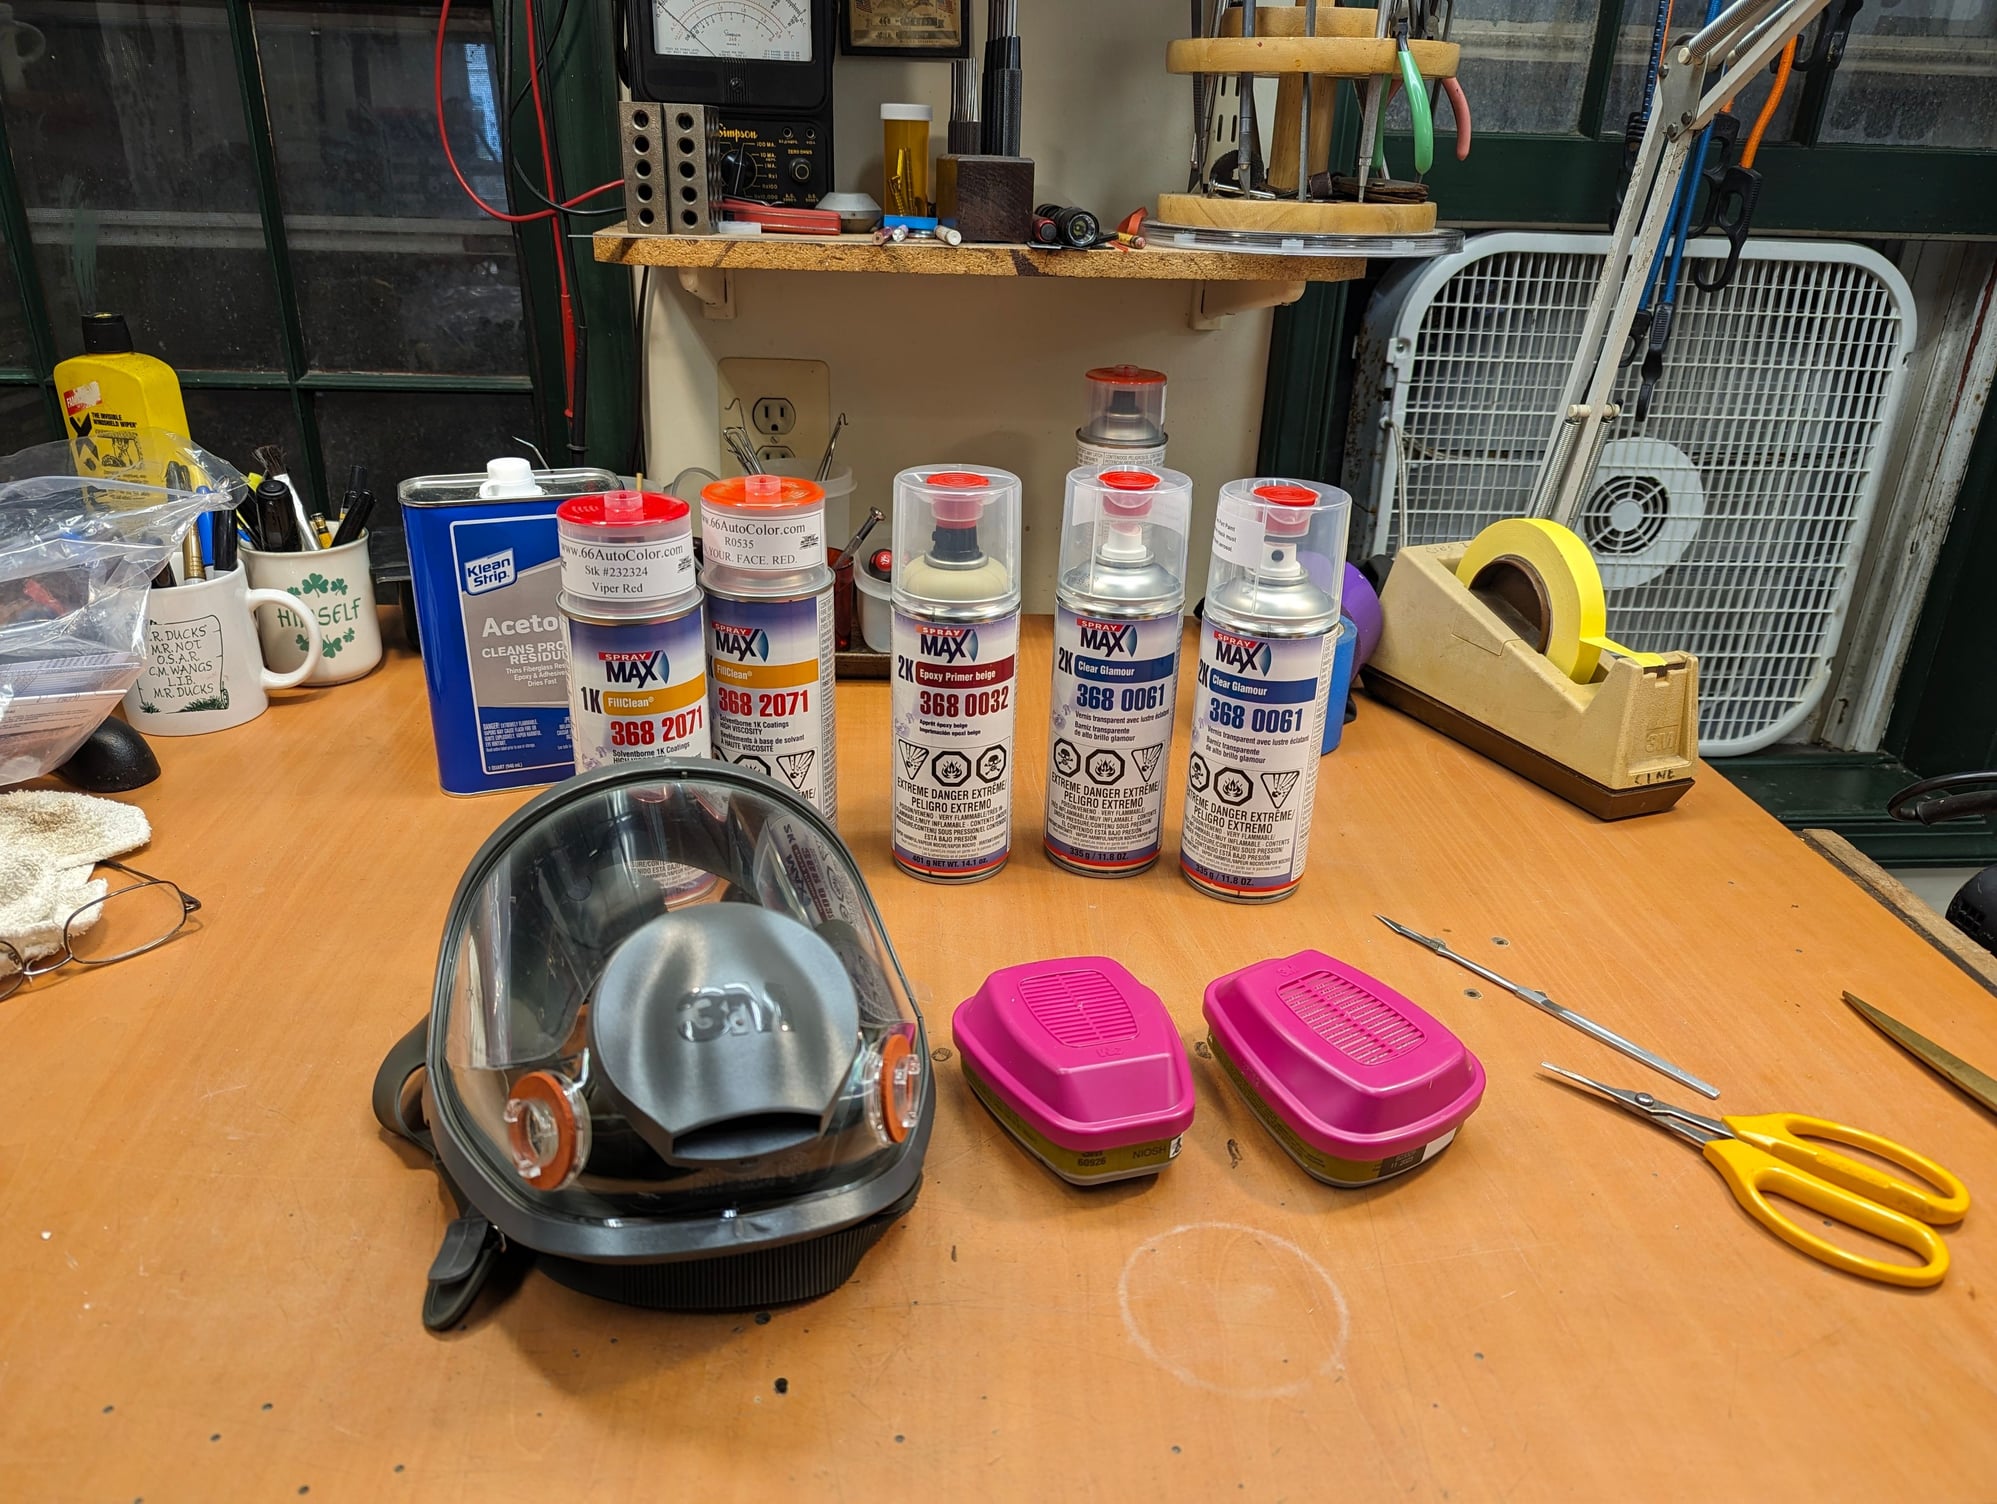
3M Respirator with 6001 NOISH cartridges
Good question again. I am assuming that you are not only asking me for my safety, but also as a reference for anyone thinking about painting their frame to get the right stuff. The answer for mine is I did some research before buying my respirator and bought a 3M with a 6001 cartridge from The Home Depot near me.

The original black elastic lost its bounce after a short while. The elastic was replaced with a similar width ribbon from a fabric shop. Black was not available, but fashion takes a back seat for safety. This replacement elastic has held up better than the original. It seems to be thicker and have more rebound force, if that is a thing. I think it has more rubber in it than the original.
The original black elastic lost its bounce after a short while. The elastic was replaced with a similar width ribbon from a fabric shop. Black was not available, but fashion takes a back seat for safety. This replacement elastic has held up better than the original. It seems to be thicker and have more rebound force, if that is a thing. I think it has more rubber in it than the original.
08-01-23, 06:50 PM
#28
Old bikes, Older guy

Join Date: Jun 2014
Location: Fiscal Conservative on the Lefty Coast - Oregon
Posts: 846
Bikes: A few modern, Several vintage, All ridden when weather allows.
Mentioned: 8 Post(s)
Tagged: 0 Thread(s)
Quoted: 251 Post(s)
Liked 167 Times
in
115 Posts
Great idea & design!
Here’s a suggestion for paint curing. Can’t take credit since it has been posted before.
After air drying for a couple of days, use a cardboard box or small child’s wading pool that has been painted flat black inside. You can also use a 1 X 6” folding frame and set it on a sheet of black plastic. Support the frame so that minimal spots touch. Cover with a large recycled window pane or clear plastic & put in a sunny location. The cover should not be tight so that the vapor can escape. Sorry, no pictures.
Cheers,
Van
__________________
Remember: Real bikes have pedals.
...and never put a yellow tail on a Red, White and Blue kite!
Remember: Real bikes have pedals.
...and never put a yellow tail on a Red, White and Blue kite!
08-01-23, 08:38 PM
#29
Senior Member

Join Date: May 2012
Location: Point Reyes Station, California
Posts: 4,532
Bikes: Indeed!
Mentioned: 92 Post(s)
Tagged: 0 Thread(s)
Quoted: 1508 Post(s)
Liked 3,484 Times
in
1,134 Posts
Great idea & design!
Here�s a suggestion for paint curing. Can�t take credit since it has been posted before.
After air drying for a couple of days, use a cardboard box or small child�s wading pool that has been painted flat black inside. You can also use a 1 X 6� folding frame and set it on a sheet of black plastic. Support the frame so that minimal spots touch. Cover with a large recycled window pane or clear plastic & put in a sunny location. The cover should not be tight so that the vapor can escape. Sorry, no pictures.
Cheers,
Van

Here's my version of the painting stand:


The handle and little blue thrust bearing came from McMaster Carr. Without the thrust bearing the handle would unscrew each time I rotated the frame up and down.

Brent
__________________
"I have a tendency to meander sometimes." B.G.
"I have a tendency to meander sometimes." B.G.
Likes For obrentharris:
08-01-23, 09:12 PM
#30
Old bikes, Older guy
Join Date: Jun 2014
Location: Fiscal Conservative on the Lefty Coast - Oregon
Posts: 846
Bikes: A few modern, Several vintage, All ridden when weather allows.
Mentioned: 8 Post(s)
Tagged: 0 Thread(s)
Quoted: 251 Post(s)
Liked 167 Times
in
115 Posts
Wowzer
I use the South Facing Subaru brand drying closet which is based on the same principle.
Here's my version of the painting stand:
The handle and little blue thrust bearing came from McMaster Carr. Without the thrust bearing the handle would unscrew each time I rotated the frame up and down.
Brent
Here's my version of the painting stand:
The handle and little blue thrust bearing came from McMaster Carr. Without the thrust bearing the handle would unscrew each time I rotated the frame up and down.
Brent
Just curious, where did the cones come from? The co-op where I volunteer has a mill, a lathe & welding equipment. I�m not much machinist, but can weld.
Cheers,
Van
__________________
Remember: Real bikes have pedals.
...and never put a yellow tail on a Red, White and Blue kite!
Remember: Real bikes have pedals.
...and never put a yellow tail on a Red, White and Blue kite!
08-02-23, 06:12 AM
#31
blahblahblah chrome moly
Join Date: Apr 2009
Location: Seattle
Posts: 2,002
Mentioned: 92 Post(s)
Tagged: 0 Thread(s)
Quoted: 1185 Post(s)
Liked 2,584 Times
in
1,083 Posts
Me too � curious, but only casually, I'd probably just make my own. Maybe I should wait for Brent to answer... nah I'll just shoot from the hip. 
Here's a pair, but whether they're worth $64 (shipped) will depend on whether you can DIY.
The link above goes to what they call head tube cones, but I'm pretty sure they'll work for BBs too. The ones they sell intended for BBs are a bit more expensive and could be overkill for a paint stand. Well, even the smaller headtube cones could be more metal than you need there, but the convenience of ordering from the web, versus the hassle of DIY, might make this compelling. Even compared to something smaller, lighter, and possibly even better at the job, like an internal expander that holds the BB shell from the inside only, nothing touching the outer face.
Note, I've never tried such an internal expander in a BB so maybe that's a terrible idea, just spitballin'. But I have used an internal expander (similar to a quill stem) that goes in the seat tube, and held the frame there for painting. Like a dummy seatpost, only (a slight preference of mine) it's smaller than a seatpost at the top of the lube or lug. It tightens down inside a ways, at the seatpost diameter, but then the part that sticks out the top of the frame, and joins it to the stand, is smaller diameter so it doesn't touch the top edge of the seat tube. If a BB cone cone or dummy seatpost does touch at the outer edge of the frame, and if the paint wets out on both the frame and the stand holder-thingum, then there's a risk of tearing the paint when those two parts are separated after the paint dries. There are ways to avoid that problem though, to where sometimes it's not a problem at all, just something to watch out for. Thus my slight preference, not a big deal usually.
Mark B
08-02-23, 07:21 AM
#32
Wheelman
Thread Starter
Join Date: Aug 2021
Location: Putney, London UK
Posts: 853
Bikes: 1982 Holdsworth Avanti (531), 1961 Holdsworth Cyclone
Mentioned: 4 Post(s)
Tagged: 0 Thread(s)
Quoted: 298 Post(s)
Liked 681 Times
in
344 Posts
Note, I've never tried such an internal expander in a BB so maybe that's a terrible idea, just spitballin'. But I have used an internal expander (similar to a quill stem) that goes in the seat tube, and held the frame there for painting. Like a dummy seatpost, only (a slight preference of mine) it's smaller than a seatpost at the top of the lube or lug. It tightens down inside a ways, at the seatpost diameter, but then the part that sticks out the top of the frame, and joins it to the stand, is smaller diameter so it doesn't touch the top edge of the seat tube. If a BB cone cone or dummy seatpost does touch at the outer edge of the frame, and if the paint wets out on both the frame and the stand holder-thingum, then there's a risk of tearing the paint when those two parts are separated after the paint dries. There are ways to avoid that problem though, to where sometimes it's not a problem at all, just something to watch out for. Thus my slight preference, not a big deal usually.
Mark B
Mark B
I decided to live with it and maybe clear coat the sides later.
08-02-23, 07:28 AM
#33

Senior Member
Join Date: Jun 2006
Posts: 20,305
Mentioned: 130 Post(s)
Tagged: 0 Thread(s)
Quoted: 3464 Post(s)
Liked 2,831 Times
in
1,997 Posts
Good point. I resisted getting a respirator as long as I was spraying single component paints. Once I got one (I was shooting 2K paint), I realized that I was a cheapskate idiot for not getting it sooner. Now I use it whenever I paint. If it is aerosol, I use it. I learned how to take it apart, clean it and replace the filters as well. I'm also glad that I got it pre-COVID, since the shortage caused the price to rise substantially.
Best $$ I've spent.
Best $$ I've spent.
the 3M is a good mask but does not fit my face comfortably. Wilson was the best for me but finding those today is a problem.
Likes For repechage:
08-02-23, 08:09 AM
#34
Senior Member
Join Date: May 2012
Location: Point Reyes Station, California
Posts: 4,532
Bikes: Indeed!
Mentioned: 92 Post(s)
Tagged: 0 Thread(s)
Quoted: 1508 Post(s)
Liked 3,484 Times
in
1,134 Posts
Me too � curious, but only casually, I'd probably just make my own. Maybe I should wait for Brent to answer... nah I'll just shoot from the hip.
Here's a pair, but whether they're worth $64 (shipped) will depend on whether you can DIY.
The link above goes to what they call head tube cones, but I'm pretty sure they'll work for BBs too. The ones they sell intended for BBs are a bit more expensive and could be overkill for a paint stand. Well, even the smaller headtube cones could be more metal than you need there, but the convenience of ordering from the web, versus the hassle of DIY, might make this compelling...
Brent
__________________
"I have a tendency to meander sometimes." B.G.
"I have a tendency to meander sometimes." B.G.
04-11-24, 10:41 AM
#35
Slowfoot

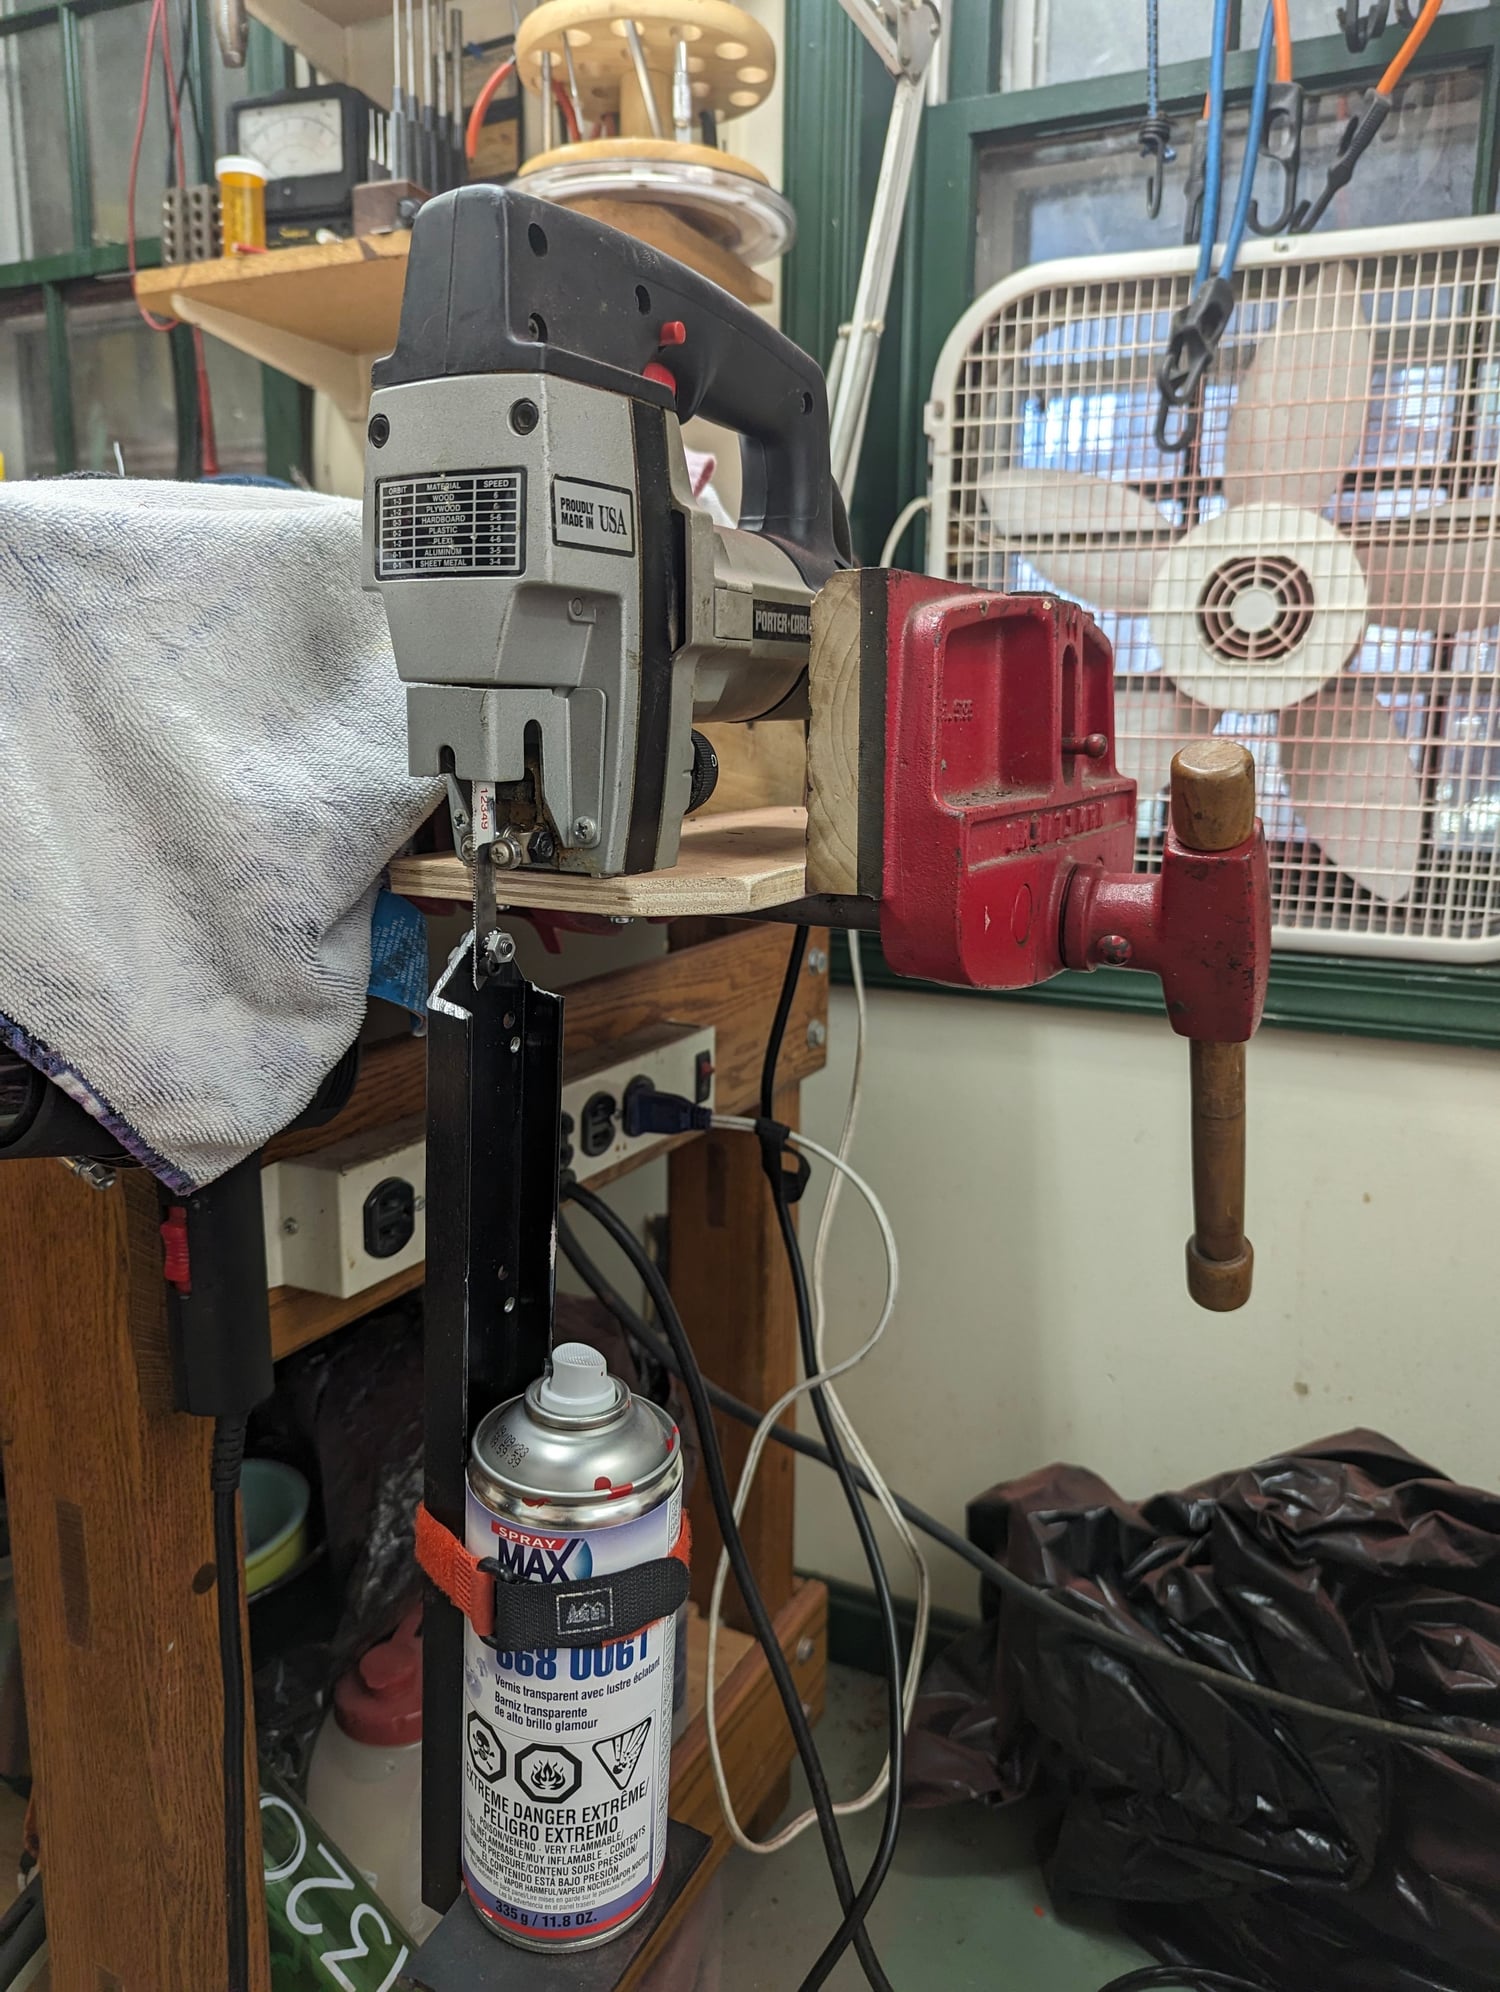
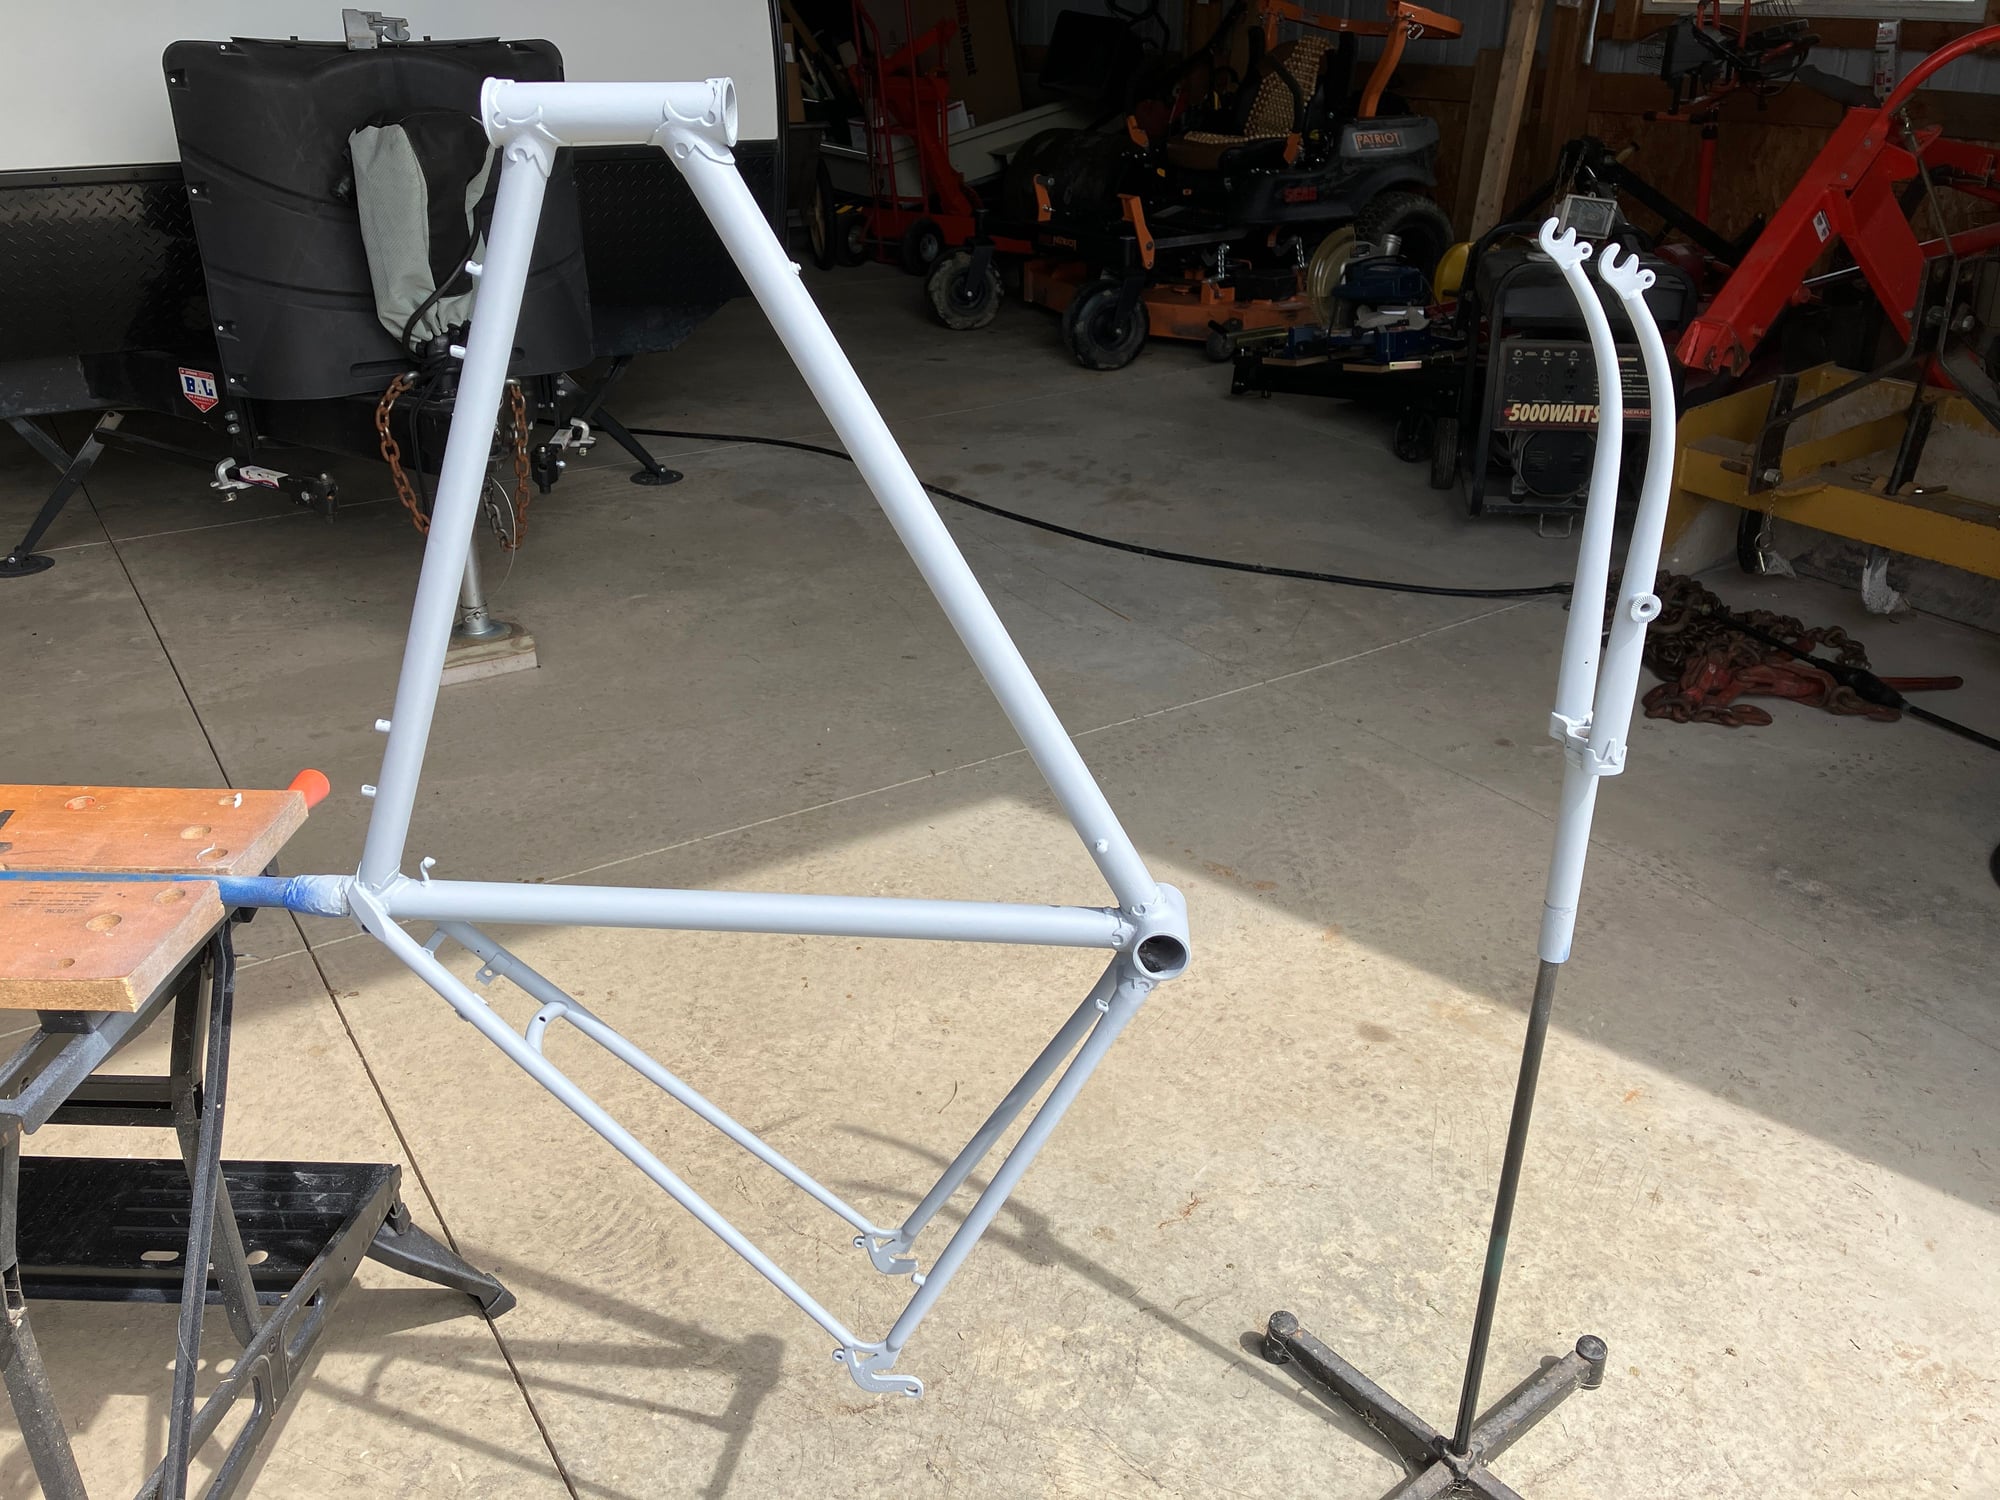
I cut an old Park stand in half. The top I mounted on a rolling tool cart and the bottom I used as a frame holder for painting. The PVC pipe in the head tube is held with a clamping thing that allows me to raise the tube. I used SprayMax: 1 can of 2-part primer (2k), 2 cans of color non-catalyzed (1k), and 2 cans of 2-part gloss coat clear (2k). The instructions call for 4 minutes of shaking so I used a saber saw as a shaking machine. Spraying is a bit nerve-racking because for best results they want you to spray all the color and all the clear with a short time in between each coat. So that means like 8+ coats in a row that all have to be perfect. But the result is that the coats all bond together nice and shiny. Color coat is thin and goes on pretty well but you get orange peel if you spray too thin. Primer and clear is thicker and you get drips if you spray too thick. As I said, nerve-racking. You need a professional technique for professional results (not saying I have that). Not perfect but it came out pretty good and I would do the same way again. I had some drips in the primer that came out with light wet sanding. Important to inspect your work for any missed spots BEFORE you use up all the paint (which goes fast). I gave the floor a good vacuuming and put a fan in the window to suck out, letting it run for a few hours before I started. (Not a single speck of dust in the paint). I turned off the furnace and suggested that Mrs might want to spend the day at the garden center.
One more important thing:
I would do better masking. I would follow this advice from a car painting forum: The best way to mask things is to tape off the area you want covered but leave the last 1/8" or so showing. Now, after the whole thing is covered but that 1/8" you tape that last edge with blue fine line tape that is 1/4" wide. So you cover up that last bit and a little of the regular masking tape. After you paint you pull off that blue fine line that was added last at the edge WHILE the clear is still just tacked up. I even pull it off while still totally wet sometimes.
Last edited by dmarkun; 04-11-24 at 11:06 AM. Reason: spelling
04-11-24, 08:12 PM
#36
Senior Member
Join Date: Nov 2005
Location: NW Ohio
Posts: 3,440
Bikes: 1984 Miyata 310, 1986 Schwinn Sierra, 2011 Jamis Quest, 1980 Peugeot TH8 Tandem, 1992 Performance Parabola, 1987 Ross Mt. Hood, 1988 Schwinn LeTour, 1988 Trek 400T, 1981 Fuji S12-S LTD, 197? FW Evans
Mentioned: 24 Post(s)
Tagged: 0 Thread(s)
Quoted: 540 Post(s)
Liked 1,027 Times
in
527 Posts
For the frame, I clamp a broomstick in a Workmate and slide the seat tube over it. I can spin the frame 360 degrees to hit every nook and crannie. It is a lot easier to paint when you don't have to spray upwards to get the undersides. For the fork I use an old lamp base. I put a small dowel in the brake hole as a stopper. I'll hold the fork in one hand and paint the top of then crown, then I'll flip it over and slide the steerer on the stand to paint the legs.
Likes For Pompiere:
04-12-24, 04:10 AM
#37
Strong Walker

Very nice!
I've been doing this with a repair stand. I use a snug-fitting seatpost (so far, I haven't had trouble finding one) to hold the frame and a sacrificial bottom bracket to protect the threads there.

This has worked reasonably well, but it's difficult to rotate the frame while the paint is wet.
Last year I bought a Wagner paint tent, which keeps the overspray from settling all over the garage. For outdoor purposes you might not care as much about that, but the tent would also help keep dust off of your paint. Of course, the tent makes having a proper respirator more important.
I've been doing this with a repair stand. I use a snug-fitting seatpost (so far, I haven't had trouble finding one) to hold the frame and a sacrificial bottom bracket to protect the threads there.
This has worked reasonably well, but it's difficult to rotate the frame while the paint is wet.
Last year I bought a Wagner paint tent, which keeps the overspray from settling all over the garage. For outdoor purposes you might not care as much about that, but the tent would also help keep dust off of your paint. Of course, the tent makes having a proper respirator more important.
