


How to mount Gravel King TLC on FIR EA60 clincher rims?
 05-20-24, 02:00 PM
#1

Senior Member
Thread Starter
Join Date: Apr 2007
Location: Ottawa, Canada
Posts: 785
Bikes: Raleigh Classic 15, 84; Miyata 912, 85; Miyata Ridge Runner SE, 85; Miyata 610, 86; Miyata 100M, 86; Miyata Valley Runner, 88; Miyata Triple Cross, 89; GT Karakoram, 90; Miyata Elevation 300, 91; Marinoni Touring, 95; Long Haul Trucker, 2013
Mentioned: 9 Post(s)
Tagged: 0 Thread(s)
Quoted: 162 Post(s)
Liked 135 Times
in
82 Posts
How to mount Gravel King TLC on FIR EA60 clincher rims?
So, I have had Pasela 32C tires with wire beads on these rims, but they're quite worn,
I thought I'd try the Gravel Kings TLC folding tires, but I can't begin to figure out how to mount them. I'm not new to bikes, or to changing tires, but all my bikes have clincher rims, and most of my tires are wire beads.
Have I made a mistake? Are these not compatible with clincher rims? Are they only for tubeless rims? I can't even get one side to seat�too tight. And I'm not sure how I'd ever get the tube, and the bead on the other side into position.
Basically, I haven't the faintest idea how to do this. All the googling I've done leads me to instructions on mounting these on tubeless rims.
Do I need different tires or just some knowledge? Or better search terms?
Thanks in advance.
 05-20-24, 02:27 PM
#2
Senior Member
Join Date: Mar 2010
Posts: 1,731
Mentioned: 8 Post(s)
Tagged: 0 Thread(s)
Quoted: 1291 Post(s)
Liked 1,392 Times
in
708 Posts
Mounting a tight bicycle tire on a rim can be challenging, but with some patience and the right technique, it can be done smoothly. Here's a step-by-step guide to help you:
1. **Prepare Your Materials**:
- Tire levers
- A small amount of soapy water or a tire mounting lubricant (optional, for very tight tires)
- A pump
2. **Start with the Rim and Tire**:
- Ensure the rim tape is correctly positioned and undamaged.
- Check that the tire is correctly oriented (directional tread facing the right way).
3. **Mount the First Bead**:
- Push one side (bead) of the tire into the well of the rim. This should be done by hand and generally is the easier side to mount.
4. **Insert the Inner Tube (if applicable)**:
- If you’re using an inner tube, slightly inflate it so it takes shape but remains very soft.
- Place the valve stem through the valve hole in the rim.
- Carefully tuck the inner tube into the tire, making sure it’s not twisted and is evenly distributed inside the tire.
5. **Mount the Second Bead**:
- Starting at the valve stem, begin pushing the second bead of the tire into the rim. Ensure that the valve is pushed up into the tire to avoid pinching the tube.
- Work the bead into the rim with your hands, moving around the wheel and pushing the bead into the center well of the rim (the deepest part).
6. **Work Around the Tire**:
- As you work the bead into the rim, make sure the bead already in place stays in the center well. This provides more slack and makes the last part of the bead easier to mount.
- When you get to the tight section near the end, use both hands to roll the bead over the edge of the rim. If necessary, use tire levers carefully to avoid pinching the inner tube.
7. **Final Adjustments**:
- Once the tire is fully mounted, check that the tube is not pinched between the tire and the rim.
- Ensure the tire bead is seated evenly around the rim on both sides.
8. **Inflate the Tire**:
- Inflate the tire gradually, checking frequently to ensure the bead is seating properly and the tire isn’t bulging out unevenly.
- Inflate to the recommended pressure indicated on the tire sidewall.
9. **Check for Proper Seating**:
- Spin the wheel and observe the tire to ensure it is mounted evenly and there are no bulges or sections where the bead hasn't seated properly.
10. **Final Inspection**:
- Double-check the tire bead, the valve stem area, and the overall seating of the tire. Make sure there are no pinches, bulges, or misalignments.
**Tips**:
- Warming up the tire (by leaving it in the sun or in a warm room) can make it more pliable and easier to work with.
- Using a bit of soapy water or a specific tire mounting lubricant can help the bead slide into place more easily.
- If using tire levers, be careful not to pinch the tube, especially near the final section where the bead is tightest.
By following these steps and tips, you should be able to mount even the tightest bicycle tires onto your rims.
05-20-24, 02:44 PM
#3
Senior Member
Thread Starter
Join Date: Apr 2007
Location: Ottawa, Canada
Posts: 785
Bikes: Raleigh Classic 15, 84; Miyata 912, 85; Miyata Ridge Runner SE, 85; Miyata 610, 86; Miyata 100M, 86; Miyata Valley Runner, 88; Miyata Triple Cross, 89; GT Karakoram, 90; Miyata Elevation 300, 91; Marinoni Touring, 95; Long Haul Trucker, 2013
Mentioned: 9 Post(s)
Tagged: 0 Thread(s)
Quoted: 162 Post(s)
Liked 135 Times
in
82 Posts
Thanks very much for your careful instructions.
For the most part, your steps are what I've followed in the past, but I've never had to resort to using soap or warming the tire up, and I usually just use my thumbs rather than levers. I'll give those tips try.
For the most part, your steps are what I've followed in the past, but I've never had to resort to using soap or warming the tire up, and I usually just use my thumbs rather than levers. I'll give those tips try.
05-20-24, 03:23 PM
#5
Expired Member

Join Date: Jun 2007
Location: TN
Posts: 11,937
Mentioned: 42 Post(s)
Tagged: 0 Thread(s)
Quoted: 3814 Post(s)
Liked 5,834 Times
in
2,948 Posts
FWIW, step 5 is perhaps not correct. Most suggest starting opposite the valve as that gives you more unobstructed channel for the bead. Unfortunately it seems Panaracer no longer makes a non-tubeless GK in that width.

Likes For shelbyfv:
05-20-24, 03:56 PM
#6
Senior Member
Thread Starter
Join Date: Apr 2007
Location: Ottawa, Canada
Posts: 785
Bikes: Raleigh Classic 15, 84; Miyata 912, 85; Miyata Ridge Runner SE, 85; Miyata 610, 86; Miyata 100M, 86; Miyata Valley Runner, 88; Miyata Triple Cross, 89; GT Karakoram, 90; Miyata Elevation 300, 91; Marinoni Touring, 95; Long Haul Trucker, 2013
Mentioned: 9 Post(s)
Tagged: 0 Thread(s)
Quoted: 162 Post(s)
Liked 135 Times
in
82 Posts
05-20-24, 04:53 PM
#7
Senior Member
Join Date: Mar 2010
Posts: 1,731
Mentioned: 8 Post(s)
Tagged: 0 Thread(s)
Quoted: 1291 Post(s)
Liked 1,392 Times
in
708 Posts
Some advice, never correct or challenge AI publicly on a forum such as this you know who the machines are going to come for 1st don�t you?
05-20-24, 04:58 PM
#8
Expired Member
Join Date: Jun 2007
Location: TN
Posts: 11,937
Mentioned: 42 Post(s)
Tagged: 0 Thread(s)
Quoted: 3814 Post(s)
Liked 5,834 Times
in
2,948 Posts
No. With tubes, start opposite the valve. Probably makes less difference with tubeless since the tube isn't taking up space in the channel.
05-20-24, 05:41 PM
#9
Senior Member

Join Date: Aug 2009
Posts: 2,541
Mentioned: 14 Post(s)
Tagged: 0 Thread(s)
Quoted: 1649 Post(s)
Liked 1,872 Times
in
1,040 Posts
Far be it from me to question our almighty GPT4o Overlord, one additional tip not mentioned is that, you can start by placing the entire wheel inside the tire like this:
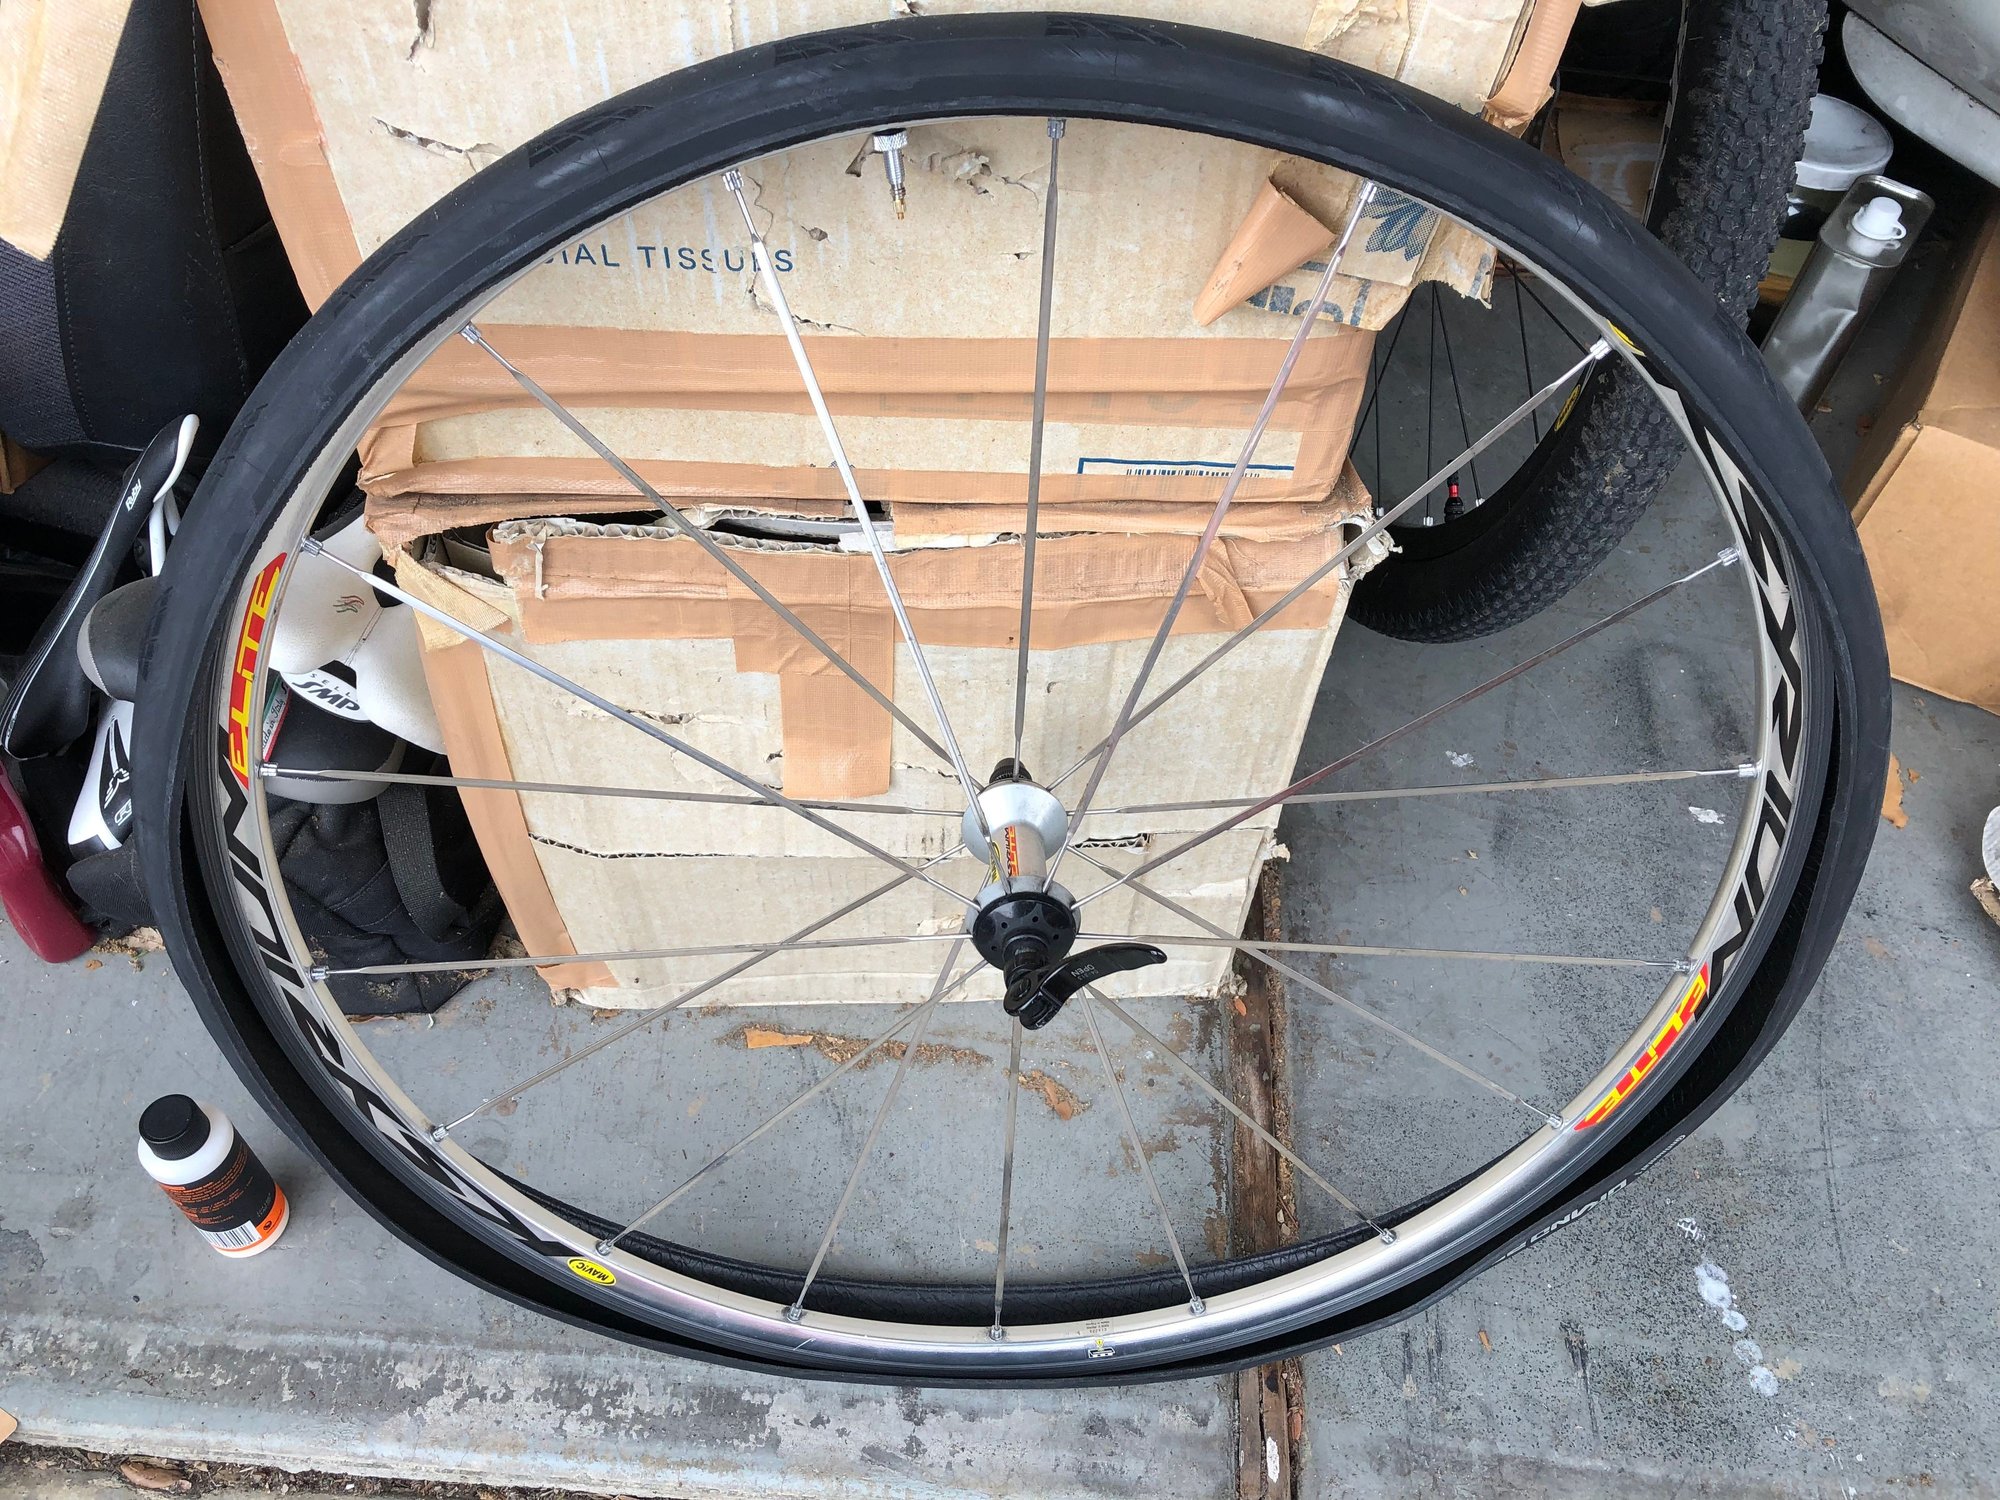
And then pry the bead on from the outside in. The advantage is that you can use a tire jack to pry the tire from the outside in. Important in the case, as in the OP's, where you can't even get the first bead on.
And then pry the bead on from the outside in. The advantage is that you can use a tire jack to pry the tire from the outside in. Important in the case, as in the OP's, where you can't even get the first bead on.
05-20-24, 05:58 PM
#10
Senior Member
Join Date: Dec 2008
Location: Pioneer Valley
Posts: 1,343
Mentioned: 3 Post(s)
Tagged: 0 Thread(s)
Quoted: 444 Post(s)
Liked 1,040 Times
in
533 Posts
If you�re using cloth rim tape, replace it with tubeless tape, which is thinner. Also helps to leave the tires in the sun or by a warm furnace for awhile first.
05-20-24, 06:53 PM
#11
Bad example
Join Date: Nov 2015
Location: Seattle and Reims
Posts: 3,288
Bikes: Peugeot: AO-8 1973, PA-10 1971, PR-10 1973, Sante 1988; Masi Gran Criterium 1975, Stevenson Tourer 1980, Stevenson Criterium 1981, Schwinn Paramount 1972, Rodriguez 2006, Gitane Federal ~1975, Holdsworth Pro, Follis 172 ~1973, Bianchi '62
Mentioned: 38 Post(s)
Tagged: 0 Thread(s)
Quoted: 898 Post(s)
Liked 425 Times
in
200 Posts
I've never done this. Always started at the valve. But I must admit with the new tubeless-ready setups it's getting damn hard to do. I'll give this "new" way a try next time.
__________________
Keeping Seattle�s bike shops in business since 1978
Keeping Seattle�s bike shops in business since 1978
05-20-24, 07:10 PM
#12
Senior Member
Thread Starter
Join Date: Apr 2007
Location: Ottawa, Canada
Posts: 785
Bikes: Raleigh Classic 15, 84; Miyata 912, 85; Miyata Ridge Runner SE, 85; Miyata 610, 86; Miyata 100M, 86; Miyata Valley Runner, 88; Miyata Triple Cross, 89; GT Karakoram, 90; Miyata Elevation 300, 91; Marinoni Touring, 95; Long Haul Trucker, 2013
Mentioned: 9 Post(s)
Tagged: 0 Thread(s)
Quoted: 162 Post(s)
Liked 135 Times
in
82 Posts
Far be it from me to question our almighty GPT4o Overlord, one additional tip not mentioned is that, you can start by placing the entire wheel inside the tire like this:
And then pry the bead on from the outside in. The advantage is that you can use a tire jack to pry the tire from the outside in. Important in the case, as in the OP's, where you can't even get the first bead on.
And then pry the bead on from the outside in. The advantage is that you can use a tire jack to pry the tire from the outside in. Important in the case, as in the OP's, where you can't even get the first bead on.
05-21-24, 01:13 PM
#13
Senior Member
Thread Starter
Join Date: Apr 2007
Location: Ottawa, Canada
Posts: 785
Bikes: Raleigh Classic 15, 84; Miyata 912, 85; Miyata Ridge Runner SE, 85; Miyata 610, 86; Miyata 100M, 86; Miyata Valley Runner, 88; Miyata Triple Cross, 89; GT Karakoram, 90; Miyata Elevation 300, 91; Marinoni Touring, 95; Long Haul Trucker, 2013
Mentioned: 9 Post(s)
Tagged: 0 Thread(s)
Quoted: 162 Post(s)
Liked 135 Times
in
82 Posts
With tire levers, soap and a bit of persistence I finally got it mounted. Thanks everyone.
Likes For John Nolan:
