


Transporting a bicycle by bicycle?
 07-03-17, 02:22 PM
#26
Senior Member
Not in Northern Baltimore County. Good luck. Oh ride that down York Road. Better yet take it down Charles Street. Falls Road would be fun. Lots of Cyclists taking their lives in their hands. You might be able to through Roland Park, but if you can afford to live in Roland park I doubt you are using a bike carrier.
And Baltimore has a bike share.
They look like some bike share bikes that somebody is taking to have serviced?
Not some bikes some digger found.
And Baltimore has a bike share.
They look like some bike share bikes that somebody is taking to have serviced?
Not some bikes some digger found.
 07-04-17, 12:08 AM
#27

Been Around Awhile

Join Date: Oct 2004
Location: Burlington Iowa
Posts: 29,965
Bikes: Vaterland and Ragazzi
Mentioned: 0 Post(s)
Tagged: 0 Thread(s)
Quoted: 12 Post(s)
Liked 1,530 Times
in
1,042 Posts
07-06-17, 08:38 AM
#29
Been Around Awhile
Join Date: Oct 2004
Location: Burlington Iowa
Posts: 29,965
Bikes: Vaterland and Ragazzi
Mentioned: 0 Post(s)
Tagged: 0 Thread(s)
Quoted: 12 Post(s)
Liked 1,530 Times
in
1,042 Posts
Does that mean that in the StarBiker dictionary a "digger" is defined as someone who finds stuff at thrift stores?
Reading LCF on BF is enlightening for learning about unique use of words by imaginative thinkers.
Reading LCF on BF is enlightening for learning about unique use of words by imaginative thinkers.
07-06-17, 08:57 AM
#30
Senior Member
Two local Thrifts are readily available.
You could call yourself whatever you like. Digger is an old term. Could mean many things.
I could call myself a connoisseur of interesting/somewhat valuable items I search for? A person with modest means, and high hopes? A follower of monetary trends based on used tangible objects?
09-24-17, 12:13 PM
#32
Senior Member
Join Date: Sep 2010
Location: Rupert's Land
Posts: 1,243
Bikes: 1981 Raleigh GP, 1985 Norco Bush Pilot, . . .
Mentioned: 13 Post(s)
Tagged: 0 Thread(s)
Quoted: 241 Post(s)
Liked 187 Times
in
136 Posts
Minimalist method 1.
I have been tring to figure out how to transport a bicycle with another bicycle for some time. I also want to do it with the minimum of special equipment.
Here is what I have come up with.
The transporting bike needs a rear rack. Parts needed: Front axle, "U" clamps, bungie cords and (optional) an old inner tube.
The old inner tube is wrapped around the fork blades to hold things in place while the U-clamps are secured.
The key principle is this: The front axle of the transported bicycle must be secured parallel to the rear axle of the transporting bicycle.
If you can achieve this principle the transported bicycle behaves like a trail-a-bike.
09-24-17, 12:14 PM
#33
Senior Member
Join Date: Sep 2010
Location: Rupert's Land
Posts: 1,243
Bikes: 1981 Raleigh GP, 1985 Norco Bush Pilot, . . .
Mentioned: 13 Post(s)
Tagged: 0 Thread(s)
Quoted: 241 Post(s)
Liked 187 Times
in
136 Posts
Minimalist method 2.
I have not tried this method and as such I have no pictures.
This method requires some disassembly of the transported bicycle. The fork must be removed from the frame. This means removing the stem, handlebars and seperating the front brake cable.
The steering tube is now empty.
The transporting bike needs a rear rack and an additional seat with seatpost. Firmly secure a seat upsidedown to the rack. The seatpost is vertiaclly
Put the steering tube on the seatpost. Now it really looks like a trail-a-bike.
The trick is to keep the seatpost vertically secure while transporting.
05-20-20, 11:49 AM
#34
Senior Member
Join Date: Sep 2010
Location: Rupert's Land
Posts: 1,243
Bikes: 1981 Raleigh GP, 1985 Norco Bush Pilot, . . .
Mentioned: 13 Post(s)
Tagged: 0 Thread(s)
Quoted: 241 Post(s)
Liked 187 Times
in
136 Posts
It has been three years since my previous post and I have been doing some thinking on the back burner.
My previous trail-a bike method of transporting a bicycle by:
1. removing the front wheel
2. put an axle into the fork dropouts
3. Secure the axle to a rear rack.
With this method there are two problems:
Finding some way to secure the axle (which is in the fork of the bicycle that is being transported) to the rear rack.
I have found that the axle does not stay as secure as it needs to be.
The angle of the trailing bike to the ground and the center of gravity is to much and the trailing bike wants to go its own way and fall over.
Hmmmm? What to do?
Remove the fork from the bicycle. This means also removing the stem with handlebars. The frame head tube is now empty.
If you have another stem and handlebar, turn then upside-down put the stem into the underside of the head tube. Now mount stem and handlebar securely to the rear rack of the transporting bike. The transportee bicycle is now connected for transportation.
Secure the bicycle's stem and bar with cables still attached to the frame of the transportee bicycle. Transport the fork and front wheel as is appropriate.
Put a bunge cord around the seat post of the transporting bicycle and connect it to the head tube of the transportee bicycle. The seat post then takes some of the stress of pulling the bicycle.
Here are some pictures. In this case I have a basket on the rear rack and the handle bars and stem are secured to the basket.
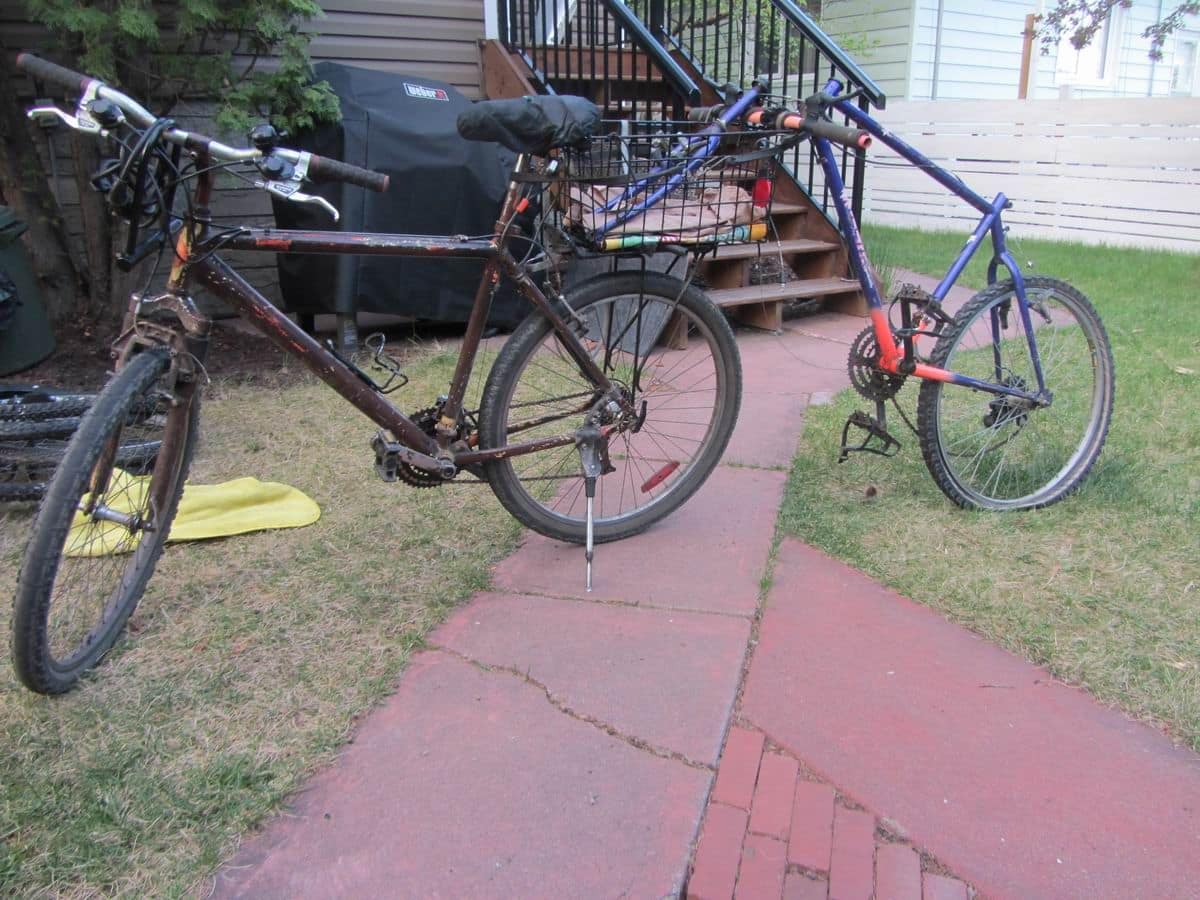
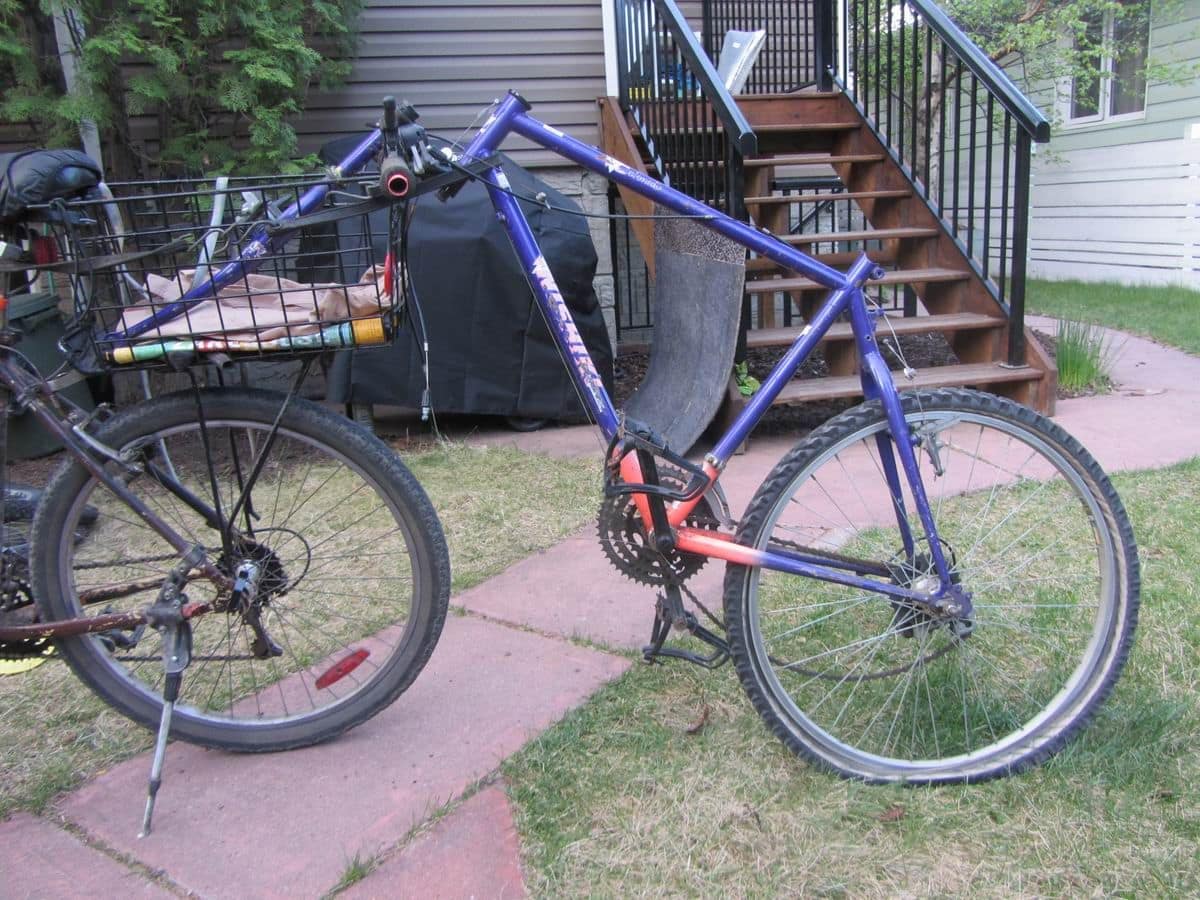
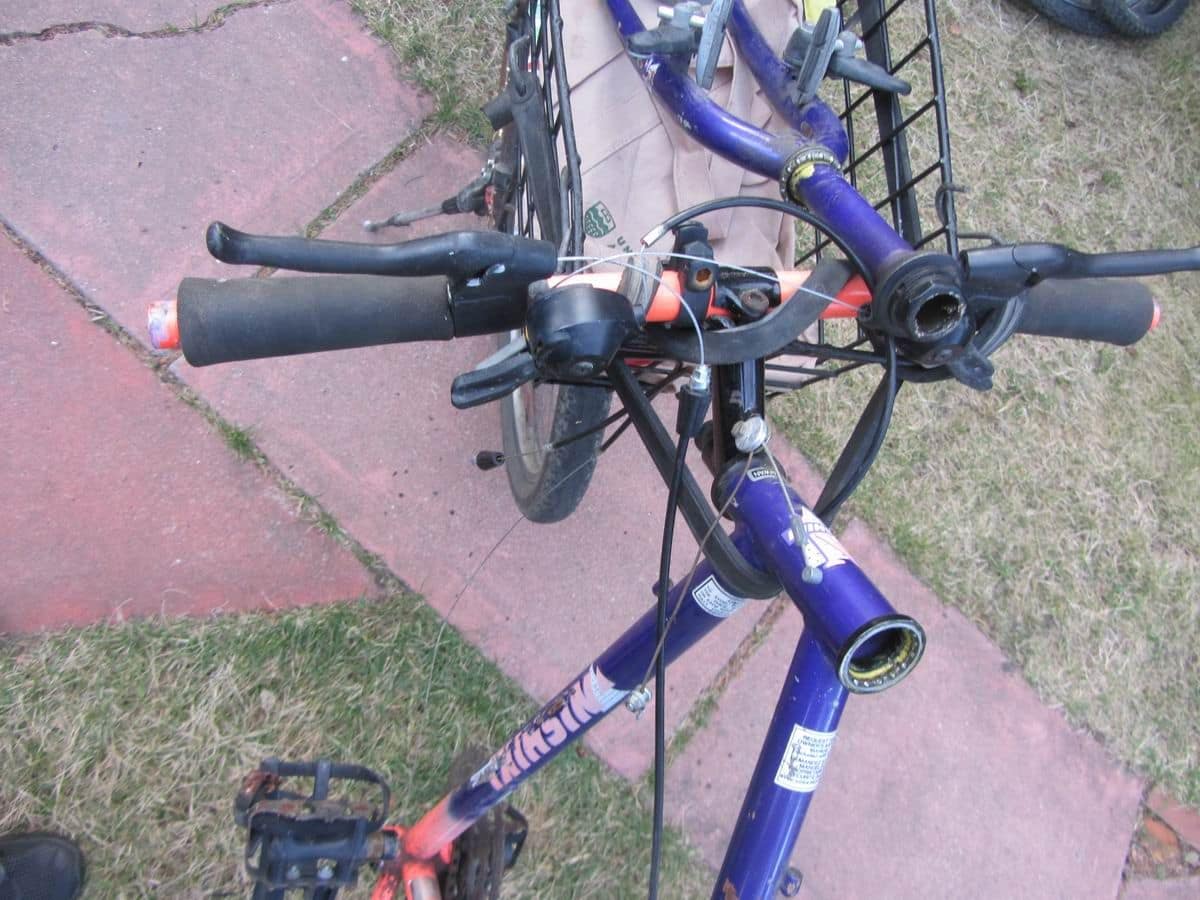
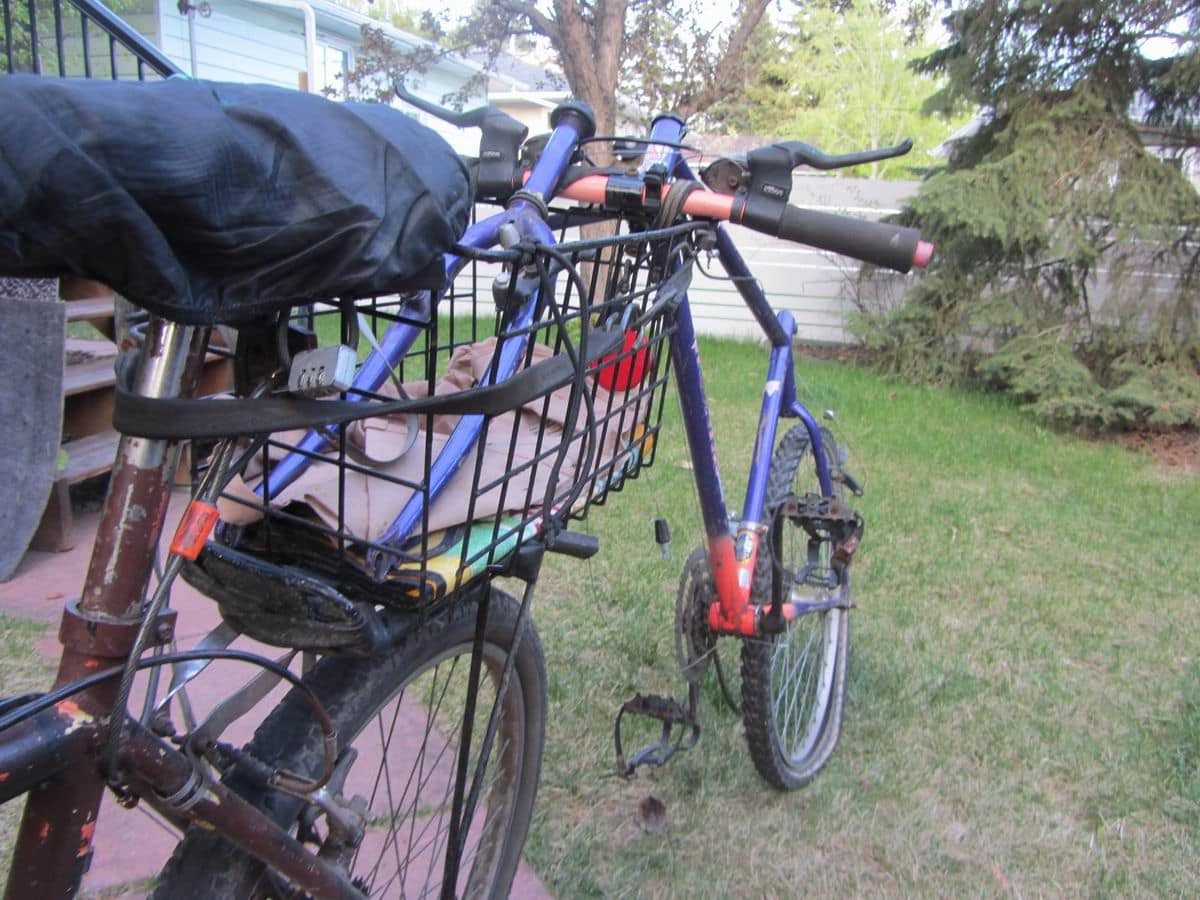
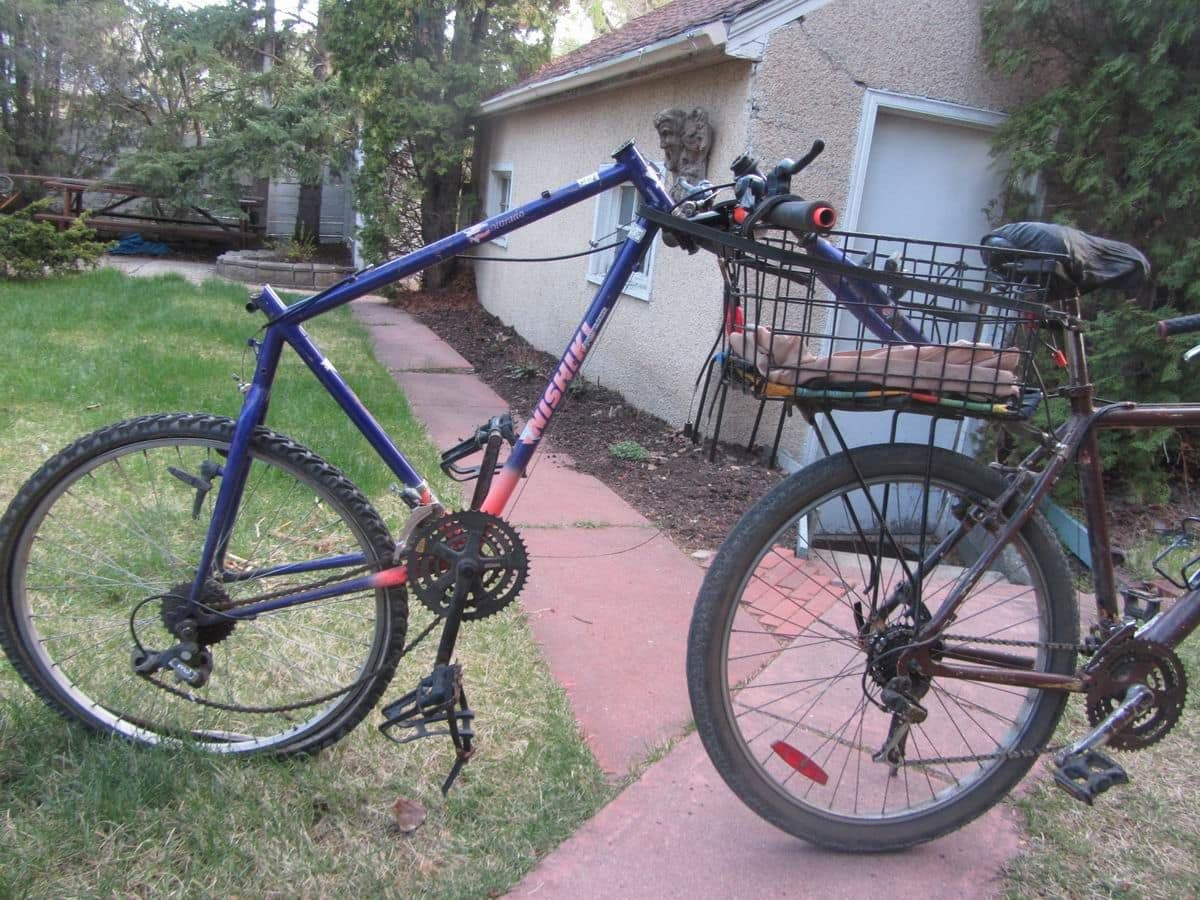
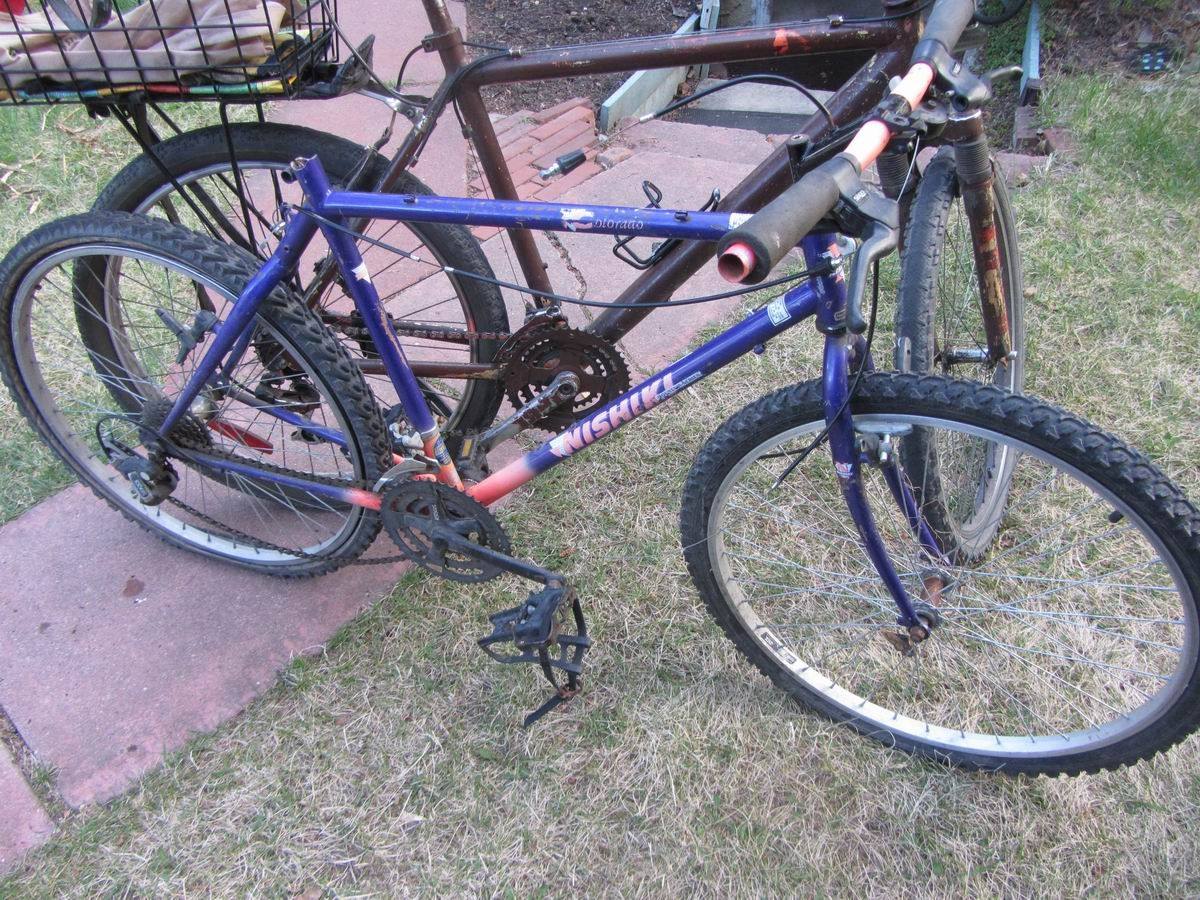
In this case I used the handlebar and stem of the transportee bicycle to insert into the under side of the head tube. The brake and shifter cables all had to be loosened.
The bicycle was going to be overhauled anyway so loosening all the cables was not a concern for me.
Transported the bicycle at least 5 miles with some small hills. No problems. Much more stable than my previous method.
This is my cheap and minimalist (in terms of equipment) method. Note that this bicycle had a threaded headset.
What do you need for this method.
One bicycle with a rear rack.
Stem and handlebars to secure to the rack and put into the underside of the head tube.
wrench to loosen the stem for removal.
Wrenchs to remove headset nuts for fork removal.
Several bungy cords.
Downside of this method is time and tools for disassembly and reassemble of the transportee bicycle.
My previous trail-a bike method of transporting a bicycle by:
1. removing the front wheel
2. put an axle into the fork dropouts
3. Secure the axle to a rear rack.
With this method there are two problems:
Finding some way to secure the axle (which is in the fork of the bicycle that is being transported) to the rear rack.
I have found that the axle does not stay as secure as it needs to be.
The angle of the trailing bike to the ground and the center of gravity is to much and the trailing bike wants to go its own way and fall over.
Hmmmm? What to do?
Remove the fork from the bicycle. This means also removing the stem with handlebars. The frame head tube is now empty.
If you have another stem and handlebar, turn then upside-down put the stem into the underside of the head tube. Now mount stem and handlebar securely to the rear rack of the transporting bike. The transportee bicycle is now connected for transportation.
Secure the bicycle's stem and bar with cables still attached to the frame of the transportee bicycle. Transport the fork and front wheel as is appropriate.
Put a bunge cord around the seat post of the transporting bicycle and connect it to the head tube of the transportee bicycle. The seat post then takes some of the stress of pulling the bicycle.
Here are some pictures. In this case I have a basket on the rear rack and the handle bars and stem are secured to the basket.
In this case I used the handlebar and stem of the transportee bicycle to insert into the under side of the head tube. The brake and shifter cables all had to be loosened.
The bicycle was going to be overhauled anyway so loosening all the cables was not a concern for me.
Transported the bicycle at least 5 miles with some small hills. No problems. Much more stable than my previous method.
This is my cheap and minimalist (in terms of equipment) method. Note that this bicycle had a threaded headset.
What do you need for this method.
One bicycle with a rear rack.
Stem and handlebars to secure to the rack and put into the underside of the head tube.
wrench to loosen the stem for removal.
Wrenchs to remove headset nuts for fork removal.
Several bungy cords.
Downside of this method is time and tools for disassembly and reassemble of the transportee bicycle.
05-22-20, 08:51 AM
#36
Senior Member
Join Date: Jun 2014
Location: Ontario, Canada
Posts: 4,624
Bikes: iele Latina, Miele Suprema, Miele Uno LS, Miele Miele Beta, MMTB, Bianchi Model Unknown, Fiori Venezia, Fiori Napoli, VeloSport Adamas AX
Mentioned: 16 Post(s)
Tagged: 0 Thread(s)
Quoted: 1324 Post(s)
Liked 927 Times
in
640 Posts
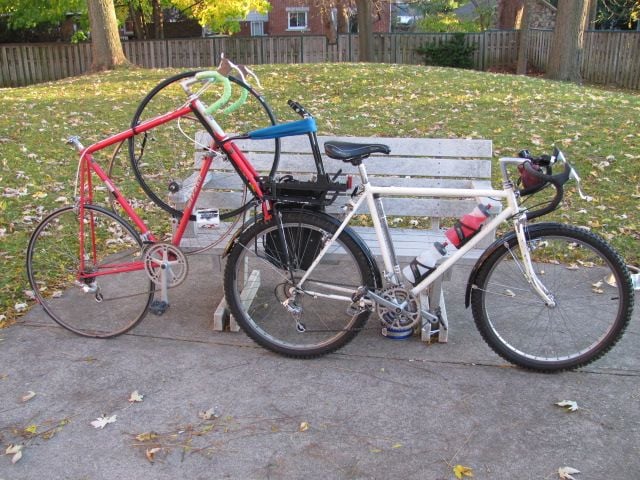
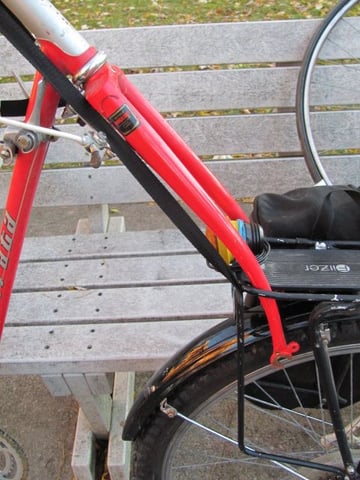
I take the front wheel off and slide sections of inner tube over the fork legs to protect the paint. Then I turn the fork around so that it faces the rear of the bike. Next I push the fork legs down through the my rear rack. I secure the bike with a couple of Coghlan's Arno Straps and use some toe-straps to secure the front wheel to the bike being towed. With this method the towed bike is extremely secure and I don't even know it's there.
Here's an image of a Miyata 710 I brought home along with my wheel truing stand. It was one time when I didn't use the inner tube segments on the fork legs.
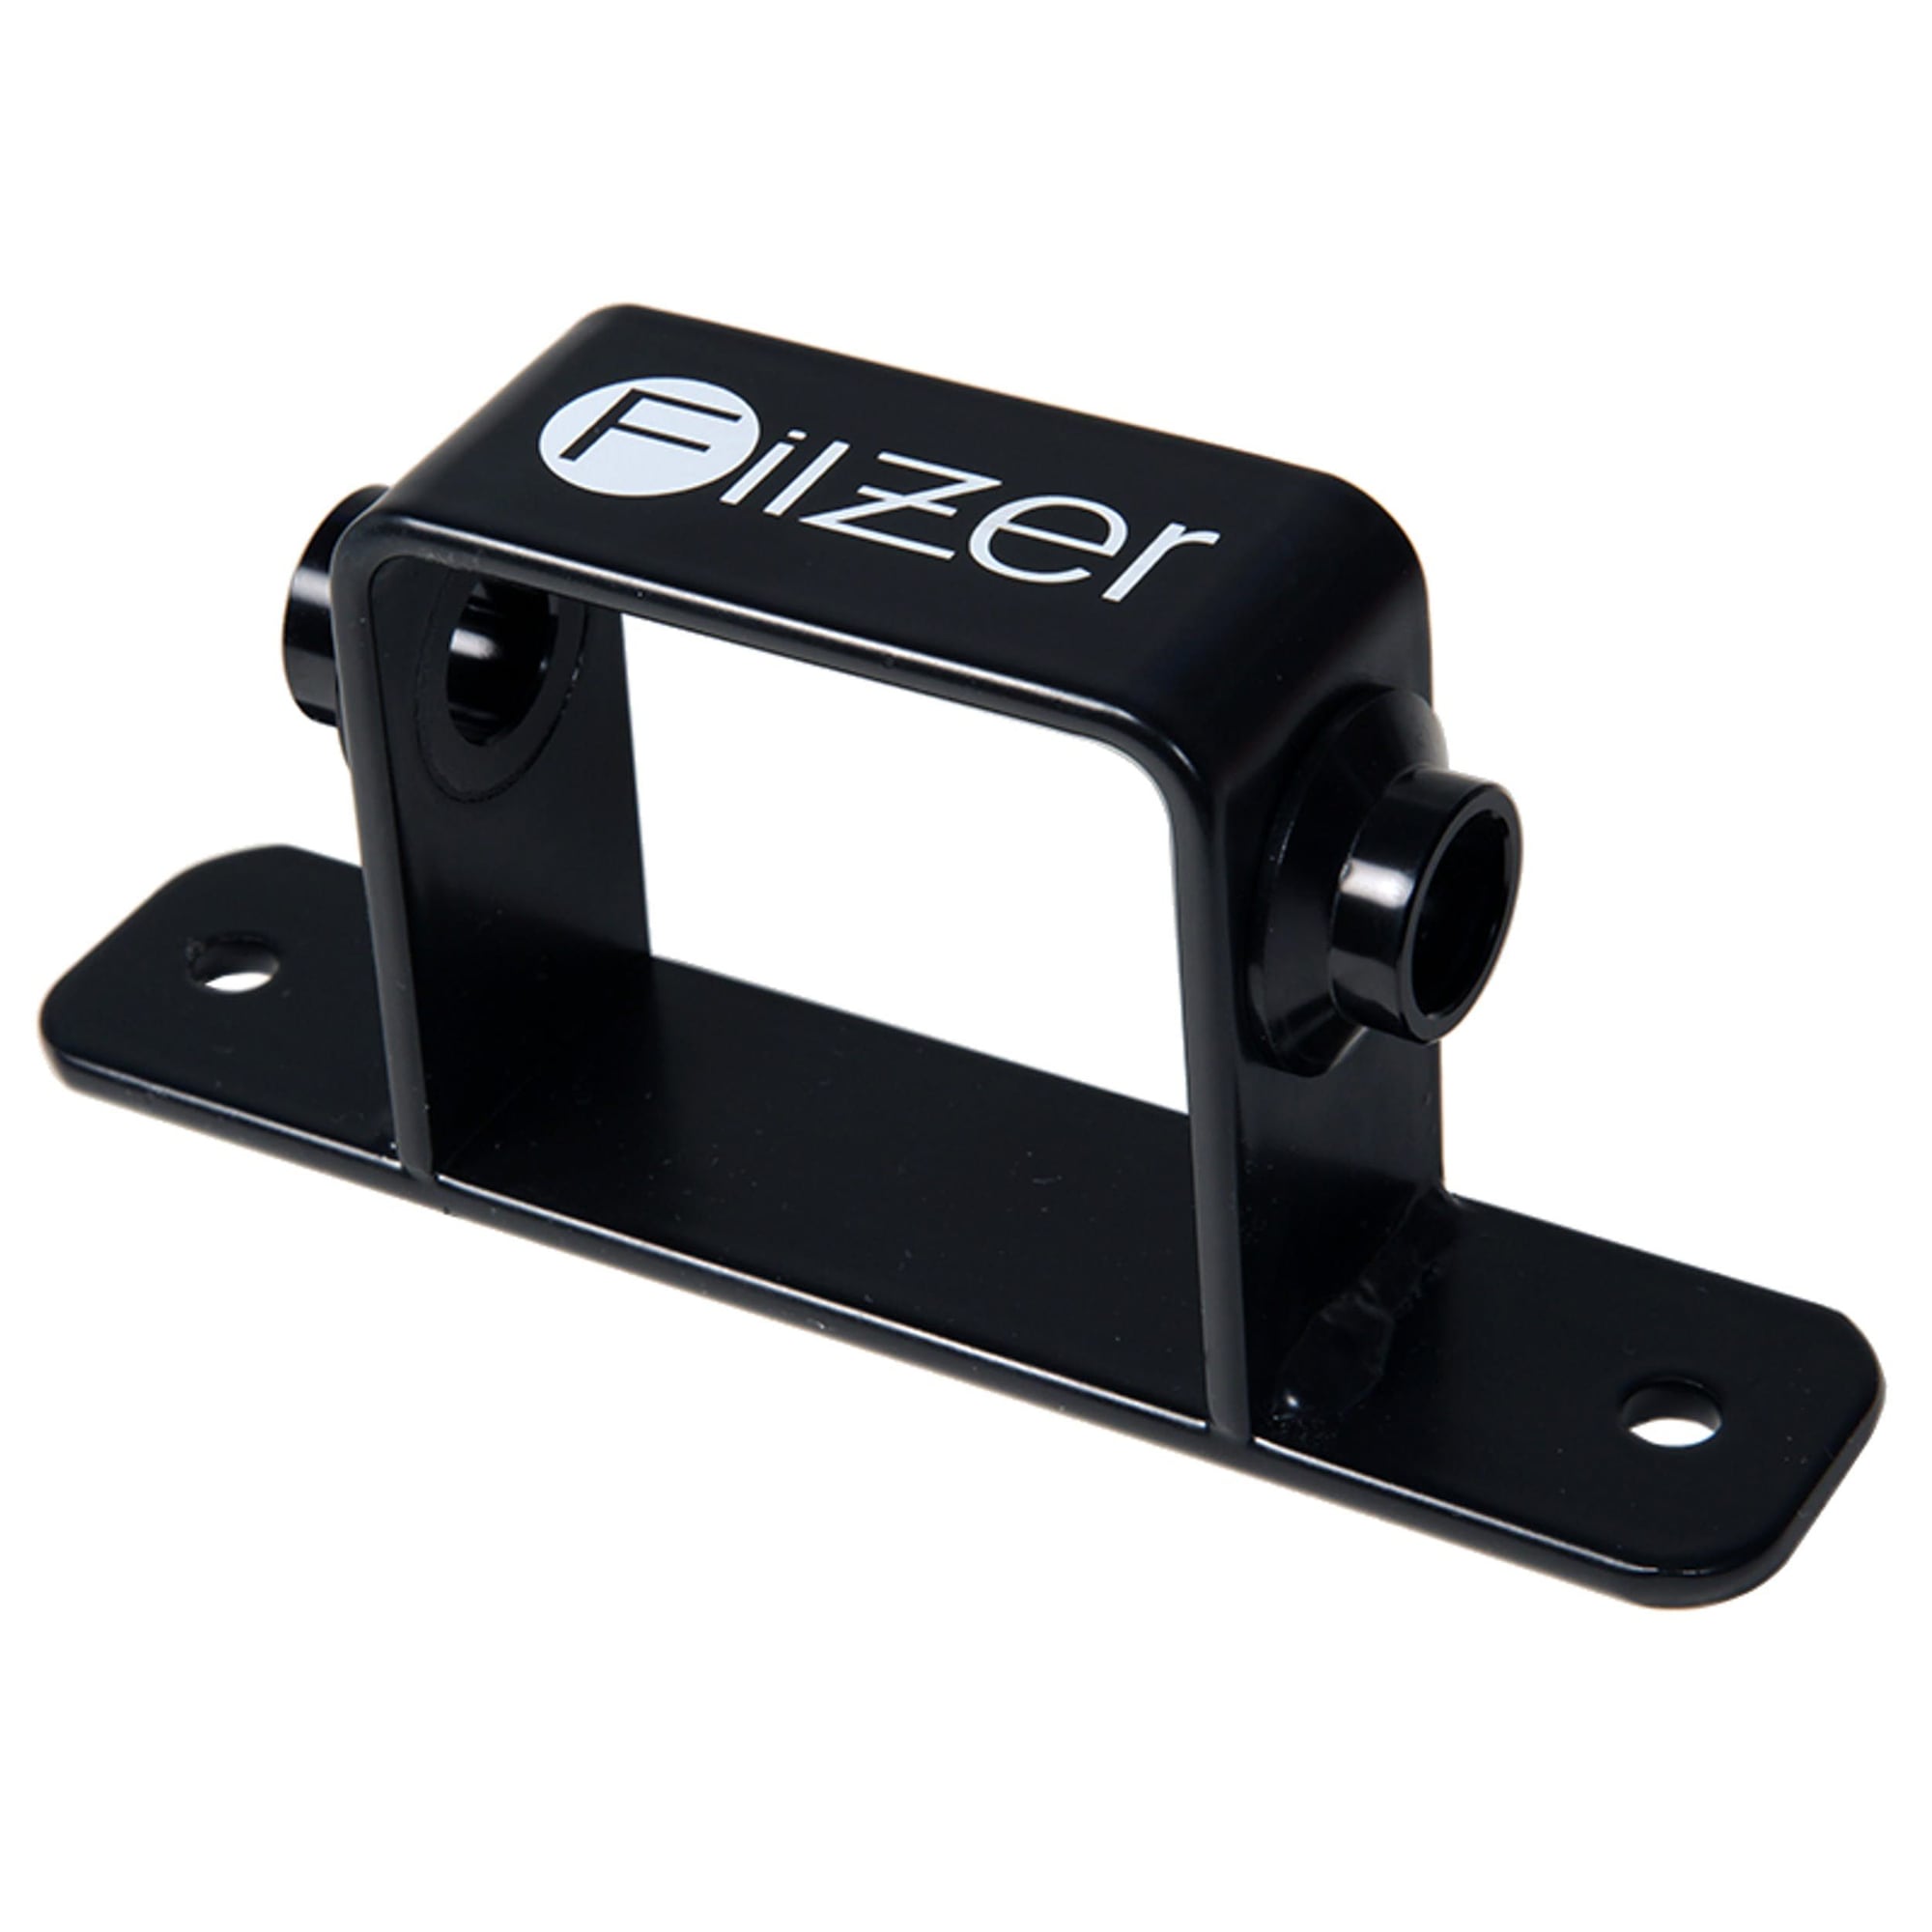
Or you can buy a front fork mount similar to these.


Cheers
Here's an image of a Miyata 710 I brought home along with my wheel truing stand. It was one time when I didn't use the inner tube segments on the fork legs.
Or you can buy a front fork mount similar to these.
Cheers

