


New Track Bike, help with stuck nuts and rust & wheels
 03-14-21, 08:34 AM
#51
SE Wis
Join Date: Apr 2005
Location: Milwaukee, WI
Posts: 10,491
Bikes: '68 Raleigh Sprite, '02 Raleigh C500, '84 Raleigh Gran Prix, '91 Trek 400, 2013 Novara Randonee, 1990 Trek 970
Mentioned: 40 Post(s)
Tagged: 0 Thread(s)
Quoted: 2738 Post(s)
Liked 3,379 Times
in
2,044 Posts
I would be using a wheel style brush rather than a cup style to avoid chances of hitting the rim with the cup.
https://www.homedepot.com/p/Robtec-3...CS12/301770990
https://www.homedepot.com/p/Robtec-3...CS12/301770990
 03-14-21, 08:39 AM
#52
Junior Member
Thread Starter
This has been a fun thread to read through. A restoration like this can be really satisfying. Some thoughts, most of which have been mentioned:
- That frame is in rough shape. Im not sure if it is from sweat or sitting in the elements, but I�d want to deal with the rust first, particularly around the headset and the home made cable port. The good thing about rust is that it is usually only on the surface, not a structural concern. Either way, strip all the parts off the frame.
- If you do care about aesthetics, bring the stripped frame to a powder coater. They�ll bead blast the corrosion off. before powder coating.
- After you deal with the corrosion, invest in a can of frame saver. Also cheap and easy (though smelly) to do at home.
- given the corrosion and possible refinishing, when you�re ready to build the frame again, I�d visit either a good shop or a frame builder to face the headset and bottom bracket, chase the bottom bracket threads, and possibly ream the seat tube. This requires specialized tools, but shouldn�t be expensive. Getting the surfaces faced might be particularly important, as bad surfaces will cause the headset / bb to loosen over time.
- I wouldn�t bother finding someone to braze on a real cable port unless you want to spend the money. Obviously, you�d do this before refinishing.
- That stem doesn�t look good. I�d call around to local shops to see if they have a used quill stem sitting in a parts bin.
- You�ve removed plenty of the old from those rims. Take a look at the hub bearings to see if they need service.
Meeting the powdercoat guys tom need to see how much it will cost. Im a bit hesitant do do sandblasting so I will ask them if they can do some sort of chemical rust removal or electrolysis so that way the inside will be handled as well. My thinking is that if its too expensive to have it powdercoated or if they cant do any proper de rusting then I might try to DIY it.
My research to internal anti rust solutions led me to this Anti-Corrosion product shootout! | Page 4 | Mountain Bike Reviews Forum (mtbr.com) Seems like either fluid film, corrosion x or wd40 long term corrosion inhibitor have substantially better results. Trying to get my hands on fluid film or wd40. Also asked my uncle who is a sailor what they use for their ships. If he can recommend a proven method I might try his.
For the stem I ordered some citric acid which I will mix into a solution and pour under the fork and let it sit overnight to see if that can loosen the stem. If that fails, I have ordered an impact driver and screw remover drill bit as well for worst case scenarios.
Do you think that having the cable ports done is not necessary? If so why not?
I redid the wheels again today and removed maybe 95% of the glue. Scuffed them up with sandpaper per the video, cleaned them with alcohol and left them to dry overnight. Will start the glue process tom.
Man this is super fun, but its also quite bittersweet. Half of me is like ooooohhh so thats how it works. The other half just wants it to be over with so I can ride my bike. Who would have thought you could have this kind of Love-Hate relationship with a bicycle.
 03-14-21, 08:42 AM
#53

Full Member
Join Date: Aug 2020
Posts: 237
Mentioned: 2 Post(s)
Tagged: 0 Thread(s)
Quoted: 107 Post(s)
Liked 151 Times
in
96 Posts
And be sure the bristles on the wire wheel brush are of a softer metal than the rim. Looking at the photos, it appears the brush wore through the "hard anodized" surface.
03-14-21, 08:46 PM
#54
Full Member
If you apply a frame saver, wait until after the frame is powdercoated. The heat will cause any oils in the frame to run out and that will mess up the powdercoat. As far as masking goes, let the powdercoater do that. They use a heat resistant mylar tape, not any regular tapes we would use for painting. Again, the heat will melt the tape and mess up the finish.
Likes For rickpaulos:
03-15-21, 08:16 AM
#55
Junior Member
Thread Starter
If you apply a frame saver, wait until after the frame is powdercoated. The heat will cause any oils in the frame to run out and that will mess up the powdercoat. As far as masking goes, let the powdercoater do that. They use a heat resistant mylar tape, not any regular tapes we would use for painting. Again, the heat will melt the tape and mess up the finish.

My only remaining problem now is the stuck stem. Waiting for the chemicals and tools to arrive. Hopefully it gets sorted.
I would be using a wheel style brush rather than a cup style to avoid chances of hitting the rim with the cup.
https://www.homedepot.com/p/Robtec-3...CS12/301770990
https://www.homedepot.com/p/Robtec-3...CS12/301770990

Turned out pretty good I think. I scuffed it up very lightly with sandpaper per the video and applied the first coating of glue. Also inflated the tyres to let them form out and stretch.
03-15-21, 11:01 AM
#56
The dropped

Join Date: Oct 2018
Location: Columbus, OH
Posts: 2,144
Bikes: Pake C'Mute Touring/Commuter Build, 1989 Kona Cinder Cone, 1995 Trek 5200, 1973 Raleigh Super Course FG, 1960/61 Montgomery Ward Hawthorne "thrift" 3 speed, by Hercules (sold) : 1966 Schwinn Deluxe Racer (sold)
Mentioned: 10 Post(s)
Tagged: 0 Thread(s)
Quoted: 1739 Post(s)
Liked 1,014 Times
in
696 Posts
Good advice. I went to a few powdercoaters today. The most reasonable guy cannot anything complex beyond simple colors for cheap. Guy said that most people use them as a base coat and then do the details themselves with spray cans. The process will cost me 15 USD for Acid Bath and anti rust chemical treatment, Primer and base powder coat. I have set a schedule for Sat next week to get the frame done. Once I get the frame back I still intend to use some anti rust on the inside just to be sure. Guess its time to learn how to spray paint my frame too
My only remaining problem now is the stuck stem. Waiting for the chemicals and tools to arrive. Hopefully it gets sorted.
Yea I tried to be super careful with hitting the rim. This is the end state of the rims after a 2nd pass using the wire brush.
Turned out pretty good I think. I scuffed it up very lightly with sandpaper per the video and applied the first coating of glue. Also inflated the tyres to let them form out and stretch.
03-17-21, 09:14 AM
#57
Senior Member

Join Date: Mar 2014
Location: City of Angels
Posts: 4,867
Bikes: A few too many
Mentioned: 42 Post(s)
Tagged: 1 Thread(s)
Quoted: 1360 Post(s)
Liked 2,175 Times
in
1,180 Posts
I would be using a wheel style brush rather than a cup style to avoid chances of hitting the rim with the cup.
https://www.homedepot.com/p/Robtec-3...CS12/301770990
https://www.homedepot.com/p/Robtec-3...CS12/301770990
__________________
"EVERY PERSON IS GUILTY OF ALL THE GOOD THEY DID NOT DO"
Voltaire
Voice recognition may sometimes create odd spelling and grammatical errors
"EVERY PERSON IS GUILTY OF ALL THE GOOD THEY DID NOT DO"
Voltaire
Voice recognition may sometimes create odd spelling and grammatical errors
03-17-21, 12:47 PM
#58
Senior Member

Join Date: Jul 2005
Location: Boulder County, CO
Posts: 4,385
Bikes: '80 Masi Gran Criterium, '12 Trek Madone, early '60s Frejus track
Mentioned: 6 Post(s)
Tagged: 0 Thread(s)
Quoted: 512 Post(s)
Liked 444 Times
in
334 Posts
Originally Posted by LeSexyFishorse;21955857[img
https://cimg5.ibsrv.net/gimg/bikeforums.net-vbulletin/901x1600/frame_4_ab75e3ef8ae46a93a61b78f39b7fbd91fd5f01bf.jpg[/img]
03-17-21, 01:33 PM
#59
Junior Member
Thread Starter
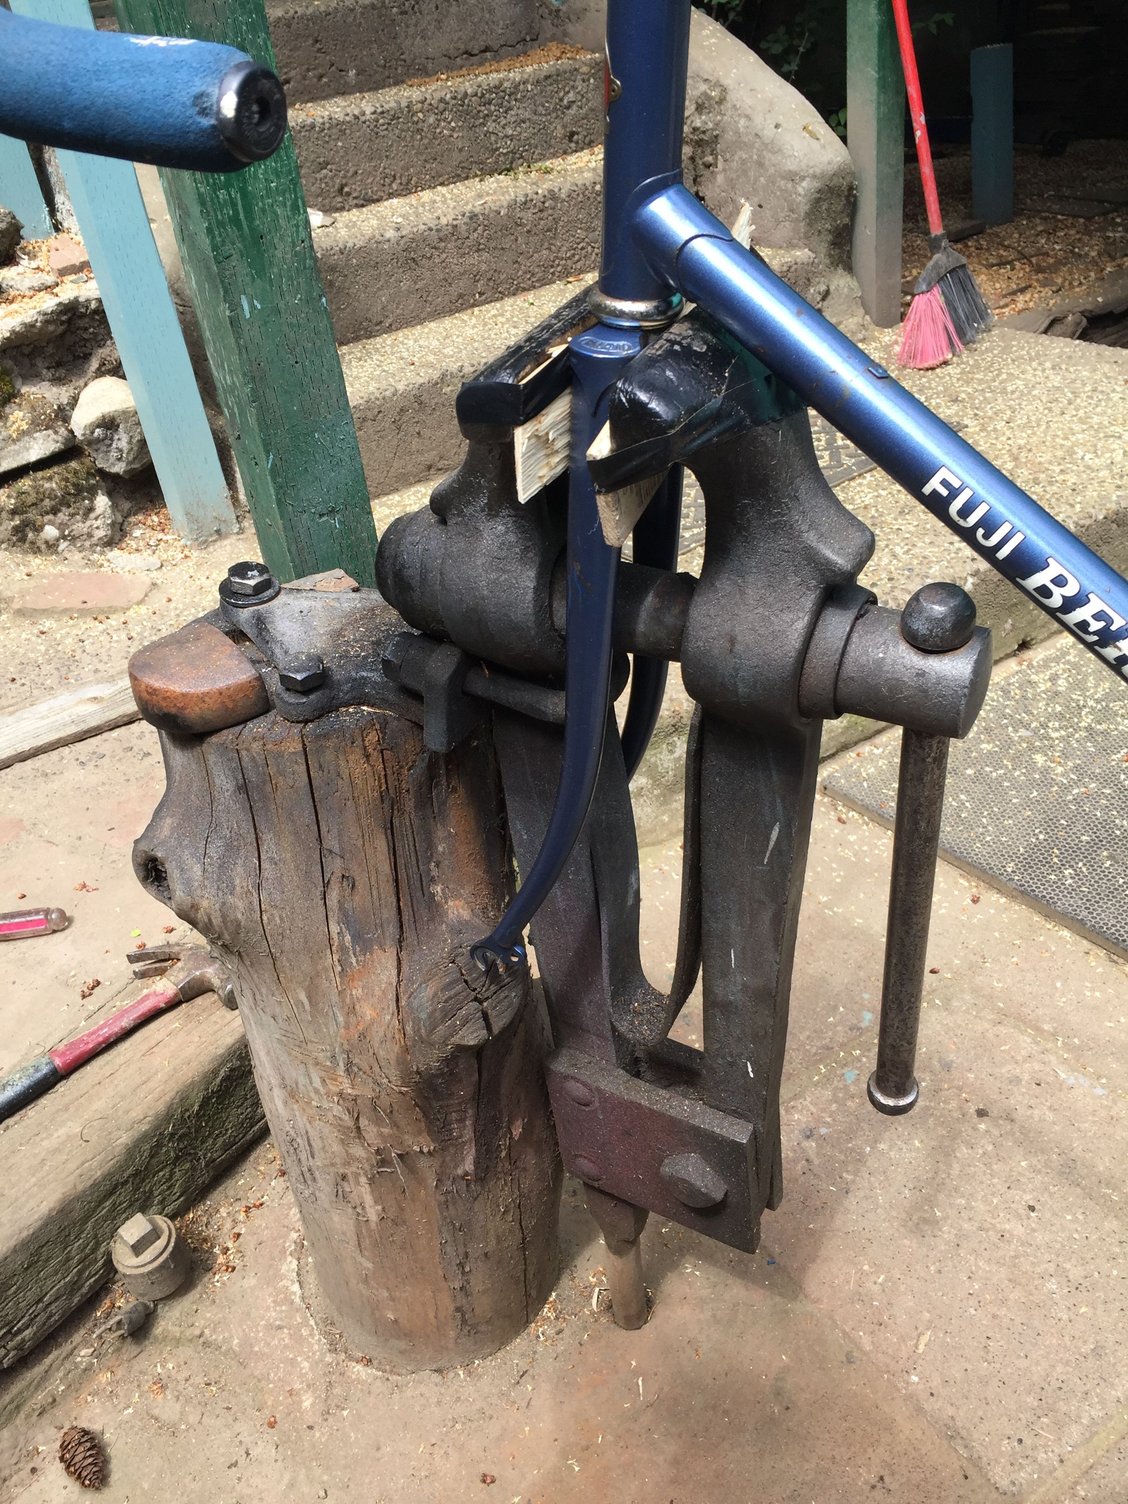
About that bare metal on the lower head lug. Is that something you did with the vice-grip. Also, at this point, were you already dismantling the headset, because the crown race does not appear squarely seated in the headset cup, suggesting a bent steerer. Is this setting off alarms with anybody else?
Last day of glue for the wheels tom then I get to reward myself with a weeks worth of rides till I have to send the frame in for powdercoat. I have flipped the frame upside down and poured some citric acid and water down the fork to see if it can do something about the rust biding the stem since penetrating oil didnt seem to work. Worst case I will have to destroy and replace the bolt or stem.
03-17-21, 02:30 PM
#60
Senior Member
Join Date: Jul 2005
Location: Boulder County, CO
Posts: 4,385
Bikes: '80 Masi Gran Criterium, '12 Trek Madone, early '60s Frejus track
Mentioned: 6 Post(s)
Tagged: 0 Thread(s)
Quoted: 512 Post(s)
Liked 444 Times
in
334 Posts
The bare metal was a rusted out section that I took some soda and aluminum foil to. Dont think the steerer is bent, its prob more visual distortion from the angle I took the photo.
Last day of glue for the wheels tom then I get to reward myself with a weeks worth of rides till I have to send the frame in for powdercoat. I have flipped the frame upside down and poured some citric acid and water down the fork to see if it can do something about the rust biding the stem since penetrating oil didnt seem to work. Worst case I will have to destroy and replace the bolt or stem.
Last day of glue for the wheels tom then I get to reward myself with a weeks worth of rides till I have to send the frame in for powdercoat. I have flipped the frame upside down and poured some citric acid and water down the fork to see if it can do something about the rust biding the stem since penetrating oil didnt seem to work. Worst case I will have to destroy and replace the bolt or stem.
03-18-21, 05:15 AM
#61
Senior Member

Join Date: Sep 2020
Location: Eastern Poland
Posts: 743
Bikes: Romet Jubilat x 4, Wigry x 1, Turing x 1
Mentioned: 3 Post(s)
Tagged: 0 Thread(s)
Quoted: 194 Post(s)
Liked 204 Times
in
151 Posts
I have a folder frame I am considering them for, it is the kind of thing you will congratulate yourself for doing every time you see them.
03-19-21, 12:35 AM
#62
Junior Member
Thread Starter
So ive been going around my area to find any framebuilders that can do that for me. Seems like no one can do anything but weld it on. The only other framebuilder and also most reputable one is not taking job orders at the moment due to supply disruptions and has a long waiting list. Do you guys have any alternatives if I cannot find anyone to do it in time? Should I just cover them up until I can get them done?
03-19-21, 07:57 AM
#63
The dropped
Join Date: Oct 2018
Location: Columbus, OH
Posts: 2,144
Bikes: Pake C'Mute Touring/Commuter Build, 1989 Kona Cinder Cone, 1995 Trek 5200, 1973 Raleigh Super Course FG, 1960/61 Montgomery Ward Hawthorne "thrift" 3 speed, by Hercules (sold) : 1966 Schwinn Deluxe Racer (sold)
Mentioned: 10 Post(s)
Tagged: 0 Thread(s)
Quoted: 1739 Post(s)
Liked 1,014 Times
in
696 Posts
So ive been going around my area to find any framebuilders that can do that for me. Seems like no one can do anything but weld it on. The only other framebuilder and also most reputable one is not taking job orders at the moment due to supply disruptions and has a long waiting list. Do you guys have any alternatives if I cannot find anyone to do it in time? Should I just cover them up until I can get them done?
03-19-21, 10:21 PM
#64
Junior Member
Thread Starter
Should I continue to route the cable internally or would it just be better to cover the hole up with cut tape or something after de rusting it?
03-22-21, 10:28 AM
#65
Full Member
Going to visit a few machine shops to see if they can do this kind of work for me.
Yea gonna visit the powder coating company that my LBS recommended tom. I was thinking some sort of shade of nebula style purple or blue with the logos in white. Unfortunately the guys that are gonna replicate my decals cant do the sort of swarovski style effect on the Bridgestone logo I am going for.
Will frame saver be necessary after an acid bath and powder coat?
So I took a wire brush mounted on a drill to that old glue and this is the result. I noticed after going through the rim that there were some damaged areas. I dont know if that was cause by me using a steel brush or not. I tried to be as careful as possible and I think it might have been previously existing damage. What do you guys think? Rest of the rim seems fine. Do I need to do another pass to completely remove all of the glue (batteries are currently charging)? The remaining residue is quite difficult to remove even with the brush and the drill.


Does this look like rim damage from the brush?
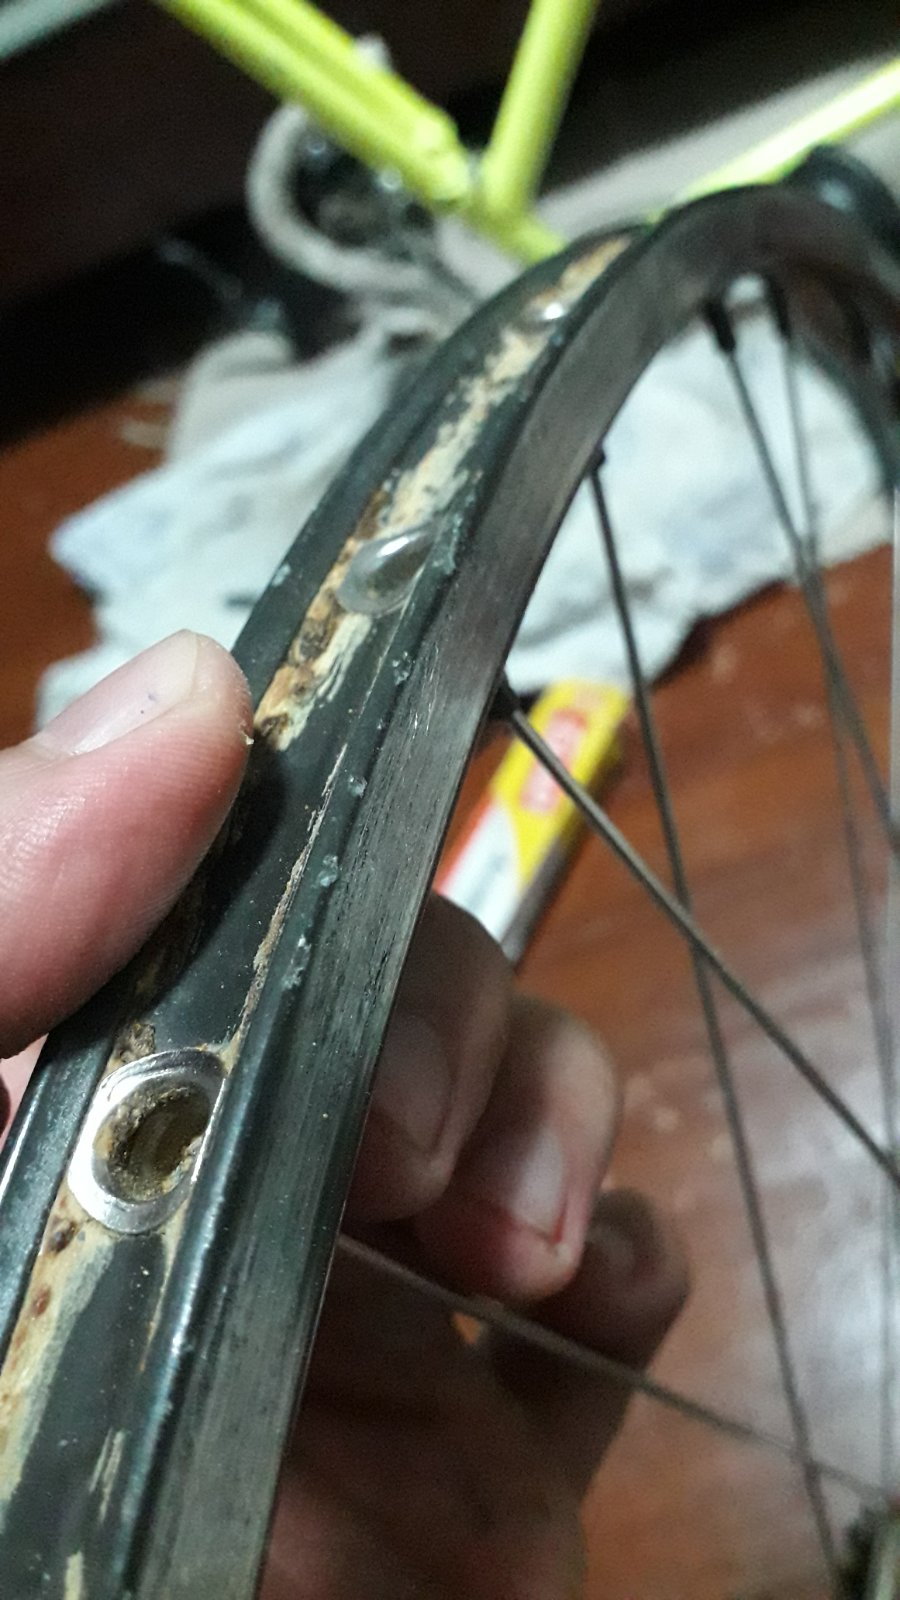

This is what I used

Tape or Glue?
As for gluing the tire on, I will be using this guide How To Glue Tubular Tyres Like A Pro Mechanic - YouTube. Although there is no mention of pre stretching the tubulars, should I be doing this? Any additional considerations to follow?
Yea gonna visit the powder coating company that my LBS recommended tom. I was thinking some sort of shade of nebula style purple or blue with the logos in white. Unfortunately the guys that are gonna replicate my decals cant do the sort of swarovski style effect on the Bridgestone logo I am going for.
Will frame saver be necessary after an acid bath and powder coat?
So I took a wire brush mounted on a drill to that old glue and this is the result. I noticed after going through the rim that there were some damaged areas. I dont know if that was cause by me using a steel brush or not. I tried to be as careful as possible and I think it might have been previously existing damage. What do you guys think? Rest of the rim seems fine. Do I need to do another pass to completely remove all of the glue (batteries are currently charging)? The remaining residue is quite difficult to remove even with the brush and the drill.
Does this look like rim damage from the brush?
This is what I used
Tape or Glue?
As for gluing the tire on, I will be using this guide How To Glue Tubular Tyres Like A Pro Mechanic - YouTube. Although there is no mention of pre stretching the tubulars, should I be doing this? Any additional considerations to follow?
The only time we stretched tires was when they were too tight to get on the rim. Once on the rim and inflated they will stretch to the correct size. Every brand/model/material type is different. Inflating off the rim makes them curl around and stretches the wrong bit of the casing.
Putting them on dry will give you the practice you will need when it is time to glue them on. NO TOOLS. Only use your hands. Once you add the glue, it's mess time. You will need some proper solvent to clean you hands and the braking surfaces of the rim clean.
03-22-21, 10:50 AM
#66
Full Member
So ive been going around my area to find any framebuilders that can do that for me. Seems like no one can do anything but weld it on. The only other framebuilder and also most reputable one is not taking job orders at the moment due to supply disruptions and has a long waiting list. Do you guys have any alternatives if I cannot find anyone to do it in time? Should I just cover them up until I can get them done?
If you cover the holes up temporarily , what about paint/powder coating? You don't normally "touch up" powdercoat finishes.
03-23-21, 07:04 AM
#67
Junior Member
Thread Starter
Back when we rode and raced on tubular tires, we would keep old buggered rims to store the new tires on. put them on dry and inflate to 50psi or so. that will give them time to work out the creases from being folded up from shipping. Now that your rims are clean, you can put them on dry until the bike is ready, then glue/tape. Dont' forget and ride without tape/glue. Unglued tires will come off very quickly.
The only time we stretched tires was when they were too tight to get on the rim. Once on the rim and inflated they will stretch to the correct size. Every brand/model/material type is different. Inflating off the rim makes them curl around and stretches the wrong bit of the casing.
Putting them on dry will give you the practice you will need when it is time to glue them on. NO TOOLS. Only use your hands. Once you add the glue, it's mess time. You will need some proper solvent to clean you hands and the braking surfaces of the rim clean.
MAPP gas and Oxygen torch would be hot enough for brazing inserts in. You might do it yourself. it's far less expensive than oxygen-acetylene gear and tanks and the gasses. I would not build an entire frame using MAPP but for cable guide inserts, it should work okay. There are a lot of auto shops that have oxy-acc kits. Most auto repair places have them to remove rusty parts quickly. Many recycle places use oxy-acc cutting torches to make stuff smaller in hurry. Ocean going ships are cut apart with oxy-acc torches. For cable guides where you run full housing, the guides aren't under any tension or pressure. sweat soldering or even epoxy glue might work. Many companies used plastic snap in guides. You usually see those on aluminum frames.
If you cover the holes up temporarily , what about paint/powder coating? You don't normally "touch up" powdercoat finishes.
If you cover the holes up temporarily , what about paint/powder coating? You don't normally "touch up" powdercoat finishes.
Is the brazing something I can learn from a youtube vid? I have no welding experience at all. You mentioned epoxy glue? Is this a viable alternative to brazing them on?
03-23-21, 07:38 AM
#68
Senior Member

Join Date: Aug 2015
Posts: 3,281
Mentioned: 39 Post(s)
Tagged: 0 Thread(s)
Quoted: 1134 Post(s)
Liked 1,726 Times
in
950 Posts
 03-23-21, 07:45 AM
#69
Senior Member
Join Date: Aug 2015
Posts: 3,281
Mentioned: 39 Post(s)
Tagged: 0 Thread(s)
Quoted: 1134 Post(s)
Liked 1,726 Times
in
950 Posts
Yeah, I missed that part. I put glue on the tires before I stretched them. I also inflated them and left them for a day or 2 without being on the rim so the base tape rolled outward one way. I finally mounted them both today and it was extremely difficult to get the last section on because they had not been stretched. Eventually got it on but made a mess of the glue, lesson learned. Always pre stretch tires. Also figured out when checking if they were straight that the rim was not true. I dont know if this is from my forceful mounting or has been untrue for a while. Am going to LBS tom morning to get them trues and the tires double checked for straightness. I hope I dont have to redo the glue job, but I will if they say its unsafe.
I was thinking of getting the powdercoat done then covering them up with a sticker or something until the framebuilder starts taking business again and I can have them done.
Is the brazing something I can learn from a youtube vid? I have no welding experience at all. You mentioned epoxy glue? Is this a viable alternative to brazing them on?
03-24-21, 07:15 AM
#70
Junior Member
Thread Starter
Cool will look this up. Thanks!
03-24-21, 09:50 PM
#71
Senior Member
Join Date: May 2020
Posts: 490
Mentioned: 0 Post(s)
Tagged: 0 Thread(s)
Quoted: 252 Post(s)
Liked 67 Times
in
48 Posts
I read about half the thread, was shuddering all the time and I have to ask, is it worth rescuing the bike, or the frame? Is there a value in that? Like does it have antique or personal value? Mind you, I like to do un-economical fixes of all kinds myself but this is pretty seriously bad condition. I take it, the bike must have spent years under open sky or what. Given you go for it, you should be equipped for that, shop and know-how wise. But I wish you good luck nonetheless.
If you will keep the rims, tubular tires are not cheap. On my old bike, I hung the tubular rims up in the attic long ago and invested in new clincher wheels precisely because of the running costs or riding tubular tires.
If you will keep the rims, tubular tires are not cheap. On my old bike, I hung the tubular rims up in the attic long ago and invested in new clincher wheels precisely because of the running costs or riding tubular tires.
Last edited by vane171; 03-24-21 at 09:57 PM.


