


Drilling out a rusted screw
 04-12-24, 05:01 PM
#1
Junior Member
Thread Starter
Drilling out a rusted screw
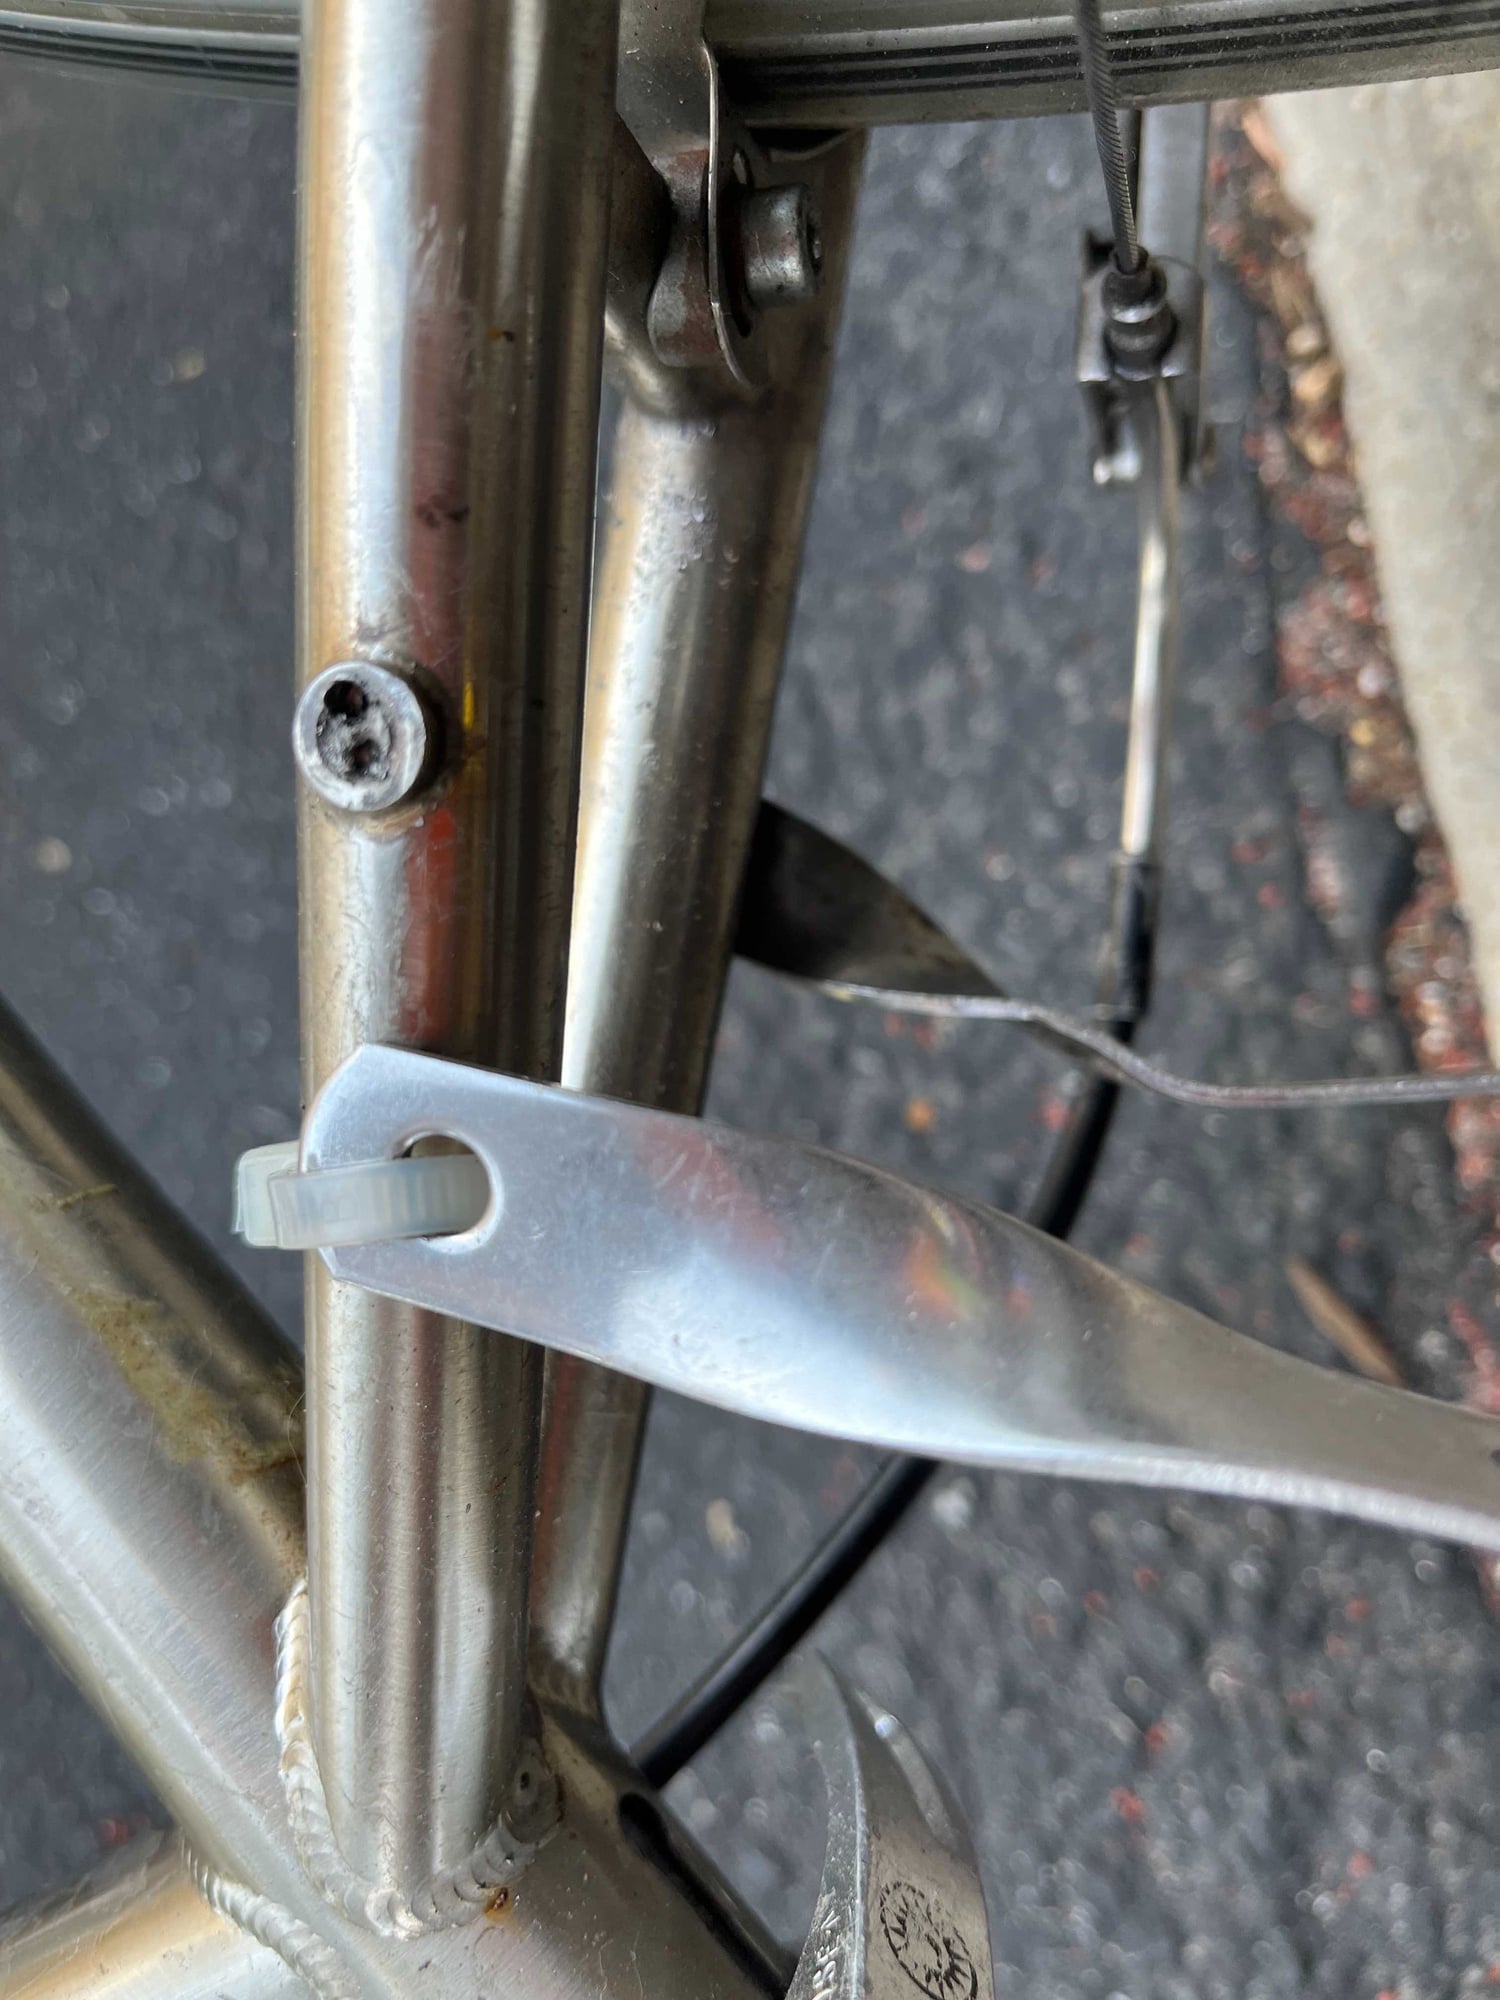
More of a metal working question I'd imagine but I installed a rear rack many years ago using carbon steel fasteners thinking I'd swap them for stainless in a timely fashion Needless to say I forgot all about them and they rusted in the threads of my aluminum Jamis Coda. One drilled out very easily essentially disintegrating without even using the easy out. On the other I've gone thru five drill bits and only managed to get a single 1/16" off center hole in the broken off flush threaded section of the screw. Really trying to not damage the thread in the frame so what are best practices for drilling out a machine screw ( now just a threaded stud ) from an aluminum bike frame?
Edit: My image loading skills were deficient
Edit: My image loading skills were deficient
Last edited by erileykc; 04-14-24 at 02:36 PM.
 04-12-24, 06:50 PM
#2
Junior Member
"Ezy-Outs" ( I think that's the original tool spelling ) aren't easy to use. Especially for small diameter threaded fasteners. I avoid them completely nowadays.
I found that trying to drill a central hole in the broken off fastener using an ordinary right hand twist drill of let's say around 1/16 inch diameter, involved lots of drill bit flexing and often breakage. Then assuming you get your hole, you next have the challenge of judging when to stop exerting force before the Ezy-Out snaps...
I have less drama using more modern extraction tools, with shorter and stiffer drill and extraction tools. I use tools of this style now ( in link ). Both drill and extractor are on opposite ends of the same tool. And the drilling is done by left handed drills, which alone sometimes winds out the broken fastener.
Alden Grabit Select Series 7 piece Broken-Bolt Extractor Set - 7017P - Penn Tool Co., Inc
The other thing I would say, is do not buy cheap tools in this instance ! If they break inside the hole, you have new problems.
I assume you are centre punching the broken off fastener before drilling.
Edit : Also apply heat to the aluminium before using the screw extractor.
Last edited by redshift1; 04-12-24 at 07:07 PM.
04-12-24, 07:01 PM
#3

Full Member

Join Date: Jul 2023
Location: "Driftless" WI
Posts: 392
Bikes: 1972 Motobecane Grand Record, 2022 Kona Dew+
Mentioned: 2 Post(s)
Tagged: 0 Thread(s)
Quoted: 163 Post(s)
Liked 146 Times
in
107 Posts
What size are the carbon steel machine screws?
Rather than relying on EzOuts, you may want to look into using properly-sized left-hand drill bits. They're available in metric sizes too if necessary.
With judicious use of Kroil (or some other available penetrant) ahead of time, you may find that a lefty bit itself provides enough torque during drilling that the screw loosens & backs out on its own.
Whatever penetrant you choose, leave it to soak in for at least twelve hours after application. Twenty-four is even better.
Be careful not to attempt using too large a bit however as you'll thin the screw's wall thickness when drilling, making further extraction efforts difficult as the thinned wall tends to stretch from the torque on an EzOut-type extractor. Try to choose a bit roughly 50 - 60% the core diameter of the fastener to be removed.
Last edited by spclark; 04-13-24 at 05:03 AM. Reason: spelling error
04-12-24, 07:43 PM
#4
Senior Member
Join Date: Apr 2016
Posts: 1,251
Mentioned: 3 Post(s)
Tagged: 0 Thread(s)
Quoted: 507 Post(s)
Liked 442 Times
in
338 Posts
More of a metal working question I'd imagine but I installed a rear rack many years ago using carbon steel fasteners thinking I'd swap them for stainless in a timely fashion Needless to say I forgot all about them and they rusted in the threads of my aluminum Jamis Coda. One drilled out very easily essentially disintegrating without even using the easy out. On the other I've gone thru five drill bits and only managed to get a single 1/16" off center hole in the broken off flush threaded section of the screw. Really trying to not damage the thread in the frame so what are best practices for drilling out a machine screw ( now just a threaded stud ) from an aluminum bike frame?
04-12-24, 10:17 PM
#5
Senior Member
Join Date: Apr 2009
Location: New Rochelle, NY
Posts: 38,741
Bikes: too many bikes from 1967 10s (5x2)Frejus to a Sumitomo Ti/Chorus aluminum 10s (10x2), plus one non-susp mtn bike I use as my commuter
Mentioned: 140 Post(s)
Tagged: 1 Thread(s)
Quoted: 5797 Post(s)
Liked 2,610 Times
in
1,448 Posts
"Best practiice", which is expensive unless you have a friend with a machine shop is removal by EDM. This is how I used to remove broken taps (usually micro-adjust) for frame builders.
Here, I'd start by patient soaking with a proven "rusted screw" remover product like Kroil" or similar. Then use a series of drills to enlarge the hole so you can use a larger EZ out. Since this is a through hole, I'd file or Dremel flush, to make removal by pushing forward possible, hoping the drill does that before going through. In any case, since you started a hole off center, proceed with caution because any drill used to enlarge it will follow the hole, causing a high likelihood of breaking through on one side and cutting into the frame.
Lastly, depending on the size of the eye and amount of surrounding metal, consider that you may have more breathing room, and can use a thread insert if the finished job rather than saving the original threads, which in any case, may already be compromised by rust.
__________________
FB
Chain-L site
An ounce of diagnosis is worth a pound of cure.
Just because I'm tired of arguing, doesn't mean you're right.
�One accurate measurement is worth a thousand expert opinions� - Adm Grace Murray Hopper - USN
WARNING, I'm from New York. Thin skinned people should maintain safe distance.
FB
Chain-L site
An ounce of diagnosis is worth a pound of cure.
Just because I'm tired of arguing, doesn't mean you're right.
�One accurate measurement is worth a thousand expert opinions� - Adm Grace Murray Hopper - USN
WARNING, I'm from New York. Thin skinned people should maintain safe distance.
Likes For FBinNY:
04-13-24, 04:36 AM
#6
...
Join Date: Oct 2021
Location: Whitestone and Rensselaerville, New York
Posts: 1,521
Bikes: Bicycles? Yup.
Mentioned: 8 Post(s)
Tagged: 0 Thread(s)
Quoted: 482 Post(s)
Liked 1,593 Times
in
739 Posts
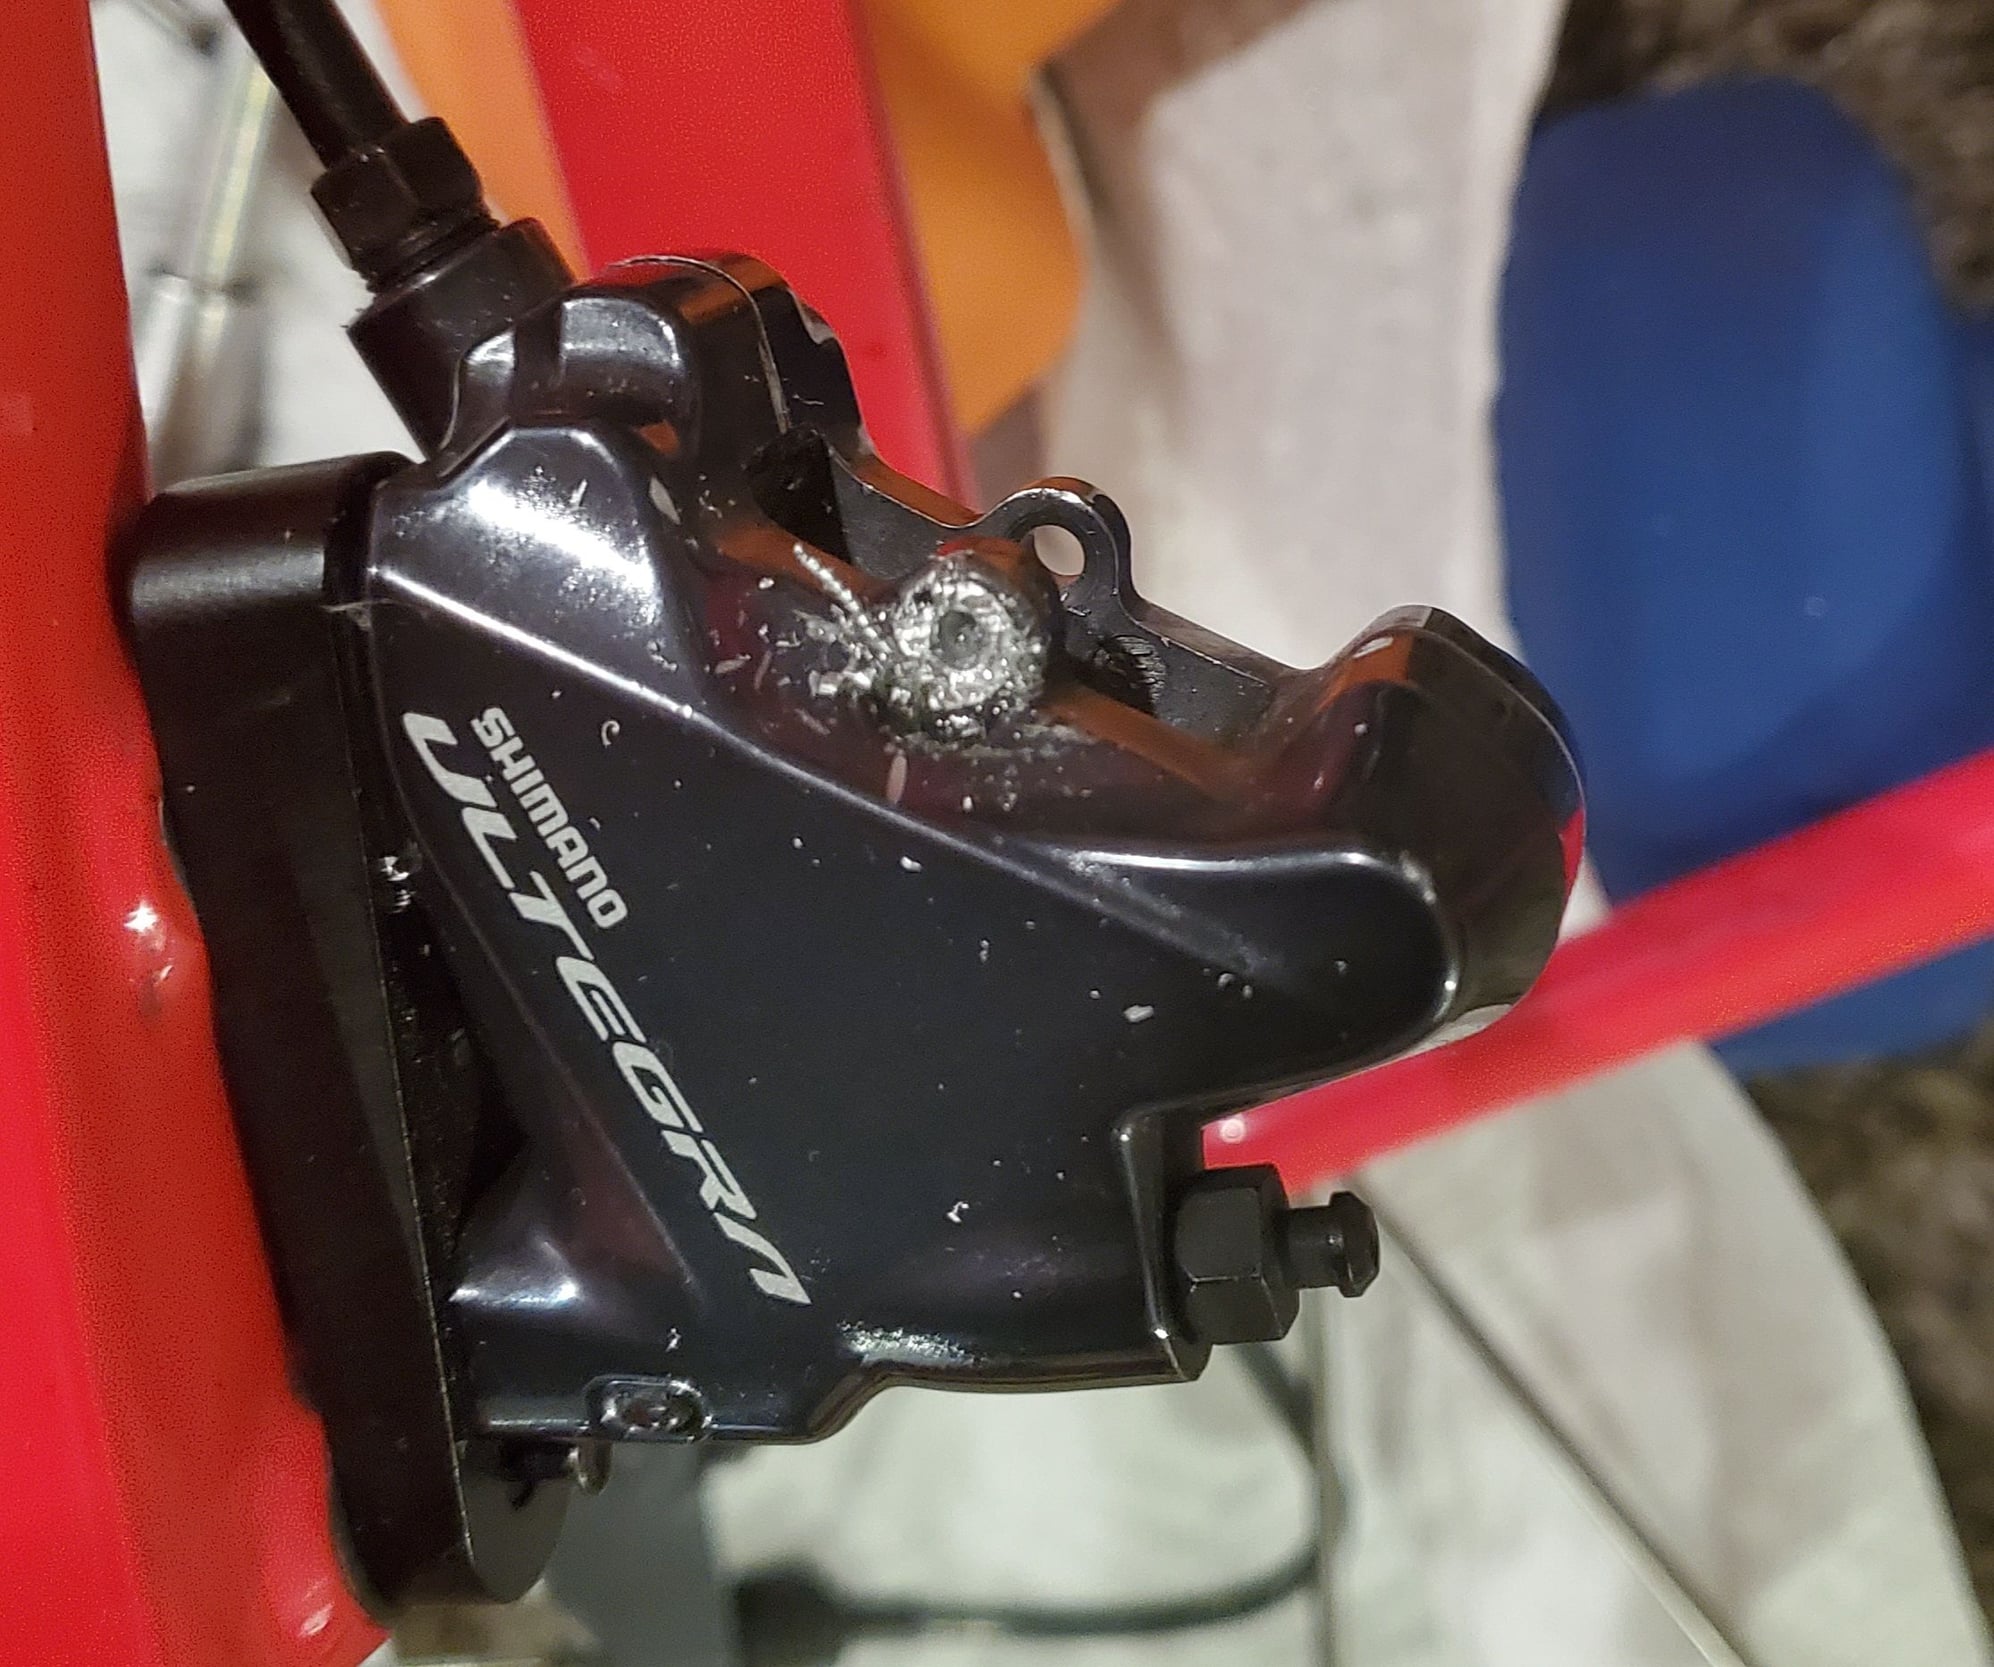
Left hand drill bits is my go-to for smaller bolts. Freed this stuck SOB leaving the caliper threads intact.
 04-13-24, 08:58 AM
#7
I like cats.
IDK if this is necessarily helpful but I live in NW DC and have a manual mini mill and center drill bits. If there's a way to easily fixture the frame in the mill vise you could drill a precise hole, after milling out the off angle hole a bit. A drill press might be better. I also have a SMAW/GTAW welder and am intrigued by the one suggestion of welding a nut to the sheared bolt. The powder coat around the boss would almost certainly fry but it might be just a few millimeters under the edges of the nut. You're welcome to come over and give any of that a shot!
Likes For ericoseveins:
04-13-24, 01:09 PM
#8
Senior Member
Join Date: Sep 2005
Location: Michigan
Posts: 3,706
Bikes: Trek 730 (quad), 720 & 830, Bike Friday NWT, Brompton M36R & M6R, Dahon HAT060 & HT060, ...
Mentioned: 10 Post(s)
Tagged: 0 Thread(s)
Quoted: 840 Post(s)
Liked 336 Times
in
251 Posts
You should normally only use carbide drill bits for such a task.
04-13-24, 02:03 PM
#9
Senior Member
Join Date: Apr 2009
Location: New Rochelle, NY
Posts: 38,741
Bikes: too many bikes from 1967 10s (5x2)Frejus to a Sumitomo Ti/Chorus aluminum 10s (10x2), plus one non-susp mtn bike I use as my commuter
Mentioned: 140 Post(s)
Tagged: 1 Thread(s)
Quoted: 5797 Post(s)
Liked 2,610 Times
in
1,448 Posts
Why?
Quality. HSS is more than adequate to the task. Besides, it would be hard to get adequate speed for carbide to offer a benefit.
Carbide MIGHT make sense if this were a heat treated CrMo cap screw, but we know bit isn't since the OP already drilled it.
Quality. HSS is more than adequate to the task. Besides, it would be hard to get adequate speed for carbide to offer a benefit.
Carbide MIGHT make sense if this were a heat treated CrMo cap screw, but we know bit isn't since the OP already drilled it.
__________________
FB
Chain-L site
An ounce of diagnosis is worth a pound of cure.
Just because I'm tired of arguing, doesn't mean you're right.
�One accurate measurement is worth a thousand expert opinions� - Adm Grace Murray Hopper - USN
WARNING, I'm from New York. Thin skinned people should maintain safe distance.
FB
Chain-L site
An ounce of diagnosis is worth a pound of cure.
Just because I'm tired of arguing, doesn't mean you're right.
�One accurate measurement is worth a thousand expert opinions� - Adm Grace Murray Hopper - USN
WARNING, I'm from New York. Thin skinned people should maintain safe distance.
Likes For FBinNY:
04-13-24, 03:26 PM
#10
Senior Member
Join Date: Sep 2005
Location: Michigan
Posts: 3,706
Bikes: Trek 730 (quad), 720 & 830, Bike Friday NWT, Brompton M36R & M6R, Dahon HAT060 & HT060, ...
Mentioned: 10 Post(s)
Tagged: 0 Thread(s)
Quoted: 840 Post(s)
Liked 336 Times
in
251 Posts
With a carbide bit, you do not need to analyze what is before you, and your chances of the hole ending up where you want it are much higher.
04-13-24, 04:53 PM
#11
Senior Member
Join Date: Apr 2016
Posts: 1,251
Mentioned: 3 Post(s)
Tagged: 0 Thread(s)
Quoted: 507 Post(s)
Liked 442 Times
in
338 Posts
It's a standard auto mechanic technique, possibly less effective on the 5 mm threads a bike mechanic has to remove. If you don't get good fusion pretty much as soon as you strike an arc you're just getting it hot, so be sure you're aiming at a good clean bit of bolt, and with adequate current. Welding a washer first helps with smaller bolts, because you're not obstructed by a nut so you can see your arc, and work on some sort of bead, rather than just point and hope.
Likes For grumpus:
04-13-24, 08:21 PM
#12
Clark W. Griswold
Join Date: Mar 2014
Location: ,location, location
Posts: 13,578
Bikes: Foundry Chilkoot Ti W/Ultegra Di2, Salsa Timberjack Ti, Cinelli Mash Work RandoCross Fun Time Machine, 1x9 XT Parts Hybrid, Co-Motion Cascadia, Specialized Langster, Phil Wood Apple VeloXS Frame (w/DA 7400), R+M Supercharger2 Rohloff, Habanero Ti 26
Mentioned: 54 Post(s)
Tagged: 0 Thread(s)
Quoted: 4381 Post(s)
Liked 4,016 Times
in
2,681 Posts
Just FYI the Jamis Coda is a steel bike and has been a steel bike I think throughout history. The Allegro is the aluminum hybrid they make similar to the Coda.
04-14-24, 02:06 AM
#13
Senior Member
Join Date: Apr 2016
Posts: 1,251
Mentioned: 3 Post(s)
Tagged: 0 Thread(s)
Quoted: 507 Post(s)
Liked 442 Times
in
338 Posts
In that case it's probably fairly easy to weld up a ragged hole and drill and tap a new one. Worst case scenario, if surgical removal fails and oversizing to 6 mm is not appropriate.
04-14-24, 08:07 AM
#14
I like cats.
04-14-24, 02:51 PM
#15
Full Member
Join Date: Jul 2023
Location: "Driftless" WI
Posts: 392
Bikes: 1972 Motobecane Grand Record, 2022 Kona Dew+
Mentioned: 2 Post(s)
Tagged: 0 Thread(s)
Quoted: 163 Post(s)
Liked 146 Times
in
107 Posts
5mm's a small target for welding on a spud, particularly if the broken screw's been drilled into already. If it's stuck in an aluminum threaded fitting, way easy to overheat & melt the aluminum threads, maybe more. Only positive aspect is that aluminum conducts heat so fast a careful attempt just might work.
04-14-24, 03:02 PM
#16
Senior Member

Join Date: May 2010
Location: Bastrop Texas
Posts: 4,491
Bikes: Univega, Peu P6, Peu PR-10, Ted Williams, Peu UO-8, Peu UO-18 Mixte, Peu Dolomites
Mentioned: 13 Post(s)
Tagged: 0 Thread(s)
Quoted: 970 Post(s)
Liked 1,636 Times
in
1,050 Posts
Its just a shame how these things can humble us...
__________________
 No matter where you're at... There you are... Δf:=f(1/2)-f(-1/2)
No matter where you're at... There you are... Δf:=f(1/2)-f(-1/2)
04-14-24, 03:06 PM
#17
Full Member
Join Date: Jul 2023
Location: "Driftless" WI
Posts: 392
Bikes: 1972 Motobecane Grand Record, 2022 Kona Dew+
Mentioned: 2 Post(s)
Tagged: 0 Thread(s)
Quoted: 163 Post(s)
Liked 146 Times
in
107 Posts
True enough, but meeting a good challenge head-on is a worthwhile endeavor if you have the experience to make a good show of it.
OP hadn't posted a pic with his opening post.
I just looked again, there's a pic now & I see two holes, one off-center in busted fastener w/ t'other splitting the thread @ ~ 11 o'clock. That second hole into the threads may complicate things a bit.
OP hadn't posted a pic with his opening post.
I just looked again, there's a pic now & I see two holes, one off-center in busted fastener w/ t'other splitting the thread @ ~ 11 o'clock. That second hole into the threads may complicate things a bit.
Last edited by spclark; 04-14-24 at 03:10 PM.
Likes For spclark:
04-14-24, 03:09 PM
#18
Junior Member
Thread Starter
04-14-24, 06:26 PM
#19
Friendship is Magic

Join Date: Nov 2010
Location: Sacramento, CA
Posts: 22,985
Bikes: old ones
Mentioned: 304 Post(s)
Tagged: 0 Thread(s)
Quoted: 26431 Post(s)
Liked 10,387 Times
in
7,213 Posts
.
...not sure if anyone has mentioned it yet, but a good point on a center punch, used to mark your start point for drilling with an indent, is usually enough to keep the drill bit from wandering around as you start. If you're careful.
With what you've got there now, I'd be tempted to just drill one of those holes all the way through. The enlarge it a little to the size you need, and rethread it. I presume you're just going to mount another rack.
__________________
Likes For 3alarmer:
04-14-24, 07:20 PM
#20
Clark W. Griswold
Join Date: Mar 2014
Location: ,location, location
Posts: 13,578
Bikes: Foundry Chilkoot Ti W/Ultegra Di2, Salsa Timberjack Ti, Cinelli Mash Work RandoCross Fun Time Machine, 1x9 XT Parts Hybrid, Co-Motion Cascadia, Specialized Langster, Phil Wood Apple VeloXS Frame (w/DA 7400), R+M Supercharger2 Rohloff, Habanero Ti 26
Mentioned: 54 Post(s)
Tagged: 0 Thread(s)
Quoted: 4381 Post(s)
Liked 4,016 Times
in
2,681 Posts
It happens our intern swore his aluminum Specialized was steel because it is a DH bike and DH bikes are heavy and people have this assumption that steel must be the heaviest when it is not always the case. The Coda has generally been a great bike!
04-15-24, 07:40 AM
#21
Senior Member
Join Date: Jan 2009
Location: San Diego, CA
Posts: 3,678
Mentioned: 10 Post(s)
Tagged: 0 Thread(s)
Quoted: 839 Post(s)
Liked 1,064 Times
in
747 Posts
That top hole that was partially drilled into the threads may actually help some penetrating fluid penetrate further and faster. I would go ahead and carefully finish drilling out the other hole and as mentioned, use some good PF such as Kroil Oil, PB Blaster or if you have some automatic transmission fluid and acetone laying around, mix them 50/50 for one of the best penetrants available. Drip it into the hole and on the end of the broken bolt, let sit for at least 24 hours and without using gorilla strength and an easy out bit keep trying to extract the bolt once or twice a day for at least a week before giving up.
04-15-24, 09:06 AM
#22
Senior Member

Join Date: Aug 2015
Posts: 3,306
Mentioned: 39 Post(s)
Tagged: 0 Thread(s)
Quoted: 1143 Post(s)
Liked 1,760 Times
in
966 Posts
I think you screwed the pooch with the off center holes.
Do you have any needle end pliers, maybe the tip ends of some wire cutters may have enough to grab in the two holes.
Do you have any needle end pliers, maybe the tip ends of some wire cutters may have enough to grab in the two holes.
04-15-24, 12:21 PM
#23
Senior Member
Join Date: Apr 2016
Posts: 1,251
Mentioned: 3 Post(s)
Tagged: 0 Thread(s)
Quoted: 507 Post(s)
Liked 442 Times
in
338 Posts
I'd assumed we were talking about bosses on the dropout - seat stays puts a different complexion on it, and the ultimate solution is to unbraze the eyelet and fit a new one, pretty easy if it's actually silver soldered, rather than risking damage to the stay. But before going there I'd attack it with a small carbide burr in a dremel, which would have been a good idea in the first place to create a dimple that a drill could follow.
04-15-24, 12:26 PM
#25
I'm good to go!
Join Date: Jul 2017
Location: Mississippi
Posts: 15,019
Bikes: Tarmac Disc Comp Di2 - 2020
Mentioned: 51 Post(s)
Tagged: 0 Thread(s)
Quoted: 6212 Post(s)
Liked 4,821 Times
in
3,326 Posts
.
...not sure if anyone has mentioned it yet, but a good point on a center punch,used to mark your start point for drilling with an indent, is usually enough to keep the drill bit from wandering around as you start. If you're careful. placed at 90� to the circumference of the screw and a good hammer blow, the screw will unscrew.
...not sure if anyone has mentioned it yet, but a good point on a center punch,
This surprisingly works on very tiny screws. I've done it and seen it done many times. But for tiny screws with the head broken off, you need a very good quality punch with a tiny but sharply squared off edge or point for pushing that screw.
With what you've got there now, I'd be tempted to just drill one of those holes all the way through. The enlarge it a little to the size you need, and rethread it. I presume you're just going to mount another rack.
Last edited by Iride01; 04-15-24 at 12:31 PM.