


Applying decals
 01-14-21, 05:37 PM
#26

Senior Member
Join Date: May 2019
Location: Bloomington, IN
Posts: 2,949
Bikes: Paramount, Faggin, Ochsner, Ciocc, Basso
Mentioned: 117 Post(s)
Tagged: 0 Thread(s)
Quoted: 1303 Post(s)
Liked 1,911 Times
in
1,141 Posts
I am currently restoring eight bikes that were damaged by a house fire a few years ago. I have been lucky in finding decals and the detergent and water system seems to work for me when applying the decals. My go to for some decals has been a lacquer overspray clear coat. But with the Velocals decals they recommend a lesser paint, so I have used an enamel clear for the latest set. I would recommend that very light coats multiple times to get the best results. The current Paramount project will take up to three days to get the clear coat right. In the past I have rushed the process and wound up with horrible results. Go slow and take your time is the best advice I can give for this process. Smiles, MH
 01-15-21, 10:28 AM
#27
Senior Member
Join Date: Apr 2011
Location: Maryland, USA
Posts: 2,435
Bikes: Drysdale/Gitane/Zeus/Masi/Falcon/Palo Alto/Raleigh/Legnano
Mentioned: 34 Post(s)
Tagged: 0 Thread(s)
Quoted: 984 Post(s)
Liked 632 Times
in
403 Posts
While it is possible to use frame tubing (of course as a framebuilding teacher I have hundreds of short pieces of scraps), they are a bit of a sloppy fit. The very best option is to use steel tubing that has a wall thickness of 0.058". The outside diameter (�) will be 1/8" larger than the tube you are placing this tool on top of. For example if you are using the tool on a 1 1/8" down tube, the tool itself would have an OD of 1 3/8" with a wall thickness of 0.058". This is commonly available tubing from steel tubing suppliers. For example Wicks Aircraft or Airport Spruce are 2 examples of places that sell 4130 tubing in those wall thickness. They sell it by the foot (or more). The purpose of 0.058" wall tubing is because they are a slip fit that can create telescoping tubing with just the right amount of clearance so the smaller tube can fit and move inside a bigger one. I don't know anything about and have never tried to use plastic tubing. It will work if a split piece fits snuggly on top of a tube.
DT decal including clear surround is 10-1/8" long by 1-3/8" high. DT lug-to-lug is 22-1/2" long so I figured 6-3/16 at each end beyond the decal -- smack into the bottle bosses. centering between bottle bosses and shifter bosses means only 3-1/2" from the lug (measured from most-scooped-out point). Too far "up"? I thought about moving it down into the water boss area but-- DT diameter is 1.1305" so circumference is about 3-9/16". Two decals at 1-3/8" high means only about 3/8" open space between decals at the top, and again at the bottom. It's gonna be fun measuring that accurately as it is. But if I slide down into the bottle boss area, the boss measures 27/64", I'm right on an "interference fit". and, anyway, the decal will be visually "obscured" more the closer to a water bottle it gets. Inclined to mount the decals in the higher position.
 It occurred to me to check my computer's (skimpy) collection of stored photos and I find I have two of the bike before stripping; the decals were in the higher position between the shift bosses and bottle bosses.
__________________
Larry:1958 Drysdale, 1961 Gitane Gran Sport, 1974 Zeus track, 1988 Masi Gran Corsa, 1974 Falcon, 1980 Palo Alto, 1973 Raleigh Gran Sport, 1974 Legnano. Susan: 1976 Windsor Profesional.
Larry:1958 Drysdale, 1961 Gitane Gran Sport, 1974 Zeus track, 1988 Masi Gran Corsa, 1974 Falcon, 1980 Palo Alto, 1973 Raleigh Gran Sport, 1974 Legnano. Susan: 1976 Windsor Profesional.
01-21-21, 04:14 PM
#28
Senior Member
Join Date: Apr 2011
Location: Maryland, USA
Posts: 2,435
Bikes: Drysdale/Gitane/Zeus/Masi/Falcon/Palo Alto/Raleigh/Legnano
Mentioned: 34 Post(s)
Tagged: 0 Thread(s)
Quoted: 984 Post(s)
Liked 632 Times
in
403 Posts
So basically the idea is to establish an accurate annular ring around the tubing to measure off from? Hmm, I'm going to try something, hopefully it works. Plumbing pipe will not, as you point out, snugly fit the tubing diameter except by accident. That said, I just got back from Home Depot, making some minor purchases, and I brought home one of those snap-on plastic covers for shower curtain rods. They have what looks like a good squared-off machine-cut end, and the smallest diameter is going to be smaller than the smallest tubing I'll encounter other than stays. Might need to cut two sections, one from each end, to overlap if a section of tubing like the head tube is greater than the rod cover's "max". If it does not work I am out only a couple of dollars (and I use them as friction-reducing covers on closet hanger rods anyway!)
Peel-n-stick decals, three from Cyclomondo and one set of (frightfully old?) decals from the Palo Alto shop, applied "wet", no luck being able to "slide" into place but I could lift/move, and like the results. The final set, bought from SSSink which I found out about through BF, is a far different technology, rub into place and remove covering film.
__________________
Larry:1958 Drysdale, 1961 Gitane Gran Sport, 1974 Zeus track, 1988 Masi Gran Corsa, 1974 Falcon, 1980 Palo Alto, 1973 Raleigh Gran Sport, 1974 Legnano. Susan: 1976 Windsor Profesional.
Larry:1958 Drysdale, 1961 Gitane Gran Sport, 1974 Zeus track, 1988 Masi Gran Corsa, 1974 Falcon, 1980 Palo Alto, 1973 Raleigh Gran Sport, 1974 Legnano. Susan: 1976 Windsor Profesional.
01-23-21, 01:00 AM
#29
Senior Member

Join Date: Apr 2007
Location: Thunder Bay, Ontario, Canada - burrrrr!
Posts: 11,674
Bikes: 1958 Rabeneick 120D, 1968 Legnano Gran Premio, 196? Torpado Professional, 2000 Marinoni Piuma
Mentioned: 210 Post(s)
Tagged: 0 Thread(s)
Quoted: 1372 Post(s)
Likes: 0
Liked 1,751 Times
in
938 Posts
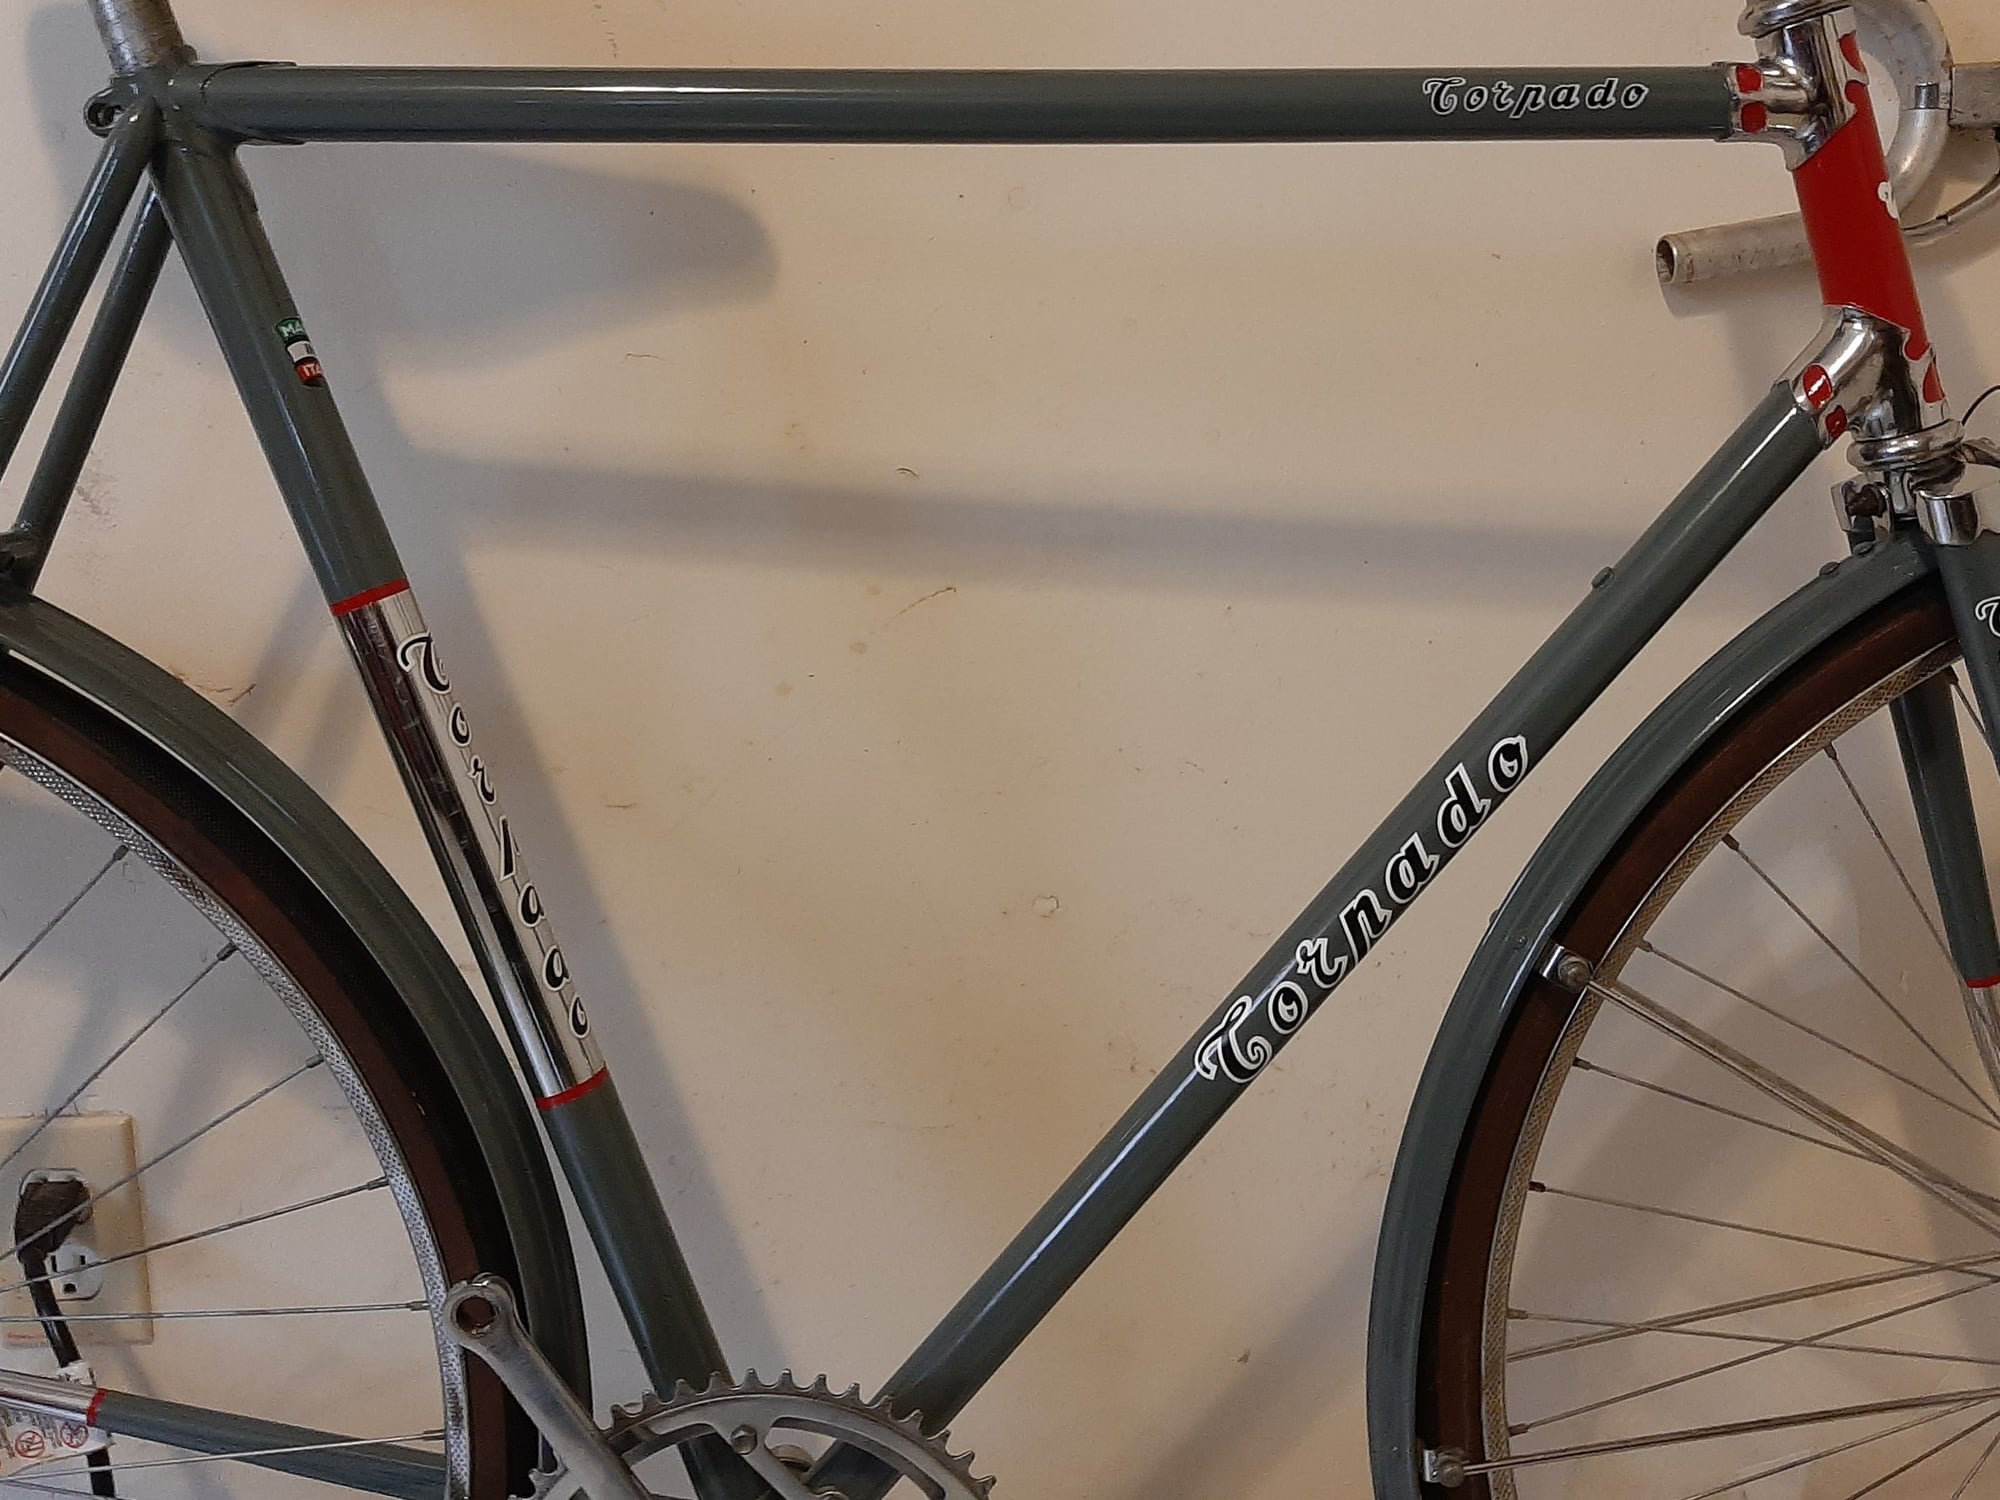
Well, I learned a thing or two yesterday when I applied the decal set to my sixties something Torpado...
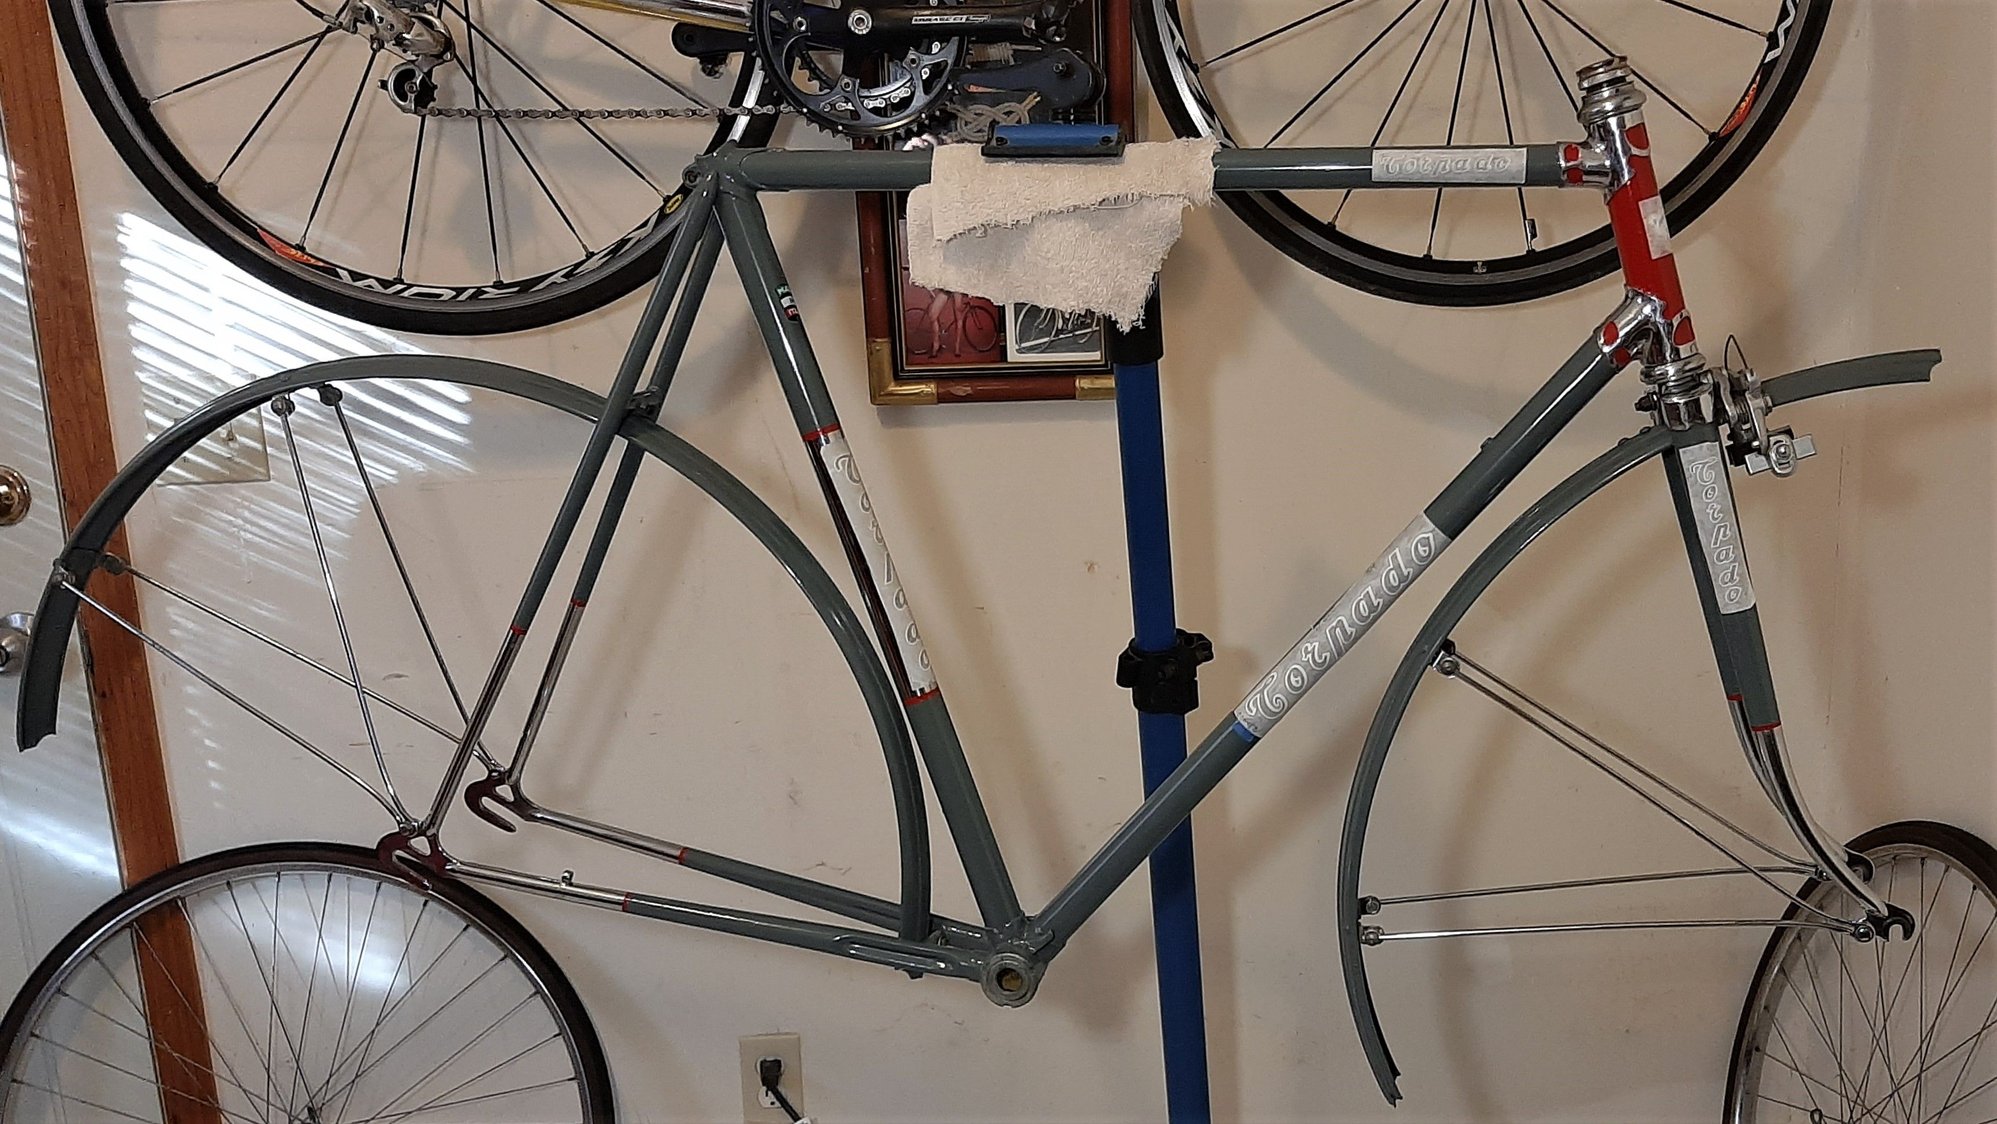
I learned that the water/soap solution can and should be sprayed onto the tubing surface and the sticky side of the decal. Gently position the decal applying little pressure (pressure will begin the stick to the bike). Once satisfied with position, start in the middle and work out toward the edges to remove air/soap/water from under the decal. Velocals suggested using a smooth credit card as a tool to help push the stuff out from under the decal (works great but do not use the edge - use the flat surface to smooth the decal towards the edges.
Final results in about six hours when I hope to remove the protective application material that is still protecting the decals as they dry into place.
__________________
"98% of the bikes I buy are projects".
"98% of the bikes I buy are projects".
01-23-21, 07:26 AM
#30
Senior Member
Join Date: Apr 2011
Location: Maryland, USA
Posts: 2,435
Bikes: Drysdale/Gitane/Zeus/Masi/Falcon/Palo Alto/Raleigh/Legnano
Mentioned: 34 Post(s)
Tagged: 0 Thread(s)
Quoted: 984 Post(s)
Liked 632 Times
in
403 Posts
__________________
Larry:1958 Drysdale, 1961 Gitane Gran Sport, 1974 Zeus track, 1988 Masi Gran Corsa, 1974 Falcon, 1980 Palo Alto, 1973 Raleigh Gran Sport, 1974 Legnano. Susan: 1976 Windsor Profesional.
Larry:1958 Drysdale, 1961 Gitane Gran Sport, 1974 Zeus track, 1988 Masi Gran Corsa, 1974 Falcon, 1980 Palo Alto, 1973 Raleigh Gran Sport, 1974 Legnano. Susan: 1976 Windsor Profesional.
01-23-21, 03:53 PM
#31
Senior Member
Join Date: Apr 2007
Location: Thunder Bay, Ontario, Canada - burrrrr!
Posts: 11,674
Bikes: 1958 Rabeneick 120D, 1968 Legnano Gran Premio, 196? Torpado Professional, 2000 Marinoni Piuma
Mentioned: 210 Post(s)
Tagged: 0 Thread(s)
Quoted: 1372 Post(s)
Likes: 0
Liked 1,751 Times
in
938 Posts
Well, the Velocals procedure was right on the mark. The decals went on and, thanks to the generous application of water/soap solution, they could be gently repositioned (don't press at all during the locating process or the decal WILL stick). I let them dry over night before attempting to pull the transfer mask or what ever it is called (someone told me a better name in another thread but I forgot it).
With great care, I removed the transfer mask and found myself pleased with the result...
With great care, I removed the transfer mask and found myself pleased with the result...
__________________
"98% of the bikes I buy are projects".
"98% of the bikes I buy are projects".
