


bottom bracket removal help
 12-21-20, 09:22 AM
#1
Junior Member
Thread Starter
bottom bracket removal help
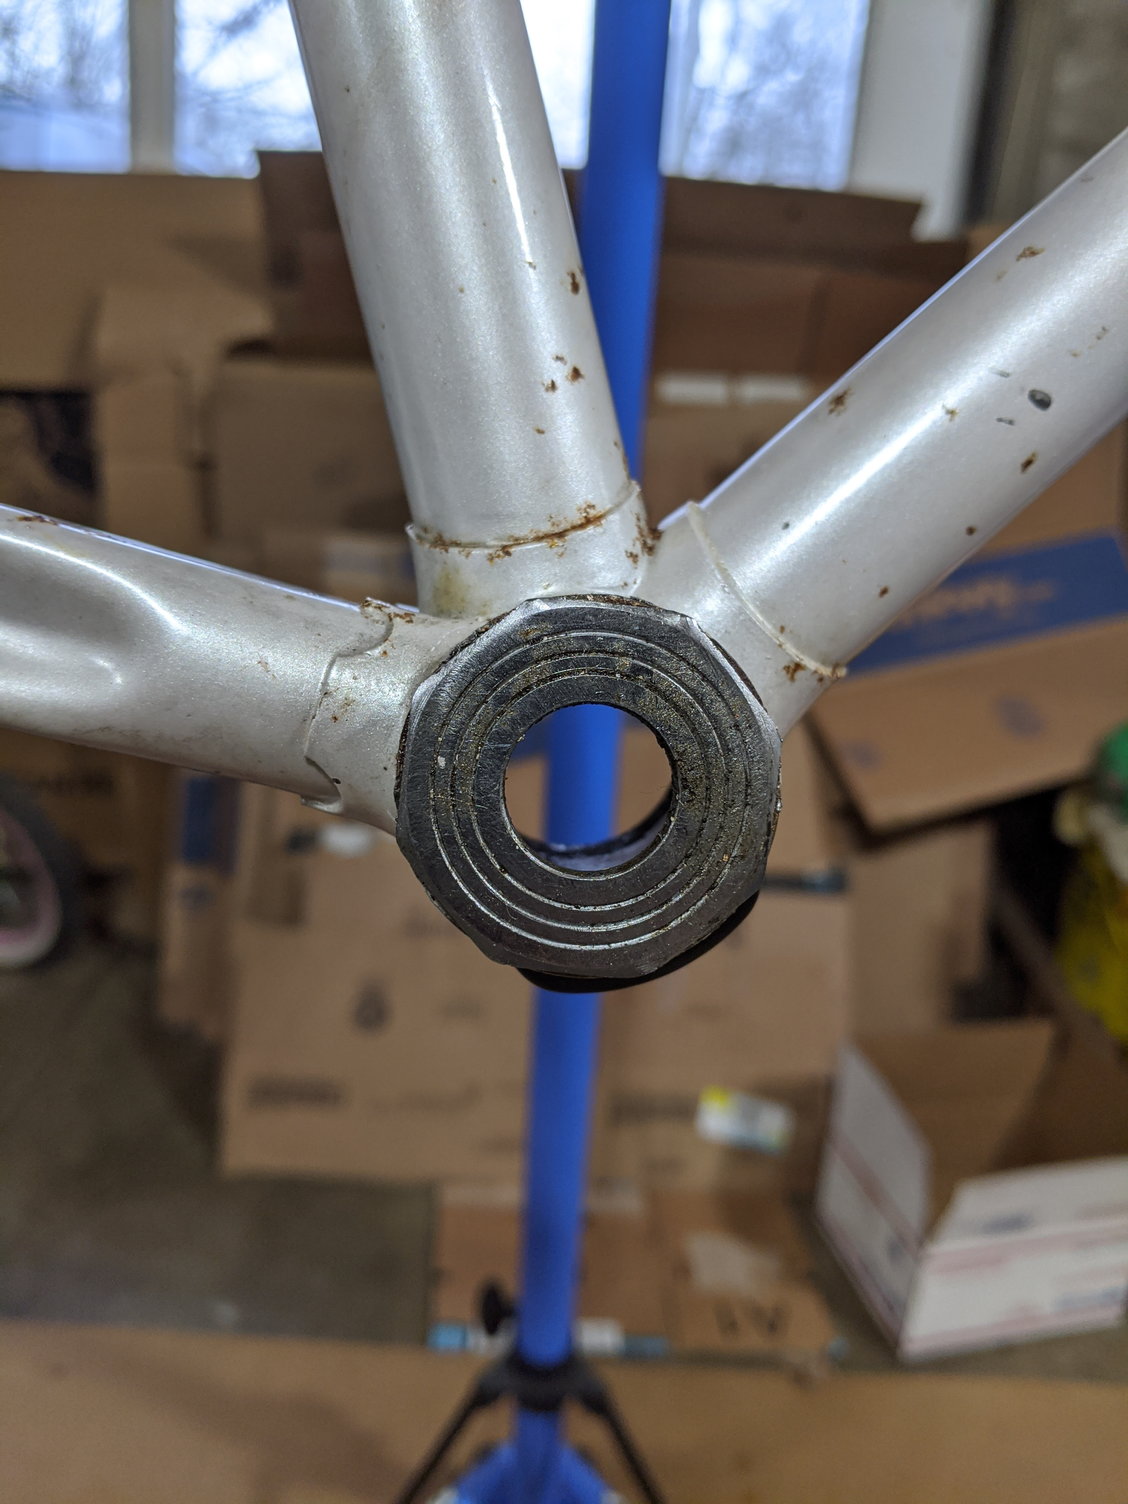
Would someone tell me how to best remove this? 1980 peugeot PKN10 bottom bracket on drive side.
Should I try to find a 38mm socket? I am guessing this is a right hand thread but I am only guessing from research so please let me know if I am wrong. Obviously I will never get it off if I am turning it the wrong way. Have everything else off and ready to start working on the frame but this last piece has me stumped.
 12-21-20, 10:11 AM
#2
Used to be Conspiratemus
Join Date: Jan 2009
Location: Hamilton ON Canada
Posts: 1,512
Mentioned: 4 Post(s)
Tagged: 0 Thread(s)
Quoted: 297 Post(s)
Liked 245 Times
in
163 Posts
The internet is full of methods to remove fixed cups. But first ask yourself why you think you need to remove it “to start working on the frame.” If you think about it, you will probably decide to leave it where it is, unless you have already decided to replace the entire BB with a cartridge or something.
12-21-20, 10:18 AM
#3

Senior Member

Join Date: May 2008
Location: Fredericksburg, Va
Posts: 9,579
Bikes: '65 Frejus TDF, '73 Bottecchia Giro d'Italia, '83 Colnago Superissimo, '84 Trek 610, '84 Trek 760, '88 Pinarello Veneto, '88 De Rosa Pro, '89 Pinarello Montello, '94 Burley Duet, 97 Specialized RockHopper, 2010 Langster, Tern Link D8
Mentioned: 73 Post(s)
Tagged: 0 Thread(s)
Quoted: 1607 Post(s)
Liked 2,216 Times
in
1,103 Posts
@peppiace - A socket might not work because the flats are so shallow that the beveled edge of the cup and the socket will limit engagement if any is achieved. My suggestion is to place the cup in a vice with copper jaws and use the frame as a leaverage.
The other option is the Sheldon Brown approach, which worked well with me after heating and cooling the cup without burning the paint.
Tool Tips--Bottom Bracket Cups (sheldonbrown.com)
The other option is the Sheldon Brown approach, which worked well with me after heating and cooling the cup without burning the paint.
Tool Tips--Bottom Bracket Cups (sheldonbrown.com)
__________________
Bikes don't stand alone. They are two tired.
Bikes don't stand alone. They are two tired.
12-21-20, 10:39 AM
#4
Senior Member
Join Date: Feb 2020
Posts: 2,819
Mentioned: 49 Post(s)
Tagged: 0 Thread(s)
Quoted: 1106 Post(s)
Likes: 0
Liked 1,327 Times
in
783 Posts
I am guessing this is a right hand thread but I am only guessing from research so please let me know if I am wrong. Obviously I will never get it off if I am turning it the wrong way. Have everything else off and ready to start working on the frame but this last piece has me stumped.
If you are not sure of the thread try each way alternately, increasing the effort a little each time. When it moves you reverse and the difference in feel tells you which way is undo.
12-21-20, 10:49 AM
#5
Full Member

Join Date: Apr 2010
Location: '16 StumpJ, Salsa Mukluk, Soulcycles SS, Dean Colonel HT, BMC FourstrokeTrail, Dean Torres CX, Santana Visa Tandem, Trek T2000 Tandem, Cupertino MTB Tandem, FreeAgent26"Xtracycle, Dirt Drop Dingle, Jamis Dragon Dingle, Airborne Skyhag SS, SSDean Cols
Posts: 219
Mentioned: 0 Post(s)
Tagged: 0 Thread(s)
Quoted: 70 Post(s)
Liked 116 Times
in
61 Posts
This dilemma is one of those dramatic ones. Good luck.
I don't have anything to contribute. I'm going to try to remove a seized BB myself today when it warms up outside later using some techniques I saw on YouTube.
At least I know which way to turn the cups!
There's got to be a way to figure out what kind of threads you have before you start torquing on it. I'd be afraid of damaging the frame.
The person who suggested retaining the cup and restoring the original bottom bracket could be onto something. There might be spindles and cups that will work available somewhere.
Sometimes it takes a lot of patience doesn't it.
12-21-20, 10:57 AM
#6
Senior Member
The RJ bike guy has a video where he shows various methods of removing stuck BB cups. I know that yours might not be stuck but RJ shows a couple of methods to remove the cup without a proper tool:
Hope this helps.
Hope this helps.
12-21-20, 11:36 AM
#7
Shifting is fun!

Join Date: Aug 2009
Location: South Holland, NL
Posts: 11,004
Bikes: Yes, please.
Mentioned: 280 Post(s)
Tagged: 0 Thread(s)
Quoted: 2198 Post(s)
Liked 4,600 Times
in
1,764 Posts
8 sides, 3 rings. I do not have the decoder with me, so someone please confirm, but I think that might be a Stronglight Swiss-threaded cup. I've read that Peugeot had a fling with Swiss threading before going to BSA.
And +1 to leaving it alone, if possible.
And +1 to leaving it alone, if possible.
 12-21-20, 11:49 AM
#8

Senior Member
Join Date: Jun 2006
Posts: 20,305
Mentioned: 130 Post(s)
Tagged: 0 Thread(s)
Quoted: 3464 Post(s)
Liked 2,829 Times
in
1,995 Posts
One way would be to reference the threading of the adjustable cup. If French, then suggests Swiss.
These Stronglight cups were always a bear to remove, there was a VAR tool insert that fit well, good luck finding one.
12-21-20, 12:17 PM
#9
Senior Member
Join Date: May 2008
Location: Fredericksburg, Va
Posts: 9,579
Bikes: '65 Frejus TDF, '73 Bottecchia Giro d'Italia, '83 Colnago Superissimo, '84 Trek 610, '84 Trek 760, '88 Pinarello Veneto, '88 De Rosa Pro, '89 Pinarello Montello, '94 Burley Duet, 97 Specialized RockHopper, 2010 Langster, Tern Link D8
Mentioned: 73 Post(s)
Tagged: 0 Thread(s)
Quoted: 1607 Post(s)
Liked 2,216 Times
in
1,103 Posts
This is a non Swiss cup from a 1972 Motobecane Le Champion. I had challenges removing it. I tried the first method suggested by me and then heated it up with a torch to get it hot then used the SB method, also mentioned and it came off easily.
 Stronglight BB Outside Cup on Flickr
Don't have the decoder ring.
Stronglight BB Outside Cup on FlickrDon't have the decoder ring.
__________________
Bikes don't stand alone. They are two tired.
Bikes don't stand alone. They are two tired.
12-21-20, 12:41 PM
#10

Senior Member
Join Date: Dec 2005
Posts: 17,156
Mentioned: 481 Post(s)
Tagged: 0 Thread(s)
Quoted: 3810 Post(s)
Liked 6,688 Times
in
2,609 Posts

Likes For nlerner:
12-21-20, 02:37 PM
#11
Ride, Wrench, Swap, Race

Join Date: Jan 2010
Location: Northern California
Posts: 9,193
Bikes: Cheltenham-Pedersen racer, Boulder F/S Paris-Roubaix, Varsity racer, '52 Christophe, '62 Continental, '92 Merckx, '75 Limongi, '76 Presto, '72 Gitane SC, '71 Schwinn SS, etc.
Mentioned: 132 Post(s)
Tagged: 0 Thread(s)
Quoted: 1565 Post(s)
Liked 1,295 Times
in
865 Posts
An common and inexpensive 1/2"-drive, 12-point socket in the 1-1/2" size will remove these 8-sided cups using a breaker bar with little effort.
A local pawn shop may have boxes of random 1/2" drive sockets to choose from.

The 1-1/2" (38.1mm metric size) 12-point socket just happens to engage properly with the 38mm octagon-shaped cup
I'm guessing that just four of the corners engage with the 12 internal flats but this is plenty.
I also tried a slightly-smaller 1-7/16" socket and it was solidly a no-go.
A local pawn shop may have boxes of random 1/2" drive sockets to choose from.
The 1-1/2" (38.1mm metric size) 12-point socket just happens to engage properly with the 38mm octagon-shaped cup
I'm guessing that just four of the corners engage with the 12 internal flats but this is plenty.
I also tried a slightly-smaller 1-7/16" socket and it was solidly a no-go.
Likes For dddd:
12-21-20, 03:21 PM
#12
Used to be Conspiratemus
Join Date: Jan 2009
Location: Hamilton ON Canada
Posts: 1,512
Mentioned: 4 Post(s)
Tagged: 0 Thread(s)
Quoted: 297 Post(s)
Liked 245 Times
in
163 Posts
This is a non Swiss cup from a 1972 Motobecane Le Champion. I had challenges removing it. I tried the first method suggested by me and then heated it up with a torch to get it hot then used the SB method, also mentioned and it came off easily.
Stronglight BB Outside Cup on Flickr
.
Stronglight BB Outside Cup on Flickr.
 12-21-20, 03:37 PM
#13
Senior Member

Join Date: Apr 2007
Location: Thunder Bay, Ontario, Canada - burrrrr!
Posts: 11,674
Bikes: 1958 Rabeneick 120D, 1968 Legnano Gran Premio, 196? Torpado Professional, 2000 Marinoni Piuma
Mentioned: 210 Post(s)
Tagged: 0 Thread(s)
Quoted: 1372 Post(s)
Likes: 0
Liked 1,751 Times
in
938 Posts
I use The Big Bolt Method and have had great success with it. Get a bit bolt. Install bb ends (drive side is already in). Set up the big bolt and a big wrench (I use a 15" adjustable or even a 12"). Snug the big bolt washers up against the wrench. Make sure that you know which way to turn to loosen and remove the assembly...

__________________
"98% of the bikes I buy are projects".
"98% of the bikes I buy are projects".
12-21-20, 05:05 PM
#14
Senior Member
A Peugeot that used to belong to my wife was ~1980 and had a Swiss fixed cup - left hand thread - clockwise to remove. She also used to have an Alfa Romeo whose lug nuts were left-hand threaded on the left side of the car and right-hand thread on the right side of the car. Not marked either - but described pretty carefully in the owner's manual with nice illustrations. I hate to think of how many tire-shop goons with air tools broke those off.......
12-21-20, 05:14 PM
#15
Senior Member
Join Date: Feb 2020
Posts: 2,819
Mentioned: 49 Post(s)
Tagged: 0 Thread(s)
Quoted: 1106 Post(s)
Likes: 0
Liked 1,327 Times
in
783 Posts
I use The Big Bolt Method and have had great success with it. Get a bit bolt. Install bb ends (drive side is already in). Set up the big bolt and a big wrench (I use a 15" adjustable or even a 12"). Snug the big bolt washers up against the wrench. Make sure that you know which way to turn to loosen and remove the assembly...
With the proper tool however that is the preferred method.
12-21-20, 05:37 PM
#16
Junior Member
Thread Starter
This is a non Swiss cup from a 1972 Motobecane Le Champion. I had challenges removing it. I tried the first method suggested by me and then heated it up with a torch to get it hot then used the SB method, also mentioned and it came off easily.
Stronglight BB Outside Cup on Flickr
Don't have the decoder ring.
Stronglight BB Outside Cup on FlickrDon't have the decoder ring.
12-21-20, 08:47 PM
#17
Senior Member
Join Date: May 2008
Location: Fredericksburg, Va
Posts: 9,579
Bikes: '65 Frejus TDF, '73 Bottecchia Giro d'Italia, '83 Colnago Superissimo, '84 Trek 610, '84 Trek 760, '88 Pinarello Veneto, '88 De Rosa Pro, '89 Pinarello Montello, '94 Burley Duet, 97 Specialized RockHopper, 2010 Langster, Tern Link D8
Mentioned: 73 Post(s)
Tagged: 0 Thread(s)
Quoted: 1607 Post(s)
Liked 2,216 Times
in
1,103 Posts
@peppiace - This is a pretty clean BB because it probably doesn't have more than a couple hundred miles on it if that much. Sat in a bike for over 30 years unused along with the crankset and the other parts on the bike.
Mineral spirits.
Mineral spirits.
__________________
Bikes don't stand alone. They are two tired.
Bikes don't stand alone. They are two tired.
12-21-20, 09:22 PM
#18
Old fart

Join Date: Nov 2004
Location: Appleton WI
Posts: 24,784
Bikes: Several, mostly not name brands.
Mentioned: 153 Post(s)
Tagged: 0 Thread(s)
Quoted: 3587 Post(s)
Liked 3,400 Times
in
1,934 Posts
The VAR-30 has a jaw that will fit the cup. Otherwise, the Sheldon Brown tool or professional equivalent will do.
12-21-20, 09:34 PM
#19
Full Member
Join Date: Apr 2010
Location: '16 StumpJ, Salsa Mukluk, Soulcycles SS, Dean Colonel HT, BMC FourstrokeTrail, Dean Torres CX, Santana Visa Tandem, Trek T2000 Tandem, Cupertino MTB Tandem, FreeAgent26"Xtracycle, Dirt Drop Dingle, Jamis Dragon Dingle, Airborne Skyhag SS, SSDean Cols
Posts: 219
Mentioned: 0 Post(s)
Tagged: 0 Thread(s)
Quoted: 70 Post(s)
Liked 116 Times
in
61 Posts
A seized run of the mill Shimano UN-52 was removed successfully this afternoon. I was unable to crack it last week using a 12" bar and a mallet.
I went out and bought a couple of new tools after Saturday's ride: A welder's 12" F Clamp and a 36" pipe wrench.
The F Clamp held the splined removal socket tool securely on the BB so I could use the pipe wrench to turn it.
The tools are from Harbor Freight and cost $50 altogether. It's worth it to me because I have a lot of square taper bikes.
Not having Barked knuckles and over-strained muscles made it worth it. Both sides couldn't resist the powerful massive 36" pipe wrench. This was like power steering.
12-22-20, 03:07 AM
#20
Senior Member
Join Date: Feb 2020
Posts: 2,819
Mentioned: 49 Post(s)
Tagged: 0 Thread(s)
Quoted: 1106 Post(s)
Likes: 0
Liked 1,327 Times
in
783 Posts
A seized run of the mill Shimano UN-52 was removed successfully this afternoon. I was unable to crack it last week using a 12" bar and a mallet.
I went out and bought a couple of new tools after Saturday's ride: A welder's 12" F Clamp and a 36" pipe wrench.
The F Clamp held the splined removal socket tool securely on the BB so I could use the pipe wrench to turn it.
I went out and bought a couple of new tools after Saturday's ride: A welder's 12" F Clamp and a 36" pipe wrench.
The F Clamp held the splined removal socket tool securely on the BB so I could use the pipe wrench to turn it.
And if you are stuck somewhere with a too-short spanner, a length of <2x4,iron pipe, anything> and some hose-clamps will make the handle long enough.
12-22-20, 06:53 AM
#21
Senior Member
Join Date: Nov 2005
Location: NW Ohio
Posts: 3,419
Bikes: 1984 Miyata 310, 1986 Schwinn Sierra, 2011 Jamis Quest, 1980 Peugeot TH8 Tandem, 1992 Performance Parabola, 1987 Ross Mt. Hood, 1988 Schwinn LeTour, 1988 Trek 400T, 1981 Fuji S12-S LTD, 197? FW Evans
Mentioned: 24 Post(s)
Tagged: 0 Thread(s)
Quoted: 531 Post(s)
Liked 1,004 Times
in
514 Posts
There was a tool like in the second picture in the Box O' Crap recently. I wasn't sure what it was at first. I already have a Sheldon tool and I haven't needed to resort to extreme measures (yet) so I left it in for someone else.
12-22-20, 01:55 PM
#22
Full Member
Join Date: Apr 2010
Location: '16 StumpJ, Salsa Mukluk, Soulcycles SS, Dean Colonel HT, BMC FourstrokeTrail, Dean Torres CX, Santana Visa Tandem, Trek T2000 Tandem, Cupertino MTB Tandem, FreeAgent26"Xtracycle, Dirt Drop Dingle, Jamis Dragon Dingle, Airborne Skyhag SS, SSDean Cols
Posts: 219
Mentioned: 0 Post(s)
Tagged: 0 Thread(s)
Quoted: 70 Post(s)
Liked 116 Times
in
61 Posts
I had everything to do it with a QR to hold the tool and slip the handle from a Hi-Lift jack on there.
But I wanted these tools anyway.
