


Kiddie's Bike Chain Guard
 01-17-21, 09:42 AM
#1
Senior Member
Thread Starter
Kiddie's Bike Chain Guard
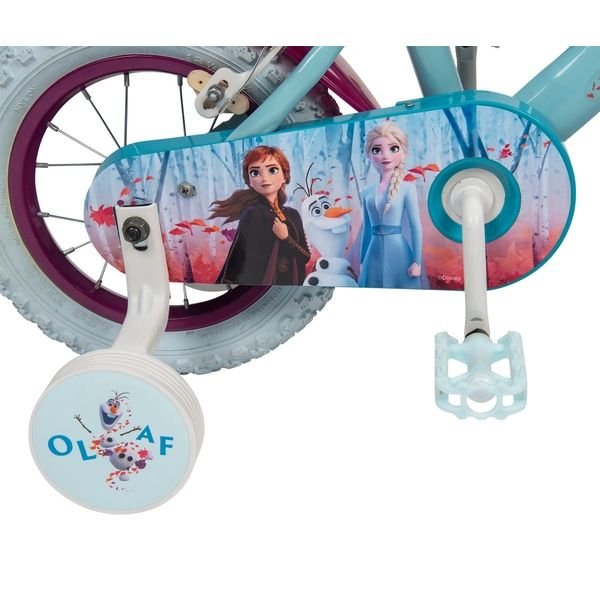
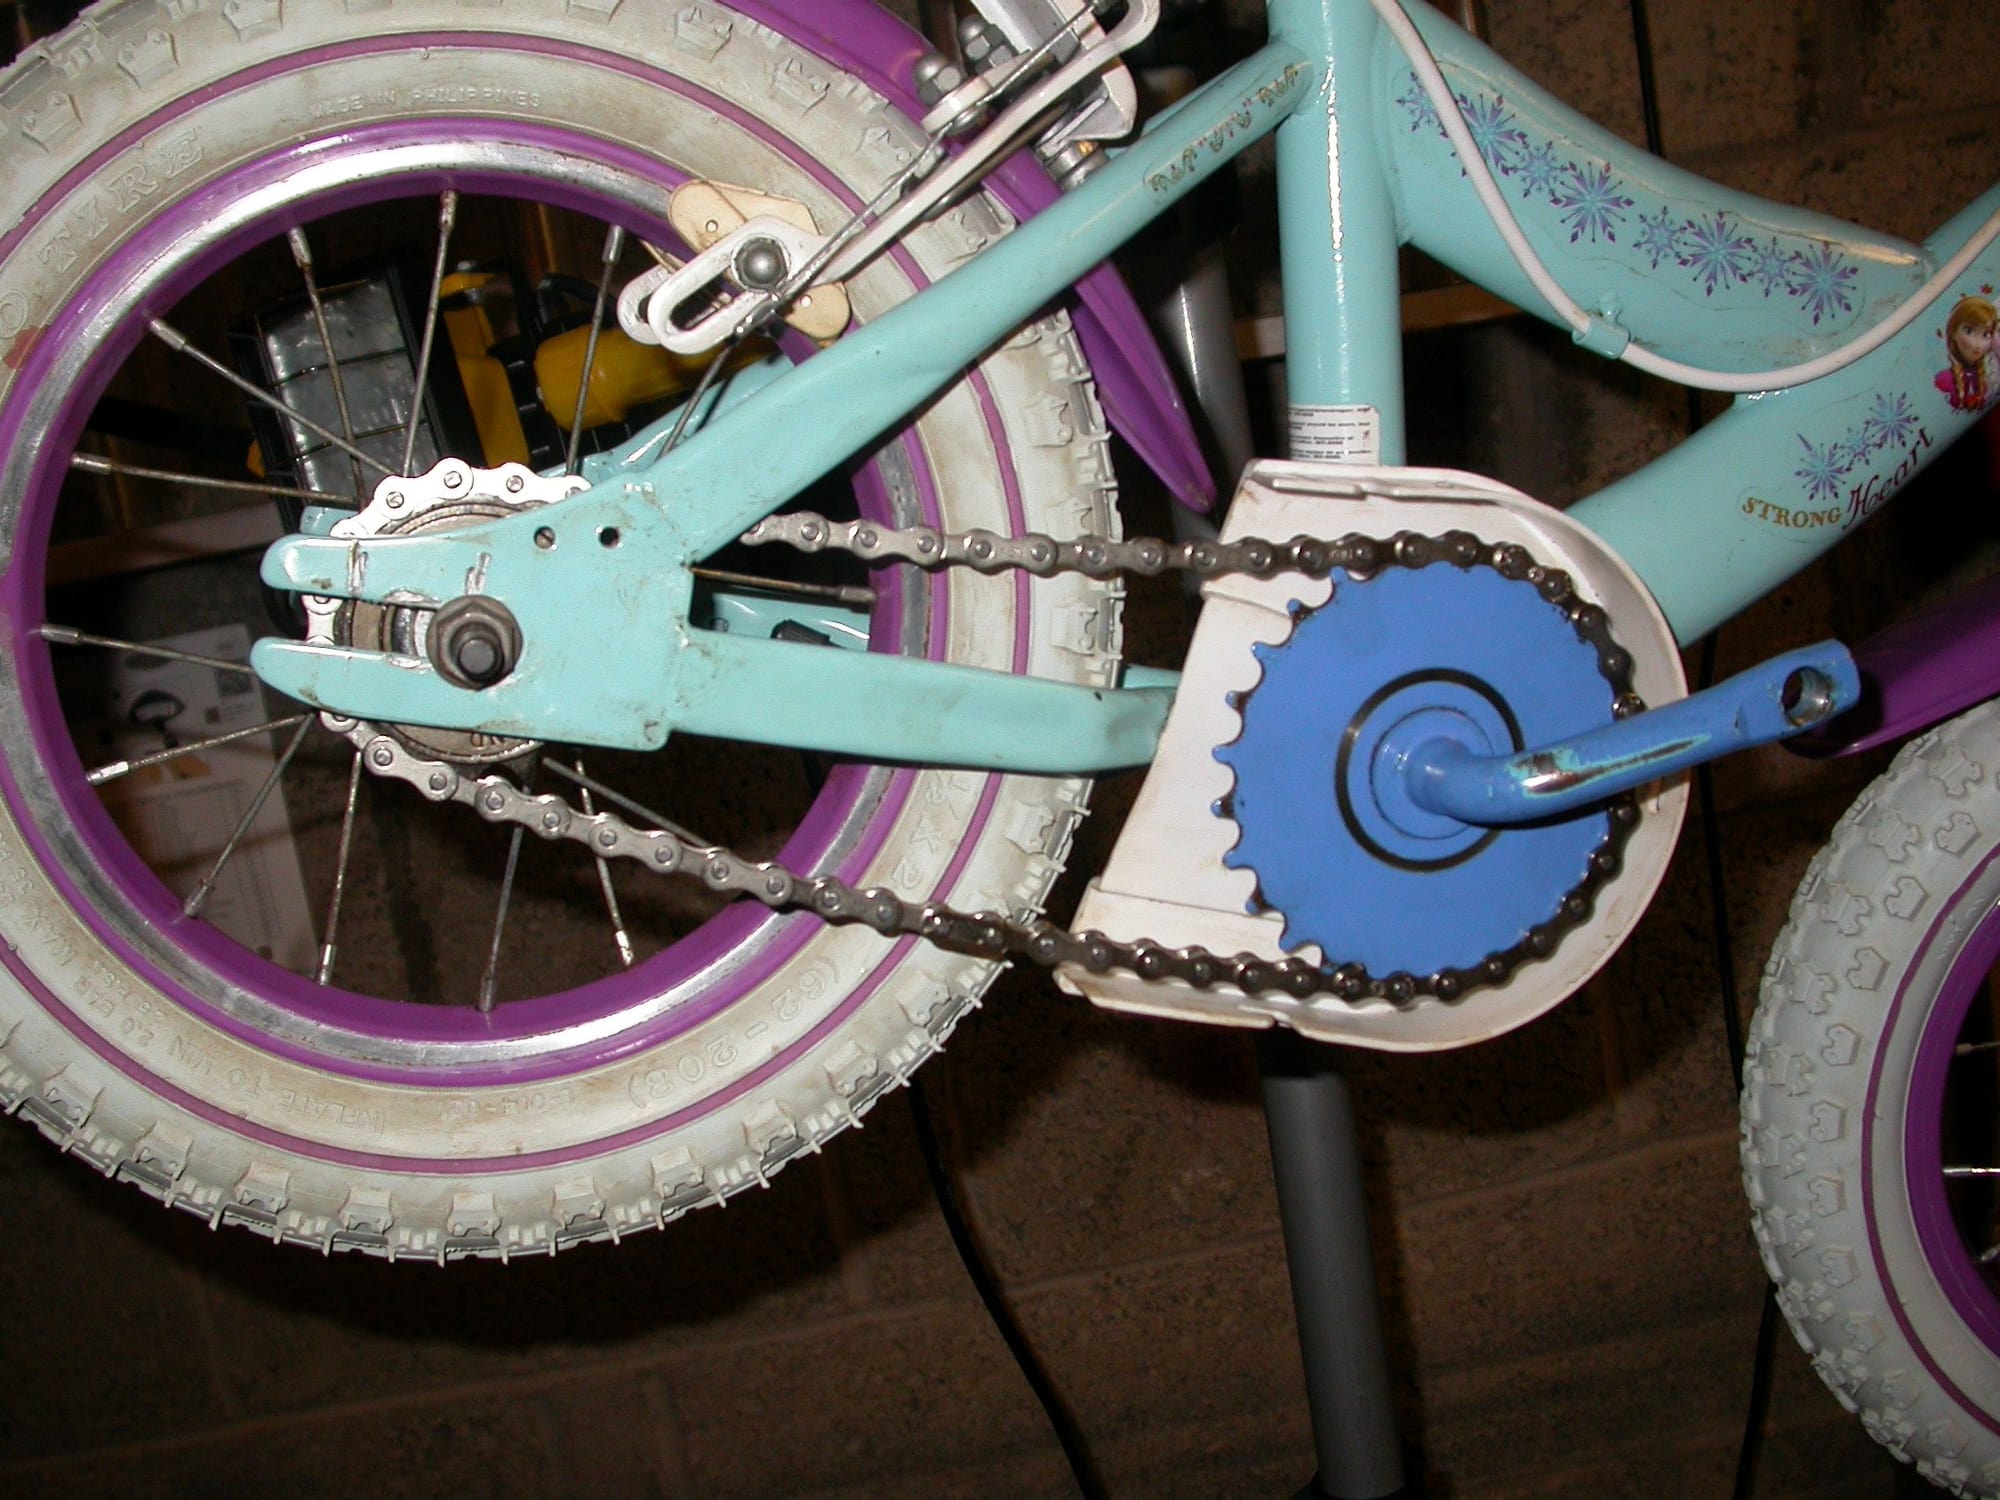
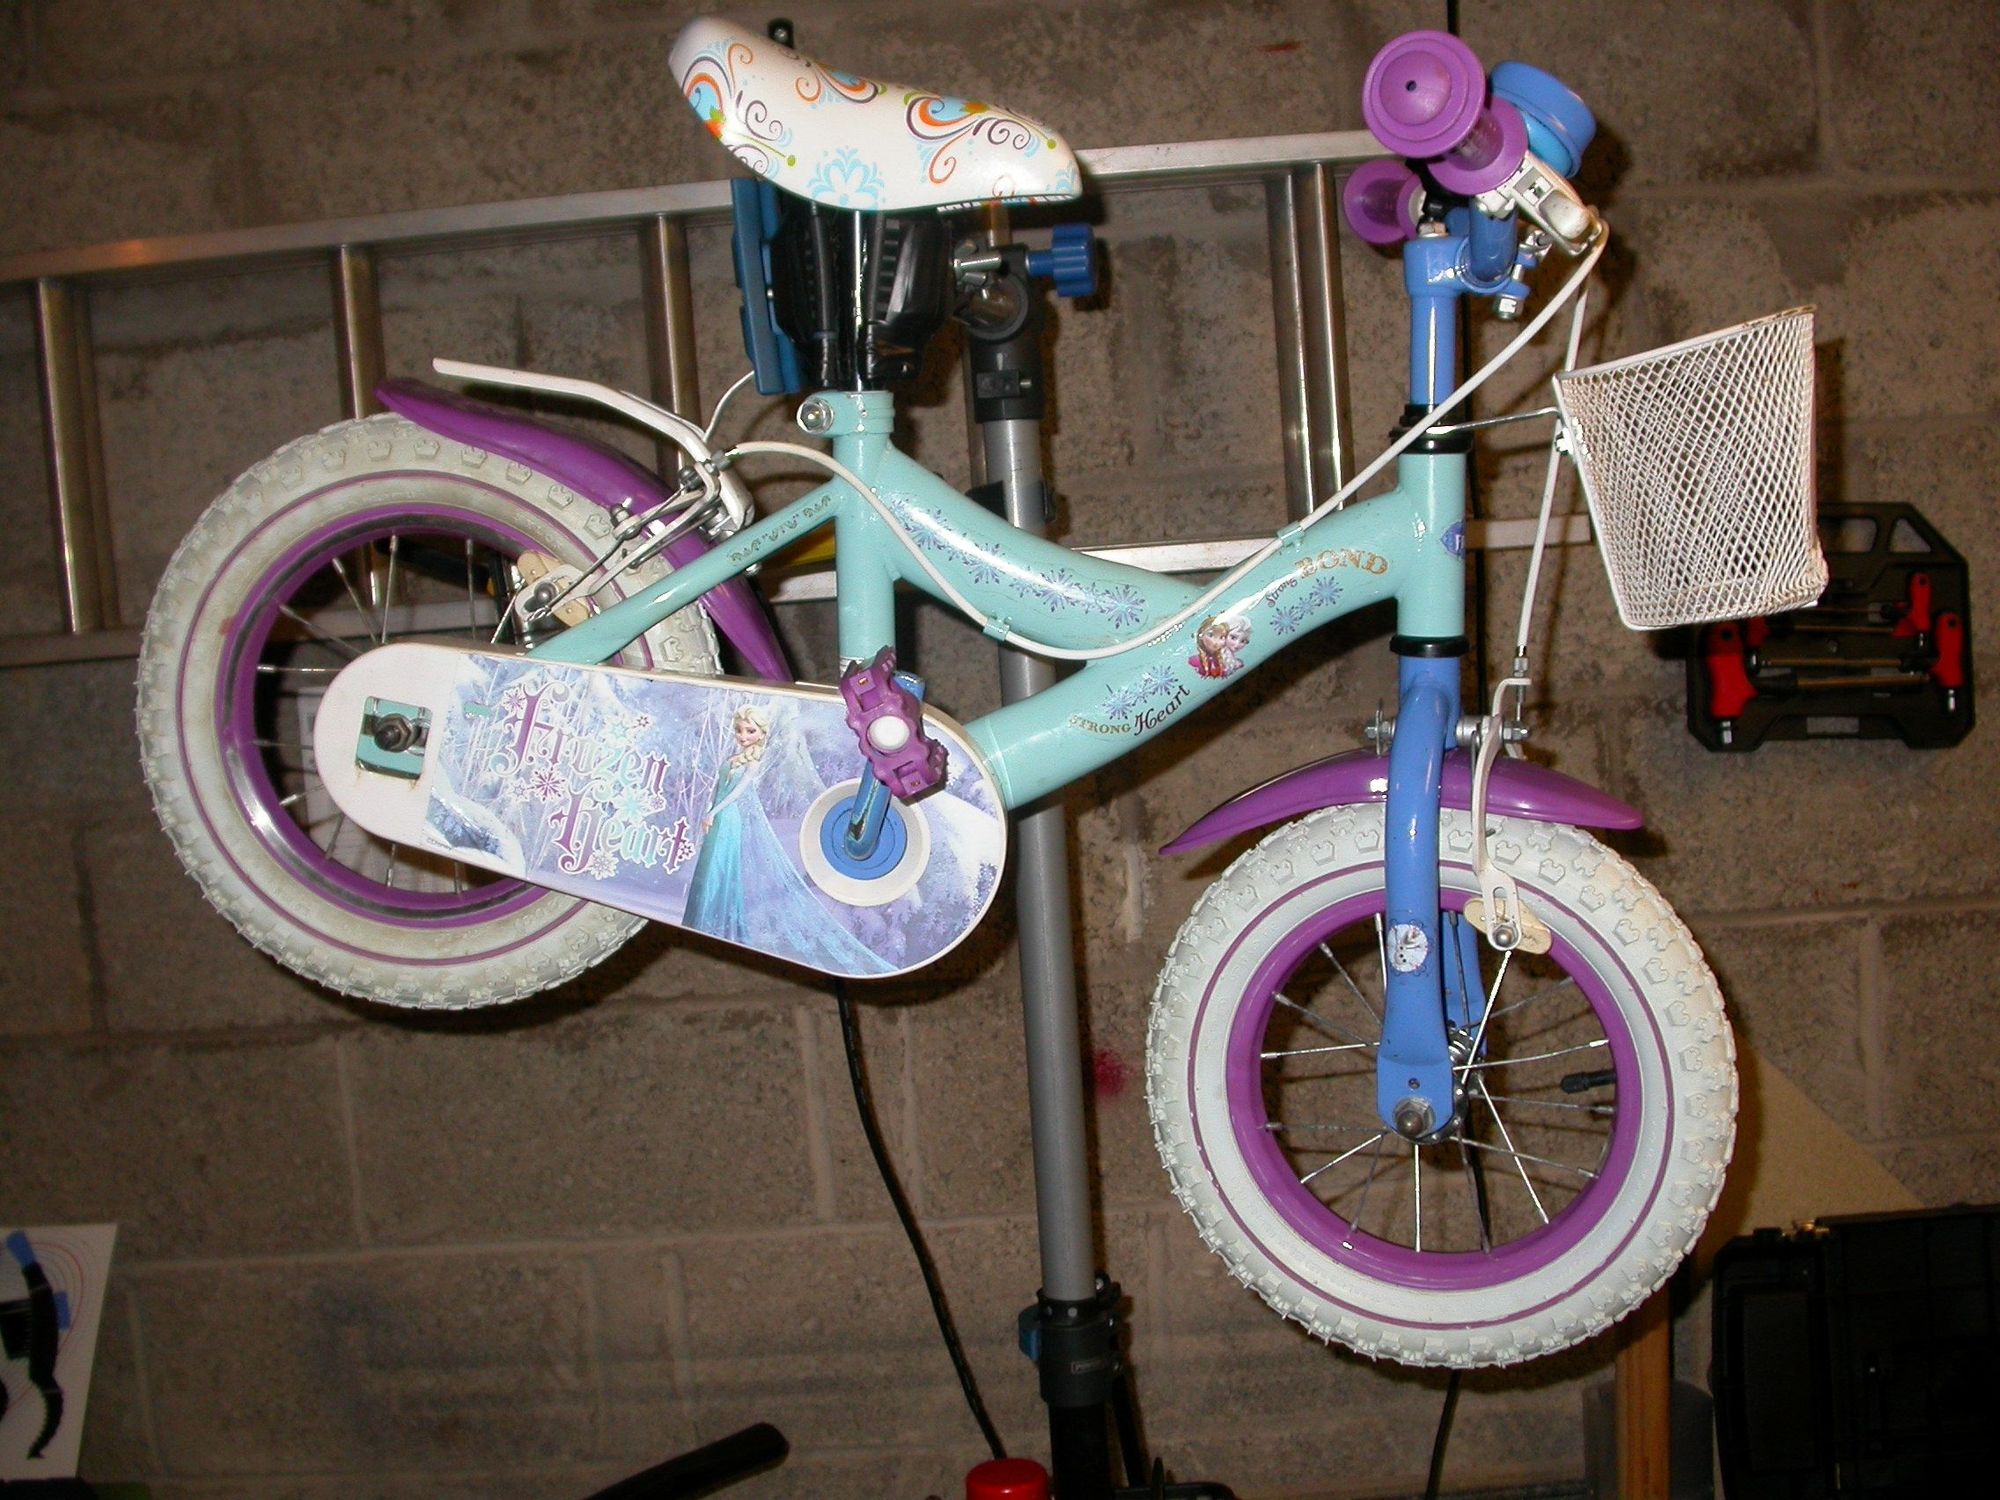
Well this is a bit embarrassing but my grand-daughter's 12" Frozen bike has seized up. I have taken it to work on it but the plastic chain guard is proving to be a real pain to separate.
Has anyone worked on one of these bikes and can advise on a safe way to remove the guard without destroying the thing. It appears to me to be factory fitted and the back and front are clip/push fits. However, I cannot find an obvious place to try to release those clips. I would rather not destroy the guard as my grand-daughter is likely to be upset.
Any tips would be appreciated.
 01-17-21, 11:02 AM
#2

Senior Member
Join Date: Feb 2012
Location: Rochester, NY
Posts: 18,073
Bikes: Stewart S&S coupled sport tourer, Stewart Sunday light, Stewart Commuting, Stewart Touring, Co Motion Tandem, Stewart 3-Spd, Stewart Track, Fuji Finest, Mongoose Tomac ATB, GT Bravado ATB, JCP Folder, Stewart 650B ATB
Mentioned: 0 Post(s)
Tagged: 0 Thread(s)
Quoted: 4201 Post(s)
Liked 3,857 Times
in
2,305 Posts
These guards are often help on by both screws (and I see two, likely a third present) and plastic finger or tab in slot designs. Usually the axle nuts and washers need to be removed in addition to any screws. Then one does the wiggle, pry, prod dance to remove the guard without damaging it's plastic interfacing parts. Sometimes the guard is in two parts, one main part surrounding the chainring and extending back to about the rear axle and another pars that slips on from the back and covers the rear cog. Sometimes the rear wheel needs to be able to be slid fore or aft in the drop out (and thus the coaster brake reaction arm bolt would also be removed). Sometimes the RH pedal (the one with common right hand threading, like a light bulb's) needs removal, as it seems by the image. Sometimes the guard's mounting clips should be removed from the frame. So it all depends on the design and the image doesn't show enough views and details for us to say much more. Andy
__________________
AndrewRStewart
AndrewRStewart
Likes For Andrew R Stewart:
01-17-21, 12:39 PM
#3
Senior Member
Join Date: Dec 2019
Location: South Shore of Long Island
Posts: 2,799
Bikes: 2010 Carrera Volans, 2015 C-Dale Trail 2sl, 2017 Raleigh Rush Hour, 2017 Blue Proseccio, 1992 Giant Perigee, 80s Gitane Rallye Tandem
Mentioned: 12 Post(s)
Tagged: 0 Thread(s)
Quoted: 1088 Post(s)
Liked 1,024 Times
in
723 Posts
Betting there's a bottom screw to match the one you can see at the top, plus the screw by Anna's hair and pull off the training wheel, should come off then. However you may not need to remove it, what's frozen besides the decal?
Bad pun aside. If the rear wheel doesn't spin you will need to pull the drive side training wheel, undo the screw by Anna's head, loosen the actual axle nut on the drive side and you should be able to slip a cone wrench in and loosen the cone. Don't bother loosening the non-drive side. That side of the axle won't move and hasn't self adjusted. Once the wheel is spinning tighten the lock nut against the cone nut, and bolt everything back together. If the wheel moves but the crank is stuck there's no real adjustment on the drive side, you'll need a 32 or 36mm wrench and probably a pin spanner for the BB cone nut. You can adjust it with a screwdriver in some situations, but you'll need to know what you're doing.
Bad pun aside. If the rear wheel doesn't spin you will need to pull the drive side training wheel, undo the screw by Anna's head, loosen the actual axle nut on the drive side and you should be able to slip a cone wrench in and loosen the cone. Don't bother loosening the non-drive side. That side of the axle won't move and hasn't self adjusted. Once the wheel is spinning tighten the lock nut against the cone nut, and bolt everything back together. If the wheel moves but the crank is stuck there's no real adjustment on the drive side, you'll need a 32 or 36mm wrench and probably a pin spanner for the BB cone nut. You can adjust it with a screwdriver in some situations, but you'll need to know what you're doing.
Likes For Russ Roth:
01-17-21, 01:13 PM
#4
Senior Member
Thread Starter
These guards are often help on by both screws (and I see two, likely a third present) and plastic finger or tab in slot designs. Usually the axle nuts and washers need to be removed in addition to any screws. Then one does the wiggle, pry, prod dance to remove the guard without damaging it's plastic interfacing parts. Sometimes the guard is in two parts, one main part surrounding the chainring and extending back to about the rear axle and another pars that slips on from the back and covers the rear cog. Sometimes the rear wheel needs to be able to be slid fore or aft in the drop out (and thus the coaster brake reaction arm bolt would also be removed). Sometimes the RH pedal (the one with common right hand threading, like a light bulb's) needs removal, as it seems by the image. Sometimes the guard's mounting clips should be removed from the frame. So it all depends on the design and the image doesn't show enough views and details for us to say much more. Andy

As far as I can tell with my failing eyesight, the guard does not split fore and aft. It does look like it splits inside and outside of the chain, though.
The pedal will need to come off, if the work needed involves removing the chain or anything else.
01-17-21, 01:18 PM
#5
Senior Member
Thread Starter
Betting there's a bottom screw to match the one you can see at the top, plus the screw by Anna's hair and pull off the training wheel, should come off then. However you may not need to remove it, what's frozen besides the decal?
Bad pun aside. If the rear wheel doesn't spin you will need to pull the drive side training wheel, undo the screw by Anna's head, loosen the actual axle nut on the drive side and you should be able to slip a cone wrench in and loosen the cone. Don't bother loosening the non-drive side. That side of the axle won't move and hasn't self adjusted. Once the wheel is spinning tighten the lock nut against the cone nut, and bolt everything back together. If the wheel moves but the crank is stuck there's no real adjustment on the drive side, you'll need a 32 or 36mm wrench and probably a pin spanner for the BB cone nut. You can adjust it with a screwdriver in some situations, but you'll need to know what you're doing.
Bad pun aside. If the rear wheel doesn't spin you will need to pull the drive side training wheel, undo the screw by Anna's head, loosen the actual axle nut on the drive side and you should be able to slip a cone wrench in and loosen the cone. Don't bother loosening the non-drive side. That side of the axle won't move and hasn't self adjusted. Once the wheel is spinning tighten the lock nut against the cone nut, and bolt everything back together. If the wheel moves but the crank is stuck there's no real adjustment on the drive side, you'll need a 32 or 36mm wrench and probably a pin spanner for the BB cone nut. You can adjust it with a screwdriver in some situations, but you'll need to know what you're doing.
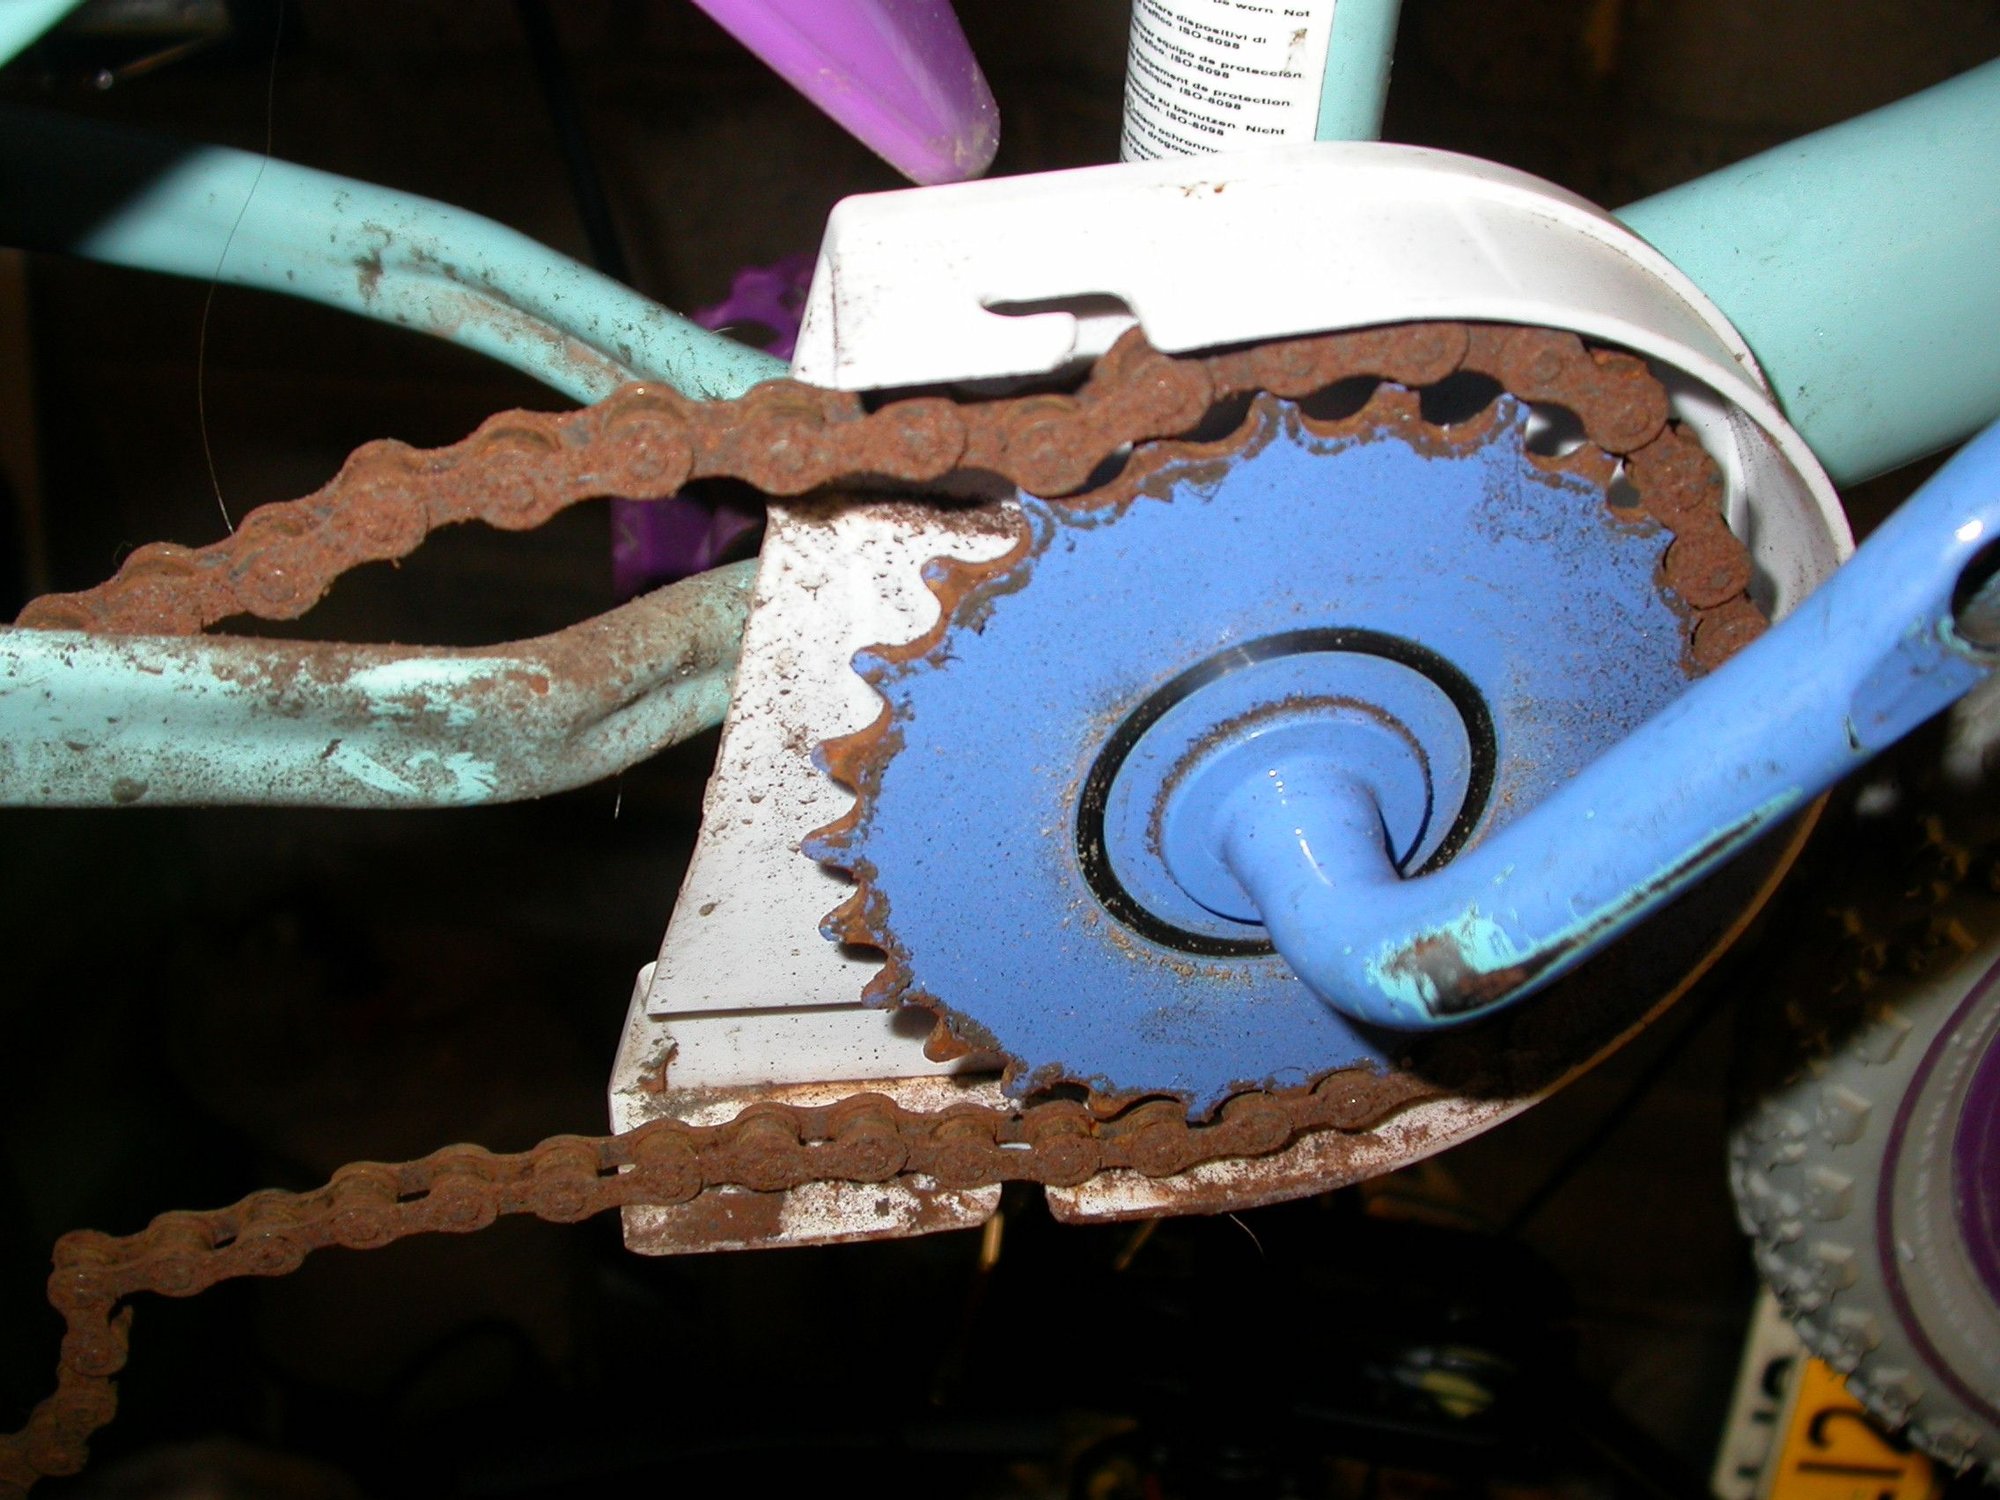
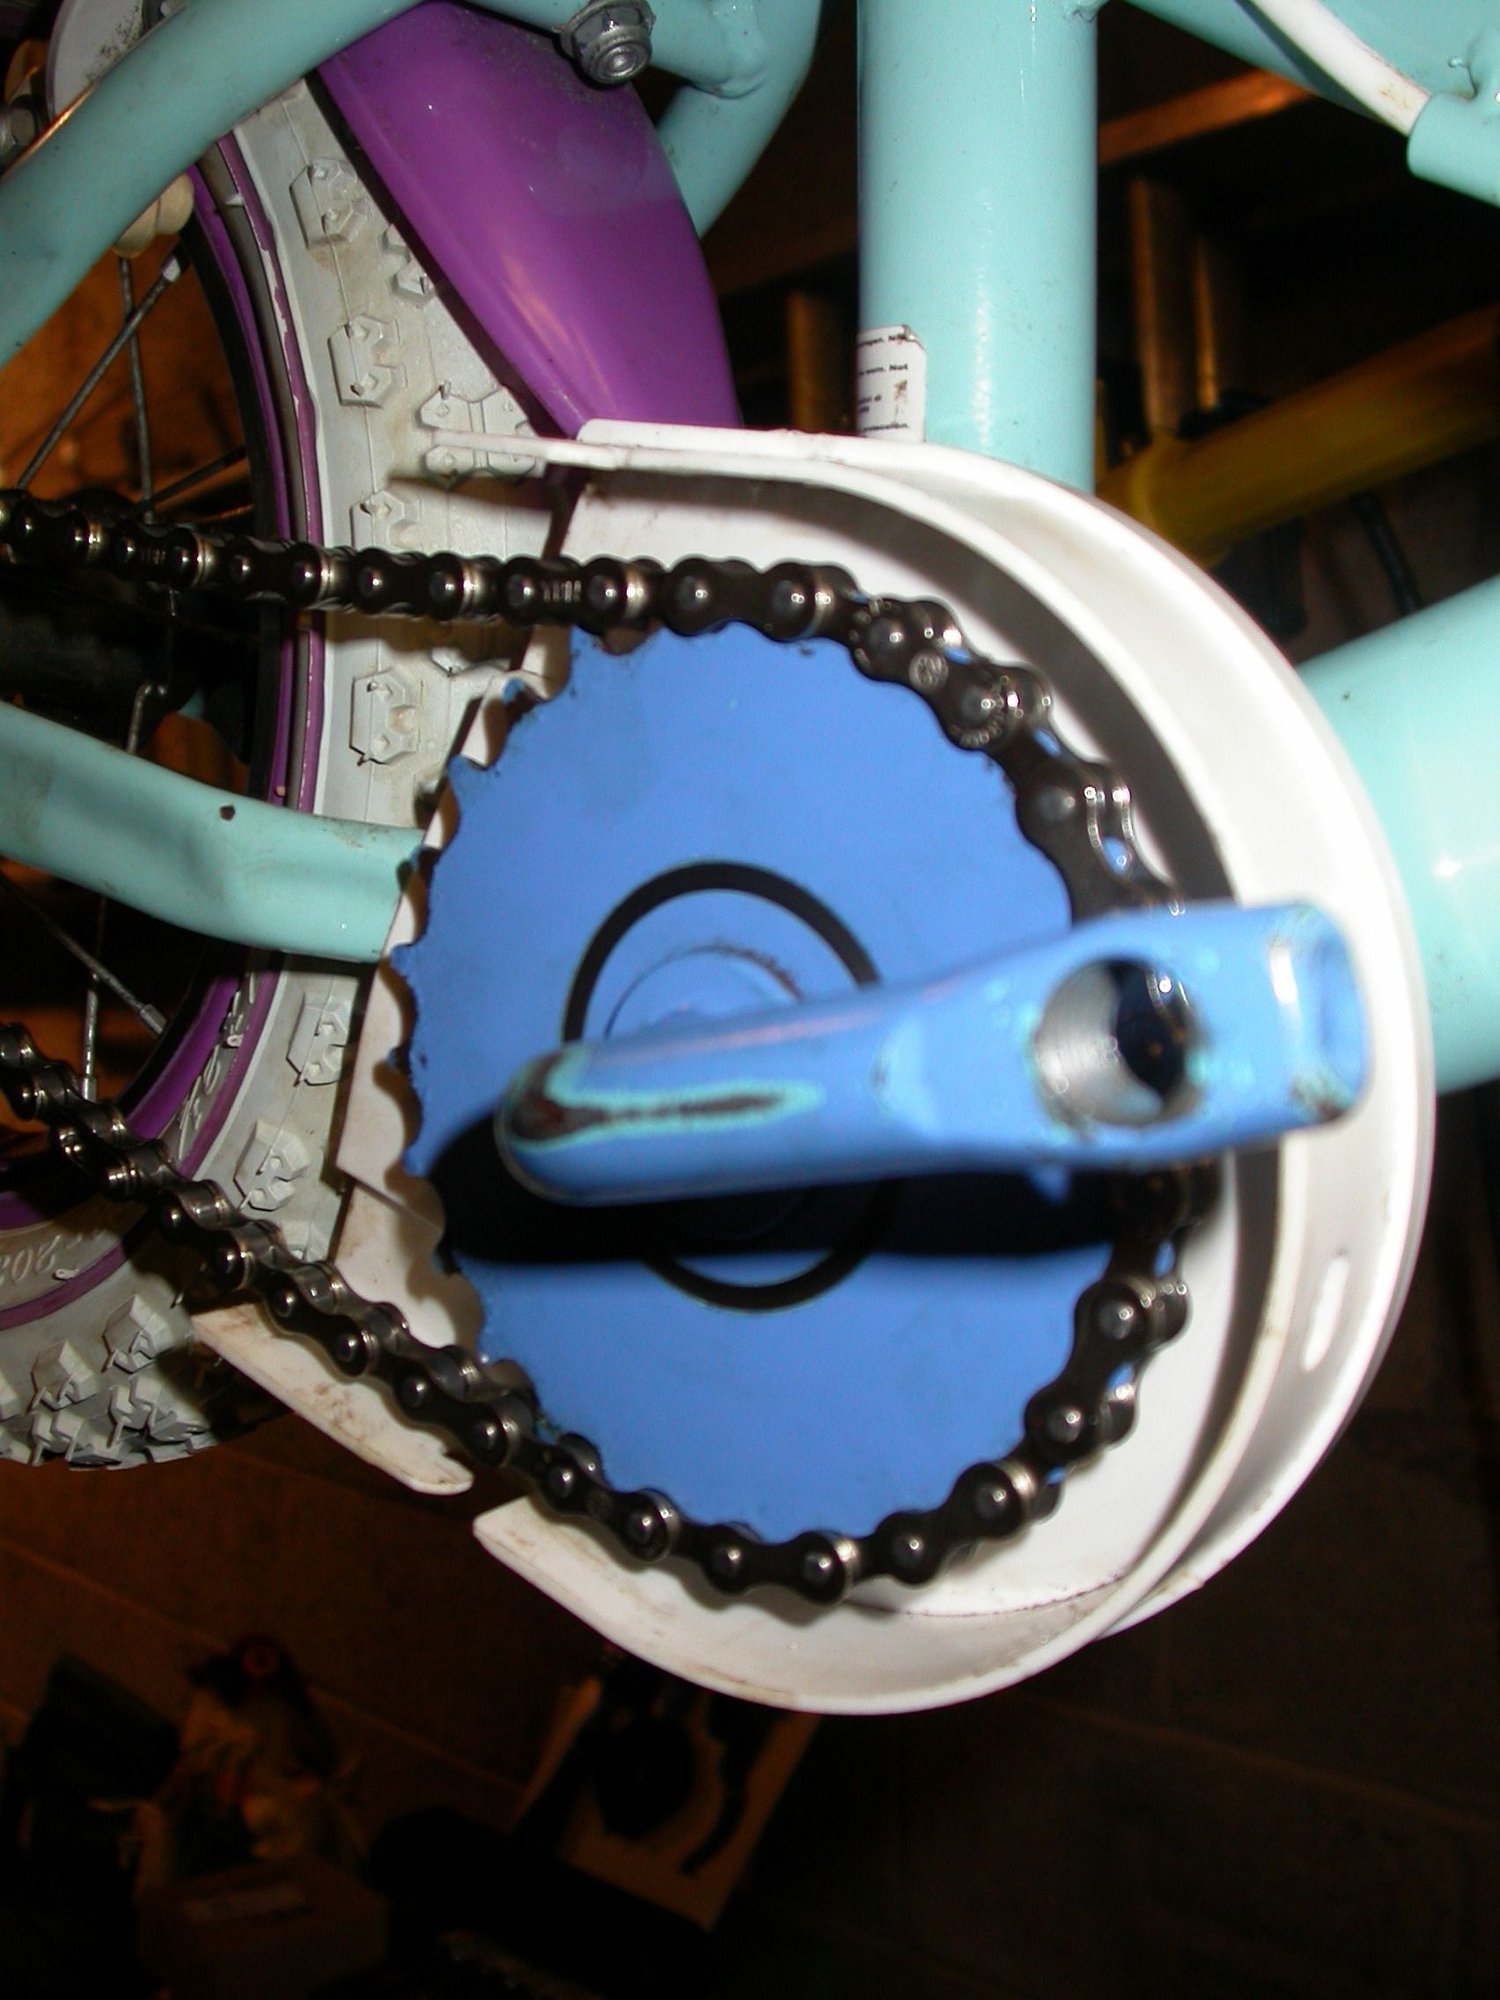
The wheel is completely seized and from what I can see under the guard, the chain is badly corroded. Surprising considering the bike is only 1 year old.
I would prefer to get into that chain to at very least clean it, or if necessary, replace it. But I'll try what you suggest to see if I get some movement on the wheel.
I also have a sledgehammer which could pass for a faery wand, if I run out of patience!
01-17-21, 02:05 PM
#6
SE Wis
Join Date: Apr 2005
Location: Milwaukee, WI
Posts: 10,511
Bikes: '68 Raleigh Sprite, '02 Raleigh C500, '84 Raleigh Gran Prix, '91 Trek 400, 2013 Novara Randonee, 1990 Trek 970
Mentioned: 40 Post(s)
Tagged: 0 Thread(s)
Quoted: 2746 Post(s)
Liked 3,391 Times
in
2,054 Posts
Likes For dedhed:
01-17-21, 04:42 PM
#7
Senior Member
Thread Starter
Thanks for the video link. The bike is very similar and as can be seen in the video, the chain guard is already fitted, unfortunately.
01-17-21, 05:38 PM
#8
SE Wis
Join Date: Apr 2005
Location: Milwaukee, WI
Posts: 10,511
Bikes: '68 Raleigh Sprite, '02 Raleigh C500, '84 Raleigh Gran Prix, '91 Trek 400, 2013 Novara Randonee, 1990 Trek 970
Mentioned: 40 Post(s)
Tagged: 0 Thread(s)
Quoted: 2746 Post(s)
Liked 3,391 Times
in
2,054 Posts
Likes For dedhed:
01-18-21, 05:30 AM
#9
Senior Member
Thread Starter
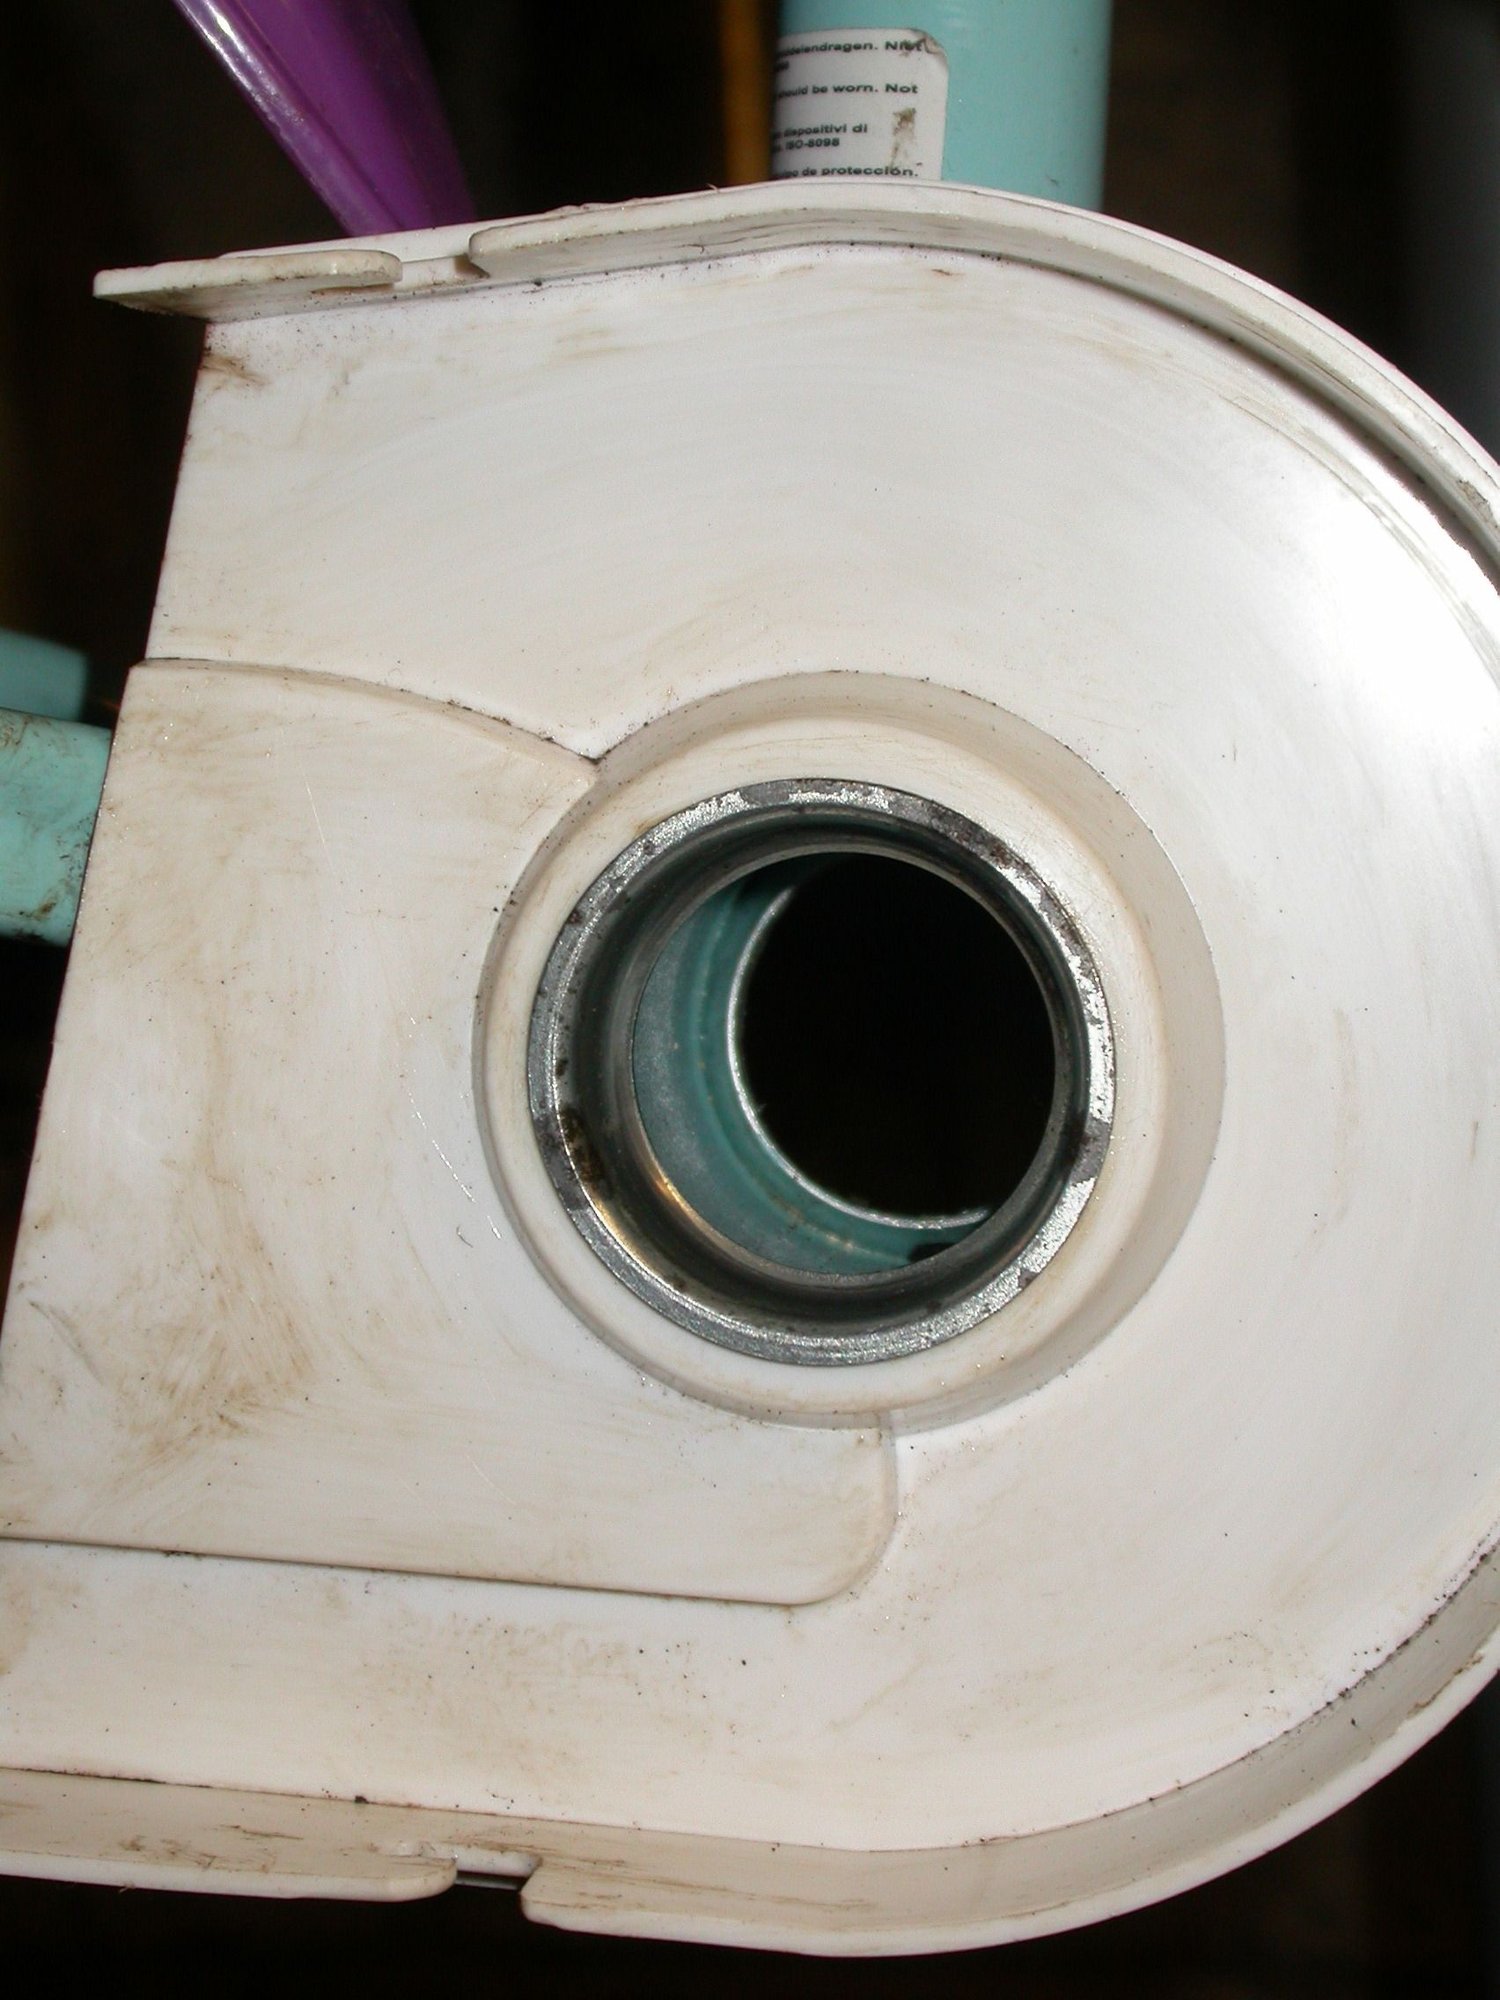
Managed to get the guard split enough to let me work on it. I'll add some pics if anyone is interested in how it is joined. It is a simply lug and slot connection and by pushing the outer shell of the guard towards the front, the lugs clear the slots and the guard can be separated. Now to get a chain to run on that chainring. I suppose it is not really a chainring, so whatever that is called.


Likes For rodscot:
01-18-21, 05:57 AM
#10
Junior Member

Join Date: Jan 2021
Posts: 10
Mentioned: 0 Post(s)
Tagged: 0 Thread(s)
Quoted: 1 Post(s)
Likes: 0
Liked 3 Times
in
2 Posts
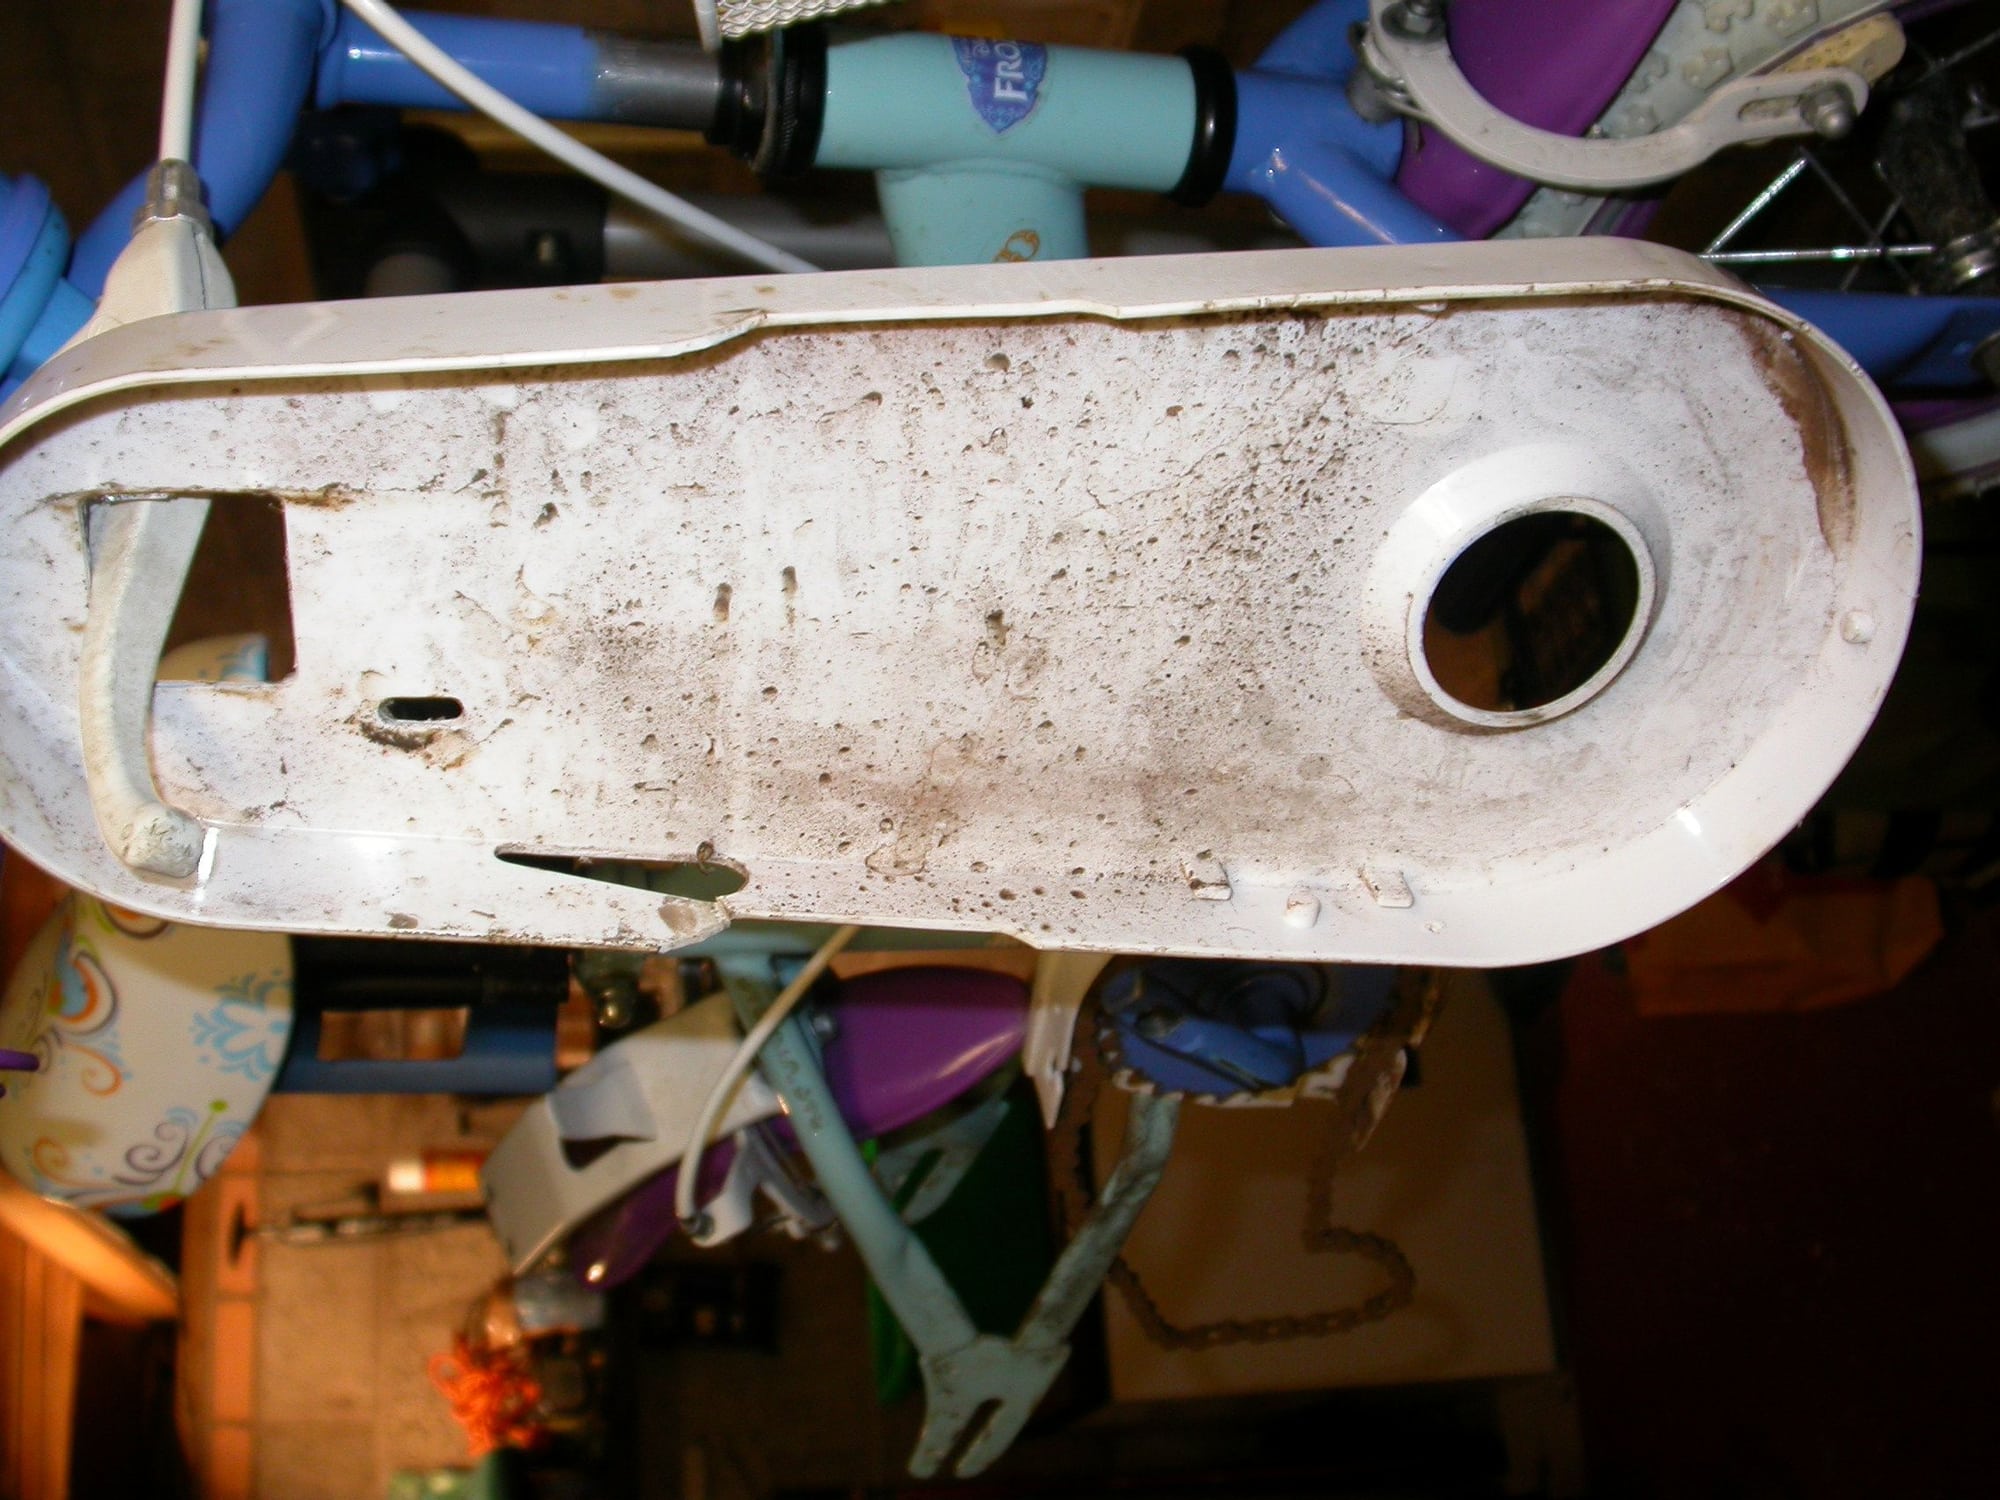
Nice work! In that last image is small section of of the chain case behind the pedal crank. I can not for the life of me figure out the tool I need to remove it. Following along to see what you do here. Great bike!
01-19-21, 02:52 AM
#11
Senior Member
Thread Starter
I am pretty sure that the only way to remove that section without cutting it is to dismantle the bottom bracket and pull the crank out. I did not intend on doing that as I have access now to what I need, but as I am waiting for a chain to arrive, I may give the cranks, etc a clean too. If I do, I will let you know how things went.
01-19-21, 06:18 AM
#12
Senior Member

Join Date: Sep 2020
Location: Eastern Poland
Posts: 744
Bikes: Romet Jubilat x 4, Wigry x 1, Turing x 1
Mentioned: 3 Post(s)
Tagged: 0 Thread(s)
Quoted: 194 Post(s)
Liked 204 Times
in
151 Posts
Is a single piece crank? The one I have just needed the bottom bearing retainers, remove the none drive side bearing and then draw the none drive side crank through the bottom bearing. They are quite basic, and then you can see if the bottom bearing needs regreasing. The bearings in the rear wheel were a bit toasty on my one, so regreasing all round is not a bad idea - and everything is so light!
01-19-21, 09:50 AM
#13
Senior Member
Thread Starter
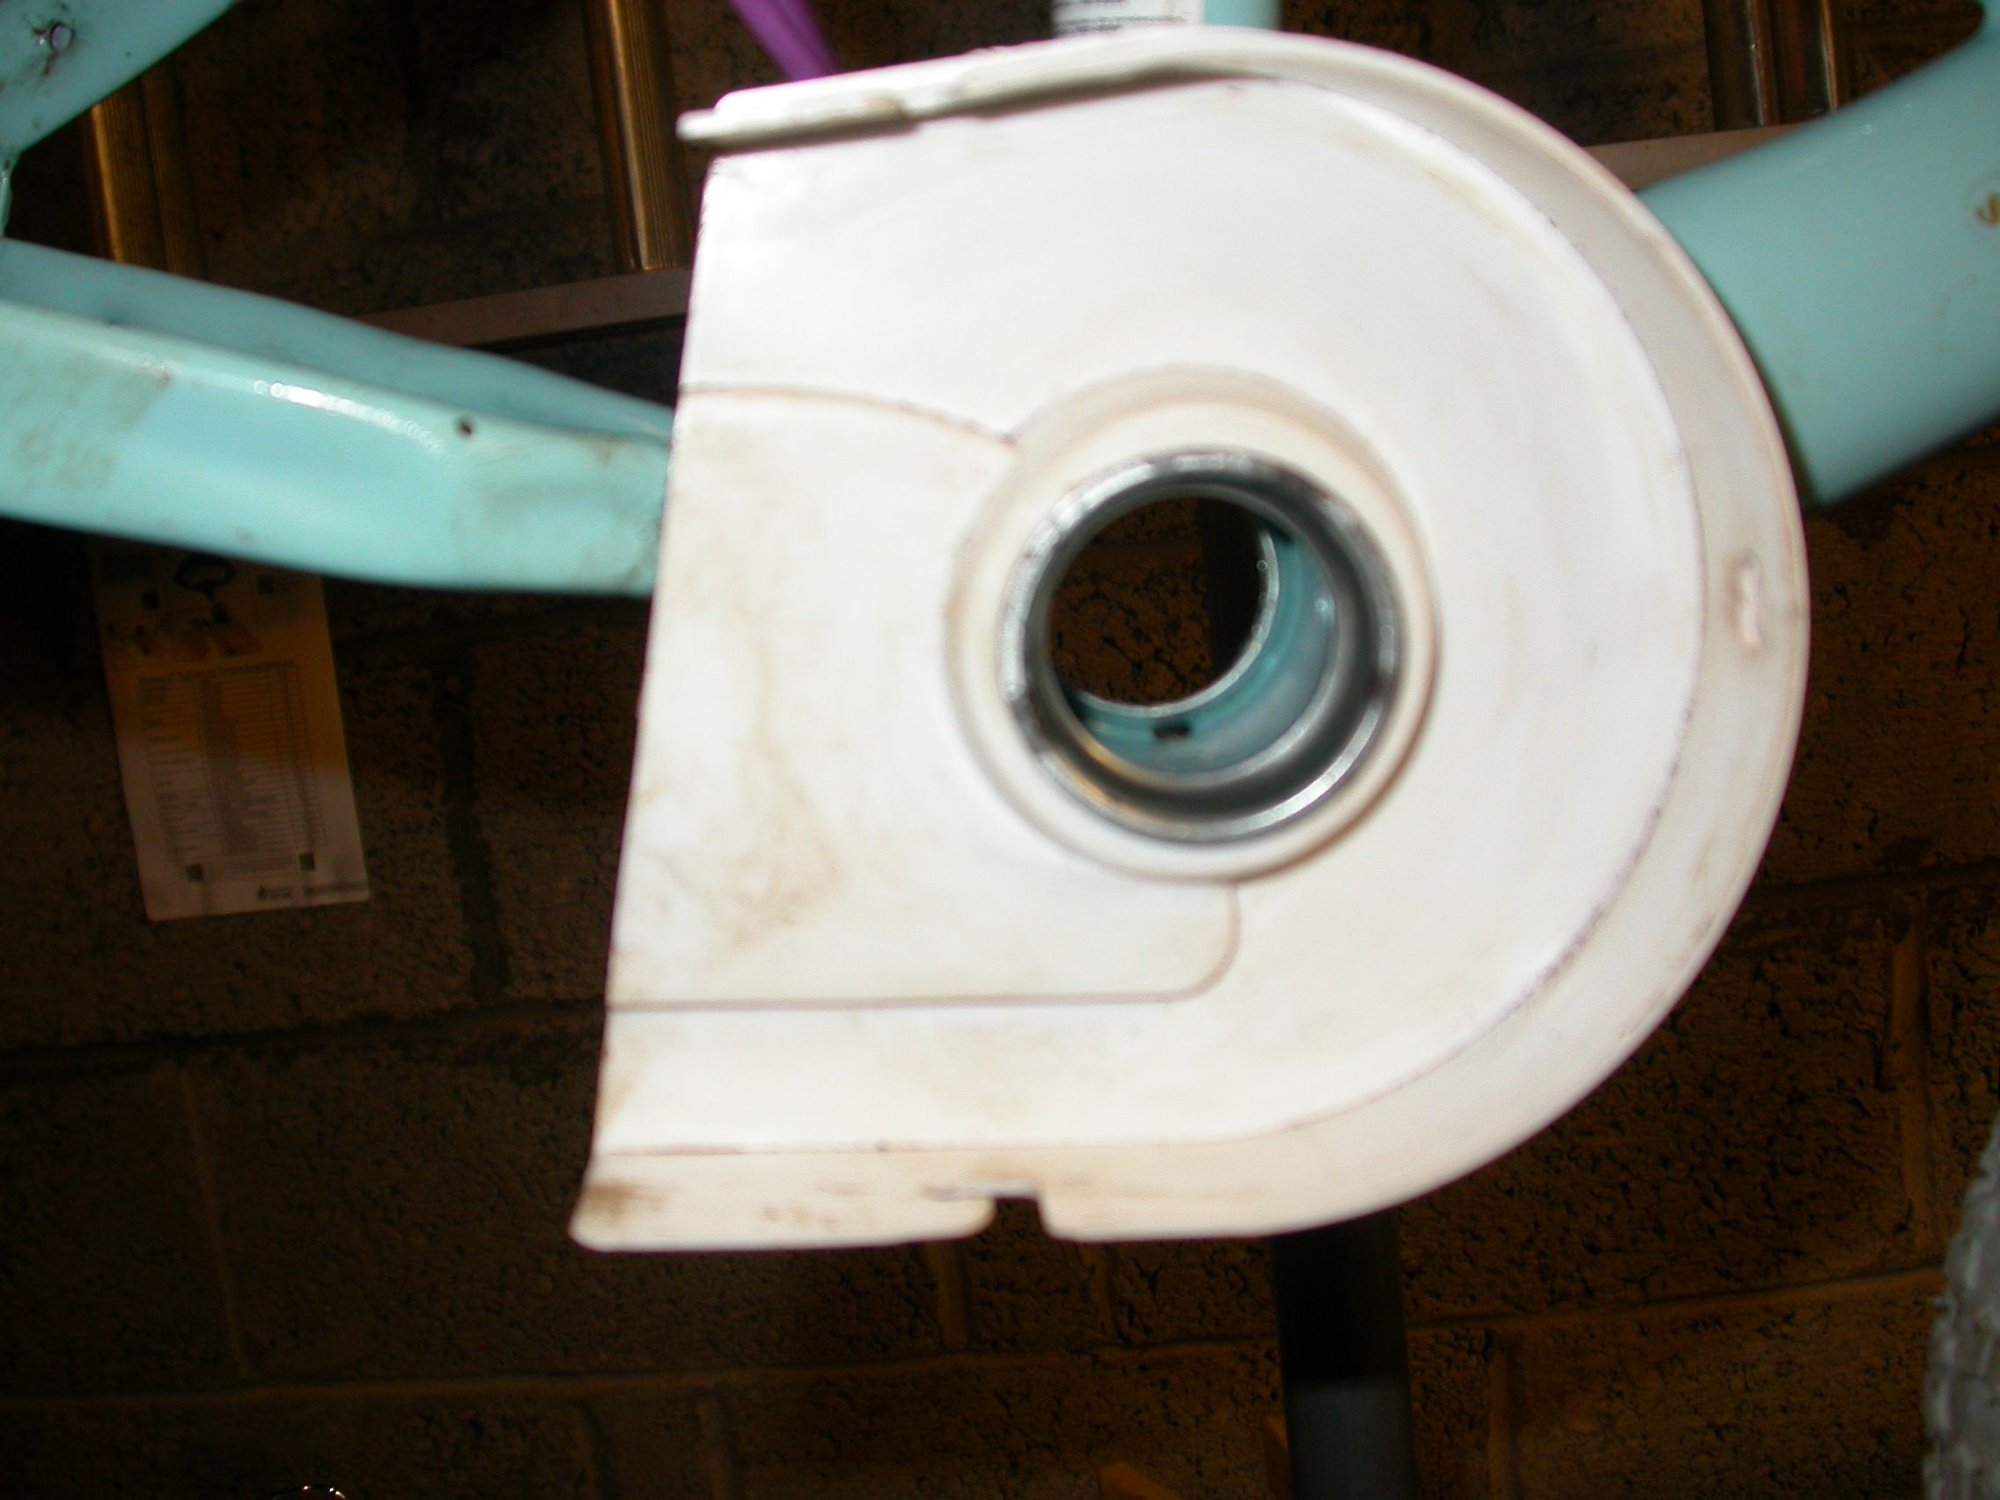
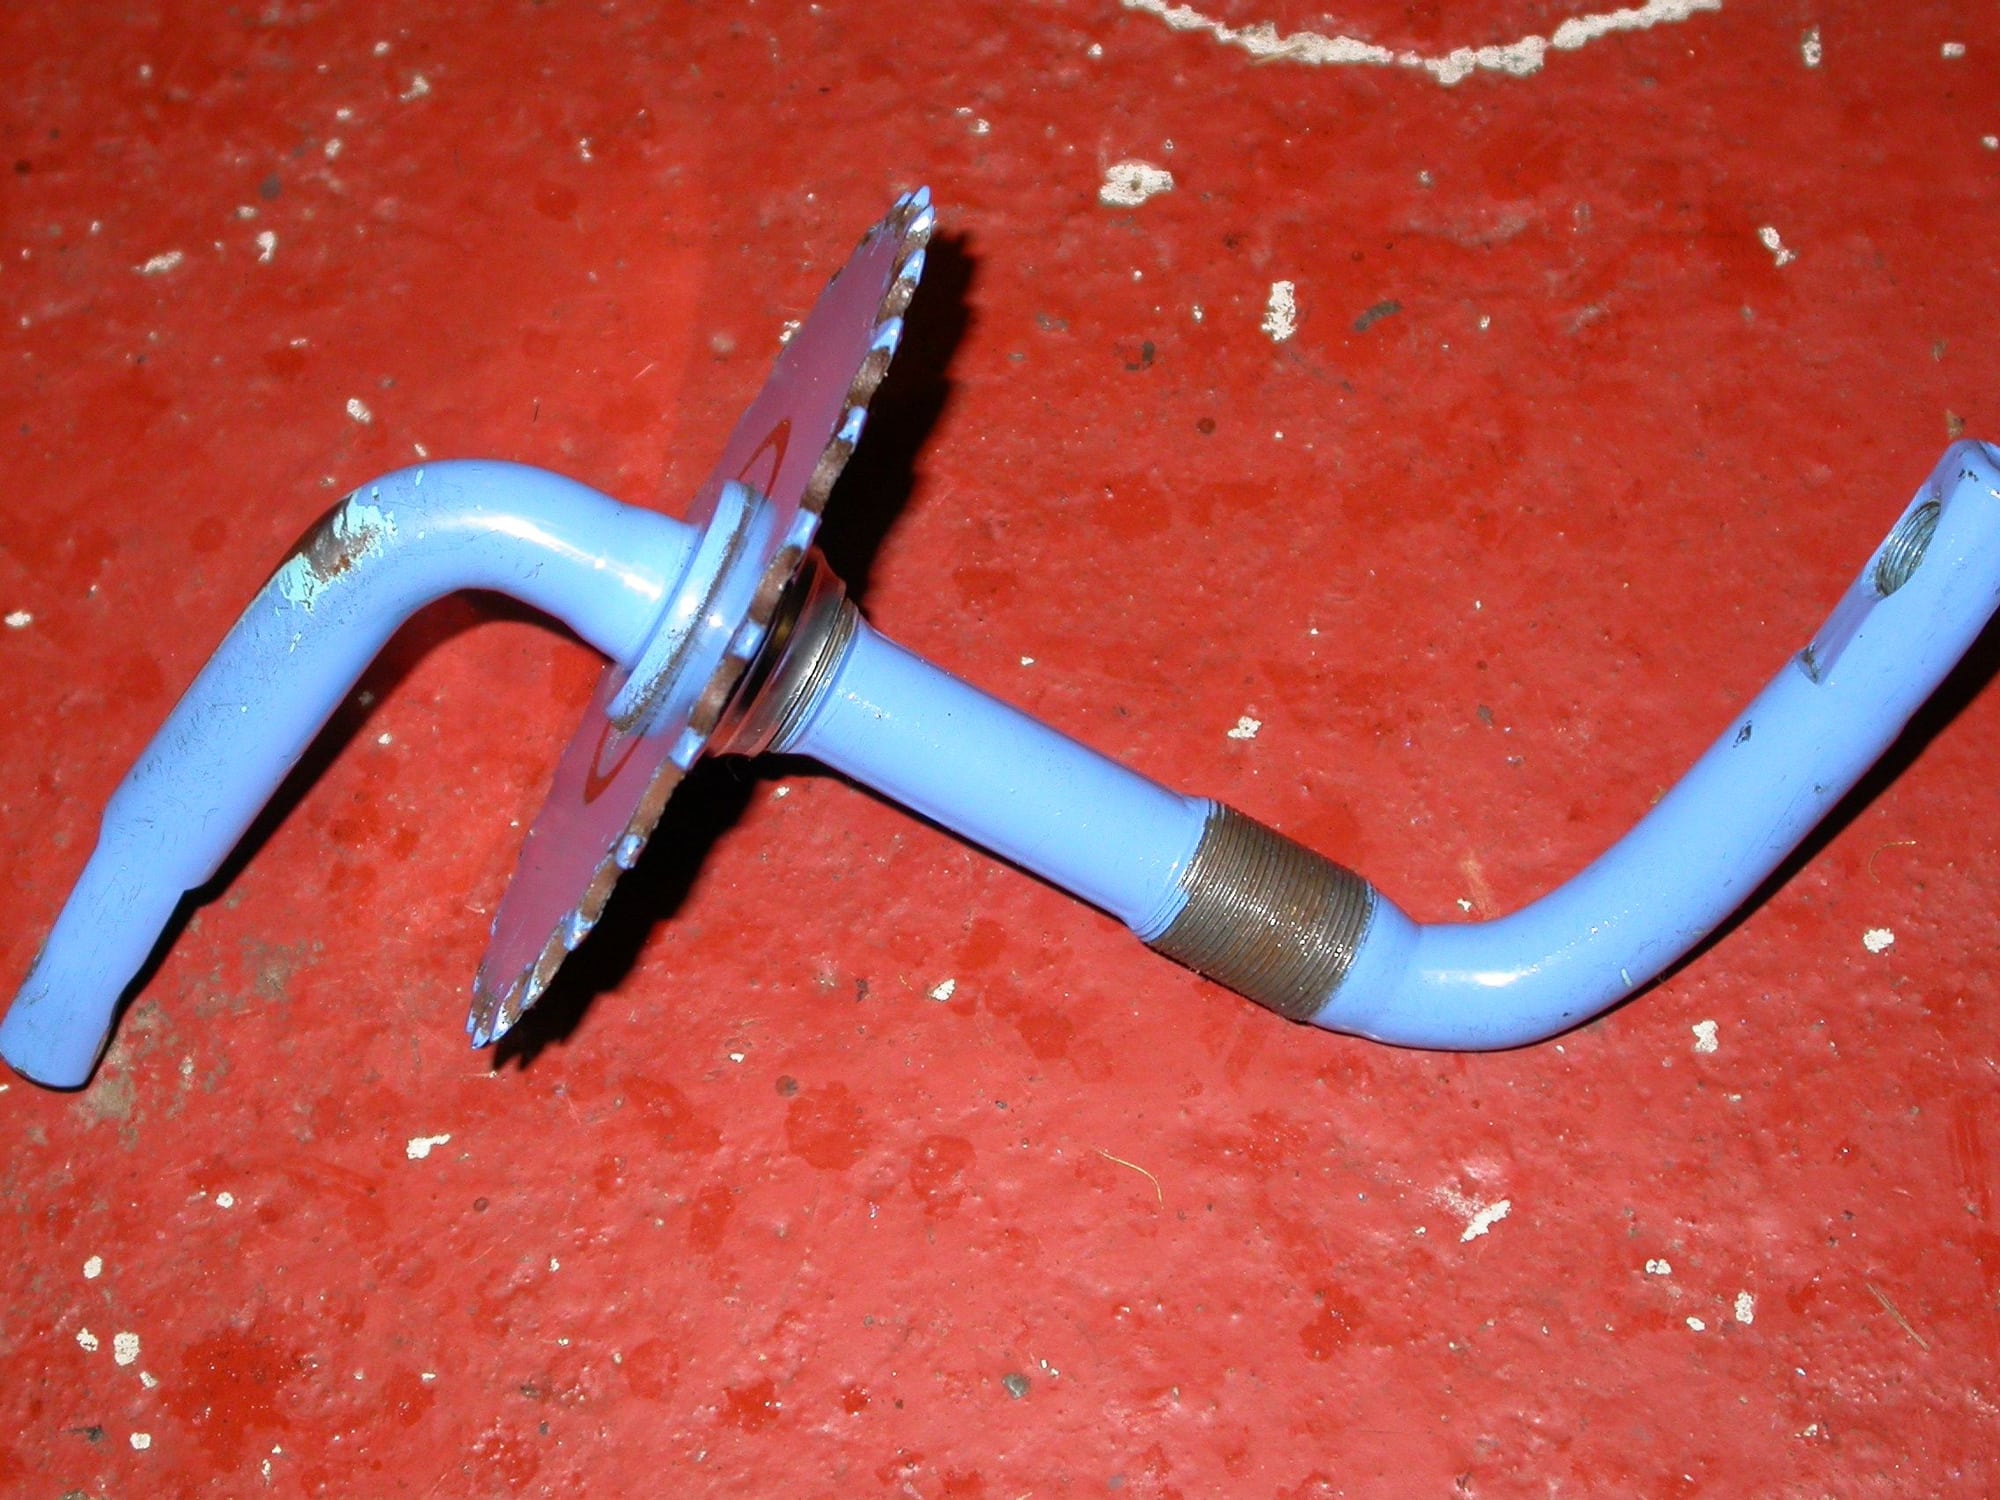
It is a single piece crank. I stripped it out this afternoon and greased up the bearings and replaced it.
However, the inner side of the chain guard is held in place by the bearing cup and that was not for coming out! So, I left it where it was rather than try to force it out and damage it. I'll settle for this.
I did the rear wheel bearings yesterday. The wheel and cranks bearings were a bit gritty. Not surprising considering the quality of the bike, closeness to the road and the sort of wear a kid puts on a wee bike. They are running better now.
Sadly, the chain is not playing ball. I have soaked it in penetrating oil; tried to flex the links using my hands and pliers; even tried pushing pins out and back in. It is remaining stubbornly stiff and not worth trying to save. A new one is on its way and hopefully it will fit and do the job.
01-19-21, 10:36 AM
#14
Junior Member
Join Date: Sep 2011
Location: San Juan, PR
Posts: 160
Bikes: 1980's Royce Union "fixed wheel", 1995 Trek 370, 406 -wheeled " shopper/minivelo"for running errands, SS Raleigh M60
Mentioned: 0 Post(s)
Tagged: 0 Thread(s)
Quoted: 44 Post(s)
Liked 58 Times
in
46 Posts
Nice refurbishing job!!! Hopefully she'll have once again a big smile rolling next to grandpa with her "new/improved" bike. 

Likes For Juan el Boricua:
01-20-21, 02:43 AM
#15
Senior Member
Join Date: Sep 2020
Location: Eastern Poland
Posts: 744
Bikes: Romet Jubilat x 4, Wigry x 1, Turing x 1
Mentioned: 3 Post(s)
Tagged: 0 Thread(s)
Quoted: 194 Post(s)
Liked 204 Times
in
151 Posts
Nice job, just be careful you don't strain yourself lifting that massive crank...
Getting the bearing cups in and out are a minute's work with a punch and a hammer, but hardly with the effort here. My folders have similar bottom bearings, and I usually only take the cups out if I am going to switch to another bearing type that allows the use of a different axle type.
You might drop the frozen chain in a cola bath, I used some to free up the spoke nipples on a recent project. With the new chain coming you might not need the old one, but news of your kiddie bike expertise may spread like wildfire down at the nursery

Now what did I do with my 1 inch drive socket set and air wrench?
Getting the bearing cups in and out are a minute's work with a punch and a hammer, but hardly with the effort here. My folders have similar bottom bearings, and I usually only take the cups out if I am going to switch to another bearing type that allows the use of a different axle type.
You might drop the frozen chain in a cola bath, I used some to free up the spoke nipples on a recent project. With the new chain coming you might not need the old one, but news of your kiddie bike expertise may spread like wildfire down at the nursery
Now what did I do with my 1 inch drive socket set and air wrench?
Likes For Geepig:
01-20-21, 08:11 AM
#16
Half way there

Join Date: Sep 2015
Location: North Carolina
Posts: 2,957
Bikes: Many, and the list changes frequently
Mentioned: 5 Post(s)
Tagged: 0 Thread(s)
Quoted: 986 Post(s)
Liked 880 Times
in
527 Posts
I shudder when I have to deal with a kid's bike chain guard when I'm rehabbing bikes at our local coop. They are like a spatial IQ test that challenges the best of us.
These bikes are designed for quick factory assembly with no consideration for repair. I imagine that a lot of these bikes get zero maintenance because they are outgrown so quickly.
These bikes are designed for quick factory assembly with no consideration for repair. I imagine that a lot of these bikes get zero maintenance because they are outgrown so quickly.
01-20-21, 09:49 AM
#17
Senior Member
Thread Starter
Nice job, just be careful you don't strain yourself lifting that massive crank...
Getting the bearing cups in and out are a minute's work with a punch and a hammer, but hardly with the effort here. My folders have similar bottom bearings, and I usually only take the cups out if I am going to switch to another bearing type that allows the use of a different axle type.
You might drop the frozen chain in a cola bath, I used some to free up the spoke nipples on a recent project. With the new chain coming you might not need the old one, but news of your kiddie bike expertise may spread like wildfire down at the nursery
Now what did I do with my 1 inch drive socket set and air wrench?
You may joke, but I actually hurt my shoulder. I belted a spanner with the palm of my left hand and felt a sharp pain in my shoulder. I have had frozen shoulders in the past and knew what it was likely to be. Thankfully, it is not too bad now though.I was not sure whether then cups would be so tight that I may damage them by trying to knock them out. They seem ok and that gave me the excuse I needed to leave them where they were. The bearings are all now ell lubed, so hopefully that part will run smoothly. Unlike the decal which did need to be trimmed to remove a torn section.
A cola bath? You mean Coca-Cola type cola? I have never heard of that. As the soaking in penetrating oil is not doing much good, I may give that a shot.
01-21-21, 03:07 AM
#18
Senior Member
Join Date: Sep 2020
Location: Eastern Poland
Posts: 744
Bikes: Romet Jubilat x 4, Wigry x 1, Turing x 1
Mentioned: 3 Post(s)
Tagged: 0 Thread(s)
Quoted: 194 Post(s)
Liked 204 Times
in
151 Posts
You may joke, but I actually hurt my shoulder. I belted a spanner with the palm of my left hand and felt a sharp pain in my shoulder. I have had frozen shoulders in the past and knew what it was likely to be. Thankfully, it is not too bad now though.I was not sure whether then cups would be so tight that I may damage them by trying to knock them out. They seem ok and that gave me the excuse I needed to leave them where they were. The bearings are all now ell lubed, so hopefully that part will run smoothly. Unlike the decal which did need to be trimmed to remove a torn section.
A cola bath? You mean Coca-Cola type cola? I have never heard of that. As the soaking in penetrating oil is not doing much good, I may give that a shot.
Yes coca cola. I was trying to strip the spokes out of an older child's bike to replace the rim, hopefully avoiding the need to buy more spokes. I tried heat, tapping with a hammer and different penetrating oils, but the last half dozen nipples continued to hold firm for weeks. Then I read somewhere about cola, and dripped some in the outer end of each nipple, left them for a day, and then they all released. I am not sure quite how it works, but it is a really cheap option.
Likes For Geepig:
01-21-21, 07:39 AM
#19
Zip tie Karen
Join Date: Aug 2009
Location: Fair Oaks Ranch, TX
Posts: 7,004
Bikes: '13 Motobecane Fantom29 HT, '16 Motobecane Turino Pro Disc, '18 Velobuild VB-R-022, '21 Tsunami SNM-100
Mentioned: 26 Post(s)
Tagged: 0 Thread(s)
Quoted: 1465 Post(s)
Liked 1,542 Times
in
806 Posts
Subscribing to this thread. I'm really interested in the outcome. It's a pretty bike.
Likes For Phil_gretz:
01-21-21, 09:51 AM
#20
Senior Member
Thread Starter
Sorry to hear about your shoulder, those kiddie bikes don't always play fair.
Yes coca cola. I was trying to strip the spokes out of an older child's bike to replace the rim, hopefully avoiding the need to buy more spokes. I tried heat, tapping with a hammer and different penetrating oils, but the last half dozen nipples continued to hold firm for weeks. Then I read somewhere about cola, and dripped some in the outer end of each nipple, left them for a day, and then they all released. I am not sure quite how it works, but it is a really cheap option.
Yes coca cola. I was trying to strip the spokes out of an older child's bike to replace the rim, hopefully avoiding the need to buy more spokes. I tried heat, tapping with a hammer and different penetrating oils, but the last half dozen nipples continued to hold firm for weeks. Then I read somewhere about cola, and dripped some in the outer end of each nipple, left them for a day, and then they all released. I am not sure quite how it works, but it is a really cheap option.
That is really interesting about the cola. The new chain has arrived, but I will try that out of curiosity to see if it frees it.
01-21-21, 11:18 AM
#21
Senior Member
Join Date: Feb 2012
Location: Rochester, NY
Posts: 18,073
Bikes: Stewart S&S coupled sport tourer, Stewart Sunday light, Stewart Commuting, Stewart Touring, Co Motion Tandem, Stewart 3-Spd, Stewart Track, Fuji Finest, Mongoose Tomac ATB, GT Bravado ATB, JCP Folder, Stewart 650B ATB
Mentioned: 0 Post(s)
Tagged: 0 Thread(s)
Quoted: 4201 Post(s)
Liked 3,857 Times
in
2,305 Posts
When we were kids we were getting a new clothes washing machine delivered and installed. The guy asked our mother for a coke. Being the good Scottish bred mother she was she instead offered tea, milk, OJ, water or whatever else we had in the house (we were a soda pop free home). The guy laughed and said he wasn't thirsty but wanted to clean the corrosion off the water supply pipe fittings. Us 4 kids still remember that and are relatively still soda pop free. Andy
__________________
AndrewRStewart
AndrewRStewart
Likes For Andrew R Stewart:
01-21-21, 01:13 PM
#22
Senior Member
Thread Starter
When we were kids we were getting a new clothes washing machine delivered and installed. The guy asked our mother for a coke. Being the good Scottish bred mother she was she instead offered tea, milk, OJ, water or whatever else we had in the house (we were a soda pop free home). The guy laughed and said he wasn't thirsty but wanted to clean the corrosion off the water supply pipe fittings. Us 4 kids still remember that and are relatively still soda pop free. Andy
01-22-21, 09:43 AM
#23
Senior Member
Thread Starter
All done...... almost!
Chain replaced. Bearings in rear wheel and bottom bracket out, cleaned and lubed. Everything cleaned. New stabilisers ordered. Brakes set and adjusted. Runs smoothly. Yay!
But I dd screw up a bit. I cut the chain having placed the rear wheel back into the frame. However, when it came to refit the guard, it would not fit back properly. The wheel needs to sit exactly in its original position for the guard to slot home. So, I had to add a couple of links and draw the wheel back in the frame. Bit embarrassing that!
Anyway, that was fun.
01-22-21, 05:08 PM
#24

Senior Member
Join Date: Sep 2014
Posts: 3,893
Mentioned: 20 Post(s)
Tagged: 0 Thread(s)
Quoted: 1062 Post(s)
Liked 665 Times
in
421 Posts
Excellent! And by the time she outgrows this one, she'll be old enough to watch and help on the next one. Watching my dad overhaul a second hand bike was how I first learned bike repair and general mechanics.
Likes For Gresp15C:
01-22-21, 09:20 PM
#25
Clark W. Griswold
Join Date: Mar 2014
Location: ,location, location
Posts: 13,516
Bikes: Foundry Chilkoot Ti W/Ultegra Di2, Salsa Timberjack Ti, Cinelli Mash Work RandoCross Fun Time Machine, 1x9 XT Parts Hybrid, Co-Motion Cascadia, Specialized Langster, Phil Wood Apple VeloXS Frame (w/DA 7400), R+M Supercharger2 Rohloff, Habanero Ti 26
Mentioned: 54 Post(s)
Tagged: 0 Thread(s)
Quoted: 4352 Post(s)
Liked 3,990 Times
in
2,663 Posts
If it is frozen you might let it thaw out...
Come on people, I shouldn't be the only one with excellent puns?
Cool to see it repaired and back into riding hopefully many more bikes and many more useful repairs and a lot of great learning down the road.
Also as they say "If it's not Scottish, IT'S CRAAP" (Clan McPherson myself)
Come on people, I shouldn't be the only one with excellent puns?
Cool to see it repaired and back into riding hopefully many more bikes and many more useful repairs and a lot of great learning down the road.
Also as they say "If it's not Scottish, IT'S CRAAP" (Clan McPherson myself)
Likes For veganbikes: