


Sturmey Archer front hub seized and sheared
 06-14-20, 04:52 AM
#1
Senior Member
Thread Starter
Sturmey Archer front hub seized and sheared
I sold a vintage Falcon to a friend, but after a disastrous first ride he returned it to me. While he took it out he managed to snap the front wheel's skewer. He told me pedalling was very difficult, he was feeling a lot of resistance, but kept going. It got to the point where he had to spin the wheel backwards in order for it to spin forward again. For some reason he kept going despite this, and the axle bolt snapped off. I'm wondering if I can fix this.
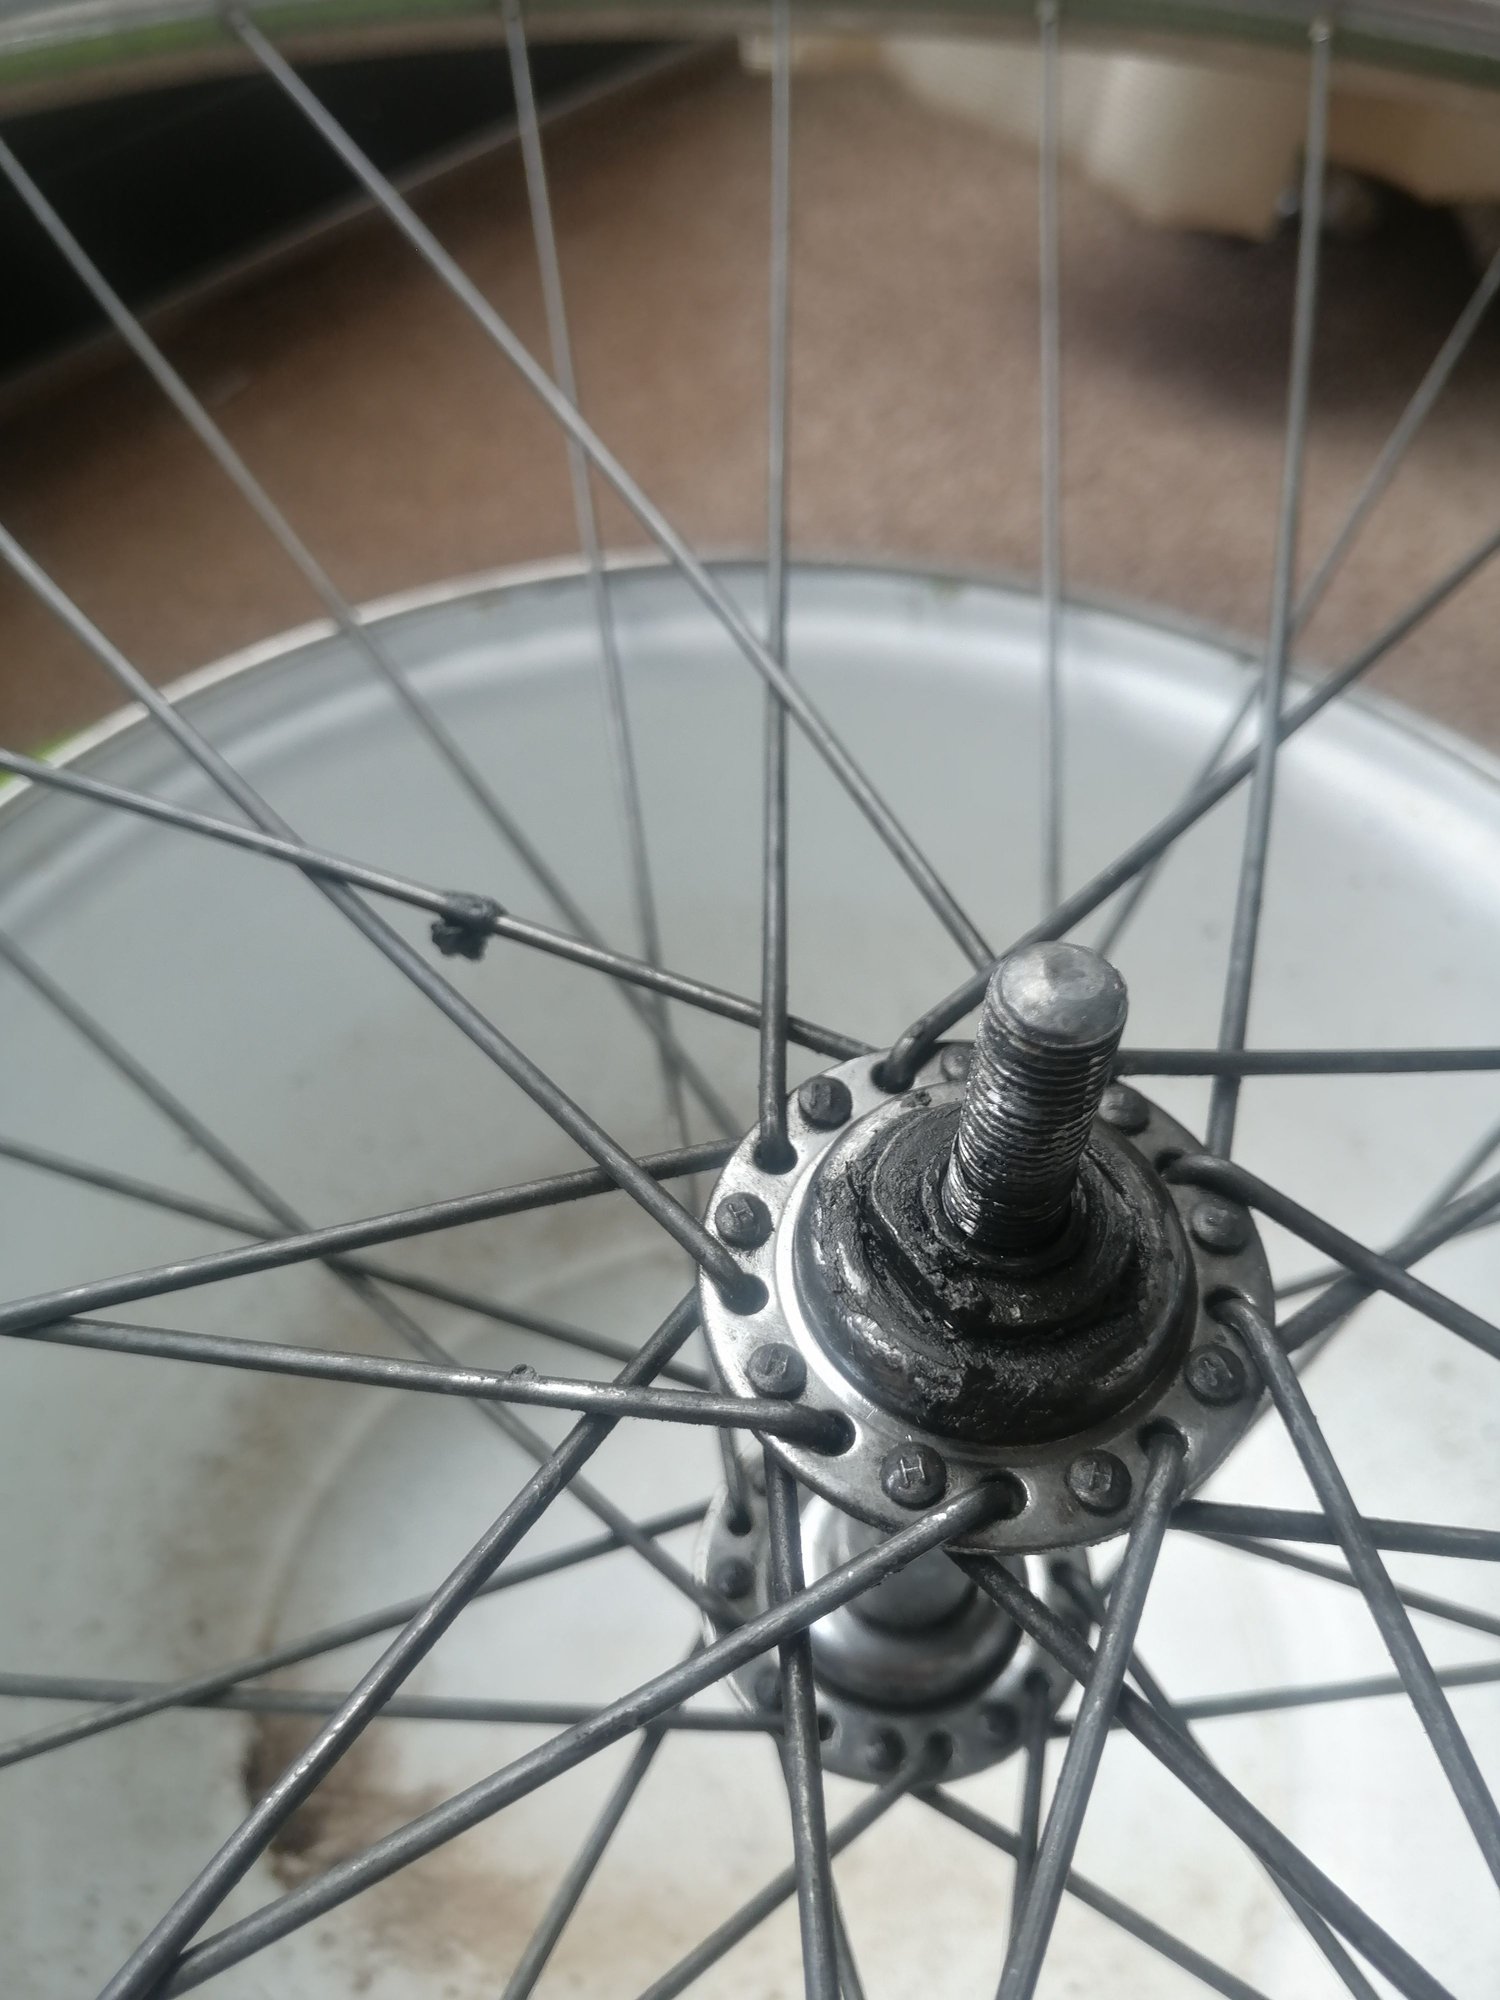
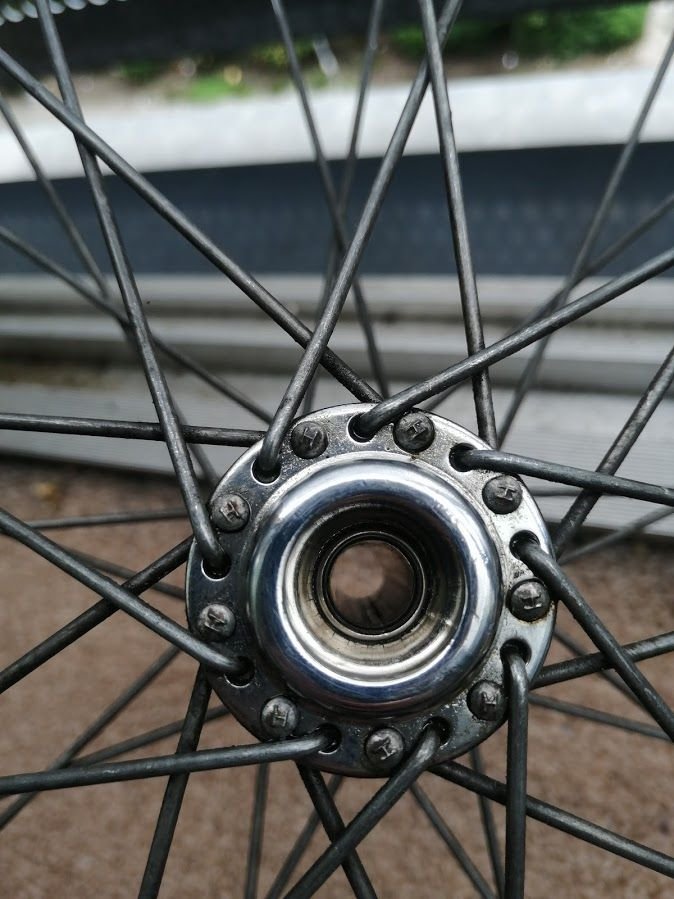
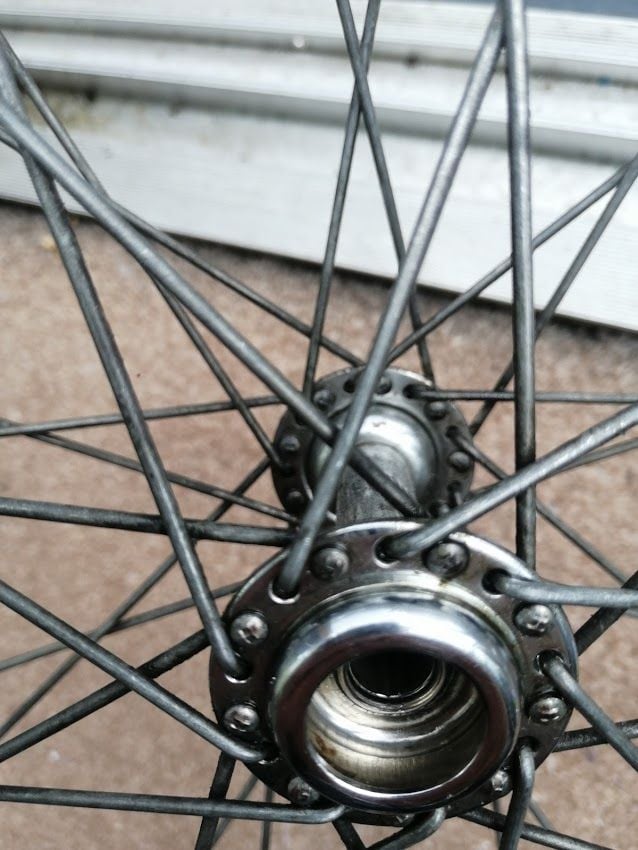
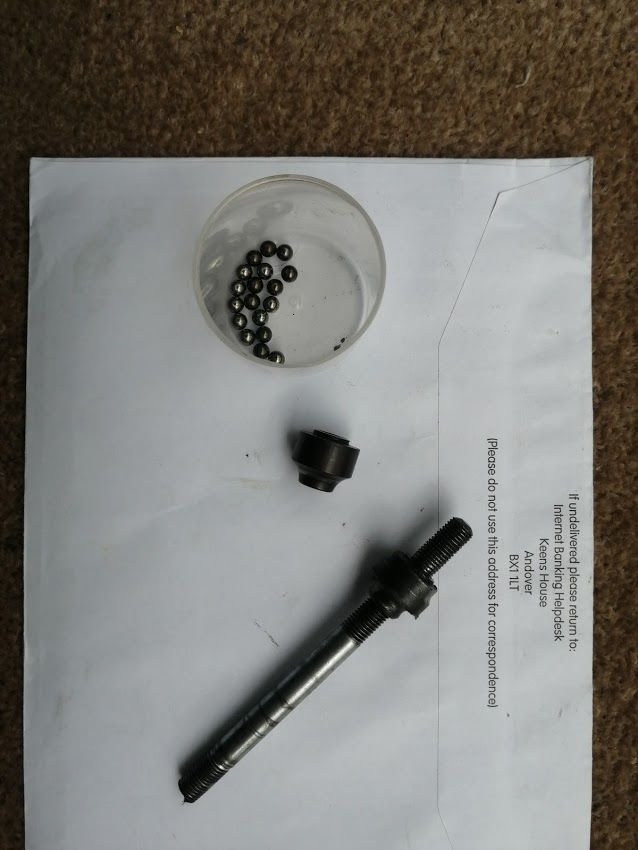
I can't make anything on the hub spin at all, and I can't remove the skewer. I've sprayed some release spray in there, but I suspect that's not going to help. Here are some pics of both sides of the hub (the skewer snapped on one side only).
I don't have any real experience with hubs at all, so if I've said something that sounds wrong shout. Appreciate all help and pointers!
 06-14-20, 05:28 AM
#2
Senior Member
Join Date: Mar 2008
Posts: 8,688
Mentioned: 46 Post(s)
Tagged: 0 Thread(s)
Quoted: 1074 Post(s)
Liked 295 Times
in
222 Posts
�Skewer� WRT hubs usually refers to a quick-release fastener running through a hollow axle.
Yours look like a threaded front axle.
I�ve read about a design where only one side would have a locknut for the bearing cone. On the other, the bearing cone would come up against a shoulder machined onto the axle. Wheels with these hubs had to go into the fork in a specific left/right orientation, or the non-locknut side would try to rotate. Seems like that would fit well with what�s happened.
I�d start with putting two axle nuts on the remaining end, tightening them together. Then use them as a counter-force to try to undo the adjustable cone with the tool flats. If you get that side off, the axle should slip out. Another option is to Try to grab the protruding bit of the cone w/o tool flats (on the damaged side) with a vise grip or similar. It�s probably hardened and prone to slipping out.
failing that, I�d try to drill out the damaged axle end. Axles are generally not that hard as steels go and you�d only need to drill 1/2� or so to get the cone off.
Be advised that torqueing a wheel bearing until the wheel no longer spins may have dimpled the cups, permanently damaging the wheel.
(unless you find replacement cups, which can be a challenge.)
06-14-20, 08:04 AM
#3


Senior Member
Join Date: Dec 2005
Posts: 17,146
Mentioned: 481 Post(s)
Tagged: 0 Thread(s)
Quoted: 3803 Post(s)
Liked 6,639 Times
in
2,602 Posts
Well, the good news is that the side that has the removable cone (with flats on two edges) is still there; the bad news is that there isn't a stub of axle on the other side to stick in a vise or otherwise immobilize. Still, you should be able to get a cone wrench on those flat and a vice-grip on the axle protrudes and see if you can work that cone off (lefty loosey). One you do that, the axle will come out. At least, that's what I would do.
Likes For nlerner:
06-14-20, 08:40 AM
#4
Senior Member
Join Date: Apr 2005
Posts: 912
Mentioned: 0 Post(s)
Tagged: 0 Thread(s)
Quoted: 34 Post(s)
Likes: 0
Liked 8 Times
in
7 Posts
You can put two nuts on the good axle end, tighten against each other. Now you can hold that with pliers or visegrips and loosen the cone. As soon as the cone moves, remove the nuts and take out the cone. Then the axle should come out the other side.
06-14-20, 09:00 AM
#5
Senior Member
Thread Starter
Thanks for the responses everyone. Given I'm going to need to source replacement parts anyway, and there might be internal damage, I may treat this as an opportunity to learn how to build a wheel and replace the hub entirely. Doesn't seem hard to find replacements on ebay, and none of the spokes are seized...
06-14-20, 10:52 AM
#7
Senior Member
Thread Starter
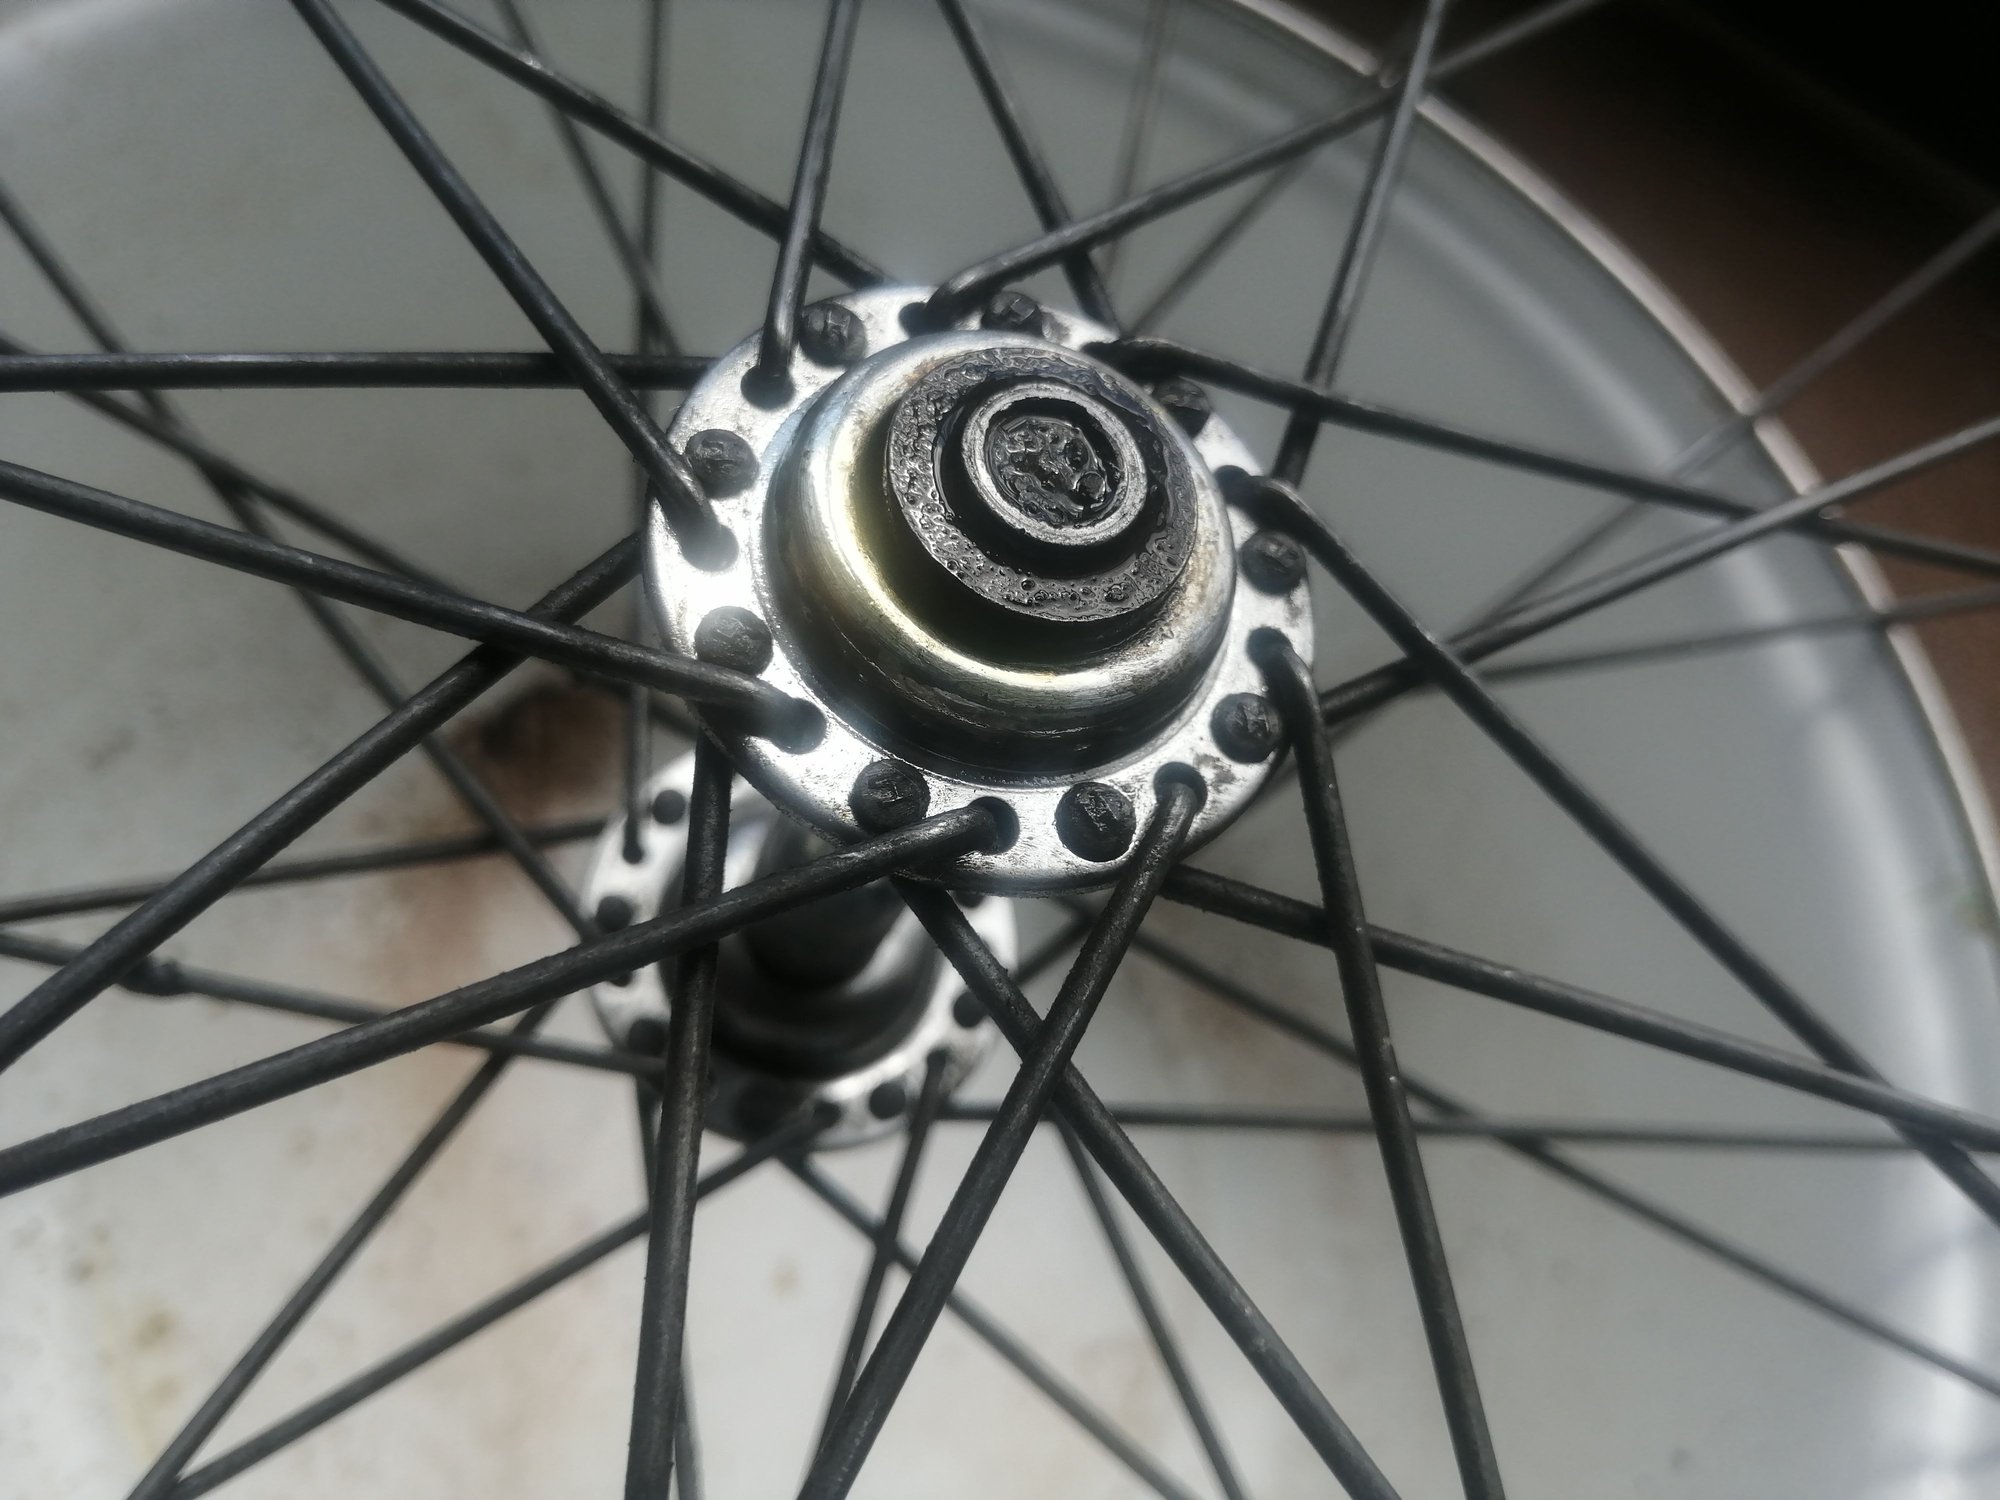
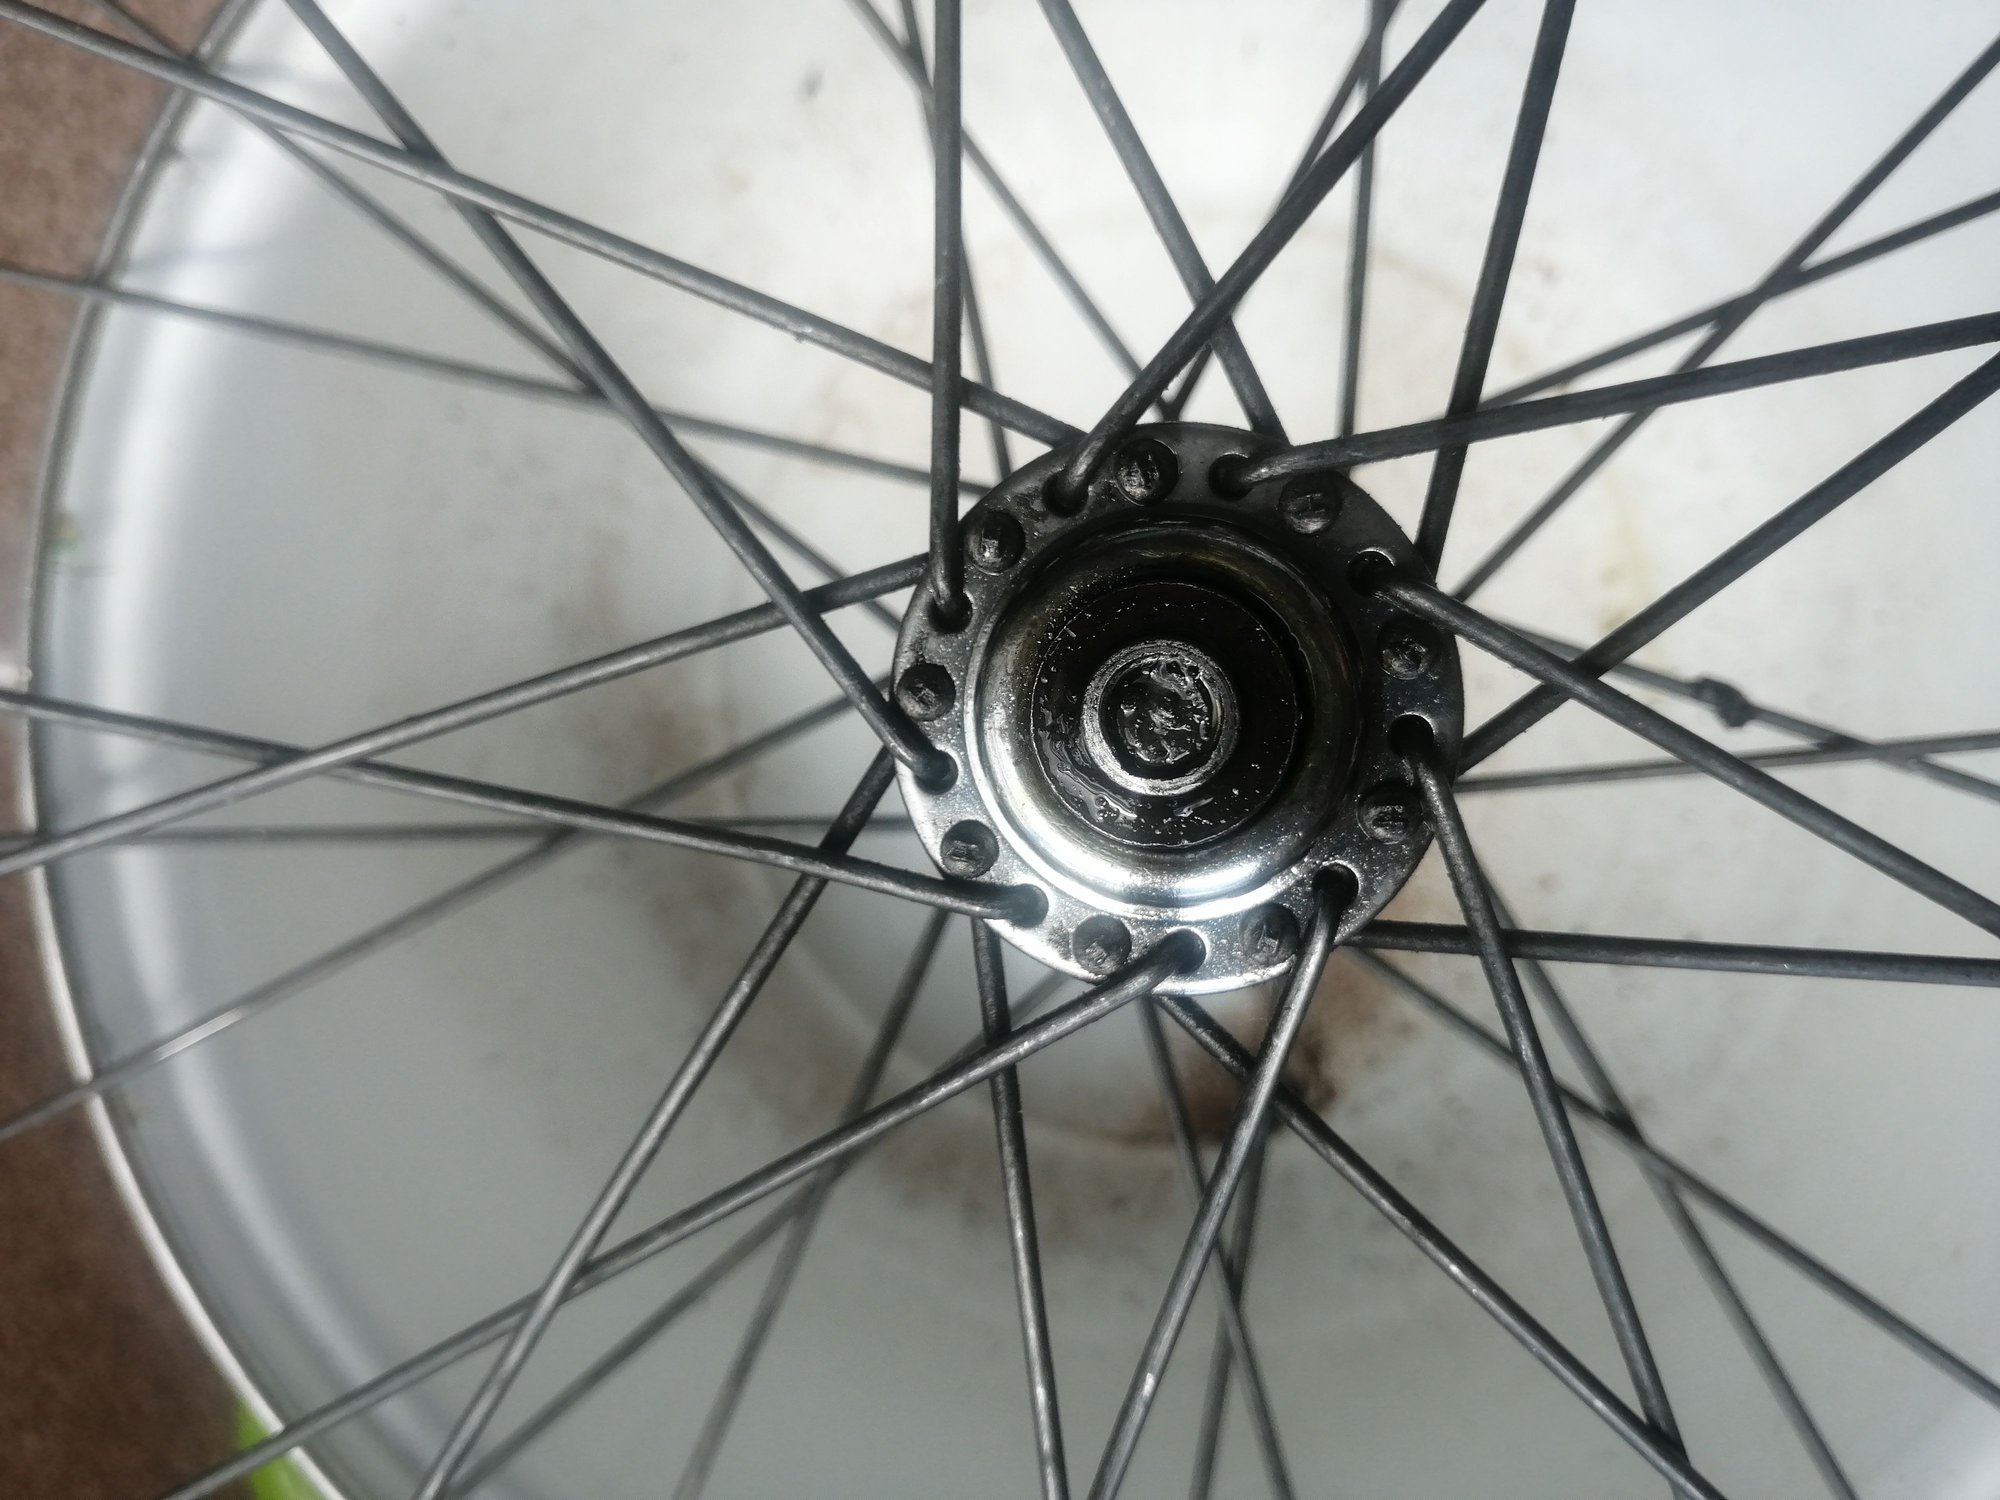
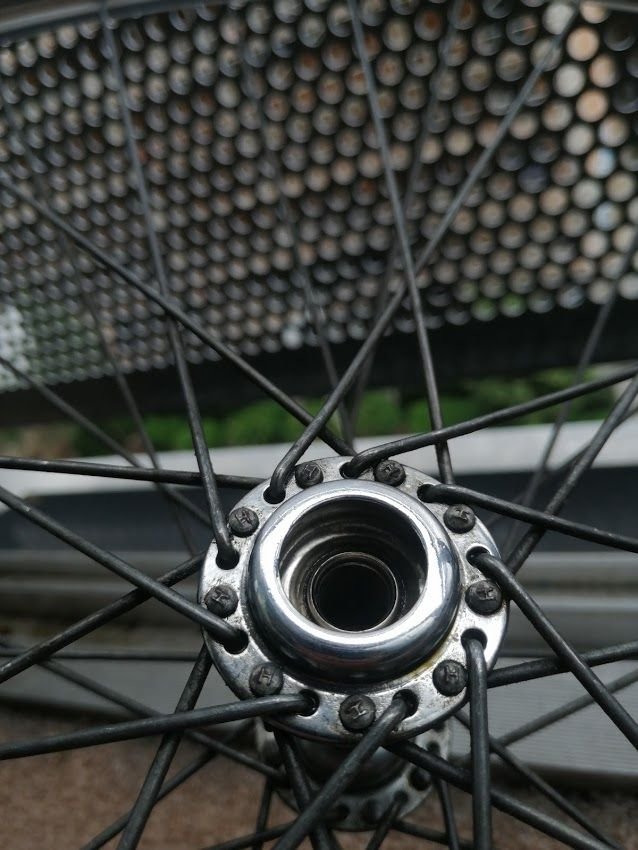
So I don't have any nuts that fit on the axle (friend didn't give them back and the back wheel nuts are a different size) but I have somehow managed to remove the non-removable cone by holding it with pliers while I loosened the removable cone. To my surprise it was the non-removable one that dropped off. Sadly still can't take the axle out, I'm assuming the removable cone needs to be off for that to happen. This does mean some of the axle on the snapped side is now accessible for clamping, but pliers don't seem to keep it in place and I don't own a vice.
I've found a hub of the same model for quite cheap on ebay. If I get that the nuts and axle should be interchangeable, so I could use those nuts to remove this axle. Can then also replace the cones and bearings if my current ones turn out to be damaged.
Unless anyone has any other ideas on removing this axle before the replacement turns up?
06-14-20, 12:06 PM
#8
Senior Member
Join Date: Jan 2004
Location: Madison, WI USA
Posts: 6,149
Mentioned: 50 Post(s)
Tagged: 0 Thread(s)
Quoted: 2362 Post(s)
Liked 1,746 Times
in
1,190 Posts
Did you try just loosening the adjustable cone? Just to see if it turns relative to the hub body? Snce there's no locknut, you should be able to do this with an adjustable wrench, or an regular open-end wrench of the proper size, if you don't have a cone wrench.
Did your friend remove and re-install the wheel, by any chance? If I recall, what happened is the textbook case of the result of installing a wheel of this design backward.
Did your friend remove and re-install the wheel, by any chance? If I recall, what happened is the textbook case of the result of installing a wheel of this design backward.
Likes For madpogue:
06-14-20, 12:38 PM
#9
Senior Member
Thread Starter
Did you try just loosening the adjustable cone? Just to see if it turns relative to the hub body? Snce there's no locknut, you should be able to do this with an adjustable wrench, or an regular open-end wrench of the proper size, if you don't have a cone wrench.
Did your friend remove and re-install the wheel, by any chance? If I recall, what happened is the textbook case of the result of installing a wheel of this design backward.
Did your friend remove and re-install the wheel, by any chance? If I recall, what happened is the textbook case of the result of installing a wheel of this design backward.
06-14-20, 12:44 PM
#10
Senior Member
Join Date: Jan 2004
Location: Madison, WI USA
Posts: 6,149
Mentioned: 50 Post(s)
Tagged: 0 Thread(s)
Quoted: 2362 Post(s)
Liked 1,746 Times
in
1,190 Posts
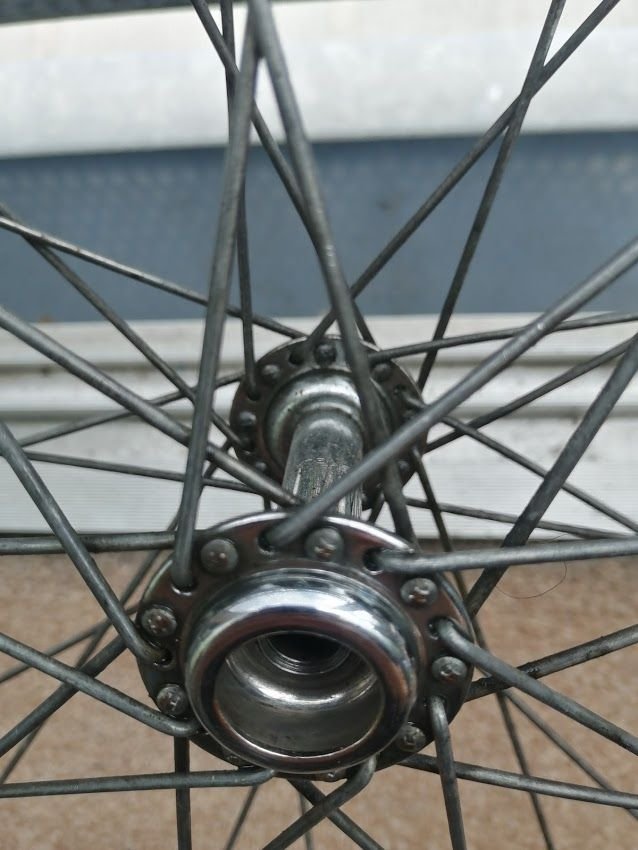
Did the bearings come out from the non-adjustable side when that cone came off?
Post another photo of the broken-off side, now that that cone is off. That might inspire another idea from someone.
Post another photo of the broken-off side, now that that cone is off. That might inspire another idea from someone.
06-14-20, 12:50 PM
#11
Senior Member
Thread Starter

Thanks for the help!
06-14-20, 01:06 PM
#12
Senior Member
Join Date: Jan 2004
Location: Madison, WI USA
Posts: 6,149
Mentioned: 50 Post(s)
Tagged: 0 Thread(s)
Quoted: 2362 Post(s)
Liked 1,746 Times
in
1,190 Posts
There should be nothing holding the axle in place now, other than the fact that the adjustable cone has jammed the bearings on that side into the hub body. I would try putting a small piece of wood on that broken end of the axle and then hitting it with a hammer. The axle might just fall out the other side.
That said, if that's indeed what's got the axle stuck in place, there's a good chance that the bearing cup surfaces in the hub body are damaged from the axle locking up, so you may be looking at rebuilding the wheel using the hub that's on the way.
That said, if that's indeed what's got the axle stuck in place, there's a good chance that the bearing cup surfaces in the hub body are damaged from the axle locking up, so you may be looking at rebuilding the wheel using the hub that's on the way.
06-14-20, 01:25 PM
#13
Phyllo-buster

Join Date: Jan 2010
Location: Nova Scotia
Posts: 8,844
Bikes: roadsters, club bikes, fixed and classic
Mentioned: 133 Post(s)
Tagged: 0 Thread(s)
Quoted: 2296 Post(s)
Liked 2,046 Times
in
1,253 Posts
I�ve read about a design where only one side would have a locknut for the bearing cone. On the other, the bearing cone would come up against a shoulder machined onto the axle. Wheels with these hubs had to go into the fork in a specific left/right orientation, or the non-locknut side would try to rotate. Seems like that would fit well with what�s happened.
06-14-20, 01:25 PM
#14
Senior Member
Join Date: Mar 2008
Posts: 8,688
Mentioned: 46 Post(s)
Tagged: 0 Thread(s)
Quoted: 1074 Post(s)
Liked 295 Times
in
222 Posts
As is learning to build a great wheel.
If you can�t learn to build a functional, traditional front wheel within an evening or two, you probably shouldn�t be riding in traffic anyhow.
It really isn�t that bad.
Whether you choose to keep it up or give it a miss once you�ve demonstrated ability is another thing entirely.
06-14-20, 01:35 PM
#15
Senior Member
Thread Starter
There should be nothing holding the axle in place now, other than the fact that the adjustable cone has jammed the bearings on that side into the hub body. I would try putting a small piece of wood on that broken end of the axle and then hitting it with a hammer. The axle might just fall out the other side.
That said, if that's indeed what's got the axle stuck in place, there's a good chance that the bearing cup surfaces in the hub body are damaged from the axle locking up, so you may be looking at rebuilding the wheel using the hub that's on the way.
That said, if that's indeed what's got the axle stuck in place, there's a good chance that the bearing cup surfaces in the hub body are damaged from the axle locking up, so you may be looking at rebuilding the wheel using the hub that's on the way.
06-14-20, 01:37 PM
#16
Senior Member
Thread Starter
I couldn't agree more! I think the way he sees it I ruined an afternoon of his by giving him a dodgy bike. But I really would have loved it if he hadn't rode it until it became physically impossible to carry on.
06-14-20, 01:43 PM
#17
Senior Member
Thread Starter
Learning to build a wheel fast is difficult.
As is learning to build a great wheel.
If you can�t learn to build a functional, traditional front wheel within an evening or two, you probably shouldn�t be riding in traffic anyhow.
It really isn�t that bad.
Whether you choose to keep it up or give it a miss once you�ve demonstrated ability is another thing entirely.
06-14-20, 01:48 PM
#18
Senior Member
Join Date: Feb 2020
Posts: 2,812
Mentioned: 49 Post(s)
Tagged: 0 Thread(s)
Quoted: 1105 Post(s)
Likes: 0
Liked 1,326 Times
in
782 Posts
Clean everything and look at the bits.
Everything should be smooth and shiny, races (the line where the balls wear away at teir containign pieces) in the cups and on the cone should NOT have any pits or cracks.
And take photos - we want to see what happened. You hub wasn't supposed to do that.
Everything should be smooth and shiny, races (the line where the balls wear away at teir containign pieces) in the cups and on the cone should NOT have any pits or cracks.
And take photos - we want to see what happened. You hub wasn't supposed to do that.
06-14-20, 02:37 PM
#19
Senior Member
Join Date: Mar 2013
Location: Maryland
Posts: 3,799
Bikes: Lots of English 3-speeds, a couple of old road bikes, 3 mountain bikes, 1 hybrid, and a couple of mash-ups
Mentioned: 53 Post(s)
Tagged: 0 Thread(s)
Quoted: 887 Post(s)
Liked 335 Times
in
225 Posts
This is why I keep a little note stuck on the back of my workbench about Raleigh front wheel orientation. It's just so easy to screw-up if you don't pay attention.
Likes For dweenk:
06-14-20, 02:57 PM
#20
Phyllo-buster
Join Date: Jan 2010
Location: Nova Scotia
Posts: 8,844
Bikes: roadsters, club bikes, fixed and classic
Mentioned: 133 Post(s)
Tagged: 0 Thread(s)
Quoted: 2296 Post(s)
Liked 2,046 Times
in
1,253 Posts
Actually it's a textbook example of what can happen when you reverse an older Raleigh wheel orientation and probably why this design was relegated to the dustbin in favour of locknuts. I suspect the wheel wasn't original to the Falcon.
Even if the inspection looks good, the heat generated could have been enough to take the temper out of of the cone races or distort the hub. You wouldn't want this to happen on a long downhill, it could lock up and throw you over the bars.
Even if the inspection looks good, the heat generated could have been enough to take the temper out of of the cone races or distort the hub. You wouldn't want this to happen on a long downhill, it could lock up and throw you over the bars.
06-15-20, 10:29 AM
#21
Senior Member
Thread Starter
Clean everything and look at the bits.
Everything should be smooth and shiny, races (the line where the balls wear away at teir containign pieces) in the cups and on the cone should NOT have any pits or cracks.
And take photos - we want to see what happened. You hub wasn't supposed to do that.
Everything should be smooth and shiny, races (the line where the balls wear away at teir containign pieces) in the cups and on the cone should NOT have any pits or cracks.
And take photos - we want to see what happened. You hub wasn't supposed to do that.
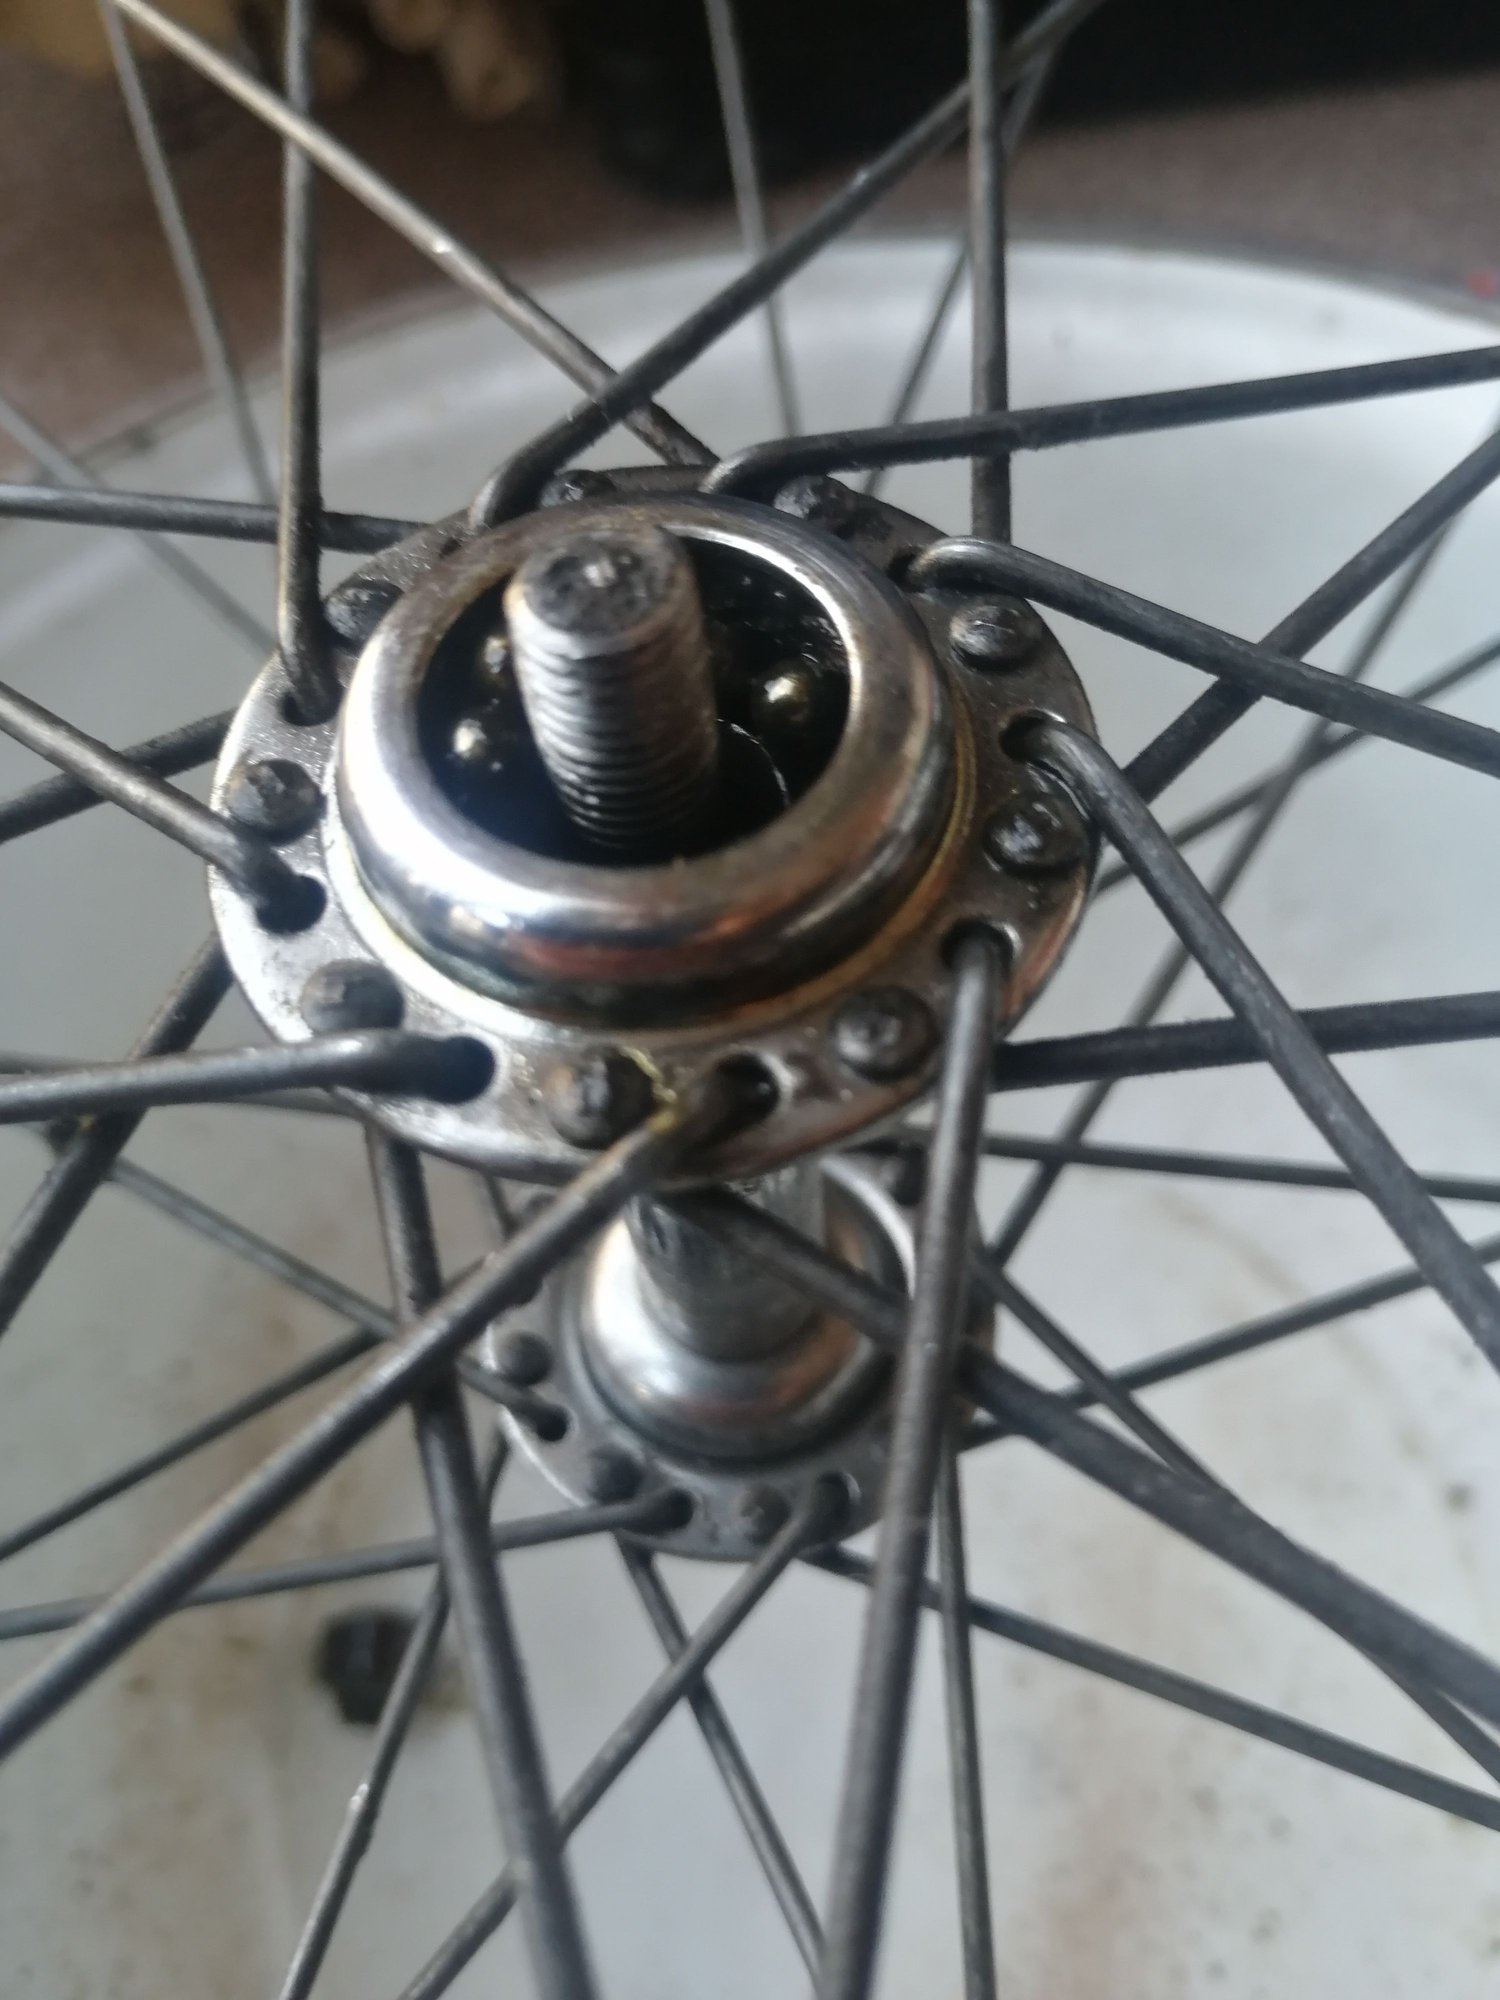
Not very visible, but the chrome is cracking here.
Not very visible, but the chrome is cracking here.


Apologies for the poor lighting. The cups seem to have kept their shape, but on one of them (not sure which side this was when installed, unfortunately), the chrome plating is cracking, both in the cup and on the exterior.
Shape-wise I would feel fine using this again if it weren't for the possibility Clubman raised that the temper may have been lost. Not sure if the chrome is an indicator that the cup may have gotten hot.
06-15-20, 12:15 PM
#22
Phyllo-buster
Join Date: Jan 2010
Location: Nova Scotia
Posts: 8,844
Bikes: roadsters, club bikes, fixed and classic
Mentioned: 133 Post(s)
Tagged: 0 Thread(s)
Quoted: 2296 Post(s)
Liked 2,046 Times
in
1,253 Posts
Well, as requested, photos:
Not very visible, but the chrome is cracking here.
Not very visible, but the chrome is cracking here.
Apologies for the poor lighting.
Shape-wise I would feel fine using this again if it weren't for the possibility Clubman raised that the temper may have been lost. Not sure if the chrome is an indicator that the cup may have gotten hot.
Not very visible, but the chrome is cracking here.
Not very visible, but the chrome is cracking here.
Apologies for the poor lighting.
Shape-wise I would feel fine using this again if it weren't for the possibility Clubman raised that the temper may have been lost. Not sure if the chrome is an indicator that the cup may have gotten hot.
 06-15-20, 12:29 PM
#23
Senior Member
Thread Starter
Here's what it should look like. Smooth and clean. Those cracks are bad. Another part of the problem is the OLD of these front hubs is 90mm and the Falcon fork is likely 100, it's worth a measure. Sure it might work but it's not a proper fit. Perhaps a visit to a coop to get a replacement wheel is the way to go. You haven't told us what these wheels were but with a Raleigh hub, maybe they're steel wheels from a Sprite or Grand Prix?
Honestly I had no idea the wheels weren't original, but the idea that they're not makes a lot of sense. I got this bike from a guy who'd basically been gifted a load of old bikes from an old man who was going a bit senile and had decided he was too old for bikes.
The person who was gifted them knew nothing about any of them, but said that this one was what the old man considered the best of the lot, and he thought the old guy was planning on taking parts from the others to put on this one. Seems like he'd already done that with these wheels, which on a closer look are in a much better state than the rest of the bike.
When I picked it up it still had some kind of home made lighting contraption on it, where a couple of bare wires ran from an exposed battery to a bulb taken from a pocket torch. Not sure what his master plan was.
06-15-20, 12:34 PM
#24
Senior Member
Join Date: Jan 2004
Location: Madison, WI USA
Posts: 6,149
Mentioned: 50 Post(s)
Tagged: 0 Thread(s)
Quoted: 2362 Post(s)
Liked 1,746 Times
in
1,190 Posts
So is it certain that an old Falcon would not have the same type of fork dropout / cone interface that an old Raleigh would? Maybe the OP should post photos of the fork dropouts.
06-15-20, 12:41 PM
#25
Senior Member
Thread Starter

