


Wiring up a dyno powered lighting system with USB charger
 04-22-21, 11:29 AM
#1
Senior Member
Thread Starter
Join Date: Aug 2010
Location: Madison, WI
Posts: 11,170
Bikes: 1961 Ideor, 1966 Perfekt 3 Speed AB Hub, 1994 Bridgestone MB-6, 2006 Airnimal Joey, 2009 Thorn Sherpa, 2013 Thorn Nomad MkII, 2015 VO Pass Hunter, 2017 Lynskey Backroad, 2017 Raleigh Gran Prix, 1980s Bianchi Mixte on a trainer. Others are now gone.
Mentioned: 47 Post(s)
Tagged: 0 Thread(s)
Quoted: 3450 Post(s)
Liked 1,449 Times
in
1,130 Posts
Wiring up a dyno powered lighting system with USB charger
In this thread I describe how I wired up my dynohub wiring for headlight, taillight, and dyno powered USB charger. And why I made some of the choices that I made. I am not saying this is the best way to do it, I am just saying this is how I did it and I am pleased with the results. So, if you are looking for ideas, this thread may provide a few.
This is a very long post, I tried to balance brevity with completeness. I expect that only a few will read all of this unless they plan to wire up a dyno powered lighting system.
In late 2015 I bought the frame and fork for a Velo Orange Pass Hunter, rim brake version and built it up in early 2016. That model was described as a randonneuring bike frame with cantilever brake mounts. Initially I was looking for a home for a lot of parts that I had stripped off of a touring bike that had a defective frame. Initially I put wheels on the Pass Hunter that I had built up in 2004 without a dynohub. In early 2017, I decided to put a dynohub wheel on the bike. Initially I only wired the bike for headlight, but later put a temporary rack mounted dyno powered taillight on the bike. And a few weeks ago I installed a fender mounted dyno powered taillight on the bike for permanent use. I consider this project to now be complete, or as complete as bike projects get. So, now is the time to show off my project.
I also have a Sinewave Revolution USB charger on the bike, but I consider that temporary. I bought and use the Sinewave, along with an external pass through cache battery for bike touring. But when I am not touring, instead of putting the Sinewave in storage, I put it on the Pass Hunter in case I want to charge up a powerbank for my GPS.
https://www.sinewavecycles.com/produ...ave-revolution
There are many options for taillight mounting. Mounting on a seatstay, a rack, a seatpost, or fender. Sometimes I have a rack fitted to this bike, sometimes not, but always have fenders on it. Thus, a fender mount made the most sense to me.
There are many options for how to run the wire to a fender mounted taillight, I chose gluing it inside the fender. In the past Kingston on this forum has cited using a foil HVAC tape to tape wire inside a fender. Others have used fenders that had metal strips sandwiched in the plastic fender and used the metal for a conductor, and some have used wire inside a rolled edge on a metal fender. And there probably are other options too that I had not run across.
Initially I only used a battery powered taillight on this bike, I often use a battery powered taillight during daytime in flash mode, thus I still have a battery taillight on the bike for that purpose.
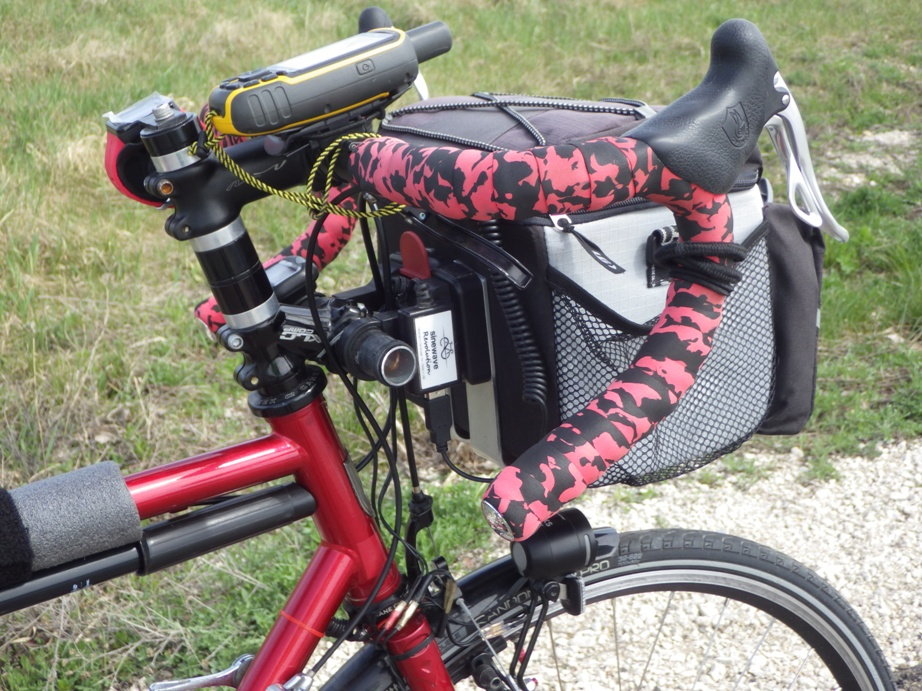
First photo, the bike:
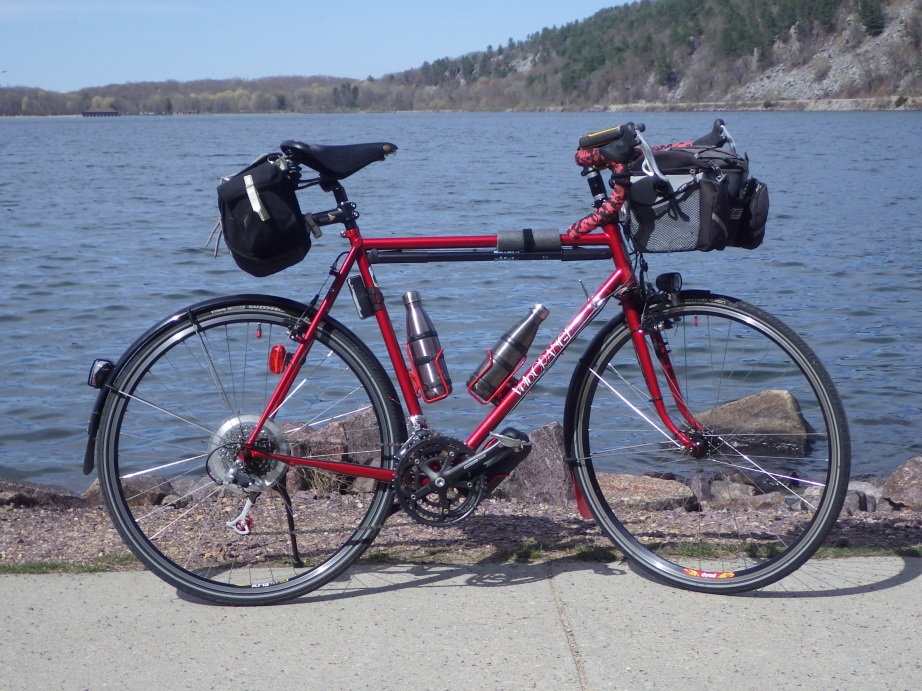
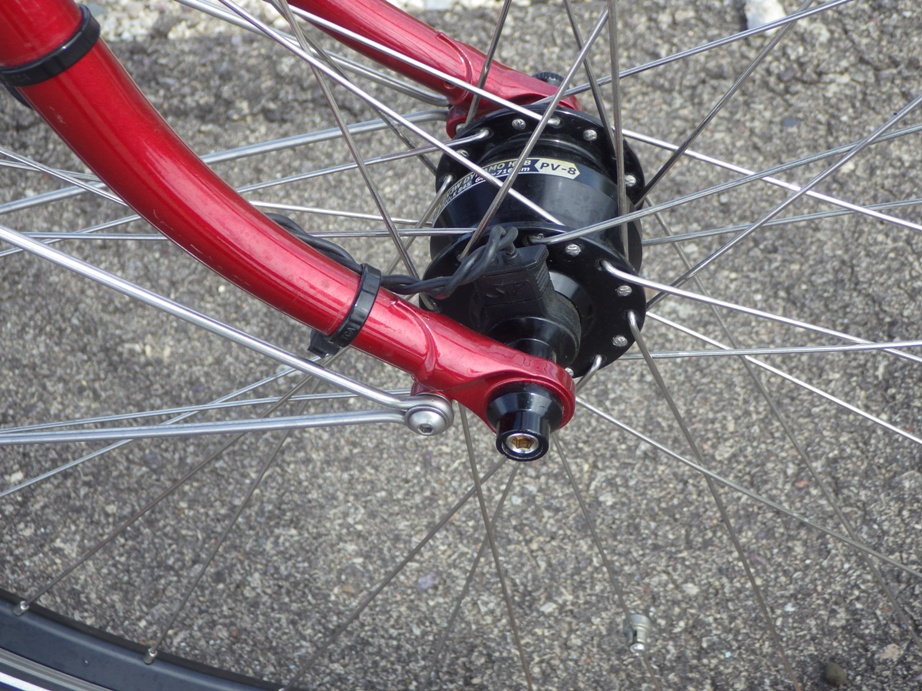
Second photo, below. The dynohub is an SP PV-8. I bought my first dynohub in spring 2013 to use on a touring bike, have been very happy with it, so bought a second one of the same make and model.
https://www.sp-dynamo.com/series8-pv8
For wiring from the hub to fork crown, I used a twisted pair of single conductor wires attached to the fork with zip ties, did not use the stock B&M wire. In the past there were a few times when I snagged and damaged a wire for a wired bike computer, I wanted heavier duty wire than the stock B&M wire for that reason. I am not sure what gauge wire I used, I think somewhere between 18 and 22.
Most dynohubs do not include the skewer, SP does not. Although most thieves in my community do not know what a dynohub is, there might be a few that might want to take the wheel. I assume most thieves are opportunists, for that reason I usually use a bolt on skewer instead of a quick release on dynohub wheels. And to make sure that decision does not cause me any grief later, I also pack a 5mm allen wrench with my spare tube for when I get a flat.
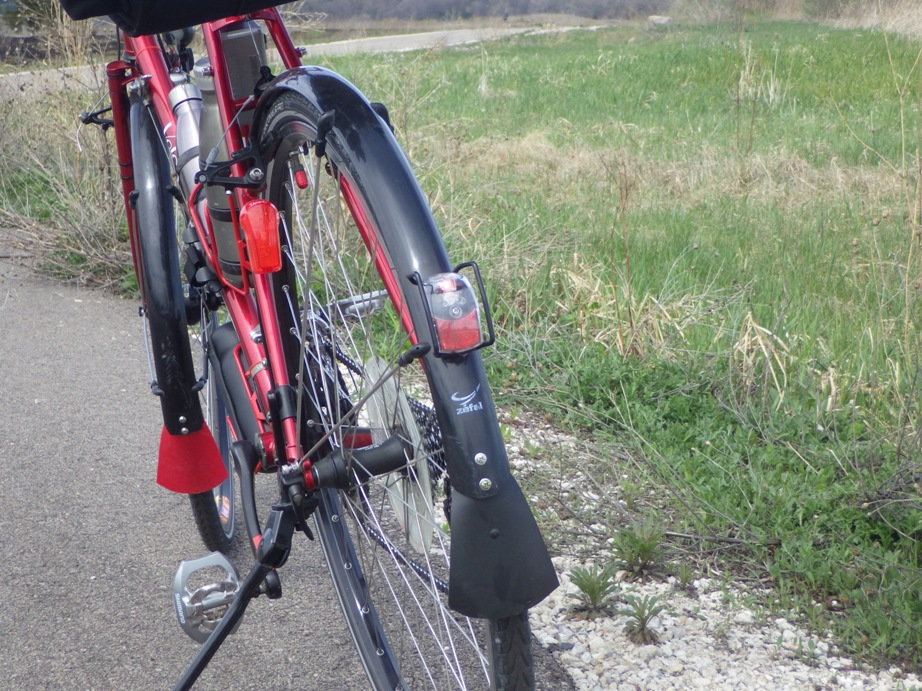
Third photo, the taillight is a Spanninga Pixeo, with optional wire guard.
https://spanninga.com/product/pixeo/
If anyone buys that light, make sure you check the light beam pattern before you decide where to drill holes in your fender. The beam does not have a lot of height, thus it needs careful aim when mounting on the fender so that you do not mount it too high or too low. I put a 4 volt DC power supply on the wires to power it to determine where on the fender to mount it to get a horizontal light beam.
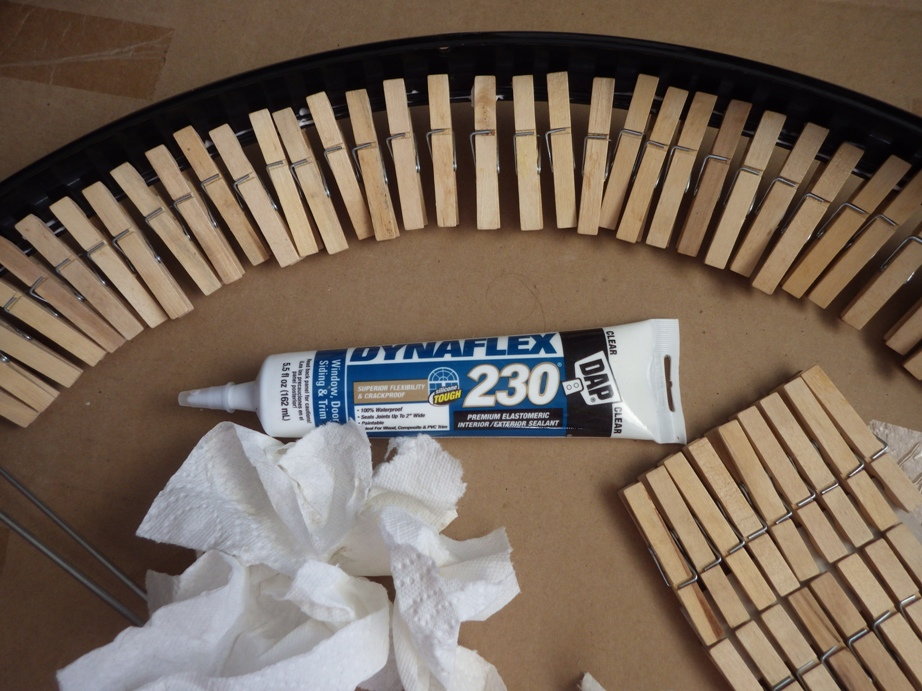
Fourth photo, I glued the wire to the inside of the fender. Three years ago I did that on a different bike and the glue is still holding well, so did the same on this bike. The glue I used is shown in the photo, I chose that based on a recommendation on a different bike forum three years ago, the recommendation cited the flexible material and ability to grip on almost any surface, is waterproof, and easy water based cleanup before it set. It comes in clear or white, I used clear. The clear is white when it comes out of the tube but the whiteness disappears when it has set if you buy the clear variety.
Used a two conductor wire, slightly heavier than B&M wire. The wire was salvaged from a charger for something that I had previously discarded. Note that I used clothespins as gluing clamps. They worked great, two packets at Dollar Tree was more than enough. But it is best to remove them after about 2 or 3 hours after you are done gluing before they become too difficult to remove. I let the glue set for several days before re-installing the fender on the bike.
About a week after I glued the wiring and reassembled the bike, I did a bit of touch up gluing where the wire was not as well attached to the fender as I wanted. This time used wax paper to keep the clothespins from sticking since there were only a few spots.
***
Fifth photo. I wanted to make sure that if I had to remove the light for a repair later, that I could do so. Thus I left a spare inch or two of wire under the fender so that the light could be removed and have exposed wire between the fender and light. The spare wire is covered with electrical tape, probably will have to renew the tape every few years. If the light fails and I need to replace it with a new one, the extra wire will make it much easier to do so.
You can see a bit of white color on some of the wiring, that was some of my touch up gluing that had not set yet.
I used blue (removable) threadlocker on the fender bolt to make sure it does not vibrate loose, the bolt was not long enough for a nylock nut. And used an M5 stainless nut so that it is less likely to rust onto the mounting bolt. On a different light I had bad luck using the B&M nuts on a B&M taillight, the nut rusted tightly to a mounting bolt, thus here I was careful to use stainless.

Sixth photo, the wire exits the fender through a drilled hole just above the non-drive side chain stay and extends down below the bottom bracket. By running the wire through a hole, it is less likely that I could tear the wire off of the glue holding it to the fender if I snagged it on something.
In this photo you can see some red zip ties on the downtube, they hold the taillight wire under the downtube.
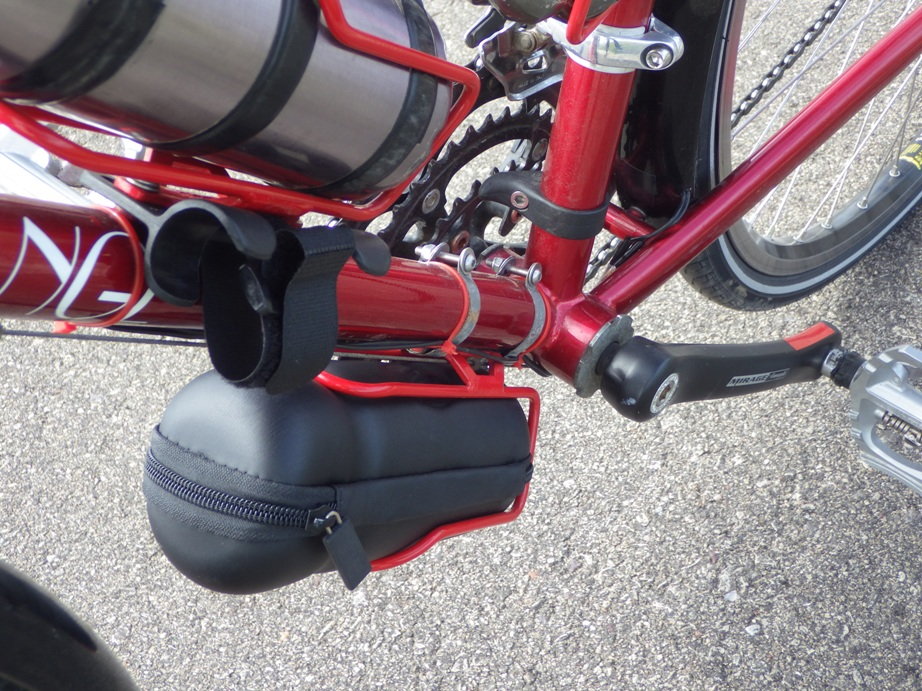
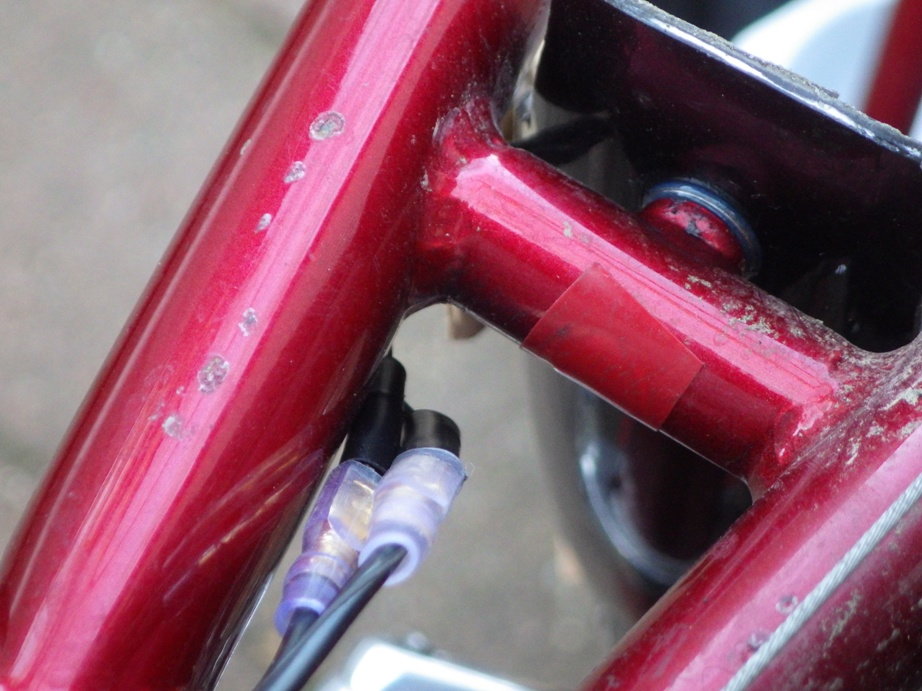
Seventh photo. The wire goes under the bottom bracket. I installed connectors in the wiring so that I could disconnect the wiring in the event that I needed to do a repair or remove the fender. The bike was upside down for this photo.
Since B&M wire and lights used 2.8mm spade connectors, I bought spare connectors of the same type to use as quick connectors. I also used these same 2.8mm spade connectors at the fork crown and so that I can easily remove my Sinewave Revolution USB Charger.
Eighth photo. The wire is attached under the downtube with zip ties. That wire is the same wire that I used inside the fender, two conductor wire that is a bit heavier than B&M wire. Near the fork crown, I wrapped the wire around an 8mm allen wrench in a coiled shape so that I could dip the coiled wire on the allen wrench into a cup of hot (nearly boiling) water for about 10 seconds, then dipped that in cold water for maybe a half minute to cool. That was enough to set the plastic insulation in a coiled shape. The purpose of the coiled shape is so that the wire is somewhat elastic when the fork turns to the right or left. So far the coiled shape of the wire is holding nicely, hopefully that coiled shape will be retained over the years.
Also note in this photo that I have a pair of 2.8mm spade connectors at the fork crown on the wire that extends up from the hub, attached to the fork with zip ties.
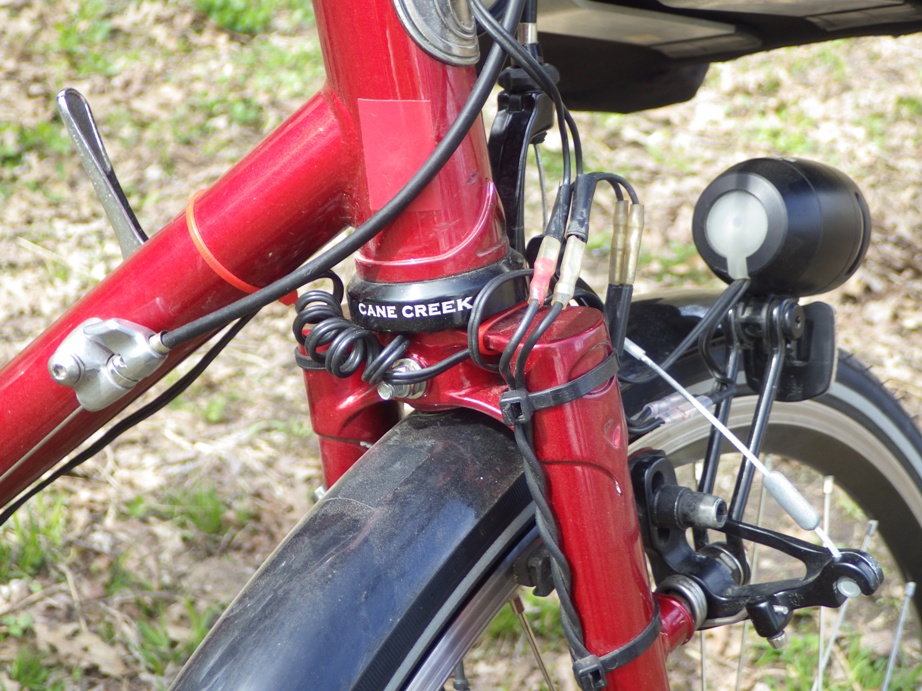
Ninth photo. The headlight is mounted on a brake cantilever mount. It would have been easier to mount the light on the fork crown, but that is already used for the canti brake cable hanger, that is why I mounted the light in an alternative place. The brake mounting bolt was not long enough to be safely used, I used galvanized threaded rod and several nuts and washers instead. The light mount is an extra tall Edelux light mount, slightly straightened to get the light up higher above the fender and also move the rear of the light further above any tire spray on wet days. Used blue (removable) threadlocker and made sure that these nuts are all very tight, I do not want this to loosen since my front brake uses the same mount as the light.
The light is the B&M IQ-XS. I find this light is a nice compromise on price, metal housing for ruggedness, small, and at 70 Lux I believe that the light is adequate. There are brighter lights out there, some with more even light patterns, etc. But, this was good enough for me and I wanted a small light for a lot of clearance since the handlebar bag bounces up and down a bit when I hit sudden potholes.
https://www.bumm.de/en/products/dyna...di-silber.html
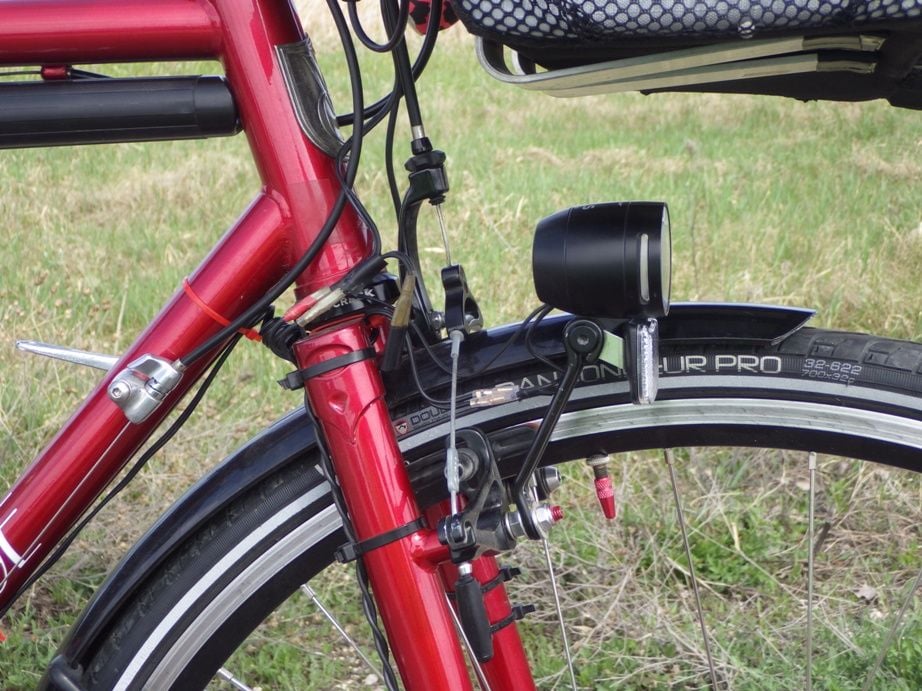
Tenth photo. I have the Sinewave Revolution wired in parallel with the light, the Sinewave is the white box on the right side of my handlebar bag bracket. The USB port is aimed down so rainwater can't collect in the USB port. In the photo I have a black coiled USB cable running from the Sinewave into my handlebar bag where I have a pass through cache battery. I used the same 2.8mm spade connectors on the Sinewave wiring that I used elsewhere so that I can easily remove the Sinewave and reconnect the light wiring directly to the hub wiring without the Sinewave in the circuit.
My GPS is not a cycling model, it does not play well directly with the Sinewave Revolution, I use a powerbank in the handlebar bag as a pass through cache battery. I can charge the NiMH batteries in the GPS from the powerbank whether I am rolling or stationary.
A USB charger like the Sinewave is not needed on a rando bike, but since I already owned it, I felt I might as well use it. Thus I do not bother to charge up my GPS battery indoors at home, do that on the bike as I ride.
The bike has been a work in progress for five years, four with the dynohub. With brake cables, a shifter cable, the wiring for lights, wiring for the USB charger, plus a wired bike computer, the wires and cabling look a bit busy between the front wheel and handlebars. But, I have not figured out a way to make that less so. I could use some shrink tubing, maybe in a few years I will experiment with that. But for now I am quite happy with the wiring I have here and I anticipate no changes.
I expect questions. But if your question is a basic one on dyno powered lights, I would suggest you first check Peter White's website. His discussion on the topic is very good and he is more knowledgeable than I am on the topic:
https://www.peterwhitecycles.com/
I will watch for questions and plan to answer them once or twice a day. If there is a question posted months from now and if I do not reply quickly, I am probably traveling as I do not check this forum when traveling. But I should get to it eventually.
To reiterate, I am not saying this is the best way to do it, but it works for me and I am pretty happy with it.
And, yes, I know that kickstands on rando bikes are not cool, but I like the convenience.
ADDENDUM, August 25, 2023: I looked at this again before I cited this link in another post and I see that now several of my photos have been removed from this posting. Sorry, they were they there when I posted it initially.
ADDENDUM, February 3, 2024: I see that the photos that I previously noted were missing have re-appeared. I recently saw a retailer blog had posted a good thread on how they wired up the lights on a bike. They did it similar to the way I described here, but used different components, glue and tools than I did.
https://velo-orange.blogspot.com/201...h-shimano.html
This is a very long post, I tried to balance brevity with completeness. I expect that only a few will read all of this unless they plan to wire up a dyno powered lighting system.
In late 2015 I bought the frame and fork for a Velo Orange Pass Hunter, rim brake version and built it up in early 2016. That model was described as a randonneuring bike frame with cantilever brake mounts. Initially I was looking for a home for a lot of parts that I had stripped off of a touring bike that had a defective frame. Initially I put wheels on the Pass Hunter that I had built up in 2004 without a dynohub. In early 2017, I decided to put a dynohub wheel on the bike. Initially I only wired the bike for headlight, but later put a temporary rack mounted dyno powered taillight on the bike. And a few weeks ago I installed a fender mounted dyno powered taillight on the bike for permanent use. I consider this project to now be complete, or as complete as bike projects get. So, now is the time to show off my project.
I also have a Sinewave Revolution USB charger on the bike, but I consider that temporary. I bought and use the Sinewave, along with an external pass through cache battery for bike touring. But when I am not touring, instead of putting the Sinewave in storage, I put it on the Pass Hunter in case I want to charge up a powerbank for my GPS.
https://www.sinewavecycles.com/produ...ave-revolution
There are many options for taillight mounting. Mounting on a seatstay, a rack, a seatpost, or fender. Sometimes I have a rack fitted to this bike, sometimes not, but always have fenders on it. Thus, a fender mount made the most sense to me.
There are many options for how to run the wire to a fender mounted taillight, I chose gluing it inside the fender. In the past Kingston on this forum has cited using a foil HVAC tape to tape wire inside a fender. Others have used fenders that had metal strips sandwiched in the plastic fender and used the metal for a conductor, and some have used wire inside a rolled edge on a metal fender. And there probably are other options too that I had not run across.
Initially I only used a battery powered taillight on this bike, I often use a battery powered taillight during daytime in flash mode, thus I still have a battery taillight on the bike for that purpose.
First photo, the bike:
Second photo, below. The dynohub is an SP PV-8. I bought my first dynohub in spring 2013 to use on a touring bike, have been very happy with it, so bought a second one of the same make and model.
https://www.sp-dynamo.com/series8-pv8
For wiring from the hub to fork crown, I used a twisted pair of single conductor wires attached to the fork with zip ties, did not use the stock B&M wire. In the past there were a few times when I snagged and damaged a wire for a wired bike computer, I wanted heavier duty wire than the stock B&M wire for that reason. I am not sure what gauge wire I used, I think somewhere between 18 and 22.
Most dynohubs do not include the skewer, SP does not. Although most thieves in my community do not know what a dynohub is, there might be a few that might want to take the wheel. I assume most thieves are opportunists, for that reason I usually use a bolt on skewer instead of a quick release on dynohub wheels. And to make sure that decision does not cause me any grief later, I also pack a 5mm allen wrench with my spare tube for when I get a flat.
Third photo, the taillight is a Spanninga Pixeo, with optional wire guard.
https://spanninga.com/product/pixeo/
If anyone buys that light, make sure you check the light beam pattern before you decide where to drill holes in your fender. The beam does not have a lot of height, thus it needs careful aim when mounting on the fender so that you do not mount it too high or too low. I put a 4 volt DC power supply on the wires to power it to determine where on the fender to mount it to get a horizontal light beam.
Fourth photo, I glued the wire to the inside of the fender. Three years ago I did that on a different bike and the glue is still holding well, so did the same on this bike. The glue I used is shown in the photo, I chose that based on a recommendation on a different bike forum three years ago, the recommendation cited the flexible material and ability to grip on almost any surface, is waterproof, and easy water based cleanup before it set. It comes in clear or white, I used clear. The clear is white when it comes out of the tube but the whiteness disappears when it has set if you buy the clear variety.
Used a two conductor wire, slightly heavier than B&M wire. The wire was salvaged from a charger for something that I had previously discarded. Note that I used clothespins as gluing clamps. They worked great, two packets at Dollar Tree was more than enough. But it is best to remove them after about 2 or 3 hours after you are done gluing before they become too difficult to remove. I let the glue set for several days before re-installing the fender on the bike.
About a week after I glued the wiring and reassembled the bike, I did a bit of touch up gluing where the wire was not as well attached to the fender as I wanted. This time used wax paper to keep the clothespins from sticking since there were only a few spots.
***
Fifth photo. I wanted to make sure that if I had to remove the light for a repair later, that I could do so. Thus I left a spare inch or two of wire under the fender so that the light could be removed and have exposed wire between the fender and light. The spare wire is covered with electrical tape, probably will have to renew the tape every few years. If the light fails and I need to replace it with a new one, the extra wire will make it much easier to do so.
You can see a bit of white color on some of the wiring, that was some of my touch up gluing that had not set yet.
I used blue (removable) threadlocker on the fender bolt to make sure it does not vibrate loose, the bolt was not long enough for a nylock nut. And used an M5 stainless nut so that it is less likely to rust onto the mounting bolt. On a different light I had bad luck using the B&M nuts on a B&M taillight, the nut rusted tightly to a mounting bolt, thus here I was careful to use stainless.
Sixth photo, the wire exits the fender through a drilled hole just above the non-drive side chain stay and extends down below the bottom bracket. By running the wire through a hole, it is less likely that I could tear the wire off of the glue holding it to the fender if I snagged it on something.
In this photo you can see some red zip ties on the downtube, they hold the taillight wire under the downtube.
Seventh photo. The wire goes under the bottom bracket. I installed connectors in the wiring so that I could disconnect the wiring in the event that I needed to do a repair or remove the fender. The bike was upside down for this photo.
Since B&M wire and lights used 2.8mm spade connectors, I bought spare connectors of the same type to use as quick connectors. I also used these same 2.8mm spade connectors at the fork crown and so that I can easily remove my Sinewave Revolution USB Charger.
Eighth photo. The wire is attached under the downtube with zip ties. That wire is the same wire that I used inside the fender, two conductor wire that is a bit heavier than B&M wire. Near the fork crown, I wrapped the wire around an 8mm allen wrench in a coiled shape so that I could dip the coiled wire on the allen wrench into a cup of hot (nearly boiling) water for about 10 seconds, then dipped that in cold water for maybe a half minute to cool. That was enough to set the plastic insulation in a coiled shape. The purpose of the coiled shape is so that the wire is somewhat elastic when the fork turns to the right or left. So far the coiled shape of the wire is holding nicely, hopefully that coiled shape will be retained over the years.
Also note in this photo that I have a pair of 2.8mm spade connectors at the fork crown on the wire that extends up from the hub, attached to the fork with zip ties.
Ninth photo. The headlight is mounted on a brake cantilever mount. It would have been easier to mount the light on the fork crown, but that is already used for the canti brake cable hanger, that is why I mounted the light in an alternative place. The brake mounting bolt was not long enough to be safely used, I used galvanized threaded rod and several nuts and washers instead. The light mount is an extra tall Edelux light mount, slightly straightened to get the light up higher above the fender and also move the rear of the light further above any tire spray on wet days. Used blue (removable) threadlocker and made sure that these nuts are all very tight, I do not want this to loosen since my front brake uses the same mount as the light.
The light is the B&M IQ-XS. I find this light is a nice compromise on price, metal housing for ruggedness, small, and at 70 Lux I believe that the light is adequate. There are brighter lights out there, some with more even light patterns, etc. But, this was good enough for me and I wanted a small light for a lot of clearance since the handlebar bag bounces up and down a bit when I hit sudden potholes.
https://www.bumm.de/en/products/dyna...di-silber.html
Tenth photo. I have the Sinewave Revolution wired in parallel with the light, the Sinewave is the white box on the right side of my handlebar bag bracket. The USB port is aimed down so rainwater can't collect in the USB port. In the photo I have a black coiled USB cable running from the Sinewave into my handlebar bag where I have a pass through cache battery. I used the same 2.8mm spade connectors on the Sinewave wiring that I used elsewhere so that I can easily remove the Sinewave and reconnect the light wiring directly to the hub wiring without the Sinewave in the circuit.
My GPS is not a cycling model, it does not play well directly with the Sinewave Revolution, I use a powerbank in the handlebar bag as a pass through cache battery. I can charge the NiMH batteries in the GPS from the powerbank whether I am rolling or stationary.
A USB charger like the Sinewave is not needed on a rando bike, but since I already owned it, I felt I might as well use it. Thus I do not bother to charge up my GPS battery indoors at home, do that on the bike as I ride.
The bike has been a work in progress for five years, four with the dynohub. With brake cables, a shifter cable, the wiring for lights, wiring for the USB charger, plus a wired bike computer, the wires and cabling look a bit busy between the front wheel and handlebars. But, I have not figured out a way to make that less so. I could use some shrink tubing, maybe in a few years I will experiment with that. But for now I am quite happy with the wiring I have here and I anticipate no changes.
I expect questions. But if your question is a basic one on dyno powered lights, I would suggest you first check Peter White's website. His discussion on the topic is very good and he is more knowledgeable than I am on the topic:
https://www.peterwhitecycles.com/
I will watch for questions and plan to answer them once or twice a day. If there is a question posted months from now and if I do not reply quickly, I am probably traveling as I do not check this forum when traveling. But I should get to it eventually.
To reiterate, I am not saying this is the best way to do it, but it works for me and I am pretty happy with it.
And, yes, I know that kickstands on rando bikes are not cool, but I like the convenience.
ADDENDUM, August 25, 2023: I looked at this again before I cited this link in another post and I see that now several of my photos have been removed from this posting. Sorry, they were they there when I posted it initially.
ADDENDUM, February 3, 2024: I see that the photos that I previously noted were missing have re-appeared. I recently saw a retailer blog had posted a good thread on how they wired up the lights on a bike. They did it similar to the way I described here, but used different components, glue and tools than I did.
https://velo-orange.blogspot.com/201...h-shimano.html
Last edited by Tourist in MSN; 03-03-24 at 08:33 AM.

Likes For Tourist in MSN:
04-22-21, 12:18 PM
#2
Senior Member
Join Date: Oct 2013
Location: Highlands Ranch, CO
Posts: 1,221
Bikes: '13 Diamondback Hybrid Commuter, '17 Spec Roubaix Di2, '17 Spec Camber 29'er, '19 CDale Topstone Gravel
Mentioned: 5 Post(s)
Tagged: 0 Thread(s)
Quoted: 590 Post(s)
Liked 445 Times
in
260 Posts
Nice setup. Though I personally wouldn't route any wires inside/under the fender. There's too many rocks and sticks flying around inside that space at high speeds and with a lot of torque, which could snag/cut/short the tail light wire. I rely on my dynamo to provide light in the pitch black, and wouldn't want a rock or stick to jeopardize that.
Last edited by Riveting; 04-22-21 at 12:23 PM.
04-22-21, 12:44 PM
#3
Senior Member
Join Date: Mar 2015
Posts: 209
Mentioned: 1 Post(s)
Tagged: 0 Thread(s)
Quoted: 86 Post(s)
Liked 51 Times
in
35 Posts
I agree with that, on my last tour I was brought to a halt twice by unavoidable gooey debris in the road (once regular old mud, once thick fresh cowpies) which packed up the inside of the fender and physically stopped the bike. Had to remove the fender to get going again. Personally I think I might run the wire on the outside of the fender with a similar tape/glue scheme. But I do get that this way looks cleaner.
Super clean and simple overall, thanks for sharing the build
Super clean and simple overall, thanks for sharing the build
Last edited by fourfa; 04-22-21 at 02:42 PM.
04-22-21, 07:33 PM
#4

aka Tom Reingold

Join Date: Jan 2009
Location: New York, NY, and High Falls, NY, USA
Posts: 40,481
Bikes: 1962 Rudge Sports, 1971 Raleigh Super Course, 1971 Raleigh Pro Track, 1974 Raleigh International, 1975 Viscount Fixie, 1982 McLean, 1996 Lemond (Ti), 2002 Burley Zydeco tandem
Mentioned: 511 Post(s)
Tagged: 0 Thread(s)
Quoted: 7333 Post(s)
Liked 2,430 Times
in
1,419 Posts
Very nice. I will eventually use some of these ideas.
What cache battery are you using? Not all of them can charge and discharge at the same time.
What cache battery are you using? Not all of them can charge and discharge at the same time.
__________________
Tom Reingold, tom@noglider.com
New York City and High Falls, NY
Blogs: The Experienced Cyclist; noglider's ride blog
�When man invented the bicycle he reached the peak of his attainments.� � Elizabeth West, US author
Please email me rather than PM'ing me. Thanks.
Tom Reingold, tom@noglider.com
New York City and High Falls, NY
Blogs: The Experienced Cyclist; noglider's ride blog
�When man invented the bicycle he reached the peak of his attainments.� � Elizabeth West, US author
Please email me rather than PM'ing me. Thanks.
04-23-21, 04:13 AM
#5
Senior Member
Thread Starter
Join Date: Aug 2010
Location: Madison, WI
Posts: 11,170
Bikes: 1961 Ideor, 1966 Perfekt 3 Speed AB Hub, 1994 Bridgestone MB-6, 2006 Airnimal Joey, 2009 Thorn Sherpa, 2013 Thorn Nomad MkII, 2015 VO Pass Hunter, 2017 Lynskey Backroad, 2017 Raleigh Gran Prix, 1980s Bianchi Mixte on a trainer. Others are now gone.
Mentioned: 47 Post(s)
Tagged: 0 Thread(s)
Quoted: 3450 Post(s)
Liked 1,449 Times
in
1,130 Posts
https://voltaicsystems.com/battery-packs
The V44 that I bought was rated at 44 watt hours capacity. I assume on a good day without too many hills that I will average 2 watts out of my Sinewave when bike touring, that puts mine at 22 hours of riding to charge from empty to full. And that means for touring that I have quite a few days of capacity if I need it. I see improvements in their V50 over what I have, I would buy the V50 if I was shopping today. I got free shipping by buying on Amazon.
But there are plenty of touring people that just charge the powerbank during the day and charge up their devices in the campground in the evening. They do not use or need pass through capability, I have seen references to Anker brand for them. I however wanted to be able to use pass through capability when charging my GPS or phone.
04-23-21, 04:46 AM
#6
Senior Member
Thread Starter
Join Date: Aug 2010
Location: Madison, WI
Posts: 11,170
Bikes: 1961 Ideor, 1966 Perfekt 3 Speed AB Hub, 1994 Bridgestone MB-6, 2006 Airnimal Joey, 2009 Thorn Sherpa, 2013 Thorn Nomad MkII, 2015 VO Pass Hunter, 2017 Lynskey Backroad, 2017 Raleigh Gran Prix, 1980s Bianchi Mixte on a trainer. Others are now gone.
Mentioned: 47 Post(s)
Tagged: 0 Thread(s)
Quoted: 3450 Post(s)
Liked 1,449 Times
in
1,130 Posts
Nice setup. Though I personally wouldn't route any wires inside/under the fender. There's too many rocks and sticks flying around inside that space at high speeds and with a lot of torque, which could snag/cut/short the tail light wire. I rely on my dynamo to provide light in the pitch black, and wouldn't want a rock or stick to jeopardize that.
I agree with that, on my last tour I was brought to a halt twice by unavoidable gooey debris in the road (once regular old mud, once thick fresh cowpies) which packed up the inside of the fender and physically stopped the bike. Had to remove the fender to get going again. Personally I think I might run the wire on the outside of the fender with a similar tape/glue scheme. But I do get that this way looks cleaner.
Super clean and simple overall, thanks for sharing the build
Super clean and simple overall, thanks for sharing the build
And, there is a lot of space between the fender where my taillight is mounted and the tire. The first photo that shows the whole bike, that shows a small gap between the fender and tire, but that is hard to see in that photo so I cropped that photo to show that better, here:
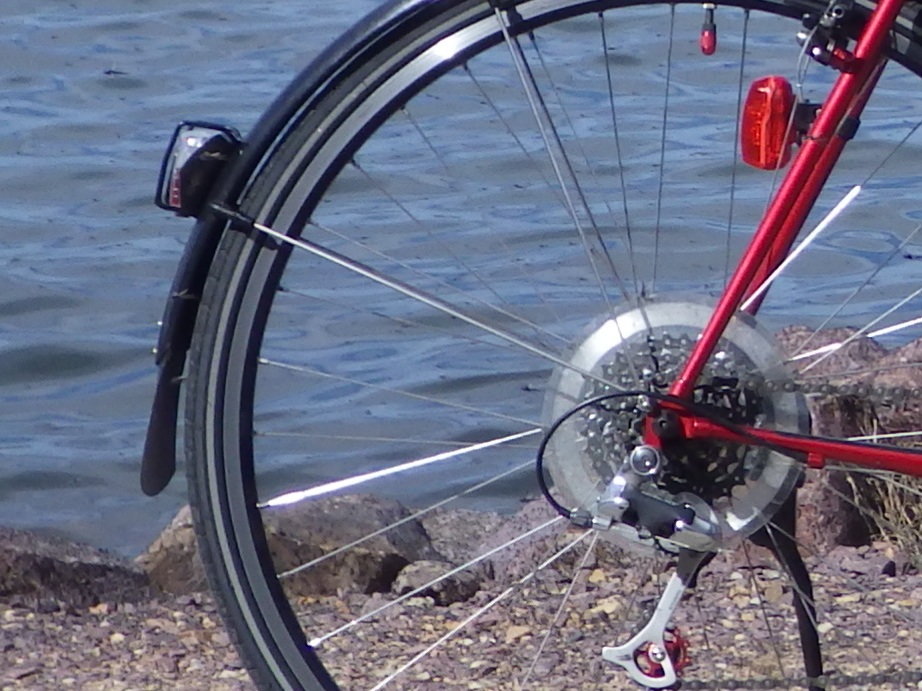
I like as much room between my fenders and tire as I can manage, within reason, for the same reasons that you cite.
I have three touring bikes, one of which I glued the wire inside the fender three years ago. That bike I consider to be my light touring bike, that bike has a titanium frame. Only use that for routes that are almost exclusively for paved touring. Sometimes I ride that bike on local rail trails, but only when I anticipate minimal mud.
My medium duty touring bike, I only use battery powered taillights. Routes with significant gravel like rail trails are the ones I use with that bike, or use that bike if the load will be heavier than my light touring bike. That bike has fenders, but no wiring in them.
My heavy duty expedition bike is an S&S coupled bike, when I travel with that bike I have to disassemble it for packing for air travel, and reassemble latter. That is a hassle and I no longer use dyno powered lighting on that bike, instead I only use the dynohub for battery charging. The only wiring attached to the bike is along the fork from the hub, the Sinewave gets attached to the frame or to my handlebar bag bracket. Use battery taillights on that bike, headlamp is powered with a USB cable and is strapped to handlebar with an elastic when I need it..
Likes For Tourist in MSN:
04-23-21, 12:06 PM
#7
Senior Member
Join Date: Mar 2015
Posts: 209
Mentioned: 1 Post(s)
Tagged: 0 Thread(s)
Quoted: 86 Post(s)
Liked 51 Times
in
35 Posts
Well-reasoned and the lived experience is obvious... I do just want to add that both the mud and manure incidents were on paved roads - mud on a secondary road in France after a river or something had flooded every possible route, manure on a paved bike path in Sicily that happened to be between two cattle fields. Not like I went looking for that one, lol. Looks like I had about the same amount of space between tire and fender when it happened.
04-26-21, 06:43 AM
#8
I�m a little Surly

Join Date: Jan 2010
Location: Near the district
Posts: 2,422
Bikes: Two Cross Checks, a Karate Monkey, a Disc Trucker, and a VO Randonneur
Mentioned: 5 Post(s)
Tagged: 0 Thread(s)
Quoted: 699 Post(s)
Liked 1,294 Times
in
647 Posts
While I know there are better I use the B&M USB Werk, if I have my light off it will charge my phone which is all I really need it to do.

I just used the little strap dodad and put the battery under the stem
I just used the little strap dodad and put the battery under the stem
Likes For Germany_chris:
04-26-21, 03:15 PM
#9
Overdoing projects

Join Date: Oct 2011
Location: Rotterdam, former republic of the Netherlands
Posts: 2,397
Bikes: Batavus Randonneur GL, Gazelle Orange Excellent, Gazelle Super Licht, Gazelle Grand Tourist, Gazelle Lausanne, Gazelle Tandem, Koga-Miyata SilverAce, Koga-Miyata WorldTraveller
Mentioned: 58 Post(s)
Tagged: 0 Thread(s)
Quoted: 784 Post(s)
Liked 1,237 Times
in
686 Posts
Nice setup @Tourist in MSN. Personally I prefer running the wires inside the frame as much as possible to prevent any risk of snagging and use SON coaxial couplers on all the bits in between. I like running the light inside the rolled edge of the fender as well but recently I ran into an issue where the wheel was rubbing against the fender but I had to continue. The end result was that I actually heated the fender enough that the cable melted inside the rolled edge. Which, as you can imagine, caused a short in the rear light. 
Next time I'm trying the glue. Crimping a rolled edge is hard to do invisibly and nearly impossible if you want to paint the fender.
Next time I'm trying the glue. Crimping a rolled edge is hard to do invisibly and nearly impossible if you want to paint the fender.


