


Blue locktite under chainring nuts?
 01-31-21, 03:08 PM
#1

Senior Member
Thread Starter

Join Date: Apr 2006
Location: Washington County, Vermont, USA
Posts: 3,778
Bikes: 1966 Dawes Double Blue, 1976 Raleigh Gran Sport, 1975 Raleigh Sprite 27, 1980 Univega Viva Sport, 1971 Gitane Tour de France, 1984 Lotus Classique, 1976 Motobecane Grand Record
Mentioned: 77 Post(s)
Tagged: 0 Thread(s)
Quoted: 765 Post(s)
Liked 660 Times
in
351 Posts
Blue locktite under chainring nuts?
You know that maddening thing when you go to loosen a chainring bolt and it just spins in the hole? And then you have to use that stupid little two-pronged tool to hold it in place--or try to hold it in place--so it will unscrew? One of the instructors at UBI bike school, where I went years ago, called it "the worst tool in the world," and I think that's a fair description.
What about putting a dab of blue lockite under the head of the slotted half of the bolt as a preventative during assembly? Not the threaded part--just the part that makes contact with the counterbored portion of the hole in the chainring. It seems to me that that might help prevent the bolt from turning when you go to loosen it. Off the top of my head, I can't think of any possible negative side effects. Of course, if the nut is really seized to the bolt, the locktite will probably shear before the bolt breaks loose, but it might be helpful in less extreme cases.
Has anyone here tried that, and if so did it seem to work? I'm thinking I might give it a try next time I install a chainring.
__________________
www.redclovercomponents.com
"Progress might have been all right once, but it has gone on too long."
--Ogden Nash
www.redclovercomponents.com
"Progress might have been all right once, but it has gone on too long."
--Ogden Nash
 01-31-21, 05:05 PM
#2
se�or miembro

Join Date: Dec 2018
Location: Pac NW
Posts: 6,625
Bikes: '70s - '80s Campagnolo
Mentioned: 92 Post(s)
Tagged: 0 Thread(s)
Quoted: 3889 Post(s)
Liked 6,488 Times
in
3,211 Posts
Blue loctite is better than rust ... less permanent, anyway.
01-31-21, 05:07 PM
#3
Strong Walker

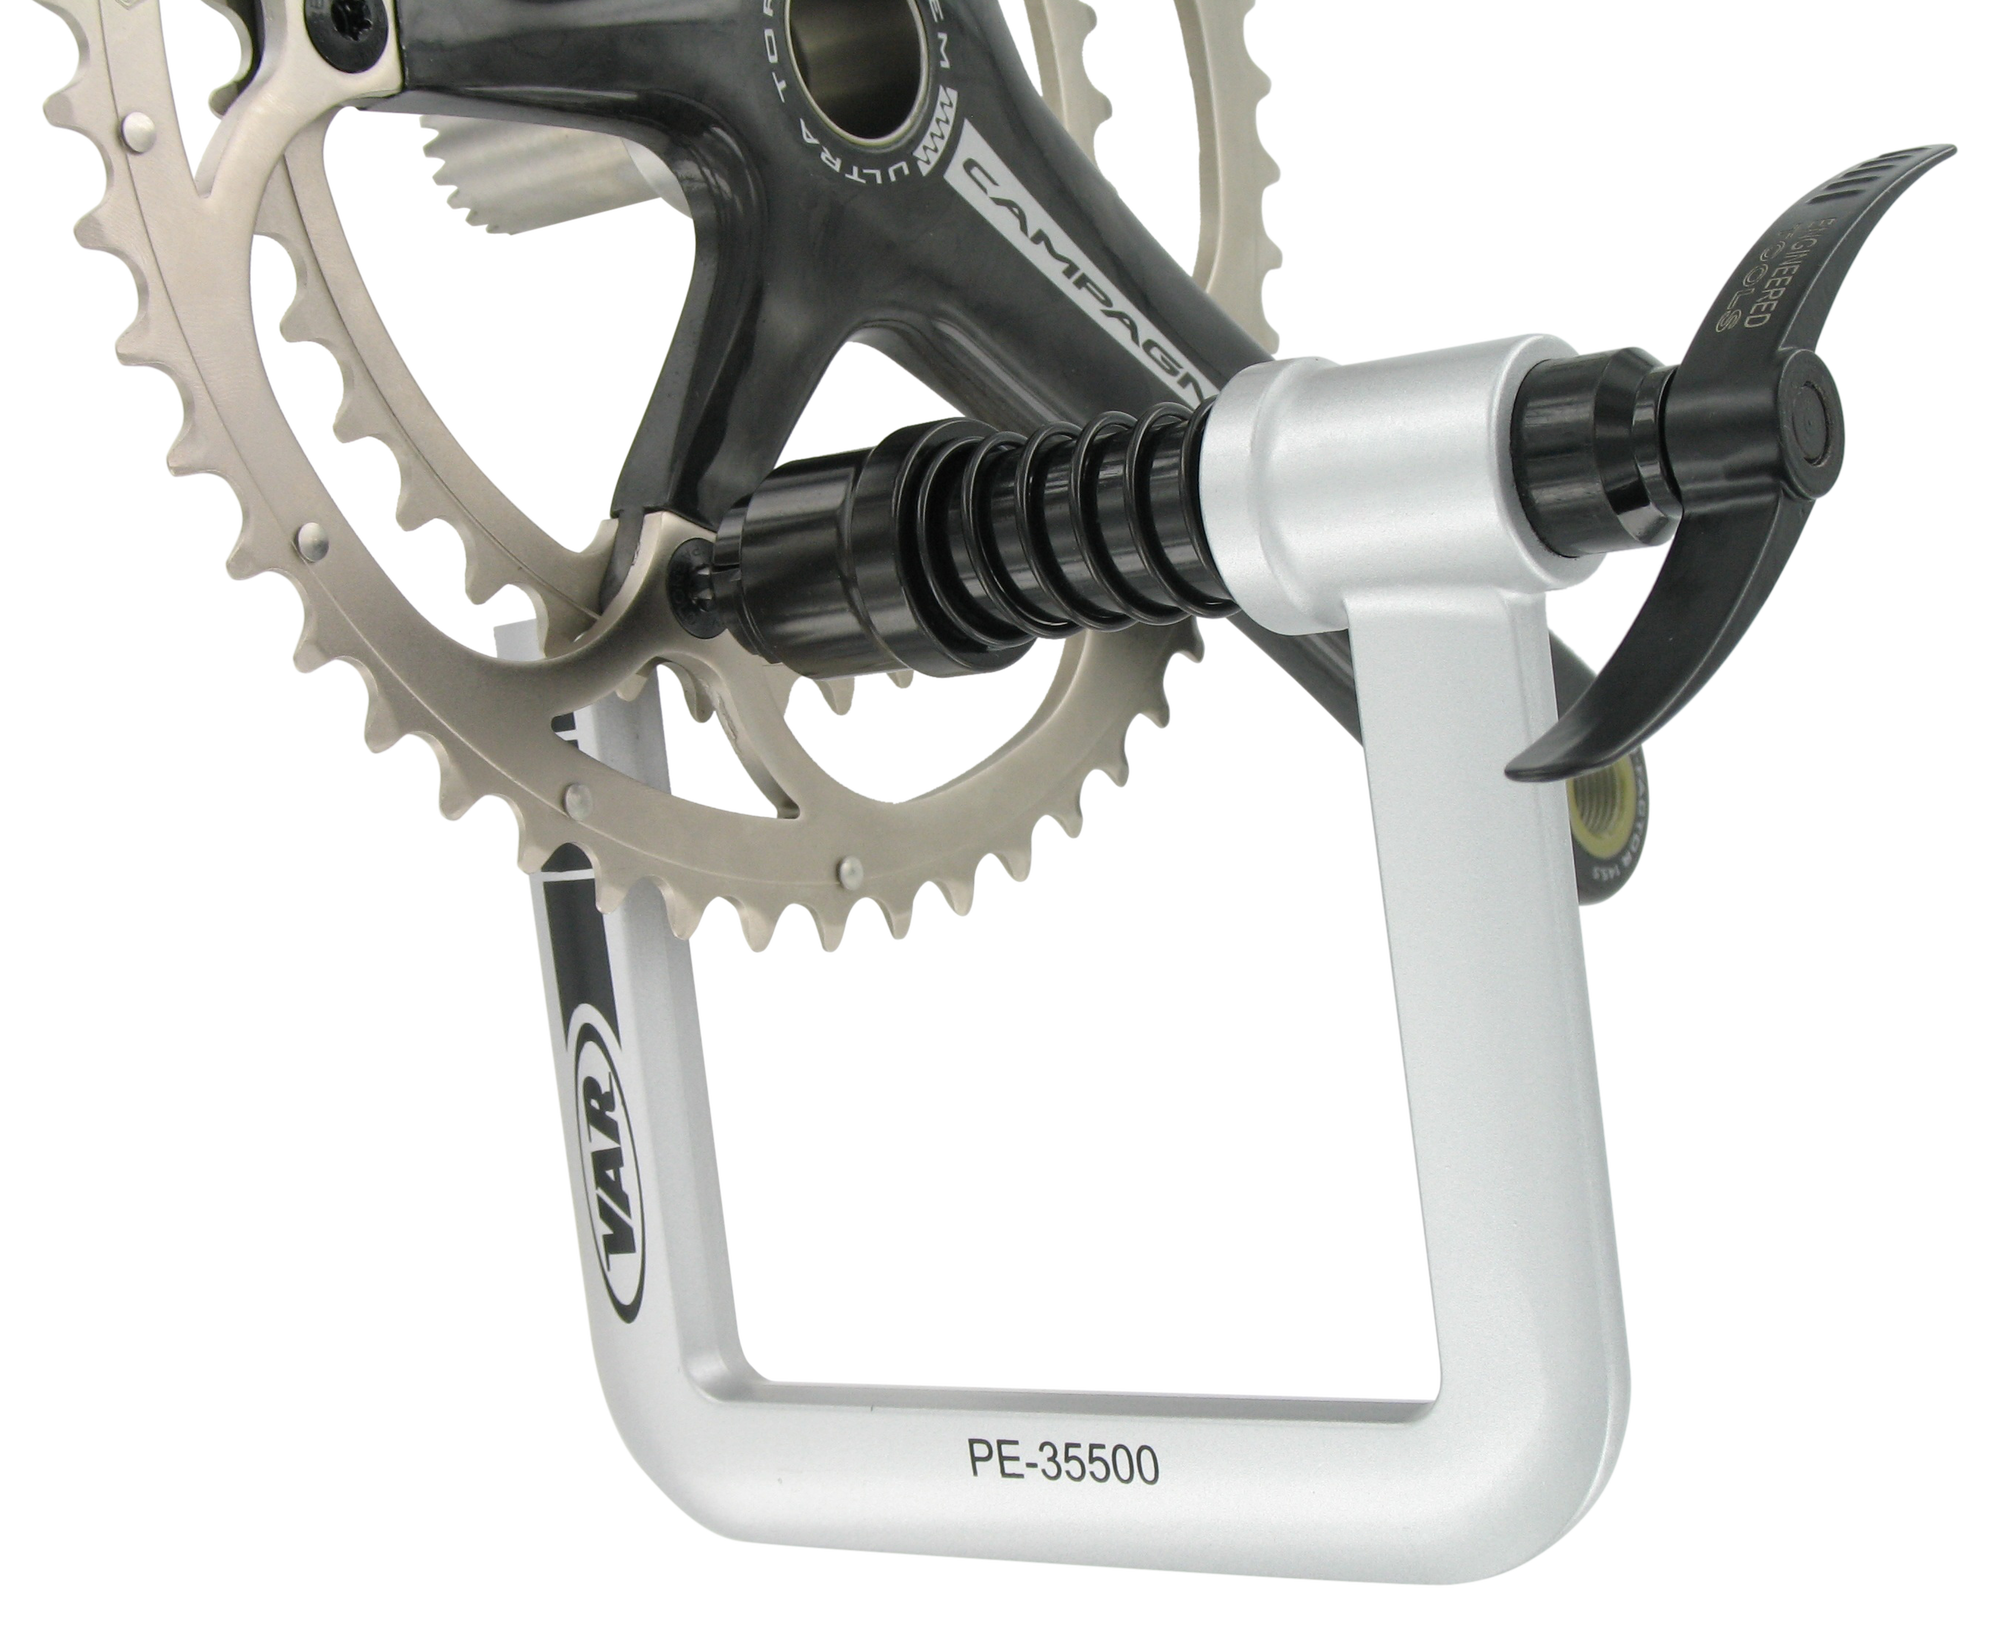
So far, whenever I had trouble with the chain ring bolts, it was getting them loose (which is why I keep a VAR tool for that in my arsenal), not them rattling loose.
01-31-21, 05:25 PM
#4
Senior Member

Join Date: Apr 2007
Location: Thunder Bay, Ontario, Canada - burrrrr!
Posts: 11,674
Bikes: 1958 Rabeneick 120D, 1968 Legnano Gran Premio, 196? Torpado Professional, 2000 Marinoni Piuma
Mentioned: 210 Post(s)
Tagged: 0 Thread(s)
Quoted: 1372 Post(s)
Likes: 0
Liked 1,752 Times
in
939 Posts
Blue - not a good idea for chain ring bolts! Blue just might damage fine threads during removal. I believe that Loctite 222 is for finer threads...

__________________
"98% of the bikes I buy are projects".
"98% of the bikes I buy are projects".
Likes For randyjawa:
01-31-21, 05:37 PM
#5
Senior Member
Join Date: Oct 2014
Location: Portland, OR
Posts: 12,906
Bikes: (2) ti TiCycles, 2007 w/ triple and 2011 fixed, 1979 Peter Mooney, ~1983 Trek 420 now fixed and ~1973 Raleigh Carlton Competition gravel grinder
Mentioned: 129 Post(s)
Tagged: 0 Thread(s)
Quoted: 4806 Post(s)
Liked 3,931 Times
in
2,556 Posts
I think he's talking about putting the blue between the nut and the spider, not on the threads. In other words, making the nut a semi-permanent insert. I've considered epoxying them in place, expecially in my fix gear where I change chainrings relatively often.
Likes For 79pmooney:
01-31-21, 05:58 PM
#6
RUSA #3100

Join Date: Feb 2012
Location: Oregon City
Posts: 836
Bikes: Yes
Mentioned: 20 Post(s)
Tagged: 0 Thread(s)
Quoted: 237 Post(s)
Liked 505 Times
in
181 Posts
I have done this myself and it works pretty well, and you can still remove the nut after the lock tite has set. A little light grease or vaseline on the threads (not on the exterior of the nut) also helps. You just want more friction on the interface of the nut/chain ring than at the threads to keep the nut from spinning.
__________________
https://utahrandonneur.wordpress.com
https://utahrandonneur.wordpress.com
01-31-21, 06:01 PM
#7
Half way there

Join Date: Sep 2015
Location: North Carolina
Posts: 2,957
Bikes: Many, and the list changes frequently
Mentioned: 5 Post(s)
Tagged: 0 Thread(s)
Quoted: 986 Post(s)
Liked 880 Times
in
527 Posts
I don't have problems getting them tight on assembly. Removing is a different story. I usually drill them out unless the pieces are vintage or special. Many times I wished I had one of the nice VAR tools for this purpose,
01-31-21, 06:12 PM
#8
Senior Member

I have the nice Var tool, and proved I'm not very clever by somehow tearing up my knuckles much worse using the Var tool than I ever did with the stupid little Sugino thing.
The stupid Sugino thing can work a little better with the crankarm removed, on the workbench surface with the crank facing up, and pushing down on the crank so the tool is less likey to slip.
You can also position the tool so that it is pushing up against the edge of a spider arm, that plus leaning on it makes it very unlikely to slip.
If you don't mind mixing eras, you can use modern nuts/bolts which have allen key openings at both ends. Usually 5/6mm.
__________________
Fuggedaboutit!
Fuggedaboutit!
01-31-21, 08:28 PM
#9
aka Tom Reingold

Join Date: Jan 2009
Location: New York, NY, and High Falls, NY, USA
Posts: 40,503
Bikes: 1962 Rudge Sports, 1971 Raleigh Super Course, 1971 Raleigh Pro Track, 1974 Raleigh International, 1975 Viscount Fixie, 1982 McLean, 1996 Lemond (Ti), 2002 Burley Zydeco tandem
Mentioned: 511 Post(s)
Tagged: 0 Thread(s)
Quoted: 7349 Post(s)
Liked 2,474 Times
in
1,437 Posts
All my knuckles are scarred from work like this, so I don't care if I gouge them again. 
__________________
Tom Reingold, tom@noglider.com
New York City and High Falls, NY
Blogs: The Experienced Cyclist; noglider's ride blog
�When man invented the bicycle he reached the peak of his attainments.� � Elizabeth West, US author
Please email me rather than PM'ing me. Thanks.
Tom Reingold, tom@noglider.com
New York City and High Falls, NY
Blogs: The Experienced Cyclist; noglider's ride blog
�When man invented the bicycle he reached the peak of his attainments.� � Elizabeth West, US author
Please email me rather than PM'ing me. Thanks.
Likes For noglider:
02-01-21, 06:09 AM
#10
Senior Member
Join Date: Apr 2007
Location: Thunder Bay, Ontario, Canada - burrrrr!
Posts: 11,674
Bikes: 1958 Rabeneick 120D, 1968 Legnano Gran Premio, 196? Torpado Professional, 2000 Marinoni Piuma
Mentioned: 210 Post(s)
Tagged: 0 Thread(s)
Quoted: 1372 Post(s)
Likes: 0
Liked 1,752 Times
in
939 Posts
Point well taken. I failed to properly understand the issue. To that add, I too see the need to do something to prevent or at least reduce the frustration caused when one of the fasteners fails to release.
__________________
"98% of the bikes I buy are projects".
"98% of the bikes I buy are projects".
02-01-21, 06:19 AM
#11
Senior Member
It is always a good day when all 5 bolts make that crack and loosen without the little pin tool. And yes, my hands have been bloodied by that stupid tool but at least it has worked every time. Instead if making the nuts harder to remove you could focus on making the bolts easier to remove. A bit of grease should have them turning sooner than the nuts.
Likes For Narhay:
02-01-21, 09:17 AM
#12
Senior Member
Join Date: Apr 2011
Location: Maryland, USA
Posts: 2,441
Bikes: Drysdale/Gitane/Zeus/Masi/Falcon/Palo Alto/Raleigh/Legnano
Mentioned: 34 Post(s)
Tagged: 0 Thread(s)
Quoted: 987 Post(s)
Liked 640 Times
in
406 Posts
Interesting! I think I am aging to get some of that.
__________________
Larry:1958 Drysdale, 1961 Gitane Gran Sport, 1974 Zeus track, 1988 Masi Gran Corsa, 1974 Falcon, 1980 Palo Alto, 1973 Raleigh Gran Sport, 1974 Legnano. Susan: 1976 Windsor Profesional.
Larry:1958 Drysdale, 1961 Gitane Gran Sport, 1974 Zeus track, 1988 Masi Gran Corsa, 1974 Falcon, 1980 Palo Alto, 1973 Raleigh Gran Sport, 1974 Legnano. Susan: 1976 Windsor Profesional.
02-01-21, 09:38 AM
#13
PM me your cotters

Join Date: Jun 2015
Location: ATL
Posts: 3,241
Mentioned: 80 Post(s)
Tagged: 0 Thread(s)
Quoted: 1137 Post(s)
Liked 590 Times
in
422 Posts
I'll play devil's advocate here for a sec in case nobody else has...
What if you're like me, and you spend 75%+ of your time in the small ring on a double crankset, and thus you wear down and replace your small ring more than anything else? When you go to replace, you'll need to thread something into the sleeved wide you locked in, then hammer it out, potentially damaging its threads?
I like the idea of using blue threadlock, the bond is light, on-par with locking it in place with paint. But the long-term effects could make for painful upgrades later.
__________________
███████████████
███████████████
02-01-21, 01:00 PM
#14
Senior Member
Loctite 247 is primarily designed for threaded applications; for a press-fit or slip-fit, you might have better luck using the appropriate green loctite.
I have accidentally done your experiment in the past (with too much blue loctite), and it was a huge pain in the butt to remove.
If you want a simple (but modern) solution: FSA makes chainring bolts that have a 5MM hex on one side, and T25 on the other.
I have accidentally done your experiment in the past (with too much blue loctite), and it was a huge pain in the butt to remove.
If you want a simple (but modern) solution: FSA makes chainring bolts that have a 5MM hex on one side, and T25 on the other.
Last edited by smoothness; 02-01-21 at 01:04 PM.
02-01-21, 01:33 PM
#15
Senior Member
Join Date: Mar 2019
Posts: 1,606
Mentioned: 8 Post(s)
Tagged: 0 Thread(s)
Quoted: 581 Post(s)
Liked 921 Times
in
518 Posts
I have been frustrated by many difficult-to-release chainring bolts over the years. The solution I came up with was selective application of grease- basically the photo negative of OP's Loctite idea -
1. Thoroughly clean all surfaces on the bolts and the spots on the chainring holes where they touch;
2. When reassembling, insert the back side of the fastener (the 'nut' half of the chainring bolt) into its hole
3. Put a light dab of grease only on the threads of the chainring bolt and thread it into the nut so it takes up all the slack, but is not yet tight
4. Repeat steps 2-3 for all chainring bolts
5. Tighten in a 'star' pattern.
6. Re-tighten after a couple rides just to be sure
The low friction of the greased threads combined with the relatively higher friction of the bare metal of the outside of the fastener against the chainring will allow you to tighten the chairing bolts without the back part of the bolt turning. THe grease will also serve as an 'anti-seize', and the bare metal contact between chainring and fastener will still have higher friction and hold the fastener in place enough to easily break the tight bolt free when removing.
Although, I also have one of the little chainring bolt pin spanners, they work perfectly for what they are supposed to do, and I don't really see how these are so complicated.
Likes For ClydeClydeson:
02-01-21, 02:49 PM
#16
Senior Member
Join Date: Jun 2009
Location: Brooklyn, NY
Posts: 512
Bikes: 1970s Coppi/Fiorelli beater, 1973 Raleigh Competition, 1972 Bob Jackson, 1970 Cilo Sprint-X, 1985 Fuji Touring Series IV, 1969 Legnano Roma
Mentioned: 11 Post(s)
Tagged: 0 Thread(s)
Quoted: 217 Post(s)
Liked 198 Times
in
129 Posts
would stainless chainring bolts (if they really are) mitigate the problem simply by not seizing as quickly/often as the generic ones?
02-01-21, 04:43 PM
#17
Catching Smallmouth

Join Date: Oct 2013
Location: In a boat
Posts: 590
Bikes: 1990 Specialized Sirrus Triple, 1985 Trek 460, 2005 Lemond Tourmalet, 1984 Schwinn LeTour 'Luxe, 1988 Trek 400T, 1985 Trek 450, 1997 Lemond Zurich, 1993 Diamond Back Apex, 1988 Schwinn Circuit, 1988 Schwinn Prologue, 1978 Trek TX700, Sannino
Mentioned: 5 Post(s)
Tagged: 0 Thread(s)
Quoted: 88 Post(s)
Liked 134 Times
in
79 Posts
Same here. I grease the threads and clean everything else. No problems.
02-01-21, 05:26 PM
#18
Full Member
I've used red loctite for the purpose mentioned and think I'll take the suggestion to switch to green loctite for this sleeve retaining purpose. Klein used to use it for bearing retention at the factory.
02-01-21, 06:25 PM
#19

Stop reading my posts!

Join Date: Sep 2004
Posts: 12,584
Mentioned: 90 Post(s)
Tagged: 0 Thread(s)
Quoted: 1444 Post(s)
Liked 1,063 Times
in
788 Posts
I have not tried any colors of LocTite but would also endorse the Green (if you have it, I happen to) but with any/all of these they are an-aerobic adhesives so will only cure where air cannot reach. I think the Green is formulated for this type of interface versus any of the "for THREADED" strengths (from Low-strength Purple to "you really think so?" Red). Might give it a shot next time. Cleaning the surfaces with solvent (Acetone or de-natured Alcohol is what I use) is key.
02-01-21, 11:34 PM
#20
Senior Member
Join Date: Apr 2009
Posts: 940
Mentioned: 5 Post(s)
Tagged: 0 Thread(s)
Quoted: 380 Post(s)
Liked 541 Times
in
286 Posts
I just use the little tool - used to be Sugino and now (since '86 or so) the Shimano. In the last +/- 50 years I've never had one come loose. Never had one I couldn't take out. Just been lucky, I guess.
Likes For Steel Charlie:
02-02-21, 11:14 AM
#21
Senior Member
Join Date: Mar 2019
Posts: 1,606
Mentioned: 8 Post(s)
Tagged: 0 Thread(s)
Quoted: 581 Post(s)
Liked 921 Times
in
518 Posts
Stainless fasteners are generally more likely to gall and get stuck together than plain or chromed steel, or aluminum. Corrosion is not really the issue causing difficult removal, so stainless would not improve this at all imo.
Likes For ClydeClydeson:
02-02-21, 12:43 PM
#22
Senior Member
Join Date: Sep 2015
Location: Massachusetts
Posts: 763
Bikes: S-Works Stumpjumper HT Disc, Fuji Absolute, Kona Jake the Snake, '85 Cannondale SR900
Mentioned: 0 Post(s)
Tagged: 0 Thread(s)
Quoted: 219 Post(s)
Liked 217 Times
in
142 Posts

Though one CAN use the small crescent wrench spanning from the back nut to a chainring tooth hack if one has to...
02-02-21, 01:31 PM
#23
Senior Member

Join Date: Aug 2005
Location: Las Vegas, NV
Posts: 932
Bikes: '04 LeMond Buenos Aires, '82 Bianchi Nuova Racing, De Rosa SLX, Bridgestone MB-1, Guerciotti TSX, Torpado Aelle, LeMond Tourmalet 853, Bridgestone Radac
Mentioned: 1 Post(s)
Tagged: 0 Thread(s)
Quoted: 101 Post(s)
Liked 46 Times
in
36 Posts
I put TruVative bolts on all my cranks - 5mm on one side and 6mm on the other.

02-02-21, 09:00 PM
#24
Senior Member
Thread Starter
Join Date: Apr 2006
Location: Washington County, Vermont, USA
Posts: 3,778
Bikes: 1966 Dawes Double Blue, 1976 Raleigh Gran Sport, 1975 Raleigh Sprite 27, 1980 Univega Viva Sport, 1971 Gitane Tour de France, 1984 Lotus Classique, 1976 Motobecane Grand Record
Mentioned: 77 Post(s)
Tagged: 0 Thread(s)
Quoted: 765 Post(s)
Liked 660 Times
in
351 Posts
Only someone like me would know or care about this, but the hex-socket-on-both-sides chainring bolts are only available for double chainrings. No one makes a single-stack version, as far as I know. As it happens, you need to use a single-stack nut, a 4mm spacer, and a long chainring bolt to fasten a granny ring to a Red Clover Components triplizer. I'd switch from the slotted style to the socket version in minute, if I could.
__________________
www.redclovercomponents.com
"Progress might have been all right once, but it has gone on too long."
--Ogden Nash
www.redclovercomponents.com
"Progress might have been all right once, but it has gone on too long."
--Ogden Nash
02-03-21, 09:07 AM
#25
Senior member

Join Date: Oct 2004
Location: Oakville Ontario
Posts: 8,118
Mentioned: 25 Post(s)
Tagged: 0 Thread(s)
Quoted: 943 Post(s)
Liked 658 Times
in
371 Posts
A little dab of lapping compound works for this. Just enough grit to hold the nut from turning. I think I saw that suggestion on this forum some years ago, and I have some in the sharpening kit that came with my lawnmower so I gave it a try, and it works.