


Chinabomb Disc Brake Road Bike Build
 04-06-17, 09:55 AM
#126

Senior Member
Thread Starter

FWIW, I just did a quick test using the leftover piece of fork steerer I have and a spare stem. Prior to clamping, the ID of the tube measured 23.65mm perpendicular to the stem slot and 23.8mm parallel to the slot. After clamping with a reasonable torque, 23.65 became 23.7 and 23.8 became 23.6mm. So the steerer definitely ovalizes as it is clamped justifying the effort in my mind. My insert piece goes from being a slip fit to not fitting at all, prior to and after clamping respectively. Bonded in place, it should be offering just the support I expected it to.
 04-06-17, 10:54 AM
#127

Senior Member

Join Date: Dec 2009
Location: Houston, TX
Posts: 28,682
Bikes: 1990 Romic Reynolds 531 custom build, Merlin Works CR Ti custom build, super light Workswell 066 custom build
Mentioned: 109 Post(s)
Tagged: 1 Thread(s)
Quoted: 6556 Post(s)
Likes: 0
Liked 58 Times
in
36 Posts
If I reduce the height of my part down to 40mm from 60 to only support just the stem clamp area (which is more support than the Carbon-Ti unit offers) it would weigh 14 grams, too.
I don't use a cap because 1. I don't need one and 2. 4 grams is 4 grams and 3. I'm so vane that any benefits of using a cap are negated instantly by how ugly my stem area would look with the added height of a spacer and cap.
The screw/plug keeps water from getting down into the fork. Water can still collect in the depression in the top of my part. Had I originally planned to not use a cap I would have made that whole top surface flush, and will do so on any additional parts I produce.
04-06-17, 10:55 AM
#128
Senior Member
Join Date: Dec 2009
Location: Houston, TX
Posts: 28,682
Bikes: 1990 Romic Reynolds 531 custom build, Merlin Works CR Ti custom build, super light Workswell 066 custom build
Mentioned: 109 Post(s)
Tagged: 1 Thread(s)
Quoted: 6556 Post(s)
Likes: 0
Liked 58 Times
in
36 Posts
04-06-17, 11:08 AM
#130
Senior Member
Thread Starter

Further, due to the shape of the variety of top caps I have on hand, even if I removed the spacer after adjusting preload and used just the cap it would still sit a few millimeters above the stem due to the conical bottom of the cap interfering with the now smaller ID of my fork. I could take pictures if you really care to see to the issue in more detail. Suffice to say, I won't be adding a top cap any time soon.
04-06-17, 11:30 AM
#131
Senior Member
Thread Starter
If I was to produce something, this is the likely design:
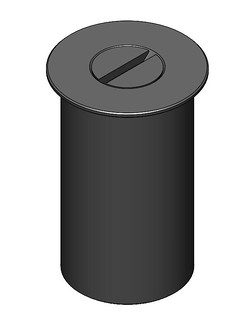
Sectioned:

13 grams as shown with plastic screw to plug the M6 hole and sized for a 23.5-23.8mm steerer tube ID. I'd have to figure out some of the most common size IDs to target which could be a bear...
Sectioned:
13 grams as shown with plastic screw to plug the M6 hole and sized for a 23.5-23.8mm steerer tube ID. I'd have to figure out some of the most common size IDs to target which could be a bear...
04-06-17, 11:37 AM
#132
staring at the mountains

Join Date: Mar 2005
Location: Castle Pines, CO
Posts: 4,560
Bikes: Obed GVR, Fairdale Goodship, Salsa Timberjack 29
Mentioned: 6 Post(s)
Tagged: 0 Thread(s)
Quoted: 394 Post(s)
Liked 197 Times
in
112 Posts
I'm happy to send you measurements I love the design and seems so simple....
I love the design and seems so simple....
04-06-17, 11:54 AM
#133
Senior Member
Join Date: Dec 2009
Location: Houston, TX
Posts: 28,682
Bikes: 1990 Romic Reynolds 531 custom build, Merlin Works CR Ti custom build, super light Workswell 066 custom build
Mentioned: 109 Post(s)
Tagged: 1 Thread(s)
Quoted: 6556 Post(s)
Likes: 0
Liked 58 Times
in
36 Posts
I stare at CAD models more hours per week than I sleep so it is hard for me to relate to how someone else might see something. It's perfectly clear to me
Because I wanted the steerer tube to extend to the top of the stem (which is the general recommendation for carbon steerer tubes), I had to use a spacer to create a gap between the top cap and top of the steerer tube so that the bearing preload could be adjusted. Without that gap, I would just be tightening the cap against the top of the steerer tube.
Further, due to the shape of the variety of top caps I have on hand, even if I removed the spacer after adjusting preload and used just the cap it would still sit a few millimeters above the stem due to the conical bottom of the cap interfering with the now smaller ID of my fork. I could take pictures if you really care to see to the issue in more detail. Suffice to say, I won't be adding a top cap any time soon.
Do you think the stem ovalizes the steerer with an expander in place?
04-06-17, 11:57 AM
#134
Senior Member
Thread Starter
1. It takes commitment. Once bonded in, there isn't any going back. If you know where you will be keeping your stem, or if, like me, you cut it as short as possible already, commitment isn't an issue.
2. You can't reuse it in another fork. Not really a big deal as most forks these days are matched to a frame so as long as the frame (or fork) isn't damaged, you'll be sticking with the same fork for the life of the frame and sell the two together if that time ever comes.
3. It isn't adjustable and, short of using a thicker epoxy to fill in the gaps, you need to make sure you buy the right size for your fork. I'm not sure how this will work with the general public who don't have calipers sitting next to them.
I'm willing to give it a go, regardless. I expect to be able to sell them for ~$15. If none of this sounds totally off-putting to you, send me your fork's measurements and I'll start doing my own additional research to try and nail down a spec, or two or three. and get some parts going.
04-06-17, 12:14 PM
#135
staring at the mountains
Join Date: Mar 2005
Location: Castle Pines, CO
Posts: 4,560
Bikes: Obed GVR, Fairdale Goodship, Salsa Timberjack 29
Mentioned: 6 Post(s)
Tagged: 0 Thread(s)
Quoted: 394 Post(s)
Liked 197 Times
in
112 Posts
I'm a spatial idiot at the moment -- I'm trying to think through how it works, and I'm not getting it. With it bonded to the steerer, what provides clamping force to preload the headset? I get how a top cap and expander/star nut applies clamping force to the top of the stem, but I'm not making the picture work in my head with this setup. I feel dum.
04-06-17, 12:24 PM
#136
Senior Member
Thread Starter
I don't know, but I do know that a tightly installed expander (tight enough that it doesn't slip) will deform (bulge) the steerer itself. Where the steerer isn't supported by the expander the stem still stands a chance of deforming it but I've never tried to measure that.
04-06-17, 12:27 PM
#137
Senior Member
Thread Starter
I'm a spatial idiot at the moment -- I'm trying to think through how it works, and I'm not getting it. With it bonded to the steerer, what provides clamping force to preload the headset? I get how a top cap and expander/star nut applies clamping force to the top of the stem, but I'm not making the picture work in my head with this setup. I feel dum.
04-06-17, 12:37 PM
#138
staring at the mountains
Join Date: Mar 2005
Location: Castle Pines, CO
Posts: 4,560
Bikes: Obed GVR, Fairdale Goodship, Salsa Timberjack 29
Mentioned: 6 Post(s)
Tagged: 0 Thread(s)
Quoted: 394 Post(s)
Liked 197 Times
in
112 Posts
It's ok. I haven't provided a clear picture of the full story. In order to apply preload to the bearings, you still need to use a top cap, bolt, and spacer. The spacer goes on first, held concentric to the steerer by the small protruding flange of the insert, giving some clearance between the top cap and top of insert (5mm spacer will do, or anything thicker). Then you add the top cap and bolt, screwing the bolt into the insert. Tighten until satisfied with preload, clamp stem in place, then remove top cap, bolt, and spacer. Install small plastic screw to plug the hole.
Thanks man,
04-06-17, 12:48 PM
#139
Senior Member
Thread Starter
I checked the two other carbon forks in my garage and found one measuring 23.4-23.5mm (close enough to fit the same insert design used on my Hongfu fork) and the other at 23.3mm, just slightly too small for the same design. Checking specs on the gap filling qualities of various Loctite products, it looks like I'd need to come within 0.5mm of the actual fork ID for optimal bonding, so likely 0.25mm increments for the inserts factoring in tolerances. So long as the total common range isn't too big (maybe 1.5mm tops, or 5 inserts), it still seems doable to me.
04-06-17, 12:58 PM
#141
Senior Member
Join Date: Dec 2009
Location: Houston, TX
Posts: 28,682
Bikes: 1990 Romic Reynolds 531 custom build, Merlin Works CR Ti custom build, super light Workswell 066 custom build
Mentioned: 109 Post(s)
Tagged: 1 Thread(s)
Quoted: 6556 Post(s)
Likes: 0
Liked 58 Times
in
36 Posts
Of course they could. With lightest possible weight and my idea of a nice aesthetic in mind, the top cap and spacer must go!
I checked the two other carbon forks in my garage and found one measuring 23.4-23.5mm (close enough to fit the same insert design used on my Hongfu fork) and the other at 23.3mm, just slightly too small for the same design. Checking specs on the gap filling qualities of various Loctite products, it looks like I'd need to come within 0.5mm of the actual fork ID for optimal bonding, so likely 0.25mm increments for the inserts factoring in tolerances. So long as the total common range isn't too big (maybe 1.5mm tops, or 5 inserts), it still seems doable to me.
I checked the two other carbon forks in my garage and found one measuring 23.4-23.5mm (close enough to fit the same insert design used on my Hongfu fork) and the other at 23.3mm, just slightly too small for the same design. Checking specs on the gap filling qualities of various Loctite products, it looks like I'd need to come within 0.5mm of the actual fork ID for optimal bonding, so likely 0.25mm increments for the inserts factoring in tolerances. So long as the total common range isn't too big (maybe 1.5mm tops, or 5 inserts), it still seems doable to me.
04-06-17, 01:21 PM
#142
Senior Member

Join Date: Oct 2015
Posts: 15,483
Bikes: 2015 Workswell 066, 2017 Workswell 093, 2014 Dawes Sheila, 1983 Cannondale 500, 1984 Raleigh Olympian, 2007 Cannondale Rize 4, 2017 Fuji Sportif 1 LE
Mentioned: 144 Post(s)
Tagged: 0 Thread(s)
Quoted: 7649 Post(s)
Liked 3,469 Times
in
1,832 Posts
What I keep thinking is that the 14-gram plug Mr. Penmanparker uses cost like $40 and I bet with shipping the other method would cost the same. The old adage about picking two ....
04-06-17, 01:29 PM
#143
Senior Member
Thread Starter
I like what you did a lot, but I think that mass producing it could be problematic. If the insert is at the lower end of the diameter tolerance, then you would be depending upon the Loctite to not compress in a way that would allow ovalization of the steerer. My experience with Loctite green for bottom brackets is that is cures to a slightly soft state, not a rigid one. Is the 648 similar? So anything more than a very thin film might allow distortion of the steerer, which you are trying to avoid by your method. Maybe something like JB Weld would work better since it cures up hard. I don't think you are ever going to get the insert out anyway, so a permanent installation isn't really an issue. Besides if you need to cut off a little more steerer, the insert wouldn't really hinder that. You would just lose the decorative top edge.
Further, don't confuse the apparent softness of the cured Loctite with it being compressible. Even thick, soft rubber doesn't compress unless given somewhere to flow. At the gaps we're talking about (0.15mm per side) and the shear strength of the compound, the Loctite isn't going anywhere under compression, at least not the level that an unsupported steerer tube will give. If someone only had an epoxy like JB Weld on hand, or if they knew they had an oddball steerer yielding big gaps to the largest insert, I agree that it would work as an alternative. There is also Loctite 660 for situations where JB Weld is too thick but 648/609/641 is too thin.
Because the insert is hollow, if you cut much of anything off the top you'll no longer have a functional threaded section (at least with my proposed latest design intended for use without a top cap, the original would allow a fair amount of future adjustment). You could still drive in a 1" star fangled nut, though, to save the fork. Or rig up an internal bearing puller to yank the rest of the insert out. But, like I said, ideally you are the committed type and not concerned with ever having to remove this piece.
04-06-17, 01:39 PM
#144
Senior Member
Thread Starter
04-06-17, 02:01 PM
#145
Senior Member
Join Date: Oct 2015
Posts: 15,483
Bikes: 2015 Workswell 066, 2017 Workswell 093, 2014 Dawes Sheila, 1983 Cannondale 500, 1984 Raleigh Olympian, 2007 Cannondale Rize 4, 2017 Fuji Sportif 1 LE
Mentioned: 144 Post(s)
Tagged: 0 Thread(s)
Quoted: 7649 Post(s)
Liked 3,469 Times
in
1,832 Posts
Yes .... the Joejack method. A regular and heavy compression fitting is probably pretty cheap.
04-06-17, 03:38 PM
#146
Senior Member
Join Date: Dec 2009
Location: Houston, TX
Posts: 28,682
Bikes: 1990 Romic Reynolds 531 custom build, Merlin Works CR Ti custom build, super light Workswell 066 custom build
Mentioned: 109 Post(s)
Tagged: 1 Thread(s)
Quoted: 6556 Post(s)
Likes: 0
Liked 58 Times
in
36 Posts
$27 from Fairwheel.
04-06-17, 03:43 PM
#147
Senior Member
Join Date: Dec 2009
Location: Houston, TX
Posts: 28,682
Bikes: 1990 Romic Reynolds 531 custom build, Merlin Works CR Ti custom build, super light Workswell 066 custom build
Mentioned: 109 Post(s)
Tagged: 1 Thread(s)
Quoted: 6556 Post(s)
Likes: 0
Liked 58 Times
in
36 Posts
Hmm, to get started manufacturing I think 3D metal printing would be perfect. Probably not any slower than a CAM mill.
04-06-17, 04:13 PM
#148
Senior Member
Join Date: Oct 2015
Posts: 15,483
Bikes: 2015 Workswell 066, 2017 Workswell 093, 2014 Dawes Sheila, 1983 Cannondale 500, 1984 Raleigh Olympian, 2007 Cannondale Rize 4, 2017 Fuji Sportif 1 LE
Mentioned: 144 Post(s)
Tagged: 0 Thread(s)
Quoted: 7649 Post(s)
Liked 3,469 Times
in
1,832 Posts
yeah, well ... I was "between jobs" (or is it "exploring my employment options") when you posted the link, and at the time that was a huge chunk of change to drop the number of grams. Now I can afford to waste money again ... a little at least ... so cheap stuff that will have no real physical effect but give me a psychological boost suddenly "makes sense" in an extremely twisted sense of the phrase.
04-06-17, 06:26 PM
#149
Senior Member
Thread Starter
Did you all miss where I said $15 earlier? Pre-order now
 04-06-17, 07:27 PM
#150
Senior Member
Join Date: Oct 2015
Posts: 15,483
Bikes: 2015 Workswell 066, 2017 Workswell 093, 2014 Dawes Sheila, 1983 Cannondale 500, 1984 Raleigh Olympian, 2007 Cannondale Rize 4, 2017 Fuji Sportif 1 LE
Mentioned: 144 Post(s)
Tagged: 0 Thread(s)
Quoted: 7649 Post(s)
Liked 3,469 Times
in
1,832 Posts
How much would one cost to fit a Workswell 066?---Also, will you engrave your name into it? 20 years form now maybe an original 1st-generation JoeJack tubestuffer will be worth some serious bucks.