


Make your own panniers
 10-14-20, 11:02 PM
#26
Senior Member


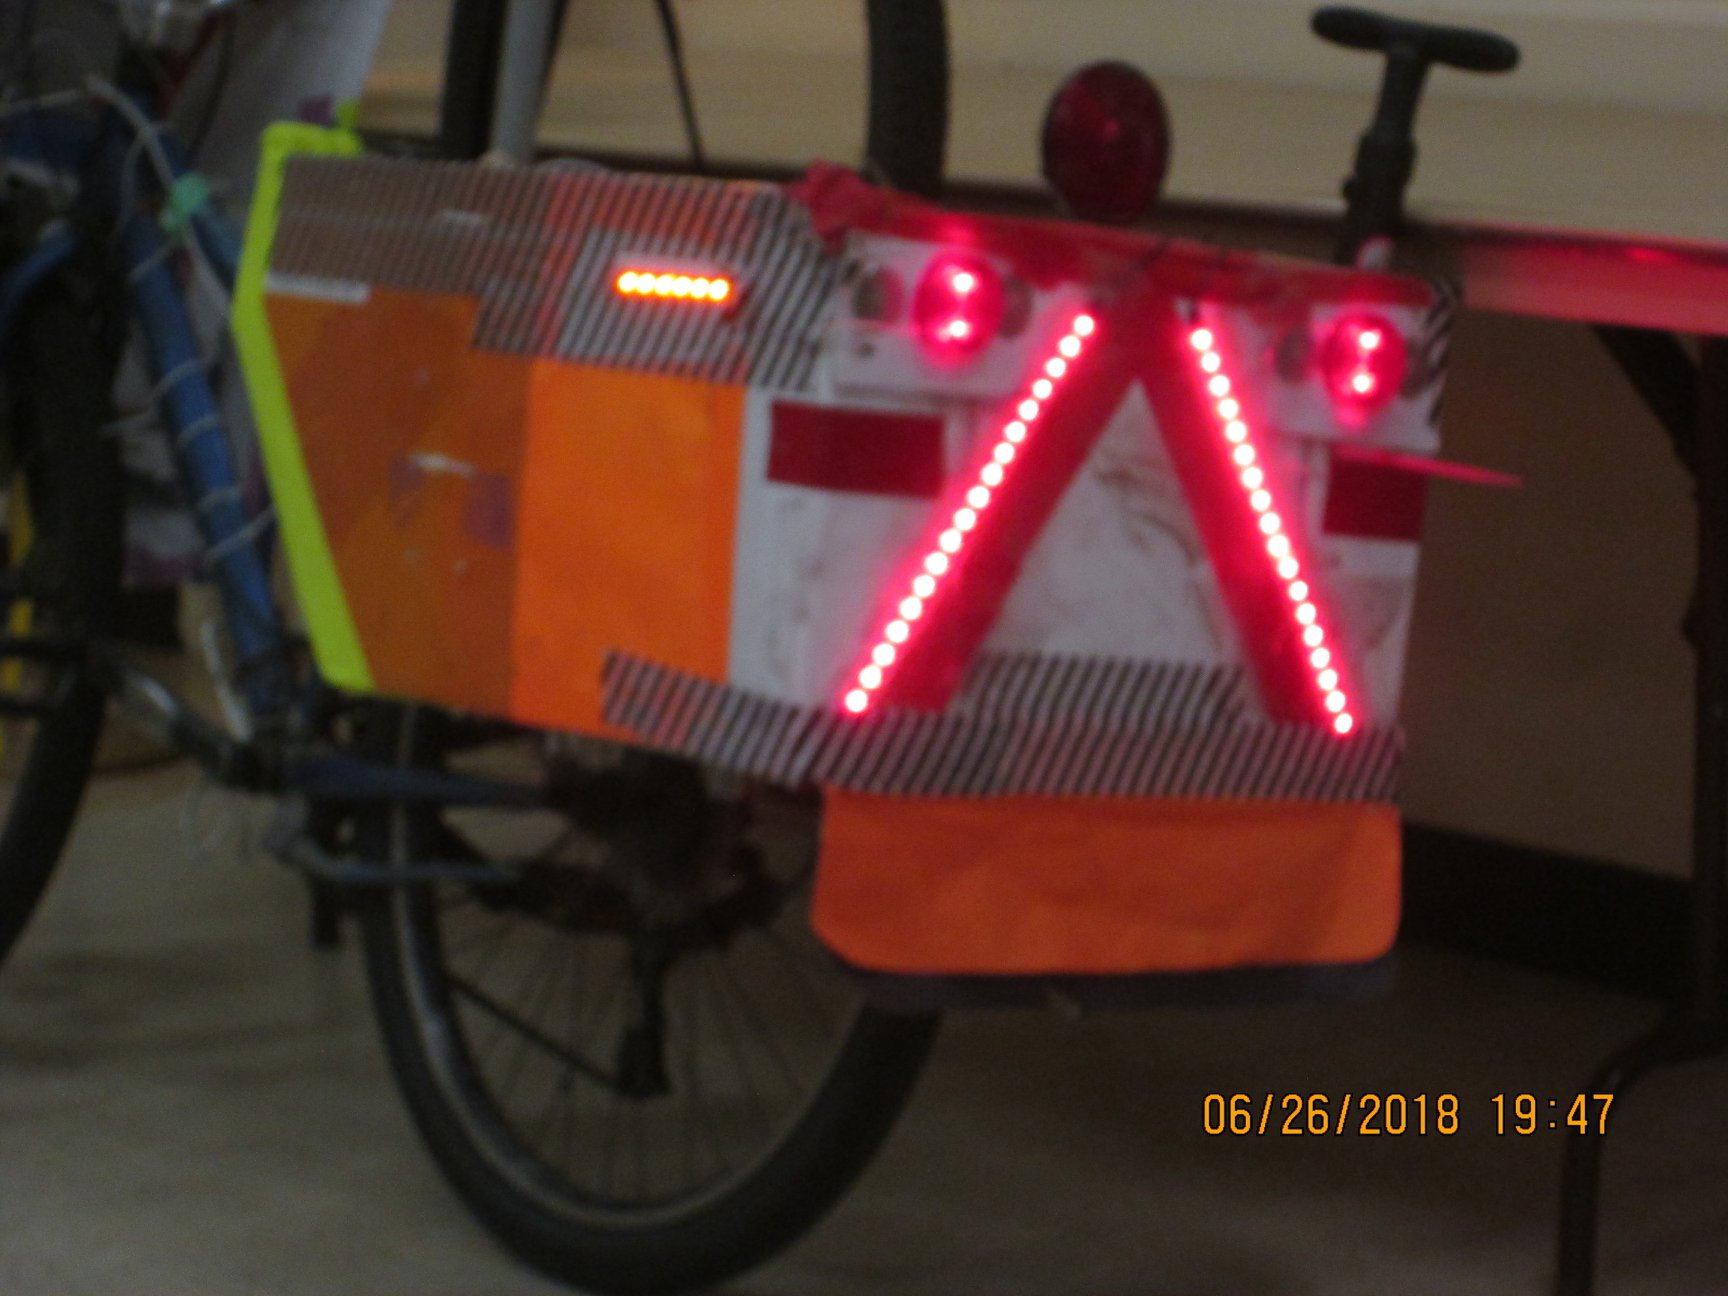
These Coroplast rear panniers are 24 inches long, 19 inches wide at the front, tapering to 16 inches wide at the rear, & 16 inches deep, although only 12 inches below the height of the rack, with a 4 inch gunwale above rack height.

This bike received the older panniers, they were still in perfect condition.
I hope you can see the area left cambered back to avoid heel strike. The newer panniers have a better design that doesn�t need to be covered in duct tape. I learn from my mistakes, I hope by documenting my work, others can too.

Likes For hotbike:
10-18-20, 03:56 AM
#27
Newbie
Join Date: Aug 2020
Posts: 63
Mentioned: 1 Post(s)
Tagged: 0 Thread(s)
Quoted: 20 Post(s)
Likes: 0
Liked 13 Times
in
10 Posts
Not so much making panniers, I just found (trash) a pl�stic bin that seemed fit to the purpose so i took it home and attached it to my rack.. I directly screwed it through with the rack screws, and works good.. I left JUST enough clearance to pedal, but I would like an inch or two more.. The problem is that positioning it towards the back of the rack, I fear the long bin flexing and touching the wheel, because my rack is not the Best for panniers.. (was from a Child seat actually), i might have to buy a better rack. So far is not flexing at all and i dont think another inch back would be a problem.. So I might reset it.. Same with hight, i would rather to keep the gravitiy center low, but maybe an inch up won't make a difference... İt has a nice sice and it's gonna b� my outdoor painting studio cargo!!. Now I'm modifying my daughter's unwanted m�ssanger bag to be able to h

ung from the other side.. I might just buy ortlieb hardware if I don't figure a better system... Anyway... Looks cool in matching color!
ung from the other side.. I might just buy ortlieb hardware if I don't figure a better system... Anyway... Looks cool in matching color!


 10-18-20, 04:24 AM
#30
Senior Member
Heel strike is a major issue with homemade panniers. Everything looks fine and dandy in the shop, until the first test ride and it strikes your Achilles� tendon , ouch.
My experience is limited, I haven�t built more than a dozen pannier sets. I say �sets� because I make the two panniers in one piece to straddle the rear rack. But I try to make improvements each time. My pannier building knowledge is based on my earlier experience building fairings. More on that later.
12 Volt LED Lighting System
I�ve found that with Coroplast, the panniers can extend past the rear wheel , on the inherent rigidity of the corrugated boards, and a Slow Moving Vehicle sign can be mounted.

Plan of the new Model 791R Tailbox
September 2020, I built a Tailbox, which my recumbent friends have been telling me to do. But I decided to make the bottom straddle the rack, the same way as my other pannier sets.
The pannier wells on each side are only 7� seven inches below the top of the rack, which avoids the heel strike problem. The sides are 14� fourteen inches higher than the top of the rack, for a total depth of 21� .
My experience is limited, I haven�t built more than a dozen pannier sets. I say �sets� because I make the two panniers in one piece to straddle the rear rack. But I try to make improvements each time. My pannier building knowledge is based on my earlier experience building fairings. More on that later.
12 Volt LED Lighting System
I�ve found that with Coroplast, the panniers can extend past the rear wheel , on the inherent rigidity of the corrugated boards, and a Slow Moving Vehicle sign can be mounted.
Plan of the new Model 791R Tailbox
September 2020, I built a Tailbox, which my recumbent friends have been telling me to do. But I decided to make the bottom straddle the rack, the same way as my other pannier sets.
The pannier wells on each side are only 7� seven inches below the top of the rack, which avoids the heel strike problem. The sides are 14� fourteen inches higher than the top of the rack, for a total depth of 21� .
10-18-20, 05:30 AM
#31
Newbie
Join Date: Aug 2020
Posts: 63
Mentioned: 1 Post(s)
Tagged: 0 Thread(s)
Quoted: 20 Post(s)
Likes: 0
Liked 13 Times
in
10 Posts
I regret not having grabbed more of those bins, there were three at least, and they were part of some storage system that someone put on the trash.. İf i had a couple more i could experiment and cut the bottom c�rner in an angle and then place some strong cordura nylon, or vinyl, fixed with screws and bolts...fot my canvas carrying purpose the squared bottom is perfect, but to travel i would rather to have more clearance, with the angled corner..

Thread
Thread Starter
Forum
Replies
Last Post
iab
Classic and Vintage Bicycles: Whats it Worth? Appraisals.
13
08-18-19 02:47 PM
