Built up some bikes and put the distance on, but with the deadline approaching Saturday I'd better get to posting. I'll retrofit in the photos when I reach 10 posts.
Entering into the
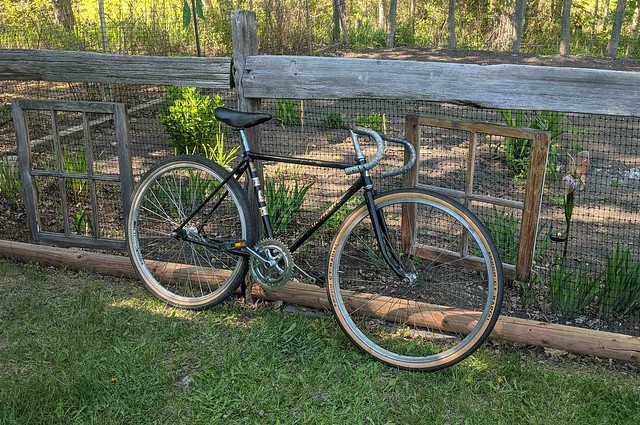
'greatest height differential between intended rider and current Clunkist' category, we've got a 1982 Venture Invader junior road bike.
 Close to as found. A little cleanup and a few things removed.
Entry fee was
$20. It's 46cm, so for somebody maybe about 5 ft. I'm a foot taller than that and ride 58cm bikes.
Heavy, cheap, most every part rusted. The 24" 540 tires are toast, the steel rims have deep pitting.
 Conveniently, since I don't have the two prong Suntour tool, the freewheel is so rusted that it comes off with just a chain whip.
I'd figured I'd be replacing wheels anyway, but the 540 rim size is a concern at first - I thought I'd be converting 520 -> 504 and gaining tire clearance. Fortunately the bike uses long reach brakes with a slack headtube angle, and a 26" x 1.5" tire fits without toe overlap. I've got a set of wheels and tires fished out of the recycling ready perfect for it
(+$0!).
Looks like it has potential to be a cool little bike with 26" slicks on. I start out with a pair of ambitious and conflicting goals that won't quite be reached during the challenge:
- goal 1: turn this thing into a proper little bike that's easy to learn to work on. Not 'nice' but functional, minimizing weird gotchas that distract from understanding how stuff works. It should fit bottle cages and a rack. It should fit standard parts that swap right out.
- goal 2: simultaneously, do everything in the hackiest way possible. Improvise tools for no good reason, experiment with bad ideas, rebuild stuff it makes no sense to rebuild, spend no money - embrace the true Clunker spirit.
I work in education and projects outside my comfort zone are useful to stay grounded. It's not the feeling for triumph in solving a problem I'm looking for this time, but the frustration, hesitation and uncertainty, the wasted time on stuff that won't work out, the instant-regret decisions that make it harder, and to sit with all that while trying to chart the path through. I spend a lot of time teaching mechanics as a co-op volunteer too and it's easy to forget that not everyone starts out having a good time when they first come round to those places. If it's frustration I'm after, this is a great bike for it - so here we go!
The 'downside' to my recycled rear wheel is that it's a freehub, and I don't get to see how far that old freewheel can go before cracking in half. Maybe on next year's clunker. It goes through rounds of rust remover and scraping for a few days anyway before eventually the cogs and locking cone come off, then into the miscellaneous pile awaiting the next misadventure.

I don't have the 16mm bottom bracket wrench and don't want to go into town to wreck the co-op's tool on a junk part, so I take off the left side with a hammer and punch.

The right's more stuck, and gets soaked in penetrating oil. With the spindle out, I can clamp an adjustable wrench to the fixed cup with a bolt & washers and hit that with the hammer, and as long as it's tight enough to not twist it works pretty well! I didn't succeed with the Sheldon Brown method of effectively locking a bolt to the cup. The approach that worked is like a trash heap version of the excellent Hozan tool.
Spend a while cleaning up the threads and then try to fit some cartridge bottom brackets
(out of the recycling & rebuilt - +$0!) that just won't go for a while before I figure out what the problem is. The tubes weren't mitered well and stick out into the shell, bumping into the bottom bracket's centre sleeve. Filed the tube extensions down a bit and now a cartridge goes in.

Made me realize that I've probably seen the issue before on a bike someone else had built where the bottom bracket ended up tilted. The older Shimano UN26 and especially UN51 are compact and don't seem fussy about this, but the other brands and new Shimano UN300 that use standard industrial bearings run out of room.
 Tucked away in the 'is this even useful to know...?' pile of information: a standard BSC cup will fit over the center sleeve of the discontinued UN26/UN51/.. style bottom brackets. All the other cartridge units I've seen have a larger outer sleeve.
This bike (like some other cheap bike boom models) has a 70mm BSC thread shell and ran the wider-shoulder 5S spindle, for a shell-end-to-right of about 29.5mm. A D-EL 127.5 bottom bracket has the same SER, so that keeps the chainline the same. Didn't do quite a good enough job fixing the tube mitering and the left cup won't fully seat, so I'll have to take this apart again and may face the shell, but not until after the challenge.
After a few days of testing rust remover on the old wheels and steel handlebars I give up on them entirely. The bars get replaced with another set of steel drops I've been meaning to get rid of. We've got wheels, cranks, and handlebars now, making this heavy lump of steel look an awful lot like a bike!