


Hints and tricks thread
 02-28-10, 10:32 AM
#251

50/50 Road/eBike Commuter

I just did the same thing to remove a BB. Nothing else worked before I used the heat gun. This is only the second time taking out a BB and both times it nearly killed me to get the damn thing out. Cranks have been tough too, but not as much as these BBs. Is it normal for these to be so hard to get out? Is there any problem with applying heat, as long as you make sure the cables don't get damaged?
I completely coated the threads with anti-sieze when I put it back in. Bike is only about 2 years old, but it is used in almost all conditions.
I did buy a fixed 1-1/4" wrench for my BB tool, but the 10" adjustable I was using was of good quality (Craftsman Professional). I was going to try the little trick of holding the tool with a QR skewer but the BB spindle isn't hollow. Maybe the 12" adjustable I just bought would have got the job done without needing the heat. The fixed wrench is considerably longer than the 10" adjustable. The 12" adjustable and the fixed wrench are about the same length.
Last edited by kmcrawford111; 02-28-10 at 10:39 AM.
 03-12-10, 06:28 PM
#252
I'm shovel-ready!

Join Date: Jan 2010
Location: Seattle, WA
Posts: 136
Bikes: Raleigh Sports All-Gold
Mentioned: 0 Post(s)
Tagged: 0 Thread(s)
Quoted: 1 Post(s)
Likes: 0
Liked 6 Times
in
5 Posts
Re: the hemostat-as-third-hand-tool tip from a couple of pages back. Actual surgical tools may be expensive and difficult to find. However, if you look around in the fishing area at your local sporting goods shop, you'll find a perfectly swell hemostat for sale, sold as a fish hook remover.
03-19-10, 07:42 PM
#253
Senior Member
Join Date: Dec 2009
Posts: 437
Bikes: late 80's bianchi campion d'italia, early 90's trek 2100, early 90's shogun selectra, mid 90's aluminum marin xcMTB, dept. store grade but upgraded columbia double eagle tandem
Mentioned: 0 Post(s)
Tagged: 0 Thread(s)
Quoted: 1 Post(s)
Likes: 0
Liked 0 Times
in
0 Posts
Buy an angle grinder If you are going to work on old bikes. no more "how do I get a siezed cotter pin out of the rusty crankset I'm replacing?" or "the seatpost clamp bolt is stripped, what do I do?" Just cut the S*it off and replace.
I just got mine yesterday (I've been meaning to buy one for a while, but the above mentioned cotter pin issue spurred me into action) It's Awesome! It turned out I also needed it to customize the new cotter pins to work with the "new" cranks and the french Spindle.
Also Rear derailleurs with cage pivot springs that are blown in a certain way so that the cage hangs loose but hold tension when rotated 360 counter clockwise can be used without issue by, well, rotating the cage 360 counterclockwise and then running your chain through it. it makes putting the wheel back on slightly more difficult but otherwise works flawlessly.
04-05-10, 05:39 PM
#254

Senior Member

Join Date: Aug 2009
Location: Berkeley, CA
Posts: 7,244
Bikes: '72 Cilo Pacer, '72 Gitane Gran Tourisme, '72 Peugeot PX10, '73 Speedwell Ti, '74 Peugeot UE-8, '75 Peugeot PR-10L, '80 Colnago Super, '85 De Rosa Pro, '86 Look Equipe 753, '86 Look KG86, '89 Parkpre Team, '90 Parkpre Team MTB, '90 Merlin
Mentioned: 87 Post(s)
Tagged: 0 Thread(s)
Quoted: 834 Post(s)
Liked 2,125 Times
in
554 Posts
In a pinch, a quick release skewer can be used in lieu of a tire iron. (Best to use a fairly flat skewer, not a knobby one such as the old Campy super record skewers.)
+1 to the use of a dollar bill to boot a split sidewall.
Having trouble getting your MTB grips on? Try just a little bit of hairspray or shaving cream on the handlebar. Provides a lubricate then becomes sticky to keep the grips in place.
Check the trash bins outside your local bike store. Mine often has a nice supply of lightly used tires.
Cloth ribbon on your tubulars separating from the rest of your tires? Re-attach with Fastack.
Brasso removes tubular tire glue.
 04-07-10, 08:20 PM
#255
Newbie
Join Date: Apr 2010
Posts: 2
Mentioned: 0 Post(s)
Tagged: 0 Thread(s)
Quoted: 0 Post(s)
Likes: 0
Liked 0 Times
in
0 Posts
im trying to buy a set of bars online and i am not sure of the measurements and wich one is the width. it says in the description: HANDLEBAR - �31.8 - 440MM. I am wondering if the widths is 31.8 cm or 44cm??? you can look at it here its in the description https://www.cycleslambert.com/sites/e...62898705114235
04-09-10, 08:10 PM
#256
Senior Member
Join Date: Jul 2006
Location: El Segundo, Ca.
Posts: 214
Bikes: '93 Performance R203, '83 Bianchi 980
Mentioned: 0 Post(s)
Tagged: 0 Thread(s)
Quoted: 0 Post(s)
Likes: 0
Liked 0 Times
in
0 Posts
don't use petolium based grease on o rings. if they are rubber, they will swell up.
use silicon gease.
use silicon gease.
05-07-10, 01:48 PM
#257
Senior Member

Join Date: Dec 2008
Location: Conroe, TX
Posts: 1,620
Mentioned: 11 Post(s)
Tagged: 0 Thread(s)
Quoted: 47 Post(s)
Likes: 0
Liked 29 Times
in
14 Posts
im trying to buy a set of bars online and i am not sure of the measurements and wich one is the width. it says in the description: HANDLEBAR - �31.8 - 440MM. I am wondering if the widths is 31.8 cm or 44cm??? you can look at it here its in the description https://www.cycleslambert.com/sites/e...62898705114235
05-13-10, 02:49 PM
#258
Senior Member
Join Date: Jul 2008
Location: Eau Claire, WI
Posts: 75
Bikes: 1997 Trek 2300
Mentioned: 0 Post(s)
Tagged: 0 Thread(s)
Quoted: 0 Post(s)
Likes: 0
Liked 0 Times
in
0 Posts
Forceps are the best way to get your brakes just...right.
A 30-sec internet search turned up a good pair for $12.50...bet you could turn up a better deal if you did a little searching and/or lived near a uni. They're so much better than "third-hand" brake tools that I've never priced (or owned) those, but I'll bet they're competitive.
The type needed resembles a locking pair of scissors with a "needle-nose-piers" gripper instead of twin blades. Basically, get the brakes (sidepulls is what comes to mind) to the exact place you want them, then squeeze the forceps onto the cable--it'll hold the desired setting as long as needed until you get the bolt tight. Same principle as a cable stop, but installs in 5% of the time.
IIRC, third-hand tools lock the brakes against the rims, so you have an additional adjustment to make...plus, locked brakes give no clue as to centering! (Plus, I'd imagine it could be pressed into use on a derailleur, as opposed to a typical brake tool.)
Obv. not a "must-have," but if you happen to be able to get a pair easy (maybe you're pre-med or somethin'), they're the best tool for the job.
Check Ebay, I bought about 40 pair for $20.00. Use them for fishing, bike repairs, gifts, and still have 15 to 20 pair left.
05-15-10, 08:24 PM
#259
Senior Member

Join Date: Dec 2009
Location: Melbourne, Oz
Posts: 9,545
Bikes: https://weightweenies.starbike.com/forum/viewtopic.php?f=10&t=152015&p=1404231
Mentioned: 15 Post(s)
Tagged: 0 Thread(s)
Quoted: 1528 Post(s)
Liked 718 Times
in
510 Posts
Instead of buying superfluous tools, you can learn to do your brakes without extra doodads.
Two hands is enough; it's only a little bit fiddly with the right technique.
Two hands is enough; it's only a little bit fiddly with the right technique.
05-19-10, 09:20 PM
#260
missing in action

Join Date: Nov 2007
Posts: 4,483
Mentioned: 0 Post(s)
Tagged: 0 Thread(s)
Quoted: 42 Post(s)
Liked 49 Times
in
29 Posts
I mentioned this in C&V and it was suggested that I share it here also: two improvised tools that I've gotten a lot of use from are an old-fashioned monkey wrench - works for headsets and bottom bracket fixed cups (and you can drive a nail with it too  )
)
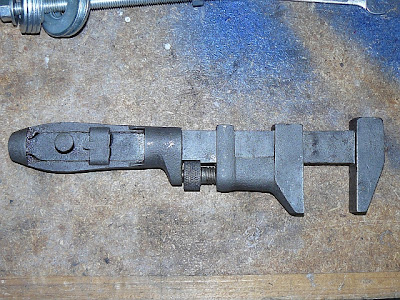
In the cases where the fixed cup has low profile flats (such as on the style of cups that are used on Raleigh Sports and similar,) I use my makeshift headset press to keep the wrench from slipping:

The other tool also serves a dual purpose - it's a set of channel lock pliers with a few of the teeth filed down to remove/install BB and cog lock rings. It doubles as a less-brutal way of removing the ball cup on Sturmey-Archer 3-speed hubs (most people use a hammer and chisel...)


I should point out that I saw the plier hack on velospace, all credit to that guy...
) In the cases where the fixed cup has low profile flats (such as on the style of cups that are used on Raleigh Sports and similar,) I use my makeshift headset press to keep the wrench from slipping:
The other tool also serves a dual purpose - it's a set of channel lock pliers with a few of the teeth filed down to remove/install BB and cog lock rings. It doubles as a less-brutal way of removing the ball cup on Sturmey-Archer 3-speed hubs (most people use a hammer and chisel...)
I should point out that I saw the plier hack on velospace, all credit to that guy...
05-23-10, 07:20 AM
#261
Member
Join Date: Apr 2010
Location: Fresno, CA
Posts: 39
Mentioned: 0 Post(s)
Tagged: 0 Thread(s)
Quoted: 0 Post(s)
Likes: 0
Liked 0 Times
in
0 Posts
For slow leaks:
If your bike has a flat, always check for a slow leak at the valve before removing the wheel. Put a little spit on your finger and wipe it on the end of the valve. Check if air hisses out.
Remove the faulty valve and put a drop of oil on the rubber gasket and reinstall the end of the valve.
Use the spit trick for Schrader valves to find a leak. See if a bubble forms. If it does, you�ll need to tighten the valve core.
Likes For nipsip:
05-26-10, 12:03 PM
#263
Newbie
Join Date: May 2010
Posts: 2
Mentioned: 0 Post(s)
Tagged: 0 Thread(s)
Quoted: 0 Post(s)
Likes: 0
Liked 1 Time
in
1 Post
I thought it would be a good thing to have a thread where people post and discuss little tricks they came up, during the course of their cycling and bike-repair experience.
One trick I have: I noticed that, no matter how good the rubber insulation on the battery lid of the cyclecomputer, in the Finnish wintery rains, at least a tiny little bit of water will make its way in, and cause a little bit of condensate inside. That might be just a cosmetic problem, or it could drain your battery's life, depending on the amount and place of condensation. This is even much more pronounced with bike lights, where the water can find much larger "holes" on the lid (much longer edge), and the insulation is usually worse than with cyclecomputers.
My solution is to put a little bit of lithium grease on the strategic places. Lithium grease is hydro-repellant and very stable. Together with the existing insulation, it will provide nearly 100% security against water infiltrations. Try to avoid getting it on the contacts with the cradle, even though it's not critical.
07-18-10, 12:46 PM
#264
Senior Member

Join Date: May 2010
Location: STL
Posts: 412
Bikes: trek 560, specialized langster, specialized stumpjumper, felt bmx, GT pro series
Mentioned: 0 Post(s)
Tagged: 0 Thread(s)
Quoted: 0 Post(s)
Likes: 0
Liked 0 Times
in
0 Posts
A sharpend spoke is a very handy tool for just about anything, put a 90* bend in it and it works well for removing things such bar plugs located in your bars and bearings that have rolled into the middle of your hub.
When un-bending your bent derailer hanger leave the derailer on so the threads don't get mishapen, then put an allen wrenh in the bolt, this gives you 2 levers to ebnd carefully with (wrench and derailer cage).
Your pedals and BB are opposite threads for each side to prevent forces of nature from ruining your bike, your crank arm bolts are not opposite threaded, that is why the forces uncrew your non-drive side crank arm...combat the forces with a large 8mm allen or 14mm socket.
Use tire levers to take off tires with flat tubes, use hands to put tires on with new tubes so you don't pinch.
When trying to remove stuck bottom brackets with the park tool and your favorite ratchet, if you can't keep the tool in the cup while cranking it, try taking the ratchet out and threading an old axle or piece of all-thread into your spindle, then putting a nut on the axle to hold the tool against the cup while you back it out with a large crescent wrench with BOTH hands.
If you can't get your chainline right and you don't want to use chainring spacers or put the chainring on the backside of the spider because thats just uncool and non-hipster like, try putting a BB lockring behind your cog to space it out a little more.
If you can't afford the fancy park tool that puts your star nut perfectly straight in your steerer tube, get it started all cadywhompus like then find a socket that has the same OD as your forks ID and use that to get it to sit level.
If you can't afford the fancy park tool to install bearing races on your fork, try putting the fork in a vice upside down and tightening the vice until its just barely touching the fork and you can still move the fork up and down, then tap the bottom of the steerer tube (where the fork legs attach) with a hammer to seat the bearing race. It will be pushed on from both saides at once so it will go on straight.
If you can't afford the fancy park tool to cut your steerer tube perfectly straight, a miter saw with a metal hacksaw blade will cut at a 90* angle, you can also use the miter saw to cut pieces of 1-1/4 PVC pipe to make spacers for your SS casette MTB hub instead of buying up your shop's whole supply of aluminum spacers for $2.50 each or buying a $20 SS spacer kit.
Why un-bend your frame when you can just re-dish your wheel?
Soda cans make great seatpost shims for fitting 27.0 seatposts into your 27.2 frame.
If your chain gets tight, then loose, then tight, then loose your chainring is probably bent. Find the tightest spot on the rotation, loosen all chainring bolts half a turn, hit the front of your chainring with a large hammer a couple times, tighten all chainring ring bolts, repeat.
Tighten 'til it gets loose then back it off a quarter turn...
-Connor
07-20-10, 07:16 PM
#265
buy Acme anvils
Join Date: Sep 2005
Location: cny
Posts: 68
Bikes: 1935 Hawthorne, 1998 Jamis hardtail(s), 2005 bikesdirect sprintour.
Mentioned: 0 Post(s)
Tagged: 0 Thread(s)
Quoted: 0 Post(s)
Likes: 0
Liked 0 Times
in
0 Posts
(connor:tnx 4 de shim tip, i have a thompson elite 26.8, old skool jamis dragon which i later found is 27mm, and a carbonated drink)
Don't throw out that old frame pump with the dongle. The threading on schrader valves is impossible to find in plumbing fittings (.271-32, yeah ok), plus you have to depress the valve anyway. The other end is usually I think 10-24 threaded, so you can adapt that to a 1/4" pipe thread and go to town with your pressure regulated shop air setup (or beer CO2 like me) or cut the hose and adapt with a barb fitting. I am not a fan of lever lock or traditional air chuck, when the tube is flat the stem goes right thru the rim! Got presta? Buy the brass thread adapters.
Don't throw out that old frame pump with the dongle. The threading on schrader valves is impossible to find in plumbing fittings (.271-32, yeah ok), plus you have to depress the valve anyway. The other end is usually I think 10-24 threaded, so you can adapt that to a 1/4" pipe thread and go to town with your pressure regulated shop air setup (or beer CO2 like me) or cut the hose and adapt with a barb fitting. I am not a fan of lever lock or traditional air chuck, when the tube is flat the stem goes right thru the rim! Got presta? Buy the brass thread adapters.
08-13-10, 11:17 AM
#266
Peripheral Visionary

Join Date: Oct 2008
Location: Jax, FL
Posts: 1,157
Mentioned: 0 Post(s)
Tagged: 0 Thread(s)
Quoted: 0 Post(s)
Likes: 0
Liked 5 Times
in
5 Posts
So you have nice wheels drilled for schrader valves but you want to put in presta tubes. Maybe like me, you tried to put it into schrader hole and ruined 2 perfectly good tubes.
You cut out a small piece of aluminum or any hard material that will fit on the internal bottom of the rim. As thick as possible for safety.
You drill presta size hole into it and put it over the valve hole and some electrical tape over it to hold it in place.
I know it seems like a finicky way to do it, but it has worked for me for over a year.
08-14-10, 01:10 AM
#267
Senior Member
Join Date: May 2010
Location: STL
Posts: 412
Bikes: trek 560, specialized langster, specialized stumpjumper, felt bmx, GT pro series
Mentioned: 0 Post(s)
Tagged: 0 Thread(s)
Quoted: 0 Post(s)
Likes: 0
Liked 0 Times
in
0 Posts
or buy one of these at any bike shop for $1.99...sorry for ****ting on your parade

-Connor
-Connor
08-16-10, 07:28 AM
#268
Peripheral Visionary
Join Date: Oct 2008
Location: Jax, FL
Posts: 1,157
Mentioned: 0 Post(s)
Tagged: 0 Thread(s)
Quoted: 0 Post(s)
Likes: 0
Liked 5 Times
in
5 Posts
^^^^
I thought we were discussing tricks people come up with. Sure I can go to the store and buy it.
Schrader>Presta adopter $1.99, Arizona tea $.99......... Coming up with tricks that work > "priceless"
My parade is just fine.
I thought we were discussing tricks people come up with. Sure I can go to the store and buy it.
Schrader>Presta adopter $1.99, Arizona tea $.99......... Coming up with tricks that work > "priceless"
My parade is just fine.
09-01-10, 10:42 AM
#271
Junior Member
Join Date: Aug 2010
Posts: 6
Mentioned: 0 Post(s)
Tagged: 0 Thread(s)
Quoted: 0 Post(s)
Likes: 0
Liked 0 Times
in
0 Posts
My solution for chain tensioner in my tandem is to use a rear derailleur, some welding though, but it can be aligned with the small screw


Building/converting a singlespeed, but have vertical dropouts and no chain tensioner? Use an old rear derailer/derailleur, it'll work great! Not only does it have really good springs and pulleys (generally much better than separately buyable chain tensioners) and is MUCH cheaper than a separate chain tensioner, even if bought new, but a derailer has the most comfortable way of adjusting the chainline - just adjust the H limit screw!
The only drawback is that a derailer is usually heavier than a chain tensioner, but you can always get rid or a few little parts on the derailer, to make it a bit lighter.
The only drawback is that a derailer is usually heavier than a chain tensioner, but you can always get rid or a few little parts on the derailer, to make it a bit lighter.
09-06-10, 09:14 PM
#272
Member
Join Date: Jul 2010
Location: Na Klang, Thailand
Posts: 29
Bikes: Alloy Mountain Bike
Mentioned: 0 Post(s)
Tagged: 0 Thread(s)
Quoted: 0 Post(s)
Likes: 0
Liked 0 Times
in
0 Posts
Keeping grit out of your d�railleur jockey wheel bearings.
I was finding that when I took my d�railleur apart for cleaning, the jockey wheels in the cage always had a small amount of grit in the sleeve bearings, causing them to bind slightly.
I have overcome this problem by using oil in the bearing sleeve, but before re-assembling the small metal cups on either side, I fill the cups with waterproof grease.
This effectively seals out any contaminants and even after riding on a dusty road the jockey wheels still spin smoothly.
Regards,
Roger
 09-13-10, 02:19 PM
#274
Junior Member

Join Date: Aug 2010
Location: Pannonia
Posts: 22
Bikes: SCOTT Tampico
Mentioned: 0 Post(s)
Tagged: 0 Thread(s)
Quoted: 0 Post(s)
Likes: 0
Liked 0 Times
in
0 Posts
Hi all, I just got this tip today and it seems very plausible to me and I'll try it as soon as I get home for the weekend. It's about lubing the chain but you have to remove it from your bike. Take a large container, cut a ketchup bottle for example or anything you can fit your chain inside. Put some general purpose lithium grease in it and heat it up with a heat gun so it starts to flow. Then dip your chain in and let the lube solidify. You could probably throw everything in all at the same time, but to prevent chain from overheating and possibly heattreating in a bad manner, first get the lube flowing, then dip the chain. Non-EP lithium flows very quickly, if you leave it out in a hot sun it will eventually flow too.
09-14-10, 06:22 AM
#275
Bicycle Repairman
This is a trick I use on old derailleur equipped Chicago Schwinns with the candy color paint that is impossible to touch up.
Some stores that sell fishing tackle offer flashy adhesive tape in 1/2" widths for dressing up spinners and other lures. This stuff is available in many colors and patterns. It can be trimmed to make a nice chainstay protector or cover up chips in the paint from years of chain slap.
There are some pictures on this site:
https://www.jannsnetcraft.com/reflect...es/309100.aspx