


Frame Repair Question: 1985 Nishiki Riviera GT
 09-20-22, 11:46 AM
#1
Newbie
Thread Starter
Join Date: Sep 2022
Posts: 18
Mentioned: 0 Post(s)
Tagged: 0 Thread(s)
Quoted: 12 Post(s)
Likes: 0
Liked 2 Times
in
2 Posts
Frame Repair Question: 1985 Nishiki Riviera GT
Acting on the advice of others on another part of this forum, I am posting this question here:After 30 years of day to day use and multiple loaded tours in 12 states and 9 foreign countries, the down tube on my 1985 Nishiki Riviera GT frame broke.
The break is about 2 inches below where the double-butted steel down tube joins the head tube, just below the lug that holds those two tubes together.
The rest of the frame appears to be solid.
Is this break repairable?
I have seen suggestions that a sleeve can be brazed over the break as the cheapest way to bring this bike back into use. Does anyone have any experience with this sort of repair?
Otherwise, the alternatives are much more expensive, from what I've gathered, including replacing the down tube. Your thoughts?
 09-20-22, 11:56 AM
#2

Senior Member

Join Date: Jul 2006
Location: San Jose (Willow Glen) Ca
Posts: 9,834
Bikes: Kirk Custom JK Special, '84 Team Miyata,(dura ace old school) 80?? SR Semi-Pro 600 Arabesque
Mentioned: 106 Post(s)
Tagged: 0 Thread(s)
Quoted: 2337 Post(s)
Liked 2,811 Times
in
1,535 Posts
Acting on the advice of others on another part of this forum, I am posting this question here:After 30 years of day to day use and multiple loaded tours in 12 states and 9 foreign countries, the down tube on my 1985 Nishiki Riviera GT frame broke.
The break is about 2 inches below where the double-butted steel down tube joins the head tube, just below the lug that holds those two tubes together.
The rest of the frame appears to be solid.
Is this break repairable?
I have seen suggestions that a sleeve can be brazed over the break as the cheapest way to bring this bike back into use. Does anyone have any experience with this sort of repair?
Otherwise, the alternatives are much more expensive, from what I've gathered, including replacing the down tube. Your thoughts?
The break is about 2 inches below where the double-butted steel down tube joins the head tube, just below the lug that holds those two tubes together.
The rest of the frame appears to be solid.
Is this break repairable?
I have seen suggestions that a sleeve can be brazed over the break as the cheapest way to bring this bike back into use. Does anyone have any experience with this sort of repair?
Otherwise, the alternatives are much more expensive, from what I've gathered, including replacing the down tube. Your thoughts?
suggest asking mods to move
__________________
Life is too short not to ride the best bike you have, as much as you can
(looking for Torpado Super light frame/fork or for Raleigh International frame fork 58cm)
Life is too short not to ride the best bike you have, as much as you can
(looking for Torpado Super light frame/fork or for Raleigh International frame fork 58cm)
Likes For squirtdad:
09-20-22, 12:02 PM
#3

Senior Member
Join Date: Oct 2005
Location: Upper Left, USA
Posts: 1,915
Mentioned: 50 Post(s)
Tagged: 0 Thread(s)
Quoted: 634 Post(s)
Liked 444 Times
in
298 Posts
Acting on the advice of others on another part of this forum, I am posting this question here:After 30 years of day to day use and multiple loaded tours in 12 states and 9 foreign countries, the down tube on my 1985 Nishiki Riviera GT frame broke.
The break is about 2 inches below where the double-butted steel down tube joins the head tube, just below the lug that holds those two tubes together.
The rest of the frame appears to be solid.
Is this break repairable?
I have seen suggestions that a sleeve can be brazed over the break as the cheapest way to bring this bike back into use. Does anyone have any experience with this sort of repair?
Otherwise, the alternatives are much more expensive, from what I've gathered, including replacing the down tube. Your thoughts?
The break is about 2 inches below where the double-butted steel down tube joins the head tube, just below the lug that holds those two tubes together.
The rest of the frame appears to be solid.
Is this break repairable?
I have seen suggestions that a sleeve can be brazed over the break as the cheapest way to bring this bike back into use. Does anyone have any experience with this sort of repair?
Otherwise, the alternatives are much more expensive, from what I've gathered, including replacing the down tube. Your thoughts?
Likes For tricky:
09-21-22, 12:35 PM
#4
feros ferio

Join Date: Jul 2000
Location: www.ci.encinitas.ca.us
Posts: 21,793
Bikes: 1959 Capo Modell Campagnolo; 1960 Capo Sieger (2); 1962 Carlton Franco Suisse; 1970 Peugeot UO-8; 1982 Bianchi Campione d'Italia; 1988 Schwinn Project KOM-10;
Mentioned: 44 Post(s)
Tagged: 0 Thread(s)
Quoted: 1390 Post(s)
Liked 1,322 Times
in
835 Posts
Yours is a very common failure (high-stress) point. My first Capo frame broke there.
My Nishiki Competition failed when the seat tube lug broke away from the bottom bracket shell.
My other Peugeot UO-8 failed between the chainring and tire clearance dimples on the chainstay.
My Nishiki Competition failed when the seat tube lug broke away from the bottom bracket shell.
My other Peugeot UO-8 failed between the chainring and tire clearance dimples on the chainstay.
__________________
"Far and away the best prize that life offers is the chance to work hard at work worth doing." --Theodore Roosevelt
Capo: 1959 Modell Campagnolo, S/N 40324; 1960 Sieger (2), S/N 42624, 42597
Carlton: 1962 Franco Suisse, S/N K7911
Peugeot: 1970 UO-8, S/N 0010468
Bianchi: 1982 Campione d'Italia, S/N 1.M9914
Schwinn: 1988 Project KOM-10, S/N F804069
09-21-22, 08:04 PM
#5
framebuilder
Using a sleeve (or more accurately 2 half sleeves) makes a lot of sense for ease of repair and causes less damage to the surrounding areas than replacing the whole tube. The biggest problem might be one not liking the final looks. However it is possible to shape the sleeves in a variety of ways to make it aesthetically more pleasing. This shaping (if done right) helps distribute the stress.
Here is a sleeve repair on a Santana that I did after the down tube broke where the triple cable stop was located. Since the OP is not asking how the repair was done, I'm just showing the results. I believe this makes a stronger and better repair than replacing the whole tube - especially because the triple cable stop is located on the sleeve near where the butting transition is likely to be located.

this is the sleeve shape attached to the tube it will be cut out of
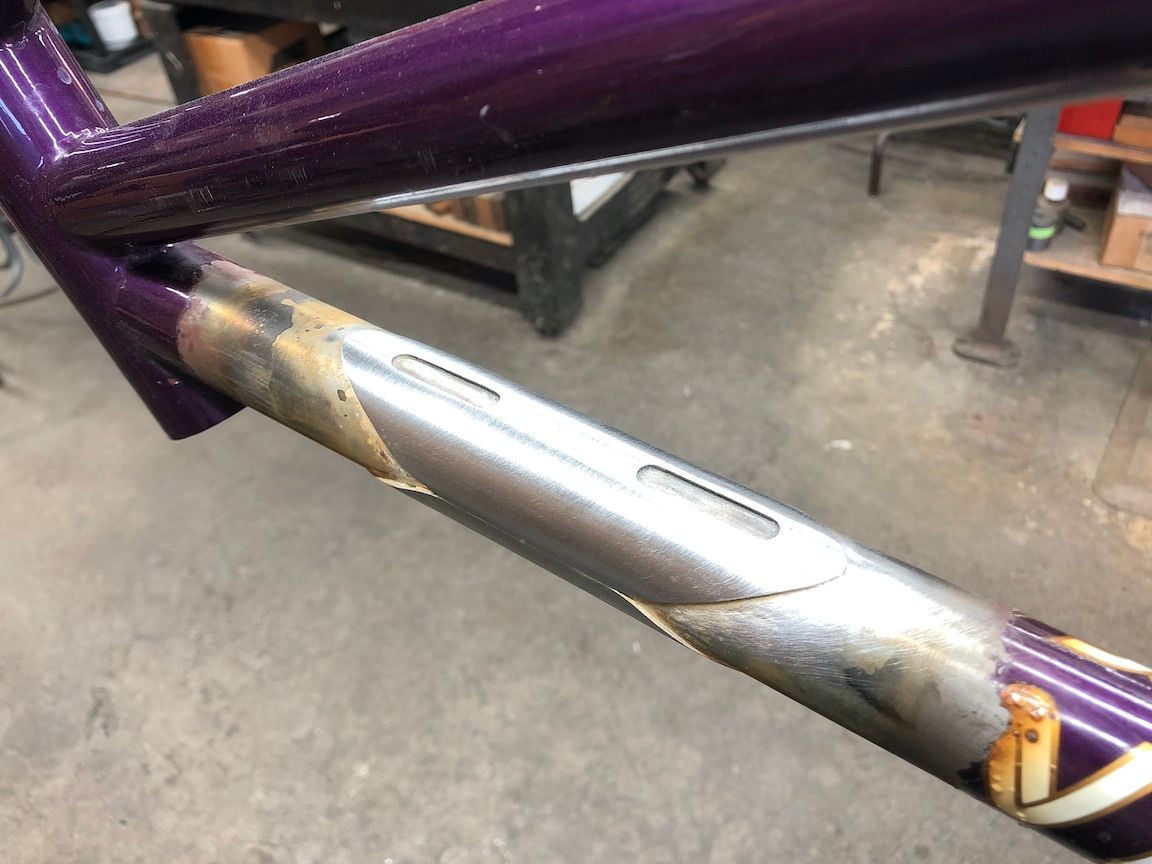
the 2 half sleeves brazed onto the tandem
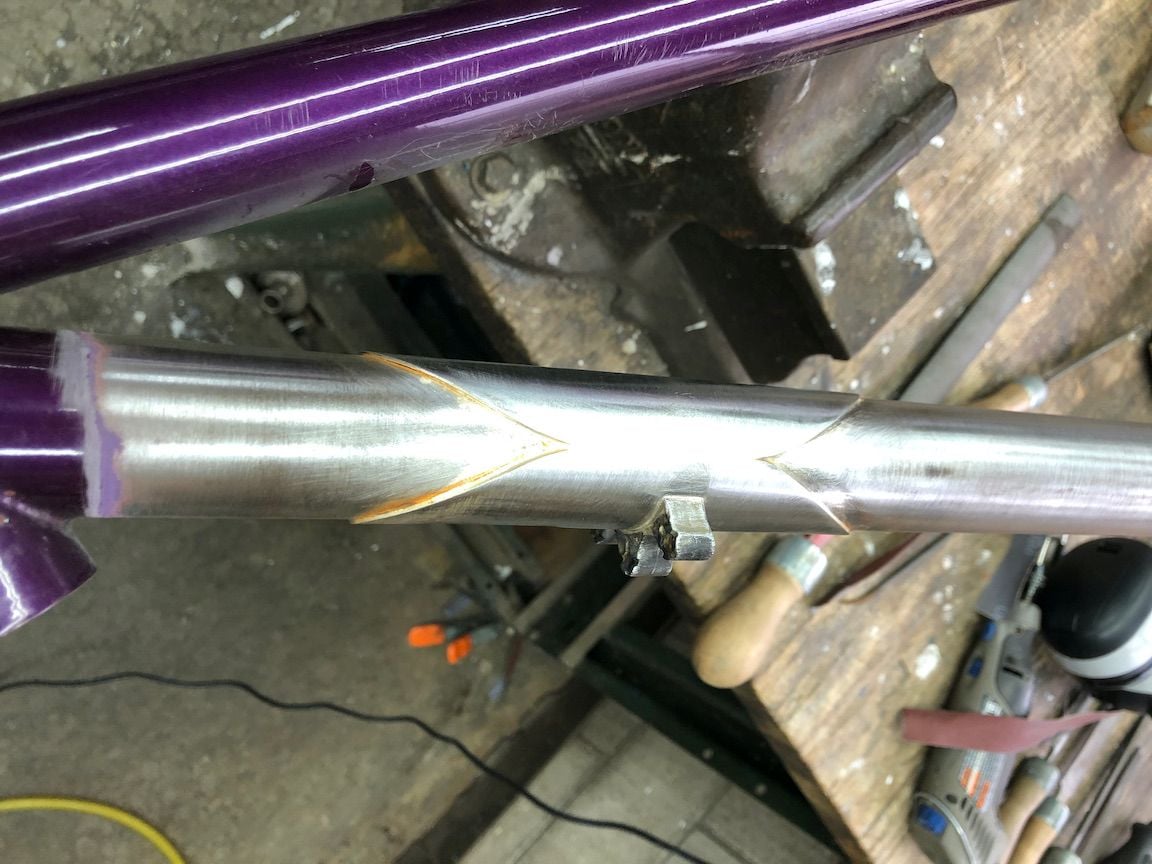
adding the triple stop braze on that caused the tube to originally break
painting just the damaged area with a similar color
Here is a sleeve repair on a Santana that I did after the down tube broke where the triple cable stop was located. Since the OP is not asking how the repair was done, I'm just showing the results. I believe this makes a stronger and better repair than replacing the whole tube - especially because the triple cable stop is located on the sleeve near where the butting transition is likely to be located.
this is the sleeve shape attached to the tube it will be cut out of
the 2 half sleeves brazed onto the tandem
adding the triple stop braze on that caused the tube to originally break
painting just the damaged area with a similar color
09-21-22, 10:36 PM
#6
Senior Member
Join Date: Jun 2006
Posts: 20,305
Mentioned: 130 Post(s)
Tagged: 0 Thread(s)
Quoted: 3464 Post(s)
Liked 2,827 Times
in
1,995 Posts
Agreed on asking the framebuilders forum regarding that sleeve fix. I've mostly heard about tube replacement in this case but maybe a sleeve is legit? For reference re: tube replacement, here is Bilenky's price list. They quote $300 (plus shipping) for downtube replacement. https://www.bilenky.com/featured Prices will vary with other framebuilders and you can save shipping costs by going with a local builder but that gives you an idea of what a frame repair would cost.
I would go with a Columbus SP tube.
09-22-22, 10:46 AM
#7
Senior Member
Join Date: Oct 2005
Location: Upper Left, USA
Posts: 1,915
Mentioned: 50 Post(s)
Tagged: 0 Thread(s)
Quoted: 634 Post(s)
Liked 444 Times
in
298 Posts
Using a sleeve (or more accurately 2 half sleeves) makes a lot of sense for ease of repair and causes less damage to the surrounding areas than replacing the whole tube. The biggest problem might be one not liking the final looks. However it is possible to shape the sleeves in a variety of ways to make it aesthetically more pleasing. This shaping (if done right) helps distribute the stress.
Here is a sleeve repair on a Santana that I did after the down tube broke where the triple cable stop was located. Since the OP is not asking how the repair was done, I'm just showing the results. I believe this makes a stronger and better repair than replacing the whole tube - especially because the triple cable stop is located on the sleeve near where the butting transition is likely to be located.
this is the sleeve shape attached to the tube it will be cut out of
the 2 half sleeves brazed onto the tandem
adding the triple stop braze on that caused the tube to originally break
painting just the damaged area with a similar color
Likes For tricky:
09-22-22, 12:54 PM
#8
Newbie
Thread Starter
Join Date: Sep 2022
Posts: 18
Mentioned: 0 Post(s)
Tagged: 0 Thread(s)
Quoted: 12 Post(s)
Likes: 0
Liked 2 Times
in
2 Posts
Thanks for this most interesting information. Would attaching the half-sleeves to the frame with JB Weld be a safe and effective substitute for brazing? I assume that the half sleeves are cut from stainless steel tubing, right?
09-22-22, 01:01 PM
#9
Newbie
Thread Starter
Join Date: Sep 2022
Posts: 18
Mentioned: 0 Post(s)
Tagged: 0 Thread(s)
Quoted: 12 Post(s)
Likes: 0
Liked 2 Times
in
2 Posts
Yours is a very common failure (high-stress) point. My first Capo frame broke there.
My Nishiki Competition failed when the seat tube lug broke away from the bottom bracket shell.
My other Peugeot UO-8 failed between the chainring and tire clearance dimples on the chainstay.
My Nishiki Competition failed when the seat tube lug broke away from the bottom bracket shell.
My other Peugeot UO-8 failed between the chainring and tire clearance dimples on the chainstay.
I had noticed that the front wheel was shimmying, especially when I was coasting. I stopped and, thinking that it might be a loose head set, locked the brakes on the front wheel and pushed the bike back and forth to test the headset adjustment. That's when the frame snapped.
I bought a 1961 Schwinn Speedster when I was a kid and rode it on and off for 50 years. On one occasion, the right half of the handlebar broke off while riding. On another the one-piece crank did the same thing. Survived them both!
09-22-22, 01:09 PM
#10
Newbie
Thread Starter
Join Date: Sep 2022
Posts: 18
Mentioned: 0 Post(s)
Tagged: 0 Thread(s)
Quoted: 12 Post(s)
Likes: 0
Liked 2 Times
in
2 Posts
I relied upon the information given in the sticky entitled "This subforum is primarily about framebuilding".
I'm not allowed to post the URL
Maybe I misunderstood it.
09-22-22, 02:01 PM
#11
Senior Member

Join Date: Jun 2010
Location: Medford MA
Posts: 2,089
Bikes: Ron Cooper touring, 1959 Jack Taylor 650b ladyback touring tandem, Vitus 979, Joe Bell painted Claud Butler Dalesman, Colin Laing curved tube tandem, heavily-Dilberted 1982 Trek 6xx, Ren� Herse tandem
Mentioned: 80 Post(s)
Tagged: 0 Thread(s)
Quoted: 964 Post(s)
Liked 1,451 Times
in
723 Posts
I wouldn't use epoxy. I would braze it. I would use tubing from a scrap frame made from oversize tubing. This will probably still need some bending to get it to fit perfectly.
You could do it if you really wanted to, using a swirl-flame "turbo torch" and mapp gas, but you should practice on some scrap first. Use Harris Safety-Silv 56 and black flux.
I would put the flux on, assemble it, then put on a couple of hose clamps to hold it all together and tighten them well to minimize gaps. A properly-shaped part would be critical. You'd probably spend a hundred dollars and 5-10 hours to get it right, but you'd learn a new skill and you get to keep the tools.
__________________
Owner & co-founder, Cycles Ren� Hubris. Unfortunately attaching questionable braze-ons to perfectly good frames since about 2015. With style.
Owner & co-founder, Cycles Ren� Hubris. Unfortunately attaching questionable braze-ons to perfectly good frames since about 2015. With style.
Likes For scarlson:
09-22-22, 09:39 PM
#12
framebuilder
Stainless Steel is much more difficult to braze and only experienced brazers should try. It requires a tighter temperature window (it has to be hotter than 4130 and can not tolerate getting overheated). If its temperature range is exceeded, then the surface gets corroded and the only solution is to take off the sleeve and start over. The bigger the area to be brazed, the more difficult it becomes to do it without overheating and scorching the surface so the silver won't stick.
What I would recommend is buying the 4130 0.058" tubing and make the sleeves yourself. This can save a framebuilder a lot of time. This takes some explanation and I'll wait to hear from you if you are really going to try doing it before writing a detailed explanation of what to do.
Likes For oneclick:
09-23-22, 10:30 AM
#14
Senior Member
Join Date: Jul 2006
Location: San Jose (Willow Glen) Ca
Posts: 9,834
Bikes: Kirk Custom JK Special, '84 Team Miyata,(dura ace old school) 80?? SR Semi-Pro 600 Arabesque
Mentioned: 106 Post(s)
Tagged: 0 Thread(s)
Quoted: 2337 Post(s)
Liked 2,811 Times
in
1,535 Posts
r3dr0ver If you let people know you general geographic location you might get some good recommendations for people who could do this... your are getting super good input from experienced, well regarded frame builders
and as much as I love epoxy and JB weld....it is simply not the same as brazing
and as much as I love epoxy and JB weld....it is simply not the same as brazing
__________________
Life is too short not to ride the best bike you have, as much as you can
(looking for Torpado Super light frame/fork or for Raleigh International frame fork 58cm)
Life is too short not to ride the best bike you have, as much as you can
(looking for Torpado Super light frame/fork or for Raleigh International frame fork 58cm)
Likes For squirtdad:
09-27-22, 11:48 AM
#15
Newbie
Thread Starter
Join Date: Sep 2022
Posts: 18
Mentioned: 0 Post(s)
Tagged: 0 Thread(s)
Quoted: 12 Post(s)
Likes: 0
Liked 2 Times
in
2 Posts
i recommend this patch should be brazed. I would use as sleeves 4130 tubing that can be bought at either Wicks Aircraft or Aircraft Spruce (Google them to find them). If your down tube is 1 1/8" in outside diameter, then the tubing you want to buy as sleeves will have an OD of 1 1/4" with a wall thickness of 0.058". This will fit perfectly around your down tube. This is much better and easier than trying to blacksmith something that doesn't quite fit. If you think you might like to try brazing it yourself (I don't recommend this on a frame you value), I would also get some feet of 1.125" OD with a wall thickness of 0.035". Before you even think of putting a torch to your real bike, you will practice a lot with the .058" as a half sleeve over a long piece of .035". Start with a small patch and if you are successful then go bigger. This kind of big sleeve takes some real skill to do and don't expect to be successful without practice. I've been teaching framebuilding classes for over 40 years and know many of my students would not be successful brazing a patch this large without instruction, a demonstration and then lots of practice.
Stainless Steel is much more difficult to braze and only experienced brazers should try. It requires a tighter temperature window (it has to be hotter than 4130 and can not tolerate getting overheated). If its temperature range is exceeded, then the surface gets corroded and the only solution is to take off the sleeve and start over. The bigger the area to be brazed, the more difficult it becomes to do it without overheating and scorching the surface so the silver won't stick.
What I would recommend is buying the 4130 0.058" tubing and make the sleeves yourself. This can save a framebuilder a lot of time. This takes some explanation and I'll wait to hear from you if you are really going to try doing it before writing a detailed explanation of what to do.
You have posted that the half sleeves can be shaped for cosmetic purposes. Is that why the half sleeves in your photos were shaped as ellipses? Or is there some structural advantage to sleeves of this shape?
09-27-22, 03:05 PM
#16
framebuilder
Thanks for this information. Even if I don't do this repair myself, it will be useful in my conversations with framebuilders about having it done.
You have posted that the half sleeves can be shaped for cosmetic purposes. Is that why the half sleeves in your photos were shaped as ellipses? Or is there some structural advantage to sleeves of this shape?
You have posted that the half sleeves can be shaped for cosmetic purposes. Is that why the half sleeves in your photos were shaped as ellipses? Or is there some structural advantage to sleeves of this shape?
Likes For Doug Fattic:
09-28-22, 11:46 AM
#17
Newbie
Thread Starter
Join Date: Sep 2022
Posts: 18
Mentioned: 0 Post(s)
Tagged: 0 Thread(s)
Quoted: 12 Post(s)
Likes: 0
Liked 2 Times
in
2 Posts
Yes there is a structural advantage to making an ellipse shape. This distributes the stress of the joint over a much larger area so it is less likely to break at the sleeve edge. The worst shape would be to cut the sleeve straight off making it have a much higher stress line. In addition I milled some slots in the sleeves. This was to make it easier to braze. Beyond the basic shape I used, it is possible to add even more detail to the shape. This can be for decoration as well as stress distribution. In theory the longer the sleeve edge the greater the distribution of stress over a larger area.
Would the uneven surface between the lug and the tube create problems when brazing the half sleeves over both?
Could the heat needed to braze the half sleeves weaken the adjoining lugged joint?
09-28-22, 11:56 AM
#18
Senior Member
Join Date: Oct 2005
Location: Upper Left, USA
Posts: 1,915
Mentioned: 50 Post(s)
Tagged: 0 Thread(s)
Quoted: 634 Post(s)
Liked 444 Times
in
298 Posts
Thanks! In my case, the break in the down tube is just below the lug that connects it to the head tube. Any set of half sleeves I make to repair it would have to overlap that lug. And so I wonder:
Would the uneven surface between the lug and the tube create problems when brazing the half sleeves over both?
Could the heat needed to braze the half sleeves weaken the adjoining lugged joint?
Would the uneven surface between the lug and the tube create problems when brazing the half sleeves over both?
Could the heat needed to braze the half sleeves weaken the adjoining lugged joint?
 09-28-22, 06:15 PM
#20
framebuilder
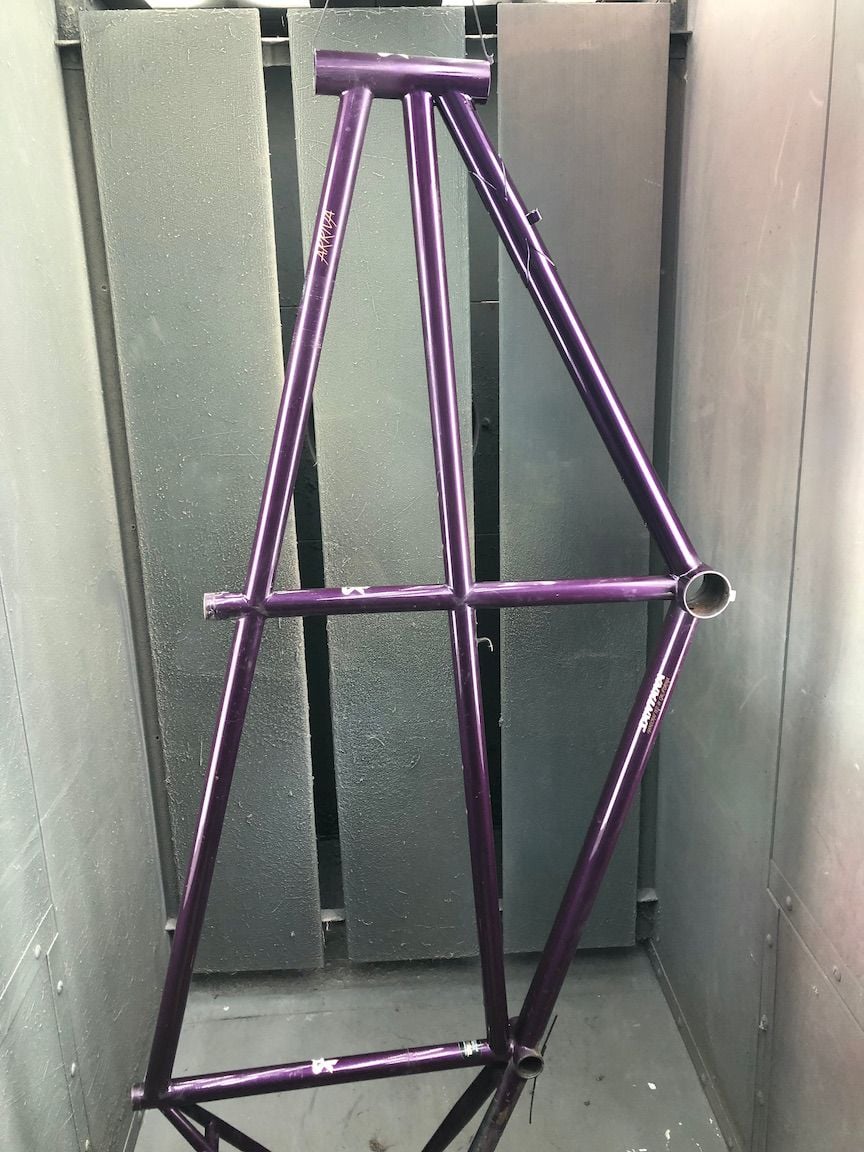
Now that I see a picture of how close the break is to your lug, I'll recommend a different but unfortunately a more expensive approach. It is possible to splice in a new section of tube using a section or sections of tubing with a wall thickness of 0.058". This is the same thickness of tubing that might have been used on an outside sleeve but of course with a smaller OD. Here are some pictures of a repair I made of my personal bike that came off the roof of my car while going down the highway. I used my lathe to turn down short pieces of tube that would just slide into the inside of what was left of my original top tube and the section of new tube. It took 4 brazing sequences to do the job (sleeve to one end of the frame, sleeve to one end of the new TT section, sleeve to the other frame end and finally sleeve to new section) before I could repaint it almost as good as new. These pictures unfortunately don't show the lathe turned sleeves so you will just have to imagine them.

The damaged section of my top tube cut out
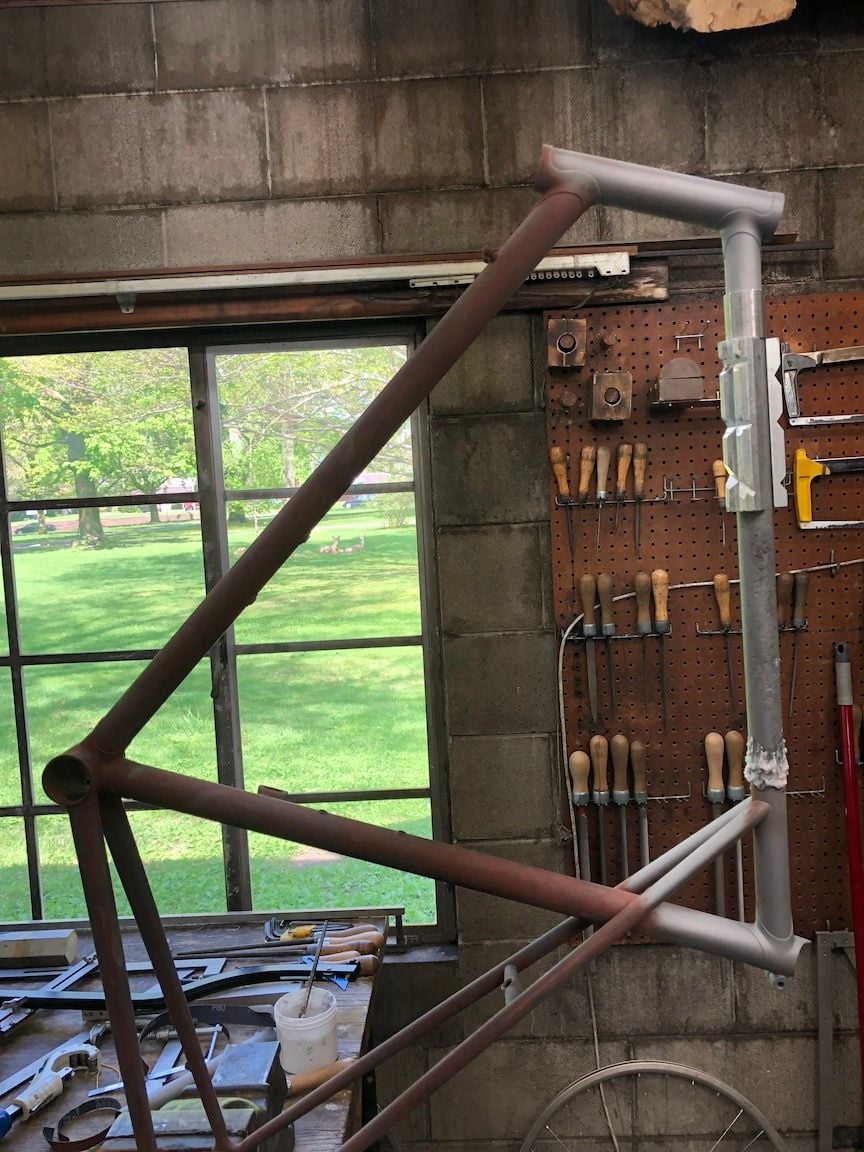
Preparation to braze in a short stub of a tube into what is left of the top tube by the seat lug.What looks like a new top tube is really just an old tube used to hold the stub and not the final tube. It keeps the stub in the correct position.
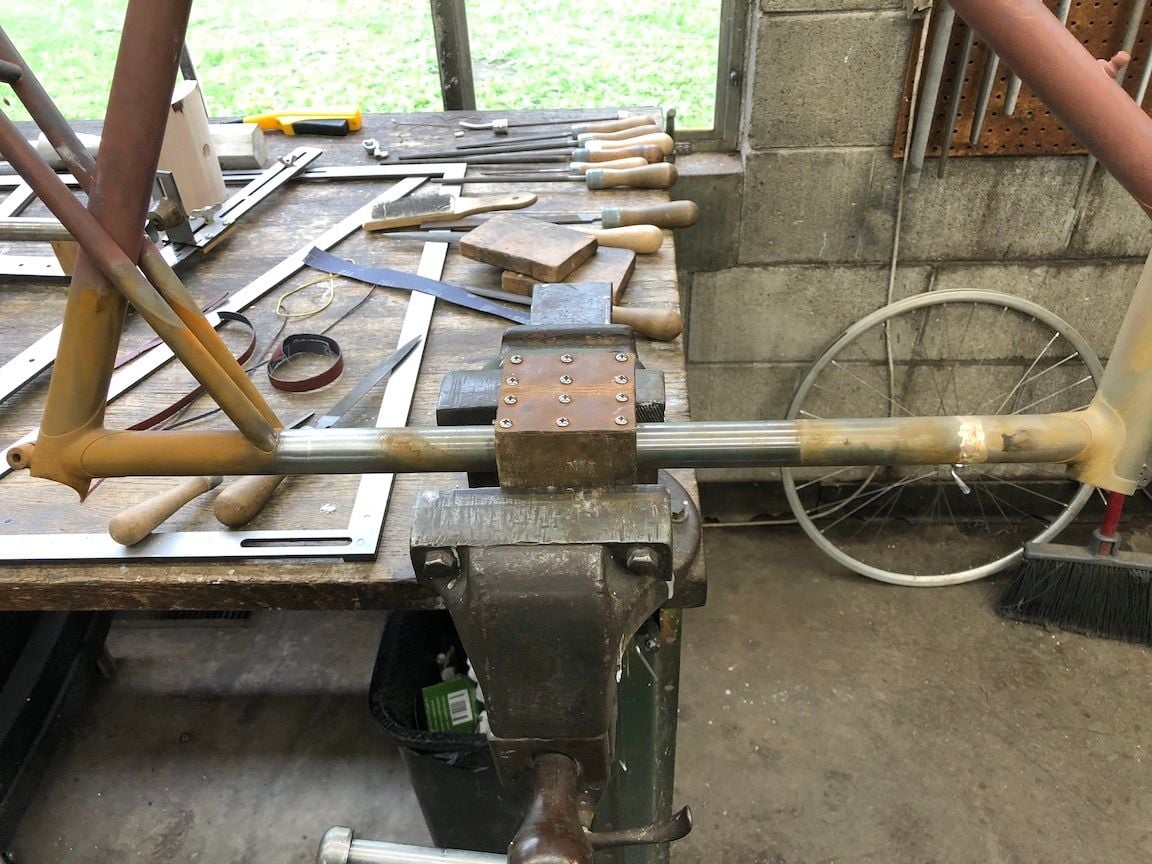
the seat tube side of the top tube has been brazed in and filed. The head tube side has been brazed but not filed yet.

the completed frame with a new section of top tube after I have repainted it
Of course all this work comes at a cost and you will have to figure out if the price of the repair is worth it to you. it always will be if the frame has sentimental value. It is sometimes possible to find a used one that costs less. It is possible your local framebuilder might find it easier just to replace the tube. That might involve replacing the lug as well. I like splicing in a new section preserving and not disturbing as much as possible what is left of your frame.
The damaged section of my top tube cut out
Preparation to braze in a short stub of a tube into what is left of the top tube by the seat lug.What looks like a new top tube is really just an old tube used to hold the stub and not the final tube. It keeps the stub in the correct position.
the seat tube side of the top tube has been brazed in and filed. The head tube side has been brazed but not filed yet.
the completed frame with a new section of top tube after I have repainted it
Of course all this work comes at a cost and you will have to figure out if the price of the repair is worth it to you. it always will be if the frame has sentimental value. It is sometimes possible to find a used one that costs less. It is possible your local framebuilder might find it easier just to replace the tube. That might involve replacing the lug as well. I like splicing in a new section preserving and not disturbing as much as possible what is left of your frame.
Likes For Doug Fattic:
09-29-22, 11:27 AM
#21
Newbie
Thread Starter
Join Date: Sep 2022
Posts: 18
Mentioned: 0 Post(s)
Tagged: 0 Thread(s)
Quoted: 12 Post(s)
Likes: 0
Liked 2 Times
in
2 Posts
Now that I see a picture of how close the break is to your lug, I'll recommend a different but unfortunately a more expensive approach. It is possible to splice in a new section of tube using a section or sections of tubing with a wall thickness of 0.058". This is the same thickness of tubing that might have been used on an outside sleeve but of course with a smaller OD. Here are some pictures of a repair I made of my personal bike that came off the roof of my car while going down the highway. I used my lathe to turn down short pieces of tube that would just slide into the inside of what was left of my original top tube and the section of new tube. It took 4 brazing sequences to do the job (sleeve to one end of the frame, sleeve to one end of the new TT section, sleeve to the other frame end and finally sleeve to new section) before I could repaint it almost as good as new. These pictures unfortunately don't show the lathe turned sleeves so you will just have to imagine them.
The damaged section of my top tube cut out
Preparation to braze in a short stub of a tube into what is left of the top tube by the seat lug.What looks like a new top tube is really just an old tube used to hold the stub and not the final tube. It keeps the stub in the correct position.
the seat tube side of the top tube has been brazed in and filed. The head tube side has been brazed but not filed yet.
the completed frame with a new section of top tube after I have repainted it
Of course all this work comes at a cost and you will have to figure out if the price of the repair is worth it to you. it always will be if the frame has sentimental value. It is sometimes possible to find a used one that costs less. It is possible your local framebuilder might find it easier just to replace the tube. That might involve replacing the lug as well. I like splicing in a new section preserving and not disturbing as much as possible what is left of your frame.
Likes For r3dr0ver:
09-29-22, 09:17 PM
#24
framebuilder
The reason I changed my recommendation of what kind of repair to do on your frame was because the down tube lug gets in the way of brazing on an outside sleeve and then the repair doesn't look as good as an internal sleeve. Outside sleeves take a bit less work than inside sleeves. You could of course still do outside sleeves on your frame but it would look dorky and still cost only somewhat less money.
09-29-22, 10:12 PM
#25
Keener splendor

I read through the thread and saw the break. IMO, thank this frame for its wonderful service, and lay it to rest. I realize you have sentimental attachment to it, but a nicer production frame is going to be cheaper than fixing this one.