


Show Us Your 650B Conversions
 08-19-21, 05:07 PM
#876

Senior Member
Join Date: Sep 2017
Location: Eastern Shore, MD
Posts: 2,107
Bikes: Road ready: 1993 Koga Miyata City Liner Touring Hybrid, 1989 Centurion Sport DLX, "I Blame GP" Bridgestone CB-1. Projects: Yea, I got a problem....
Mentioned: 24 Post(s)
Tagged: 0 Thread(s)
Quoted: 753 Post(s)
Liked 735 Times
in
421 Posts
I've asked around about having a shop respace a bike. I was told that they wouldn't respace but if brought a bike in with an alignment problem they would "re" align it for $25 or so.
 08-19-21, 07:48 PM
#877
Full Member
Join Date: Apr 2018
Location: NYC
Posts: 383
Bikes: '72 Raleigh Super Course; '90 Cannondale ST1000; '98/99 Cannondale T700; 2002 Cannondale CAAD5 R700; 2022 Cannondale Topstone 2L
Mentioned: 6 Post(s)
Tagged: 0 Thread(s)
Quoted: 166 Post(s)
Liked 348 Times
in
156 Posts
I had my 710 spread to 130mm without any issues. I took it to a shop, and ask them to be mindful as people have mentioned having trouble in the past. I've currently got some clicking when I pedal too; now I'm wondering if it's headset-related.
08-19-21, 08:13 PM
#878
working on my sandal tan

Join Date: Aug 2011
Location: CID
Posts: 22,627
Bikes: 1991 Bianchi Eros, 1964 Armstrong, 1988 Diamondback Ascent, 1988 Bianchi Premio, 1987 Bianchi Sport SX, 1980s Raleigh mixte (hers), All-City Space Horse (hers)
Mentioned: 98 Post(s)
Tagged: 0 Thread(s)
Quoted: 3870 Post(s)
Liked 2,563 Times
in
1,577 Posts
1) The Tange headset is finicky. If I tighten it just barely enough to take the little click out of it (when I apply the front brake and push it forward) then it is so tight that I can't ride no-handed and the steering is way too stiff. If I then barely loosen the headset nut - perhaps 5 degrees - then the click comes back but I can ride no-handed and the steering feels normal. There is no sweet-spot with this headset. I have decided to live with the slight 'click' because the steering feels normal.
My Diamondback's headset is sort of like that. If I adjust it so it turns completely freely on the stand, there is a little bit of a "clunk" when applying the brakes, and if I completely dial out that "clunk", I can feel notchiness in the headset. So I just try to shoot for the best middle ground that I can.
__________________
RUSA #7498
Originally Posted by noglider
People in this forum are not typical.
Last edited by ThermionicScott; 08-19-21 at 08:22 PM.
08-19-21, 08:21 PM
#879
working on my sandal tan
Join Date: Aug 2011
Location: CID
Posts: 22,627
Bikes: 1991 Bianchi Eros, 1964 Armstrong, 1988 Diamondback Ascent, 1988 Bianchi Premio, 1987 Bianchi Sport SX, 1980s Raleigh mixte (hers), All-City Space Horse (hers)
Mentioned: 98 Post(s)
Tagged: 0 Thread(s)
Quoted: 3870 Post(s)
Liked 2,563 Times
in
1,577 Posts
The thought did occur to me that if jlaw's bike were a millimeter or two off to one side, being smart when realigning it could yield a "free" 1-2mm extra OLD.
 08-19-21, 08:28 PM
#880
ambulatory senior
Join Date: Dec 2016
Location: Peoria Il
Posts: 5,998
Bikes: Austro Daimler modified by Gugie! Raleigh Professional and lots of other bikes.
Mentioned: 76 Post(s)
Tagged: 0 Thread(s)
Quoted: 1954 Post(s)
Liked 3,658 Times
in
1,677 Posts
It's a standard 12-32 7 speed cassette. Most of my rides are through rolling terrain, 400 to 600 feet of ascent per every 10 miles. 1000 feet + per 10 miles is possible, but that is not the norm.
With a 40-12 combo I can pedal comfortably up to 22+ mph - which I only do when going downhill. This means that I pedal up to 22+ and then coast when descending. Maintaining 20+ mph on the flats is not something I can do so there is no penalty for me having a 'big' combo of 40-12.
On the other end, a 40-32 combo is a very nice ascending gear for me when the terrain gets moderately steep. I can comfortably spin while seated with the 40-32 and the 40-28 combos. This means that for perhaps 95% of my 'rolling terrain' rides I never have to shift the FD. The 7 speed cassette has comfortable jumps between the gear ratios. However, with friction DT shifting and 7 speeds I do 'mash' and stand-up a bit more than I do with my bikes that have brake lever shifting and 10 speeds - but I don't mind this.
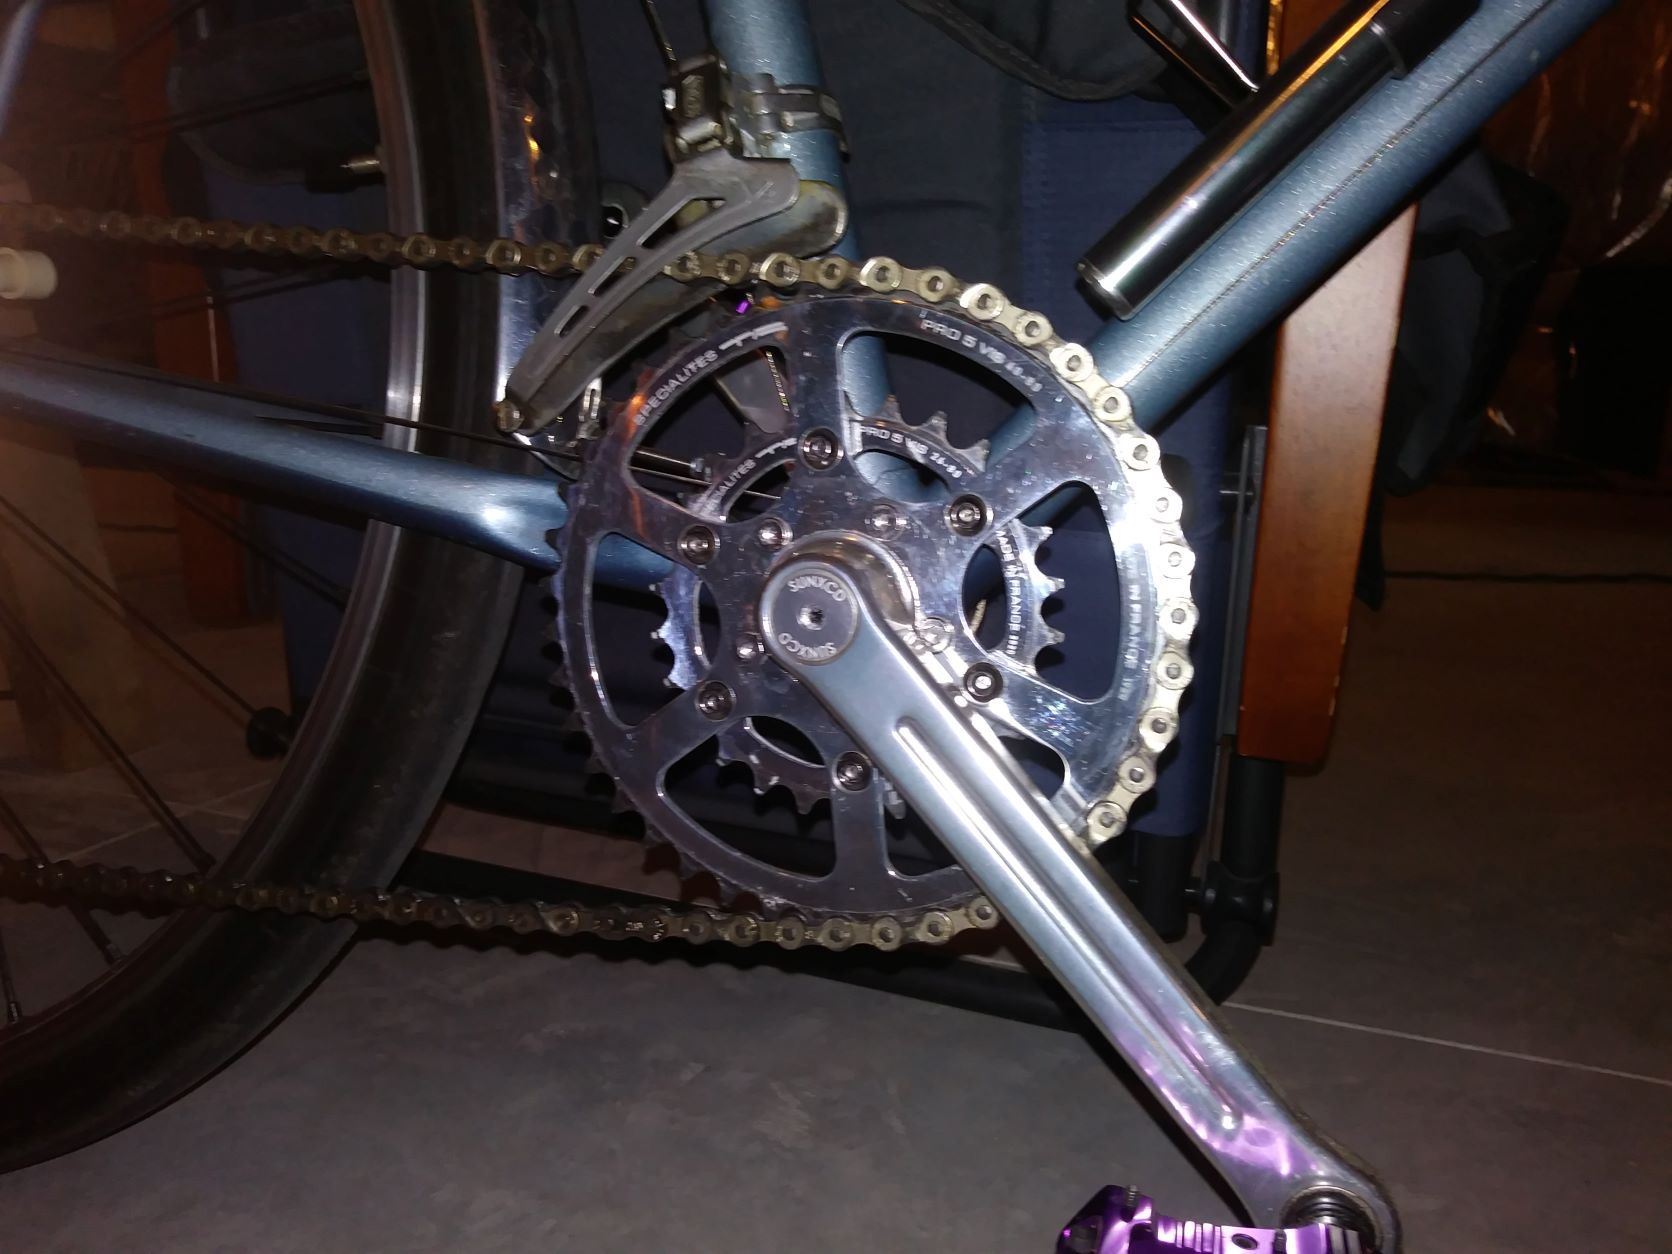
The 26T chainring gives me plenty of crawl-gears when things get really steep or I'm whooped.
The Sun XCD 50.4 BCD cranks and TA Pro Viz rings fit together without any significant issues despite being from two different manufacturers. I did need to file one chain ring hole very slightly to get the bolt to sit 'just-so'. They work fine for 6-7-8 speed chain. The shop that sold me these components said that 9 and 10 speed chains will work with this crank/ring combo, but I think some adjustment of the space between the rings might be necessary - even if a relatively narrow 10 speed chain will engage the rings properly.
I installed the crank on the original BB square taper spindle and torqued it to the low end of the Park Tools spec. range - no creaking or any other issues.
I have success shifting the old-school TA rings from small to large by briefly letting-up on the pedals, throwing the FD lever all the way, and then gradually re-applying pedal effort - sort of like a clutch. Shifting the FD upward under full pedal load can lead to grinding. The shifting might be improved if I could lower the FD cage closer to the 40T ring, but if I did this the cage would hit the chain stay when shifting to the 26T ring.
With a 40-12 combo I can pedal comfortably up to 22+ mph - which I only do when going downhill. This means that I pedal up to 22+ and then coast when descending. Maintaining 20+ mph on the flats is not something I can do so there is no penalty for me having a 'big' combo of 40-12.
On the other end, a 40-32 combo is a very nice ascending gear for me when the terrain gets moderately steep. I can comfortably spin while seated with the 40-32 and the 40-28 combos. This means that for perhaps 95% of my 'rolling terrain' rides I never have to shift the FD. The 7 speed cassette has comfortable jumps between the gear ratios. However, with friction DT shifting and 7 speeds I do 'mash' and stand-up a bit more than I do with my bikes that have brake lever shifting and 10 speeds - but I don't mind this.
The 26T chainring gives me plenty of crawl-gears when things get really steep or I'm whooped.
The Sun XCD 50.4 BCD cranks and TA Pro Viz rings fit together without any significant issues despite being from two different manufacturers. I did need to file one chain ring hole very slightly to get the bolt to sit 'just-so'. They work fine for 6-7-8 speed chain. The shop that sold me these components said that 9 and 10 speed chains will work with this crank/ring combo, but I think some adjustment of the space between the rings might be necessary - even if a relatively narrow 10 speed chain will engage the rings properly.
I installed the crank on the original BB square taper spindle and torqued it to the low end of the Park Tools spec. range - no creaking or any other issues.
I have success shifting the old-school TA rings from small to large by briefly letting-up on the pedals, throwing the FD lever all the way, and then gradually re-applying pedal effort - sort of like a clutch. Shifting the FD upward under full pedal load can lead to grinding. The shifting might be improved if I could lower the FD cage closer to the 40T ring, but if I did this the cage would hit the chain stay when shifting to the 26T ring.
08-19-21, 08:39 PM
#881
Bike Butcher of Portland

Join Date: Jul 2014
Location: Portland, OR
Posts: 11,630
Bikes: It's complicated.
Mentioned: 1299 Post(s)
Tagged: 0 Thread(s)
Quoted: 4677 Post(s)
Liked 5,790 Times
in
2,279 Posts
That's pretty reasonable, IMO.
__________________
If someone tells you that you have enough bicycles and you don't need any more, stop talking to them. You don't need that kind of negativity in your life.
If someone tells you that you have enough bicycles and you don't need any more, stop talking to them. You don't need that kind of negativity in your life.
Likes For gugie:
08-20-21, 12:41 PM
#882
Senior Member
Join Date: Jan 2019
Location: Toledo Ohio
Posts: 1,493
Bikes: 1964 Huffy Sportsman, 1972 Fuji Newest, 1973 Schwinn Super Sport (3), 1982 Trek 412, 1983 Trek 700, 1989 Miyata 1000LT, 1991 Bianchi Boardwalk, plus others
Mentioned: 21 Post(s)
Tagged: 0 Thread(s)
Quoted: 582 Post(s)
Liked 697 Times
in
393 Posts
Shimano 600
I needed a front derailleur to clear the chainstay on my miyata 1000 that I switched from. 28 small ring to a 24. I found a Shimano 600 at the co-op and it did fine. Research afterwards showed it to be a lucky guess as others had luck there also. FWIW, I went from a 28-38-48 to a 24-34-42 with a 12-28 7 speed rear.
Likes For sd5782:
08-22-21, 02:55 PM
#883
ambulatory senior
Join Date: Dec 2016
Location: Peoria Il
Posts: 5,998
Bikes: Austro Daimler modified by Gugie! Raleigh Professional and lots of other bikes.
Mentioned: 76 Post(s)
Tagged: 0 Thread(s)
Quoted: 1954 Post(s)
Liked 3,658 Times
in
1,677 Posts
This isn't done and I have since this pic lowered the seat a bit but I'm getting close. I have a front rack on order and have different lights I'll be using but this bike is excellent. 89 letour made with true temper tubing, plenty of braze ons and I only had to do a slight dimple of the chain stays. Actually 38s cleared before but now they are comfortable.
it has snappy handling and is quite comfortable.
it has snappy handling and is quite comfortable.
Likes For 52telecaster:
08-22-21, 05:35 PM
#884
Bike Butcher of Portland
Join Date: Jul 2014
Location: Portland, OR
Posts: 11,630
Bikes: It's complicated.
Mentioned: 1299 Post(s)
Tagged: 0 Thread(s)
Quoted: 4677 Post(s)
Liked 5,790 Times
in
2,279 Posts
The only frame joints I've ever seen fail from frame work are those where there as minimal or no braze at all. Paint can hide a lot of evils.
__________________
If someone tells you that you have enough bicycles and you don't need any more, stop talking to them. You don't need that kind of negativity in your life.
If someone tells you that you have enough bicycles and you don't need any more, stop talking to them. You don't need that kind of negativity in your life.
Likes For gugie:
08-22-21, 07:11 PM
#885
working on my sandal tan
Join Date: Aug 2011
Location: CID
Posts: 22,627
Bikes: 1991 Bianchi Eros, 1964 Armstrong, 1988 Diamondback Ascent, 1988 Bianchi Premio, 1987 Bianchi Sport SX, 1980s Raleigh mixte (hers), All-City Space Horse (hers)
Mentioned: 98 Post(s)
Tagged: 0 Thread(s)
Quoted: 3870 Post(s)
Liked 2,563 Times
in
1,577 Posts

Likes For ThermionicScott:


Likes For Nwvlvtnr:
11-26-21, 08:59 AM
#887

Senior Member
Join Date: Dec 2005
Posts: 17,146
Mentioned: 481 Post(s)
Tagged: 0 Thread(s)
Quoted: 3804 Post(s)
Liked 6,643 Times
in
2,602 Posts
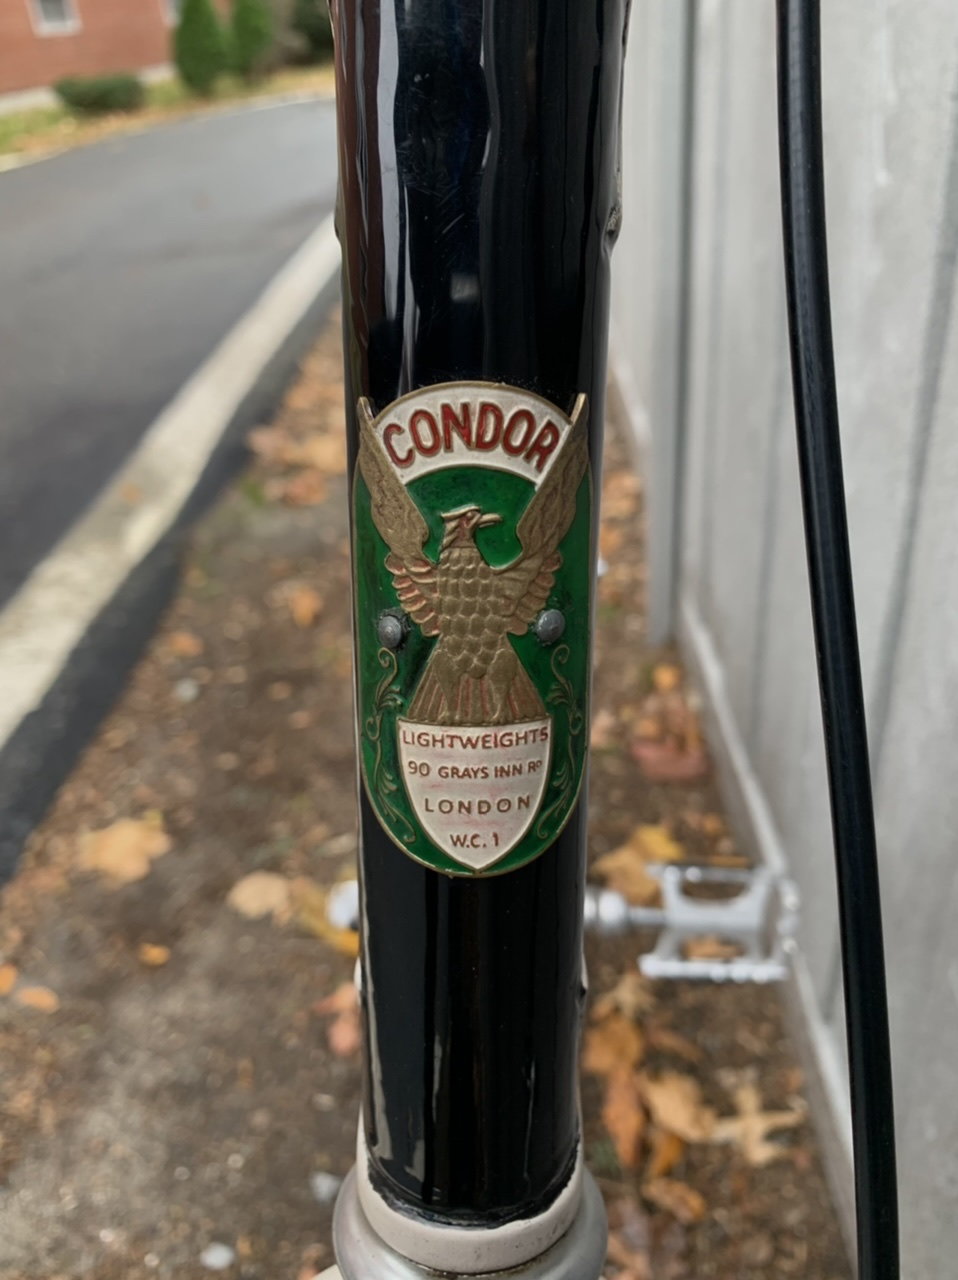
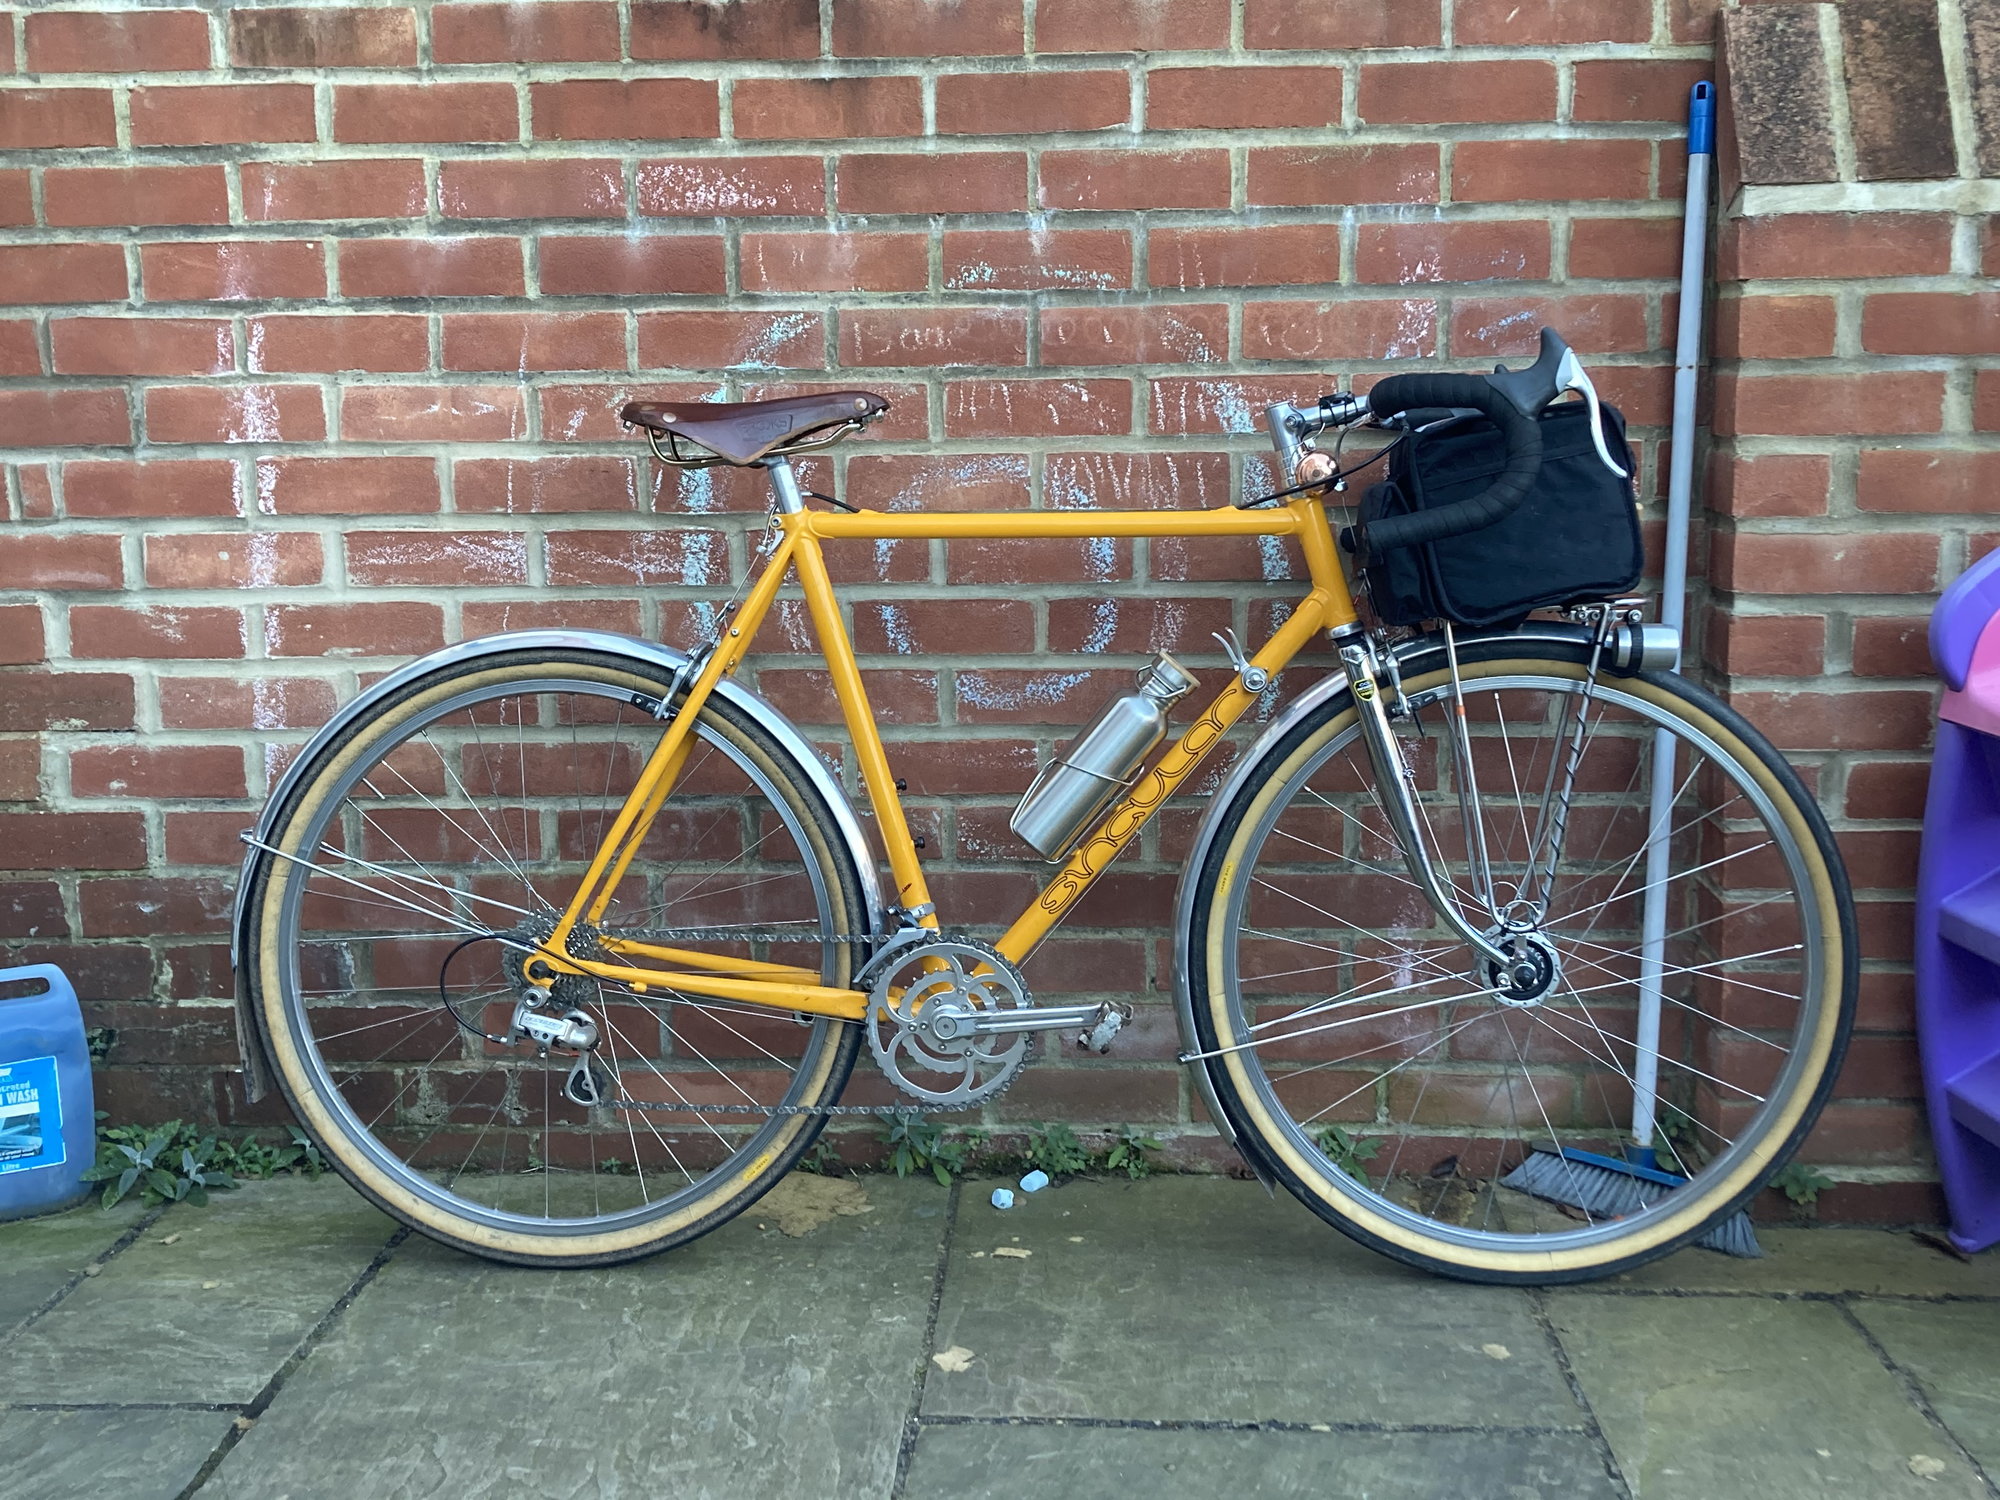
Had some time to work on bikes yesterday in between making side dishes and ended up converting my ‘73 Condor Italia to 650b. This was my 2018 CA Eroica bike but have barely ridden it since.
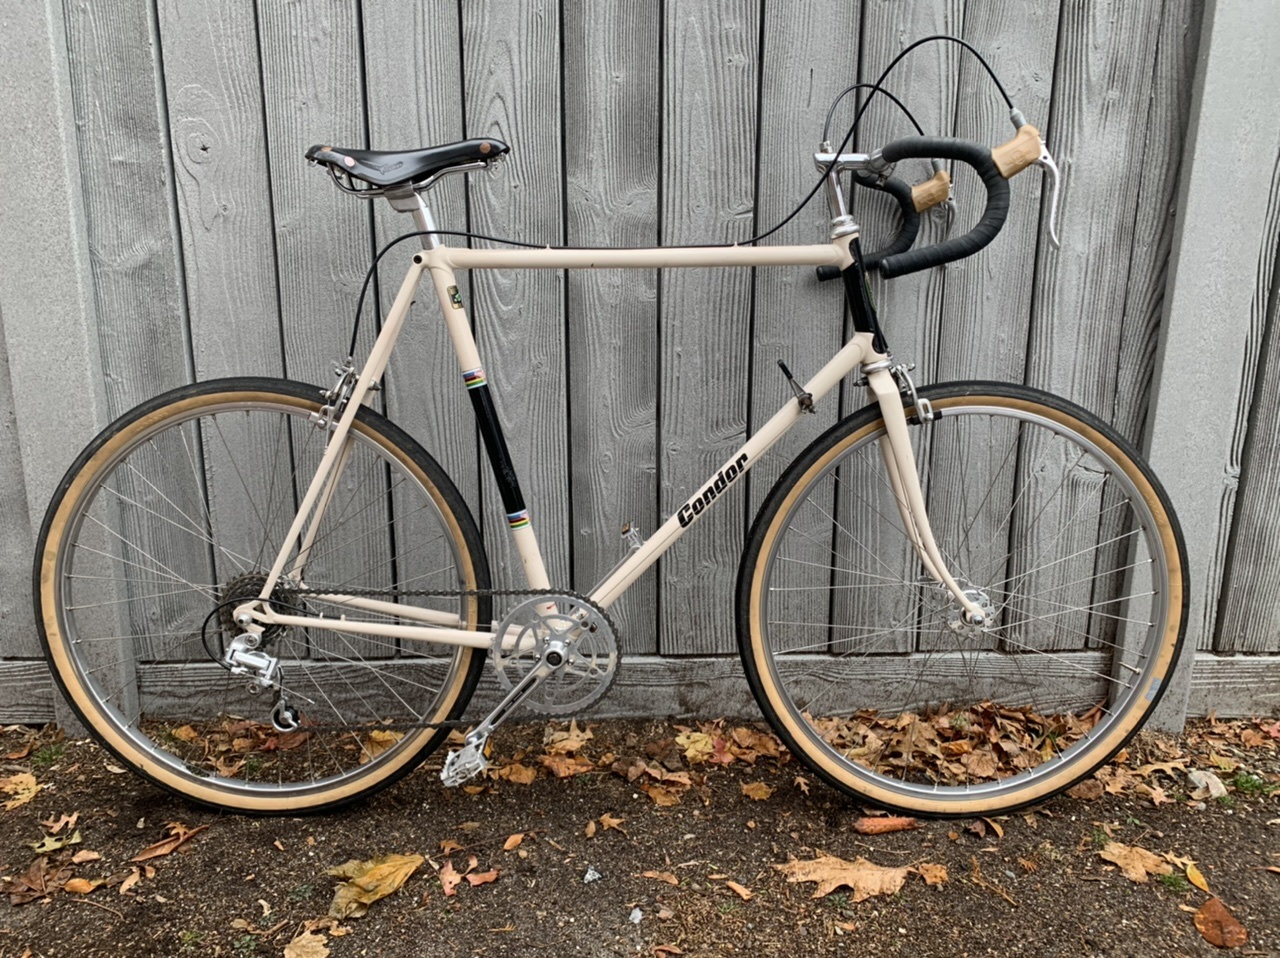
I had this previously set up with an IGH, so I opted for the minimum fuss and am running a 1 x 7 drivetrain with a single Simplex downtube lever. Works well.
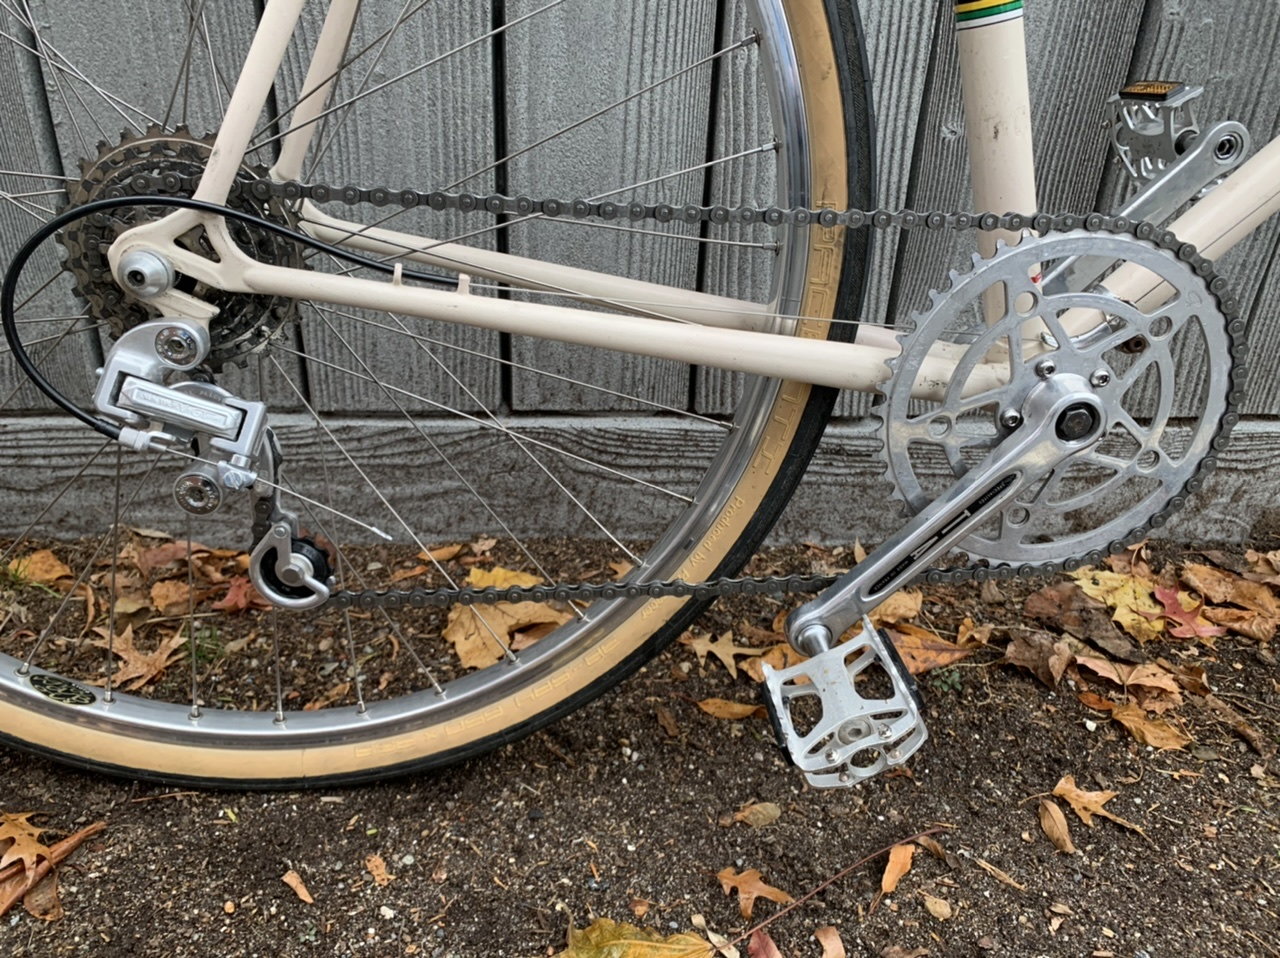
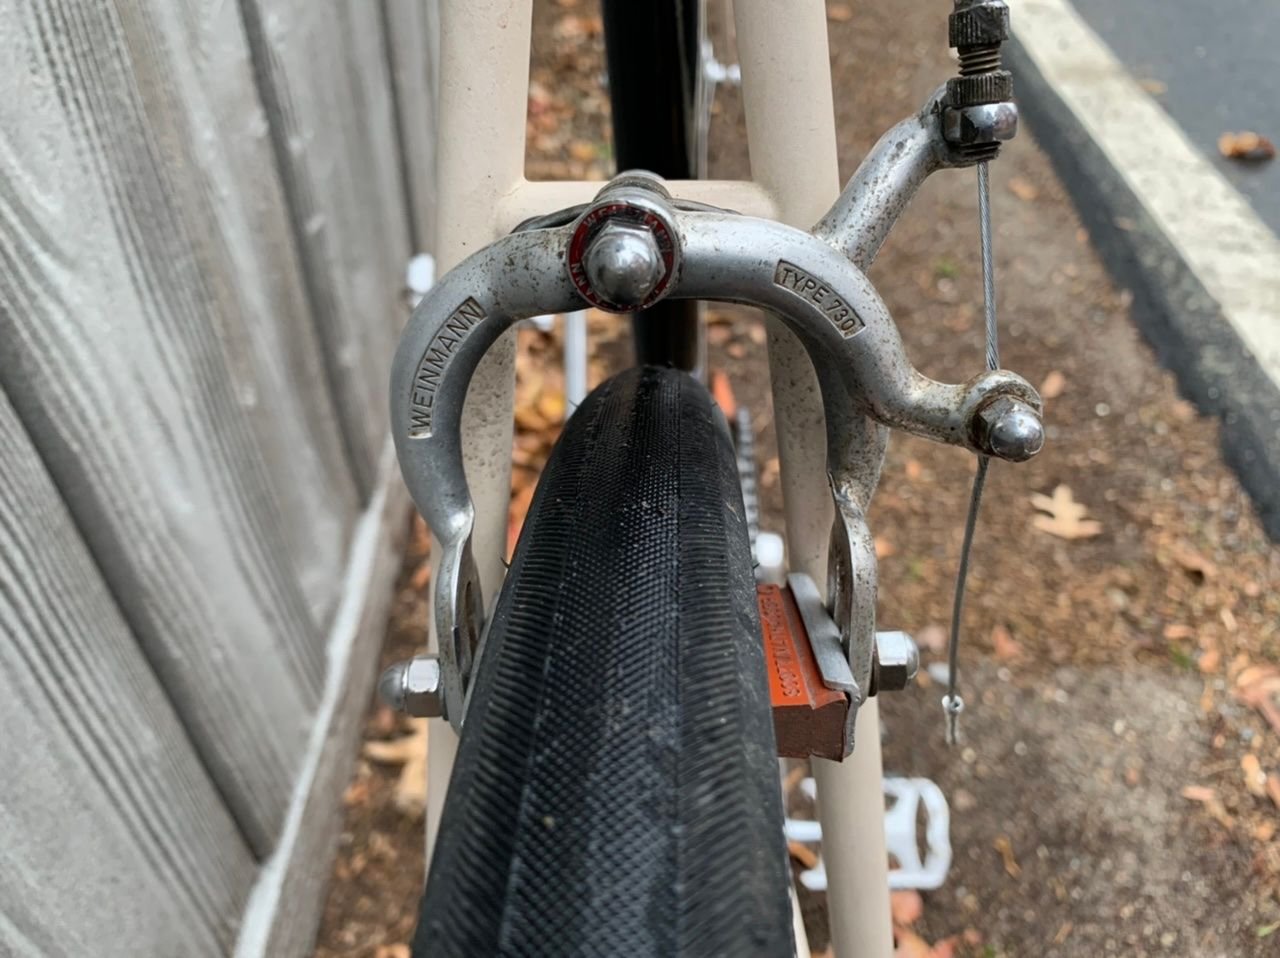
Needed 70mm of brake reach, so these old Weinmann calipers fit the bill. Can’t say they’re particularly good stoppers, however. I’ll try some Kool Stop Continental pads on the front.
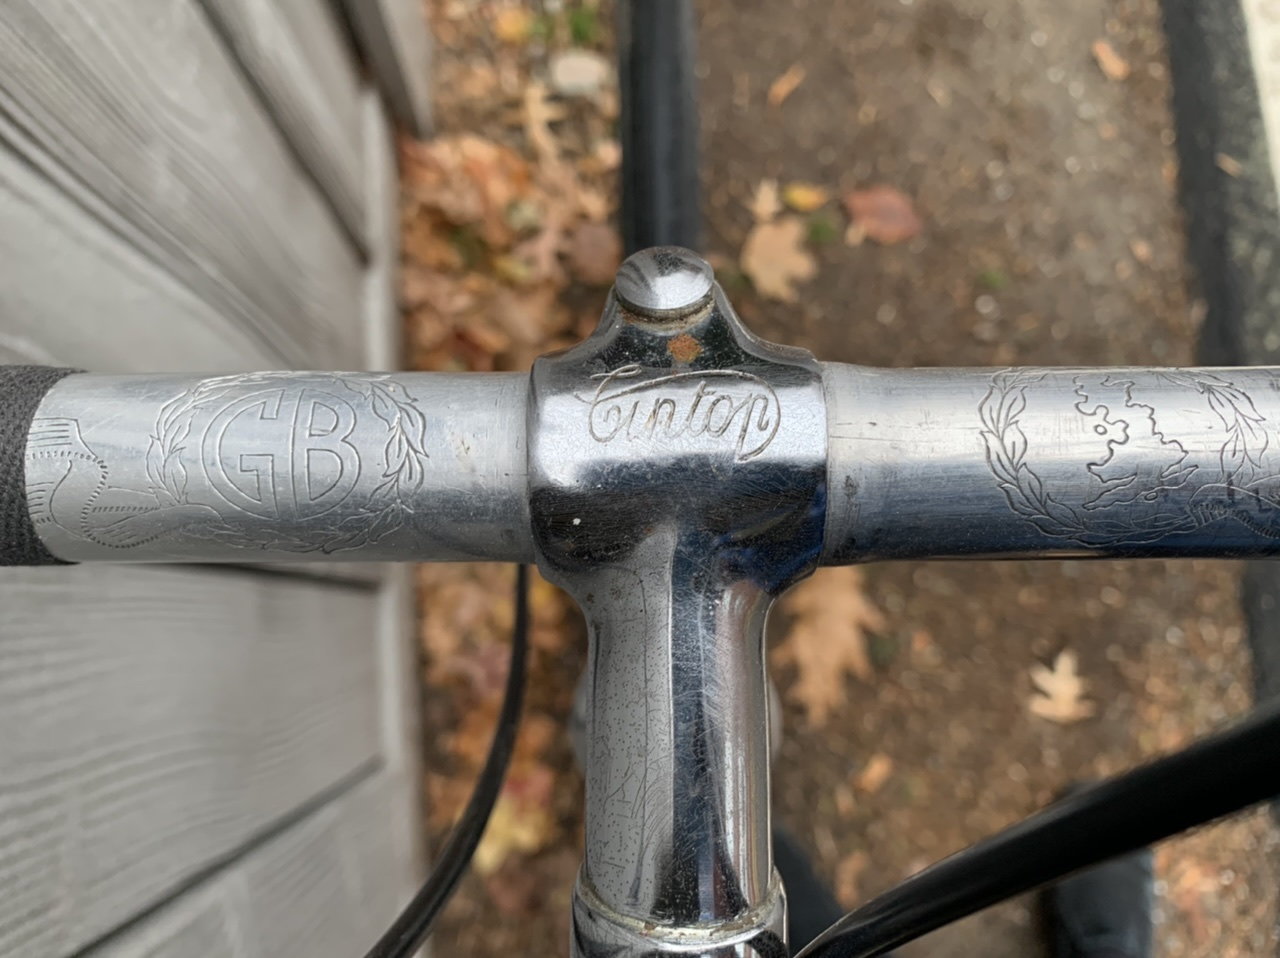
Headbadge created by @rhm.
I had this previously set up with an IGH, so I opted for the minimum fuss and am running a 1 x 7 drivetrain with a single Simplex downtube lever. Works well.
Needed 70mm of brake reach, so these old Weinmann calipers fit the bill. Can’t say they’re particularly good stoppers, however. I’ll try some Kool Stop Continental pads on the front.
Headbadge created by @rhm.
Likes For nlerner:
11-26-21, 01:05 PM
#888
Bike Butcher of Portland
Join Date: Jul 2014
Location: Portland, OR
Posts: 11,630
Bikes: It's complicated.
Mentioned: 1299 Post(s)
Tagged: 0 Thread(s)
Quoted: 4677 Post(s)
Liked 5,790 Times
in
2,279 Posts
Just saw this particular post several months late, my comments:
1. Recommend face, chase and replace. A properly installed new headset will absolutely ride you of this.
2. The spring thingie from VO is clever, but I find it rattles too much. I've used a cork with a hole drilled out through it as a spacer. They're typically pliable enough so you can push against the fender, squish the cork, and get your tire in and out.
3. I've respaced dozens of frames with no issue. 531 isn't "special", it'll take a lot of bending back and forth. What I don't suggest is usine the threaded rod method. That gives equal force to both sides, whereas drive side chainstays are often indented for chainring clearance, and will bend before the non-drive side. That results in a non-centered rear wheel. I've had people come over to the Atelier and coached them through the process. It's probably not something most would want to try themselves, however.
The only issues I have with the bike are:
1) The Tange headset is finicky. If I tighten it just barely enough to take the little click out of it (when I apply the front brake and push it forward) then it is so tight that I can't ride no-handed and the steering is way too stiff. If I then barely loosen the headset nut - perhaps 5 degrees - then the click comes back but I can ride no-handed and the steering feels normal. There is no sweet-spot with this headset. I have decided to live with the slight 'click' because the steering feels normal.
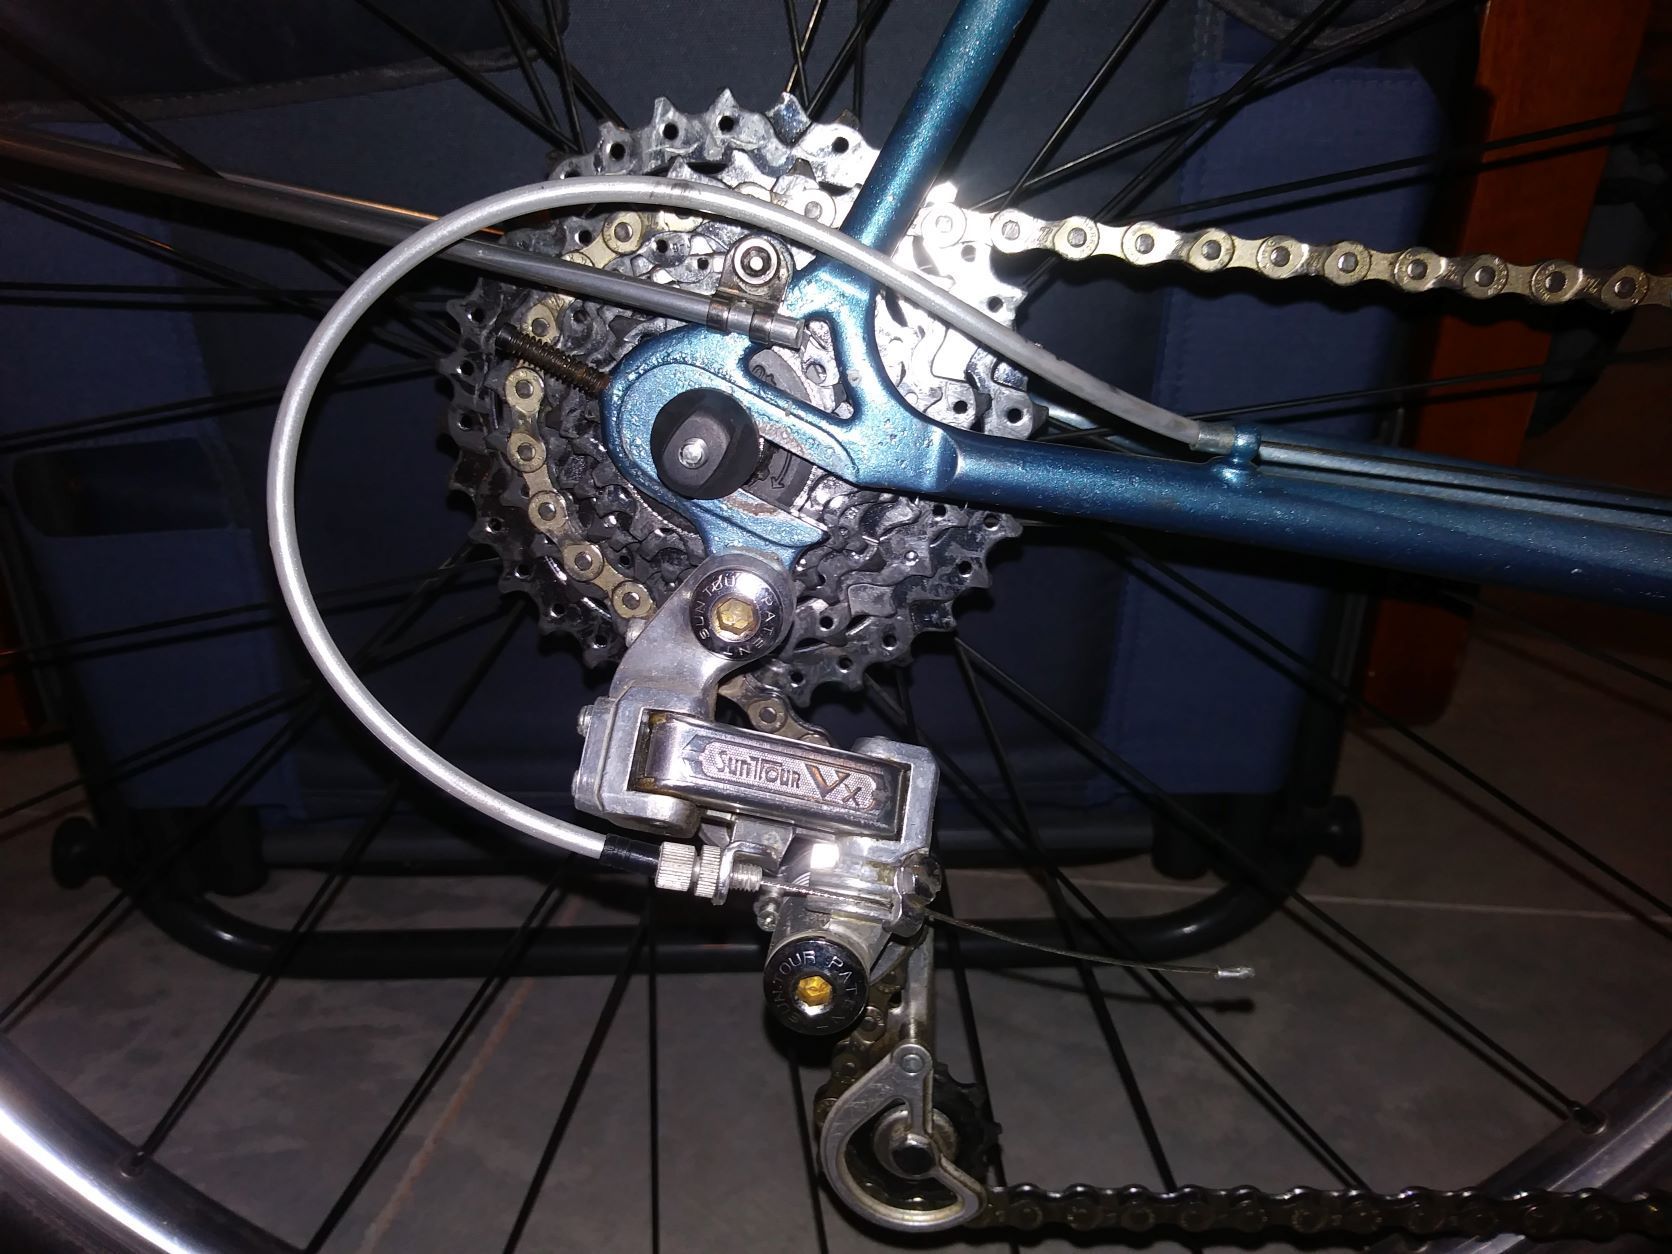
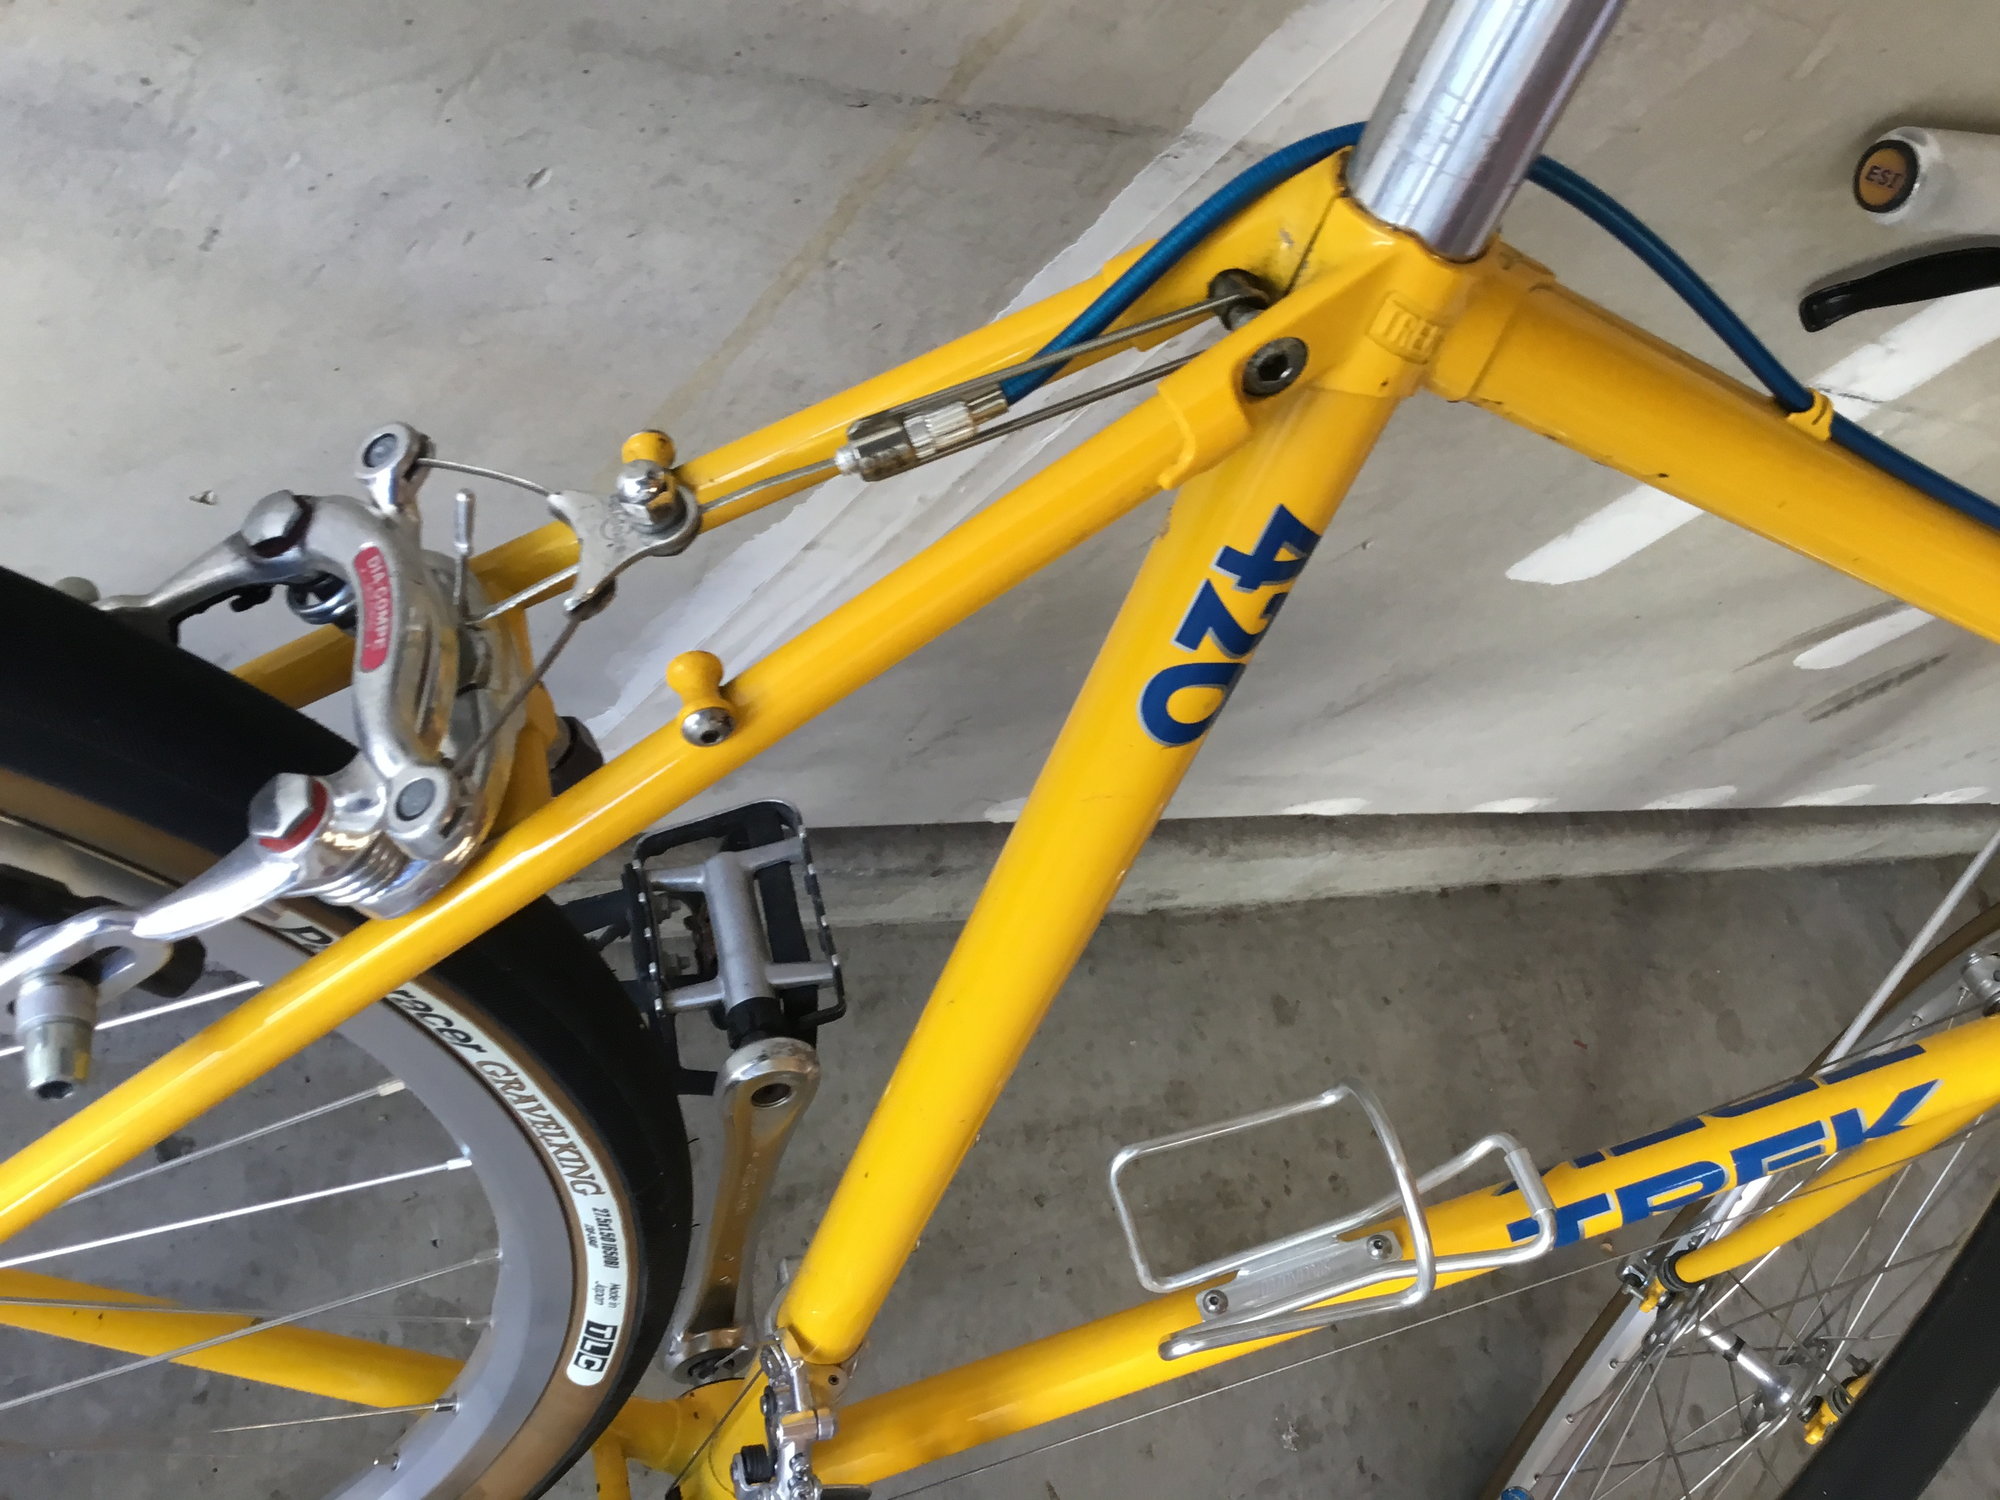
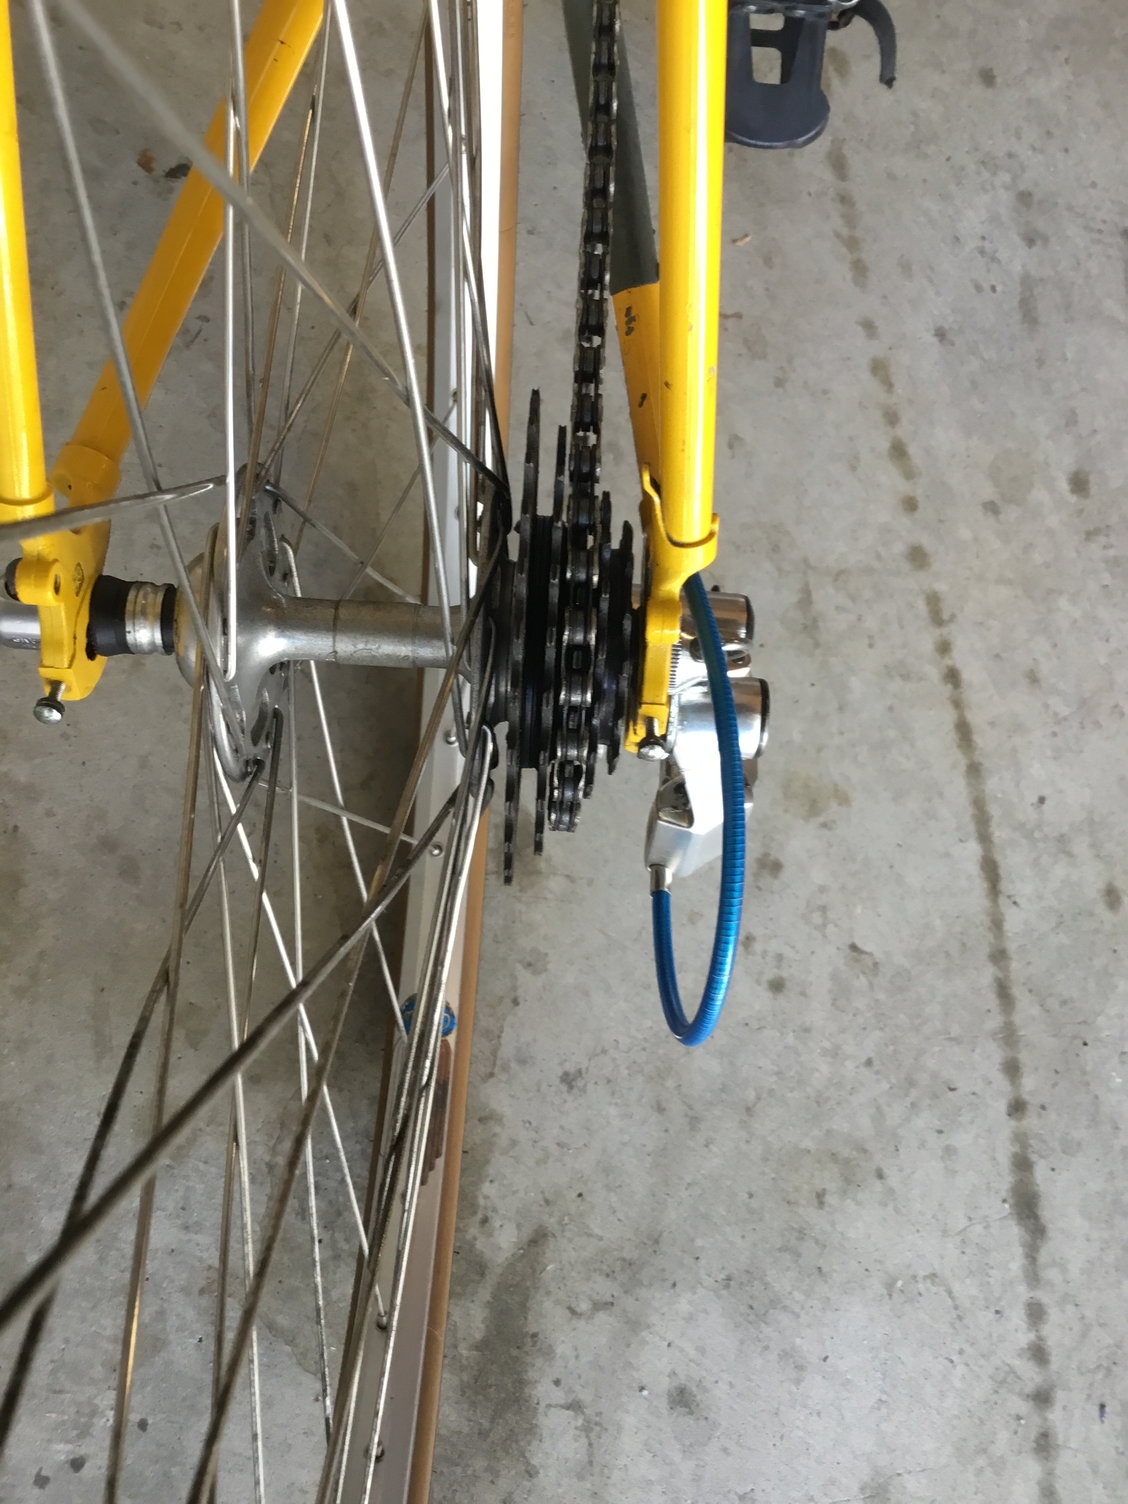
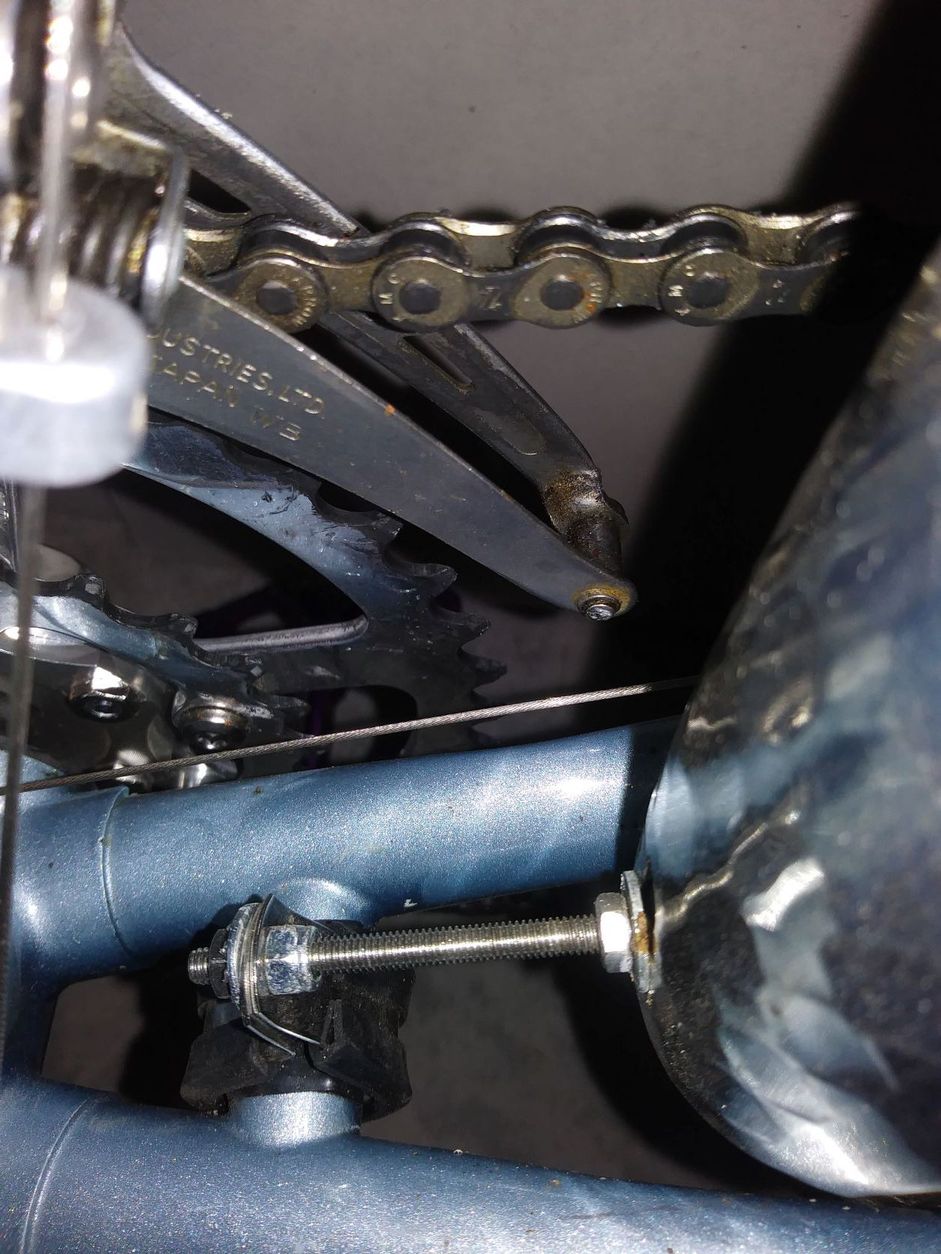
2) The fact that I installed a rear fender and the way I did the install makes it necessary that the rear tire be deflated in order to remove the rear wheel. I wanted to nail the fender line so I used a made a rigid connection from the chain stay bridge to the fender using a bolt, several nuts/washers, and a P clamp so I didn't have to drill the stay (photo). This works great for the purpose of adjusting the fender line, but offers little flexibility to be able to push the wheel forward in the horizontal drop outs when removing the wheel. I have used the Velo Orange 'spring thing' for this type of fender connection on another bike, but I prefer a fully rigid connection for making the fender line.
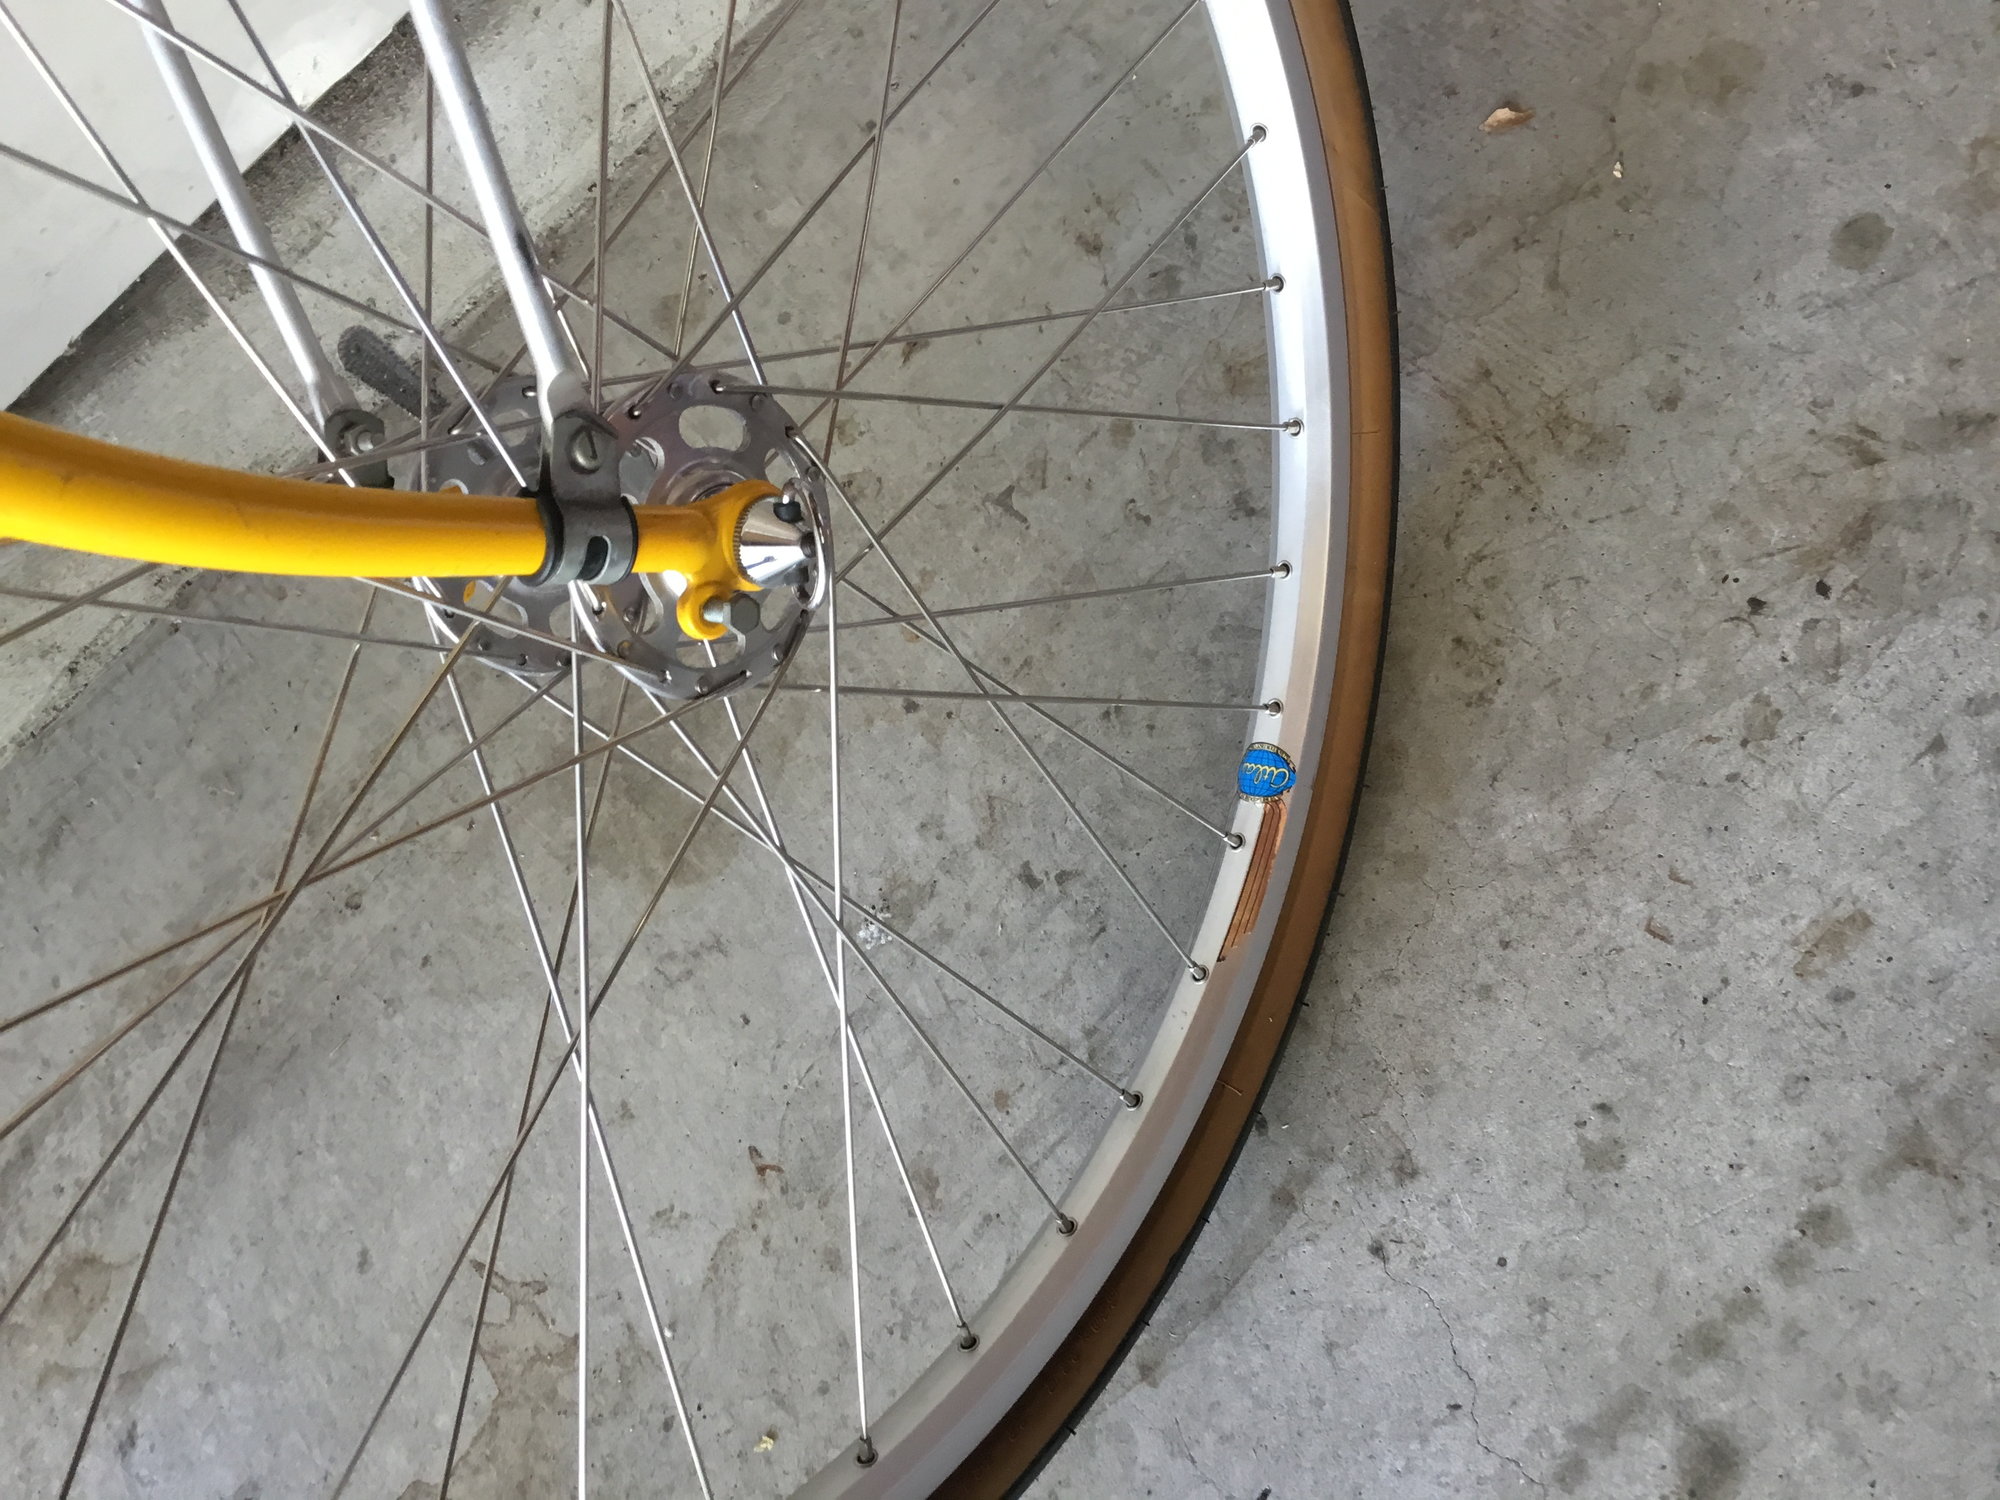
Add to this the fact that the rear hub on this bike is 130 mm while the rear drop out spacing is only 122 mm. On a work stand I can fit the rear wheel into the the drop outs by hand if I remove the skewer and exercise patience, but I anticipate a real struggle some day trying to fix a rear tire flat on the side of the road. I have ridden this bike about 600 miles so far without a flat, but the inevitable is lurking somewhere in the future.
I could re-space the drop-outs using the threaded rods/washers/nuts method shown in many Youtube videos but I am afraid that I would damage this special Reynolds 531 frame by cracking the stay welds or damaging the stays themselves. Some of the Youtube 'experts' are cranking their rear drop outs to a dimension of 170 mm or more in order to gain 5 to 7 mm when they spring back. Yikes!
But, it's this type of idiosyncrasy that makes an modified old bike interesting and I'm going to live with it. I can always call AAA, right?
1) The Tange headset is finicky. If I tighten it just barely enough to take the little click out of it (when I apply the front brake and push it forward) then it is so tight that I can't ride no-handed and the steering is way too stiff. If I then barely loosen the headset nut - perhaps 5 degrees - then the click comes back but I can ride no-handed and the steering feels normal. There is no sweet-spot with this headset. I have decided to live with the slight 'click' because the steering feels normal.
2) The fact that I installed a rear fender and the way I did the install makes it necessary that the rear tire be deflated in order to remove the rear wheel. I wanted to nail the fender line so I used a made a rigid connection from the chain stay bridge to the fender using a bolt, several nuts/washers, and a P clamp so I didn't have to drill the stay (photo). This works great for the purpose of adjusting the fender line, but offers little flexibility to be able to push the wheel forward in the horizontal drop outs when removing the wheel. I have used the Velo Orange 'spring thing' for this type of fender connection on another bike, but I prefer a fully rigid connection for making the fender line.
Add to this the fact that the rear hub on this bike is 130 mm while the rear drop out spacing is only 122 mm. On a work stand I can fit the rear wheel into the the drop outs by hand if I remove the skewer and exercise patience, but I anticipate a real struggle some day trying to fix a rear tire flat on the side of the road. I have ridden this bike about 600 miles so far without a flat, but the inevitable is lurking somewhere in the future.
I could re-space the drop-outs using the threaded rods/washers/nuts method shown in many Youtube videos but I am afraid that I would damage this special Reynolds 531 frame by cracking the stay welds or damaging the stays themselves. Some of the Youtube 'experts' are cranking their rear drop outs to a dimension of 170 mm or more in order to gain 5 to 7 mm when they spring back. Yikes!
But, it's this type of idiosyncrasy that makes an modified old bike interesting and I'm going to live with it. I can always call AAA, right?
__________________
If someone tells you that you have enough bicycles and you don't need any more, stop talking to them. You don't need that kind of negativity in your life.
If someone tells you that you have enough bicycles and you don't need any more, stop talking to them. You don't need that kind of negativity in your life.
Likes For gugie:
11-27-21, 06:52 AM
#889
Junior Member
My latest conversion is another Singular Osprey, I already have one of these that I'd converted a while back as a test (posted a few pages back), but it didn't have a Dynamo, fork clearance was a little tighter than I wanted, and the Tektro brakes were OK but right at their full reach.
I decided I like it but I wanted to make some minor changes. I had another spare frame so decided to build this one with Mafac Raid's, different fork, a Dyno wheel and a few other minor changes. I didn't want to be without a 650B bike while I was building this one so have been using the other one till this was finished, now it is I'm planning to put the other one back to 700C so I can run one of each depending on my mood and the nature of the route.
I decided I like it but I wanted to make some minor changes. I had another spare frame so decided to build this one with Mafac Raid's, different fork, a Dyno wheel and a few other minor changes. I didn't want to be without a 650B bike while I was building this one so have been using the other one till this was finished, now it is I'm planning to put the other one back to 700C so I can run one of each depending on my mood and the nature of the route.
Likes For amedias:
11-27-21, 11:15 AM
#890
tantum vehi

Join Date: Jul 2008
Location: Flathead Valley, MT
Posts: 4,440
Bikes: More than I care to admit
Mentioned: 153 Post(s)
Tagged: 0 Thread(s)
Quoted: 1167 Post(s)
Liked 992 Times
in
491 Posts
That�s a very French conversion - especially love the retrofrictions matched to a Sachs/Huret New Success!
__________________
1970 Gitane TdF; 1973 Gitane TdF
1979 Trek 710; 1981 Trek 412; 1981 Trek 710
1984 Specialized Stumpjumper Sport; 1985 Specialized Allez SE; 1988 Specialized Sirrus; 1989 Specialized Rock Combo
1984 Ross Mt. Hood
1988 Centurion Ironman Expert
1991 Bridgestone RB-1
1992 Serotta Colorado TG
2015 Elephant NFE
1979 Trek 710; 1981 Trek 412; 1981 Trek 710
1984 Specialized Stumpjumper Sport; 1985 Specialized Allez SE; 1988 Specialized Sirrus; 1989 Specialized Rock Combo
1984 Ross Mt. Hood
1988 Centurion Ironman Expert
1991 Bridgestone RB-1
1992 Serotta Colorado TG
2015 Elephant NFE
11-28-21, 12:46 PM
#891
aka Tom Reingold

Join Date: Jan 2009
Location: New York, NY, and High Falls, NY, USA
Posts: 40,498
Bikes: 1962 Rudge Sports, 1971 Raleigh Super Course, 1971 Raleigh Pro Track, 1974 Raleigh International, 1975 Viscount Fixie, 1982 McLean, 1996 Lemond (Ti), 2002 Burley Zydeco tandem
Mentioned: 511 Post(s)
Tagged: 0 Thread(s)
Quoted: 7346 Post(s)
Liked 2,453 Times
in
1,430 Posts
@amedias, that's beautiful.
__________________
Tom Reingold, tom@noglider.com
New York City and High Falls, NY
Blogs: The Experienced Cyclist; noglider's ride blog
�When man invented the bicycle he reached the peak of his attainments.� � Elizabeth West, US author
Please email me rather than PM'ing me. Thanks.
Tom Reingold, tom@noglider.com
New York City and High Falls, NY
Blogs: The Experienced Cyclist; noglider's ride blog
�When man invented the bicycle he reached the peak of his attainments.� � Elizabeth West, US author
Please email me rather than PM'ing me. Thanks.
11-28-21, 06:05 PM
#892
Senior Member
Just saw this particular post several months late, my comments:
1. Recommend face, chase and replace. A properly installed new headset will absolutely ride you of this.
2. The spring thingie from VO is clever, but I find it rattles too much. I've used a cork with a hole drilled out through it as a spacer. They're typically pliable enough so you can push against the fender, squish the cork, and get your tire in and out.
3. I've respaced dozens of frames with no issue. 531 isn't "special", it'll take a lot of bending back and forth. What I don't suggest is usine the threaded rod method. That gives equal force to both sides, whereas drive side chainstays are often indented for chainring clearance, and will bend before the non-drive side. That results in a non-centered rear wheel. I've had people come over to the Atelier and coached them through the process. It's probably not something most would want to try themselves, however.
1. Recommend face, chase and replace. A properly installed new headset will absolutely ride you of this.
2. The spring thingie from VO is clever, but I find it rattles too much. I've used a cork with a hole drilled out through it as a spacer. They're typically pliable enough so you can push against the fender, squish the cork, and get your tire in and out.
3. I've respaced dozens of frames with no issue. 531 isn't "special", it'll take a lot of bending back and forth. What I don't suggest is usine the threaded rod method. That gives equal force to both sides, whereas drive side chainstays are often indented for chainring clearance, and will bend before the non-drive side. That results in a non-centered rear wheel. I've had people come over to the Atelier and coached them through the process. It's probably not something most would want to try themselves, however.
Hello and Happy Holidays!
Re: #1 - the clunky headset - I tried the standard fix of replacing the caged bearings with loose bearings (5/32") and voila! - a buttery smooth and easily-adjusted headset with no clunky-ness. Yay!
Re: #2 - In my desire to 'nail' the fender-line (which looks pretty good if I do say so myself!) I created an inflexible fender connection at the chainstay bridge. Your idea of using a cork is certainly a valid one, but for now I am going to hope that the bicycle gods continue to watch over me and save me from a rear flat. However, in the event that I do get a flat I am now carrying a 4 foot length of 1/4" rope that I can use to suspend the bike from a tree limb or similar via the seat post - hopefully to make the work more easily accomplished. If this proves too awkward I can always flip the bike over onto the brake hoods and seat, but I'd rather not.
A buddy of mine got a rear flat a couple weeks ago on a back road about 12 miles from the end of the ride. We worked on it together and I thought how much more of a struggle it would have been to make the same repair on my 710!
Re: #3 - I checked and you are correct - the drive-side chainstay on the 710 is indented in order to clear the chain rings. I see your point about how spreading the rear dropouts with seemingly equal force applied to each side could end-up creating misalignment due to the reduced resistance on the drive-side. How does one spread the chainstays without creating misalignment?
11-28-21, 07:11 PM
#893
Bike Butcher of Portland
Join Date: Jul 2014
Location: Portland, OR
Posts: 11,630
Bikes: It's complicated.
Mentioned: 1299 Post(s)
Tagged: 0 Thread(s)
Quoted: 4677 Post(s)
Liked 5,790 Times
in
2,279 Posts
Re: #3 - I checked and you are correct - the drive-side chainstay on the 710 is indented in order to clear the chain rings. I see your point about how spreading the rear dropouts with seemingly equal force applied to each side could end-up creating misalignment due to the reduced resistance on the drive-side. How does one spread the chainstays without creating misalignment?
You'll need a way to measure the dropout width - inner face to inner face. A set of calipers works well, but a metric ruler/tape measurer is adequate as well.
A way to check your rear triangle to make sure it's centered on the frame is important. Park makes the tool I use. I've seen DIY versions of iti - it uses the same concept as a dishing tool.
The force you need to respace a frame is best done with the frame in a vice, with the bottom bracket faces clamped firmly. I sneak up on it using another Park tool.
Finally, the dropouts should be checked for parallelism.
Lots of specialized tools, and ways to make DIY versions are on the internet. Also best to have someone teach you how to use them - a few decades ago I was taught by Ed Litton, a well known frame builder and repairer in the California Bay Area. If you were in my area, I'd invite you over and show you how with my tools.
Note that the "perfection" way to do this is using a frame builder's flat table and check alignment on the rest of the frame as well. The method I detailed above is "good enough" for most people.
__________________
If someone tells you that you have enough bicycles and you don't need any more, stop talking to them. You don't need that kind of negativity in your life.
If someone tells you that you have enough bicycles and you don't need any more, stop talking to them. You don't need that kind of negativity in your life.
Last edited by gugie; 11-28-21 at 07:15 PM.
11-28-21, 07:19 PM
#894
Senior Member

Join Date: Dec 2008
Location: Seattle, WA
Posts: 649
Mentioned: 16 Post(s)
Tagged: 0 Thread(s)
Quoted: 81 Post(s)
Liked 221 Times
in
65 Posts
As always ask yourself, "What would Sheldon do?"
In this classic Sheldon Brown article on frame spacing, he describes how to spread the rear triangle with a 2 by 4 or other sturdy piece of lumber: https://www.sheldonbrown.com/frame-spacing.html
No matter how you do it, you should always check alignment when you're done. The above referenced Sheldon article also describes "the string method" as a way to check alignment without any special tools other than a few feet of string.
I've used this 2 by 4 method for spreading and the string method for checking/adjusting alignment on quite a few frames, and it has always worked quite well for me. No disasters yet.
Edit: Ha! gugie and I must having be typing at the same time. You should probably follow his advice since he's probably done this more than I have.
Last edited by lonesomesteve; 11-28-21 at 07:24 PM. Reason: Gugie beat me to it.
11-28-21, 07:34 PM
#895
Senior Member

Join Date: Jan 2008
Location: Beaverton, OR
Posts: 14,742
Bikes: Yes
Mentioned: 525 Post(s)
Tagged: 0 Thread(s)
Quoted: 3230 Post(s)
Liked 3,865 Times
in
1,439 Posts
I've tried the threaded rod technique a couple of times. You can make it work, but I have had an issue at least once with it coming out uneven. My biggest complaint about it, though is that the distance you need to spread the dropouts to get it to "take" is unnerving -- usually around 165 mm. I'm sure you end up doing that much spreading with the other methods too, but with the rod method you see it and are acutely aware of how much force those last 10 mm take. It just feels wrong. Doing the same job using the Park tools @gugie mentioned is much more satisfying though you could definitely do some damage with the Park spreader if you aren't careful. On the plus side, it's going to be my weapon of choice in the event of a zombie apocalypse.
__________________
My Bikes
My Bikes
Last edited by Andy_K; 11-29-21 at 01:11 AM.
11-28-21, 08:15 PM
#896
Bike Butcher of Portland
Join Date: Jul 2014
Location: Portland, OR
Posts: 11,630
Bikes: It's complicated.
Mentioned: 1299 Post(s)
Tagged: 0 Thread(s)
Quoted: 4677 Post(s)
Liked 5,790 Times
in
2,279 Posts
As always ask yourself, "What would Sheldon do?"
In this classic Sheldon Brown article on frame spacing, he describes how to spread the rear triangle with a 2 by 4 or other sturdy piece of lumber: https://www.sheldonbrown.com/frame-spacing.html
No matter how you do it, you should always check alignment when you're done. The above referenced Sheldon article also describes "the string method" as a way to check alignment without any special tools other than a few feet of string.
I've used this 2 by 4 method for spreading and the string method for checking/adjusting alignment on quite a few frames, and it has always worked quite well for me. No disasters yet.
Edit: Ha! gugie and I must having be typing at the same time. You should probably follow his advice since he's probably done this more than I have.
In this classic Sheldon Brown article on frame spacing, he describes how to spread the rear triangle with a 2 by 4 or other sturdy piece of lumber: https://www.sheldonbrown.com/frame-spacing.html
No matter how you do it, you should always check alignment when you're done. The above referenced Sheldon article also describes "the string method" as a way to check alignment without any special tools other than a few feet of string.
I've used this 2 by 4 method for spreading and the string method for checking/adjusting alignment on quite a few frames, and it has always worked quite well for me. No disasters yet.
Edit: Ha! gugie and I must having be typing at the same time. You should probably follow his advice since he's probably done this more than I have.
__________________
If someone tells you that you have enough bicycles and you don't need any more, stop talking to them. You don't need that kind of negativity in your life.
If someone tells you that you have enough bicycles and you don't need any more, stop talking to them. You don't need that kind of negativity in your life.
11-28-21, 08:34 PM
#897
working on my sandal tan
Join Date: Aug 2011
Location: CID
Posts: 22,627
Bikes: 1991 Bianchi Eros, 1964 Armstrong, 1988 Diamondback Ascent, 1988 Bianchi Premio, 1987 Bianchi Sport SX, 1980s Raleigh mixte (hers), All-City Space Horse (hers)
Mentioned: 98 Post(s)
Tagged: 0 Thread(s)
Quoted: 3870 Post(s)
Liked 2,563 Times
in
1,577 Posts
Even if the threaded rod method perfectly spread the dropouts equally each time, how many frames out there are perfectly aligned to start with?  No matter what, you should have a good way to adjust one side at a time, and when you do, you might as well just do that.
No matter what, you should have a good way to adjust one side at a time, and when you do, you might as well just do that.
Likes For ThermionicScott:
11-29-21, 08:22 AM
#899
Old Boy

Join Date: Jan 2016
Location: Minnesota
Posts: 2,127
Bikes: Mostly 1st-generation, top-of-the-line, non-unicrown MTBs/ATBs: All 1984 models: Dawes Ranger, Peugeot Canyon Express, Ross Mt. Whitney (chrome), Schwinn High Sierra, and a 1983 Trek 850.
Mentioned: 134 Post(s)
Tagged: 0 Thread(s)
Quoted: 984 Post(s)
Liked 1,715 Times
in
611 Posts

I use a Park FFG-2 alignment tool, marked as you see here, to precisely spread and align the rear triangle as I go. Knowing the amount of hysteresis in typical Chrome Moly or 531 rear stay tubing to be around 20%, I stop adjusting the alignment at 130mm and continue spreading to about 165 - 170mm, as Andy_K suggested here. Then, just to make sure, I use the string check to verify correct centering. If that is off at all, I have an old broom handle with a 'C'-shaped notch on one end that I use with a medium sledge hammer to correct the offset. This has always worked for me.
*
*
*
__________________

Roulez pour la joie, jamais pour la douleur.
USMC 1981-1991 Semper Fi!
Roulez pour la joie, jamais pour la douleur.
USMC 1981-1991 Semper Fi!
Last edited by DQRider; 11-29-21 at 08:26 AM.
11-29-21, 09:05 AM
#900
Senior Member

Join Date: Apr 2012
Location: Middle Earth (aka IA)
Posts: 20,433
Bikes: A bunch of old bikes and a few new ones
Mentioned: 178 Post(s)
Tagged: 0 Thread(s)
Quoted: 5888 Post(s)
Liked 3,471 Times
in
2,079 Posts
Spread one side at a time.
You'll need a way to measure the dropout width - inner face to inner face. A set of calipers works well, but a metric ruler/tape measurer is adequate as well.
A way to check your rear triangle to make sure it's centered on the frame is important. Park makes the tool I use. I've seen DIY versions of iti - it uses the same concept as a dishing tool.
The force you need to respace a frame is best done with the frame in a vice, with the bottom bracket faces clamped firmly. I sneak up on it using another Park tool.
Finally, the dropouts should be checked for parallelism.
Lots of specialized tools, and ways to make DIY versions are on the internet. Also best to have someone teach you how to use them - a few decades ago I was taught by Ed Litton, a well known frame builder and repairer in the California Bay Area. If you were in my area, I'd invite you over and show you how with my tools.
Note that the "perfection" way to do this is using a frame builder's flat table and check alignment on the rest of the frame as well. The method I detailed above is "good enough" for most people.