


towards the first bike-frame: how to get started with geometry
 09-08-21, 06:59 AM
#1
Newbie
Thread Starter
towards the first bike-frame: how to get started with geometry
Hello dear all,
i am currently working out my first frame (racing) - and therefore i need to need a CAD program - guess that i can use RattleCAD or something else.
i am 192 cm tall - and i guess that i need to create a XL-frame..
Question - do you plan your whole bike in the CAD or do you take some sizes from
a. your old bike
b. some tables that are out there
c. how to get started here
here i have made up my mind - i guess that i surely have to take the right column:

What about Reach and Stack - do you plan them on CAD or how to get to those details!?
look forward to hear from you
Regards
i am currently working out my first frame (racing) - and therefore i need to need a CAD program - guess that i can use RattleCAD or something else.
i am 192 cm tall - and i guess that i need to create a XL-frame..
Question - do you plan your whole bike in the CAD or do you take some sizes from
a. your old bike
b. some tables that are out there
c. how to get started here
here i have made up my mind - i guess that i surely have to take the right column:
What about Reach and Stack - do you plan them on CAD or how to get to those details!?
look forward to hear from you
Regards
 09-08-21, 08:49 AM
#2

Team Beer
Join Date: Apr 2004
Location: Sacramento CA
Posts: 6,339
Bikes: Too Many
Mentioned: 3 Post(s)
Tagged: 0 Thread(s)
Quoted: 114 Post(s)
Liked 159 Times
in
104 Posts
I started from a bike that I own and was my best fitting. With that as a starting point, I tweaked little things to adjust the handling. Up to a certain point fit and handling can be figured separately. This is a generalization and seasoned builder would argue that they are intertwined but for the first couple of frames I found this works. Reach and stack are for fit while trail and chainstay length (and to some degree BB drop) are for handling. I'm curious what advise others give.
__________________
I'm not one for fawning over bicycles, but I do believe that our bikes communicate with us, and what this bike is saying is, "You're an idiot." BikeSnobNYC
I'm not one for fawning over bicycles, but I do believe that our bikes communicate with us, and what this bike is saying is, "You're an idiot." BikeSnobNYC
Likes For Cynikal:
09-08-21, 09:35 AM
#3
Senior Member
Join Date: Feb 2012
Location: Rochester, NY
Posts: 18,056
Bikes: Stewart S&S coupled sport tourer, Stewart Sunday light, Stewart Commuting, Stewart Touring, Co Motion Tandem, Stewart 3-Spd, Stewart Track, Fuji Finest, Mongoose Tomac ATB, GT Bravado ATB, JCP Folder, Stewart 650B ATB
Mentioned: 0 Post(s)
Tagged: 0 Thread(s)
Quoted: 4195 Post(s)
Liked 3,837 Times
in
2,295 Posts
I use BikeCad Pro. Decided years ago that I would be doing this stuff for a long time more and the cost then was worth it. I still feel this way and am glad I did.
When I started out I did full scale draftings (sign paper taped to the floor, a yard stick and some basic trig tables for the angles). As I progressed I learned the math way to calculate dimensions and used a small programable calculator. Then I came across Bike Cad. Having a strong base of visually seeing the frame's design the calculated method was easier for me to understand and "see". I strongly suggest trying to draw out a design at least once.
Cynikal states what many/most first time builders do. They begin with a known bike and a list of differences they are curious about. Then they play with whatever method they can do and produce possible designs. At some point they get tired of only dreaming and begin the actual fabrication. between these two points there's a lot of other stuff to do, like being able to use a torch (TiG or flame), coming up with fixturing and alignment "tooling" and of course sourcing the materials (and it's this that currently a challenge for some parts).
I suggest keeping your first attempt as basic and "normal" as possible, the fewer fancy aspects the better the results tend to be at first. Avoid really thin walls and hardened/heat treated tubing. Traditional tab type drop outs have more flexibility in how they mate with blades and stays. I know of no first timers who didn't say (at least to themselves) "the next one I make will have that instead of this detail/spec". It's common to have your first frame only be used till a replacement can be made. (I've made about 24 frames and forks for myself over the 44 years I have been playing with building, only 7 are in use currently).
You don't say where you are. Is there any builder near you that you can call on to help guide/mentor? Some of us here have helped first timers off forum or in person. Andy
__________________
AndrewRStewart
AndrewRStewart
Likes For Andrew R Stewart:
09-08-21, 11:28 AM
#4


Randomhead
Join Date: Aug 2008
Location: Happy Valley, Pennsylvania
Posts: 24,386
Mentioned: 0 Post(s)
Tagged: 0 Thread(s)
Quoted: 4 Post(s)
Liked 3,687 Times
in
2,510 Posts
I still don't have an intuitive feel for reach and stack so I just go by effective top tube and effective seat tube.
If you pick those numbers, reach and stack are uniquely determined.
If you pick those numbers, reach and stack are uniquely determined.
Likes For unterhausen:
09-10-21, 02:33 PM
#5
Senior Member
Join Date: Dec 2019
Posts: 954
Mentioned: 3 Post(s)
Tagged: 0 Thread(s)
Quoted: 321 Post(s)
Liked 263 Times
in
212 Posts
There are some online frame fit calculators where you measure up all your body and it spits out recommended numbers which you then ignore.
I started measuring bikes I already had and interpolating between them. I have now made a fitting bike per the thread that was posted about them here which is really cool. But for your first frame you probably have enough work making jigs and things and will want to get on with the frame.
Agree with Andrew start simple on the first project. Mine was a fixed gear. I made it "square" geometry (ST same length as TT) which seems to fit me very well. This is the traditional Italian Vitruvian Man design and gives you fewer parameters to worry about
If you're buying in the fork get it first so you can measure it and don't forget to account for the lower stack.
09-13-21, 11:17 AM
#6
Junior Member
09-13-21, 11:37 AM
#7
Randomhead
Join Date: Aug 2008
Location: Happy Valley, Pennsylvania
Posts: 24,386
Mentioned: 0 Post(s)
Tagged: 0 Thread(s)
Quoted: 4 Post(s)
Liked 3,687 Times
in
2,510 Posts
It's been a long time, but for the fit, I copied the bike I had been riding. First 25 frames should be for you anyway.
I guess it's 45 years later and I'm still copying that bike with minor changes
I guess it's 45 years later and I'm still copying that bike with minor changes
09-13-21, 04:03 PM
#8
Junior Member
So, what was that original bike? And can we get your 45 years in the making geometry?
09-13-21, 04:17 PM
#9
Randomhead
Join Date: Aug 2008
Location: Happy Valley, Pennsylvania
Posts: 24,386
Mentioned: 0 Post(s)
Tagged: 0 Thread(s)
Quoted: 4 Post(s)
Liked 3,687 Times
in
2,510 Posts
I don't actually remember what bike it was copied from. I have a fairly long body in comparison to my legs, so it's idiosyncratic to me.
Last bike I built has a top tube that's 2cm longer than what I used to ride. That was to make it so a randonneuring front bag could be closer to the head tube.
Last bike I built has a top tube that's 2cm longer than what I used to ride. That was to make it so a randonneuring front bag could be closer to the head tube.
09-13-21, 08:54 PM
#10
blahblahblah chrome moly

Join Date: Apr 2009
Location: Seattle
Posts: 1,985
Mentioned: 92 Post(s)
Tagged: 0 Thread(s)
Quoted: 1172 Post(s)
Liked 2,567 Times
in
1,072 Posts
I don't actually remember what bike it was copied from. I have a fairly long body in comparison to my legs, so it's idiosyncratic to me.
Last bike I built has a top tube that's 2cm longer than what I used to ride. That was to make it so a randonneuring front bag could be closer to the head tube.
Last bike I built has a top tube that's 2cm longer than what I used to ride. That was to make it so a randonneuring front bag could be closer to the head tube.
Mark B
Likes For bulgie:
09-14-21, 07:10 AM
#11
Randomhead
Join Date: Aug 2008
Location: Happy Valley, Pennsylvania
Posts: 24,386
Mentioned: 0 Post(s)
Tagged: 0 Thread(s)
Quoted: 4 Post(s)
Liked 3,687 Times
in
2,510 Posts
I have trouble looking at that short stem though.
People are also going to longer top tubes on all-road bikes to get the front wheel further out. Slackening the HTA with longer rake affects the handling a lot, and generally makes standing up a chore. I suppose that mountain bikes were first in this trend.
People are also going to longer top tubes on all-road bikes to get the front wheel further out. Slackening the HTA with longer rake affects the handling a lot, and generally makes standing up a chore. I suppose that mountain bikes were first in this trend.
Likes For unterhausen:
09-18-21, 07:20 AM
#12
framebuilder
There are 2 ways to design a bike frame. The most common is to like borrow the Italian road racing design outlined in the CONI manual (there is an English translation). This assumes the purpose of the frame is for performance in order to get the maximum speed with good bike handling characteristics. This requires the rider to adjust his position to fit the frame/bicycle. Many/most production bicycles are some variation of this philosophy. They will have a seat angle of at least 73 degrees and a top tube length and head angle/fork rake to place the front wheel just out far enough out front to miss toes but not so far as to make steering sluggish. Company lawyers love this design. Most likely this design requires the handlebars to be significantly lower than the saddle for aerodynamics.
Method #2 is to design a frame around a person�s bicycle position. This is how I usually do it. Not everyone can or wants to force themselves into a maybe uncomfortable position that provides maximum efficiency. They might like or need to have their handlebars a bit higher and closer to be more comfortable. Loss of flexibility with age and an increase in weight (or just liking to ride at modest speeds) contributes to handlebars needing to come up and back. And urban riders like to sit more upright so they can keep their eyes focused up the road for any potential trouble. A more upright fit can create design challenges. As the handlebars get higher, so does the seat need to go further back requiring a slacker seat tube angle (maybe in the 71� or 72� range). If everything else remains the same, that can bring the front wheel back into rotating toes. In addition the head tube probably needs to be longer so there isn�t an ugly amount of quill stem sticking out or stackers required. Now comes the process of deciding what compromises to make in order to make the frame properly fit the rider and still have everything look proportional.
I like to control every aspect of making a frame including fitting and paint. I have several stationary fitting bikes including a home-made one (I posted its dimensions on this forum). With these bikes it is easy enough to establish a rider�s preferred seat/handlebar/pedal relationship. I realized early in my career that body measurements and bicycle position were only roughly related. Two people with similar body measurements could have quite different bicycle positions. That is why I consider a fit session to be essential in designing a frame for an individual person.
After the fit session, I then transfer that position to my own laser cut and etched fixture that is really a mechanical frame drawing. This fixture eliminates the need to do a full scale drawing. I have accessories to hold what I think will be the right stem and seatpost/saddle in the same position on the fixture as was discovered (or reconfirmed) on the fitting bike. The pieces on the fixture that represent each tube are slide around to match the bike components. The BB drop, angles and lengths are chosen to correspond with the kind of use the frame will get. The seat tube angle is determined by saddle set back amount. Almost always some compromises will have to be made to make the frame design match the fit dimensions. For example, if I am not getting enough toe clearance, do I want to just leave it, lengthen the top tube and shorten the stem or slacken the head angle? Or some combination?
The other advantage of using real components on my fixture to set the design is that it is easier for me to tell that everything looks proportional. Seeing it life size is different than seeing it on a computer screen. For example is the head tube high enough to avoid a silly number of stackers? Nothing is abstract. I don�t need trig to figure my down tube angle. I can just measure and place stuff where it is supposed to be.
To summarize, I base my design of off the rider�s bicycle position. Not the position that he presently has (because that is what he/she made work on whatever they had) but based on a fitting session. What I have found is that if a non-competitive rider is given the freedom to place their handlebars and seat where they like it best, it might not fit well on a common production frame design. No problem, we are custom builders and can change the design to match the rider�s requirements.

My homemade fitting bike. I've provided specs for this in another subject thread.
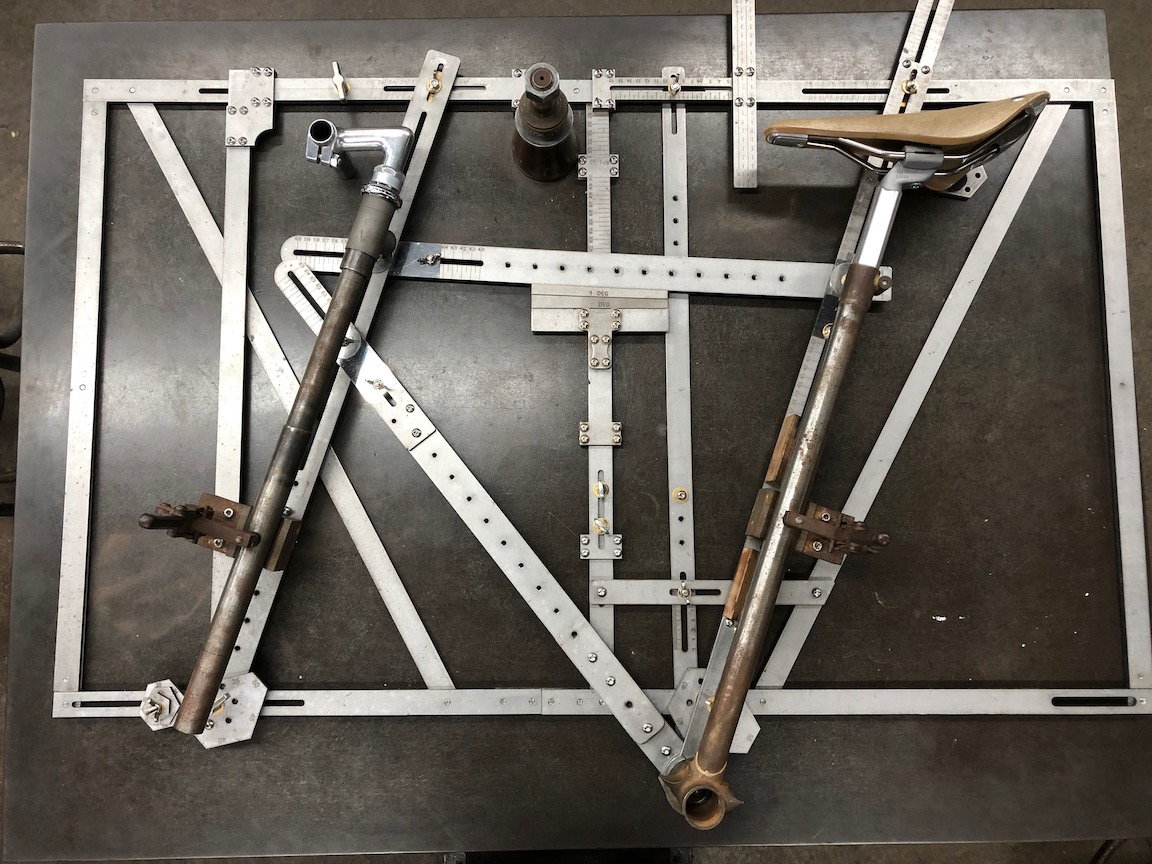
The stem and seat are positioned on my fixture in the same relationship as on the fitting bike. The frame is designed around that position.
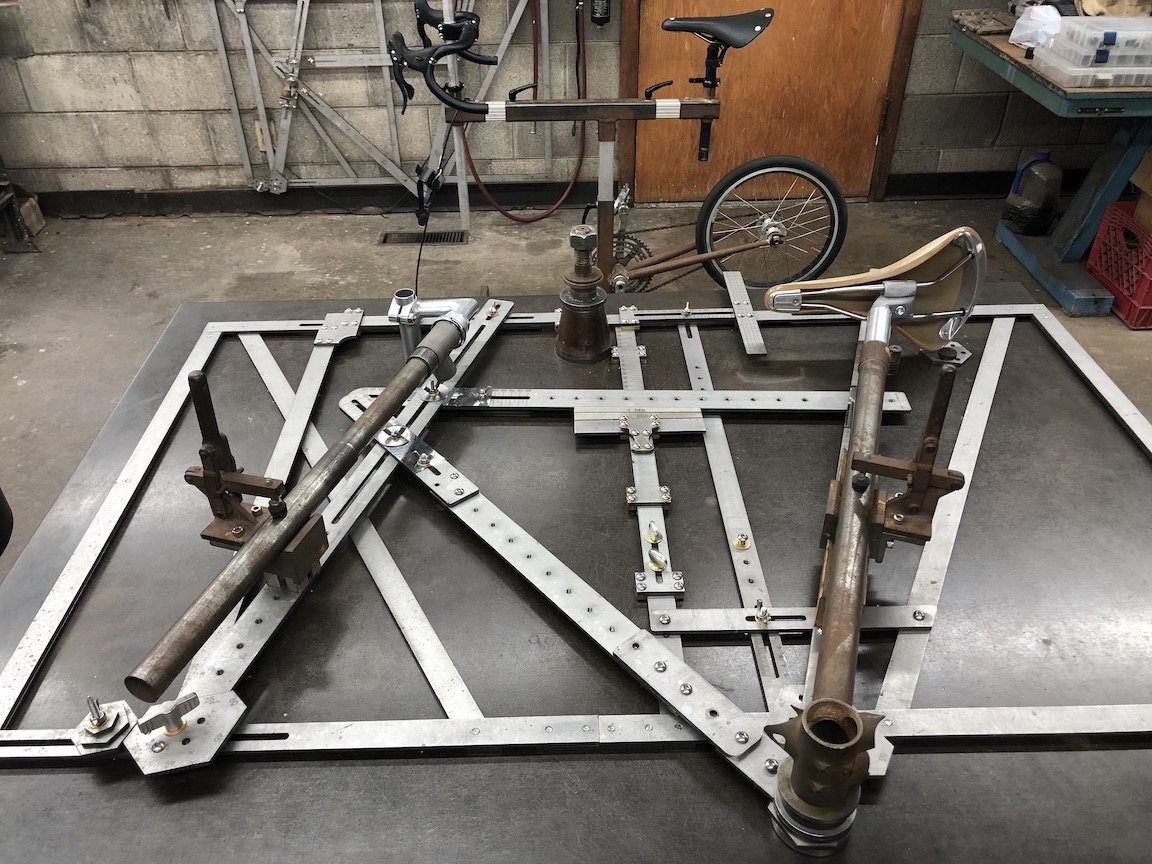
Another view from a different angle.
Method #2 is to design a frame around a person�s bicycle position. This is how I usually do it. Not everyone can or wants to force themselves into a maybe uncomfortable position that provides maximum efficiency. They might like or need to have their handlebars a bit higher and closer to be more comfortable. Loss of flexibility with age and an increase in weight (or just liking to ride at modest speeds) contributes to handlebars needing to come up and back. And urban riders like to sit more upright so they can keep their eyes focused up the road for any potential trouble. A more upright fit can create design challenges. As the handlebars get higher, so does the seat need to go further back requiring a slacker seat tube angle (maybe in the 71� or 72� range). If everything else remains the same, that can bring the front wheel back into rotating toes. In addition the head tube probably needs to be longer so there isn�t an ugly amount of quill stem sticking out or stackers required. Now comes the process of deciding what compromises to make in order to make the frame properly fit the rider and still have everything look proportional.
I like to control every aspect of making a frame including fitting and paint. I have several stationary fitting bikes including a home-made one (I posted its dimensions on this forum). With these bikes it is easy enough to establish a rider�s preferred seat/handlebar/pedal relationship. I realized early in my career that body measurements and bicycle position were only roughly related. Two people with similar body measurements could have quite different bicycle positions. That is why I consider a fit session to be essential in designing a frame for an individual person.
After the fit session, I then transfer that position to my own laser cut and etched fixture that is really a mechanical frame drawing. This fixture eliminates the need to do a full scale drawing. I have accessories to hold what I think will be the right stem and seatpost/saddle in the same position on the fixture as was discovered (or reconfirmed) on the fitting bike. The pieces on the fixture that represent each tube are slide around to match the bike components. The BB drop, angles and lengths are chosen to correspond with the kind of use the frame will get. The seat tube angle is determined by saddle set back amount. Almost always some compromises will have to be made to make the frame design match the fit dimensions. For example, if I am not getting enough toe clearance, do I want to just leave it, lengthen the top tube and shorten the stem or slacken the head angle? Or some combination?
The other advantage of using real components on my fixture to set the design is that it is easier for me to tell that everything looks proportional. Seeing it life size is different than seeing it on a computer screen. For example is the head tube high enough to avoid a silly number of stackers? Nothing is abstract. I don�t need trig to figure my down tube angle. I can just measure and place stuff where it is supposed to be.
To summarize, I base my design of off the rider�s bicycle position. Not the position that he presently has (because that is what he/she made work on whatever they had) but based on a fitting session. What I have found is that if a non-competitive rider is given the freedom to place their handlebars and seat where they like it best, it might not fit well on a common production frame design. No problem, we are custom builders and can change the design to match the rider�s requirements.
My homemade fitting bike. I've provided specs for this in another subject thread.
The stem and seat are positioned on my fixture in the same relationship as on the fitting bike. The frame is designed around that position.
Another view from a different angle.
09-18-21, 07:30 AM
#13
Drip, Drip.
Join Date: Oct 2020
Location: Southern Ontario
Posts: 1,575
Bikes: Trek Verve E bike, Felt Doctrine 4 XC, Opus Horizon Apex 1
Mentioned: 8 Post(s)
Tagged: 0 Thread(s)
Quoted: 1034 Post(s)
Liked 193 Times
in
163 Posts
It takes a lot of trial and error with different parts and frame sizes.
I am almost 190cm. I find that most XL size bikes (sizes similarl to the left one on that chart) are almost too small for me.
Use those measurements in the chart as a guideline, they will serve you will. Next would be to determine crank arm length. Standards sizes are small for you. Then, you'd need to figure out stem length. If you are closer to the small end of that specific frame size, you could do better with a stem that is slightly shorter.
Handlebar width is another important factor. You wouldn't like anything less than 460cm wide if were talking drop bar. It should be roughly shoulder width, not much wider or narrower.
You could also look around at some gravel bike measurements for comparison. That may work well for you.
09-18-21, 07:32 AM
#14
Drip, Drip.
Join Date: Oct 2020
Location: Southern Ontario
Posts: 1,575
Bikes: Trek Verve E bike, Felt Doctrine 4 XC, Opus Horizon Apex 1
Mentioned: 8 Post(s)
Tagged: 0 Thread(s)
Quoted: 1034 Post(s)
Liked 193 Times
in
163 Posts
I find like I am constantly wanting to use a longer stem (and increase stack height due to relatively tall saddle height) on every bike i try. At 190cm I am on the upper end of the average xl bike. The frames fit me fine, but not always the stem and certainly not a stock 175mm crankset. I always ditch those if I'm taking the bike seriously.
09-18-21, 04:26 PM
#15
Senior Member
Join Date: Dec 2019
Posts: 954
Mentioned: 3 Post(s)
Tagged: 0 Thread(s)
Quoted: 321 Post(s)
Liked 263 Times
in
212 Posts
I find like I am constantly wanting to use a longer stem (and increase stack height due to relatively tall saddle height) on every bike i try. At 190cm I am on the upper end of the average xl bike. The frames fit me fine, but not always the stem and certainly not a stock 175mm crankset. I always ditch those if I'm taking the bike seriously.
I would never have deviated this far from the norm if I hadn't started by making the fitting bike according to Doug's design.
Likes For guy153:
