


1200 Reasons to join The Cult: Doc Builds a Miyata

 03-21-19, 05:43 PM
#27
Banned.
Join Date: Dec 2007
Posts: 27,199
Mentioned: 34 Post(s)
Tagged: 1 Thread(s)
Quoted: 378 Post(s)
Liked 1,409 Times
in
909 Posts
But the big concern is a feature of this frame that differs from any other frame I've ever built up. Some of you (Robbie, others) know about my concerns because we've exchanged information about attempts (many of them unsuccessful, all of them frustrating) to do what I'm trying to accomplish here.
Once I have the frame in hand- hopefully late this evening- I'll know immediately whether I was able to suss this out. Pics and info then.
Meanwhile, keep that beer cold
Once I have the frame in hand- hopefully late this evening- I'll know immediately whether I was able to suss this out. Pics and info then.
Meanwhile, keep that beer cold
03-21-19, 07:09 PM
#29

Senior Member
Those aero DT shifter bosses can really be a pain. Good luck, can't wait to see the results.
__________________
My bikes: '81 Trek 957, '83 Trek 720, '85 Trek 500, '85 Trek 770,'81 Merckx, '85 Centurion Cinelli, '85 Raleigh Portage, '92 RB-2, '09 Bianchi
My bikes: '81 Trek 957, '83 Trek 720, '85 Trek 500, '85 Trek 770,
03-21-19, 08:13 PM
#30
aka: Dr. Cannondale
Thread Starter
Join Date: Jul 2009
Posts: 7,732
Mentioned: 234 Post(s)
Tagged: 0 Thread(s)
Quoted: 2155 Post(s)
Liked 3,403 Times
in
1,204 Posts
03-21-19, 08:14 PM
#31
aka: Dr. Cannondale
Thread Starter
Join Date: Jul 2009
Posts: 7,732
Mentioned: 234 Post(s)
Tagged: 0 Thread(s)
Quoted: 2155 Post(s)
Liked 3,403 Times
in
1,204 Posts
03-22-19, 12:34 PM
#32
aka: Dr. Cannondale
Thread Starter
Join Date: Jul 2009
Posts: 7,732
Mentioned: 234 Post(s)
Tagged: 0 Thread(s)
Quoted: 2155 Post(s)
Liked 3,403 Times
in
1,204 Posts
I've avoided 'top mount' or 'aero mount' frames in the past, mainly because of all the horror stories I've heard from owners who did anything to stray from what had been provided by the manufacturer as original equipment. Robbie and I went back and for months about how to solve this particular problem on his Klein (which he did with a true flash of insight), but when we communicated about this upcoming build, he cautioned me that there were no 'standard' mounting types, that they came in different sizes, shapes and attachment methods, and that he had blown more than a few bucks buying parts that just...didn't...fit. Or work. So when I saw the seller's pictures, and they included this:

I knew I was in for some customization of parts. Or at least, was hopeful that I could find some parts that were close enough to customize. The original equipment was Suntour friction on a Cyclone derailleur setup, and that just wasn't going to cut it for me. And I knew that there was very little swappability between Suntour and Shimano shifting parts, and perhaps not even between Shimano top mount parts of that era and the later components I intended to install.
So I took a deep breath and did a whole bunch of Interwebs research (much of which was completely useless) and then just decided to dive in the deep end and buy an early 80's Golden Arrow (what later became 105) top mount friction shifter setup, figuring it would be closest to what would be needed as the final part. In the end, it needed a lot of massaging in literally every dimension, but...well...see the following pics.

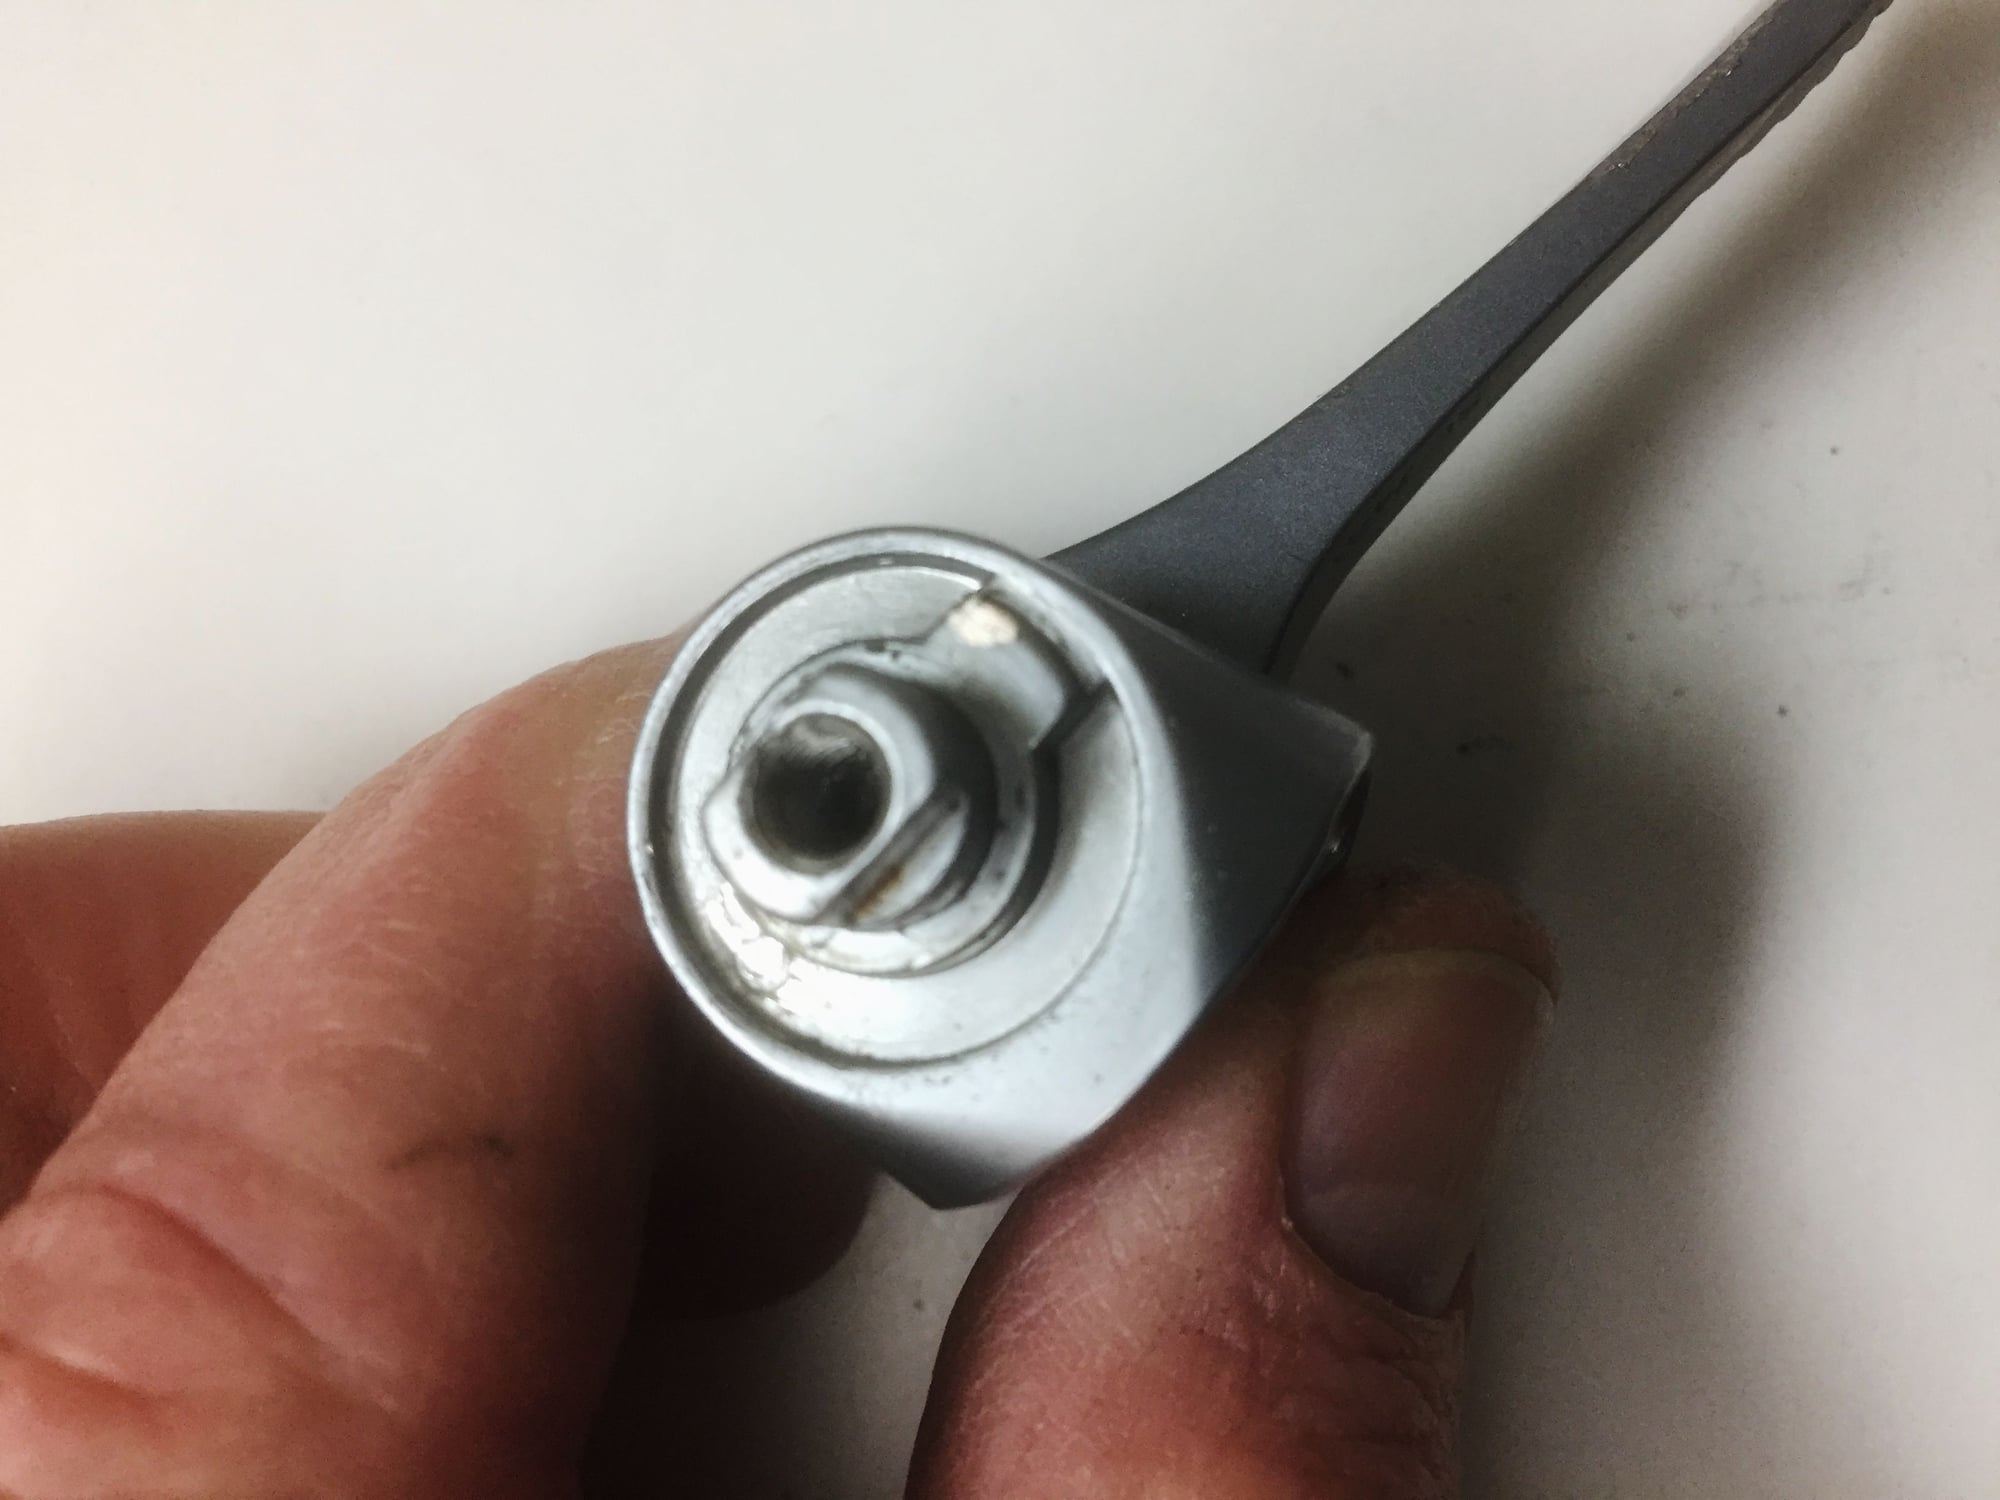
This is the top mount braze on from the Miyata frame.

This is the underside of the Shimano shifter mount. I had to grind away all of the ribs on the sides in order to fit snugly over the braze-on. Not much room in there, so wound up using a succession of Dremel grinding bits to attain the needed clearance.
__________________
Hard at work in the Secret Underground Laboratory...
Hard at work in the Secret Underground Laboratory...
Last edited by rccardr; 03-22-19 at 12:55 PM.
03-22-19, 12:48 PM
#33
aka: Dr. Cannondale
Thread Starter
Join Date: Jul 2009
Posts: 7,732
Mentioned: 234 Post(s)
Tagged: 0 Thread(s)
Quoted: 2155 Post(s)
Liked 3,403 Times
in
1,204 Posts
But WAIT- that's not all. By now you've seen the shift levers, and yeah, they were nominally 7401 7 speed Dura Ace levers, but I converted them to 8 speed using a new indexing pod. We'll talk later about the rest of the components. Meanwhile, the right (indexing) side of the mount had a little protrusion in the casting that had the be removed:
...and the small nubs on the inside of the right lever itself had to be milled down almost flush with the one remaining slotted washer so that it would fit on the slightly shorter mounting stub. Oh, and the stub had to be re-tapped to 5mm from 4.5mm. Freehand. The threading had to be correct vertically, horizontally, and for yaw, otherwise the lever wouldn't rotate properly on the stub when tightened down. No pressure!

The friction (left side) lever presented a whole different set of problems, and there was a lot of cold beer consumed in the process. The stub on this side had to be shortened a bit, otherwise the friction pod interfered with the stub when fully tightened down. The internals of the lever (as much as could be disassembled) had to be cleaned and polished to allow nice, smooth shifting feel, and it also had to be re-tapped to 5mm. Freehand.
Finally (well, as final as we're going to get in this installment), the mounting bolt hole was drilled out to accommodate the 6mm bolt.

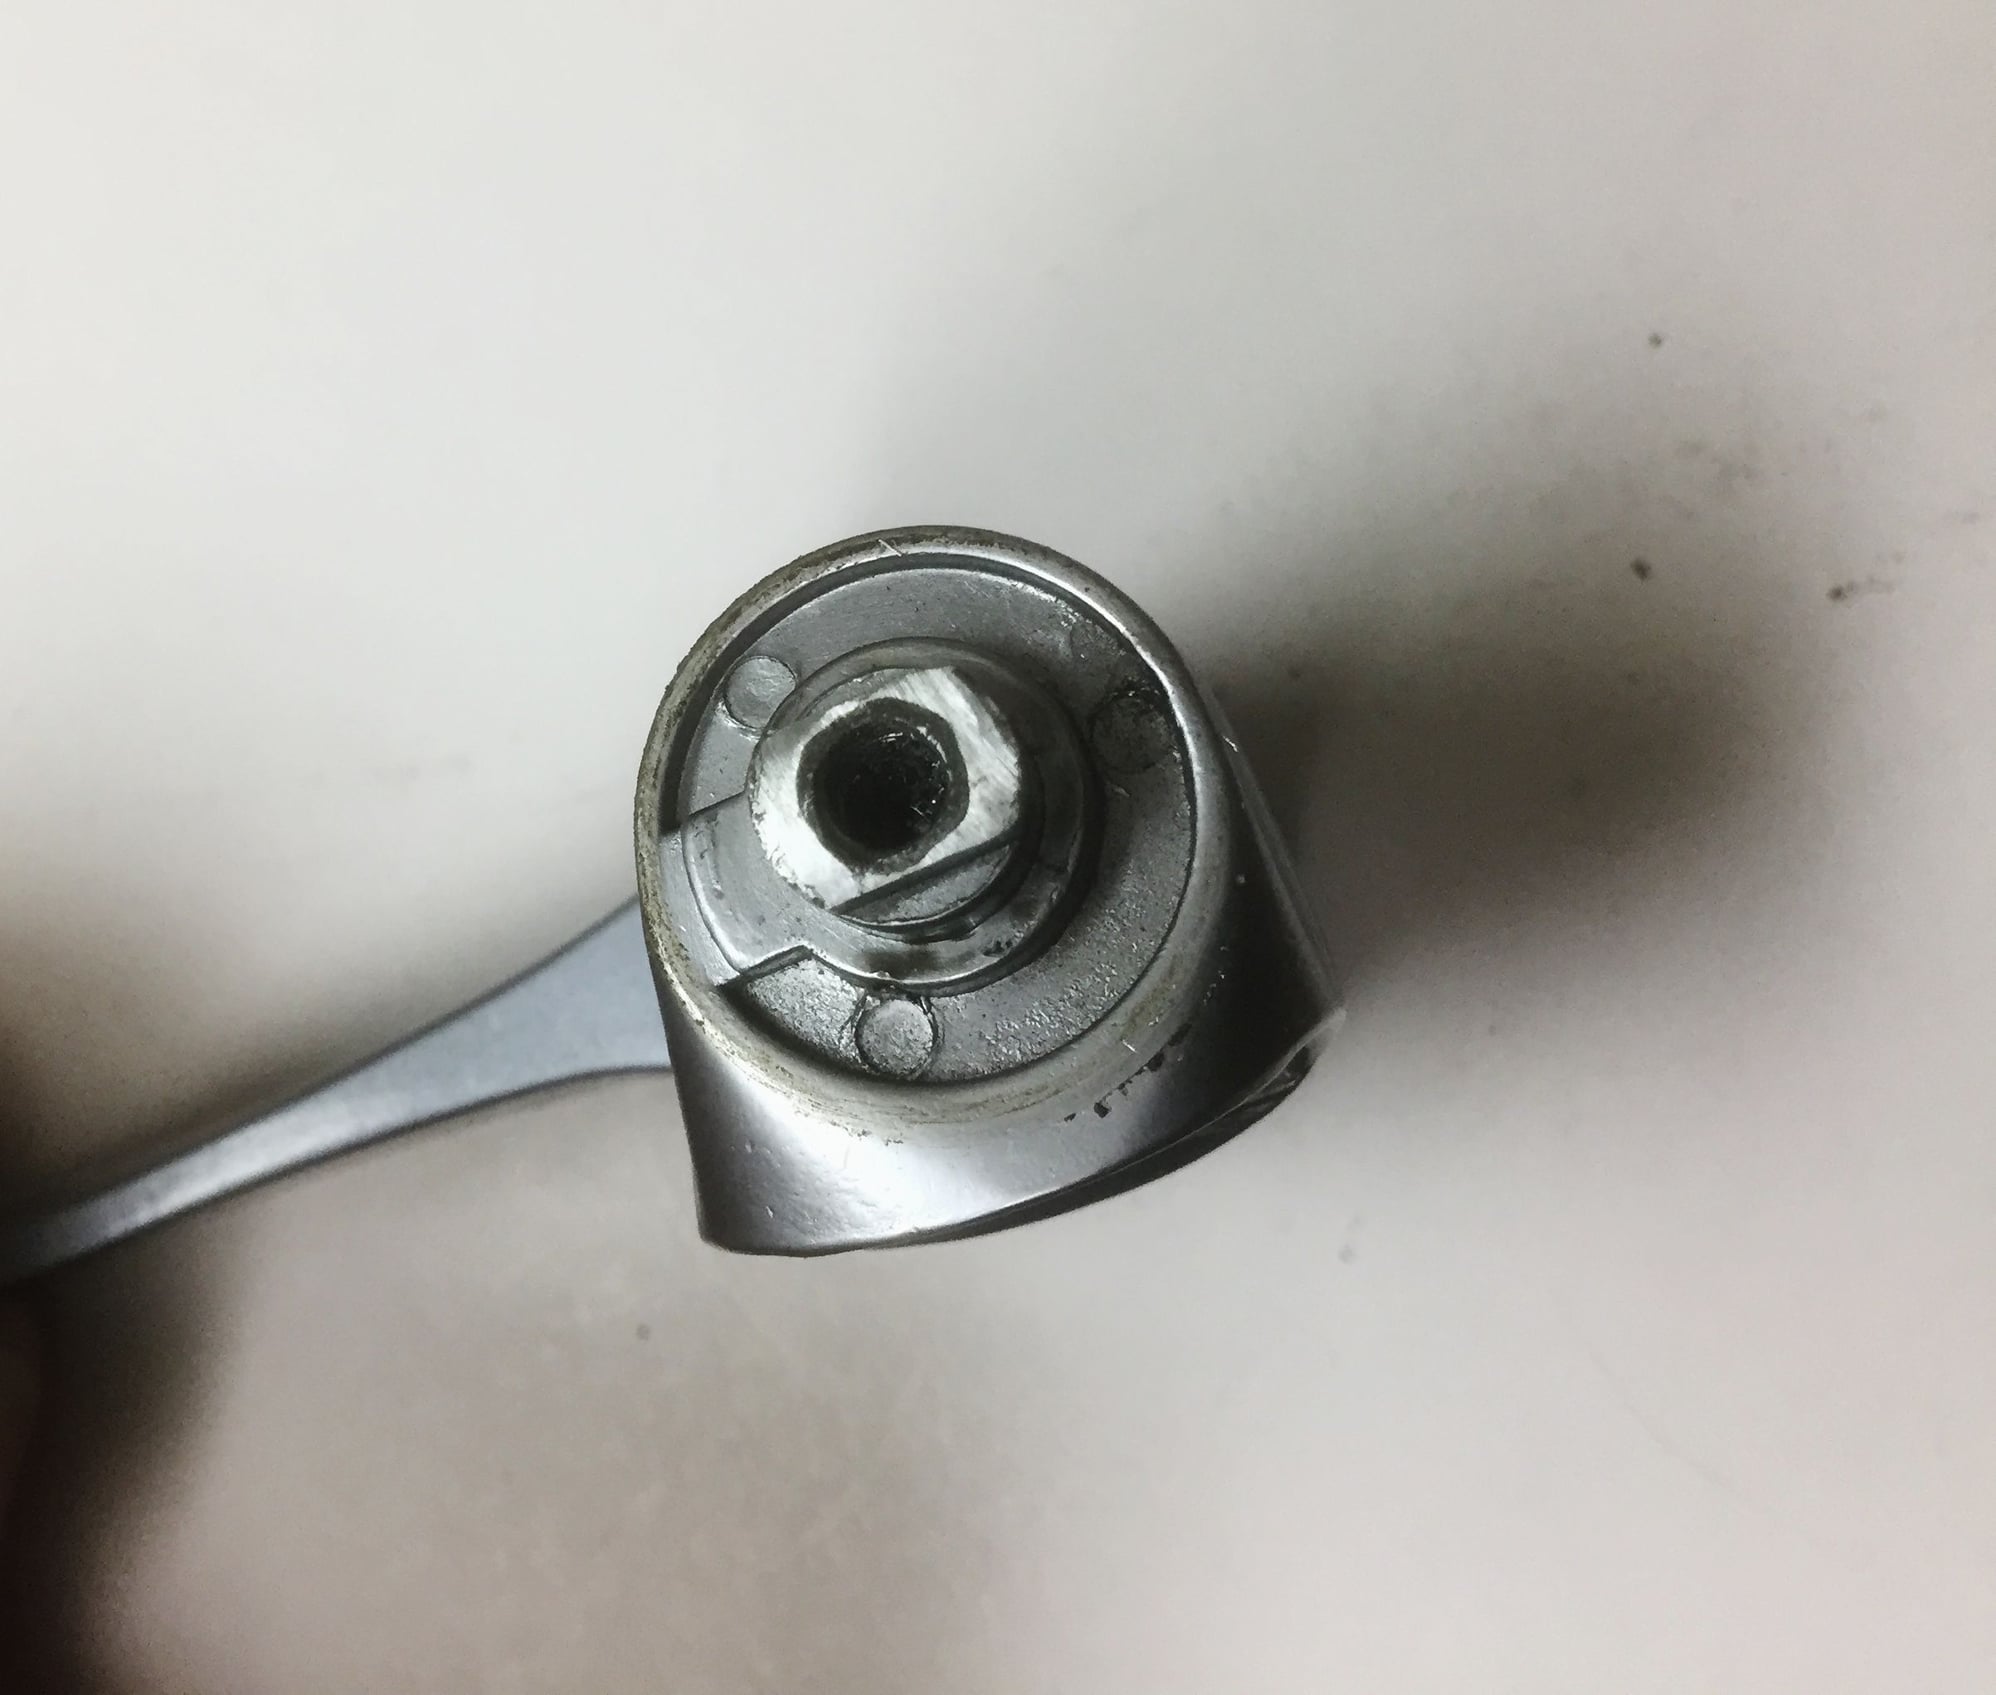
The finished product. Well, the finished shifter mount.
What uses a 6mm X 15mm bolt, you ask? With a small head? Good question! The answer is...not much. I finally wound up using a brake caliper part modified with a slotted head, but will be on the lookout for a hex head bolt to fit this:


Next up: Headset Hilarity!
Keep that beer cold and close by- you'll need it!
...and the small nubs on the inside of the right lever itself had to be milled down almost flush with the one remaining slotted washer so that it would fit on the slightly shorter mounting stub. Oh, and the stub had to be re-tapped to 5mm from 4.5mm. Freehand. The threading had to be correct vertically, horizontally, and for yaw, otherwise the lever wouldn't rotate properly on the stub when tightened down. No pressure!
The friction (left side) lever presented a whole different set of problems, and there was a lot of cold beer consumed in the process. The stub on this side had to be shortened a bit, otherwise the friction pod interfered with the stub when fully tightened down. The internals of the lever (as much as could be disassembled) had to be cleaned and polished to allow nice, smooth shifting feel, and it also had to be re-tapped to 5mm. Freehand.
Finally (well, as final as we're going to get in this installment), the mounting bolt hole was drilled out to accommodate the 6mm bolt.
The finished product. Well, the finished shifter mount.
What uses a 6mm X 15mm bolt, you ask? With a small head? Good question! The answer is...not much. I finally wound up using a brake caliper part modified with a slotted head, but will be on the lookout for a hex head bolt to fit this:
Next up: Headset Hilarity!
Keep that beer cold and close by- you'll need it!
__________________
Hard at work in the Secret Underground Laboratory...
Hard at work in the Secret Underground Laboratory...
Last edited by rccardr; 03-22-19 at 12:52 PM.
03-22-19, 01:15 PM
#34
Senior Member

Join Date: Sep 2015
Location: Madison, WI
Posts: 2,701
Mentioned: 52 Post(s)
Tagged: 0 Thread(s)
Quoted: 1136 Post(s)
Liked 650 Times
in
336 Posts
Wowzers. That's a lot of work to mount a couple of shift levers. The first shift out on the road will be a triumphant moment!
 03-22-19, 03:11 PM
#36
Senior Member
Who knew the Aero mounts presented that much trouble? Certainly not I. But they got the right man for the job. Keep it going.
03-22-19, 03:20 PM
#37
Sophomore Member

Join Date: Jan 2019
Posts: 2,531
Mentioned: 12 Post(s)
Tagged: 0 Thread(s)
Quoted: 1628 Post(s)
Liked 1,057 Times
in
631 Posts
Nice job! But they say you get spoiled by this type of aero mount, and you can never go back to regular downtube shifters again. All that extra room for your hands, and less reach too! 
03-22-19, 04:35 PM
#38
The Left Coast, USA

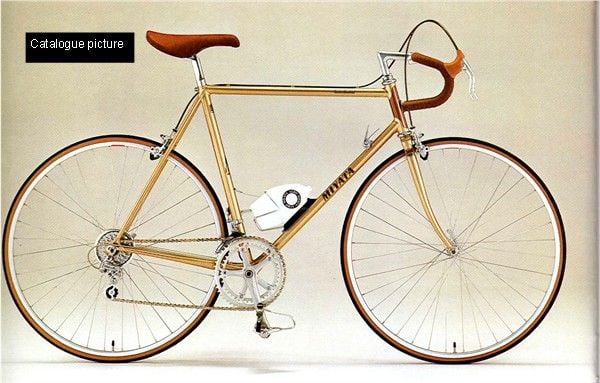
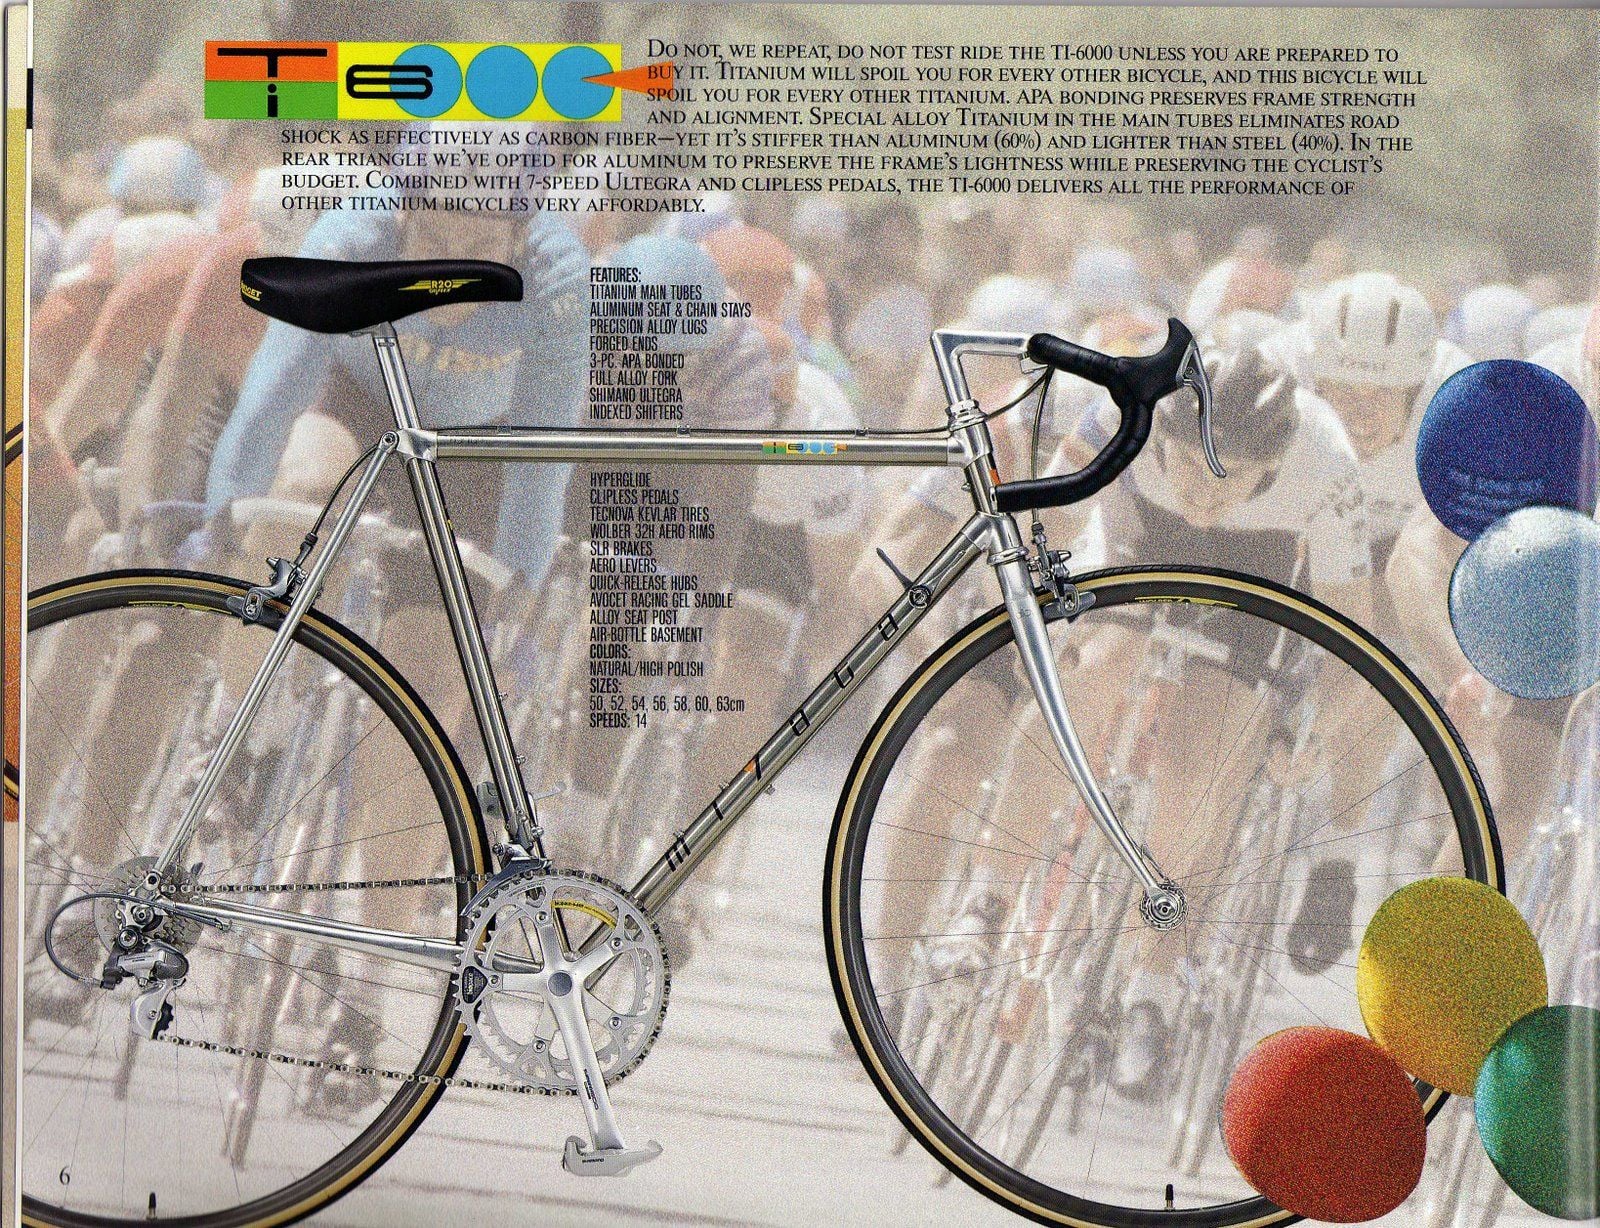
Mine, though this is the catalogue picture mine still had the original bar tape and tires on it - and it was missing the aero bottle at the time.
__________________
There is more to life than simply increasing its speed. - Gandhi
There is more to life than simply increasing its speed. - Gandhi
03-22-19, 05:03 PM
#39
Full Member
only slightly related question

Lot of real work there! I think I will keep the original Suntour Symetric levers on my Centurion Elite RS. But I have a question of this crowd. The "teardrop" seat stays and lugs on it are also identical which makes me wonder; does anyone know if Miyata was one of the several Japanese builders used by ASI (Centurion)?
This bike is too large for me, but the ride was so good it sent me on a 3 year search to obtain an Ironman. And worth it!
 03-22-19, 06:51 PM
#40
Senior Member

My '84 Univega had a 'aero-mount' top-mount SunTour Symmetric shifter, but I simply used that downtube shifter boss as a slide-prevention stop for a double-cable stop for my preferred SunTour BarCons.... I suppose I could always bolt something useful to that otherwise-underutilized threaded shifter boss...
03-22-19, 11:22 PM
#41
Partially Sane.
Join Date: Jan 2016
Location: Sunny Sacramento.
Posts: 3,559
Bikes: Soma Saga, pre-disc
Mentioned: 22 Post(s)
Tagged: 0 Thread(s)
Quoted: 972 Post(s)
Likes: 0
Liked 643 Times
in
468 Posts
Wow. Just wow. 🤔 That's a lot of effort, just to use the wrong shifters. 😁😉
03-23-19, 08:10 AM
#42
aka: Dr. Cannondale
Thread Starter
Join Date: Jul 2009
Posts: 7,732
Mentioned: 234 Post(s)
Tagged: 0 Thread(s)
Quoted: 2155 Post(s)
Liked 3,403 Times
in
1,204 Posts
So...headsets. I really wanted to use a Dura Ace 7410 cartridge type headset on this bike & as they are pretty much indestructible I thought it would be OK to install a used one. A co-op on the west coast had one for sale that had been removed from a donated bike, and they had other 740X stuff on their site that looked in good shape, so I bid on it and won. Less than half the price of NOS, and cosmetically not bad, with some scratching that would be mostly hidden once installed and the typical slightly bent crown race that happens during removal with the Park tool.
It was complete and as advertised when it arrived:
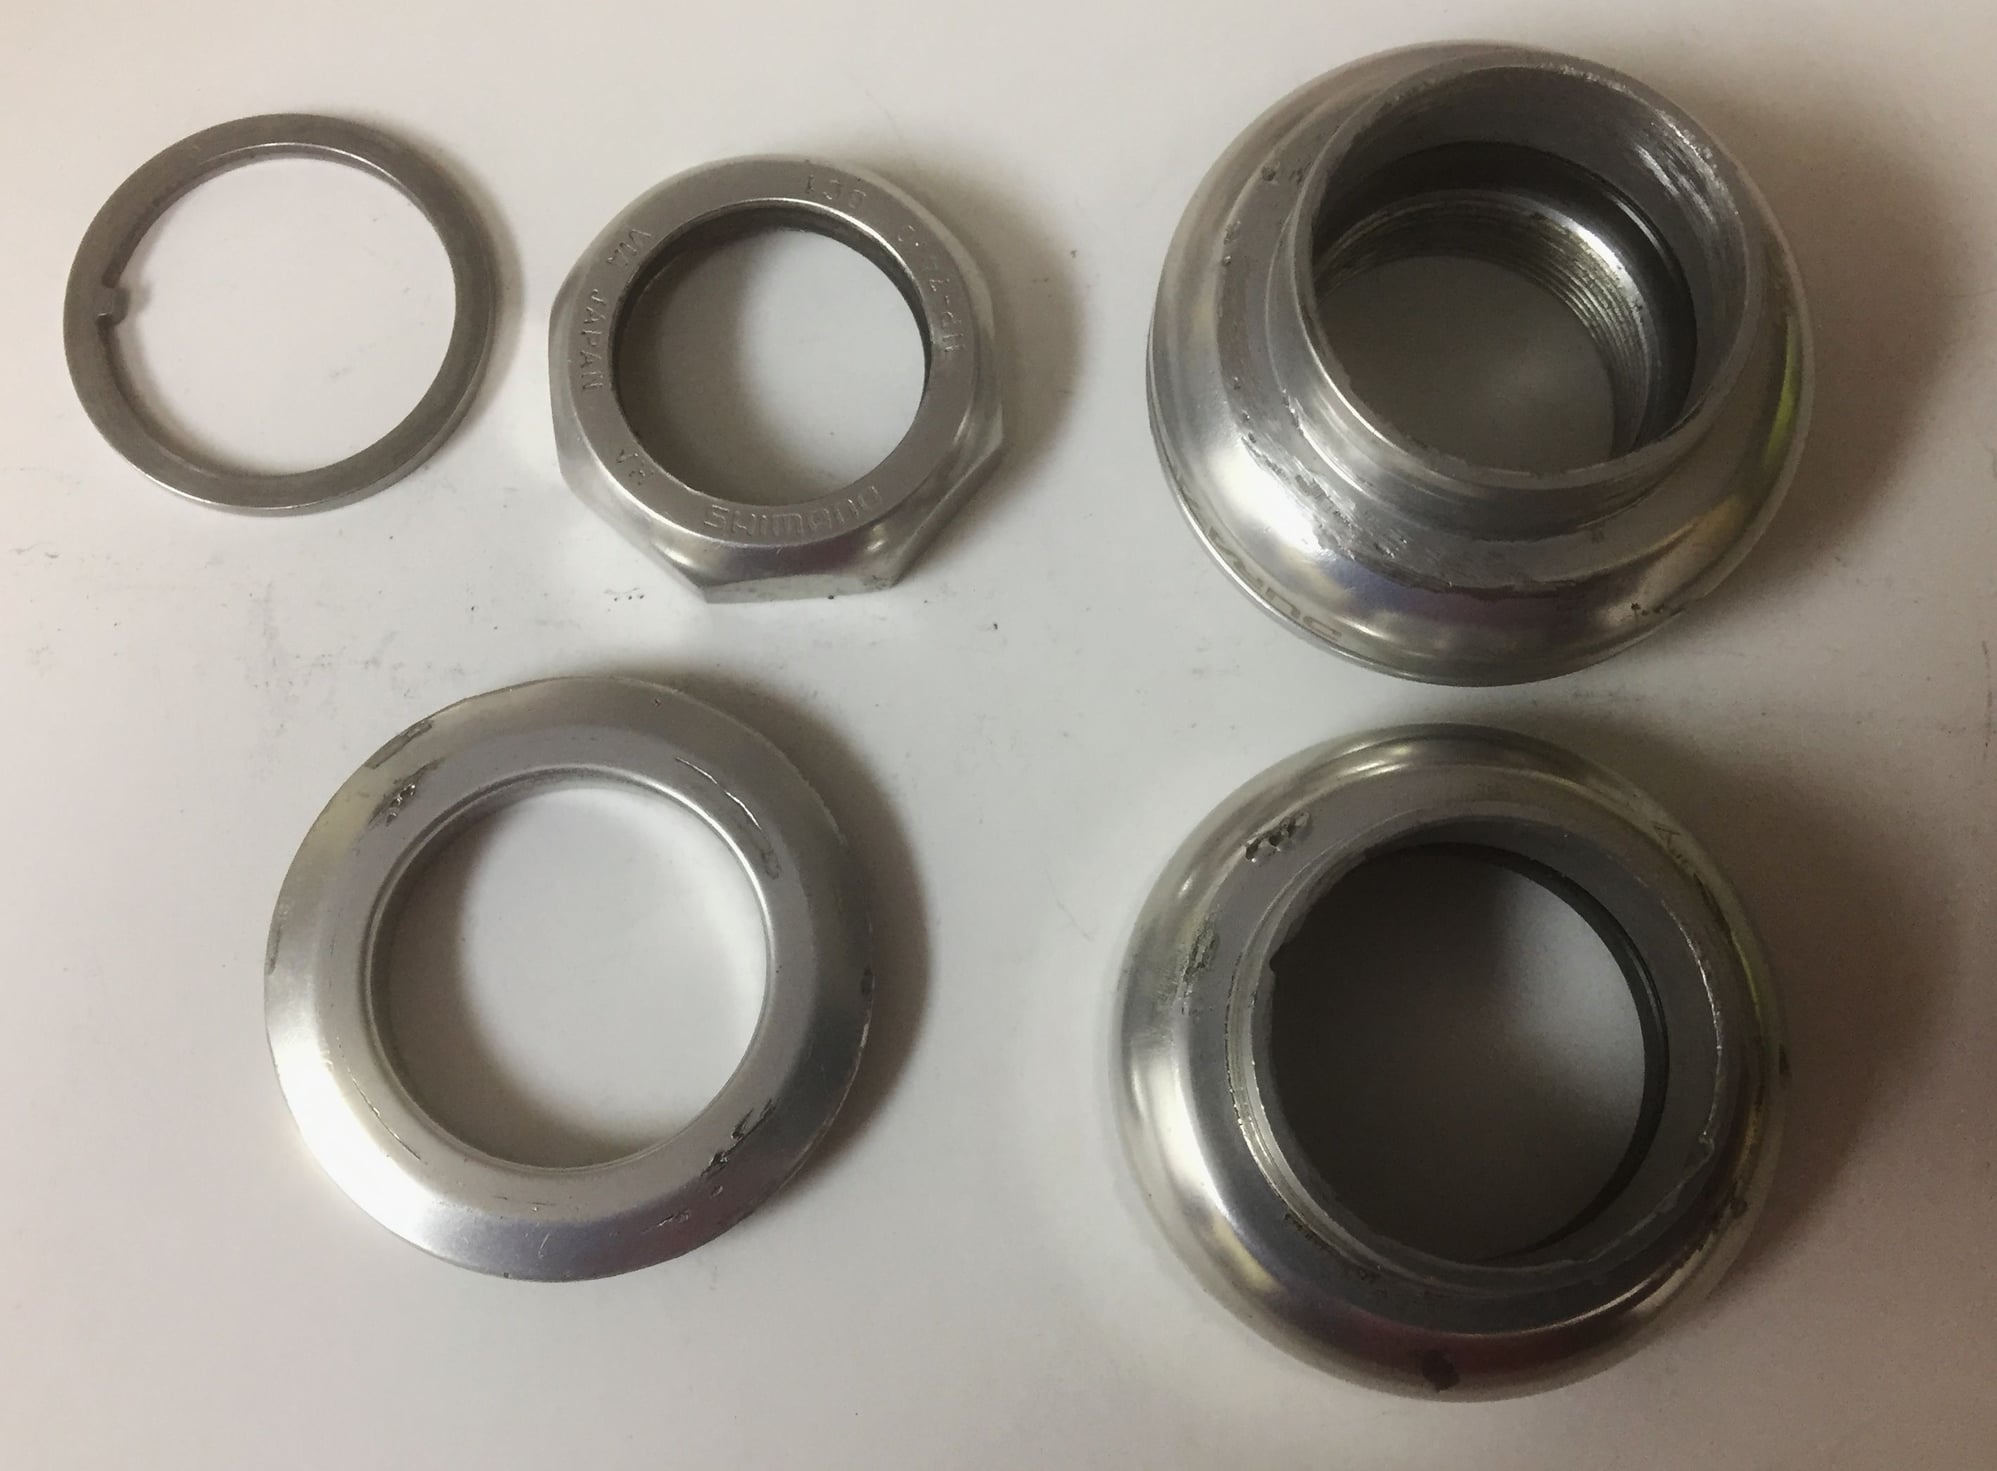
...and the crown race was easily flattened (note that on this model the crown race merely acts as a base for the bearing cartridge and not as a surface for any balls). However, both cartridges were...crunchy. Was tempted to return the whole thing as damaged, but instead decided to use my 25+ years of experience working with miniature radio control car bearings to rejuvenate them. A good dose of lighter fluid through the metal shield on top followed by vigorous spinning got a bunch of grunge out of them, and an injection of ATF/Mobil 1 put lubrication back onto the balls and races inside. But the real win came when I realized that the bottom seal had folded over on itself and was keeping the cartridge from turning smoothly:

If you look closely on the left side, you can see where the seal was unfolded and pulled out from the bearing housing using the tip of an X-Acto knife. Now it glides and rotates smoothly. After all of that drama, which took several hours to resolve, the actual headset installation went without a hitch. Also spent a few hours last night polished and waxing the frame before installation of the headset:


Next up: an elegant bottom bracket cable routing. And I've gotta buy more beer.
It was complete and as advertised when it arrived:
...and the crown race was easily flattened (note that on this model the crown race merely acts as a base for the bearing cartridge and not as a surface for any balls). However, both cartridges were...crunchy. Was tempted to return the whole thing as damaged, but instead decided to use my 25+ years of experience working with miniature radio control car bearings to rejuvenate them. A good dose of lighter fluid through the metal shield on top followed by vigorous spinning got a bunch of grunge out of them, and an injection of ATF/Mobil 1 put lubrication back onto the balls and races inside. But the real win came when I realized that the bottom seal had folded over on itself and was keeping the cartridge from turning smoothly:
If you look closely on the left side, you can see where the seal was unfolded and pulled out from the bearing housing using the tip of an X-Acto knife. Now it glides and rotates smoothly. After all of that drama, which took several hours to resolve, the actual headset installation went without a hitch. Also spent a few hours last night polished and waxing the frame before installation of the headset:
Next up: an elegant bottom bracket cable routing. And I've gotta buy more beer.
__________________
Hard at work in the Secret Underground Laboratory...
Hard at work in the Secret Underground Laboratory...
03-23-19, 09:37 AM
#45
Full Member
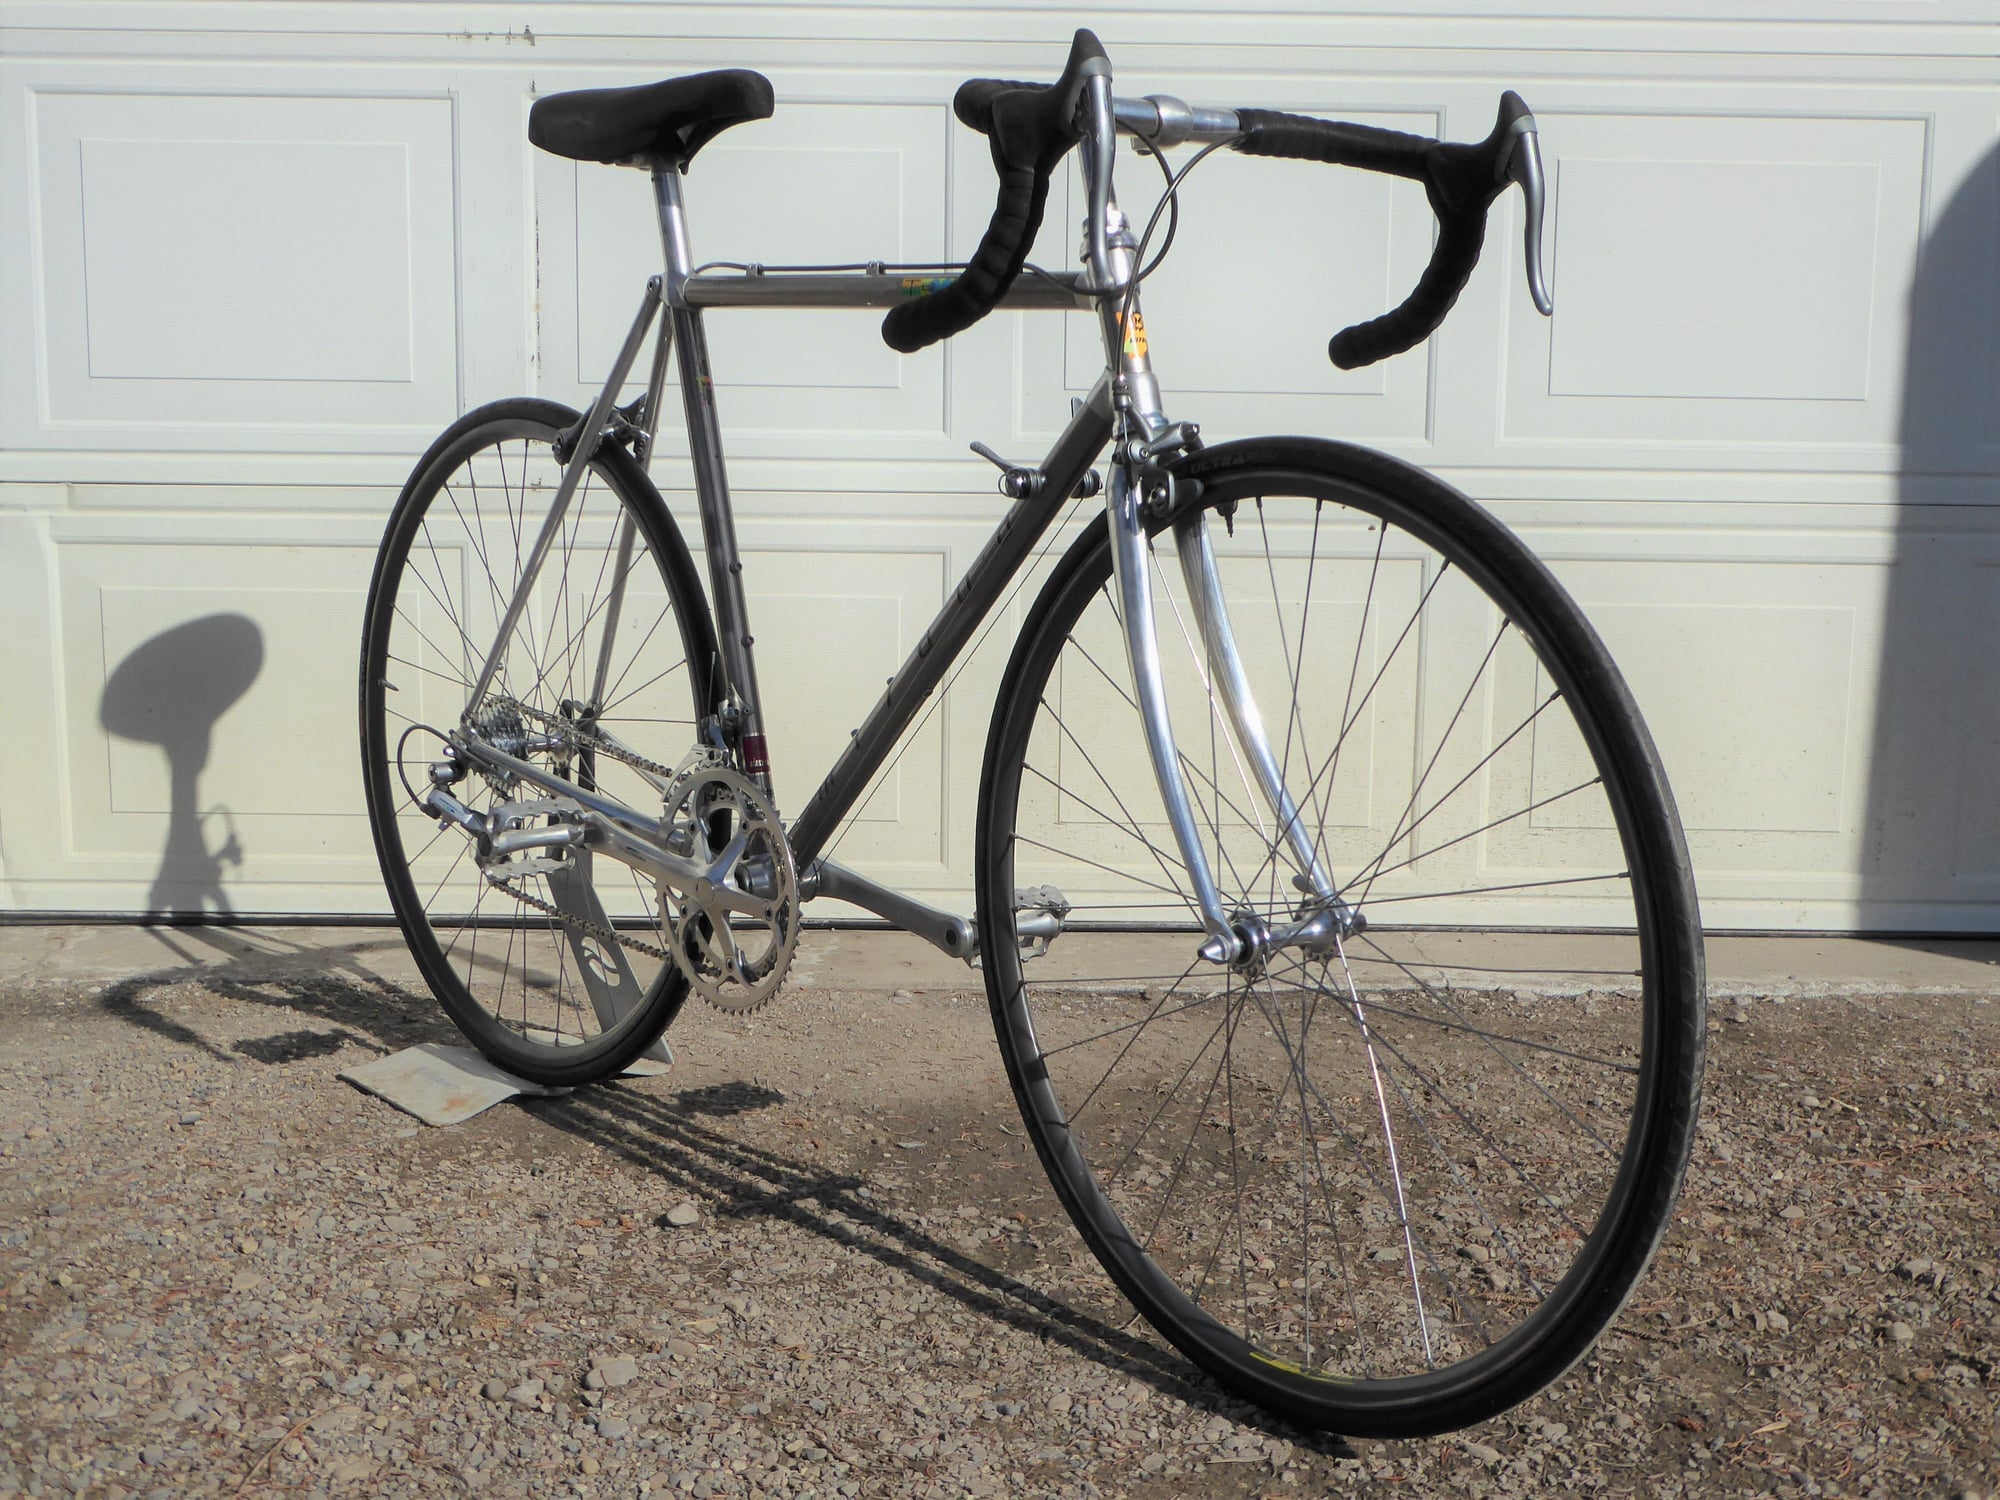
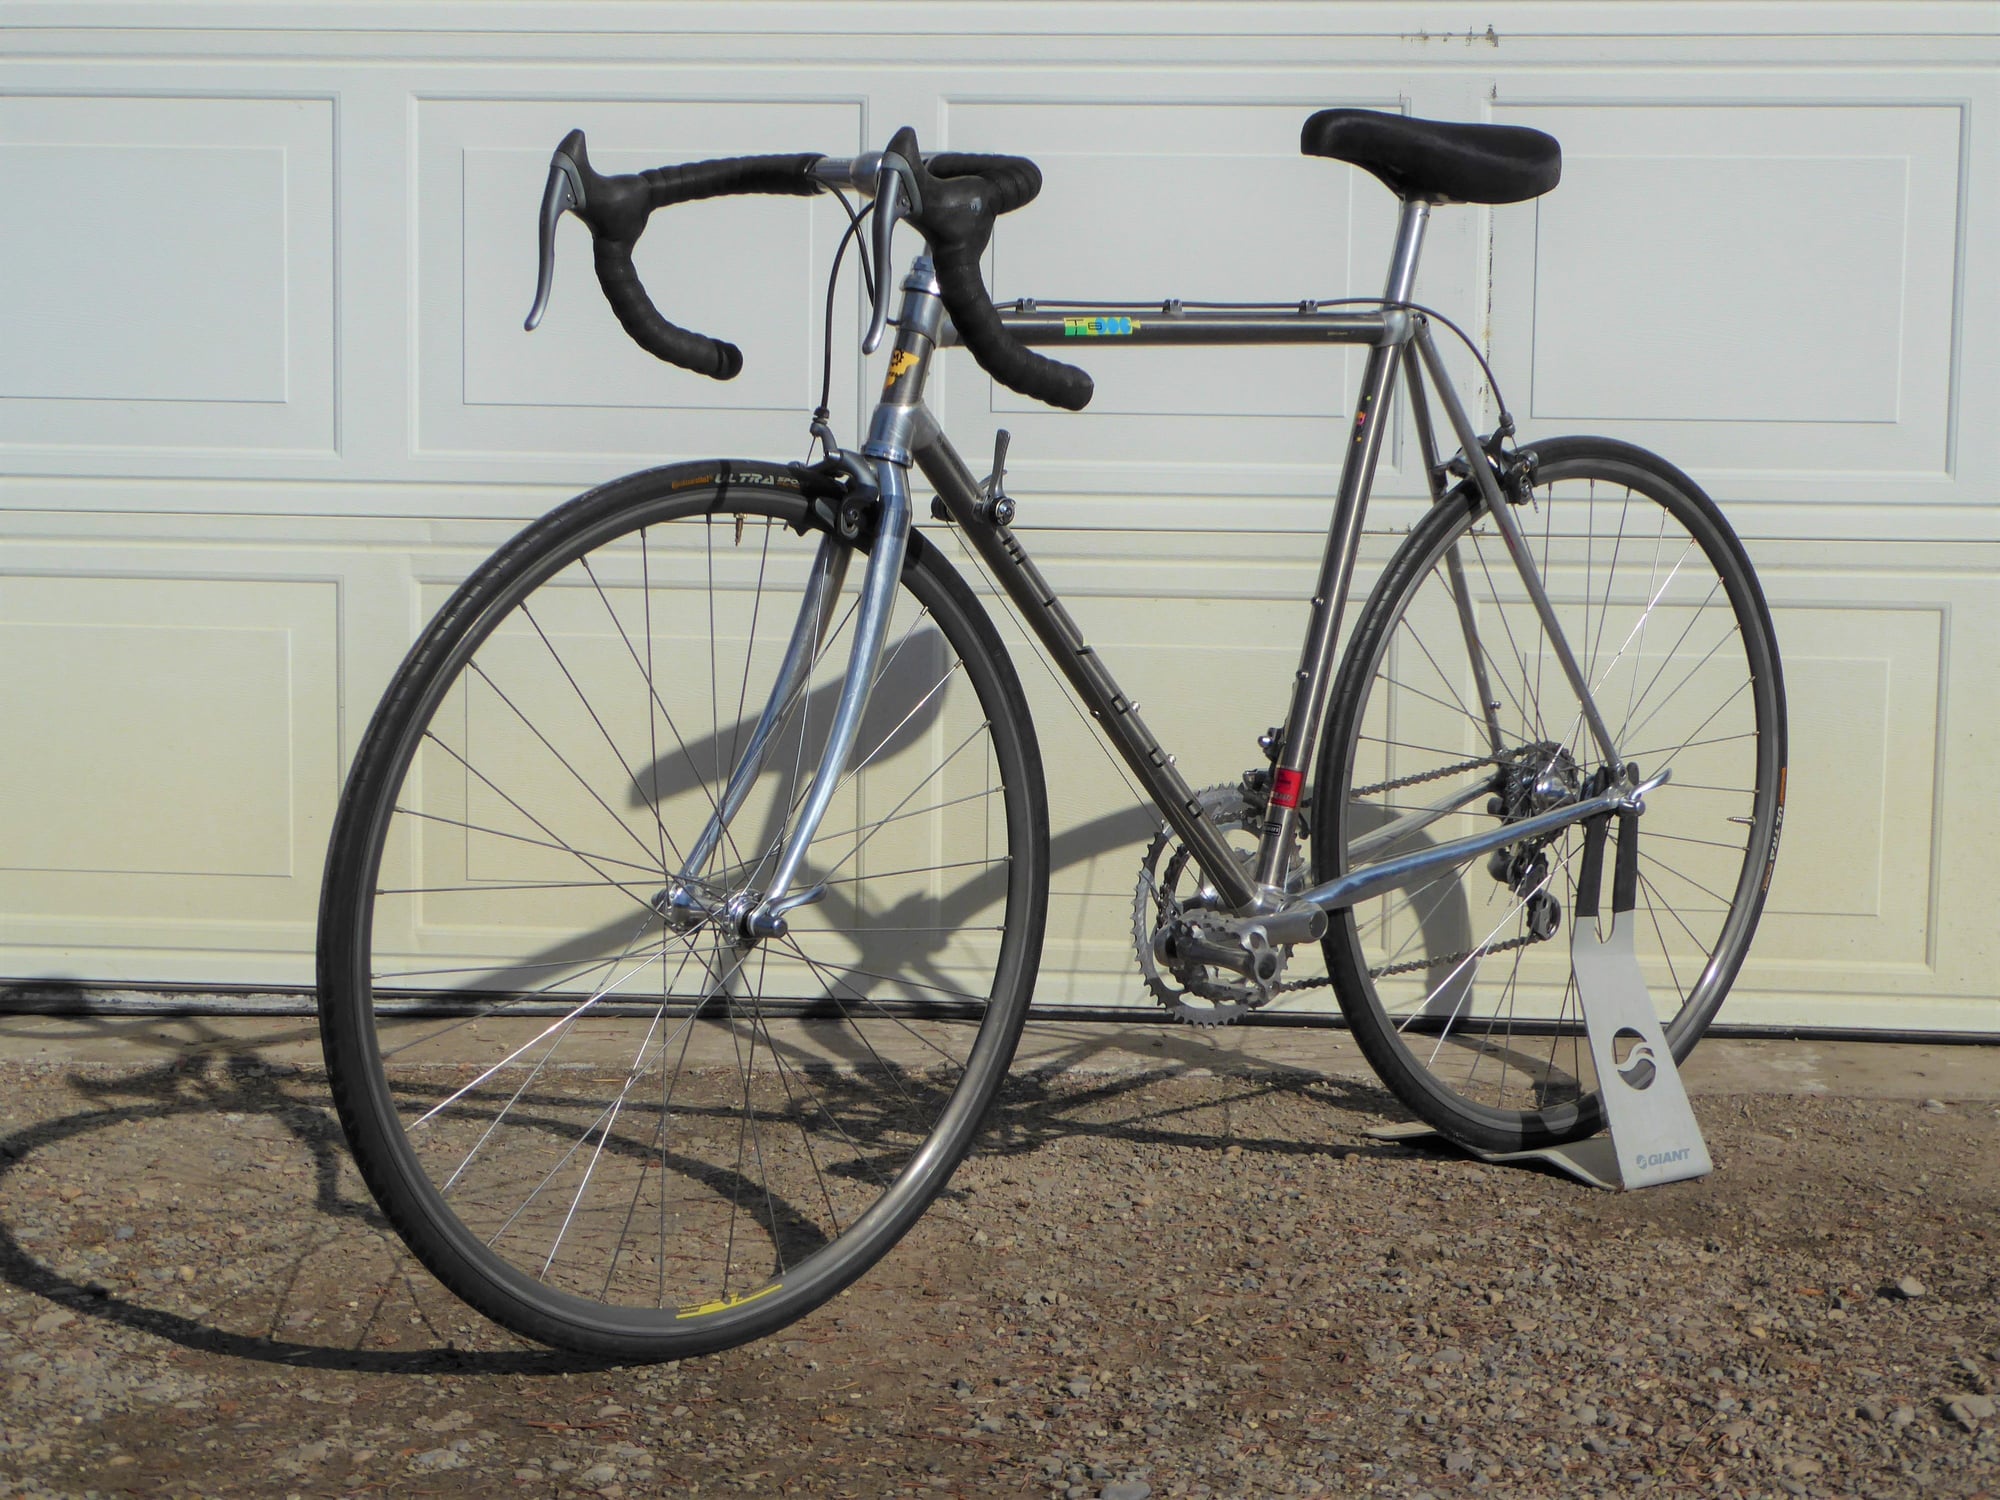
Miyata TI6000
Here is the Miyata TI600 I just finished overhauling. I think it is the only titanium bike they made (main triangle) I have had close to a dozed Miyata's but this is the only one of these I have ever seen. It is pretty much original except for a new chain and cassette, shifter cables, bar tape and tires. I also don't have the original pedals so I thew some flats on for test rides.
03-23-19, 11:38 AM
#46
aka: Dr. Cannondale
Thread Starter
Join Date: Jul 2009
Posts: 7,732
Mentioned: 234 Post(s)
Tagged: 0 Thread(s)
Quoted: 2155 Post(s)
Liked 3,403 Times
in
1,204 Posts
So that's from like 1988-89? Pretty cool.
Fork looks very similar to the one that came on the Ironman Carbon bikes during the same time period.
Fork looks very similar to the one that came on the Ironman Carbon bikes during the same time period.
__________________
Hard at work in the Secret Underground Laboratory...
Hard at work in the Secret Underground Laboratory...
03-24-19, 06:02 AM
#47
aka: Dr. Cannondale
Thread Starter
Join Date: Jul 2009
Posts: 7,732
Mentioned: 234 Post(s)
Tagged: 0 Thread(s)
Quoted: 2155 Post(s)
Liked 3,403 Times
in
1,204 Posts
Another interesting design feature on the 1200- which, like the single top mount braze-on was likely utilized in order to save weight- is this over-the-bottom bracket cable routing method:
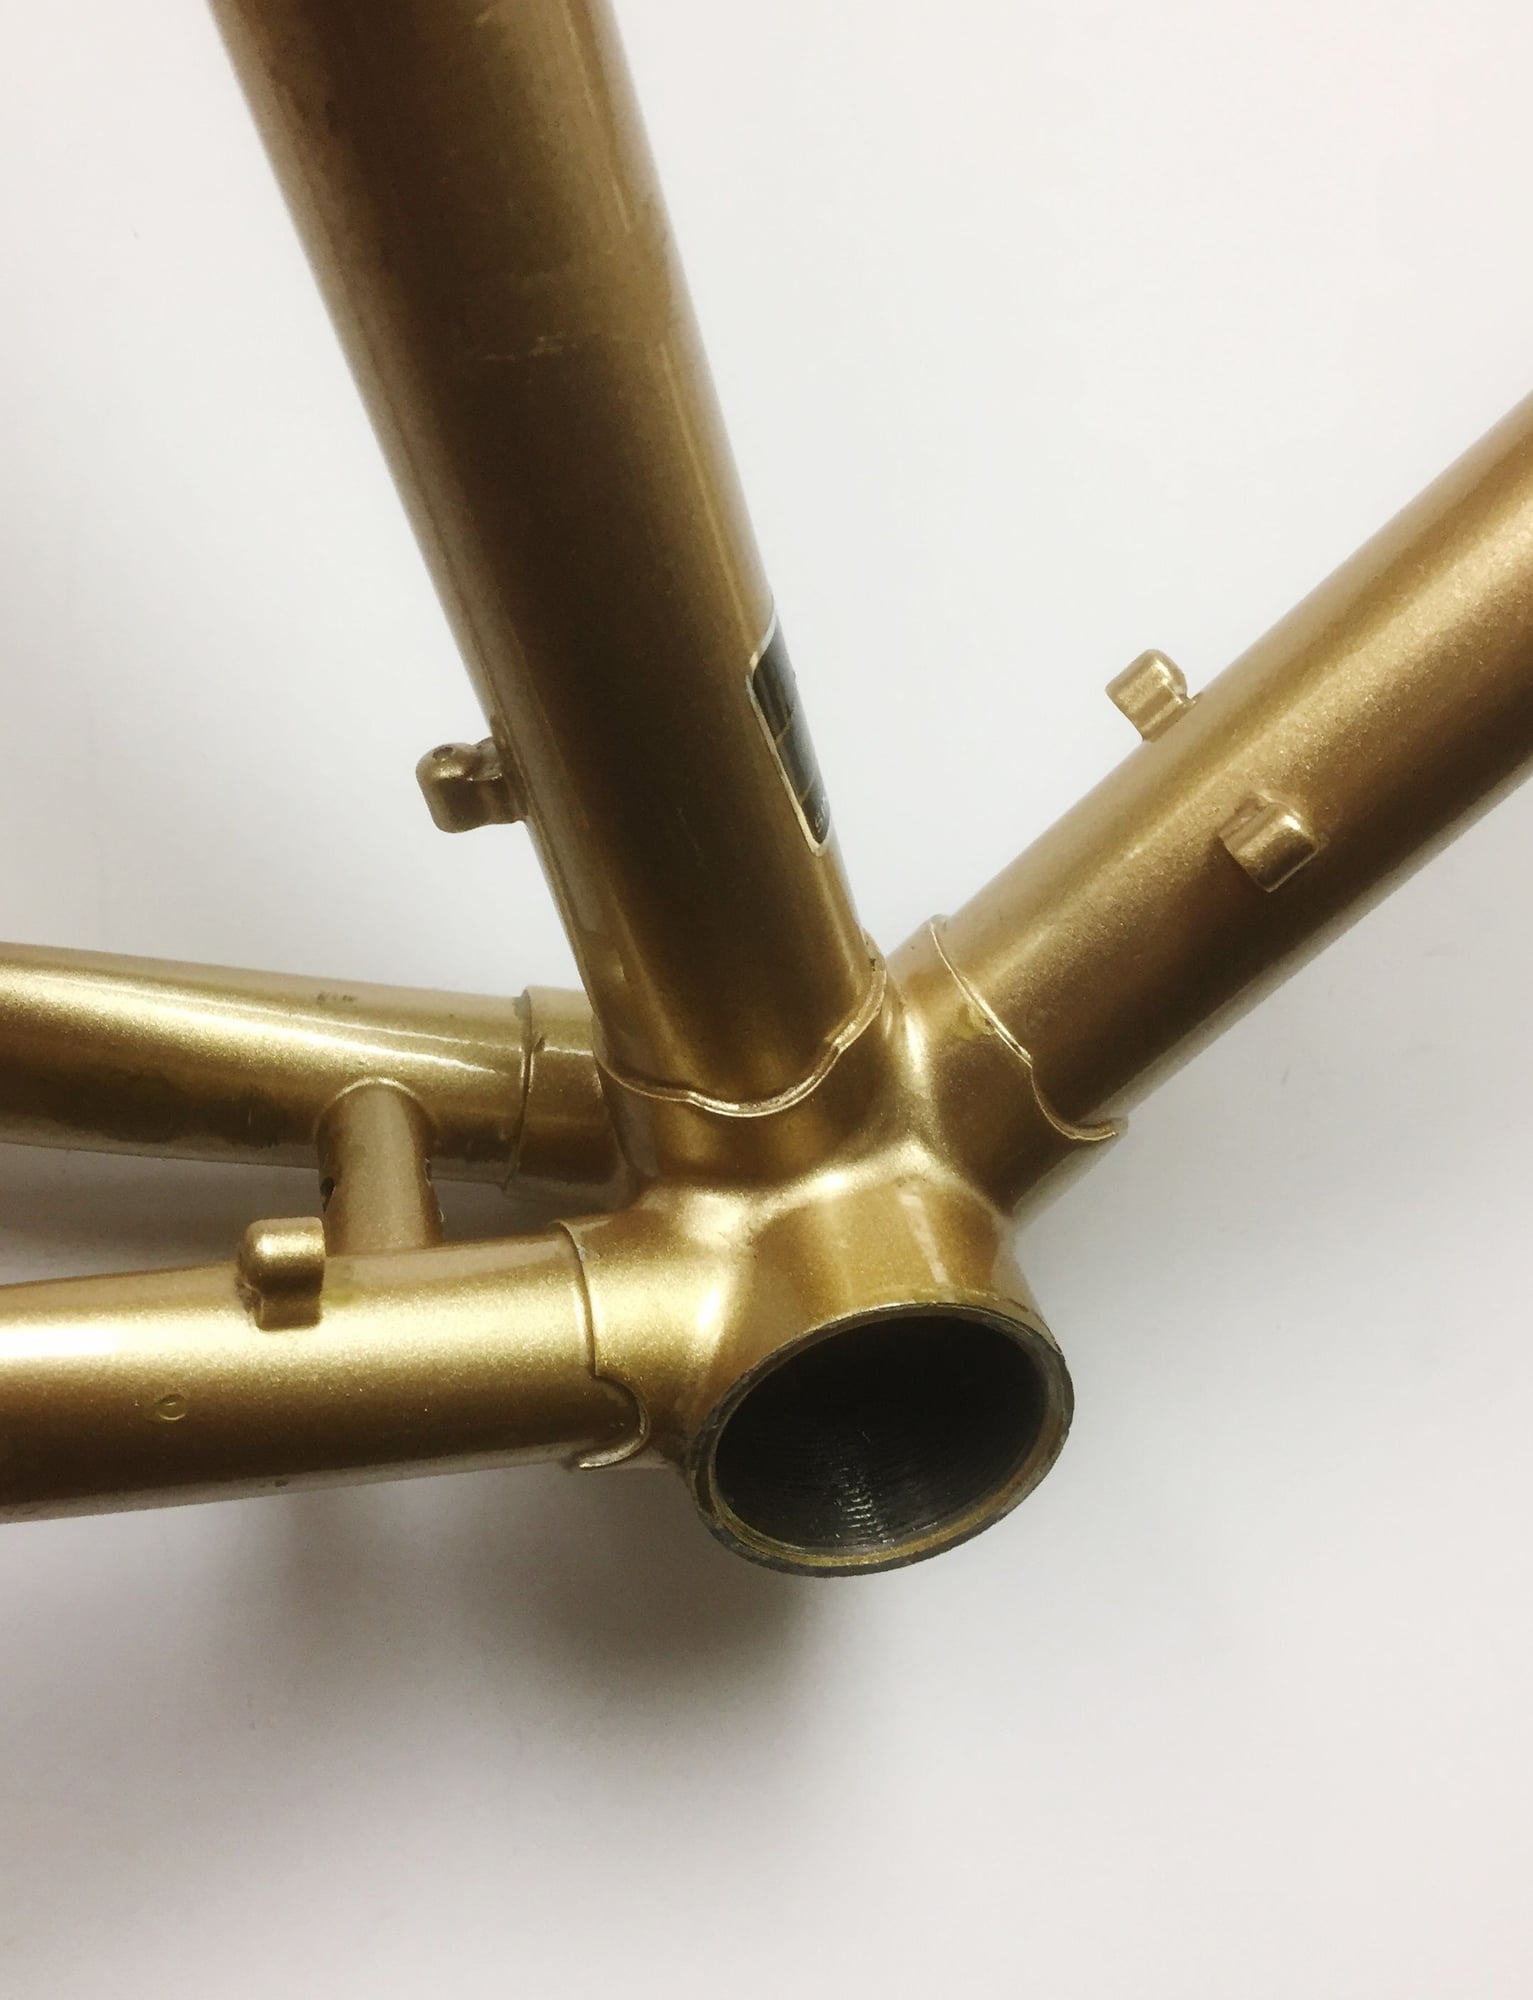
It's interesting to note that the sockets to hold the short pieces of cable housing are too small for brake housing and just barely fit modern derailleur housing. They also accept those older wound spring dealies but not if they have ferrules on them, and they're too small to accept Campagnolo housing. So I'm not sure what kind of housing they were designed for or where it came from- did they even have derailleur-specific housing back in 1983?- but some short bits of Jagwire derailleur housing fit just fine:

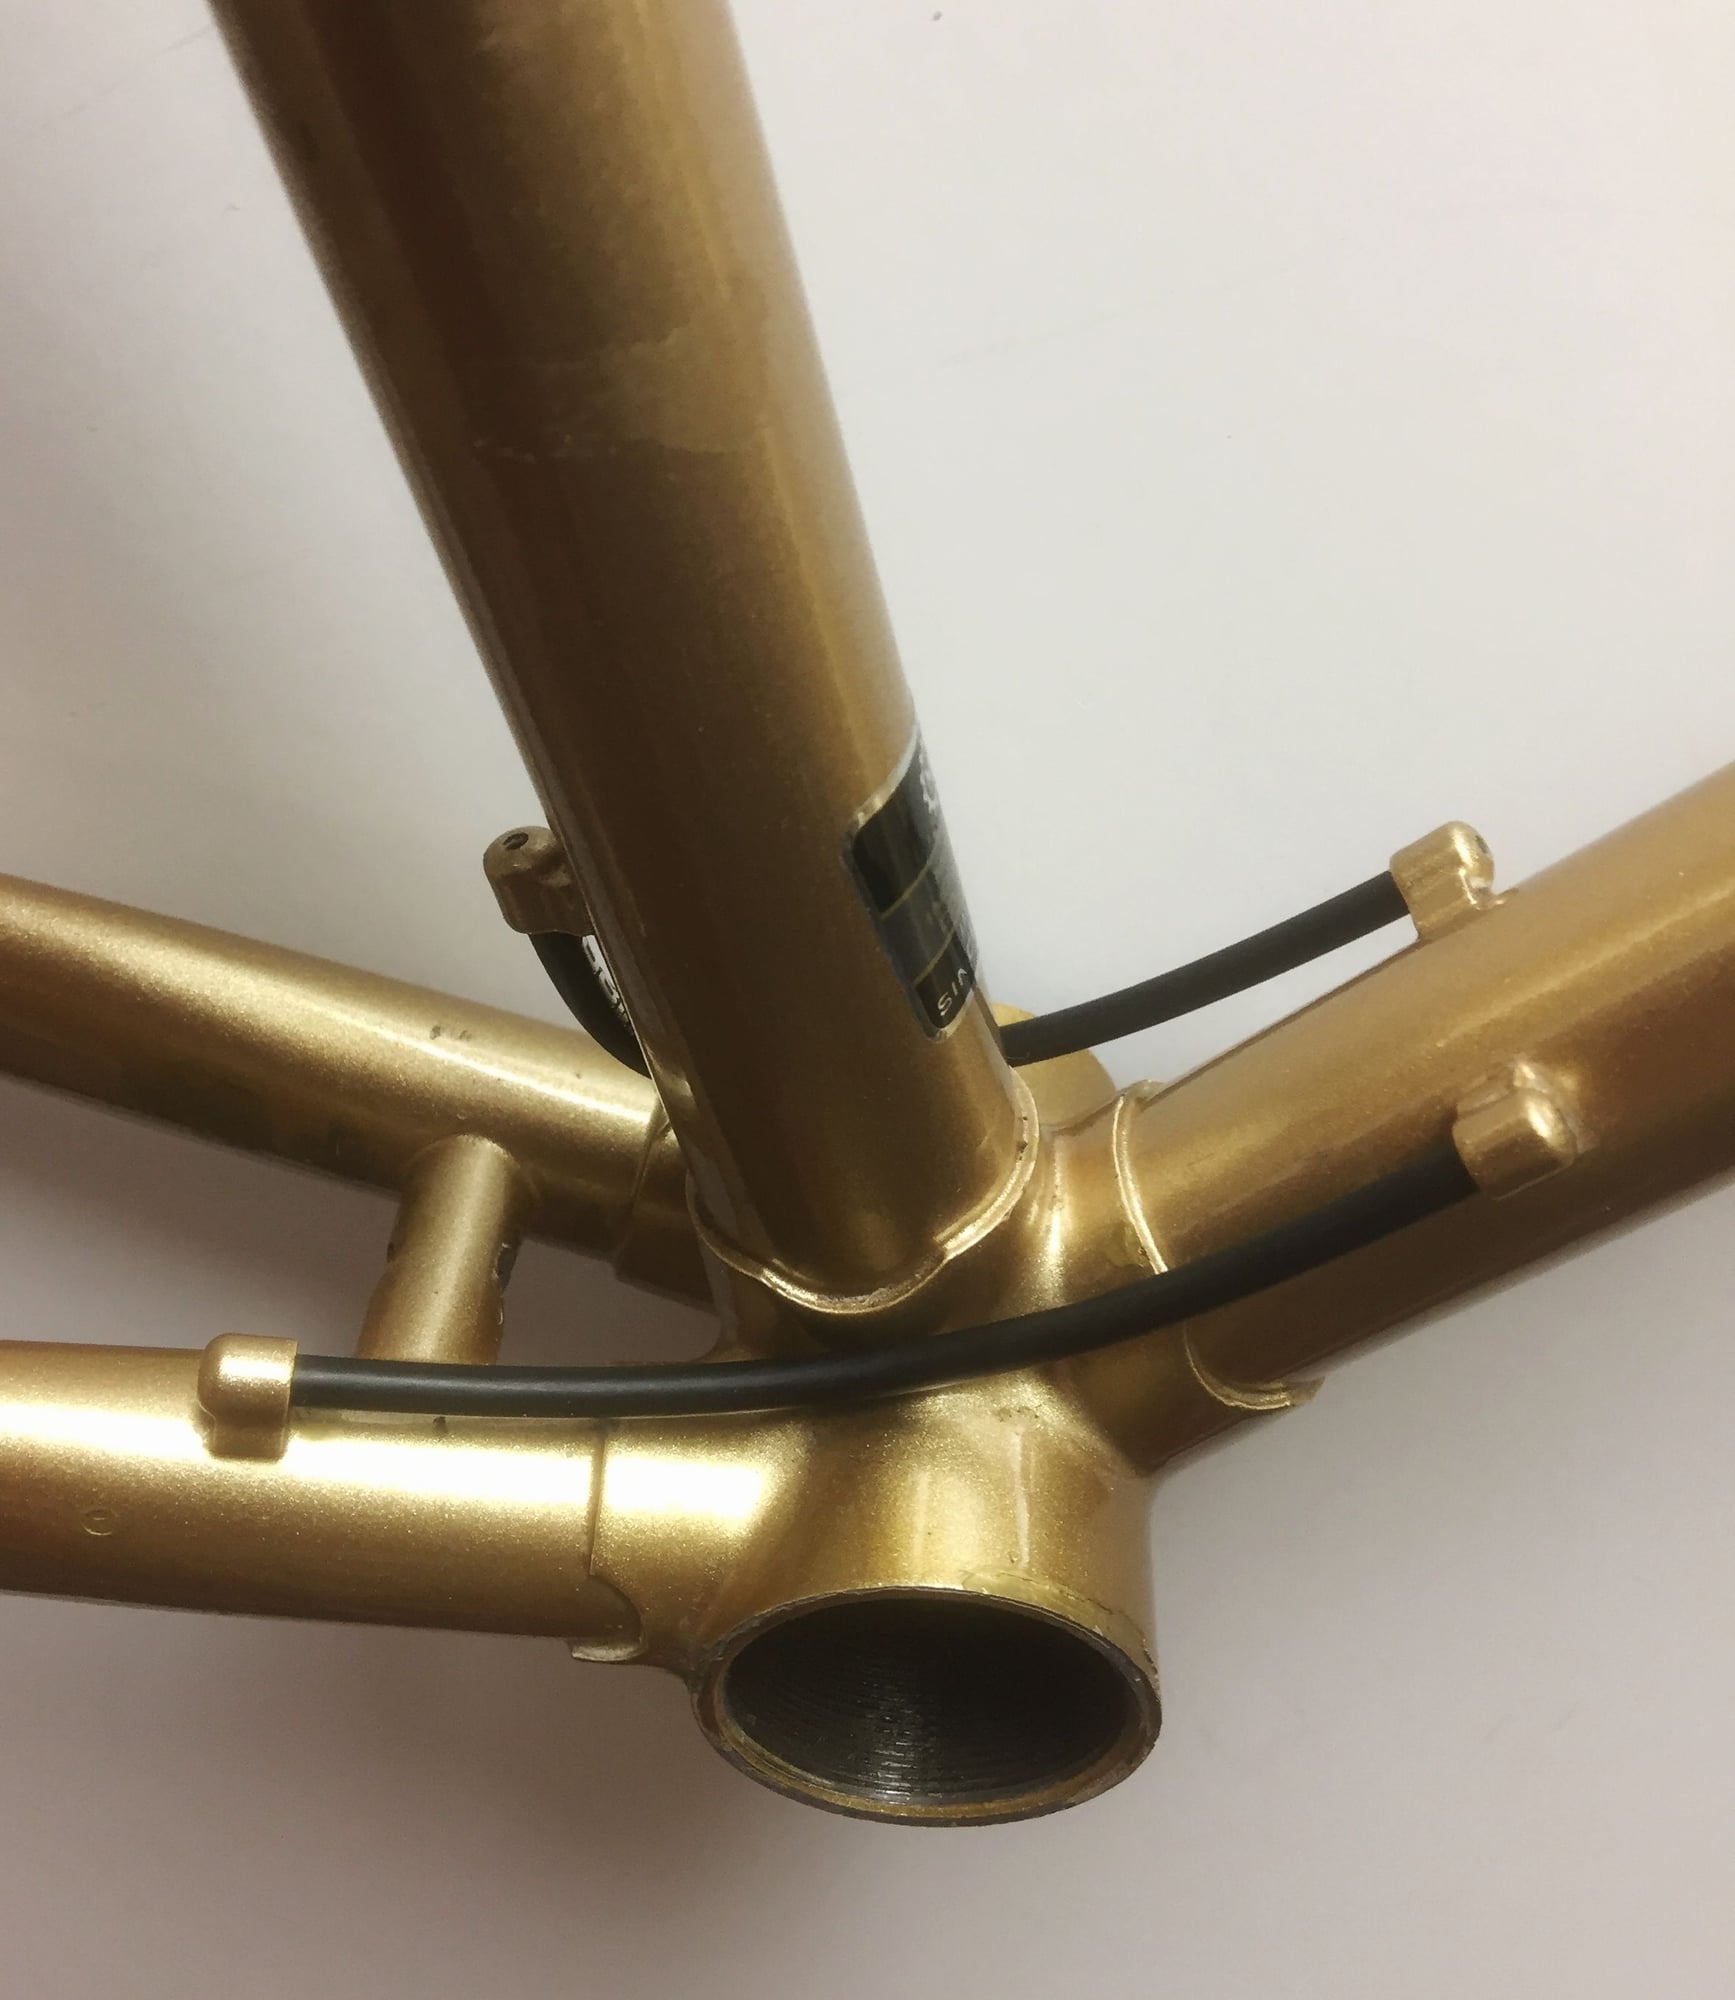
Looks kind of elegant, don't you think?
It's interesting to note that the sockets to hold the short pieces of cable housing are too small for brake housing and just barely fit modern derailleur housing. They also accept those older wound spring dealies but not if they have ferrules on them, and they're too small to accept Campagnolo housing. So I'm not sure what kind of housing they were designed for or where it came from- did they even have derailleur-specific housing back in 1983?- but some short bits of Jagwire derailleur housing fit just fine:
Looks kind of elegant, don't you think?
__________________
Hard at work in the Secret Underground Laboratory...
Hard at work in the Secret Underground Laboratory...
03-24-19, 08:40 AM
#49
Full Member
Good eye, according to the Miyata catalouges it is a 1989. I think it must be about the last year the Ultegra components where still labeled as 600 tri color..