


Jigging and Mitering the rear triangle ... thoughts on chainstay-fixture
 04-19-21, 03:56 AM
#1
Newbie
Thread Starter
Jigging and Mitering the rear triangle ... thoughts on chainstay-fixture
dear Community,
Jigging and Mitering the rear triangle ... - seems to be a nice challenge.
well i think constructing the rear half of a bike frame poses many more challenges than the front half.
Besides the tubing choices we ve got questions about techniques for jigging these assemblies - and in aiming so to create some nice framebuilding tools that help here:
Well - in order to assemble the chainstays as accurately as possible, i plan am to build
1. firstly a jig-mitering tool that mimics the final positioning in the finished frame
2. going to elaborate this a bit more.
Doing so: this hope that i can finalize the miter on the seatstays: I have had a quick view on the mitering-tools and chainstays that are out there:
recently i saw the chainstay fixture - here - at the instagram account of Kristofer Henry ( https://www.44bikes.com/ ) - Well - i like this it looks very impressive. (see the chainstay-fixture at his page ( or at the instagram account. )
see this - it looks so awesome - created by Kristofer Henry -
one question - does this tool need (and afford) a bending process of the tubes that takes place a bit earlier - i.e. right before they were put into the fixture. And besides this - the question for all of you. Which chain-stay-fixture and mitering-tool do you use.
By the way: afaik the tubes tubes (of the chain-stay) for a street-bike are straight - with no windings - so iguess that they are bended seldom - isn �t it so!?
Well - this chain-stay - jig is very nice designed and i like it very much.
on a side note: Steve from Pithybikes has created some Phase-Blocks. - can we use the Phase Blocks (from Steve at Pithybikes) - for creating something … that goes into that direction of such a nice tool
cf; Steves pages - pithybikes.; with lots of useful stuff, videos and more... - here very interesting the Phase-Blocks ..:
https://www.pithybikes.com
https://www.pithybikes.com/pithy-bikes-jig-copy-1
cf: Phase Blocks for 1-1/4"(31.75mm), 3/4"(19.05mm).
The question is - are the Phase-Blocks that Steve offers - are they useful in the task of creating a chain-stay-fixture and mitering tool?
and yes: the question for all of you. Which chain-stay-fixture and mitering-tool do you use.
look forward to hear from you
your apollo,
see more Tools i have seen on the net:
Chainstay mitering |
chainstay-fixture - a extensive discussion - with many pictures
https://www.mtbr.com/threads/chainst...re-diy.680352/
Varcocycles Stay-Mitering Fixture:
https://varcocycles.com/2020/02/25/s...ering-fixture/
Chainstay mitering jig
a collection of images - collected from Schnubbi • actualized in January 2021
29 Pins - 29 images - have a closer look:
https://www.pinterest.de/helbigdanie...-mitering-jig/
Chain Stay Mitering Fixture - see image collection
Explore Anvil Bikes' photos on Flickr. Anvil Bikes has uploaded 1482 photos to Flickr.
https://flickr.com/photos/anvilbikes...57623563680959
The Miters Touch - For Chainstays
https://farrframeworks.com/farr-tool...-miter-fixture
Behold: Method to miter oval chain stays using free-ware mitering templates - a discussion
https://www.mtbr.com/threads/behold-...plates.990335/
And as a additional info some links to Kristofer Henry: This is the current Flickr link for 44 Bikes https://www.flickr.com/photos/44bikes
This is the chain stay mitering jig you probably should reference: https://www.flickr.com/photos/44bikes/51104776470
There’s more detail shots starting here: https://www.flickr.com/photos/44bikes/26646331965
The other tool to miter chain stays by the dropout end is here: https://www.flickr.com/photos/44bikes/51099818819/in/dateposted-public/
And a chain stay sub-assembly jig here: https://www.flickr.com/photos/44bikes/50669106503
Current Attachments Valid file extensions: bmp doc jpe jpeg jpg pdf png psd txt zip
and besides - see more stuff here:
https://www.instagram.com/explore/tags/framejig/
https://www.instagram.com/explore/ta...buildingtools/
another approach: Well the plan is to create a simple/cheap chainstay mitering fixture.- i want to have accessories that can be added to standard 80/20;
That said - i want to require as little machining as possible in order to keep the cost down.
i found interesting approach - see this basic setup.
see here some interesting overall photos:
https://www.pinkbike.com/photo/14367112/
https://www.pinkbike.com/photo/14367111/
https://www.pinkbike.com/photo/14367109/
Jigging and Mitering the rear triangle ... - seems to be a nice challenge.
well i think constructing the rear half of a bike frame poses many more challenges than the front half.
Besides the tubing choices we ve got questions about techniques for jigging these assemblies - and in aiming so to create some nice framebuilding tools that help here:
Well - in order to assemble the chainstays as accurately as possible, i plan am to build
1. firstly a jig-mitering tool that mimics the final positioning in the finished frame
2. going to elaborate this a bit more.
Doing so: this hope that i can finalize the miter on the seatstays: I have had a quick view on the mitering-tools and chainstays that are out there:
recently i saw the chainstay fixture - here - at the instagram account of Kristofer Henry ( https://www.44bikes.com/ ) - Well - i like this it looks very impressive. (see the chainstay-fixture at his page ( or at the instagram account. )
one question - does this tool need (and afford) a bending process of the tubes that takes place a bit earlier - i.e. right before they were put into the fixture. And besides this - the question for all of you. Which chain-stay-fixture and mitering-tool do you use.
By the way: afaik the tubes tubes (of the chain-stay) for a street-bike are straight - with no windings - so iguess that they are bended seldom - isn �t it so!?
Well - this chain-stay - jig is very nice designed and i like it very much.
on a side note: Steve from Pithybikes has created some Phase-Blocks. - can we use the Phase Blocks (from Steve at Pithybikes) - for creating something … that goes into that direction of such a nice tool
cf; Steves pages - pithybikes.; with lots of useful stuff, videos and more... - here very interesting the Phase-Blocks ..:
https://www.pithybikes.com
https://www.pithybikes.com/pithy-bikes-jig-copy-1
cf: Phase Blocks for 1-1/4"(31.75mm), 3/4"(19.05mm).
Will take screws: 10-24nc or M5. Holes are near size but will need drill chasing and tap.
Recommend print with PET. 50% Infill seems to work well. Not meant to hold work for miter cuts.
But if you're daring, maybe 100% infill can hold work? Pithy Bikes Phase Blocks are free for use but not for re-sale.
Recommend print with PET. 50% Infill seems to work well. Not meant to hold work for miter cuts.
But if you're daring, maybe 100% infill can hold work? Pithy Bikes Phase Blocks are free for use but not for re-sale.
and yes: the question for all of you. Which chain-stay-fixture and mitering-tool do you use.
look forward to hear from you
your apollo,
see more Tools i have seen on the net:
Chainstay mitering |
chainstay-fixture - a extensive discussion - with many pictures
https://www.mtbr.com/threads/chainst...re-diy.680352/
Varcocycles Stay-Mitering Fixture:
https://varcocycles.com/2020/02/25/s...ering-fixture/
Chainstay mitering jig
a collection of images - collected from Schnubbi • actualized in January 2021
29 Pins - 29 images - have a closer look:
https://www.pinterest.de/helbigdanie...-mitering-jig/
Chain Stay Mitering Fixture - see image collection
Explore Anvil Bikes' photos on Flickr. Anvil Bikes has uploaded 1482 photos to Flickr.
https://flickr.com/photos/anvilbikes...57623563680959
The Miters Touch - For Chainstays
https://farrframeworks.com/farr-tool...-miter-fixture
Behold: Method to miter oval chain stays using free-ware mitering templates - a discussion
https://www.mtbr.com/threads/behold-...plates.990335/
And as a additional info some links to Kristofer Henry: This is the current Flickr link for 44 Bikes https://www.flickr.com/photos/44bikes
This is the chain stay mitering jig you probably should reference: https://www.flickr.com/photos/44bikes/51104776470
There’s more detail shots starting here: https://www.flickr.com/photos/44bikes/26646331965
The other tool to miter chain stays by the dropout end is here: https://www.flickr.com/photos/44bikes/51099818819/in/dateposted-public/
And a chain stay sub-assembly jig here: https://www.flickr.com/photos/44bikes/50669106503
Current Attachments Valid file extensions: bmp doc jpe jpeg jpg pdf png psd txt zip
and besides - see more stuff here:
https://www.instagram.com/explore/tags/framejig/
another approach: Well the plan is to create a simple/cheap chainstay mitering fixture.- i want to have accessories that can be added to standard 80/20;
That said - i want to require as little machining as possible in order to keep the cost down.
i found interesting approach - see this basic setup.
see here some interesting overall photos:
https://www.pinkbike.com/photo/14367112/
https://www.pinkbike.com/photo/14367111/
https://www.pinkbike.com/photo/14367109/
Last edited by apollodriver; 05-05-21 at 06:38 AM.
 04-19-21, 07:47 AM
#2


Randomhead
Join Date: Aug 2008
Location: Happy Valley, Pennsylvania
Posts: 24,394
Mentioned: 0 Post(s)
Tagged: 0 Thread(s)
Quoted: 4 Post(s)
Liked 3,693 Times
in
2,515 Posts
You can grab a link from a post on Instagram.
I have always just hand mitered my chainstays. No templates. I'm building a fixture because I want to check clearances ahead of time.
Paragon has tubing blocks. They said all of the sizes will be back in stock this week. Alex Meade has tubing blocks with oval cutouts for fork blades. I haven't seen tubing blocks for oval chainstays. Vee blocks work fairly well since there are a number of different chainstay sections.
Last edited by unterhausen; 04-19-21 at 07:52 AM.
04-19-21, 08:07 AM
#3
Randomhead
Join Date: Aug 2008
Location: Happy Valley, Pennsylvania
Posts: 24,394
Mentioned: 0 Post(s)
Tagged: 0 Thread(s)
Quoted: 4 Post(s)
Liked 3,693 Times
in
2,515 Posts
Here is the 44 bikes fixture
The second round bar on that design doesn't add anything.
The second round bar on that design doesn't add anything.
Likes For unterhausen:
04-19-21, 08:20 AM
#4
Newbie
Thread Starter
hello dear untershausen
first of all - many many thanks for the quick reply - glad to hear from you
well - thank you for the comment. - i have seen dozens of chain-stay-mitering jigs - but this seems to be the most elaborate and sophisticated i have seen in this whole year.

btw: are those tubes - /(which look like very interesting -(note: they are not straight but look like winded while being bended with special tools:
in other words.- Do they fit especially for Mountain bikes - but not so much for a street-(racing) bike!?
and besides this: the both blocks which are marked - (with a red marker) - they look very very sophisticated and complex.
Look forward to hear from you
apollo
update: btw: this is another part - from Kristopher Henry - see here: https://flickr.com/photos/blackcapst...7718964022612/
designed in 2011
- it looks also very outstanding - and seems to be (at least it seems to me ) a predessor of the new chain-stay - mitering tool - which we see on the instagram image in the threadstart - (which is [at least to me] brandnew designed )?!
first of all - many many thanks for the quick reply - glad to hear from you
well - thank you for the comment. - i have seen dozens of chain-stay-mitering jigs - but this seems to be the most elaborate and sophisticated i have seen in this whole year.
btw: are those tubes - /(which look like very interesting -(note: they are not straight but look like winded while being bended with special tools:
in other words.- Do they fit especially for Mountain bikes - but not so much for a street-(racing) bike!?
and besides this: the both blocks which are marked - (with a red marker) - they look very very sophisticated and complex.
Look forward to hear from you
apollo
update: btw: this is another part - from Kristopher Henry - see here: https://flickr.com/photos/blackcapst...7718964022612/
designed in 2011
- it looks also very outstanding - and seems to be (at least it seems to me ) a predessor of the new chain-stay - mitering tool - which we see on the instagram image in the threadstart - (which is [at least to me] brandnew designed )?!
Last edited by apollodriver; 04-19-21 at 08:24 AM.
04-19-21, 09:20 AM
#5
Randomhead
Join Date: Aug 2008
Location: Happy Valley, Pennsylvania
Posts: 24,394
Mentioned: 0 Post(s)
Tagged: 0 Thread(s)
Quoted: 4 Post(s)
Liked 3,693 Times
in
2,515 Posts
Yes, he said that the fixture in the insta that I linked replaced his older one. I'm not sure it's significantly more sophisticated than other fixtures I have seen. It's nice though. The blocks at the front are cut away for clearance. Otherwise they are just vee blocks.
The tubes are chainstays. They look to be something that is commercially available, but maybe he added some bend. The interesting thing to me is that they are mitered off-center. I'm not sure that was intentional to add a little more clearance. I assume they are for a bike with big tires. Some people use s-bend chainstays for road bikes, but these have more bend than would be required for that. These appear to be for an all-road or mountain bike.
The tubes are chainstays. They look to be something that is commercially available, but maybe he added some bend. The interesting thing to me is that they are mitered off-center. I'm not sure that was intentional to add a little more clearance. I assume they are for a bike with big tires. Some people use s-bend chainstays for road bikes, but these have more bend than would be required for that. These appear to be for an all-road or mountain bike.
04-19-21, 09:38 AM
#6
Newbie
Thread Starter
hello dear Unterhausen,
great to hear from you again !
i also guess that the chain-stay is for a big with bigger tires. To me it looks exactly this way. I get the same impression as you do!
the question for me is - do we need to bend the tubes in the chain-stay.
for some kind of bikes - it seems to be obvious or mandantory - (eg for bikes with bigger tires perhaps) but if we take street-bikes - i guess that the tubes are very often just straight - aren �t they!?
i can second your statement: "These appear to be for an all-road or mountain bike"
i have the same impression!
greetings
Apollo
great to hear from you again !
The tubes are chainstays. They look to be something that is commercially available, but maybe he added some bend. The interesting thing to me is that they are mitered off-center. I'm not sure that was intentional to add a little more clearance. I assume they are for a bike with big tires. Some people use s-bend chainstays for road bikes, but these have more bend than would be required for that. These appear to be for an all-road or mountain bike.
the question for me is - do we need to bend the tubes in the chain-stay.
for some kind of bikes - it seems to be obvious or mandantory - (eg for bikes with bigger tires perhaps) but if we take street-bikes - i guess that the tubes are very often just straight - aren �t they!?
i can second your statement: "These appear to be for an all-road or mountain bike"
i have the same impression!
greetings
Apollo
04-19-21, 09:52 AM
#7
Senior Member
Join Date: Jan 2013
Location: South Jersey
Posts: 2,265
Mentioned: 18 Post(s)
Tagged: 0 Thread(s)
Quoted: 714 Post(s)
Liked 798 Times
in
475 Posts
Yes, he said that the fixture in the insta that I linked replaced his older one. I'm not sure it's significantly more sophisticated than other fixtures I have seen. It's nice though. The blocks at the front are cut away for clearance. Otherwise they are just vee blocks.
The tubes are chainstays. They look to be something that is commercially available, but maybe he added some bend. The interesting thing to me is that they are mitered off-center. I'm not sure that was intentional to add a little more clearance. I assume they are for a bike with big tires. Some people use s-bend chainstays for road bikes, but these have more bend than would be required for that. These appear to be for an all-road or mountain bike.
The tubes are chainstays. They look to be something that is commercially available, but maybe he added some bend. The interesting thing to me is that they are mitered off-center. I'm not sure that was intentional to add a little more clearance. I assume they are for a bike with big tires. Some people use s-bend chainstays for road bikes, but these have more bend than would be required for that. These appear to be for an all-road or mountain bike.
Likes For dsaul:
04-19-21, 12:31 PM
#8
Senior Member
Join Date: Dec 2019
Posts: 955
Mentioned: 3 Post(s)
Tagged: 0 Thread(s)
Quoted: 321 Post(s)
Liked 263 Times
in
212 Posts
I also mitre by hand. It's not a difficult mitre. Most important is that the chainstays are exactly the same length, or the back wheel won't sit right. You can only do this if you can fixture it right. I attach the CS before the front triangle as it makes it easier with fixturing.
I weld the ST to the BB first, then add the CS after that, before the front triangle.
I have a bit of square tube with two nuts welded onto it about 80mm apart. This is clamped to the edge of my table. A piece of threaded rod goes through the two nuts, is locked in place with two more, and two more pairs of nuts (locked against each other) define the rear spacing (usually 130mm or 135mm). The dropouts are then put in place and held down with two more nuts.
Knowing the height of the rear axle off the table I use math to work out how far away the BB shell should be and what angle the ST should be at. Then I clamp a piece of angle iron across the table for the BB to rest against. I check everything for level and square with a laser level box. Then check it again.
This gives a pretty accurate jig that doesn't move around so I can now mitre the CS (by hand, using templates). They are tacked at the dropouts first and then at the BB shell. Then with a couple of tacks on it I take it all out and put a true rear wheel in to check, trying it both ways round just in case.
Then I weld it all out. Things will move around a bit but that can easily be corrected. This way things are fundamentally the right length and will be back in the right place once bent back.
Likes For guy153:
04-19-21, 02:25 PM
#9
Junior Mint
I made a version of the setup pictured above using Alex Meade's tubing blocks for small oval tubing.

chainstay mitering setup
It wasn't the easiest thing to use but the results were good. If I had a drill press, I could have clamped this to the table and done it that way. Since I don't, I used a hand file.
I then joined the chainstays to the bottom bracket using a similarly rudimentary setup.
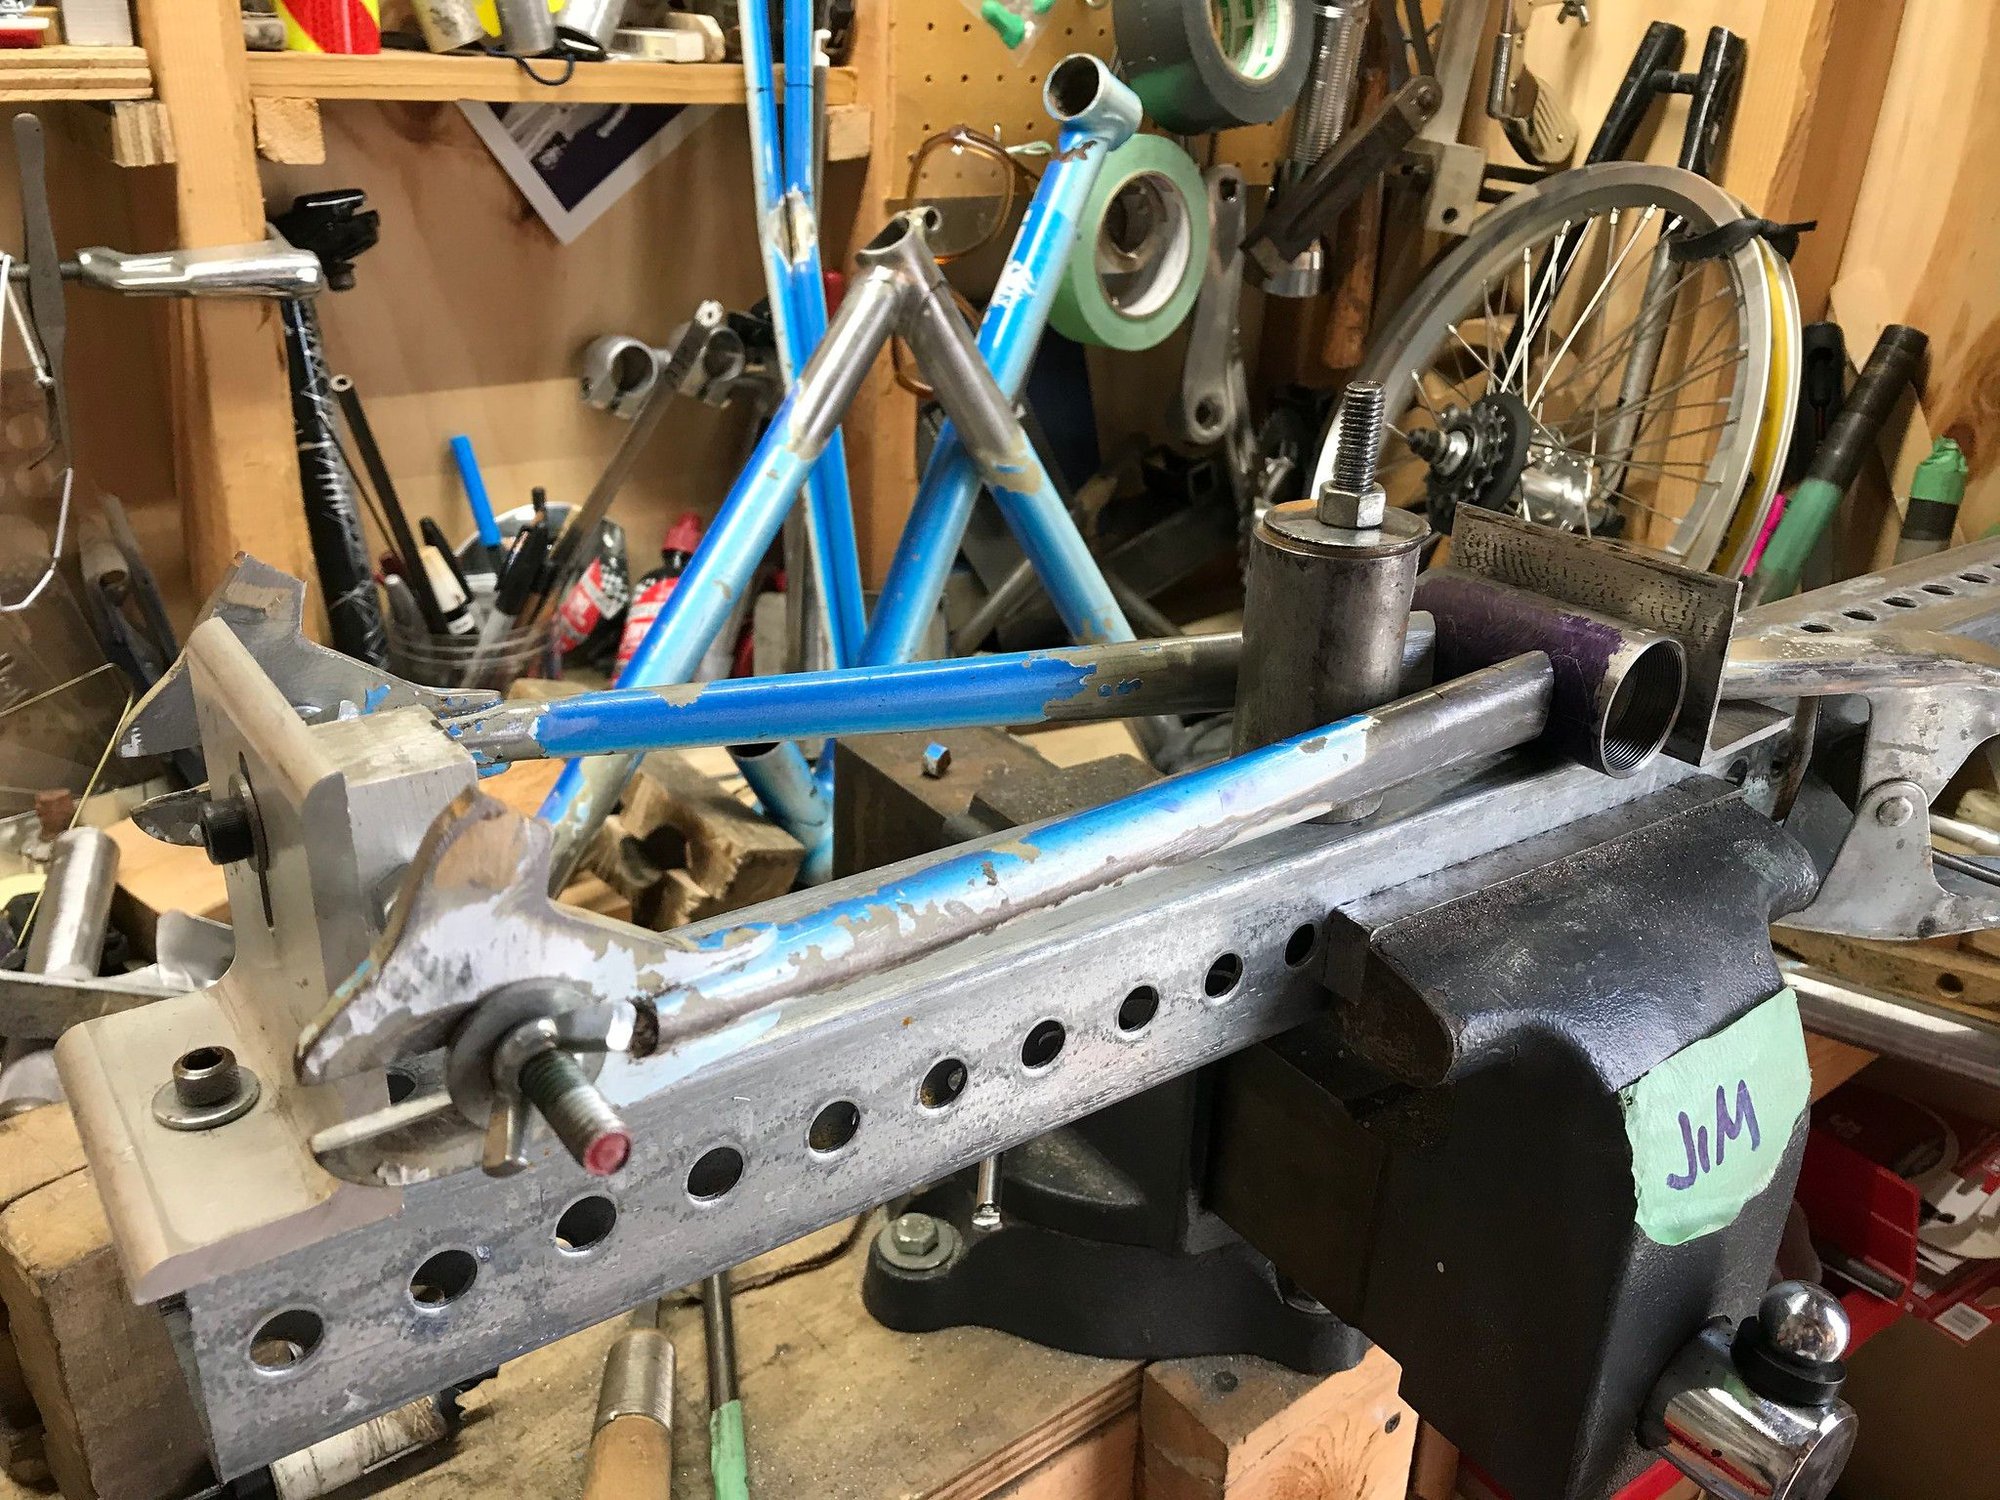
The real disadvantage of this kind of setup is that you have to check everything very carefully - there are 100 ways it can go out of alignment, out of plane, crooked, etc.
chainstay mitering setup
It wasn't the easiest thing to use but the results were good. If I had a drill press, I could have clamped this to the table and done it that way. Since I don't, I used a hand file.
I then joined the chainstays to the bottom bracket using a similarly rudimentary setup.
The real disadvantage of this kind of setup is that you have to check everything very carefully - there are 100 ways it can go out of alignment, out of plane, crooked, etc.
Likes For jimn:
04-19-21, 08:41 PM
#10

Senior Member
Join Date: Feb 2012
Location: Rochester, NY
Posts: 18,070
Bikes: Stewart S&S coupled sport tourer, Stewart Sunday light, Stewart Commuting, Stewart Touring, Co Motion Tandem, Stewart 3-Spd, Stewart Track, Fuji Finest, Mongoose Tomac ATB, GT Bravado ATB, JCP Folder, Stewart 650B ATB
Mentioned: 0 Post(s)
Tagged: 0 Thread(s)
Quoted: 4198 Post(s)
Liked 3,849 Times
in
2,300 Posts
I now use an Anvil mitering fixture. But I hand did a number before and agree with the ease of slight offness in stay lengths. That's one reason to build with BB shells that have sockets Even with the Anvil I follow up with a small bit of hand file strokes to fine tune the miters. This is where a tacking jig (different then the mitering fixture) is a nice thing. It is better at consistent stay placement and aids the ability to check minor miter tuning far better then what I had before.
While not the initial topic of this thread here's a unicrown mitering fixture I made for the first (and so far only) MtB fork I've made. The tube blocks are Alex Meade's. The rest is either specific bought or bits I had in the scrap bin. The blades still needed some hand tuning after the hole saw did the bulk of the work. With some creative thinking and fairly simple fab work a reasonable mitering fixture isn't hard to make. maybe not quickly though.

Even with the Anvil I follow up with a small bit of hand file strokes to fine tune the miters. This is where a tacking jig (different then the mitering fixture) is a nice thing. It is better at consistent stay placement and aids the ability to check minor miter tuning far better then what I had before.While not the initial topic of this thread here's a unicrown mitering fixture I made for the first (and so far only) MtB fork I've made. The tube blocks are Alex Meade's. The rest is either specific bought or bits I had in the scrap bin. The blades still needed some hand tuning after the hole saw did the bulk of the work. With some creative thinking and fairly simple fab work a reasonable mitering fixture isn't hard to make. maybe not quickly though
.
__________________
AndrewRStewart
AndrewRStewart

Likes For Andrew R Stewart:
04-20-21, 10:06 AM
#11
Newbie
Thread Starter
hello dear dsaul, hello unterhausen, guy153, jimn, Andrew R Stewart, good day
many thanks for your replies,
dsaul ... yes fully agreed - this is Kris Flickr-Feed: https://www.flickr.com/photos/44bikes/
i also like this way kris goes this way - "offset mitered to attach lower on the bottom bracket" -
btw. this is a view on the chainstay from the top - very actual: https://www.flickr.com/photos/44bike...kRTgoG-2kQHbm2
cf. Kristofer Henry - Jeremy's Sub-Assembly :: xwww.44bikes.com
guy153 - you mitre by hand - as i am currently working on the finish of the fixture according tanner w (cf. https://www.instructables.com/Bicycl...-Building-Jig/ ) i like your idea. Several weeks ago i found Kristofer Henrys chainstain mitering fixture - now i am musing on working out such a nices solution too.
but i like your ideas of the mitre-process by hand. Your detailed description of doing this is great and very helpful.
very helpful - and instructive. Thanks!
Jimn, thanks for sharing your ideas and your setup!
agreed with this comment
Andrew R Stewart, thank you for sharing your experience and thoughts; the Anvil Mitering i did not know before.
Thank you for the ideas - and for showing the unicrown mitering fixture that you made for a MtB.
Many thanks for this very fruitful discussion
Apollo
update: as for some additional support of the threadstart that is a image that kris mentioned in a recent posting (i am in a mail conversation since two days) cf. Kris Flickr-Feed: https://www.flickr.com/photos/44bikes/
cf -kristofer at flickr: https://www.flickr.com/photos/44bike...kRTgoG-2kQHbm2

picture taken this month...
by the way and on a sidenote: if we compare the both view of the chainstay-jig - we see intersting things
note: - here we have another bar on that design - whereas Unterhausen said: this doesn't add anything...!?
But anyway - it looks pretty sophisticated... Here is the 44 bikes fixture
note: - here we have another bar on that design - whereas Unterhausen said: this doesn't add anything...!?
But anyway - it looks pretty sophisticated...
many thanks for your replies,
dsaul ... yes fully agreed - this is Kris Flickr-Feed: https://www.flickr.com/photos/44bikes/
Kris makes his own stays from round tubes. His Flickr feed shows the process that he uses to bend and smash them for clearance. The stays are offset mitered to attach lower on the bottom bracket, which I have found to be very helpful in allowing better torch access for welding around the stays and the rear of the seat tube/bottom bracket joint. It can get very tight in there with a zero offset miter on
the chainstays, as the stays are often touching the seat tube.
the chainstays, as the stays are often touching the seat tube.
btw. this is a view on the chainstay from the top - very actual: https://www.flickr.com/photos/44bike...kRTgoG-2kQHbm2
cf. Kristofer Henry - Jeremy's Sub-Assembly :: xwww.44bikes.com
guy153 - you mitre by hand - as i am currently working on the finish of the fixture according tanner w (cf. https://www.instructables.com/Bicycl...-Building-Jig/ ) i like your idea. Several weeks ago i found Kristofer Henrys chainstain mitering fixture - now i am musing on working out such a nices solution too.
but i like your ideas of the mitre-process by hand. Your detailed description of doing this is great and very helpful.
I also mitre by hand. It's not a difficult mitre. Most important is that the chainstays are exactly the same length, or the back wheel won't sit right. You can only do this if you can fixture it right. I attach the CS before the front triangle as it makes it easier with fixturing.I weld the ST to the BB first, then add the CS after that, before the front triangle. I have a bit of square tube with two nuts welded onto it about 80mm apart. This is clamped to the edge of my table. A piece of threaded rod goes through the two nuts, is locked in place with two more, and two more pairs of nuts (locked against each other) define the rear spacing (usually 130mm or 135mm). The dropouts are then put in place and held down with two more nuts. Knowing the height of the rear axle off the table I use math to work out how far away the BB shell should be and what angle the ST should be at. Then I clamp a piece of angle iron across the table for the BB to rest against. I check everything for level and square with a laser level box. Then check it again. This gives a pretty accurate jig that doesn't move around so I can now mitre the CS (by hand, using templates). They are tacked at the dropouts first and then at the BB shell. Then with a couple of tacks on it I take it all out and put a true rear wheel in to check, trying it both ways round just in case. Then I weld it all out. Things will move around a bit but that can easily be corrected. This way things are fundamentally
the right length and will be back in the right place once bent back.
the right length and will be back in the right place once bent back.
I have a bit of square tube with two nuts welded onto it about 80mm apart. This is clamped to the edge of my table. A piece of threaded rod goes through the two nuts, is locked in place with two more, and two more pairs of nuts (locked against each other) define the rear spacing (usually 130mm or 135mm). The dropouts are then put in place and held down with two more nuts.
I made a version of the setup pictured above using Alex Meade's tubing blocks for small oval tubing.
The real disadvantage of this kind of setup is that you have to check everything very carefully - there are 100 ways it can go out of alignment, out of plane, crooked, etc.
Thank you for the ideas - and for showing the unicrown mitering fixture that you made for a MtB.
Many thanks for this very fruitful discussion
Apollo
update: as for some additional support of the threadstart that is a image that kris mentioned in a recent posting (i am in a mail conversation since two days) cf. Kris Flickr-Feed: https://www.flickr.com/photos/44bikes/
cf -kristofer at flickr: https://www.flickr.com/photos/44bike...kRTgoG-2kQHbm2
picture taken this month...
by the way and on a sidenote: if we compare the both view of the chainstay-jig - we see intersting things
note: - here we have another bar on that design - whereas Unterhausen said: this doesn't add anything...!?
But anyway - it looks pretty sophisticated... Here is the 44 bikes fixture
note: - here we have another bar on that design - whereas Unterhausen said: this doesn't add anything...!?
But anyway - it looks pretty sophisticated...
Last edited by apollodriver; 04-20-21 at 12:34 PM.
