


FYI: DIY seatpost binder nut for 80s Japanese frames
 12-16-20, 11:53 AM
#1
Senior Member
Thread Starter
Join Date: Oct 2010
Posts: 8,515
Mentioned: 69 Post(s)
Tagged: 0 Thread(s)
Quoted: 3241 Post(s)
Liked 2,512 Times
in
1,510 Posts
FYI: DIY seatpost binder nut for 80s Japanese frames
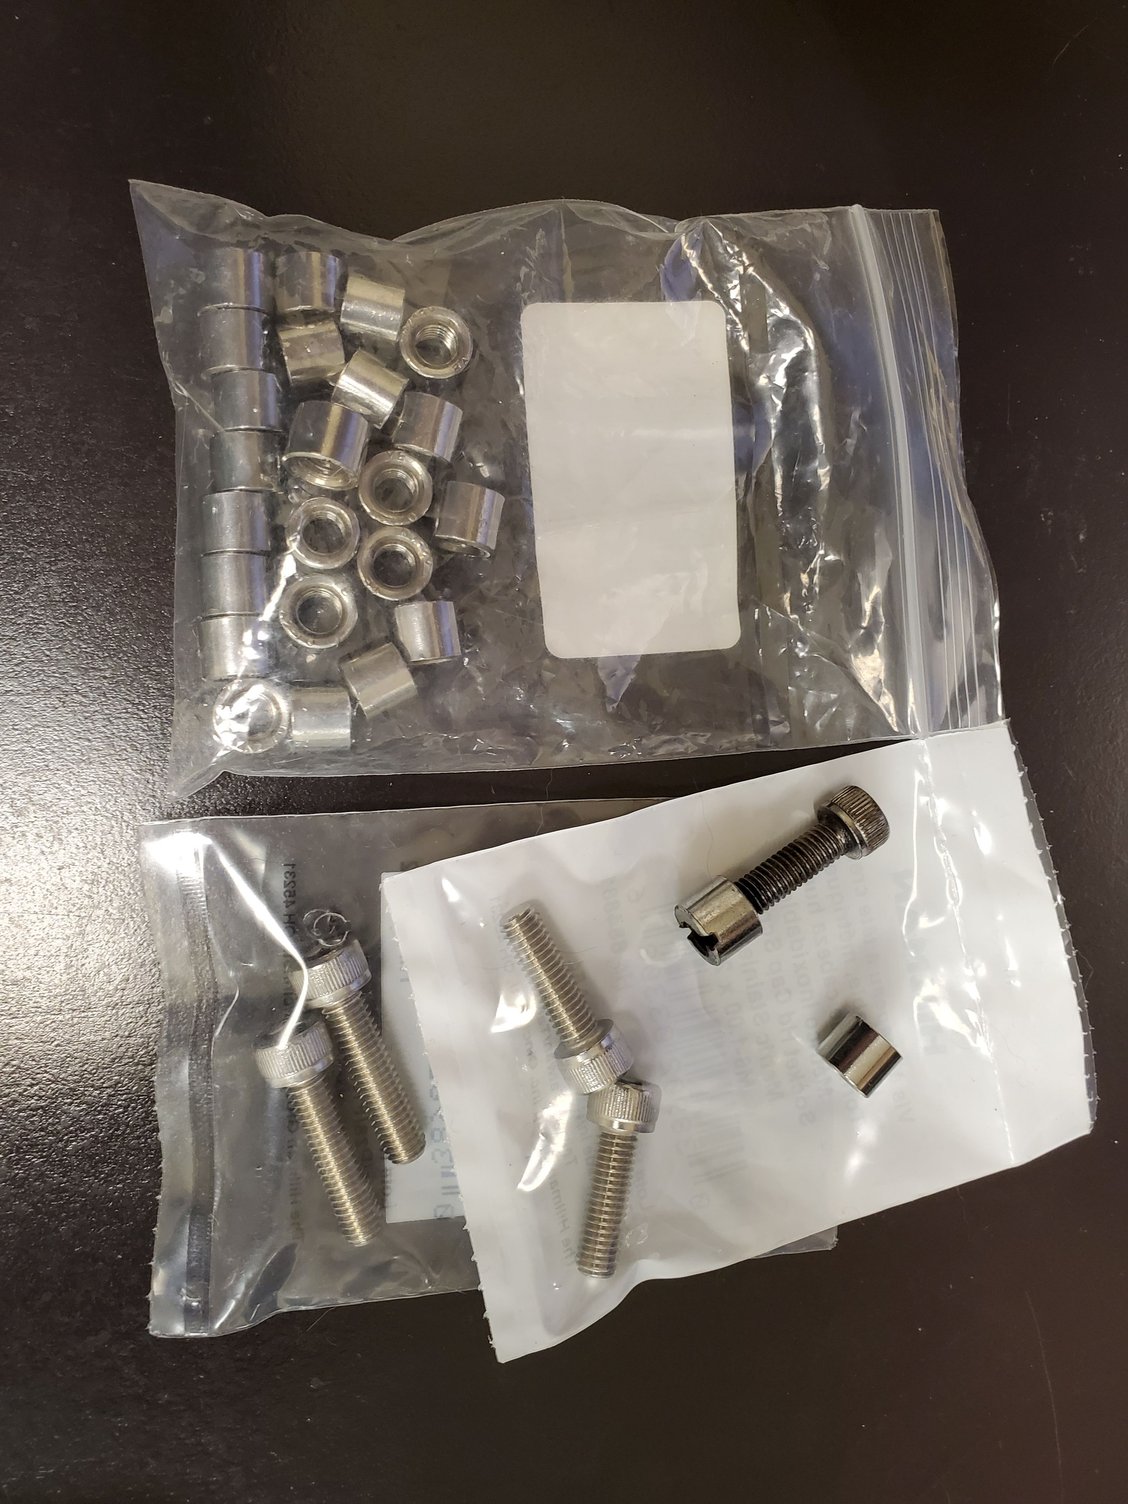
I got in a mid 80's frame that uses the rounded nut that sits inside the seatpost clamp. I have 2 frames but only 1 nut/bolt. It's a M6 x 1.0 bolt. 10mm dia/8mm long nut. It has notches cut on one end for a slotted screwdriver. I found some stainless steel coupling nuts the same size, etc on the Zon. They just need the slots cut on one end. They come in a 25 pack. Anyway, if you need one you can order some. Or you can contact me and I will send you out some. I have more than I need. 
Last edited by seypat; 12-25-20 at 07:35 PM.

Likes For seypat:
12-16-20, 02:34 PM
#3

Senior Member
Join Date: Jun 2009
Location: Brooklyn, NY
Posts: 512
Bikes: 1970s Coppi/Fiorelli beater, 1973 Raleigh Competition, 1972 Bob Jackson, 1970 Cilo Sprint-X, 1985 Fuji Touring Series IV, 1969 Legnano Roma
Mentioned: 11 Post(s)
Tagged: 0 Thread(s)
Quoted: 217 Post(s)
Liked 198 Times
in
129 Posts
wasnt this the seatpost bolt arrangement preferred by Miyata? I have kluged around this problem before, using a "tall" allen-headed nut from MTB brake pads to match the bolt. It worked, but I needed to use two allen wrenches to adjust the post -- your solution here is far 'correcter'
12-16-20, 03:13 PM
#4
Senior Member
Join Date: Nov 2005
Location: NW Ohio
Posts: 3,419
Bikes: 1984 Miyata 310, 1986 Schwinn Sierra, 2011 Jamis Quest, 1980 Peugeot TH8 Tandem, 1992 Performance Parabola, 1987 Ross Mt. Hood, 1988 Schwinn LeTour, 1988 Trek 400T, 1981 Fuji S12-S LTD, 197? FW Evans
Mentioned: 24 Post(s)
Tagged: 0 Thread(s)
Quoted: 531 Post(s)
Liked 1,004 Times
in
514 Posts
wasnt this the seatpost bolt arrangement preferred by Miyata? I have kluged around this problem before, using a "tall" allen-headed nut from MTB brake pads to match the bolt. It worked, but I needed to use two allen wrenches to adjust the post -- your solution here is far 'correcter'
12-16-20, 03:40 PM
#5
aka Tom Reingold

Join Date: Jan 2009
Location: New York, NY, and High Falls, NY, USA
Posts: 40,503
Bikes: 1962 Rudge Sports, 1971 Raleigh Super Course, 1971 Raleigh Pro Track, 1974 Raleigh International, 1975 Viscount Fixie, 1982 McLean, 1996 Lemond (Ti), 2002 Burley Zydeco tandem
Mentioned: 511 Post(s)
Tagged: 0 Thread(s)
Quoted: 7348 Post(s)
Liked 2,466 Times
in
1,434 Posts
This was an unfortunate design that was left off subsequent bikes. When the ear of the lug got bent, it put a stress on the bolt, causing the bolt to break.
__________________
Tom Reingold, tom@noglider.com
New York City and High Falls, NY
Blogs: The Experienced Cyclist; noglider's ride blog
�When man invented the bicycle he reached the peak of his attainments.� � Elizabeth West, US author
Please email me rather than PM'ing me. Thanks.
Tom Reingold, tom@noglider.com
New York City and High Falls, NY
Blogs: The Experienced Cyclist; noglider's ride blog
�When man invented the bicycle he reached the peak of his attainments.� � Elizabeth West, US author
Please email me rather than PM'ing me. Thanks.
12-16-20, 05:06 PM
#6
Senior Member
Thread Starter
Join Date: Oct 2010
Posts: 8,515
Mentioned: 69 Post(s)
Tagged: 0 Thread(s)
Quoted: 3241 Post(s)
Liked 2,512 Times
in
1,510 Posts
wasnt this the seatpost bolt arrangement preferred by Miyata? I have kluged around this problem before, using a "tall" allen-headed nut from MTB brake pads to match the bolt. It worked, but I needed to use two allen wrenches to adjust the post -- your solution here is far 'correcter'
12-17-20, 08:05 AM
#7
Senior Member

Join Date: Apr 2006
Location: Washington County, Vermont, USA
Posts: 3,778
Bikes: 1966 Dawes Double Blue, 1976 Raleigh Gran Sport, 1975 Raleigh Sprite 27, 1980 Univega Viva Sport, 1971 Gitane Tour de France, 1984 Lotus Classique, 1976 Motobecane Grand Record
Mentioned: 77 Post(s)
Tagged: 0 Thread(s)
Quoted: 765 Post(s)
Liked 660 Times
in
351 Posts
wasnt this the seatpost bolt arrangement preferred by Miyata? I have kluged around this problem before, using a "tall" allen-headed nut from MTB brake pads to match the bolt. It worked, but I needed to use two allen wrenches to adjust the post -- your solution here is far 'correcter'
https://www.bikeforums.net/classic-v...ta-1000-a.html
I agree that the OP's method is a great one--it matches the Miyata original. I wish I'd thought of it. But it's still kind of a pain--the slotted nut doesn't give a very good grip when you want to tighten the bolt. Of course, it's also a pain to have to carry a second allen wrench when using the brake-nut method, but it's arguably even more inconvenient to have to carry a slotted screwdriver.
As wonderful as the old Miyatas were and are, whoever was in charge of the company's binder-bolt division had some strange ideas. The worst setup of all was the one requiring a non-standard hex nut to fit the recess in the lug--break or lose that nut and you're really screwed. I'm eagerly waiting someone to come up with a good solution for that one. I have tried to do that and failed.
__________________
www.redclovercomponents.com
"Progress might have been all right once, but it has gone on too long."
--Ogden Nash
www.redclovercomponents.com
"Progress might have been all right once, but it has gone on too long."
--Ogden Nash
Last edited by jonwvara; 12-17-20 at 08:08 AM.
12-17-20, 04:15 PM
#8
Ride, Wrench, Swap, Race

Join Date: Jan 2010
Location: Northern California
Posts: 9,193
Bikes: Cheltenham-Pedersen racer, Boulder F/S Paris-Roubaix, Varsity racer, '52 Christophe, '62 Continental, '92 Merckx, '75 Limongi, '76 Presto, '72 Gitane SC, '71 Schwinn SS, etc.
Mentioned: 132 Post(s)
Tagged: 0 Thread(s)
Quoted: 1565 Post(s)
Liked 1,295 Times
in
865 Posts
There are pictures of the brake-nut method here:
https://www.bikeforums.net/classic-v...ta-1000-a.html
I agree that the OP's method is a great one--it matches the Miyata original. I wish I'd thought of it. But it's still kind of a pain--the slotted nut doesn't give a very good grip when you want to tighten the bolt. Of course, it's also a pain to have to carry a second allen wrench when using the brake-nut method, but it's arguably even more inconvenient to have to carry a slotted screwdriver.
As wonderful as the old Miyatas were and are, whoever was in charge of the company's binder-bolt division had some strange ideas. The worst setup of all was the one requiring a non-standard hex nut to fit the recess in the lug--break or lose that nut and you're really screwed. I'm eagerly waiting someone to come up with a good solution for that one. I have tried to do that and failed.
One can file 10mm flats down to fit in the (9mm?) socket of the Miyata frames like my 912.
On many other frames, I've used loctite to secure the round nut inserts, allowing consistent one-wrench adjustment from the drive side.
On my 1984 Stumpjumper Sport, removed the 6mm quick-release skewer from the clamp, drilled and tapped the left ear to M8x1.25, then drilled the right ear 8mm through for a beefy 8mm socket-head screw,
Lots of ways to skin this cat.
