


Frustration with Minoura wheel truing stand.
 11-18-21, 12:26 PM
#1
QR-disc must die!!!
Thread Starter
Join Date: Sep 2018
Location: Shenandoah Valley, Northern Virginia.
Posts: 703
Bikes: '99 Trek 520, '20 Kona Sutra (FOR SALE 48cm), '21 Simon-Bikes mini-velo and a chromoly-framed folding bicycle with drop-bars and V-brakes, that rolls even while folded.
Mentioned: 2 Post(s)
Tagged: 0 Thread(s)
Quoted: 397 Post(s)
Likes: 0
Liked 199 Times
in
147 Posts
Frustration with Minoura wheel truing stand.
First time wheelbuilder, trying to do a front wheel. New hub, rim, nipples and custom-cut spokes.
So I've learned that a wheel which is very off, laterally, can 'magically' be brought into true with just the right tightening and loosening. I completed that just fine, for the horizontal, but, when I went to true the vertical, I notice that the rim doesn't even center over the feeler, and the upside-down tops of the 'U' (cross-section profile of the rim) are not equal distance to the feeler. How can this happen, when the rim is centered exactly between the horizontal feelers? I would think that the cause is in the truing-stand itself, either in one of the feelers or, in the part that holds the hub axle.
So I've learned that a wheel which is very off, laterally, can 'magically' be brought into true with just the right tightening and loosening. I completed that just fine, for the horizontal, but, when I went to true the vertical, I notice that the rim doesn't even center over the feeler, and the upside-down tops of the 'U' (cross-section profile of the rim) are not equal distance to the feeler. How can this happen, when the rim is centered exactly between the horizontal feelers? I would think that the cause is in the truing-stand itself, either in one of the feelers or, in the part that holds the hub axle.
Last edited by Nyah; 11-18-21 at 12:30 PM.
 11-18-21, 01:21 PM
#2
QR-disc must die!!!
Thread Starter
Join Date: Sep 2018
Location: Shenandoah Valley, Northern Virginia.
Posts: 703
Bikes: '99 Trek 520, '20 Kona Sutra (FOR SALE 48cm), '21 Simon-Bikes mini-velo and a chromoly-framed folding bicycle with drop-bars and V-brakes, that rolls even while folded.
Mentioned: 2 Post(s)
Tagged: 0 Thread(s)
Quoted: 397 Post(s)
Likes: 0
Liked 199 Times
in
147 Posts
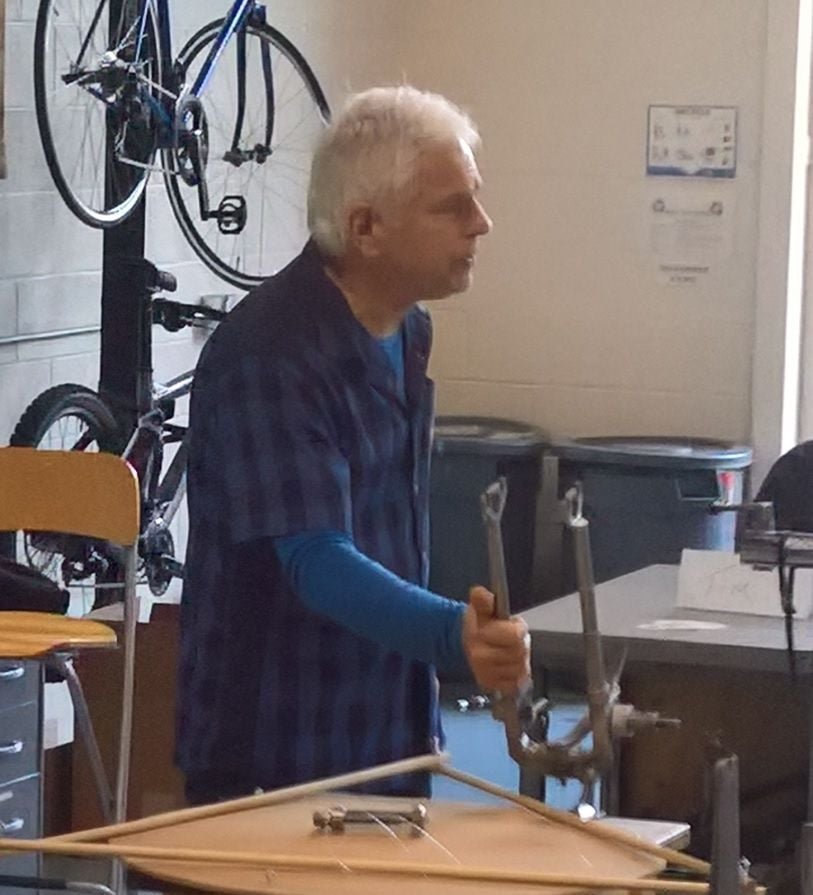
The stand looks just like this:

11-18-21, 02:43 PM
#3

Senior Member
Join Date: Feb 2012
Location: Rochester, NY
Posts: 18,056
Bikes: Stewart S&S coupled sport tourer, Stewart Sunday light, Stewart Commuting, Stewart Touring, Co Motion Tandem, Stewart 3-Spd, Stewart Track, Fuji Finest, Mongoose Tomac ATB, GT Bravado ATB, JCP Folder, Stewart 650B ATB
Mentioned: 0 Post(s)
Tagged: 0 Thread(s)
Quoted: 4195 Post(s)
Liked 3,837 Times
in
2,295 Posts
This level of build (referring to the stand) is pretty low grade. This stand, and it's ilk, are not to be trusted to be square or straight and only suitable for truing, not dishing. Even much better made stands are not to be trusted for their ability to indicate a properly dished wheel.
Now I know many here will say something like "but my Park stand is straight and can be adjusted to be so". I would first reply that Park has designed in adjustability because they have to for the stand's side indicators to be centered. Even the most solid stand I have used (Var 485 aka the Preciray) have a dishing function adjustment.
Others will say that they will flip the wheel around to perform the stand's dishing function. And this is not as bad a trusting the stand's alignment but still has room for error dependent on the wrench's touch when reseating the wheel in the stand, especially if there's a bent axle involved.
I strongly suggest using a separate tool (a dishing tool) for checking if the rim is centered over the axle (and thus within the frame). A very low cost dishing tool can be made from a large enough table top and four stacks of coins (or washers). Three stacks are placed at three points about the rim so the rim will lay on them, the wheel being "flat" to the table and high enough off the table top so the axle end closest to the table top is just above that. The fourth stack is slid under the axle end (actually the end cap or lock nuts). This stack is adjusted to just clear the axle end. Now just like a hand held dishing tool the wheel is flipped ove and you'll see where that fourth stack relates to the rim. Of course the stack will have the same amount of gap between it and the rim either way the wheel is placed if the wheel is centered/dished. The beauty of this makeshift tool is that you can get a complete refund after using it by putting the coins back into your pocket when you're done
I will speculate that your rim is not centered and or the truing stand is just that poorly aligned. Andy
__________________
AndrewRStewart
AndrewRStewart
11-18-21, 02:48 PM
#4
Jedi Master

I have one of those stands and have built a few sets of wheels with it so it's possible. I use poker chips and a table to get the dish right.
11-18-21, 02:50 PM
#5
Senior Member
Join Date: Feb 2012
Location: Rochester, NY
Posts: 18,056
Bikes: Stewart S&S coupled sport tourer, Stewart Sunday light, Stewart Commuting, Stewart Touring, Co Motion Tandem, Stewart 3-Spd, Stewart Track, Fuji Finest, Mongoose Tomac ATB, GT Bravado ATB, JCP Folder, Stewart 650B ATB
Mentioned: 0 Post(s)
Tagged: 0 Thread(s)
Quoted: 4195 Post(s)
Liked 3,837 Times
in
2,295 Posts
With all new parts one would hope (and generally assume) that the rim is pretty round and flat. Holding the bare rim against a good wheel will show big and obvious bends. Or after the spokes are laced up true the wheel with as little spoke tension as possible (ideally near zero tension) and when the wheel is spun a bent rim usually shows it's self easily. Andy
__________________
AndrewRStewart
AndrewRStewart
11-18-21, 05:32 PM
#6
Expired Member

Join Date: Jun 2007
Location: TN
Posts: 11,505
Mentioned: 37 Post(s)
Tagged: 0 Thread(s)
Quoted: 3654 Post(s)
Liked 5,391 Times
in
2,736 Posts
I had an earlier version of that stand and it worked OK within its limitations. IIRC I usually put the wheel back in the bike for final adjustment. Few know less about wheels than me, so the way I did it may be all wrong....
 11-18-21, 07:54 PM
#7
Senior Member
Join Date: Sep 2004
Location: Chicago area
Posts: 2,546
Bikes: Airborne "Carpe Diem", Motobecane "Mirage", Trek 6000, Strida 2, Dahon "Helios XL", Dahon "Mu XL", Tern "Verge S11i"
Mentioned: 22 Post(s)
Tagged: 0 Thread(s)
Quoted: 980 Post(s)
Liked 580 Times
in
398 Posts
I have that stand and have built about 6 wheels which have held up well. I agree with Andy about the dishing tool. I sprang for one made by Park Tools. The stand isn't completely stable, but I have been able to flip a wheel to check the dish; the tool is much more reliable.
11-19-21, 01:09 AM
#8
Friendship is Magic

Join Date: Nov 2010
Location: Sacramento, CA
Posts: 22,984
Bikes: old ones
Mentioned: 304 Post(s)
Tagged: 0 Thread(s)
Quoted: 26382 Post(s)
Liked 10,361 Times
in
7,196 Posts
First time wheelbuilder, trying to do a front wheel. New hub, rim, nipples and custom-cut spokes.
So I've learned that a wheel which is very off, laterally, can 'magically' be brought into true with just the right tightening and loosening. I completed that just fine, for the horizontal, but, when I went to true the vertical, I notice that the rim doesn't even center over the feeler, and the upside-down tops of the 'U' (cross-section profile of the rim) are not equal distance to the feeler. How can this happen, when the rim is centered exactly between the horizontal feelers? I would think that the cause is in the truing-stand itself, either in one of the feelers or, in the part that holds the hub axle.
So I've learned that a wheel which is very off, laterally, can 'magically' be brought into true with just the right tightening and loosening. I completed that just fine, for the horizontal, but, when I went to true the vertical, I notice that the rim doesn't even center over the feeler, and the upside-down tops of the 'U' (cross-section profile of the rim) are not equal distance to the feeler. How can this happen, when the rim is centered exactly between the horizontal feelers? I would think that the cause is in the truing-stand itself, either in one of the feelers or, in the part that holds the hub axle.
Otherwise you'll spend literally hours trying to get the thing round. Which may or may not be what you are talking about. I just can't tell from your initial post. Maybe you could take pictures or make a drawing with some arrows on what it is that is off about your wheel currently, and it might get more exact information in response ?
__________________
11-19-21, 02:11 AM
#9
Senior Member
Join Date: Apr 2010
Location: Elevation 666m Edmonton Canada
Posts: 2,475
Bikes: 2013 Custom SA5w / Rohloff Tourster
Mentioned: 7 Post(s)
Tagged: 0 Thread(s)
Quoted: 1233 Post(s)
Liked 318 Times
in
245 Posts
I've sort of tried them at the co-op. IMO They suck.
So I just put the wheel on the bike. I put a piece of elec tape across the stays. Easy to get it down to thousanths this way. You can see the rim tickling the tape.
For the side I just hold a piece of thin cardboard or plastic. I alternate between humps and hollows. For round I pull a 4 spokes section, at a time. Then 2 when it's really close.
The last front wheel this year, I just turned the wheel around for dish.
And yah, if I'm lucky it only takes 3 hours. LOL
Last edited by GamblerGORD53; 11-19-21 at 02:30 AM.
11-19-21, 09:33 AM
#10
Senior Member
Join Date: Jan 2009
Location: San Diego, CA
Posts: 3,661
Mentioned: 10 Post(s)
Tagged: 0 Thread(s)
Quoted: 836 Post(s)
Liked 1,058 Times
in
742 Posts
I also own one of these except that it's an older version without the claw type truing gauge but uses hand screws in a U-holder. The rest looks the same. I've build a handful of wheels and done a fair amount of truing with it and find it's easier to use than using your frame and zip ties or other methods but is not rigid enough to do perfect dishing and needs to be handled carefully when spinning your wheel to check true/runout by trying not to shake the stand. Dishing can be done with OK results but the wheel needs to be gently lifted straight up and dropped straight back in again without jostling the stand when flipping the wheel and repeated a few times just to get consistent results. Wheel building takes some practice so be patient.
Likes For Crankycrank:
11-19-21, 10:10 AM
#11
aged to perfection

Join Date: Jun 2009
Location: PacNW
Posts: 1,801
Bikes: Dinucci Allez 2.0, Richard Sachs, Alex Singer, Serotta, Masi GC, Raleigh Pro Mk.1, Hetchins, etc
Mentioned: 24 Post(s)
Tagged: 0 Thread(s)
Quoted: 829 Post(s)
Liked 1,241 Times
in
655 Posts
here is one little insite that master wheelbuilder Ric Hjertberg (Wheelfanatyk) shared with me.
it's fine to adjust lateral runout by tightening and loosening spokes on opposite sides of the hub, working in groups of 2 or 4
and you can tighten or loosen spokes (again working in groups of 2 or 4) to reduce "up and down" variations and bring the rim into perfect circularity
And to adjust the dish, you'll tighten all spokes on one side of the hub to put the rim into the plane that is equidistant between the axle endpieces.
you're trying to arrive at a state where the wheel is 1) straight laterally 2) perfectly round 3) dished accurately and 4) evenly and sufficiently tensioned
What experienced wheelbuilders are able to do - in the final stages of truing - is to find one spoke that affects both lateral and vertical deviation and adjust that one spoke to address both.
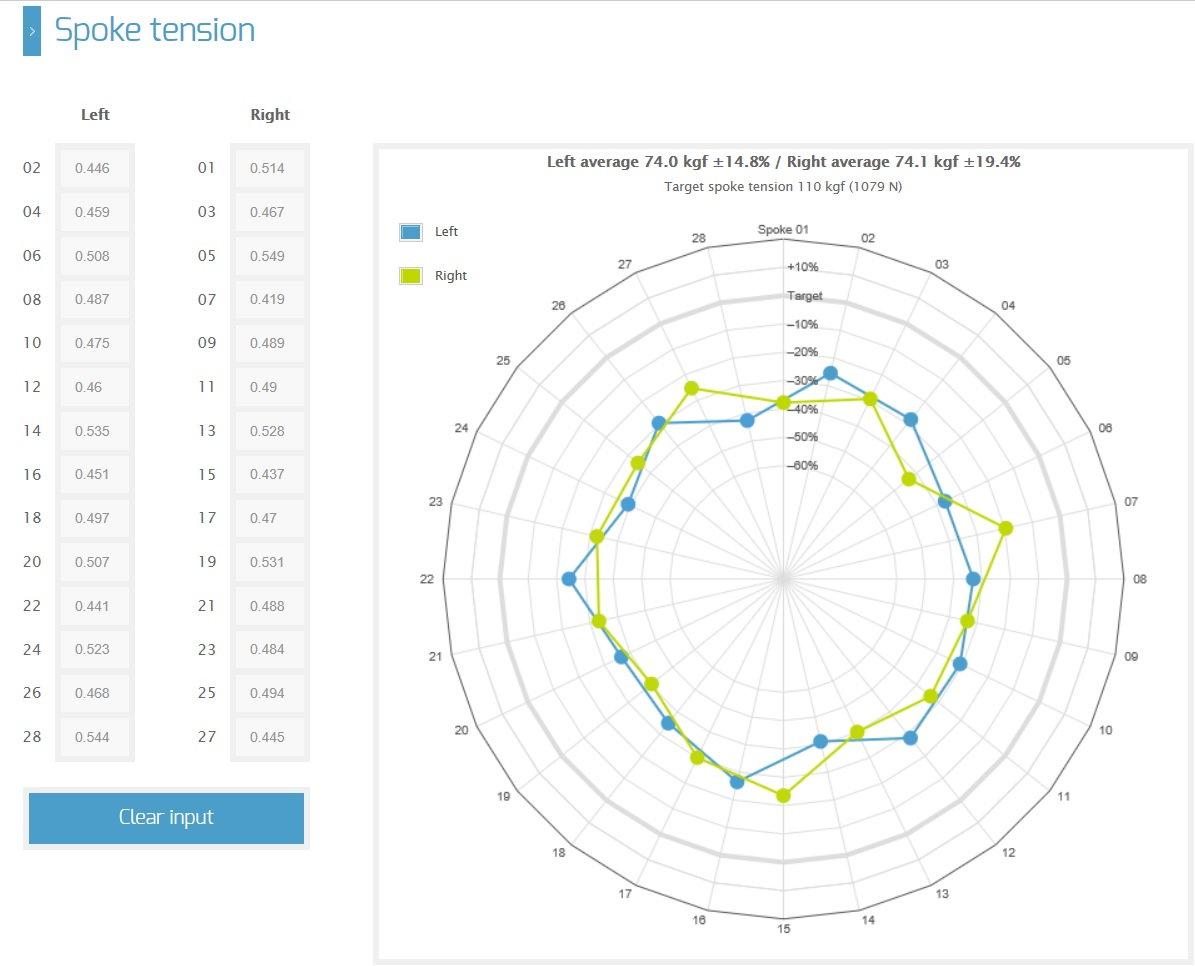
this can approach an art form. Like tuning a piano. But "that one spoke" will generally be an outlier in terms of tension, either too low or too high. in this way a skilled wheelbuilder can reduce the variation in spoke tension, which makes for wheels that stay true for a long time. And Ric's instrumentation can show you the spoke tension of the entire wheel at a glance.
/markp
it's fine to adjust lateral runout by tightening and loosening spokes on opposite sides of the hub, working in groups of 2 or 4
and you can tighten or loosen spokes (again working in groups of 2 or 4) to reduce "up and down" variations and bring the rim into perfect circularity
And to adjust the dish, you'll tighten all spokes on one side of the hub to put the rim into the plane that is equidistant between the axle endpieces.
you're trying to arrive at a state where the wheel is 1) straight laterally 2) perfectly round 3) dished accurately and 4) evenly and sufficiently tensioned
What experienced wheelbuilders are able to do - in the final stages of truing - is to find one spoke that affects both lateral and vertical deviation and adjust that one spoke to address both.
this can approach an art form. Like tuning a piano. But "that one spoke" will generally be an outlier in terms of tension, either too low or too high. in this way a skilled wheelbuilder can reduce the variation in spoke tension, which makes for wheels that stay true for a long time. And Ric's instrumentation can show you the spoke tension of the entire wheel at a glance.
/markp
Likes For mpetry912:
11-19-21, 11:24 AM
#12
Senior Member
Join Date: Dec 2010
Location: northern Deep South
Posts: 8,895
Bikes: Fuji Touring, Novara Randonee
Mentioned: 36 Post(s)
Tagged: 0 Thread(s)
Quoted: 2597 Post(s)
Liked 1,924 Times
in
1,208 Posts
For dishing a wheel (centering it between the dropouts), flipping the wheel over occasionally works for me.
My Minoura is old enough I don't have the red arms, and have to center the gauge by turning knobs to adjust the screws. I tried to get those gauges centered a few times, and then figured I could work on the wheels using one side at a time until I was really close to finished.
How do you adjust the short red arms for different width rims? Can they be independently adjusted?
11-19-21, 11:46 AM
#13
Senior Member
Join Date: Mar 2008
Posts: 8,688
Mentioned: 46 Post(s)
Tagged: 0 Thread(s)
Quoted: 1074 Post(s)
Liked 295 Times
in
222 Posts
I too am having trouble determining what you mean.
I assume that by �vertical� you refer to the orientation of the wheel in the stand.
Which would mean that you�re working on getting the wheel round.
Now, all trueing stands I�ve ever seen have been adjustable for different wheel sizes.
I can�t imagine not being able to align the gauge to the brake track, or whichever part of the rim you use to reference off.
Unless there�s a considerable error in how the the stand is assembled
Also, are the gauges ALWAYS off the rim, or do they move off the rim as you spin the wheel?
It is entirely possible to get a wheel out of round. But if it�s laced properly, and have the right spoke length, that really limits how far out of round you can get it.
There is some variation in how builders approach true and round.
Last wheels I built, the rims were so round that my usual incremental trueing basically brought them into round as well, without any special effort.
Other rims, particularly single-wall rims, it can require quite some effort to bring them into round.
Doing too many turns of the nipples in one go can easily result in a seriously egg-shaped or oval wheel.
11-19-21, 03:04 PM
#14
QR-disc must die!!!
Thread Starter
Join Date: Sep 2018
Location: Shenandoah Valley, Northern Virginia.
Posts: 703
Bikes: '99 Trek 520, '20 Kona Sutra (FOR SALE 48cm), '21 Simon-Bikes mini-velo and a chromoly-framed folding bicycle with drop-bars and V-brakes, that rolls even while folded.
Mentioned: 2 Post(s)
Tagged: 0 Thread(s)
Quoted: 397 Post(s)
Likes: 0
Liked 199 Times
in
147 Posts
I have that stand and have built about 6 wheels which have held up well. I agree with Andy about the dishing tool. I sprang for one made by Park Tools. The stand isn't completely stable, but I have been able to flip a wheel to check the dish; the tool is much more reliable.
11-19-21, 03:30 PM
#15
Senior Member
Join Date: Sep 2004
Location: Chicago area
Posts: 2,546
Bikes: Airborne "Carpe Diem", Motobecane "Mirage", Trek 6000, Strida 2, Dahon "Helios XL", Dahon "Mu XL", Tern "Verge S11i"
Mentioned: 22 Post(s)
Tagged: 0 Thread(s)
Quoted: 980 Post(s)
Liked 580 Times
in
398 Posts
11-19-21, 04:04 PM
#16
Friendship is Magic
Join Date: Nov 2010
Location: Sacramento, CA
Posts: 22,984
Bikes: old ones
Mentioned: 304 Post(s)
Tagged: 0 Thread(s)
Quoted: 26382 Post(s)
Liked 10,361 Times
in
7,196 Posts
For Sweeks and anyone else who uses a dishing stick/tool to make up for the inaccuracies of this stand, I'm curious: Are you able to effectively use the dishing stick without removing the wheel from the stand? If not, I can still see the value in it, but, that sure would be handy.
The dishing tool I use has a little tubular thing that drops over the axle end as the centering point for it, so it requires that I remove the wheel from the stand, and remove the QR. I only need to do it a couple of times, because I can see from the distance it is high on one side about how many spoke turns, and on which side, will be required to center the rim. You figure it out after a few wheels, so it's not burdensome.
What I find very useful from that style of lightweight, portable folding stand, is both the storage of it when not in use (hangs from two longer pegs on the pegboard in the tools cabinet), and the ease with which it can be moved around in use. So for certain operations, I am standing over it, while it sits on the floor. For other operations, I turn it around completely on the table, like when I want to stress relieve the spokes at the end of the process.
I have used a couple of Park Pro stands over at the co-op, and I can turn out as good a wheel on this as I can on those. IN addition, I use a tension meter, an old alloy crank arm as a lever for stress relieving, and usually a spoke wrench that grabs better without slipping, the ineffable "Spokey".
__________________
11-19-21, 06:07 PM
#17
Senior Member
Join Date: Feb 2012
Location: Rochester, NY
Posts: 18,056
Bikes: Stewart S&S coupled sport tourer, Stewart Sunday light, Stewart Commuting, Stewart Touring, Co Motion Tandem, Stewart 3-Spd, Stewart Track, Fuji Finest, Mongoose Tomac ATB, GT Bravado ATB, JCP Folder, Stewart 650B ATB
Mentioned: 0 Post(s)
Tagged: 0 Thread(s)
Quoted: 4195 Post(s)
Liked 3,837 Times
in
2,295 Posts
I think Park tool will disagree. Their dishing tool has two different contact points, to set against the axle end, to choose from. One is shaped to exactly sit within their TS-2 axle support jaws' V openings. Check it out. A real time saver after a few wheels. Andy
__________________
AndrewRStewart
AndrewRStewart
11-19-21, 07:45 PM
#18
Senior Member
Join Date: Sep 2004
Location: Chicago area
Posts: 2,546
Bikes: Airborne "Carpe Diem", Motobecane "Mirage", Trek 6000, Strida 2, Dahon "Helios XL", Dahon "Mu XL", Tern "Verge S11i"
Mentioned: 22 Post(s)
Tagged: 0 Thread(s)
Quoted: 980 Post(s)
Liked 580 Times
in
398 Posts
 11-21-21, 07:31 AM
#19
Senior Member

Join Date: May 2008
Location: Fredericksburg, Va
Posts: 9,579
Bikes: '65 Frejus TDF, '73 Bottecchia Giro d'Italia, '83 Colnago Superissimo, '84 Trek 610, '84 Trek 760, '88 Pinarello Veneto, '88 De Rosa Pro, '89 Pinarello Montello, '94 Burley Duet, 97 Specialized RockHopper, 2010 Langster, Tern Link D8
Mentioned: 73 Post(s)
Tagged: 0 Thread(s)
Quoted: 1607 Post(s)
Liked 2,213 Times
in
1,103 Posts
I have that stand too. Bought for $25 of so. The price was an indicator of its ..... quality. Knowing your tool and its limitations/capabilities makes all the difference in knowing how to use it.
For me it is easier than using the bike as the fixture.
Would I buy another one? Not now. I am still looking for a used park at a respectable price.
For me it is easier than using the bike as the fixture.
Would I buy another one? Not now. I am still looking for a used park at a respectable price.
__________________
Bikes don't stand alone. They are two tired.
Bikes don't stand alone. They are two tired.
11-21-21, 07:53 AM
#20
I am potato.

Join Date: Jun 2015
Location: Pacific Northwest
Posts: 3,104
Bikes: Only precision built, custom high performance elitist machines of the highest caliber. 🍆
Mentioned: 28 Post(s)
Tagged: 0 Thread(s)
Quoted: 1782 Post(s)
Liked 1,621 Times
in
927 Posts
If you take a look at the feelers, you'll notice that they are not simply tapered pointers, but stepped. The horizontal part of the step is for roundness (axial runout) of the wheel. The vertical part of the pointer is for side to side (radial runout) of the wheel.
Sometimes it may be best to loosen everything back up & start over if the wheel has a flat spot or shapes itself like an egg.. Rounding up all the parts & lacing up the wheel is the hardest part, anyway.
I spend most of my focus on roundness, the side-to-side tends to fall in line with the usual outlier or two that throws things wonky. Check both frequently, alternating between them to fix whatever is worse. You'll get it.
Last edited by base2; 11-22-21 at 11:52 AM.
11-21-21, 08:07 AM
#21
Senior member

Join Date: Oct 2004
Location: Oakville Ontario
Posts: 8,115
Mentioned: 25 Post(s)
Tagged: 0 Thread(s)
Quoted: 942 Post(s)
Liked 656 Times
in
370 Posts
For Sweeks and anyone else who uses a dishing stick/tool to make up for the inaccuracies of this stand, I'm curious: Are you able to effectively use the dishing stick without removing the wheel from the stand? If not, I can still see the value in it, but, that sure would be handy.
11-22-21, 11:50 AM
#22
Senior Member
When I build a wheel I first concentrate on the radial run-out. When it is very close I get serious about the lateral run-out. This has served me well over the years.
I use a dishing tool to finish centering the rim.
I use a dishing tool to finish centering the rim.
11-24-21, 08:53 AM
#23
Senior Member
Join Date: Nov 2008
Location: South Jersey
Posts: 1,959
Bikes: Too many Bicycles to list
Mentioned: 10 Post(s)
Tagged: 0 Thread(s)
Quoted: 90 Post(s)
Liked 137 Times
in
45 Posts
I started building wheels using the older model of that stand but then was given a Park by my boss, now I have no idea how I ever did it with that old stand lol. I bought the Park centering tool for my Park stand which I check every time a wheels dish is really off when I put it in the stand ( just to make sure it's the wheel and not my stand ). I have a Park dishing tool but haven't had to use it much as long as I make sure my stand is centered.
Glenn
Glenn
11-24-21, 08:50 PM
#24
Junior Member
Join Date: Oct 2017
Location: Ottawa, ON, Canada
Posts: 148
Bikes: 1974 PX-10E sold, 1977 Witcomb stolen, 1980 Roberts 1 speed, 1987 Cyclops 3 x 6 friction triple crank, 2010 Masi Commuter 1 speed, 2017 Ribble 525 2 x 10 with Ergos
Mentioned: 2 Post(s)
Tagged: 0 Thread(s)
Quoted: 59 Post(s)
Likes: 0
Liked 27 Times
in
17 Posts
The various things on the arm of the Minoura are just pointers. No measurement or centering capability expressed or implied. You will need a centering gauge, but if you work mainly on a given wheel diameter, such a thing is easily made from a stick and a few nuts and bolts.
The only reason to get any truing stand (short of an expensive, heavy, and stationary pro model that does hold centre) is that you can work sitting in a chair instead of standing at (or hunching over!) a bike. Given that, the Minoura is arguably superior to some because you can add felt pads to it and slide it around on a desk or table top to optimize your view of things.
The only reason to get any truing stand (short of an expensive, heavy, and stationary pro model that does hold centre) is that you can work sitting in a chair instead of standing at (or hunching over!) a bike. Given that, the Minoura is arguably superior to some because you can add felt pads to it and slide it around on a desk or table top to optimize your view of things.
