


Peugeot U08 Help!
 01-29-21, 12:15 AM
#1
Junior Member
Thread Starter
Join Date: Aug 2020
Location: California
Posts: 21
Bikes: Fuji Classic (Track), Peugeot U-08, Bianchi Strada turned Fixie
Mentioned: 1 Post(s)
Tagged: 0 Thread(s)
Quoted: 13 Post(s)
Likes: 0
Liked 9 Times
in
4 Posts
Peugeot U08 Help!
Hi Everyone,
I've been having an absolute nightmare with the Peugeot u08 frame I've inherited. Despite the struggle, partially due to being a noob (haha!), I'm close to getting it done.
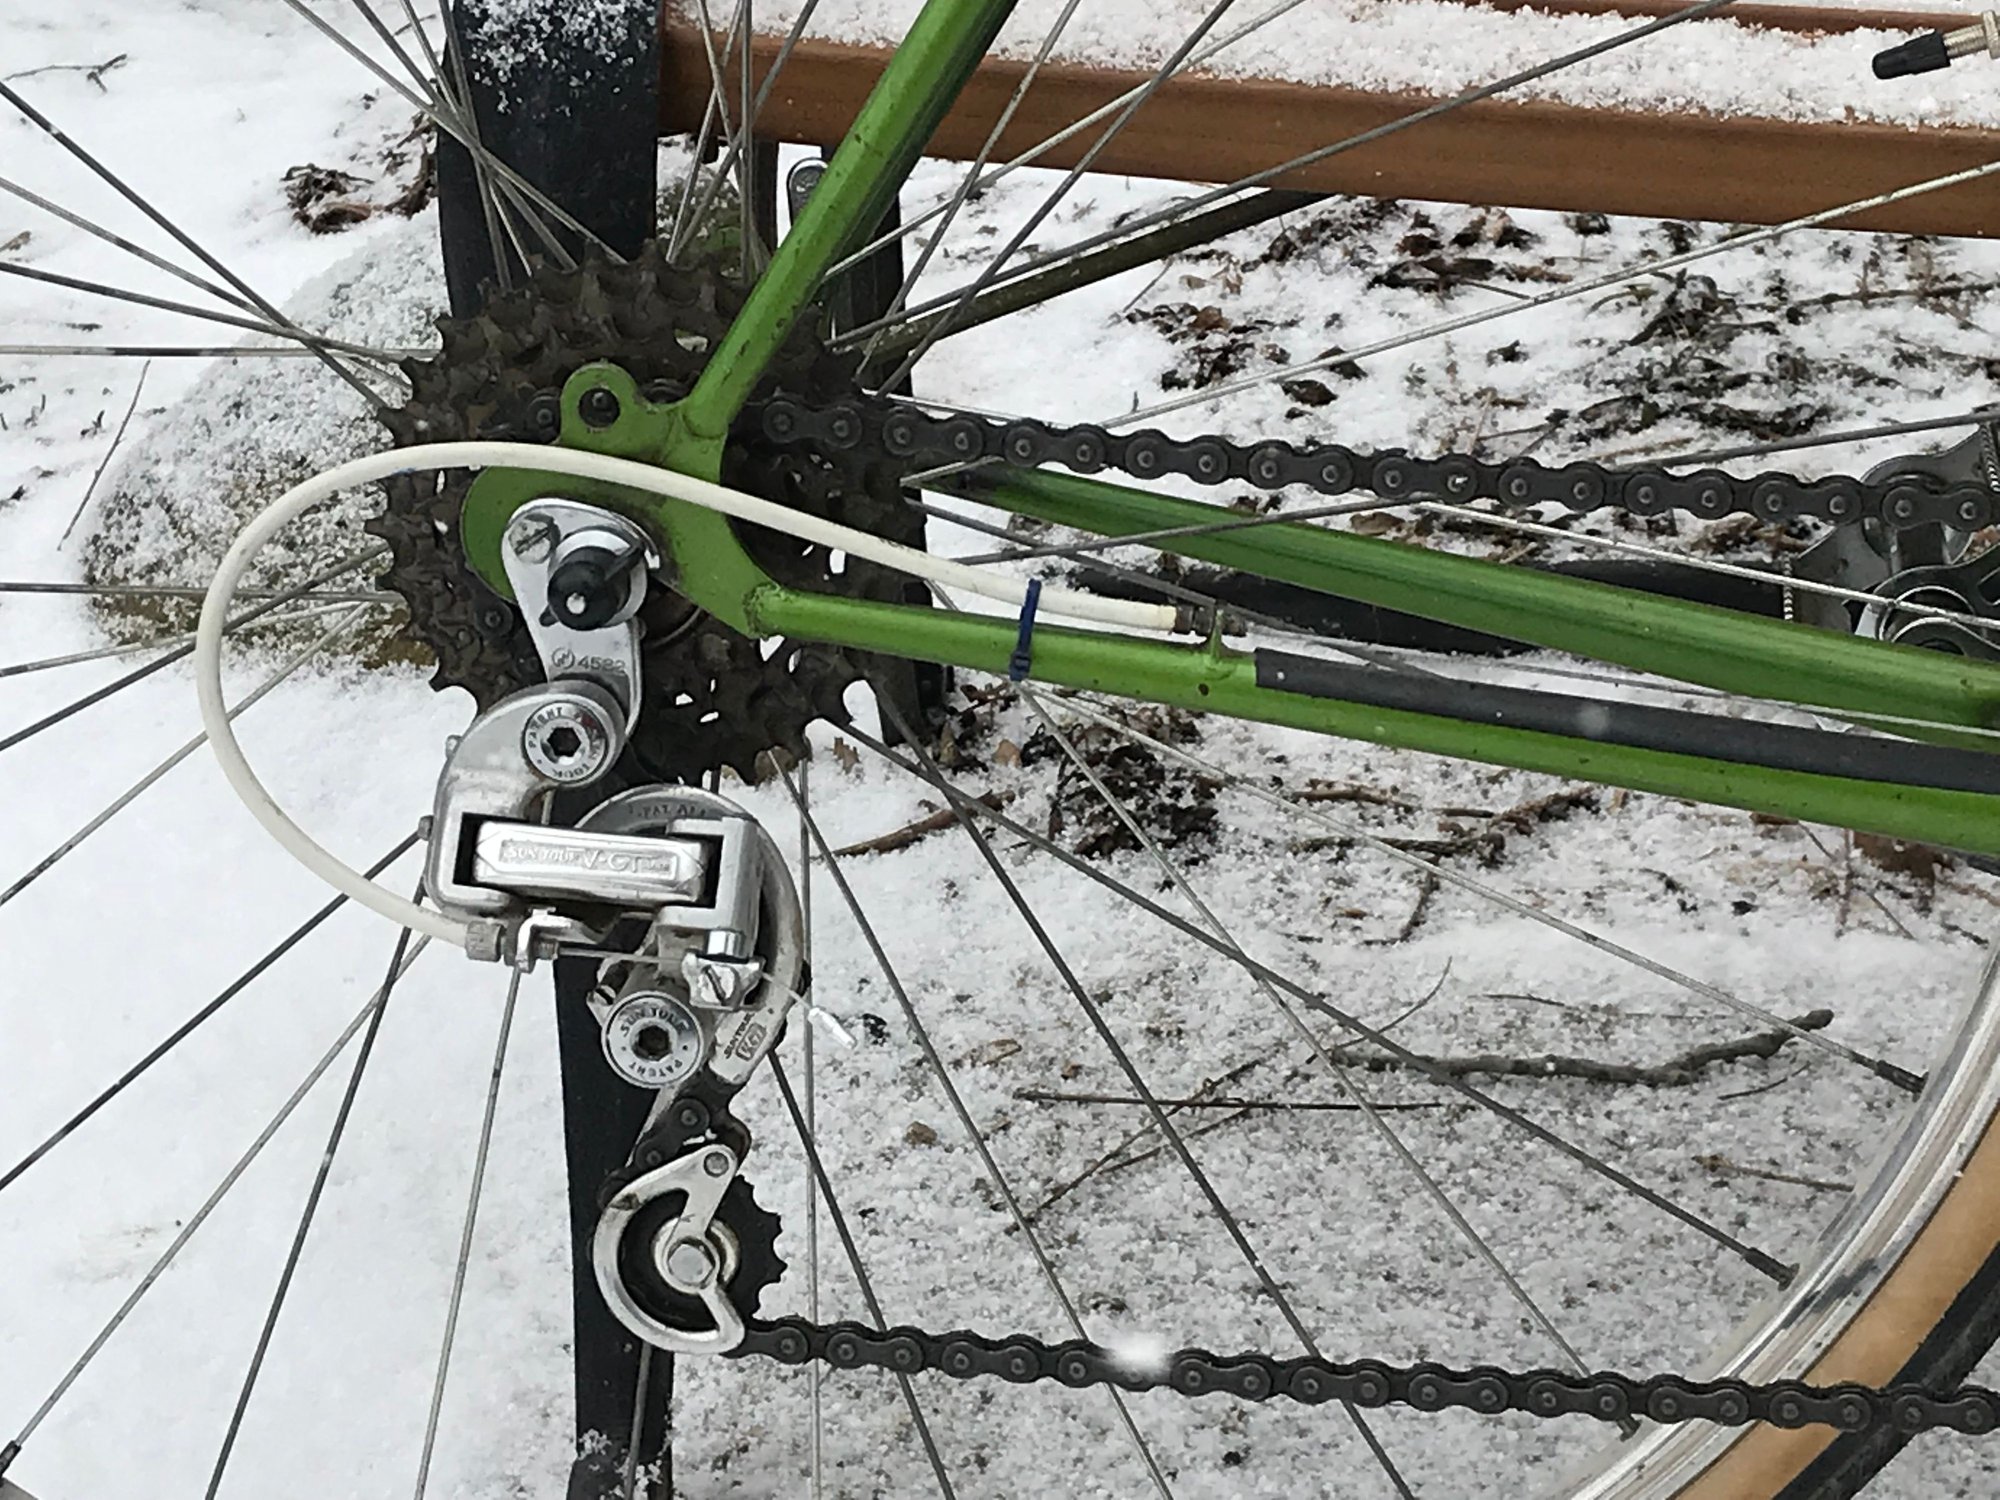
But I need some help, I cant get the rear derailleur to shift into the lowest gear and I cant get the front derailleur to align... they've been doing my head in!! I think the rear gear issue should be an easy fix... but I really need help with the front derailleur.
I'll attach some photos so you guys can see what I'm working with. However I'll list the parts I've put:
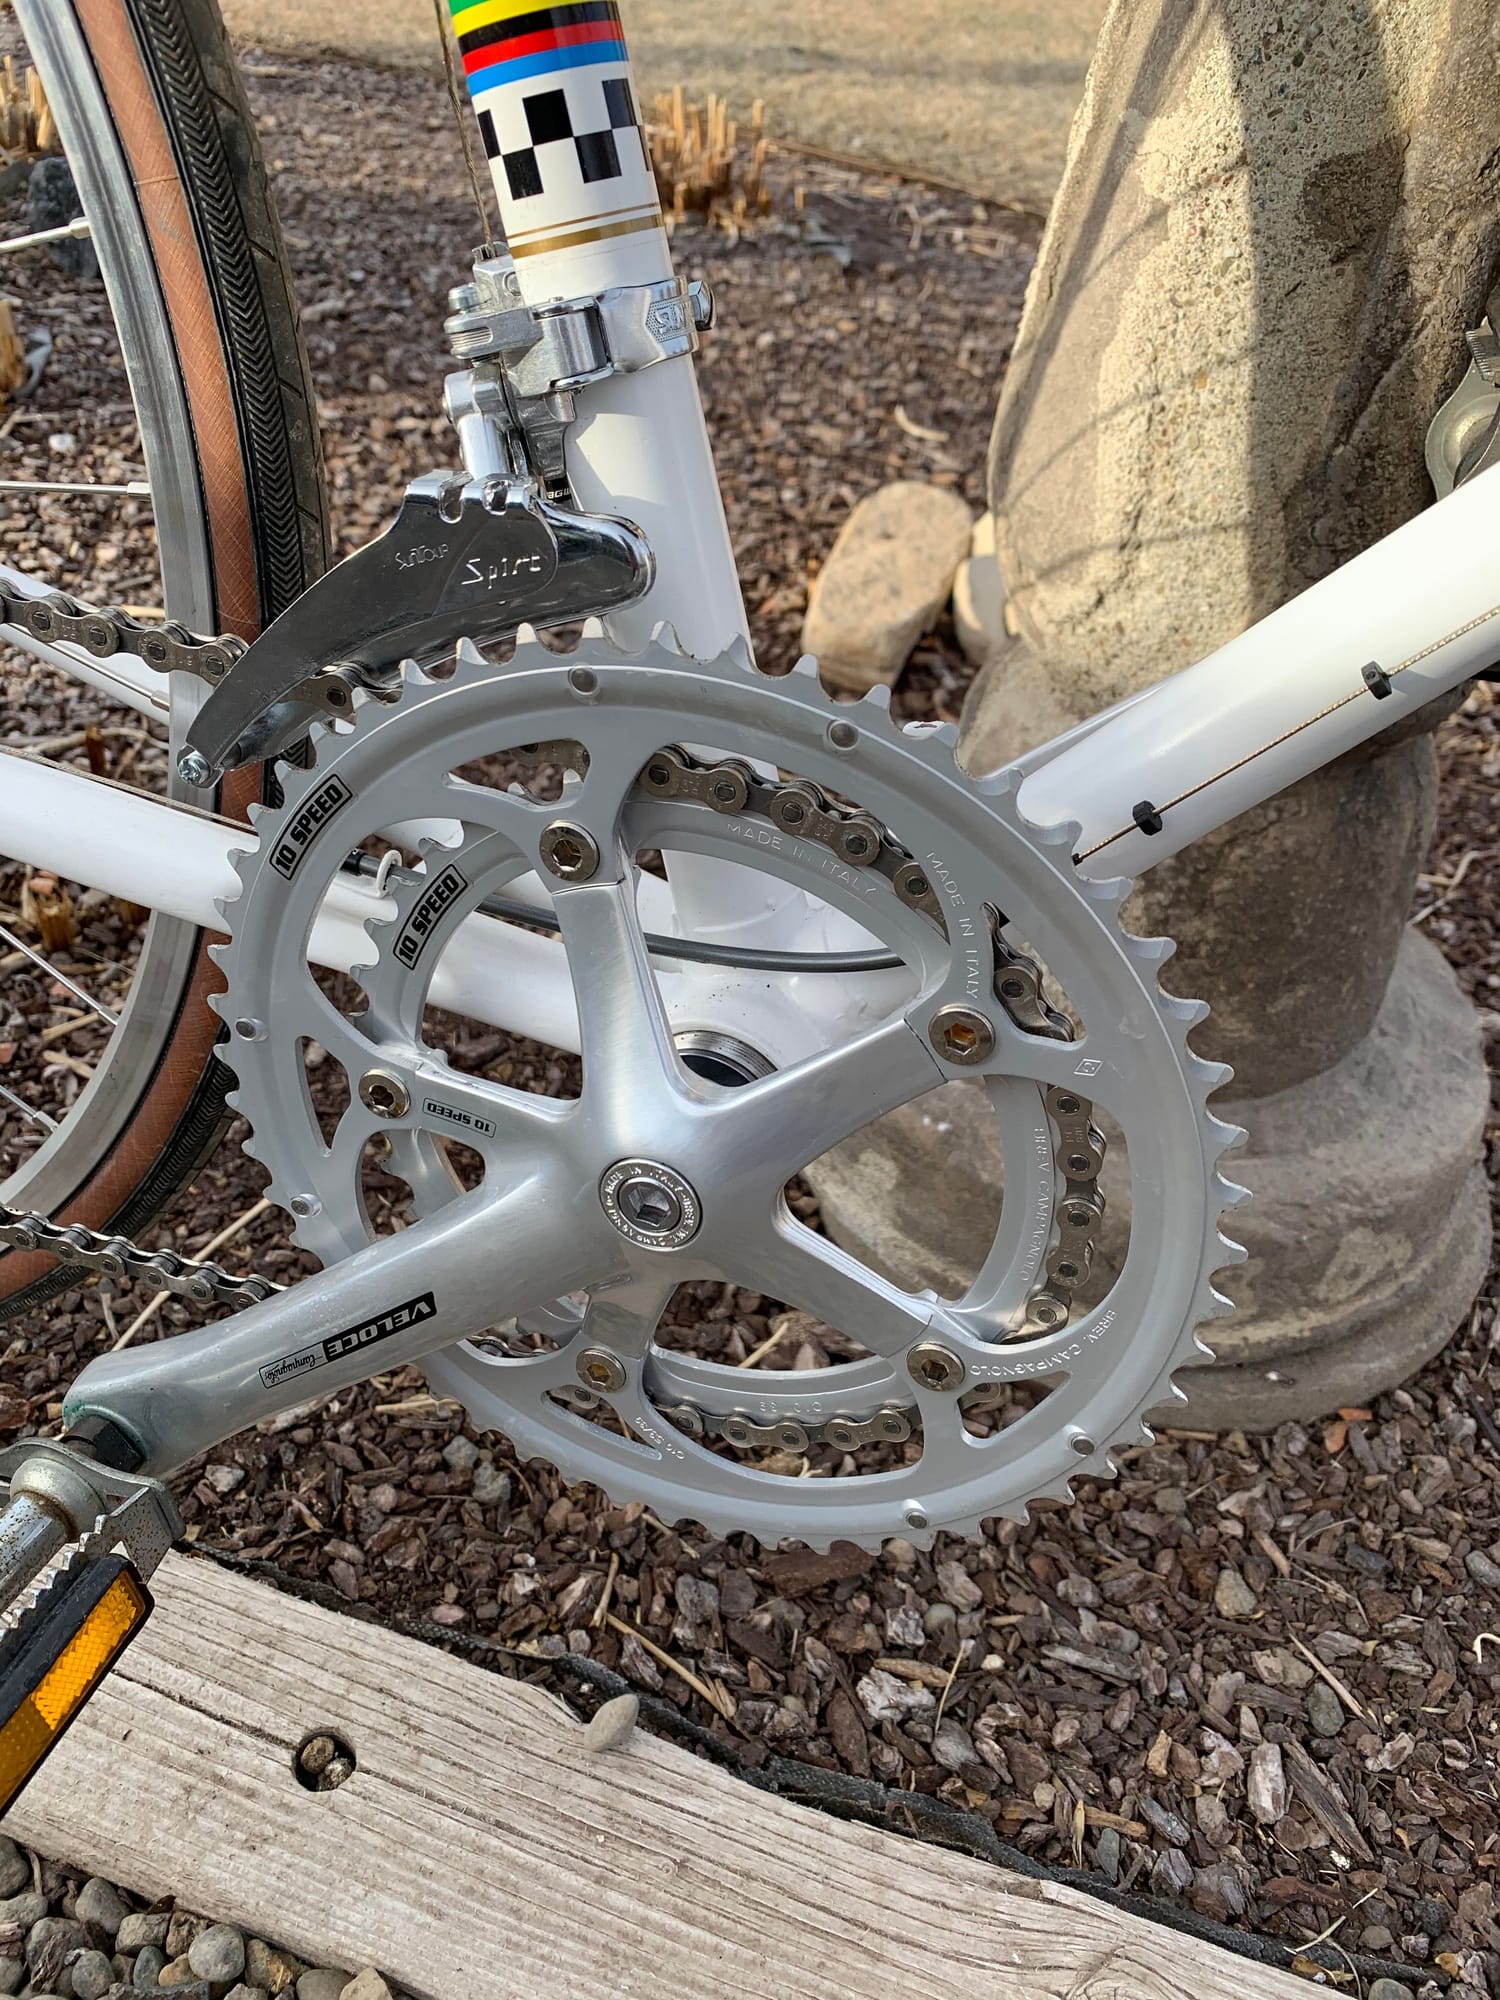
-Front derailleur: SunTour Spirt
-Crankset: Campy Veloce 10 speed (53/39)
-Rear derailleur: SunTour GT (Long Cage)
-Shifters: Simplex Criterium DownTube Shifters
-Rear freewheel: Shimano 14/28
-BB: Philwood square taper (Campy) 115mm with French BB cups
Let me know if any more information is needed.
Thanks for the help everyone!!
I can't post images just yet... im a few posts short.. Sorry guys... but can someone let me know if they can help based on what ive stated already?
I've been having an absolute nightmare with the Peugeot u08 frame I've inherited. Despite the struggle, partially due to being a noob (haha!), I'm close to getting it done.
But I need some help, I cant get the rear derailleur to shift into the lowest gear and I cant get the front derailleur to align... they've been doing my head in!! I think the rear gear issue should be an easy fix... but I really need help with the front derailleur.
I'll attach some photos so you guys can see what I'm working with. However I'll list the parts I've put:
-Front derailleur: SunTour Spirt
-Crankset: Campy Veloce 10 speed (53/39)
-Rear derailleur: SunTour GT (Long Cage)
-Shifters: Simplex Criterium DownTube Shifters
-Rear freewheel: Shimano 14/28
-BB: Philwood square taper (Campy) 115mm with French BB cups
Let me know if any more information is needed.
Thanks for the help everyone!!
I can't post images just yet... im a few posts short.. Sorry guys... but can someone let me know if they can help based on what ive stated already?
 01-29-21, 12:17 AM
#2
Junior Member
Thread Starter
Join Date: Aug 2020
Location: California
Posts: 21
Bikes: Fuji Classic (Track), Peugeot U-08, Bianchi Strada turned Fixie
Mentioned: 1 Post(s)
Tagged: 0 Thread(s)
Quoted: 13 Post(s)
Likes: 0
Liked 9 Times
in
4 Posts
I have the images uploaded to imgBB but cant post a link yet..
01-29-21, 12:21 AM
#3
Junior Member
Thread Starter
Join Date: Aug 2020
Location: California
Posts: 21
Bikes: Fuji Classic (Track), Peugeot U-08, Bianchi Strada turned Fixie
Mentioned: 1 Post(s)
Tagged: 0 Thread(s)
Quoted: 13 Post(s)
Likes: 0
Liked 9 Times
in
4 Posts
The images are in my album through here! Sorry about that Everyone.. seems to be the only way youll be able to see them...
01-29-21, 12:27 AM
#4
Senior Member

Join Date: Feb 2013
Location: Alta California
Posts: 14,242
Mentioned: 415 Post(s)
Tagged: 1 Thread(s)
Quoted: 3802 Post(s)
Liked 3,324 Times
in
2,170 Posts
-----
Hello Javi_bikes and welcome to the forum!
if you go to your member area there is something there called your member's album
you can upload any images you have to your album and then a moderator or helpful reader and put them into the thread
tip on Suntour Spirt front mech -
its mounting clamp is intended for a 28.6mm seat tube and your seat tube is 28.0mm so it is best to either file the flats on the front of the clamp or else put a bit of shim material in to make up the difference
when used OEM on french cycles they came with a clear soft plastic shim affixed to the clamp assembly with adhesive. afaik this variation was never made available to the public.
-----
Likes For juvela:
01-29-21, 12:47 AM
#5
Junior Member
Thread Starter
Join Date: Aug 2020
Location: California
Posts: 21
Bikes: Fuji Classic (Track), Peugeot U-08, Bianchi Strada turned Fixie
Mentioned: 1 Post(s)
Tagged: 0 Thread(s)
Quoted: 13 Post(s)
Likes: 0
Liked 9 Times
in
4 Posts
Thanks for the tip Juvela! I've made an album with the images!
Ah ok... I'll have to look into that
Ah ok... I'll have to look into that
01-29-21, 04:31 AM
#6
Senior Member
Join Date: Aug 2018
Location: north NJ
Posts: 687
Bikes: Miyata 710, Univega Viva Sport, Centurion LeMans, Peugeot U09
Mentioned: 0 Post(s)
Tagged: 0 Thread(s)
Quoted: 212 Post(s)
Liked 111 Times
in
80 Posts
I see you have already changed the rims to alloy. That's the first thing I would do. Biggest change in weight and performance.
Last edited by kross57; 01-29-21 at 05:57 AM.
Likes For kross57:
01-29-21, 04:59 AM
#7

Forum Moderator

Join Date: Jul 2007
Location: Kalamazoo MI
Posts: 20,626
Bikes: Fuji SL2.1 Carbon Di2 Cannondale Synapse Alloy 4 Trek Checkpoint ALR-5 Viscount Aerospace Pro Colnago Classic Rabobank Schwinn Waterford PMount Raleigh C50 Cromoly Hybrid Legnano Tipo Roma Pista
Mentioned: 58 Post(s)
Tagged: 0 Thread(s)
Quoted: 3084 Post(s)
Liked 6,561 Times
in
3,763 Posts
Pic Assist


__________________
Likes For cb400bill:
01-29-21, 07:47 AM
#8

feros ferio

Join Date: Jul 2000
Location: www.ci.encinitas.ca.us
Posts: 21,793
Bikes: 1959 Capo Modell Campagnolo; 1960 Capo Sieger (2); 1962 Carlton Franco Suisse; 1970 Peugeot UO-8; 1982 Bianchi Campione d'Italia; 1988 Schwinn Project KOM-10;
Mentioned: 44 Post(s)
Tagged: 0 Thread(s)
Quoted: 1390 Post(s)
Liked 1,322 Times
in
835 Posts
Tip: you can get a decent cable cutter on eBay for about $20.
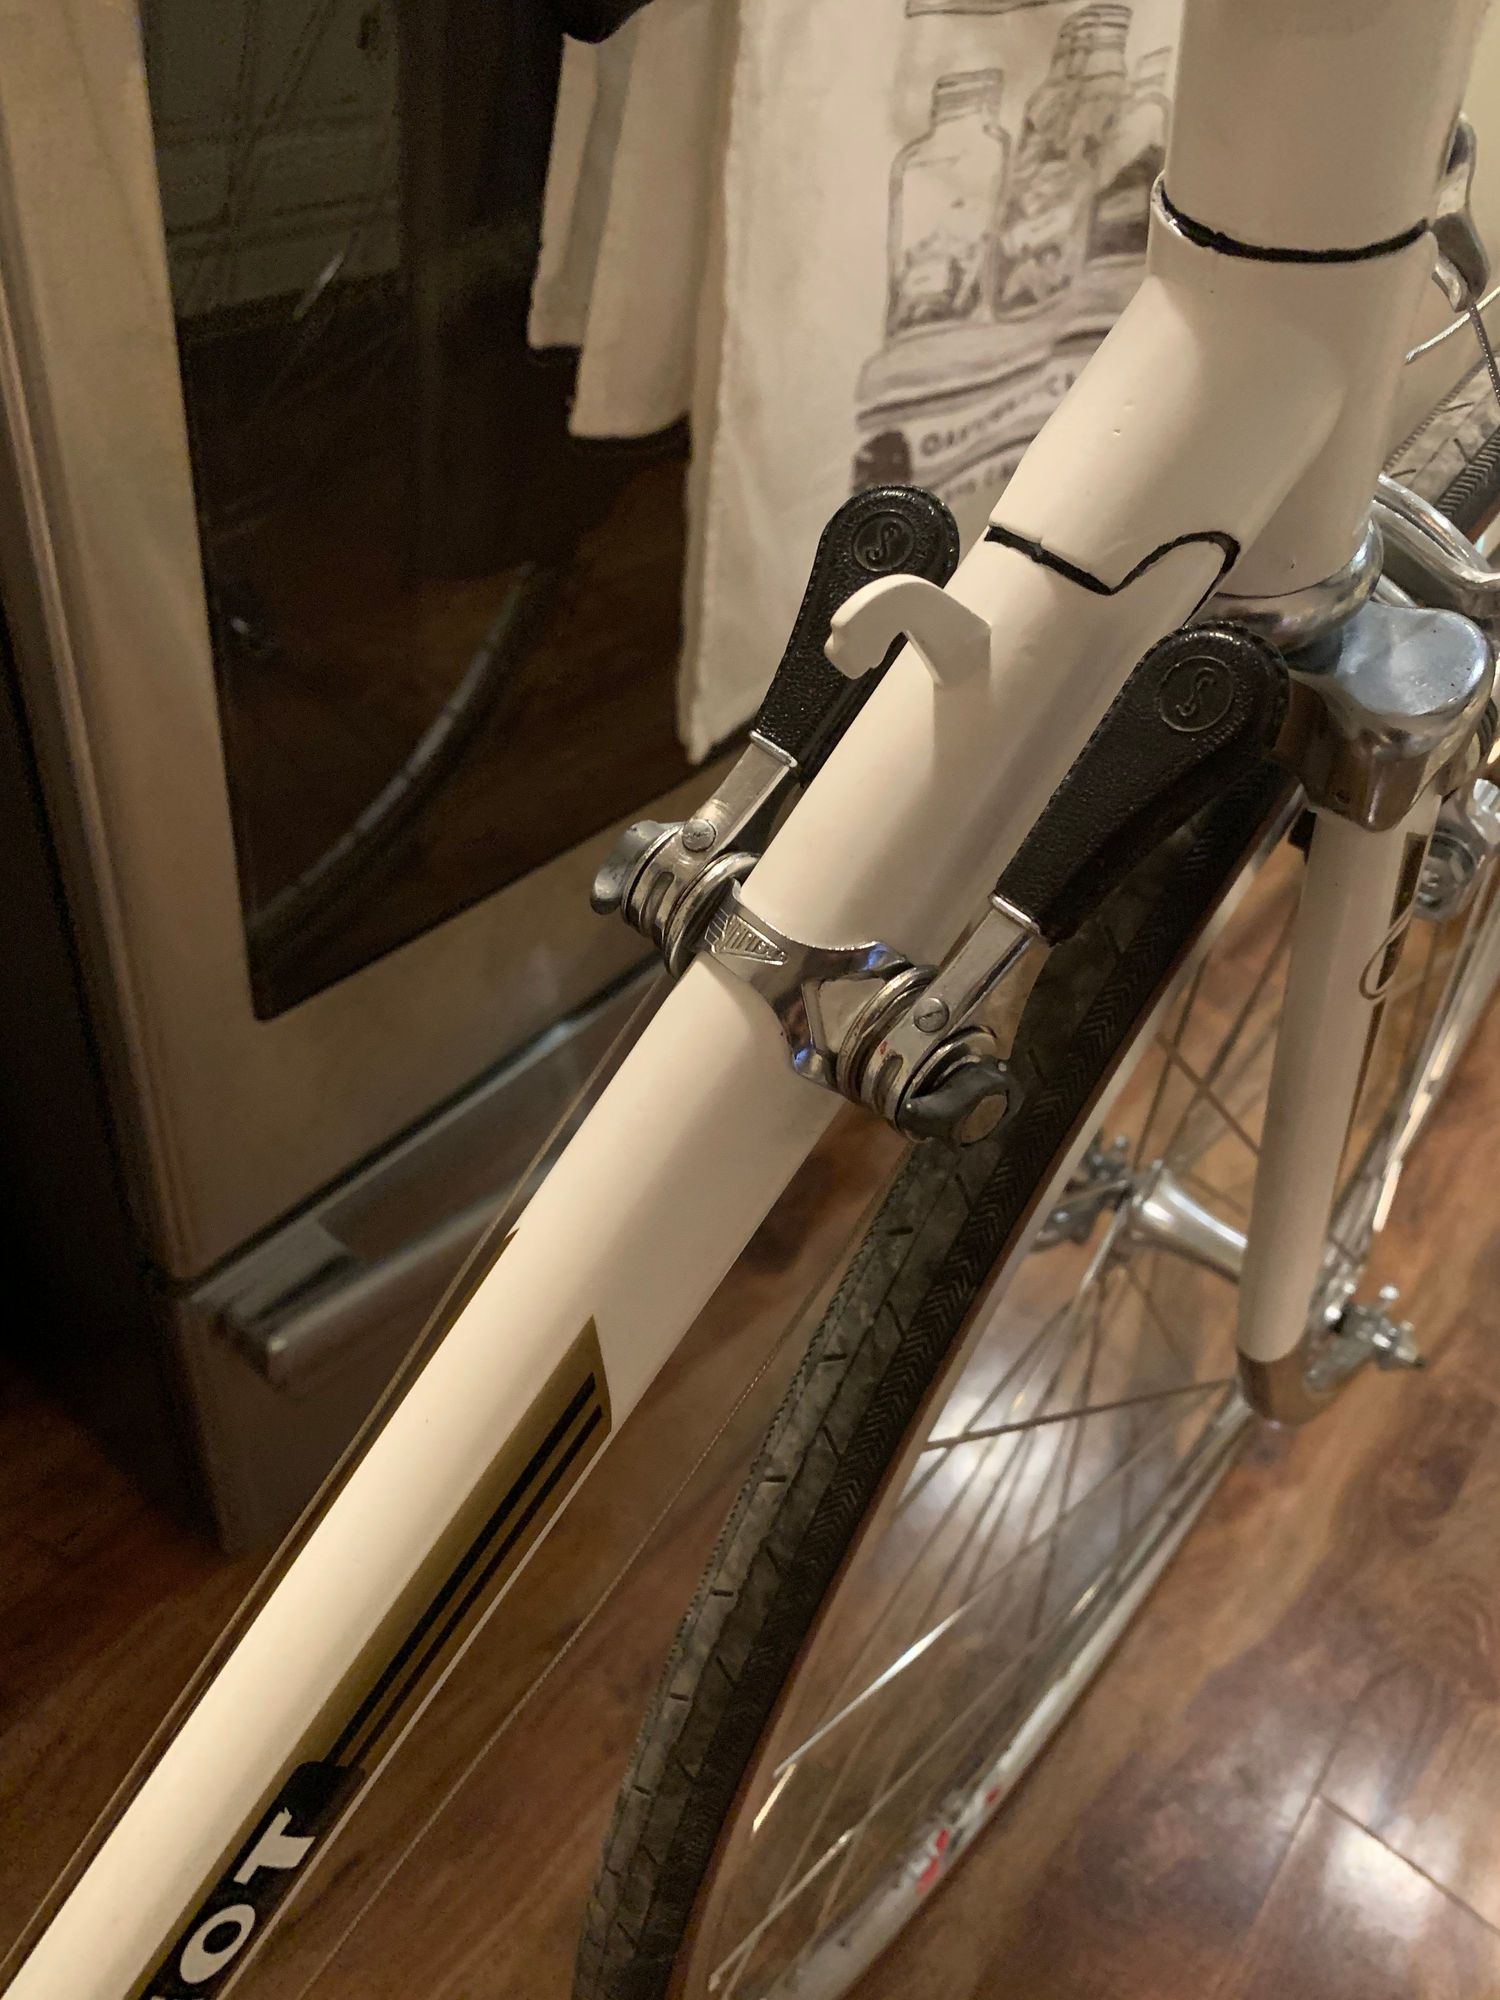
Beautiful UO-8, and perfect set of upgrades. Those new shift levers are a big improvement over the basic plastic OEM junk, and they look fabulous on that bike. (My 1970 UO-8, which I built new from a bare frame when I worked at a Peugeot/Nishiki dealership, has SunTour derailleurs, Weinmann brake levers, aluminum rims (braking safety as well as weight/performance issue), and SunTour barcons.
The only other changes I personally would make to yours include the addition of toeclips, perhaps substituting road quill pedals for the OEM units you have.
I would also immediately turn your front brake pad holders around 180 degrees, before the rubber pads work their way out of the now-open fronts of the holders. Better still, replace the pads with salmon-colored KoolStops for improved brake performance, particularly if your pads are getting old.
__________________
"Far and away the best prize that life offers is the chance to work hard at work worth doing." --Theodore Roosevelt
Capo: 1959 Modell Campagnolo, S/N 40324; 1960 Sieger (2), S/N 42624, 42597
Carlton: 1962 Franco Suisse, S/N K7911
Peugeot: 1970 UO-8, S/N 0010468
Bianchi: 1982 Campione d'Italia, S/N 1.M9914
Schwinn: 1988 Project KOM-10, S/N F804069
01-29-21, 07:53 AM
#9
Senior Member

Join Date: May 2020
Location: Great White North
Posts: 1,226
Bikes: 2013 Cannondale Caad 8, 2010 Opus Fidelio, 1985 Peugeot UO14, 1999 Peugeot Dune, Sakai Select, L'Avantage, 1971 Gitane Apache Standard, 1999 Specialized Hard Rock
Mentioned: 10 Post(s)
Tagged: 0 Thread(s)
Quoted: 548 Post(s)
Liked 473 Times
in
302 Posts
wow, probably didn't look so good bran new!
Likes For gthomson:
01-29-21, 08:04 AM
#10

Senior Member

Join Date: Jan 2015
Location: Los Angeles
Posts: 4,693
Bikes: 82 Medici, 2011 Richard Sachs, 2011 Milwaukee Road
Mentioned: 55 Post(s)
Tagged: 0 Thread(s)
Quoted: 1946 Post(s)
Liked 2,004 Times
in
1,105 Posts
Beautiful UO-8. This guy is a good espainer:
https://www.youtube.com/channel/UCaA...2xiBbAUVZsvDYQ
https://www.youtube.com/channel/UCaA...2xiBbAUVZsvDYQ
__________________
I don't do: disks, tubeless, e-shifting, or bead head nymphs.
I don't do: disks, tubeless, e-shifting, or bead head nymphs.
Likes For Classtime:
01-29-21, 09:01 AM
#11
Senior Member

Join Date: Apr 2012
Location: Middle Earth (aka IA)
Posts: 20,433
Bikes: A bunch of old bikes and a few new ones
Mentioned: 178 Post(s)
Tagged: 0 Thread(s)
Quoted: 5887 Post(s)
Liked 3,469 Times
in
2,079 Posts
This is a beautiful UO 8 and very nicely upgraded. That crank is a bit overkill on this bike but that's no reason to change it. I'd dump that saddle for something better but other than that this bike looks great. Now you just need to fix it up and ride it.
Likes For bikemig:
 01-29-21, 10:13 AM
#13
PM me your cotters

Join Date: Jun 2015
Location: ATL
Posts: 3,241
Mentioned: 80 Post(s)
Tagged: 0 Thread(s)
Quoted: 1137 Post(s)
Liked 588 Times
in
420 Posts
Well, this specific picture makes me wonder how it'd be possible there's not a chainline issue. My eyes are old, but it looks like there's at least 5-6 threads exposed on the fixed cup side of the bike?
That would account for one gear's worth, eh? Can you take some additional pics of both sides of your bottom bracket so we can see what's up, more clearly? Something seems hinky, like maybe the fixed cup is on the wrong side and there's no lockring installed on the adjustable cup.
That would account for one gear's worth, eh? Can you take some additional pics of both sides of your bottom bracket so we can see what's up, more clearly? Something seems hinky, like maybe the fixed cup is on the wrong side and there's no lockring installed on the adjustable cup.
__________________
███████████████
███████████████

 01-29-21, 01:08 PM
#15
Senior Member
Join Date: Jan 2007
Location: Ontario
Posts: 2,648
Mentioned: 16 Post(s)
Tagged: 0 Thread(s)
Quoted: 478 Post(s)
Liked 634 Times
in
336 Posts
Beautiful bike and I like all the changes you made. On your rear derailleur, I would adjust the B screw (the one at the top nearest the clamp) to make sure the parallelogram arm is more aligned with the chainstay - yours looks like its quite far out.
For the front I would suggest a tasteful beer can shim......
Will be interested in your response on the chainline/BB fixed cup question.
For the front I would suggest a tasteful beer can shim......
Will be interested in your response on the chainline/BB fixed cup question.
Last edited by markk900; 01-29-21 at 01:12 PM.
01-30-21, 01:04 AM
#18
Junior Member
Thread Starter
Join Date: Aug 2020
Location: California
Posts: 21
Bikes: Fuji Classic (Track), Peugeot U-08, Bianchi Strada turned Fixie
Mentioned: 1 Post(s)
Tagged: 0 Thread(s)
Quoted: 13 Post(s)
Likes: 0
Liked 9 Times
in
4 Posts
Thanks everyone for the compliments! Really appreciate it as its my first build and had to do a lot of research to put it together, now i'm just eager to finish the final tunes and get on it!!
I've toe cage pedals. MKS with Toe cages and leather straps, just havent put them on yet! Yea went with some modern rims, and I've changed the brake pads just went with the black over the salmon colour! Just need a new saddle, if any one has any suggestions I would appreciate them!
Funny you mention that, I was actually doing a bit of research over the phil wood BB and I think you may be onto something there.
The fixed cartridge phil wood bb comes with individual cups and locktite that goes on those cups, no lock ring is used. I guess ill have to fiddle with the adjustment on each side. I know a few threads can be exposed, just not 100% with phil wood BBs, dont want to accidentally damage them! hahaha.
Will get some extra photos and post them! Thank you!
Not too sure about the offset, now that I look at the photo I get what everyone is saying... but thats how I've been given it. Did some research and saw that a few 73'-74' had the offset in them too... is it a thing from those built in that year?
01-30-21, 01:06 AM
#19
Junior Member
Thread Starter
Join Date: Aug 2020
Location: California
Posts: 21
Bikes: Fuji Classic (Track), Peugeot U-08, Bianchi Strada turned Fixie
Mentioned: 1 Post(s)
Tagged: 0 Thread(s)
Quoted: 13 Post(s)
Likes: 0
Liked 9 Times
in
4 Posts
francophile That is a very nice blue!
markk900 Doesnt the gap have to be 2/3mm between the highest gear and the top gear on the RD? I was following the parktool video on youtube on adjustment... I could be wrong!
markk900 Doesnt the gap have to be 2/3mm between the highest gear and the top gear on the RD? I was following the parktool video on youtube on adjustment... I could be wrong!
Likes For Javi_bikes:
01-30-21, 05:11 AM
#20
Senior Member
Join Date: Aug 2018
Location: north NJ
Posts: 687
Bikes: Miyata 710, Univega Viva Sport, Centurion LeMans, Peugeot U09
Mentioned: 0 Post(s)
Tagged: 0 Thread(s)
Quoted: 212 Post(s)
Liked 111 Times
in
80 Posts


Likes For kross57:
01-30-21, 08:36 AM
#21
Senior Member
Join Date: Jan 2007
Location: Ontario
Posts: 2,648
Mentioned: 16 Post(s)
Tagged: 0 Thread(s)
Quoted: 478 Post(s)
Liked 634 Times
in
336 Posts
You got me curious so I measured my AO-8 and my Moto Nomade (Supercycle branded) - both had identical offsets (from centreline of fork blade perpendicular to axle centre was 2.75"). Actual rake/trail would depend on steering head angle which I did not measure.
01-30-21, 10:37 AM
#22
PM me your cotters
Join Date: Jun 2015
Location: ATL
Posts: 3,241
Mentioned: 80 Post(s)
Tagged: 0 Thread(s)
Quoted: 1137 Post(s)
Liked 588 Times
in
420 Posts
Funny you mention that, I was actually doing a bit of research over the phil wood BB and I think you may be onto something there.
The fixed cartridge phil wood bb comes with individual cups and locktite that goes on those cups, no lock ring is used. I guess ill have to fiddle with the adjustment on each side. I know a few threads can be exposed, just not 100% with phil wood BBs, dont want to accidentally damage them! hahaha.
The fixed cartridge phil wood bb comes with individual cups and locktite that goes on those cups, no lock ring is used. I guess ill have to fiddle with the adjustment on each side. I know a few threads can be exposed, just not 100% with phil wood BBs, dont want to accidentally damage them! hahaha.
However, I admit, when I saw the photo of the crank, this gap jumped out at me, I must've missed where you said it was Phil BB before, and my ignorance with the product is causing me to post ignorant things. It just looks off to me, but maybe this is an adjustable unit which allows you to put the edge of the cup where you need it to achieve proper chainline vs. the fixed cup on a normal BB which would be static on this side of the bike, fully seated. Could be a learning experience for me here

__________________
███████████████
███████████████
Likes For francophile:
01-30-21, 10:46 AM
#23
Senior Member

Join Date: Apr 2005
Location: Ann Arbor, MI
Posts: 16,866
Bikes: 1980 Masi, 1984 Mondonico, 1984 Trek 610, 1980 Woodrup Giro, 2005 Mondonico Futura Leggera ELOS, 1967 PX10E, 1971 Peugeot UO-8
Mentioned: 49 Post(s)
Tagged: 0 Thread(s)
Quoted: 1854 Post(s)
Liked 660 Times
in
503 Posts
I have one which is as far I can tell, about 1969 or 1970, and it also has a lot of offset.

1969 or 1970 Peug UO8. Shimano 6207 chainset, whatever single-pivot brakes, Ideale 92 saddle, Shimano 6207 f/r derailleurs.
Also a lot of fork offset! On this one I really like the metallic green paint, Peugeot really hit it out of the park on this color. Don't notice the rust! Eventually I'll built some alloy rims onto her and starting riding her again. It was nice, smooth, and stable. The trail is rather low, but I forget the numbers. For my BB/chainset change, I destroyed the spindle and cotters in surgery. It turned out my Shimano 600 spindle matched the bearing spacing well, and the original now-50 years old French cups were not too rough, so I installed the spindle and it's crankset. I think the shift levers are a Huret pair. The brake calipers are no-name but somehow long enough to fit 700c wheels on a very roomy 27 x 1 � frame. I think the seatpost is the original French one, and the stem is an SR that was in the bottom of a miscellaneous box. I forget the seat angle but I recall it is very laid back, about 71 degrees. For me that's one of the keys to comfort with a vintage leather saddle like Brooks or Ideale.
As I said a nice ride! Don't look at the rust!
Last edited by Road Fan; 01-30-21 at 10:49 AM.
01-30-21, 12:05 PM
#24
Senior Member
Join Date: Apr 2005
Location: Ann Arbor, MI
Posts: 16,866
Bikes: 1980 Masi, 1984 Mondonico, 1984 Trek 610, 1980 Woodrup Giro, 2005 Mondonico Futura Leggera ELOS, 1967 PX10E, 1971 Peugeot UO-8
Mentioned: 49 Post(s)
Tagged: 0 Thread(s)
Quoted: 1854 Post(s)
Liked 660 Times
in
503 Posts
Hi Everyone,
I've been having an absolute nightmare with the Peugeot u08 frame I've inherited. Despite the struggle, partially due to being a noob (haha!), I'm close to getting it done.
But I need some help, I cant get the rear derailleur to shift into the lowest gear and I cant get the front derailleur to align... they've been doing my head in!! I think the rear gear issue should be an easy fix... but I really need help with the front derailleur.
I'll attach some photos so you guys can see what I'm working with. However I'll list the parts I've put:
-Front derailleur: SunTour Spirt
-Crankset: Campy Veloce 10 speed (53/39)
-Rear derailleur: SunTour GT (Long Cage)
-Shifters: Simplex Criterium DownTube Shifters
-Rear freewheel: Shimano 14/28
-BB: Philwood square taper (Campy) 115mm with French BB cups
Let me know if any more information is needed.
Thanks for the help everyone!!
I can't post images just yet... im a few posts short.. Sorry guys... but can someone let me know if they can help based on what ive stated already?
1. Attach the rear derailleur - it just mainly bolts on. Put on the wheel with freewheel, leaving the chain off or unthreaded. Adjust the outer travel screw so the upper guide wheel lines up with the smallest rear sprocket. Similarly adjust the rear using the inner travel screw to limit travel so the upper guide wheel lines up with the largest rear sprocket. Now you can attach the shift cable if you haven't, and set the cable tension so the mech properly moves over to the higher and lower positions. In this step it might be convenient to have a bike-savvy assistant at some points.
2. Attach the front derailleur - the chainset has to be installed first. Position the derailleur vertically on the seat tube with your 2-3 mm gap. Campy says to use this number and I find it works well. I'm pretty sure 1 mm is usually not good and 5 mm might be too high, but ... I'm not too sure about that last one. In this position, the front derailleur needs to be rotated so the outer edge of the cage is parallel to the large chainring. Set the outer limit screw so the cage kind of straddles the big chainring - this is an initial positioning. Install the front cable and use it to pull the cage over to straddle the small chainring or smallest chainring in case of a triple. Set the inner limit screw to set the cage inner limit to straddle the inner chainring. If you have a set of feeler gauges from ancient history tuning up car engines, � milimeter is a decent match to a 0.04 " (forty thousandths of an inch) feeler gauge. 0.039 is a bit more precise, but this number is a ballpark, not an absolute spec. like valve lash or ignition point gap on a vintage sports car or VW engine.
3. Finish installing the chain - set the length and check it, and use a chain tool or a chain closing link to lock it in. With the chain on the big ring, adjust the front mech outer limit screw for a gap of about � mm between chain and inner side of the cage. Turn the crank and shift the front to put the chain on the smallest chainring. Use the inner limit screw similarly for � mm clearance chain to cage. I got this number from Campy literature as well, and so far I think it works to keep the chain from throwing off high and throwing off low. Double check the clearances and lack of rub by checking big-big, big-small, small-small, and small-big. No chain throwing, chain dragging, or chain threading itself off is permitted. If these things happen with those gaps, your front or rear chainline might be off, or at least not match. For a double the front chainline should be about 42 mm and about 45 for a triple. Twirl the pedals and shift all around, enjoying seeing your nice derailleurs work. Sometime soon, clean and oil the chain if you haven't.
At this point it's essentially finished. Tweak the cable looseness to take up the slack in the front mech cable and the rear mech cable, for instant response to motions of the levers. Don't be afraid to adjust (tighten or loosen) the friction screws (a little bit at a time) on the shift levers so they stay where you put them and the levers move as easily as possible, given no slipping. Those screws are there for you to use, and they make a difference. Go out for a ride - things can be different on the road. You might not have tightened somethung and it move, new cables can stretch, and your eyeballing of the various adjustments might not have been perfect.
I get all these quantitative numbers and limits from Campagnolo literature, because I have installed a lot of Campy on my bikes. The only major challenge in recent times has been Mrs. Road Fan's Campy 3 x 11 indexed Athena set-up, but it did eventually get in line using these instructions. In this case the Campy literature about what the Ergo power lever is supposed to do was not real clear to me. On the other side, I've had these limits and instructions work well for a 1980s Trek 610 with a Huret Duopar rear mech and a Huret Challenger front mech with Huret Challenger DT friction levers and a 46-30. I use the same limits and guidelines for most bikes I work on. YMMV, but these usually work for me. I can't say the method is perfect, however.
Can message me here or PM me if something seems wrong or is not clear.
Likes For Road Fan:
01-30-21, 01:16 PM
#25
Ride, Wrench, Swap, Race

Join Date: Jan 2010
Location: Northern California
Posts: 9,181
Bikes: Cheltenham-Pedersen racer, Boulder F/S Paris-Roubaix, Varsity racer, '52 Christophe, '62 Continental, '92 Merckx, '75 Limongi, '76 Presto, '72 Gitane SC, '71 Schwinn SS, etc.
Mentioned: 132 Post(s)
Tagged: 0 Thread(s)
Quoted: 1562 Post(s)
Liked 1,285 Times
in
856 Posts
Just to clarify, is it the largestor smallest rear sprocket (cog) that the derailer won't shift to?
A photo from above or behind the bike might show the left-right positioning of the freewheel relative to the available space between the dropouts, possibly indicating that axle spacers need to be moved to the other side of the hub(?) and which would necessitate re-dishing (centering) of the rim relative to the outside surfaces of the axle locknuts.
How many speeds is the freewheel? Is this wheelset perhaps spaced for a much wider freewheel?
As mentioned earlier, the top pulley should just clear the tips of the teeth on the largest cog by a few millimeters, not too much more or less than that.
This setup should be shifting well, but firstly can you perhaps check that the cable moves totally freely in both directions?

