


Shimano 600 "Triangle" Pedal - Dustcap Removal?
 08-08-11, 06:55 PM
#1
Senior Member
Thread Starter

Shimano 600 "Triangle" Pedal - Dustcap Removal?
I've got a nice set of Shimano 6207 pedals here that may need a rebuild. They have a plastic dustcap with what looks like a slot for a flathead screwdriver. But the plastic is very deformable. My initial attempts to open it haven't been successful, and I don't want to screw things up.
I searched all around but haven't come up with any guides to opening these aside from "just pop them off."
Does anyone have experience with these? I'd appreciate any assistance!
Velobase picture:
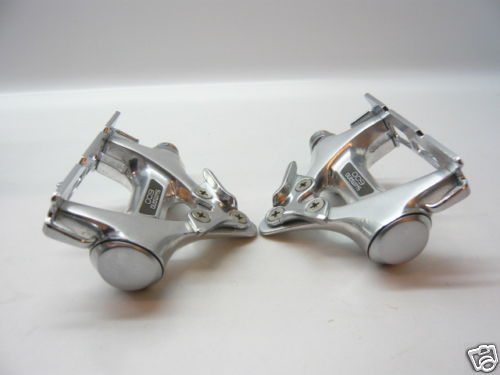
Velobase link: https://velobase.com/ViewComponent.as...=109&AbsPos=11
I searched all around but haven't come up with any guides to opening these aside from "just pop them off."
Does anyone have experience with these? I'd appreciate any assistance!
Velobase picture:
Velobase link: https://velobase.com/ViewComponent.as...=109&AbsPos=11
 08-08-11, 07:02 PM
#2

Bianchi Goddess

Join Date: Apr 2009
Location: Shady Pines Retirement Fort Wayne, In
Posts: 27,846
Bikes: Too many to list here check my signature.
Mentioned: 192 Post(s)
Tagged: 2 Thread(s)
Quoted: 2925 Post(s)
Liked 2,921 Times
in
1,489 Posts
I suspect it is press fit, with a O ring to hold it in place type of thing.
__________________
�One morning you wake up, the girl is gone, the bikes are gone, all that's left behind is a pair of old tires and a tube of tubular glue, all squeezed out"
Sugar "Kane" Kowalczyk
�One morning you wake up, the girl is gone, the bikes are gone, all that's left behind is a pair of old tires and a tube of tubular glue, all squeezed out"
Sugar "Kane" Kowalczyk
08-08-11, 07:07 PM
#3
Senior Member
Thread Starter
08-08-11, 07:22 PM
#4
Senior Member
I used a screw driver, popped off with no problem. Matter of fact, it came off so easy I lost one on the next ride.
08-08-11, 07:41 PM
#6
Senior Member

Join Date: Apr 2007
Location: Thunder Bay, Ontario, Canada - burrrrr!
Posts: 11,674
Bikes: 1958 Rabeneick 120D, 1968 Legnano Gran Premio, 196? Torpado Professional, 2000 Marinoni Piuma
Mentioned: 210 Post(s)
Tagged: 0 Thread(s)
Quoted: 1372 Post(s)
Likes: 0
Liked 1,749 Times
in
937 Posts
I used a screw driver, popped off with no problem. Matter of fact, it came off so easy I lost one on the next ride.
In days gone bye, I have used a sturdy and sharp knife to sort of roll the caps off.
The fine edge will find the grove, between the cap and the body of the pedal. Once inserted into the groove, wiggle the knife a little bit and then softly roll the knife to the next new position. Repeat the wiggle, keep moving around the cap, and it should come out without any distortion. Through out the process, you are trying to pull the cap off a wee bit at a time, not pop it off in one fell, and perhaps distorting, swoop.
Don't cut yourself, the O-Ring or the cap!
__________________
"98% of the bikes I buy are projects".
"98% of the bikes I buy are projects".
08-08-11, 08:50 PM
#7
Senior Member

Join Date: Jul 2011
Location: Phoenix, AZ
Posts: 524
Bikes: Colnago C40 HP, De Rosa-Primato, Titus Ti FCR, MOOTS YBB-SL, Pogliaghi Pista
Mentioned: 0 Post(s)
Tagged: 0 Thread(s)
Quoted: 1 Post(s)
Likes: 0
Liked 0 Times
in
0 Posts
Surprisingly dental floss works too! I used it to pop off the hood emblem on my old BMW.
08-08-11, 09:20 PM
#8
Senior Member
Thread Starter
Thanks for everyone's input!
I finally got the cap off, though it isn't so pretty anymore. The key seemed to be a second notch directly across from the most noticeable one. a flathead in there gave me some purchase on the cap.
I tried the knife rolling method before that with little success. There were many different models of triangle pedal, so maybe it works better on some of the others.
The most frustrating thing is that the faint noise the pedal was making is still there after a rebuild. No pitting. Everything looked pristine. I think it may have something to do with the strange plastic seal at the threaded end of the axle.
09-02-11, 07:17 PM
#9
Senior Member
Thread Starter
UPDATE!
I just figured out a good technique for getting these caps off. The key is to remove the thin plastic o-ring first, or at least get it out of the way. Use the indented slot to do this. It allows much more purchase to get underneath the edge. It may deform the ring a bit, but it's better than the alternative, which almost certainly will - and the press fit cap too.
Also, a masked man passed along this tip:
The caps are a press fit but sometimes they are tough to get
out without breaking. The plastic gets brittle with age and
also tends to shrink a bit and so loss of the caps is a problem.
.
Try to get the edge of a credit card or something else plastic
under the edge or in the little slot made for the purpose of
prying them out. After youl get it started, work around the
edge of the cap and it will come off.
.
These caps are expensive to replace. It's often cheaper to buy
a complete set of peds with the caps than to replace the caps
alone but that is a big waste. I've got two sets with my own
replacement caps, fashioned from pliable, black plastic end
caps made for the ends of iron/aluminum patio chair legs. They
are available in sets of for for $2 at ACE Hardware. In my
store, there are two sizes and the bigger size is correct.
.
These need to be cut down by about a quarter inch so they don't
protrude too much when pressed rully into place. They are also a
loose fit so I take a slice of old skinny inner tube and
stretch it around the trimmed cap and just "screw" it into
the ped recess. The inner tube not only insures a secure fit
but insures a watertight fit as well.
.
When trimming the caps (I use nail scissors) be sure not to
trim too much or the cap could interfere with the bearings/axle.
If you have trouble pressing them in, try lubricating the
inner tube with something like the tiniest bit of grease you
used for the bearings (I use synthetic Finish Line bearing
grease with Teflon).
.
I've not lost one of these caps yet and I ride every day,
year 'round and long on weekends.
.
Last edited by delicious; 09-02-11 at 07:21 PM.
12-18-18, 11:44 AM
#10
Senior Member

Join Date: Jul 2017
Location: Queens, NY for now...
Posts: 1,515
Bikes: 82 Lotus Unique, 86 Lotus Legend, 88 Basso Loto, 88 Basso PR, 89 Basso PR, 96 Bianchi CDI, 2013 Deda Aegis, 2019 Basso Diamante SV
Mentioned: 46 Post(s)
Tagged: 0 Thread(s)
Quoted: 943 Post(s)
Liked 172 Times
in
113 Posts
Posting in this old thread to offer some advice from personal experience. If your caps are on tight, and mine most certainly were, then there is basically no way to effectively pry them without damaging the cap itself. I tried and knife and gentile, progressive prying around all sides, but the only way to generate enough force involved deforming the caps to some extent.
So once I got frustrated enough, and the cap was already considerably damaged (luckily I have a replacement pair from a cheap second pair of these pedals I bought), I simply decided to get very aggressive. I left the screwdriver as deep in the little slot (the one that is always visible from the start) as possible, and simply hammered at it. This will put a nice little gouge deep in that slot, but the cap will come off and the damage will basically be invisible once the cap is put back on (as opposed to damage around other parts of the cap from prying that cannot be hidden).
To test this technique, I did the same thing on the second pedal from the start: just got the screwdriver end in, prying ever so slightly to get it in nice and deep, and then hammered the end of the screwdriver with repeated low-force blows. The cap popped off and the damage was as limited as I believe it can possibly be. Hope this might help someone down the road.
Likes For robertorolfo:
12-18-18, 01:39 PM
#11
Full Member

Join Date: Oct 2017
Location: NW Florida
Posts: 389
Bikes: A Few
Mentioned: 9 Post(s)
Tagged: 0 Thread(s)
Quoted: 156 Post(s)
Liked 63 Times
in
27 Posts
I just did a set of these - Like they all said, pry, wedge, and deform.
The worst parts of the edge can be dressed a bit with a fine file -
Just hammer them back in, sigh, and get on with life - At least the pedals will turn smoothly, now
The worst parts of the edge can be dressed a bit with a fine file -
Just hammer them back in, sigh, and get on with life - At least the pedals will turn smoothly, now
12-19-18, 07:49 AM
#12
Senior Member

Join Date: Jan 2015
Location: Los Angeles
Posts: 4,696
Bikes: 82 Medici, 2011 Richard Sachs, 2011 Milwaukee Road
Mentioned: 55 Post(s)
Tagged: 0 Thread(s)
Quoted: 1946 Post(s)
Liked 2,004 Times
in
1,105 Posts
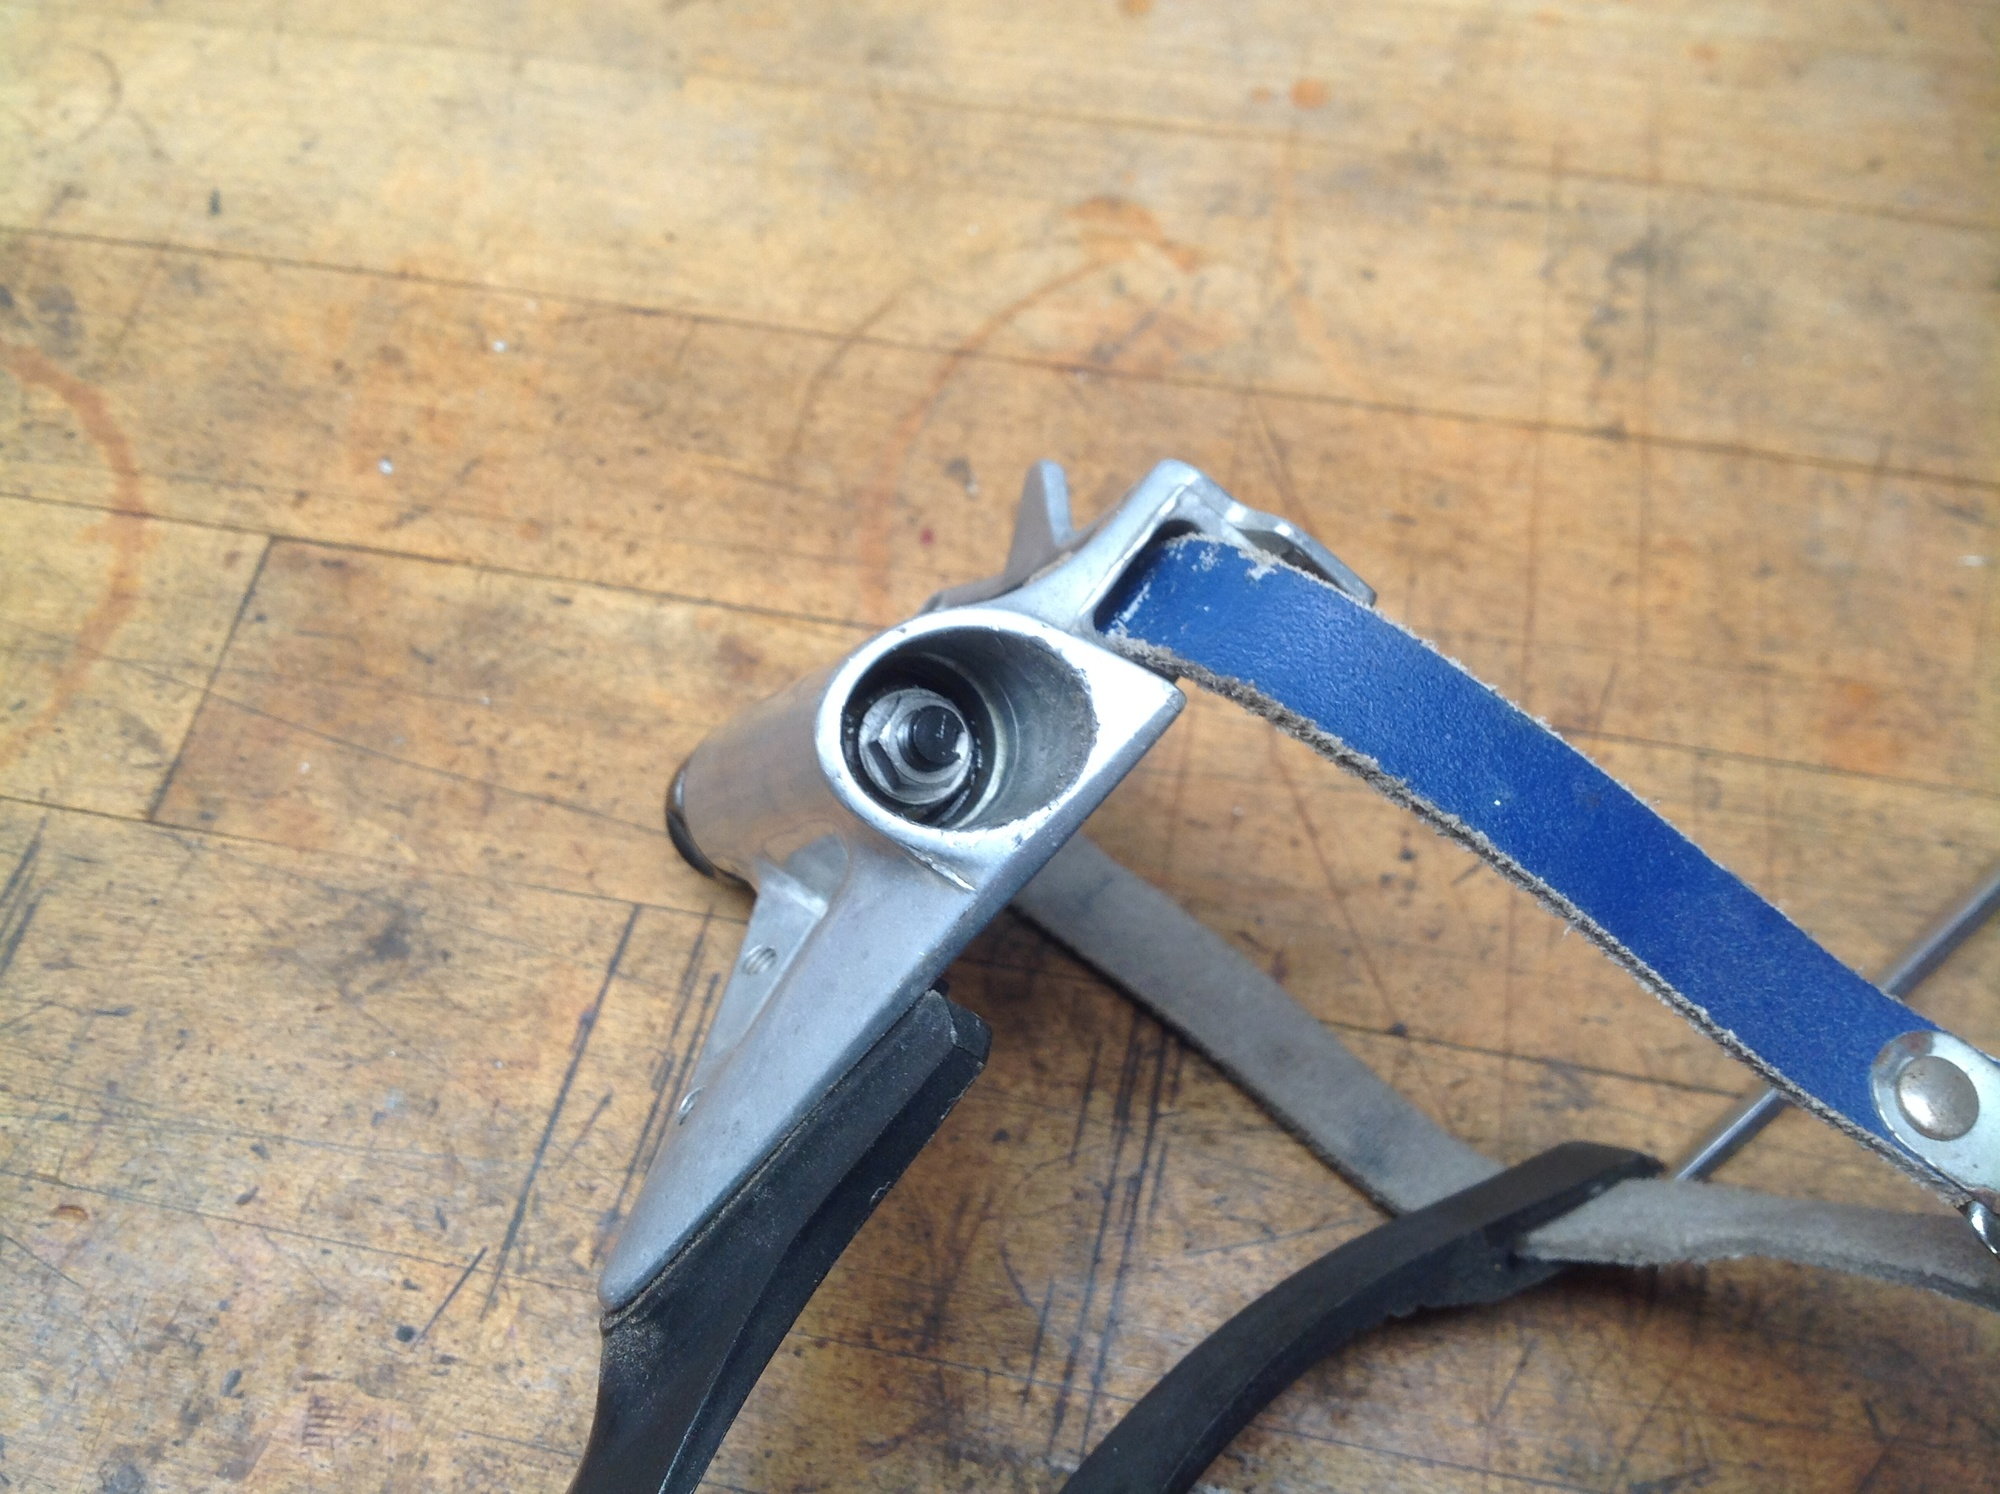

These are 1050 pedals. The "slots" are at 3 and 9 o'clock.
12-19-18, 02:05 PM
#13
Senior Member
Take them off, 3D scan them, and print a bunch in metal and sell them to guys like me that need replacements!
I am pretty sure these pedals are famous for the dust caps falling out all by them selves!
I am pretty sure these pedals are famous for the dust caps falling out all by them selves!
04-30-20, 10:53 AM
#14
Senior Member
Join Date: Nov 2013
Location: Southern California
Posts: 1,455
Mentioned: 14 Post(s)
Tagged: 0 Thread(s)
Quoted: 795 Post(s)
Liked 746 Times
in
407 Posts
Posting in this old thread to offer some advice from personal experience. If your caps are on tight, and mine most certainly were, then there is basically no way to effectively pry them without damaging the cap itself. I tried and knife and gentile, progressive prying around all sides, but the only way to generate enough force involved deforming the caps to some extent.
So once I got frustrated enough, and the cap was already considerably damaged (luckily I have a replacement pair from a cheap second pair of these pedals I bought), I simply decided to get very aggressive. I left the screwdriver as deep in the little slot (the one that is always visible from the start) as possible, and simply hammered at it. This will put a nice little gouge deep in that slot, but the cap will come off and the damage will basically be invisible once the cap is put back on (as opposed to damage around other parts of the cap from prying that cannot be hidden).
To test this technique, I did the same thing on the second pedal from the start: just got the screwdriver end in, prying ever so slightly to get it in nice and deep, and then hammered the end of the screwdriver with repeated low-force blows. The cap popped off and the damage was as limited as I believe it can possibly be. Hope this might help someone down the road.
So once I got frustrated enough, and the cap was already considerably damaged (luckily I have a replacement pair from a cheap second pair of these pedals I bought), I simply decided to get very aggressive. I left the screwdriver as deep in the little slot (the one that is always visible from the start) as possible, and simply hammered at it. This will put a nice little gouge deep in that slot, but the cap will come off and the damage will basically be invisible once the cap is put back on (as opposed to damage around other parts of the cap from prying that cannot be hidden).
To test this technique, I did the same thing on the second pedal from the start: just got the screwdriver end in, prying ever so slightly to get it in nice and deep, and then hammered the end of the screwdriver with repeated low-force blows. The cap popped off and the damage was as limited as I believe it can possibly be. Hope this might help someone down the road.
Likes For Piff:

