


"Get your 1950 Raleigh Superbe Kit Today!"
 07-17-21, 06:00 PM
#26

www.theheadbadge.com
Thread Starter

Join Date: Sep 2005
Location: Southern Florida
Posts: 28,513
Bikes: https://www.theheadbadge.com
Mentioned: 124 Post(s)
Tagged: 0 Thread(s)
Quoted: 2422 Post(s)
Liked 4,391 Times
in
2,092 Posts
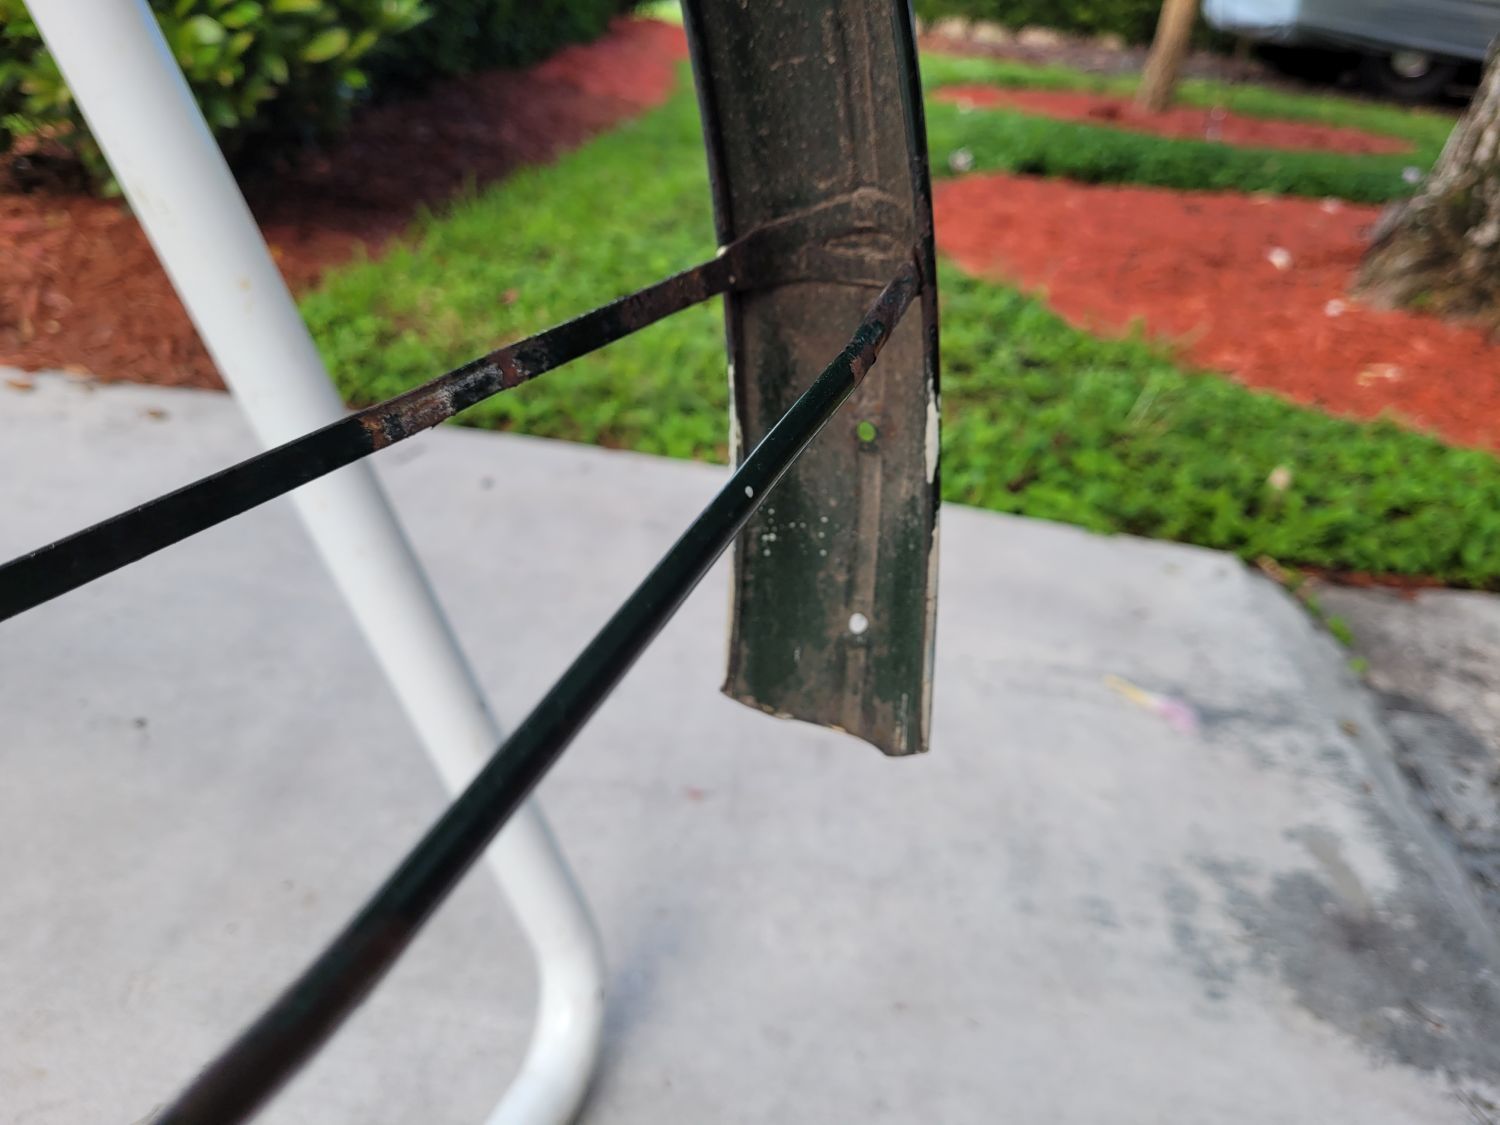
I need to get the white paint cleaned off the front fender here (no, it's not supposed to be here, and it's only on the edge), but I'm also curious if anyone happens to have the original pattern for a Superbe mudguard.
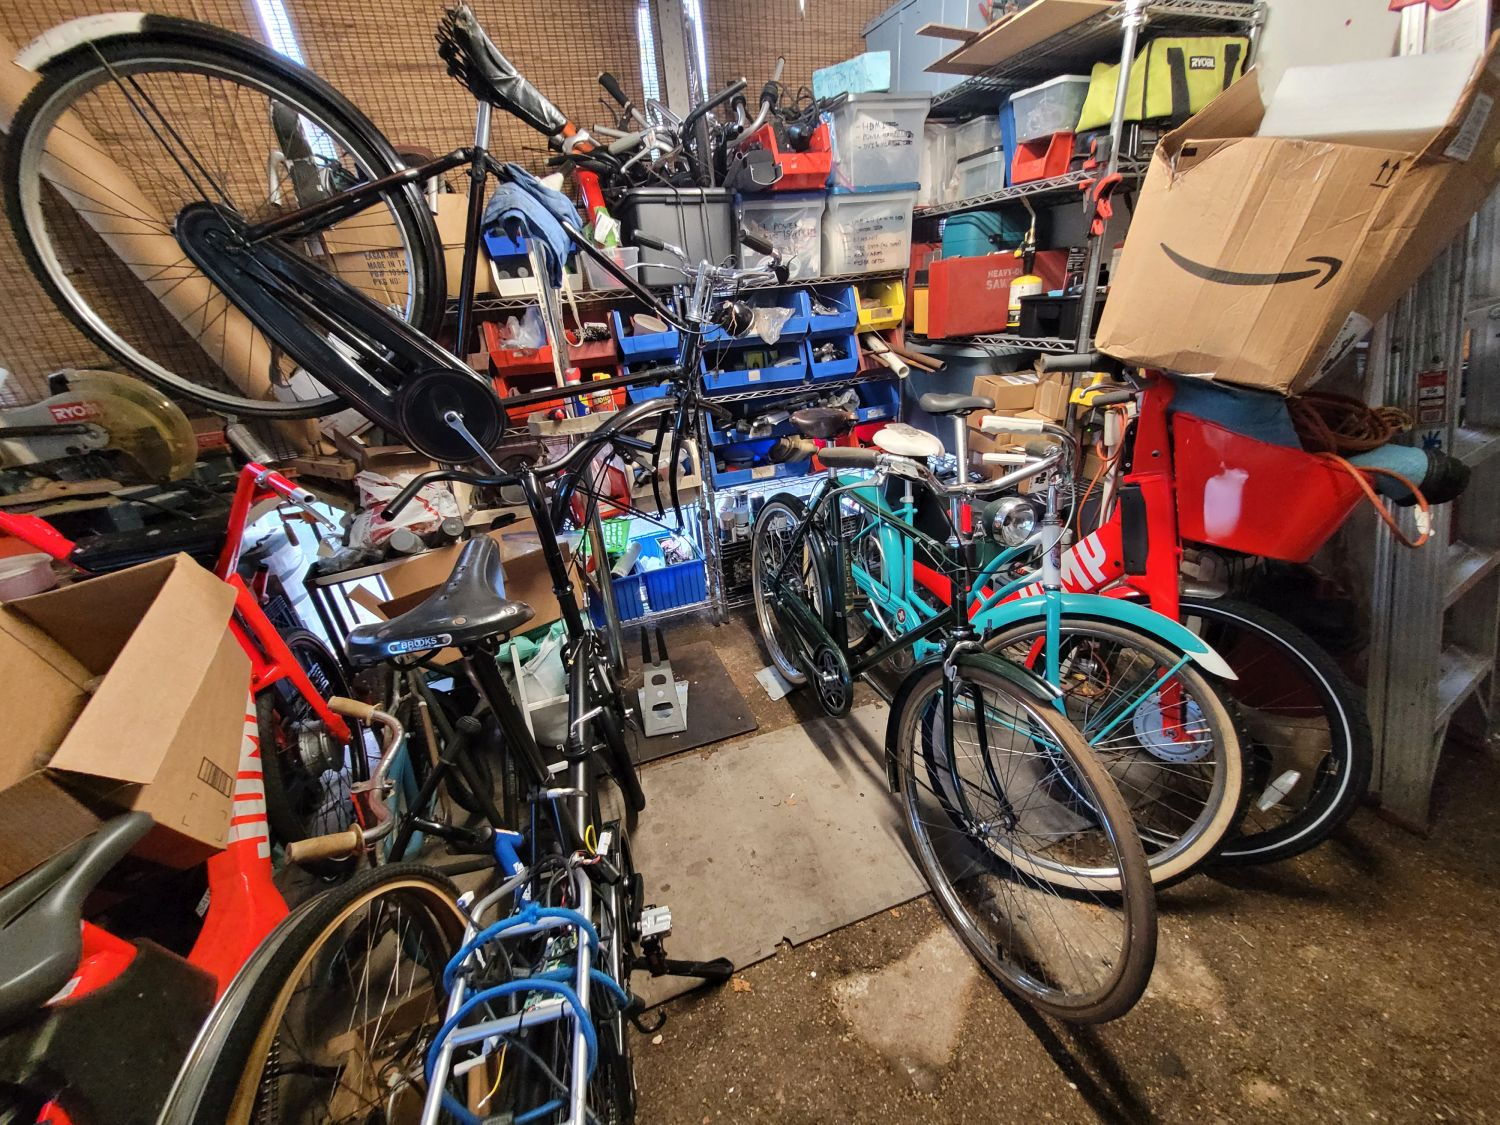
The workshop is a bit busy right now. Apologies to the Bike Share Museum bikes for supporting cardboard boxes at the moment.
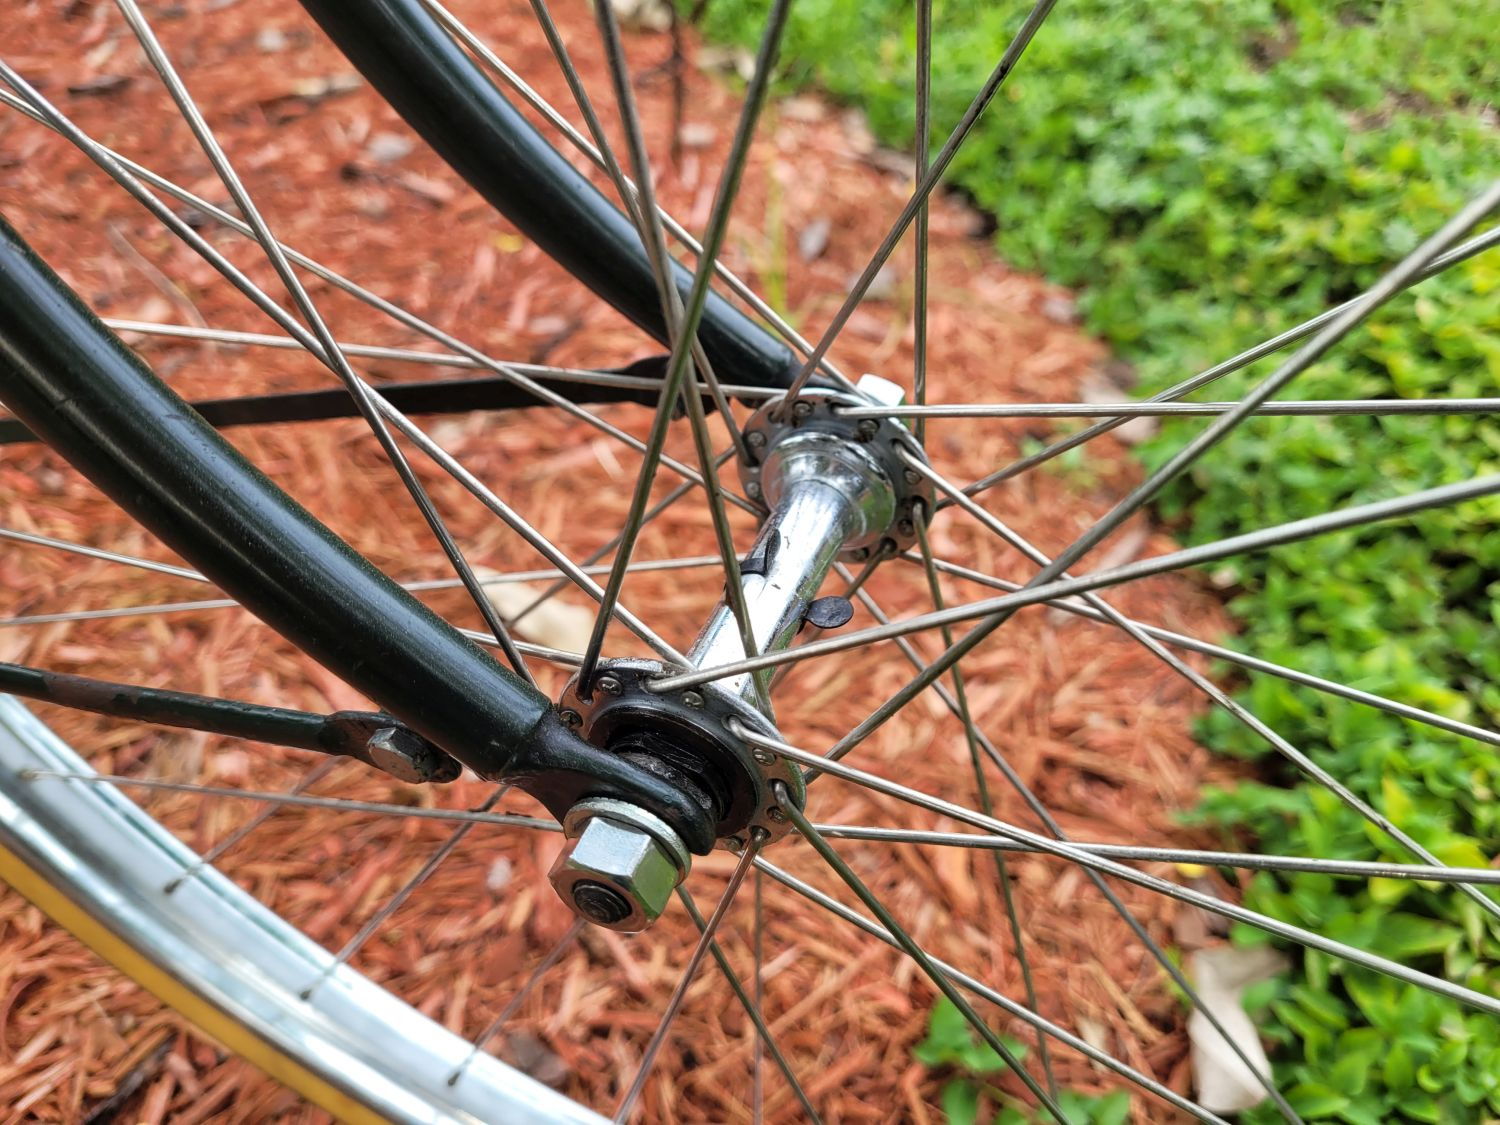
I temporarily put the '50 on the 1970's front wheel that came with it. Still nosing around for the correct one.

-Kurt
The workshop is a bit busy right now. Apologies to the Bike Share Museum bikes for supporting cardboard boxes at the moment.
I temporarily put the '50 on the 1970's front wheel that came with it. Still nosing around for the correct one.
-Kurt
__________________


Likes For cudak888:
10-07-21, 07:56 PM
#27
www.theheadbadge.com
Thread Starter
Join Date: Sep 2005
Location: Southern Florida
Posts: 28,513
Bikes: https://www.theheadbadge.com
Mentioned: 124 Post(s)
Tagged: 0 Thread(s)
Quoted: 2422 Post(s)
Liked 4,391 Times
in
2,092 Posts
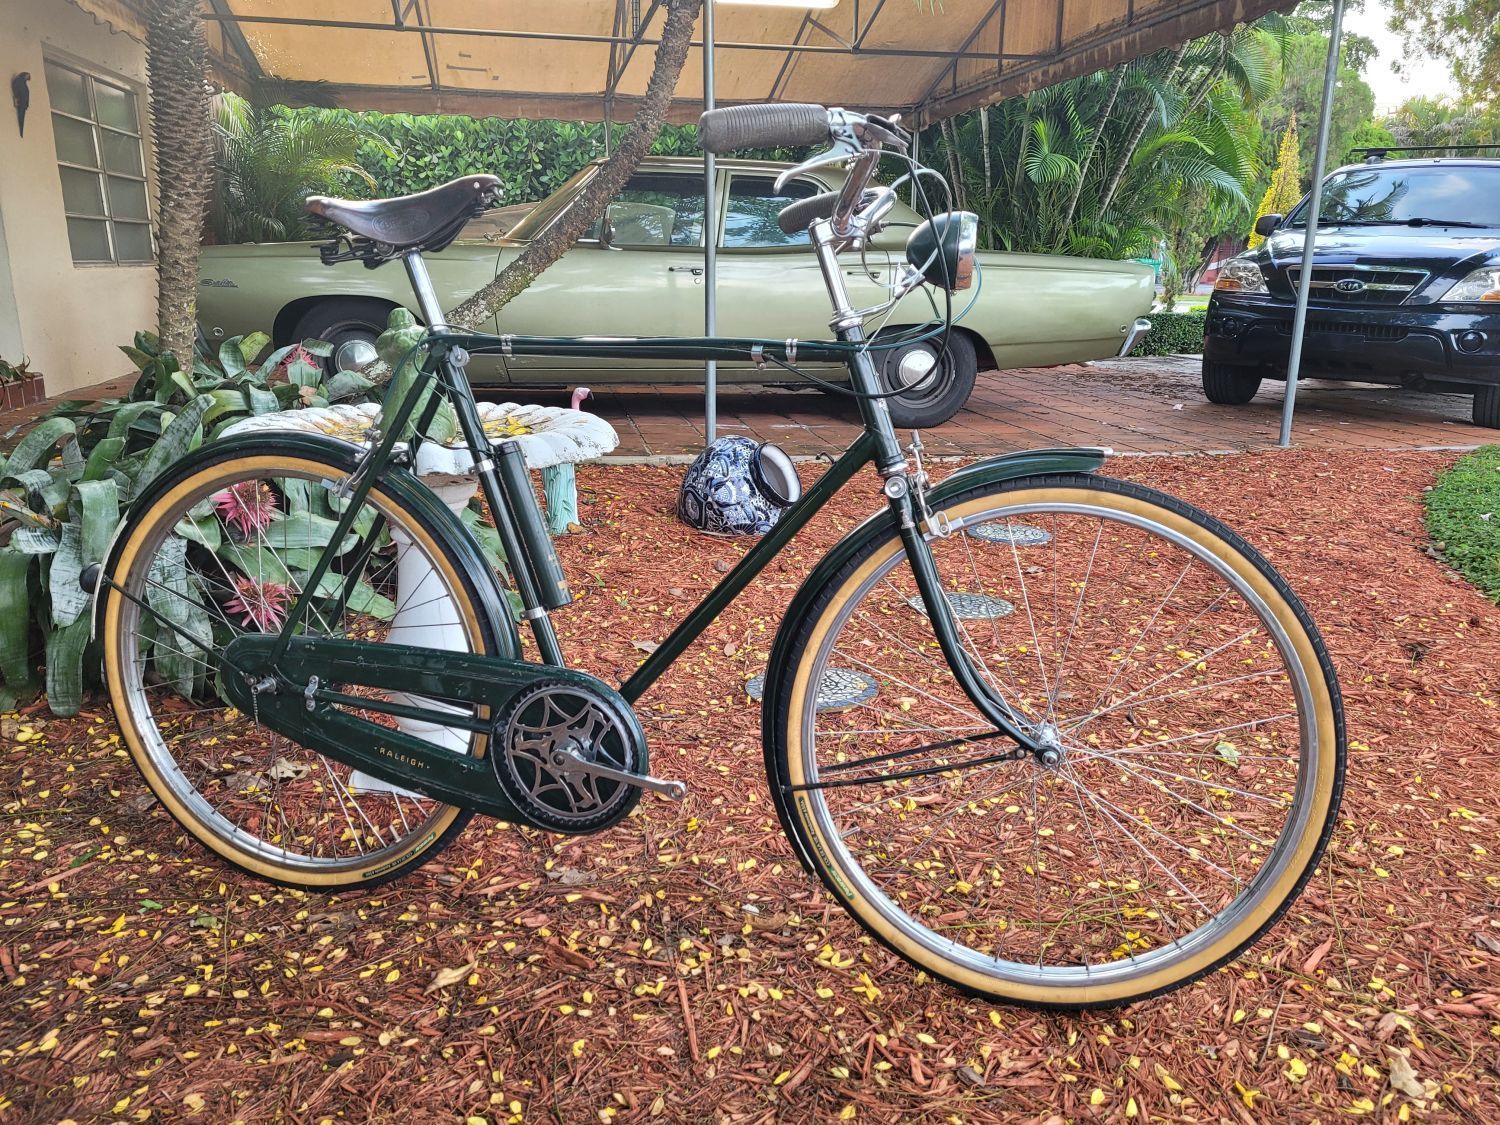
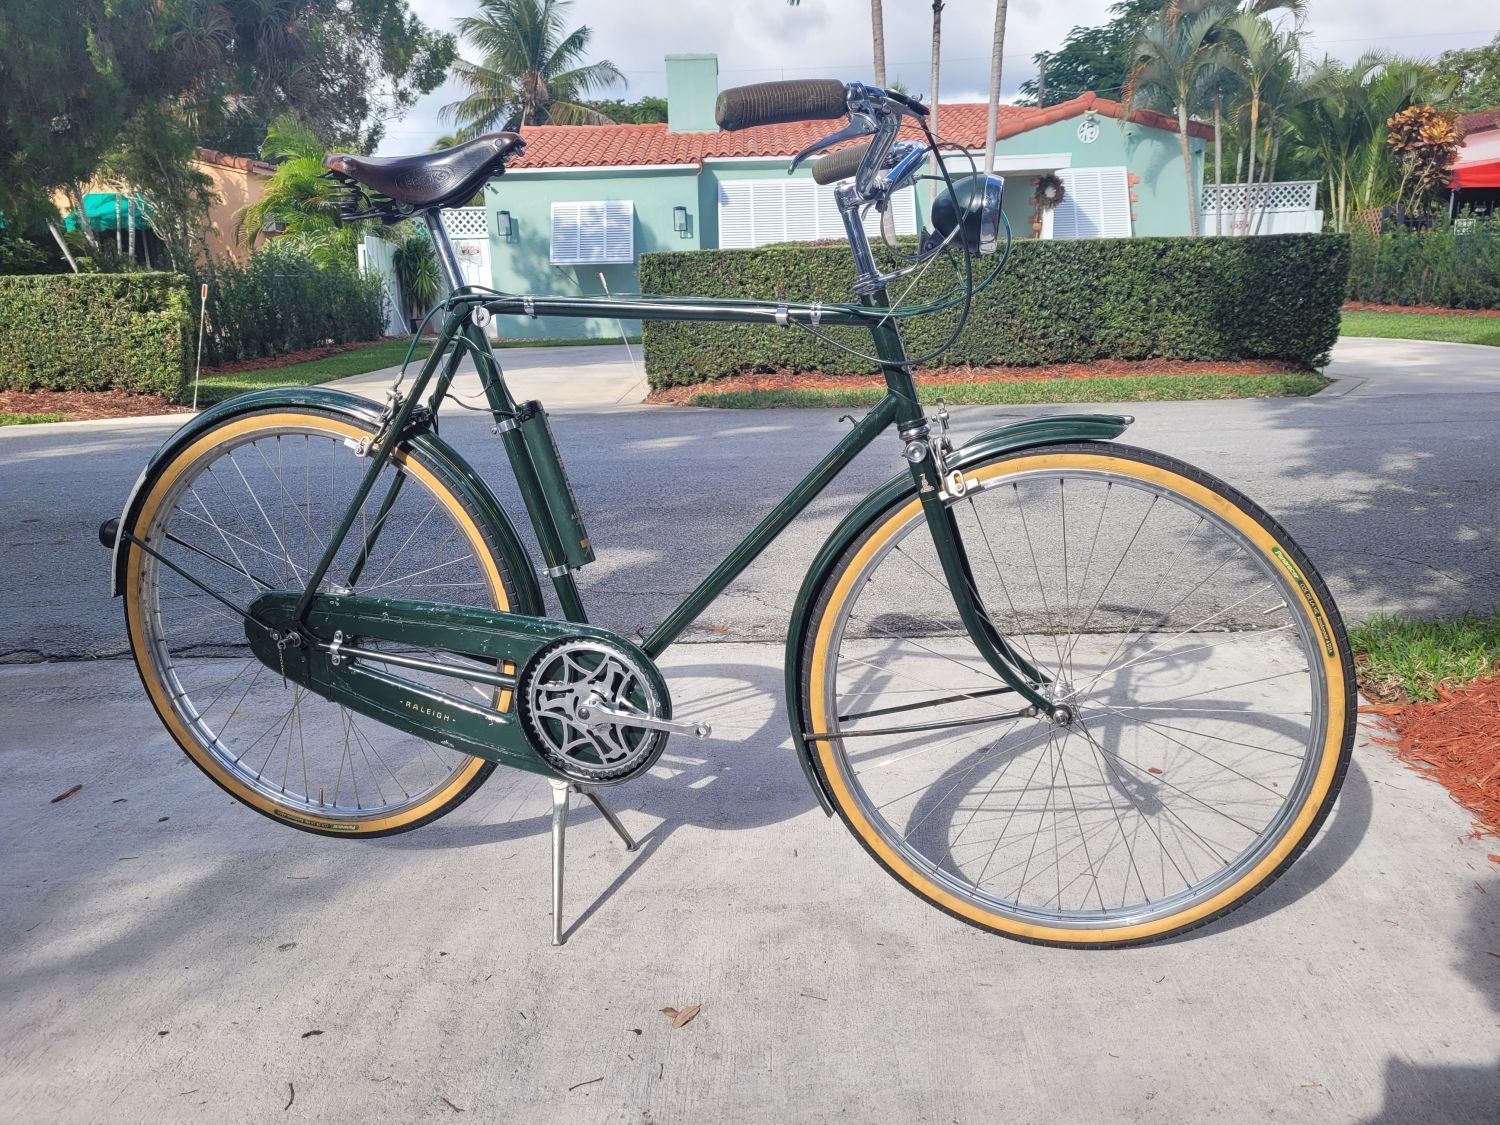
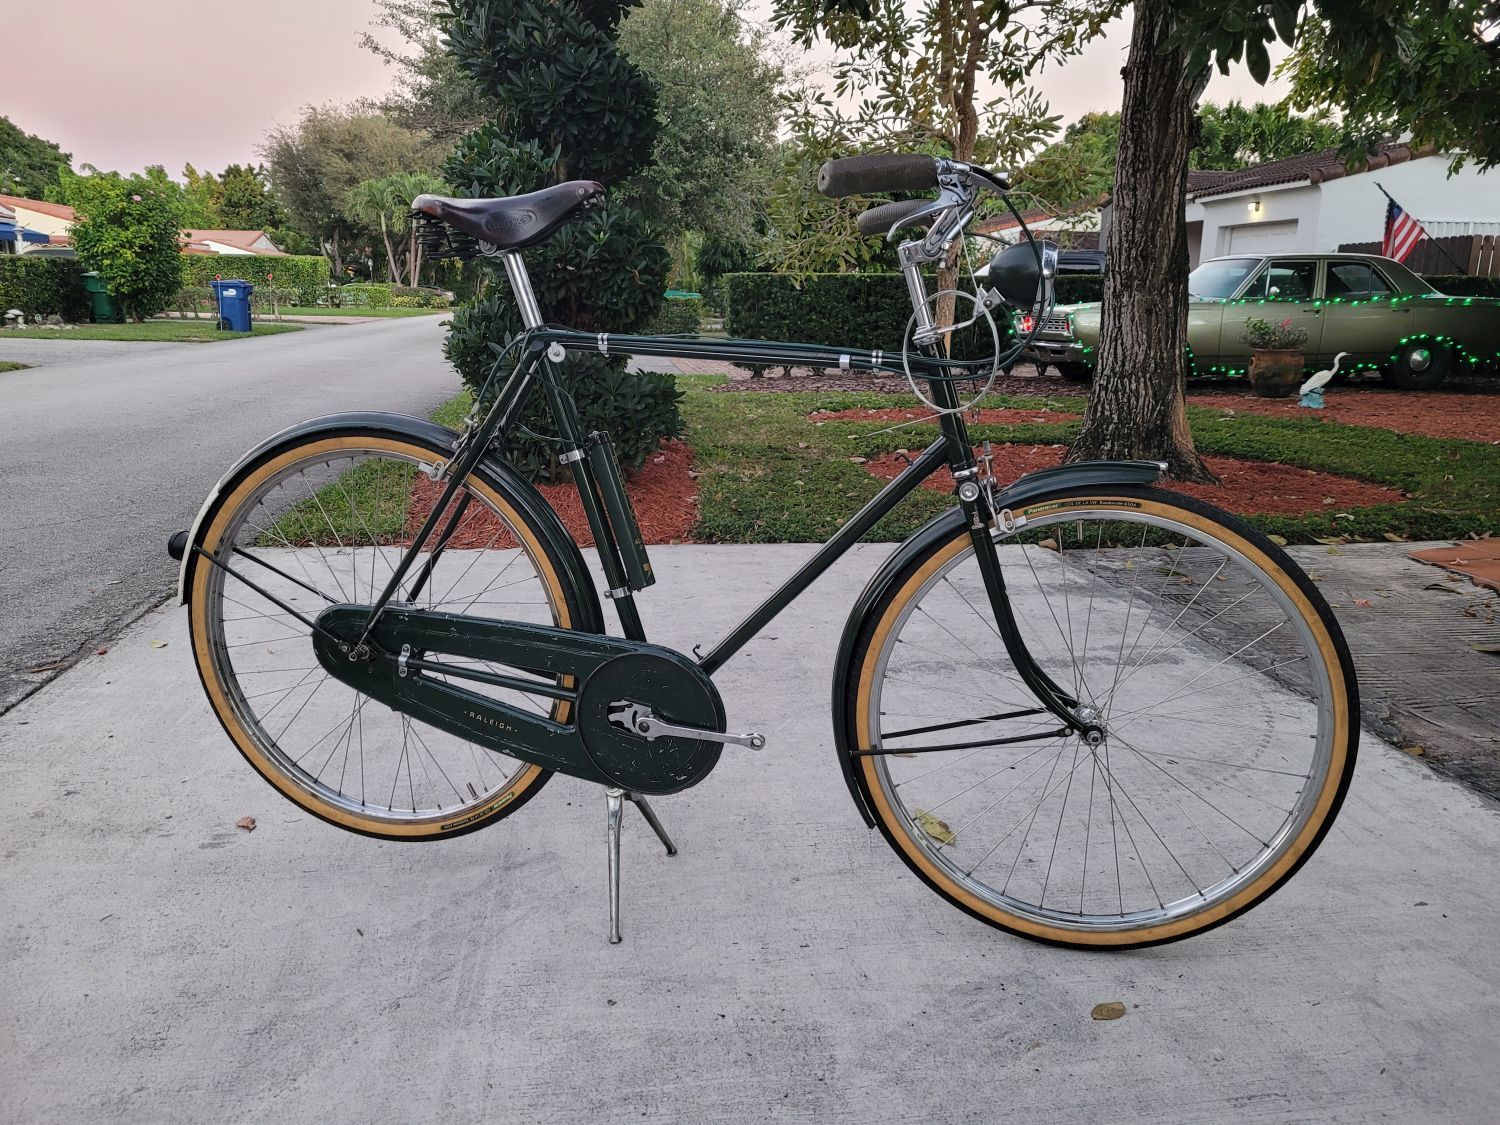
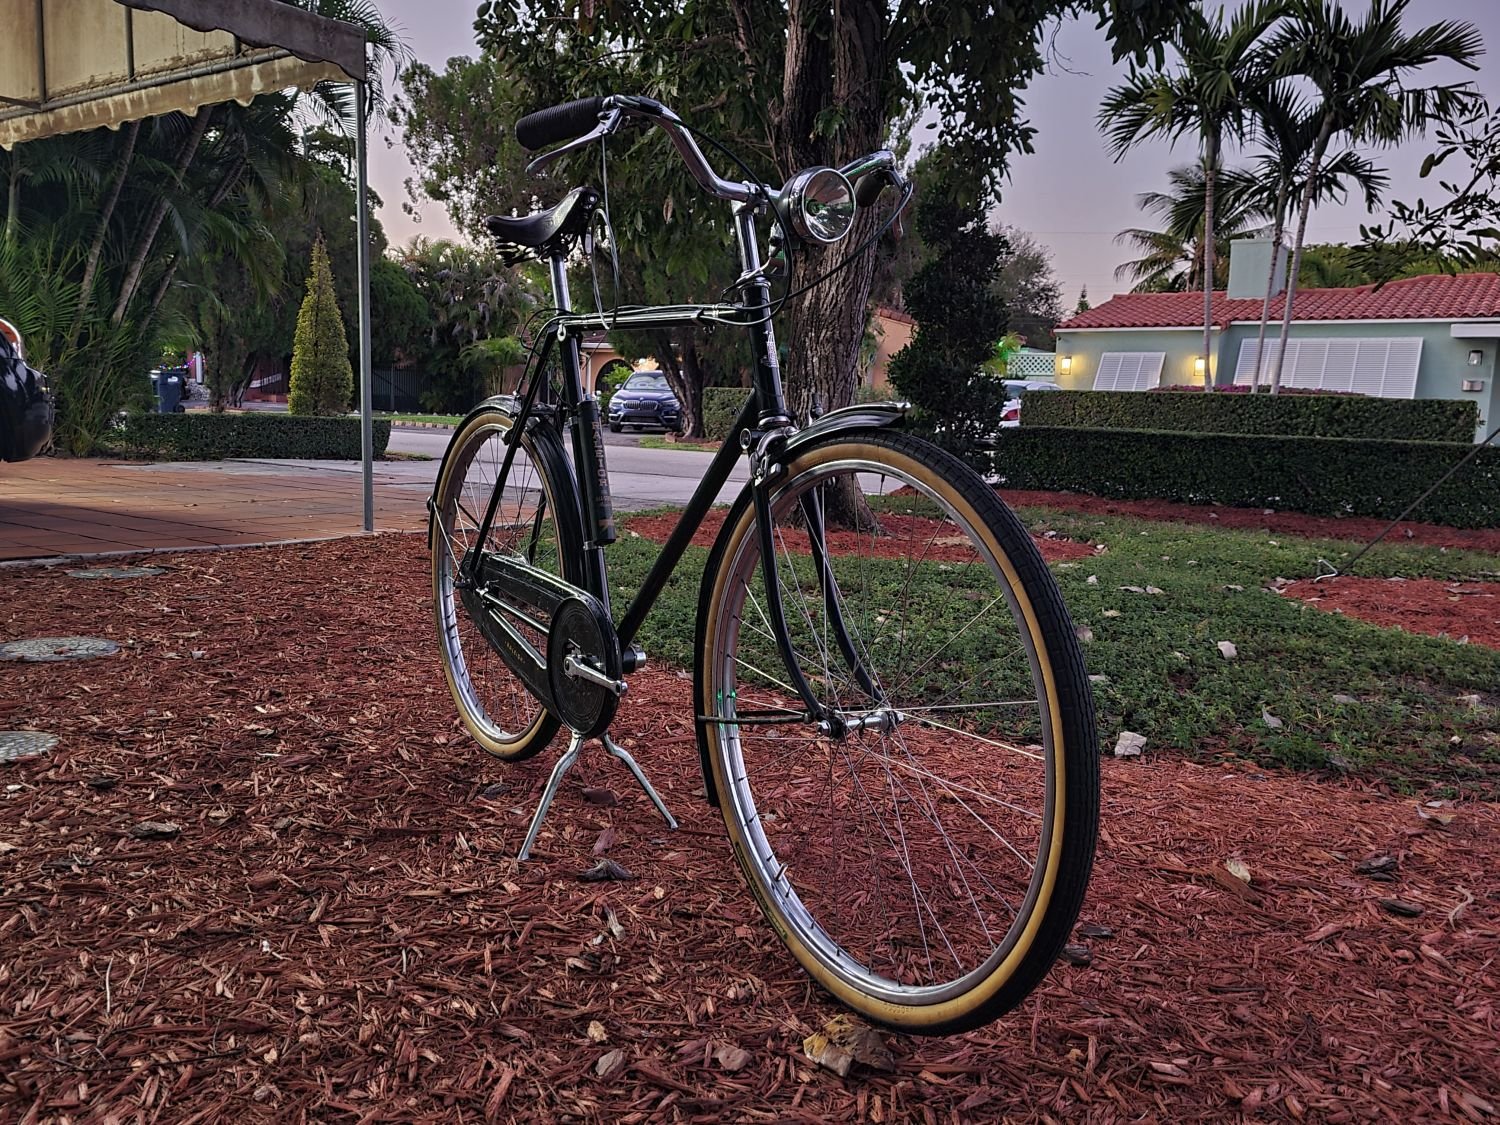
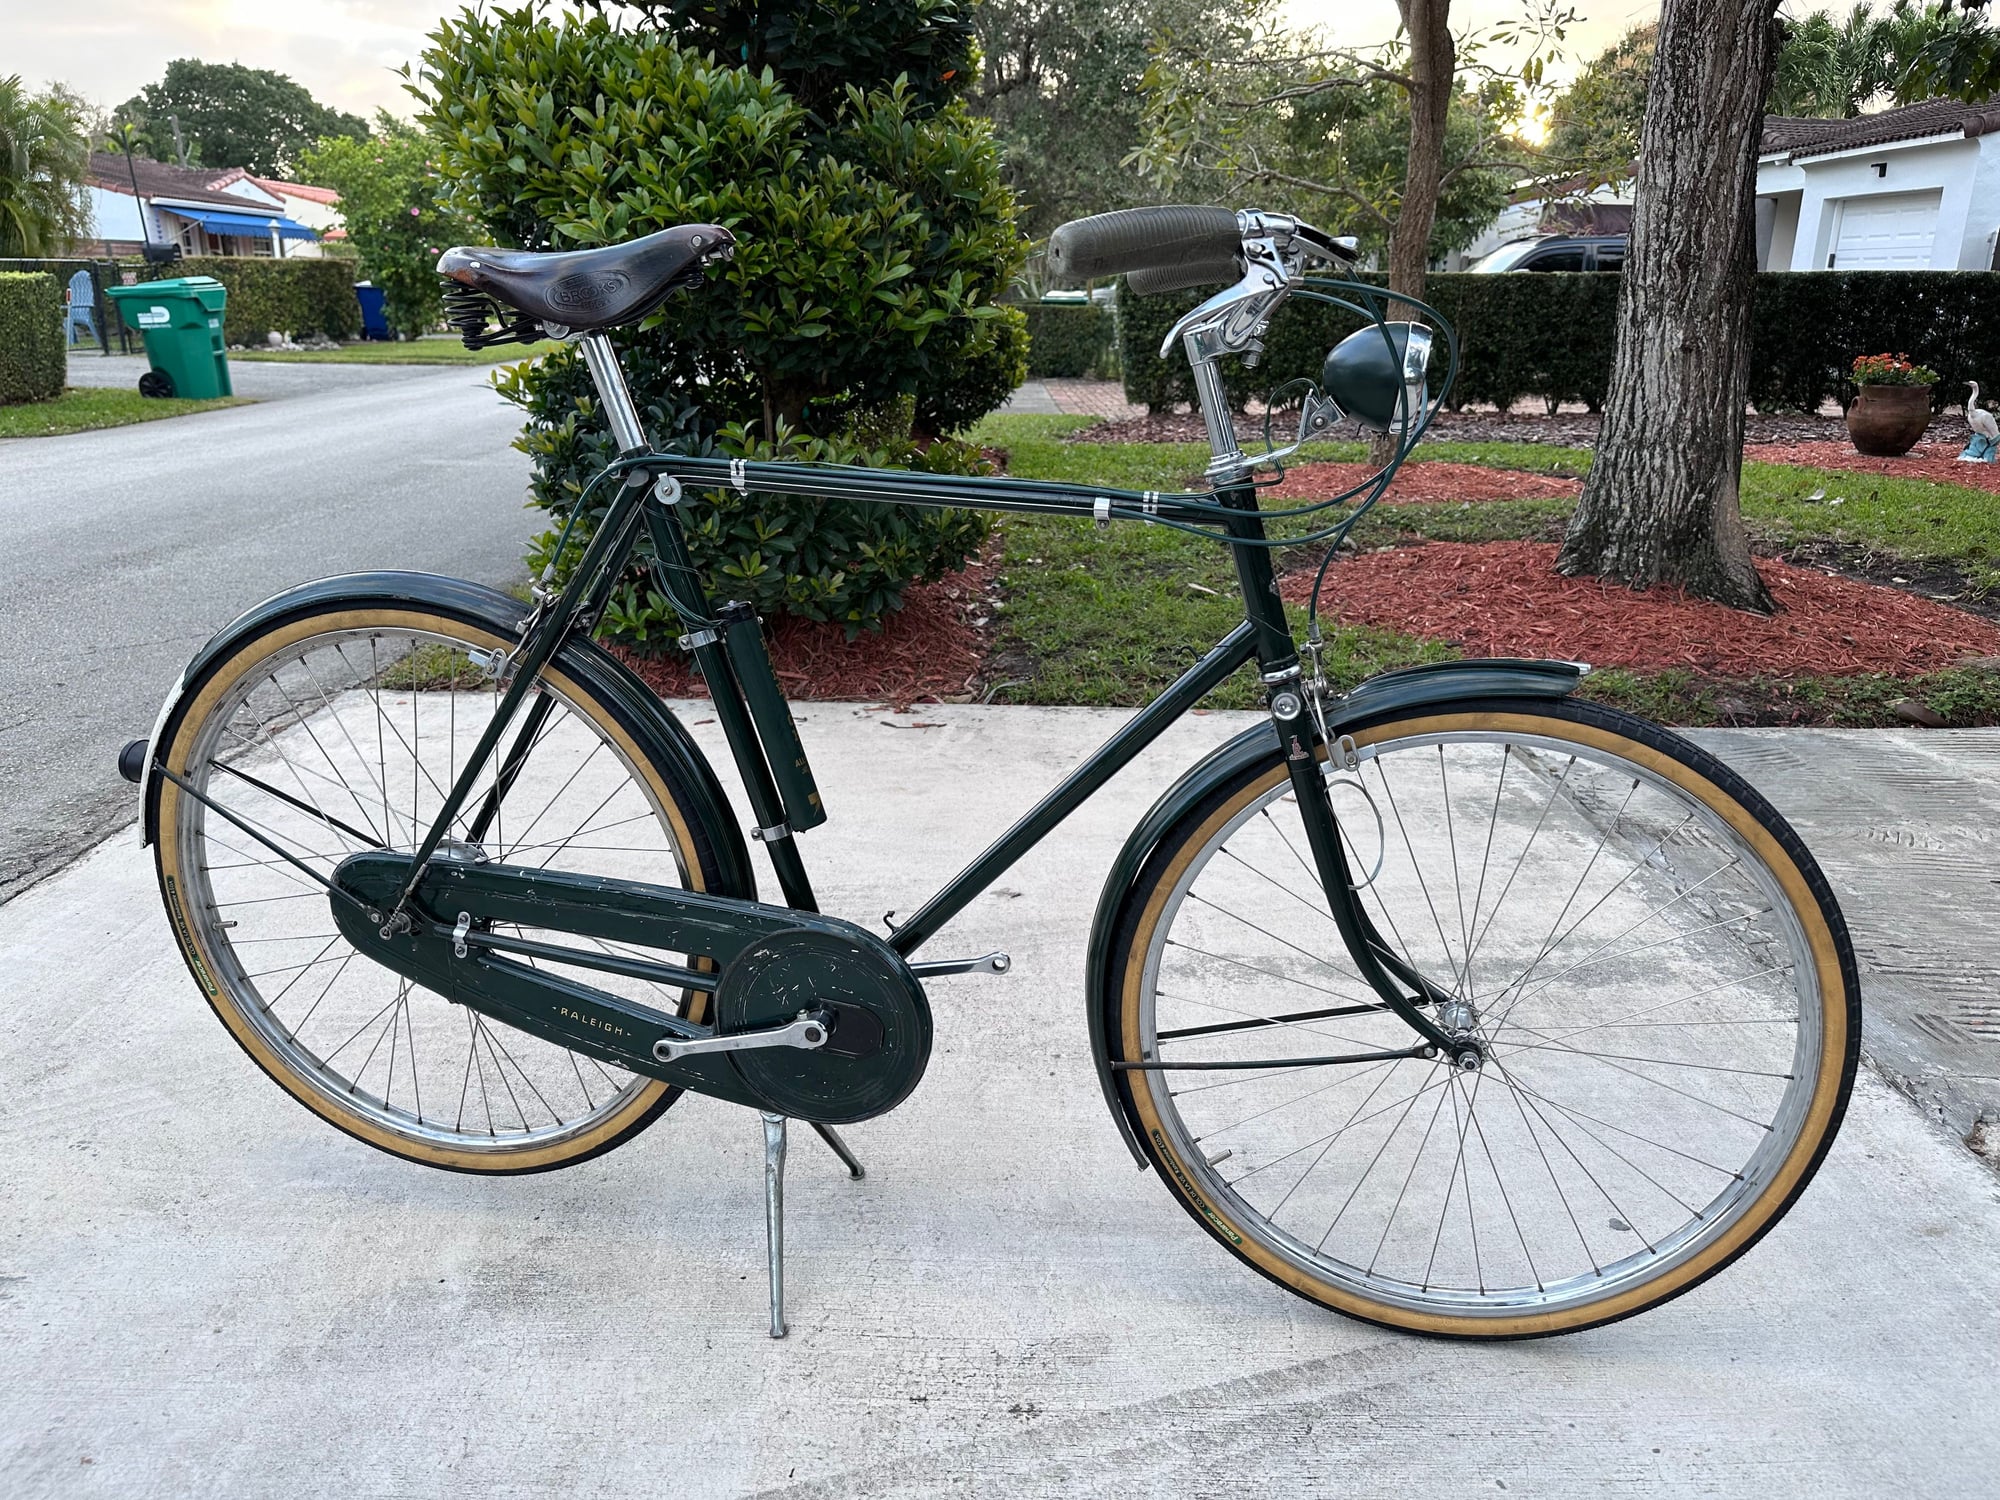
Quick update. First, obligatory beauty shot:

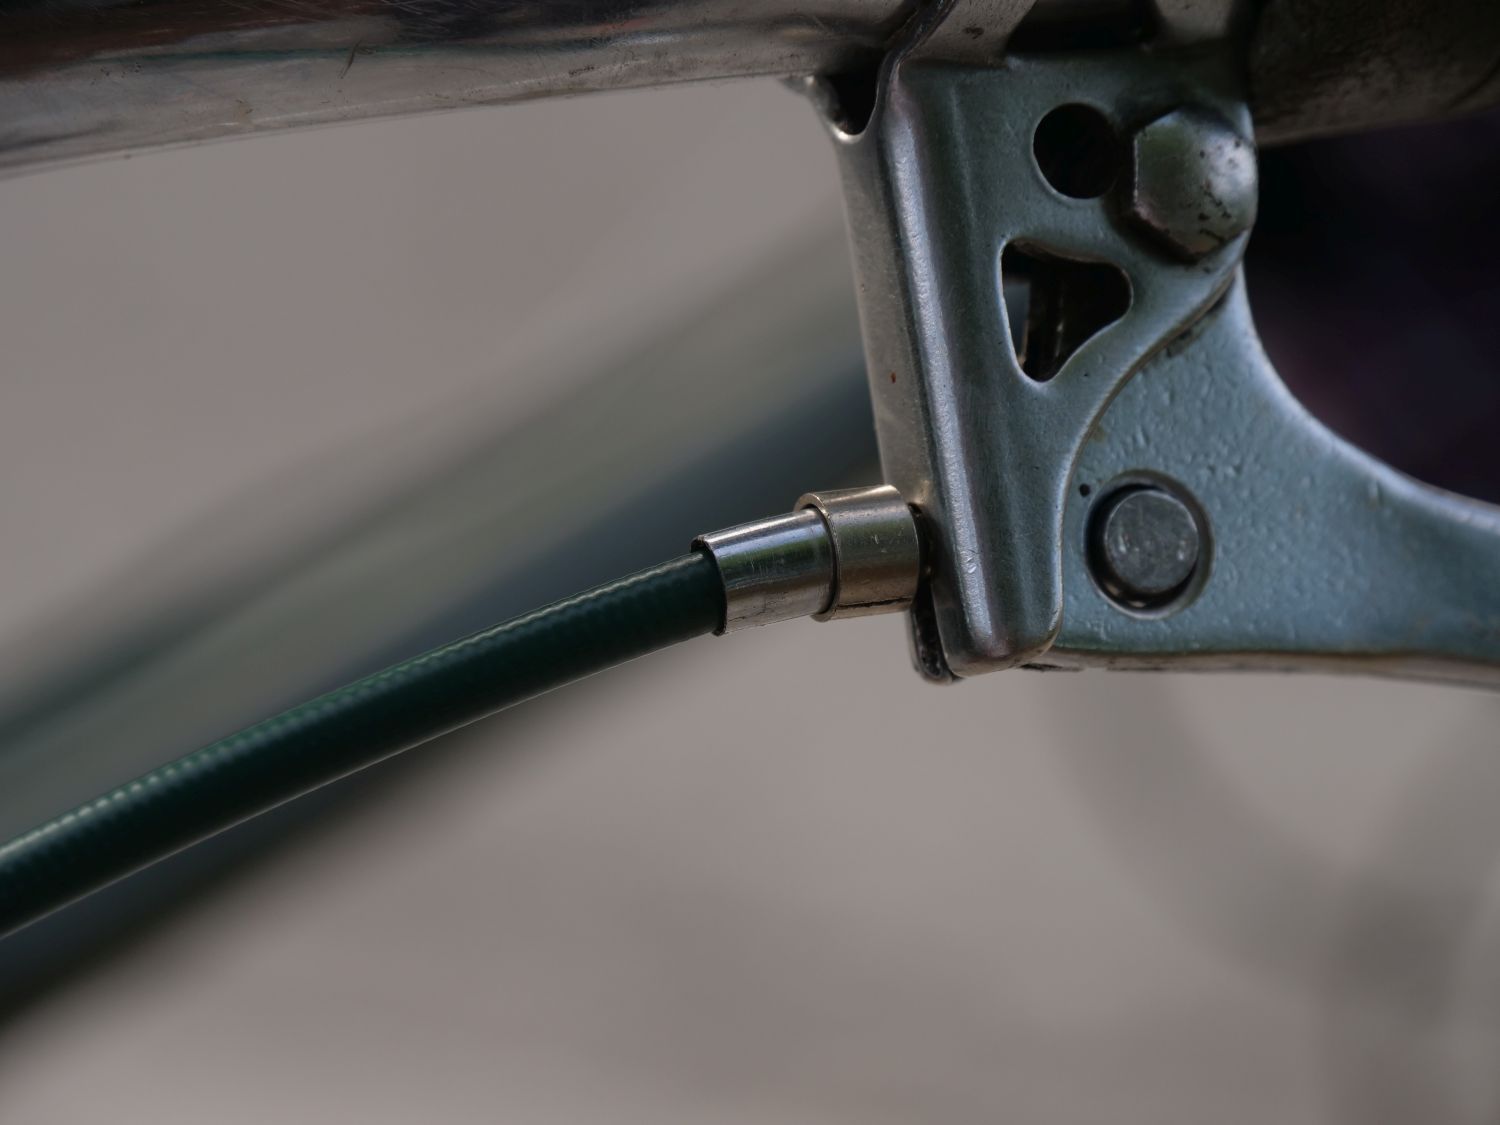
Thanks to Neal (@nlerner), the rear brake cable now has all of its necessary cable ends, so I went ahead and soldered the rear cable end in place. Got the positioning wrong on the first try and had a fun (not) time adjusting it when it slipped right off the second time.
Wound up feathering the tip of a mini butane torch on the end cap to get the solder to flow nicely.
Attempt #1:

Final result:

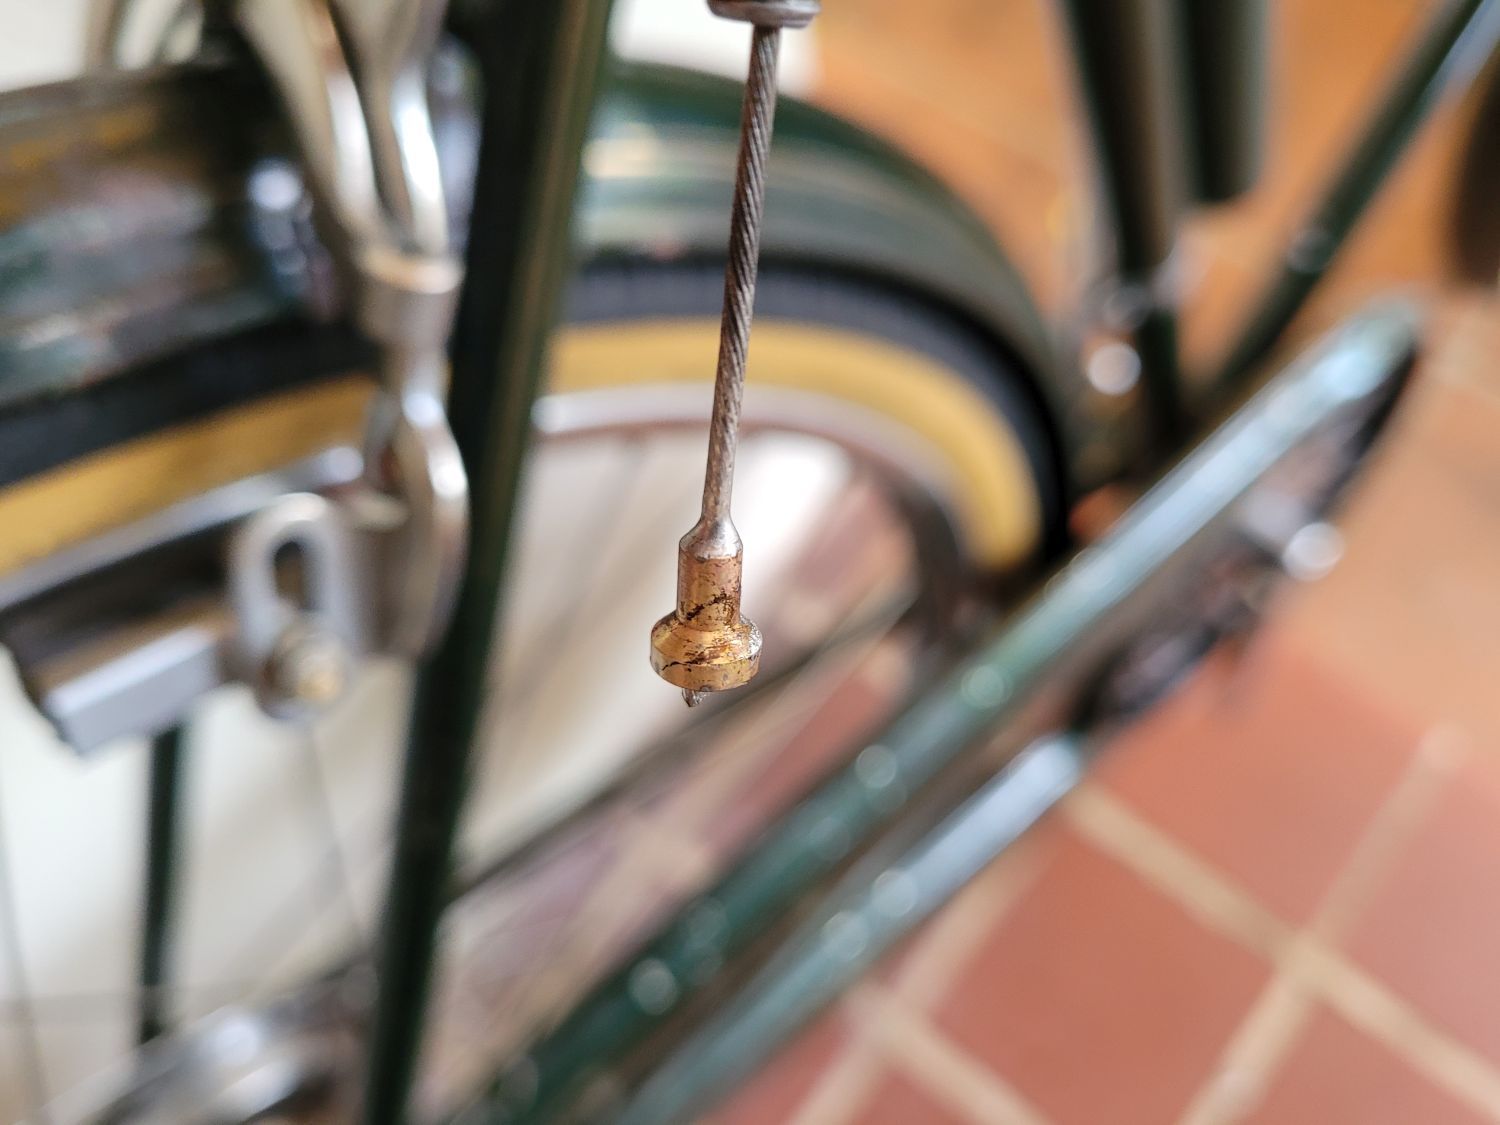
Installed:


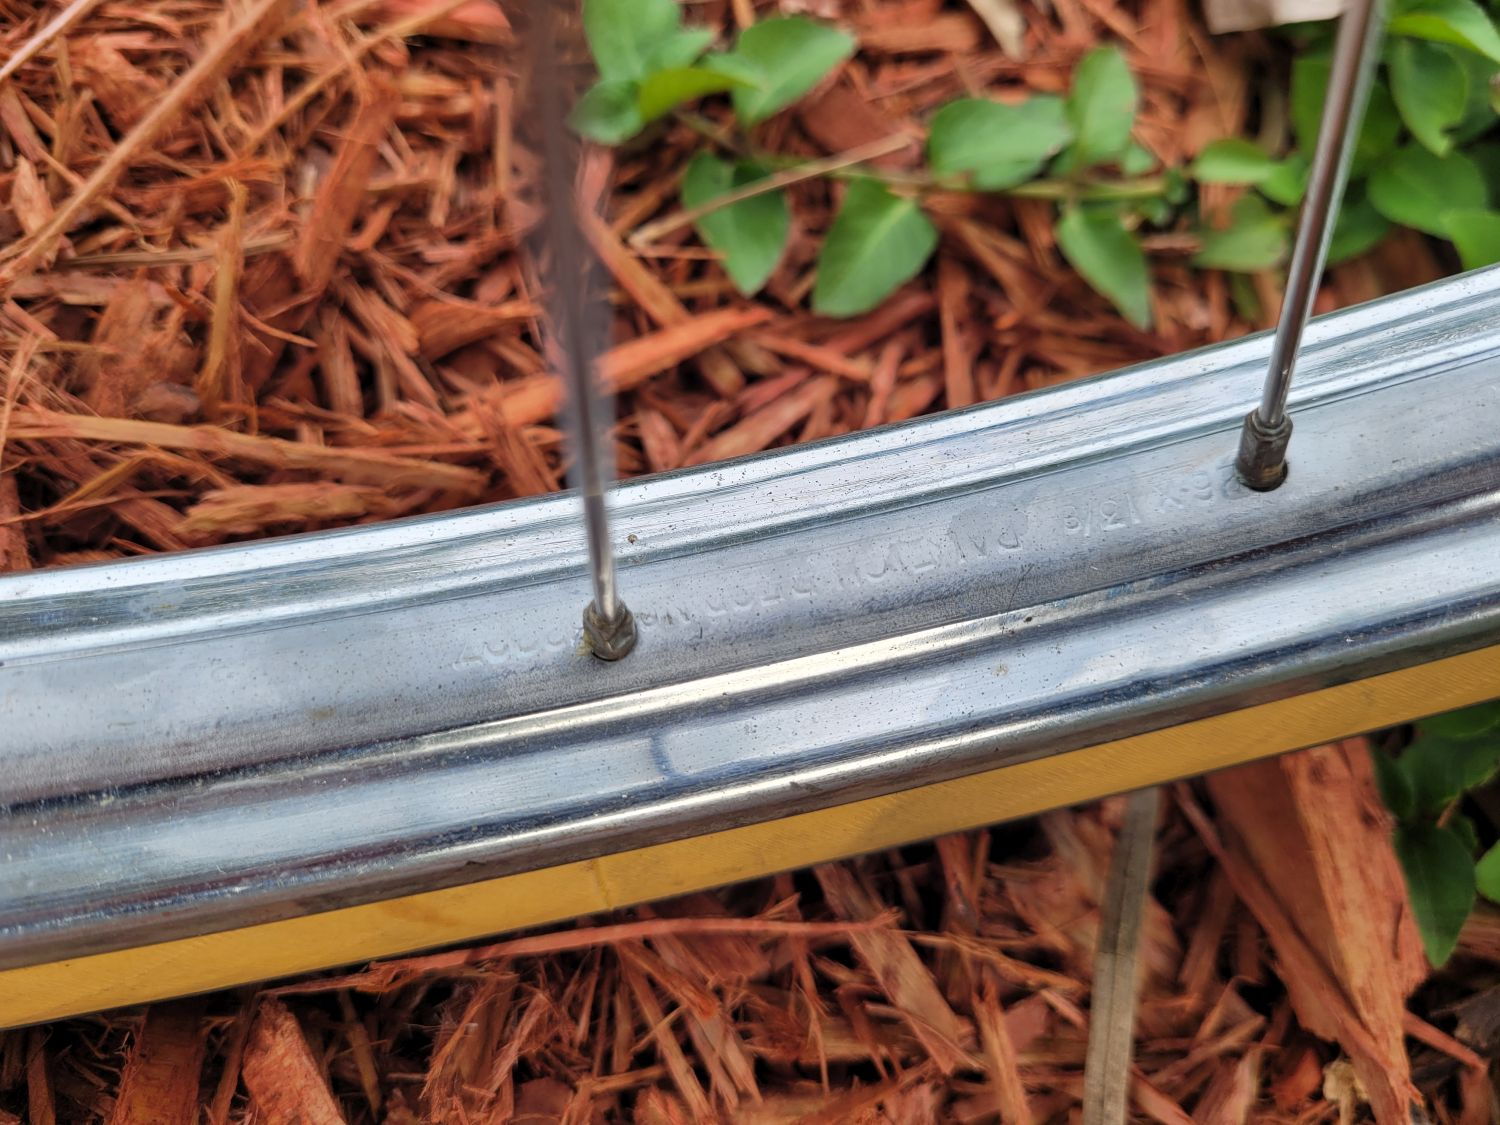
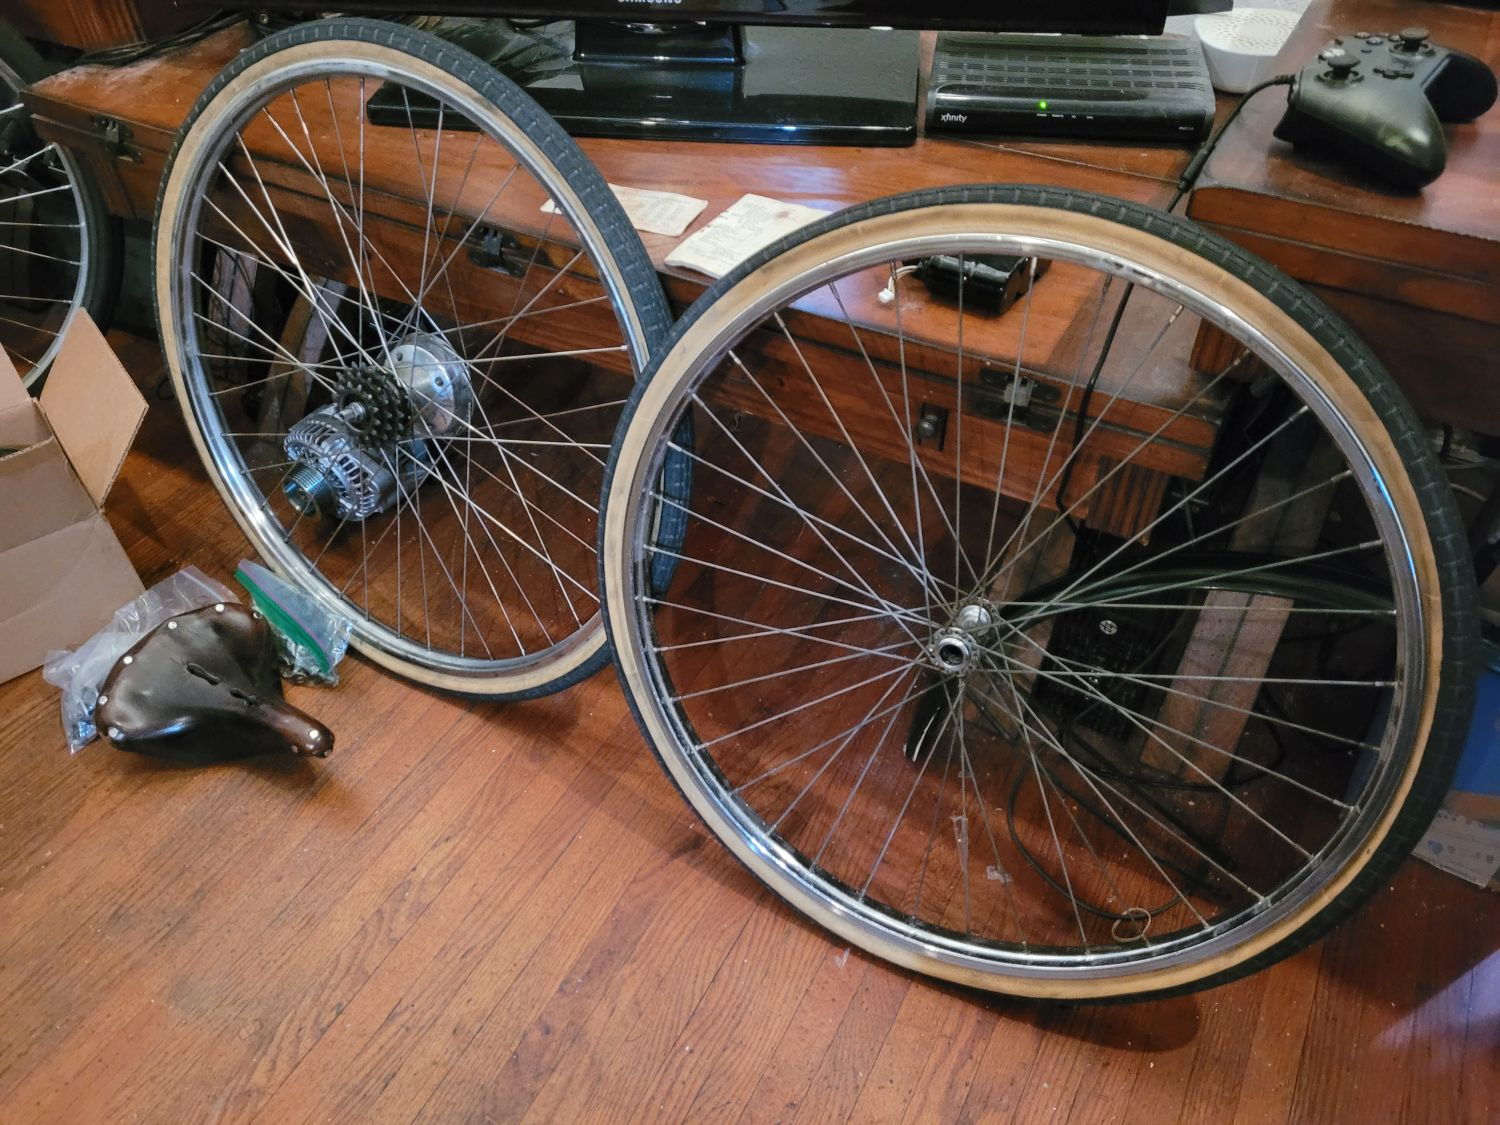
In other news, Jeff Rowse (from the Raleigh Roadsters Owners Club on Facebook) sent along a complete, correct front wheel for this project. That finally sorts out that out-of-place 1970's replacement that was on the front of this bike for many years:
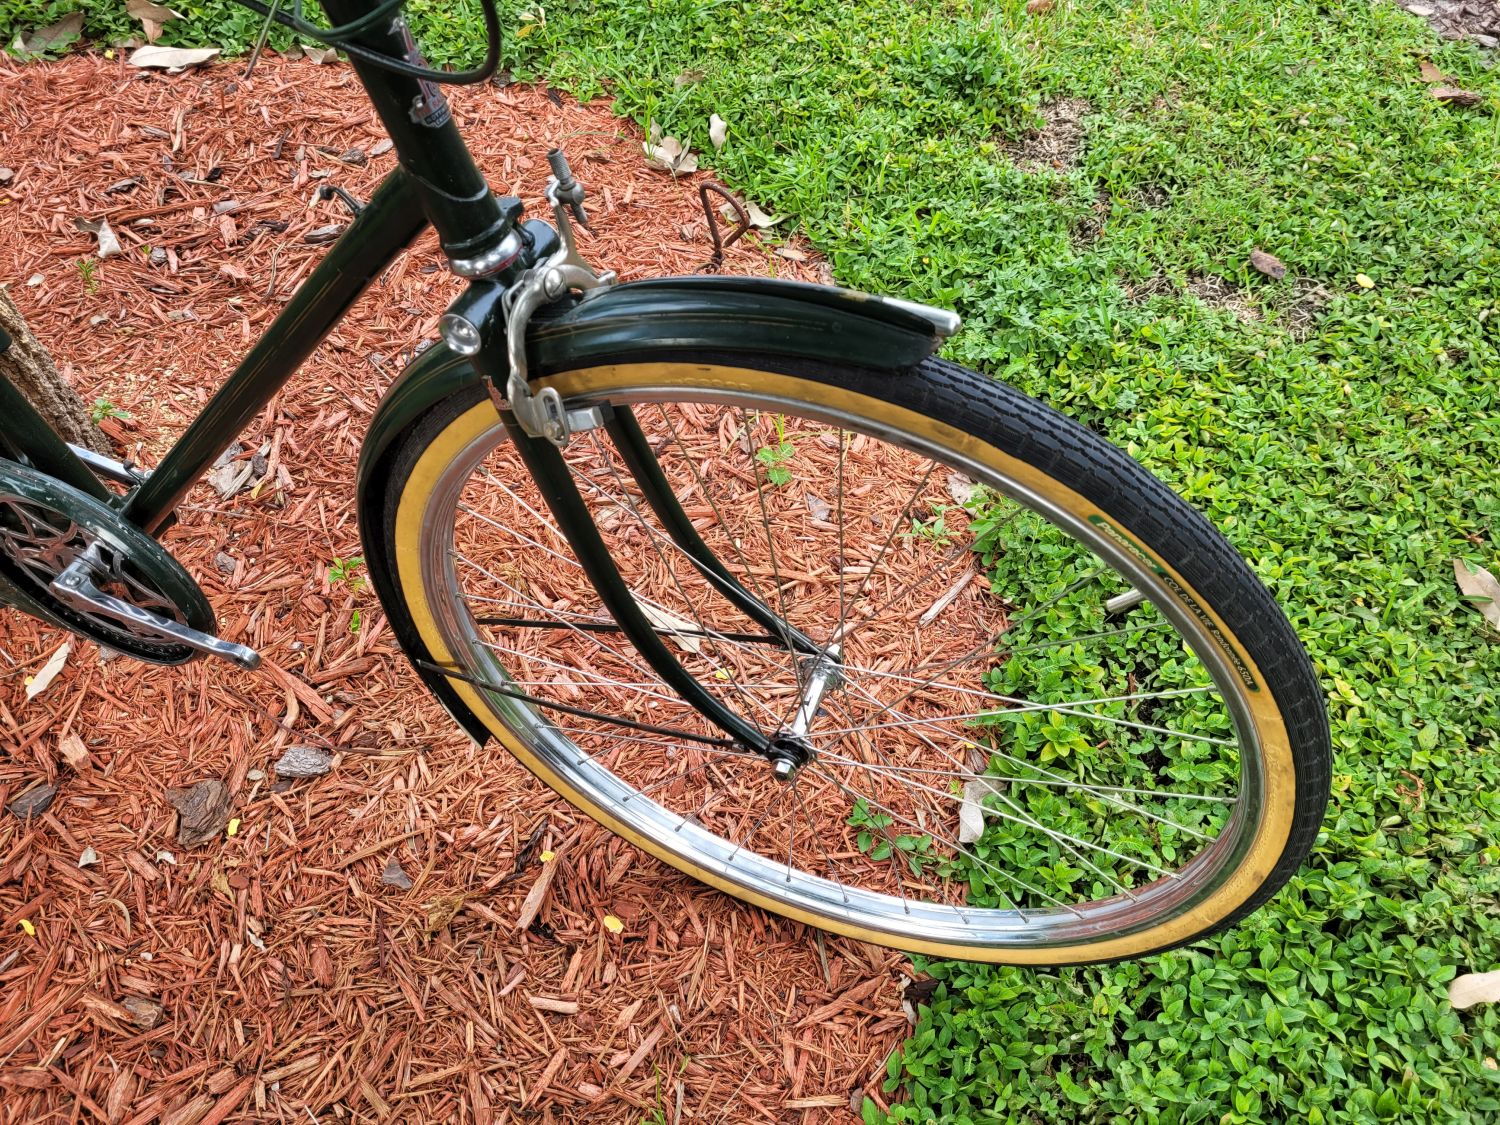
The nuts and washers are newer replacements, but look good:
It's a perfect match to the rear - matte center and all.
Still a ways to go here, but coming along. Curious if anyone has a recommendation for sleeving a cable with the proper dark green plastic-rubberish covering that would have been on it originally. I'd heat shrink it, but can't find any heat shrink in dark green.
-Kurt
Thanks to Neal (@nlerner), the rear brake cable now has all of its necessary cable ends, so I went ahead and soldered the rear cable end in place. Got the positioning wrong on the first try and had a fun (not) time adjusting it when it slipped right off the second time.
Wound up feathering the tip of a mini butane torch on the end cap to get the solder to flow nicely.
Attempt #1:
Final result:
Installed:
In other news, Jeff Rowse (from the Raleigh Roadsters Owners Club on Facebook) sent along a complete, correct front wheel for this project. That finally sorts out that out-of-place 1970's replacement that was on the front of this bike for many years:
The nuts and washers are newer replacements, but look good:
It's a perfect match to the rear - matte center and all.
Still a ways to go here, but coming along. Curious if anyone has a recommendation for sleeving a cable with the proper dark green plastic-rubberish covering that would have been on it originally. I'd heat shrink it, but can't find any heat shrink in dark green.
-Kurt
__________________
Likes For cudak888:
10-08-21, 05:51 AM
#28
Junior Member
Way back at the start of this thread you mentioned oxalic dip - Would appreciate knowing more about this and why you use it. Thanks
Likes For Maohaus:
10-08-21, 06:11 AM
#29
Senior Member
Join Date: Jan 2007
Location: Ontario
Posts: 2,648
Mentioned: 16 Post(s)
Tagged: 0 Thread(s)
Quoted: 478 Post(s)
Liked 634 Times
in
336 Posts
Kurt: nice work so far - looks great. And thank you for resolving a nit I have had about my Humber of the same era: the front fender line on mine (and yours) seems perfect until the last 6" or so (just to the stay), where it curves in close to the tire.....and with the Col de la Vie tires it becomes more obvious as the tire is larger section. On mine I assumed it was assembly error, damage of some sort or just the way it was/is; your bike curves the same way so I can now assume it just is what it is.....I know, OCD is strong in this one!

Likes For markk900:
10-08-21, 06:55 AM
#30
Senior Member

Join Date: May 2018
Location: Ottawa, Ontario, Canada
Posts: 581
Bikes: 1951 Sun Wasp, 1953 Armstrong Consort, 1975 Raleigh Competition, 1980 Apollo Gran Sport, 1988 Schwinn Voyageur, Mystery MTB
Mentioned: 31 Post(s)
Tagged: 0 Thread(s)
Quoted: 359 Post(s)
Liked 465 Times
in
191 Posts
Quick update. First, obligatory beauty shot:
Thanks to Neal (@nlerner), the rear brake cable now has all of its necessary cable ends, so I went ahead and soldered the rear cable end in place. Got the positioning wrong on the first try and had a fun (not) time adjusting it when it slipped right off the second time.
Wound up feathering the tip of a mini butane torch on the end cap to get the solder to flow nicely.
Attempt #1:
Final result
Installed:
In other news, Jeff Rowse (from the Raleigh Roadsters Owners Club on Facebook) sent along a complete, correct front wheel for this project. That finally sorts out that out-of-place 1970's replacement that was on the front of this bike for many years:
The nuts and washers are newer replacements, but look good:
It's a perfect match to the rear - matte center and all.
Still a ways to go here, but coming along. Curious if anyone has a recommendation for sleeving a cable with the proper dark green plastic-rubberish covering that would have been on it originally. I'd heat shrink it, but can't find any heat shrink in dark green.
-Kurt
Likes For Ged117:
10-08-21, 06:57 AM
#31
Junior Member
The fender curve could be intentional. I have a contemporary Trek FX commuter with fenders and have twice had a piece of debris that jammed up into the front fender after it stuck to my tire - in both cases it locked up my front wheel. So, perhaps Raleigh was addressing that issue by not allowing for a gap at that point? As we used to say in the computer business - "it is not a bug, it is a feature!"
10-08-21, 07:05 AM
#32
WGB
Join Date: Jul 2017
Location: Niagara Region
Posts: 2,917
Bikes: Panasonic PT-4500
Mentioned: 46 Post(s)
Tagged: 0 Thread(s)
Quoted: 1800 Post(s)
Liked 2,334 Times
in
1,378 Posts
I have a 72 Ladies Superbe that needs cable housings as well. Where did you find your set?
10-08-21, 07:52 AM
#33
www.theheadbadge.com
Thread Starter
Join Date: Sep 2005
Location: Southern Florida
Posts: 28,513
Bikes: https://www.theheadbadge.com
Mentioned: 124 Post(s)
Tagged: 0 Thread(s)
Quoted: 2422 Post(s)
Liked 4,391 Times
in
2,092 Posts
You'll find oxalic acid as "Wood Bleach" at Ace Hardware, probably others as well (haven't found it at the local Home Depots though). Comes in a small tub with an airseal lock. The oxalic acid inside is in a white powder/crystal form, and looks like something Scarface might snort up his desk. But make sure you don't get near the raw OA without a mask and gloves; this stuff is toxic. Same for the vapor. See: https://www.ontariobee.com/sites/ont...A%20safety.pdf
Kurt: nice work so far - looks great. And thank you for resolving a nit I have had about my Humber of the same era: the front fender line on mine (and yours) seems perfect until the last 6" or so (just to the stay), where it curves in close to the tire.....and with the Col de la Vie tires it becomes more obvious as the tire is larger section. On mine I assumed it was assembly error, damage of some sort or just the way it was/is; your bike curves the same way so I can now assume it just is what it is.....I know, OCD is strong in this one!
Seeing as this is supposed to have a factory mudflap (really looking for a template of this!), I may pull upwards a bit at both ends in the hopes of getting the fender line a bit closer to the wheel and getting the tip far away enough from the fatter Col de la Vie to clear the flap.
Kurt - the bike looks REAL nice. Great job. During my ownership, keeping the grips and saddle in as-found condition was my highest priority. Those grips are 71 year old natural rubber, and they are getting fragile. It feels good to see the bike wearing the proper front wheel, too. Let me know how you get that lamp system working - I couldn't figure it out without breaking into the filter switch unit.
Those John Bull Super Clubs are apparently unobtanium too; something in high demand by the BSA/Triumph/Norton enthusiasts as well, I believe. The Raleigh variant is probably even more difficult to find. Definitely a part deserving of a repop. Tempted to make a 3D model of them as a reference.
I've located the correct Raleigh wiring diagrams for the configuration with the AG Dynothree and filter switch, along with the original part numbers for each wire, but some of the lines appear too short, others too long, and I'm not entirely sure how they're supposed to be routed. Finding reference photos of unmodified Superbes is also nothing short of a miracle. Pretty sure I figured out the reason the rear lamp wire is abnormally short is because the harness supplied with the bike originally was intended for the UK market, and thus is supposed to be on the right-hand side of the bike.
The fender curve could be intentional. I have a contemporary Trek FX commuter with fenders and have twice had a piece of debris that jammed up into the front fender after it stuck to my tire - in both cases it locked up my front wheel. So, perhaps Raleigh was addressing that issue by not allowing for a gap at that point? As we used to say in the computer business - "it is not a bug, it is a feature!"
At any rate, these Raleighs were well built, but not precision machines - and after 71 years, who knows what might have happened to these fenders?
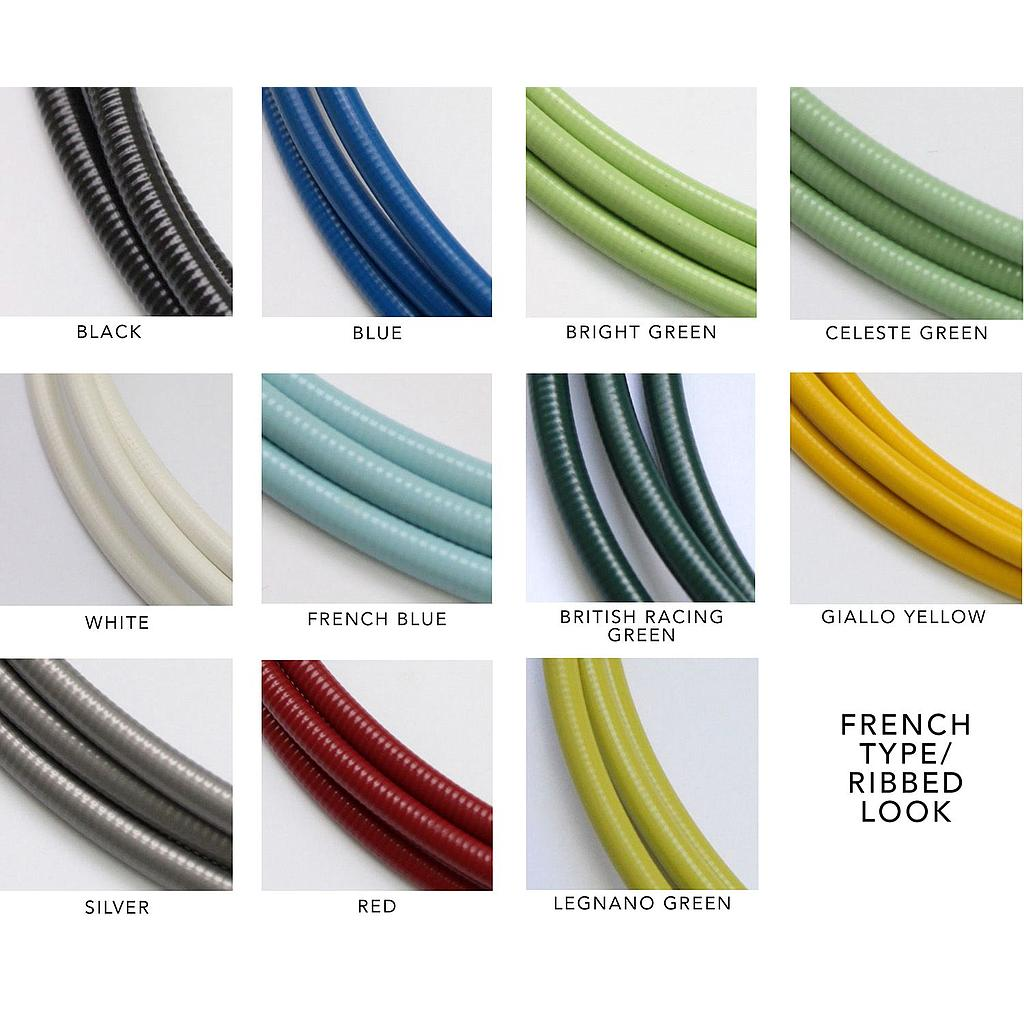
I used Yokozuna housing, which was the only brand that had anything that even resembled the 1950's Superbe green (which has nothing to do with the later Bronze Green metallic of the 1960's and 1970's). The housing is ridiculously expensive at $32.99 for 2000mm, but it comes in some really fantastic colors - which is why I wound up choosing it. Takes two loops of 2000mm to do front + rear + shifter cable on a men's Sports/Superbe:
https://www.yokozunausa.com/shop/pro...search=vintage
Nevertheless, if you choose to go this route, they do offer a "mesh" type housing which has a passing resemblance to the TI-era Raleigh housing. It's not identical though, but it may be your best opportunity for a semi-original look with an inner Teflon housing.
However, if you're running factory suicide sidepulls, I'd say this is over the top and overpriced. You'd probably be best off hawking eBay for decent used Raleigh housing with no cracks, or putting a Wanted listing on the Superbe Facebook group for the same. Greasing the inner cable before pulling it through the housing may be old-fashioned, but it still works if your housing isn't Teflon lined. Alternatively, you can try using Teflon-coated cable, though the unlined housing may just gack it; haven't tried it myself.
https://www.yokozunausa.com/shop/pro...search=vintage
-Kurt
__________________
10-08-21, 09:56 AM
#34
Senior Member
Join Date: Jan 2007
Location: Ontario
Posts: 2,648
Mentioned: 16 Post(s)
Tagged: 0 Thread(s)
Quoted: 478 Post(s)
Liked 634 Times
in
336 Posts
It depends on the bike. These are excellent machines, but the fenders weren't built to high precision. Plus, I'd take a bet that these were probably radiussed closer to the wheel arch and became bowed over the years from people leaning/sitting on the fender peak (or things falling on it), bowing the overall shape. Could also happen from road debris jamming between the tire and mudflap. Check the side edges of the fender to see if they splay out slightly. If so, this is likely the case.
Seeing as this is supposed to have a factory mudflap (really looking for a template of this!), I may pull upwards a bit at both ends in the hopes of getting the fender line a bit closer to the wheel and getting the tip far away enough from the fatter Col de la Vie to clear the flap.
-Kurt
Seeing as this is supposed to have a factory mudflap (really looking for a template of this!), I may pull upwards a bit at both ends in the hopes of getting the fender line a bit closer to the wheel and getting the tip far away enough from the fatter Col de la Vie to clear the flap.
-Kurt
10-08-21, 10:01 AM
#35
www.theheadbadge.com
Thread Starter
Join Date: Sep 2005
Location: Southern Florida
Posts: 28,513
Bikes: https://www.theheadbadge.com
Mentioned: 124 Post(s)
Tagged: 0 Thread(s)
Quoted: 2422 Post(s)
Liked 4,391 Times
in
2,092 Posts
Looking at yours I suspect if you tried to bend the front down slightly to correct the small bow issue you will end up pulling the mudflap end in even closer! I spent quite a bit of time trying to work out that last 6" but was thwarted by the length of the stays and the positioning of the upper fender mount - even tried moving it to the front of the fork crown to make the effective length of the stays slightly longer.....looked stupid and didn't help. Anyway agree these are not precision, and it works just fine (though with the CdlV tires you may have issues with the mudflap).
Might not work, but I'll give it a try if the fender allows me to.
-Kurt
__________________
12-07-21, 09:43 PM
#36
www.theheadbadge.com
Thread Starter
Join Date: Sep 2005
Location: Southern Florida
Posts: 28,513
Bikes: https://www.theheadbadge.com
Mentioned: 124 Post(s)
Tagged: 0 Thread(s)
Quoted: 2422 Post(s)
Liked 4,391 Times
in
2,092 Posts
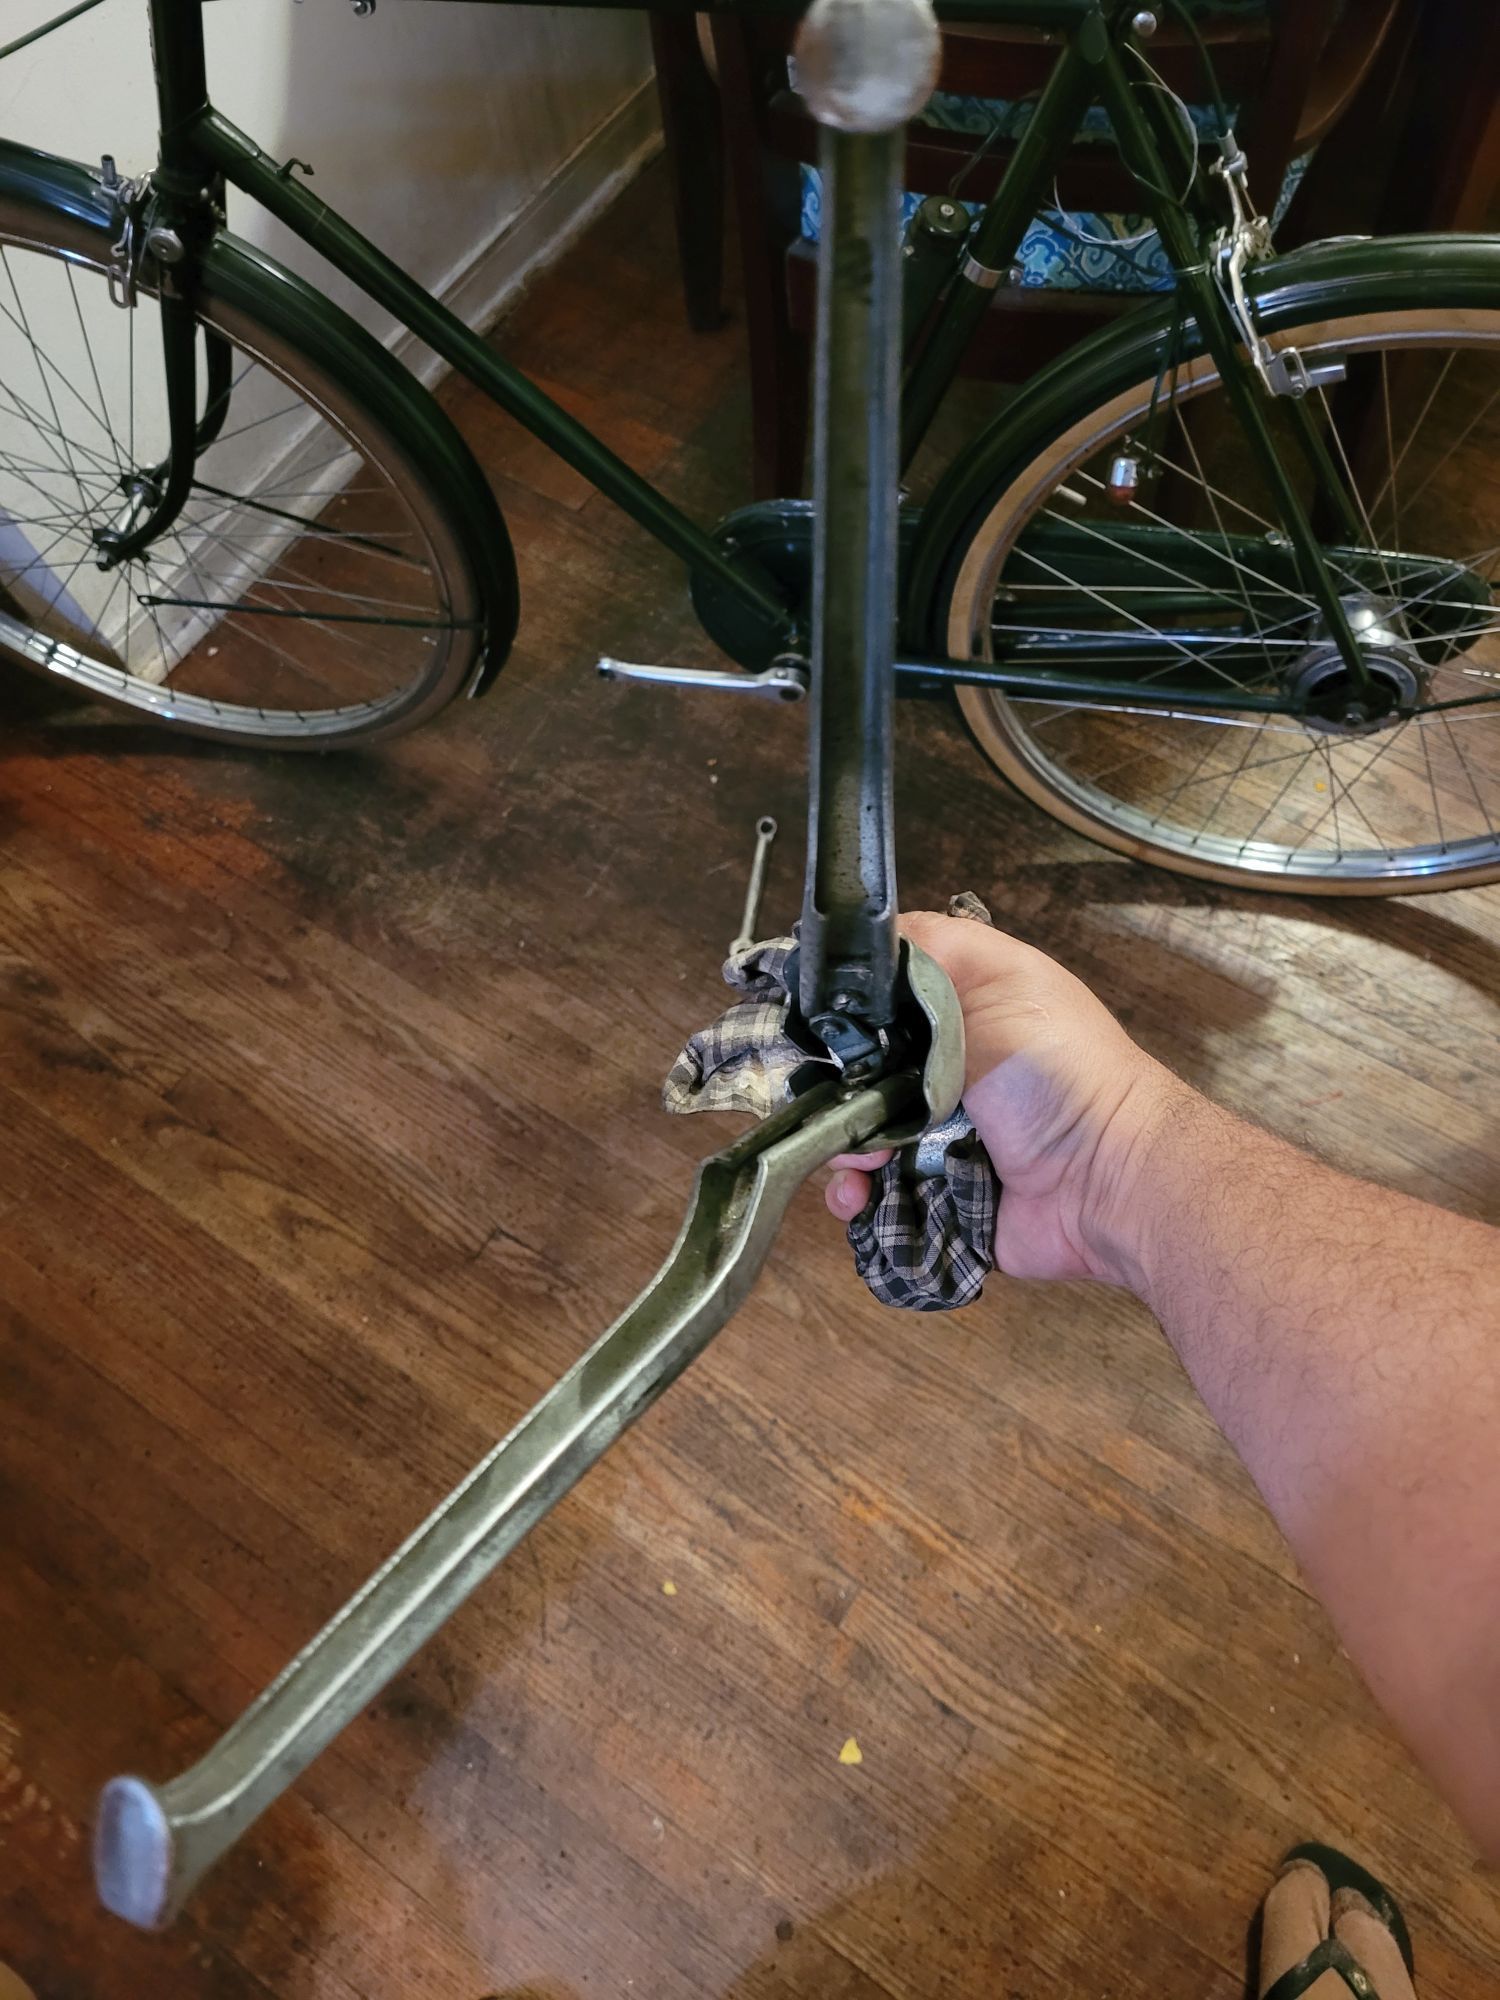
A couple of months ago, I bought a Trygg kickstand off eBay for this bike. Turned out it appeared slightly bent, but slightly bent for one of these equals hopeless operation. Note the kink in the link arms:
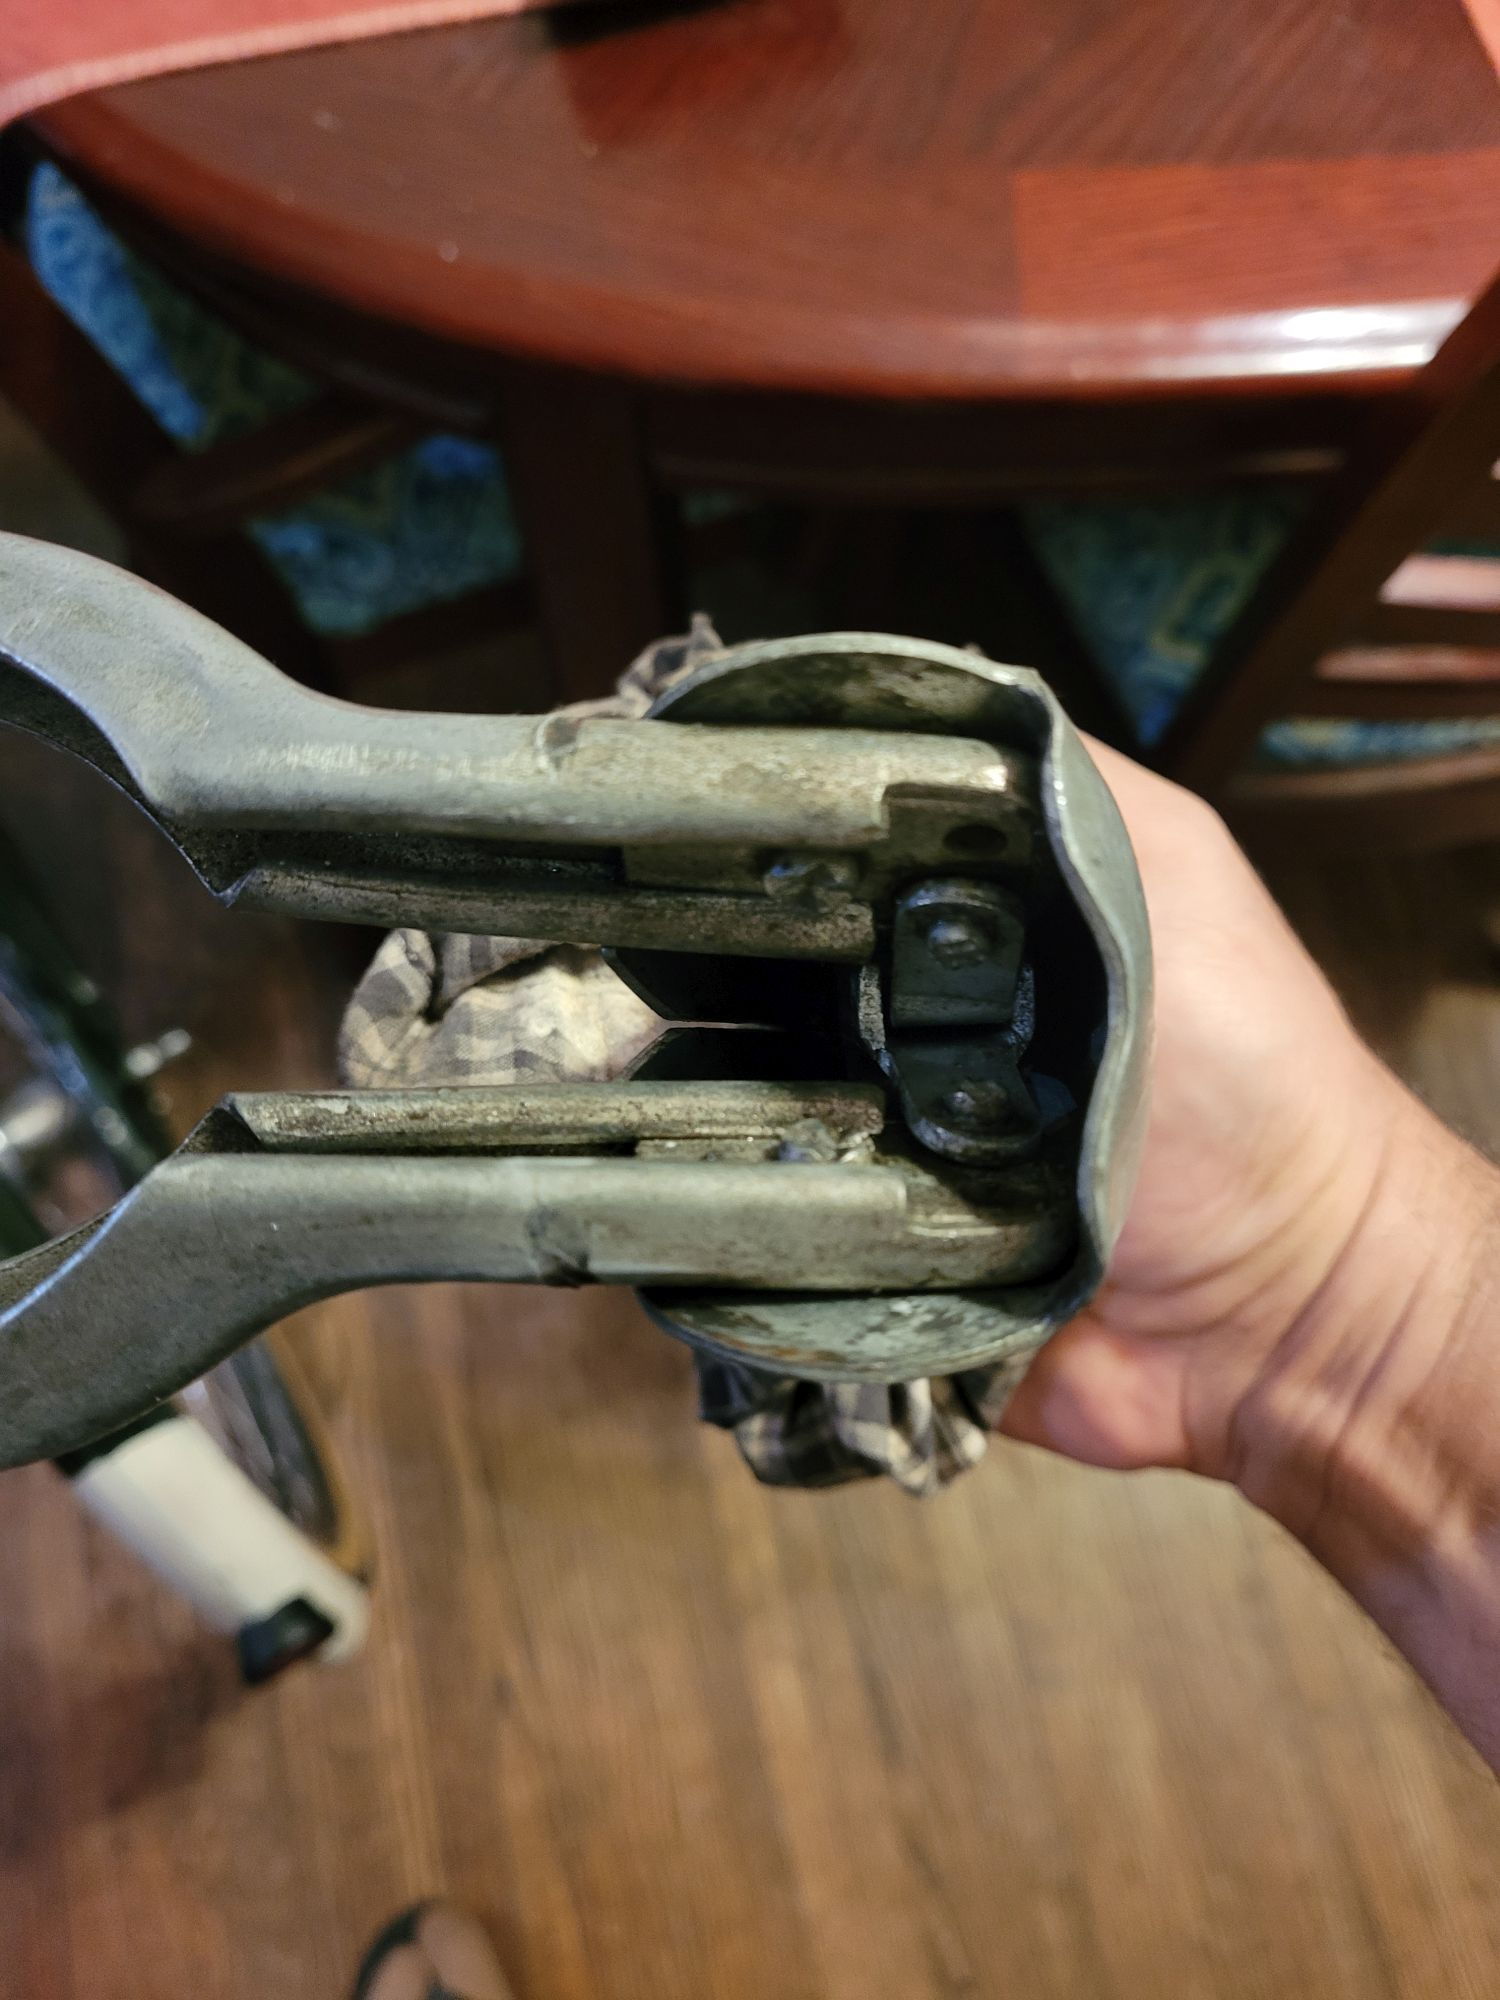
Now, that doesn't entirely hamper its function, but it means that deploying the kickstand causes alternating legs to bind up and not retract or extend. This means kickstand deployment has to be done on one side of the bike (don't remember which) and it has to be raised on the other.
No thank you, and not at the prices these things go for either.
A closer look indicated it had definitely taken some kind of a hard knock BITD, as it was very bent. You just had to know how to photograph it so it'd become visually apparent.
While this contributed to a slightly wonky position when deployed, it's worth noting that the bend in this leg wasn't specifically at fault for the problematic operation. That is due to the bent link inside the stand, which was probably due to the forces the stand encountered.
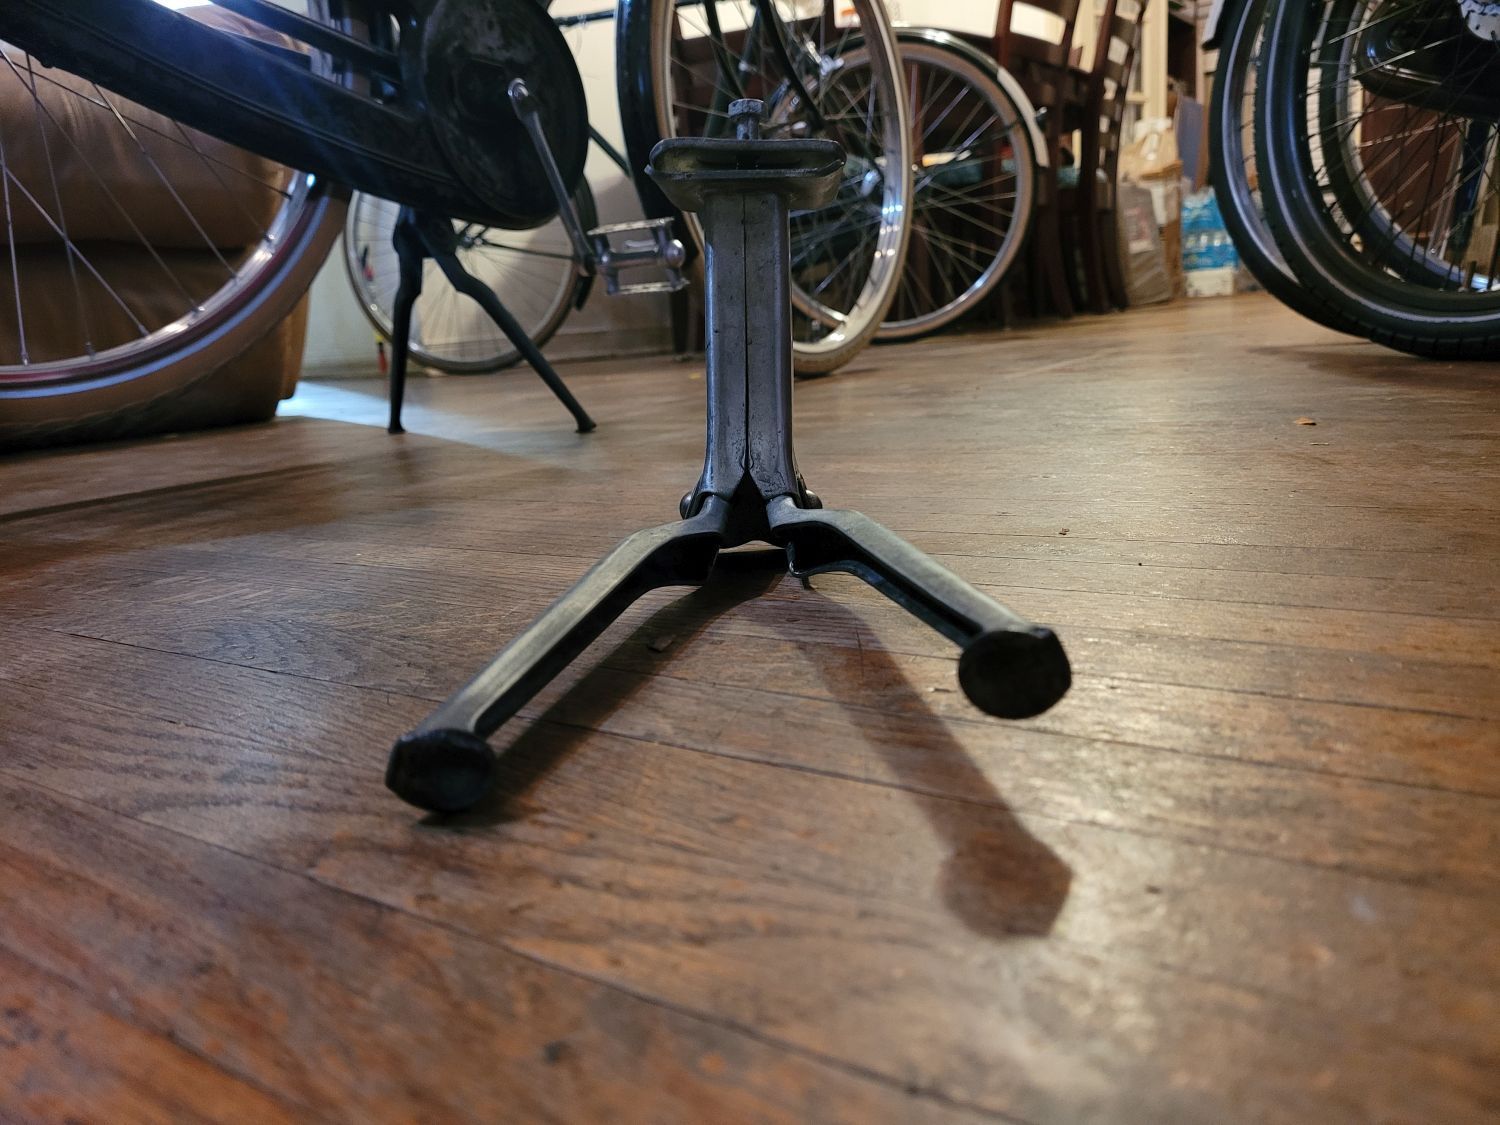
By comparison, here's the healthy Trygg on the bottom of my '51 Sports. Note the symmetry of the link arms:


I had the good fortune of successfully winning another one of these on eBay a few days ago for a less-than-usually overpriced price. It's on the way. Fingers crossed that it's not bent either.
Still have to dig one up for the '52 Sports too (!)
-Kurt
Now, that doesn't entirely hamper its function, but it means that deploying the kickstand causes alternating legs to bind up and not retract or extend. This means kickstand deployment has to be done on one side of the bike (don't remember which) and it has to be raised on the other.
No thank you, and not at the prices these things go for either.
A closer look indicated it had definitely taken some kind of a hard knock BITD, as it was very bent. You just had to know how to photograph it so it'd become visually apparent.
While this contributed to a slightly wonky position when deployed, it's worth noting that the bend in this leg wasn't specifically at fault for the problematic operation. That is due to the bent link inside the stand, which was probably due to the forces the stand encountered.
By comparison, here's the healthy Trygg on the bottom of my '51 Sports. Note the symmetry of the link arms:
I had the good fortune of successfully winning another one of these on eBay a few days ago for a less-than-usually overpriced price. It's on the way. Fingers crossed that it's not bent either.
Still have to dig one up for the '52 Sports too (!)
-Kurt
__________________
12-15-21, 05:12 PM
#37
www.theheadbadge.com
Thread Starter
Join Date: Sep 2005
Location: Southern Florida
Posts: 28,513
Bikes: https://www.theheadbadge.com
Mentioned: 124 Post(s)
Tagged: 0 Thread(s)
Quoted: 2422 Post(s)
Liked 4,391 Times
in
2,092 Posts
Second time's the charm - happy to report that the eBay-sourced kickstand works perfectly. It looks good too.
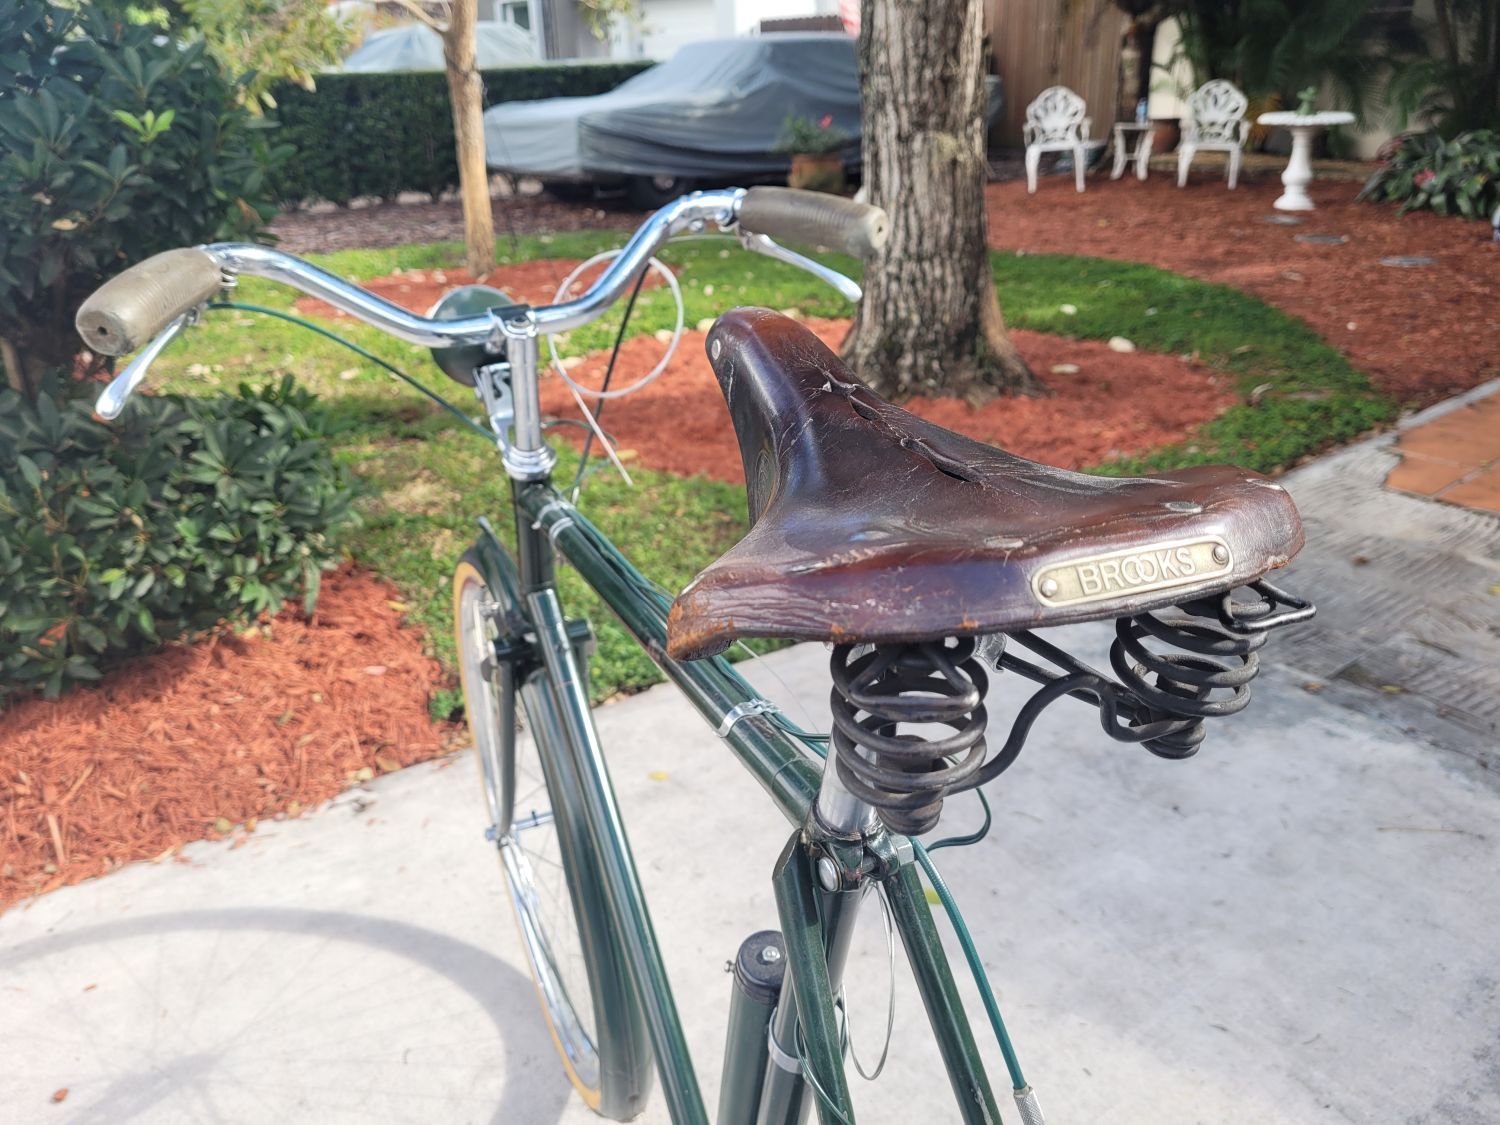
Can't get enough of this particular Brooks. Beautiful.

Someone did a number on the right-hand chainstay of this frameset at one time, but I wasn't in the mood to add to it by squishing the chainstays. As on my '51, I fitted the Trygg with the top half of an XPT kickstand. The XPT tops straddles the stays and don't damage them. Keeps the stand tight, even with the damage on this particular frame.

The Trygg lower plate is a perfect fit to the BB stay spacing. Surprisingly well, seeing as many stands are often too wide or too narrow.

Still after one more step-down ferrule for the right brake lever.
-Kurt
Can't get enough of this particular Brooks. Beautiful.
Someone did a number on the right-hand chainstay of this frameset at one time, but I wasn't in the mood to add to it by squishing the chainstays. As on my '51, I fitted the Trygg with the top half of an XPT kickstand. The XPT tops straddles the stays and don't damage them. Keeps the stand tight, even with the damage on this particular frame.
The Trygg lower plate is a perfect fit to the BB stay spacing. Surprisingly well, seeing as many stands are often too wide or too narrow.
Still after one more step-down ferrule for the right brake lever.
-Kurt
__________________
Likes For cudak888:
12-27-21, 07:42 PM
#38
www.theheadbadge.com
Thread Starter
Join Date: Sep 2005
Location: Southern Florida
Posts: 28,513
Bikes: https://www.theheadbadge.com
Mentioned: 124 Post(s)
Tagged: 0 Thread(s)
Quoted: 2422 Post(s)
Liked 4,391 Times
in
2,092 Posts
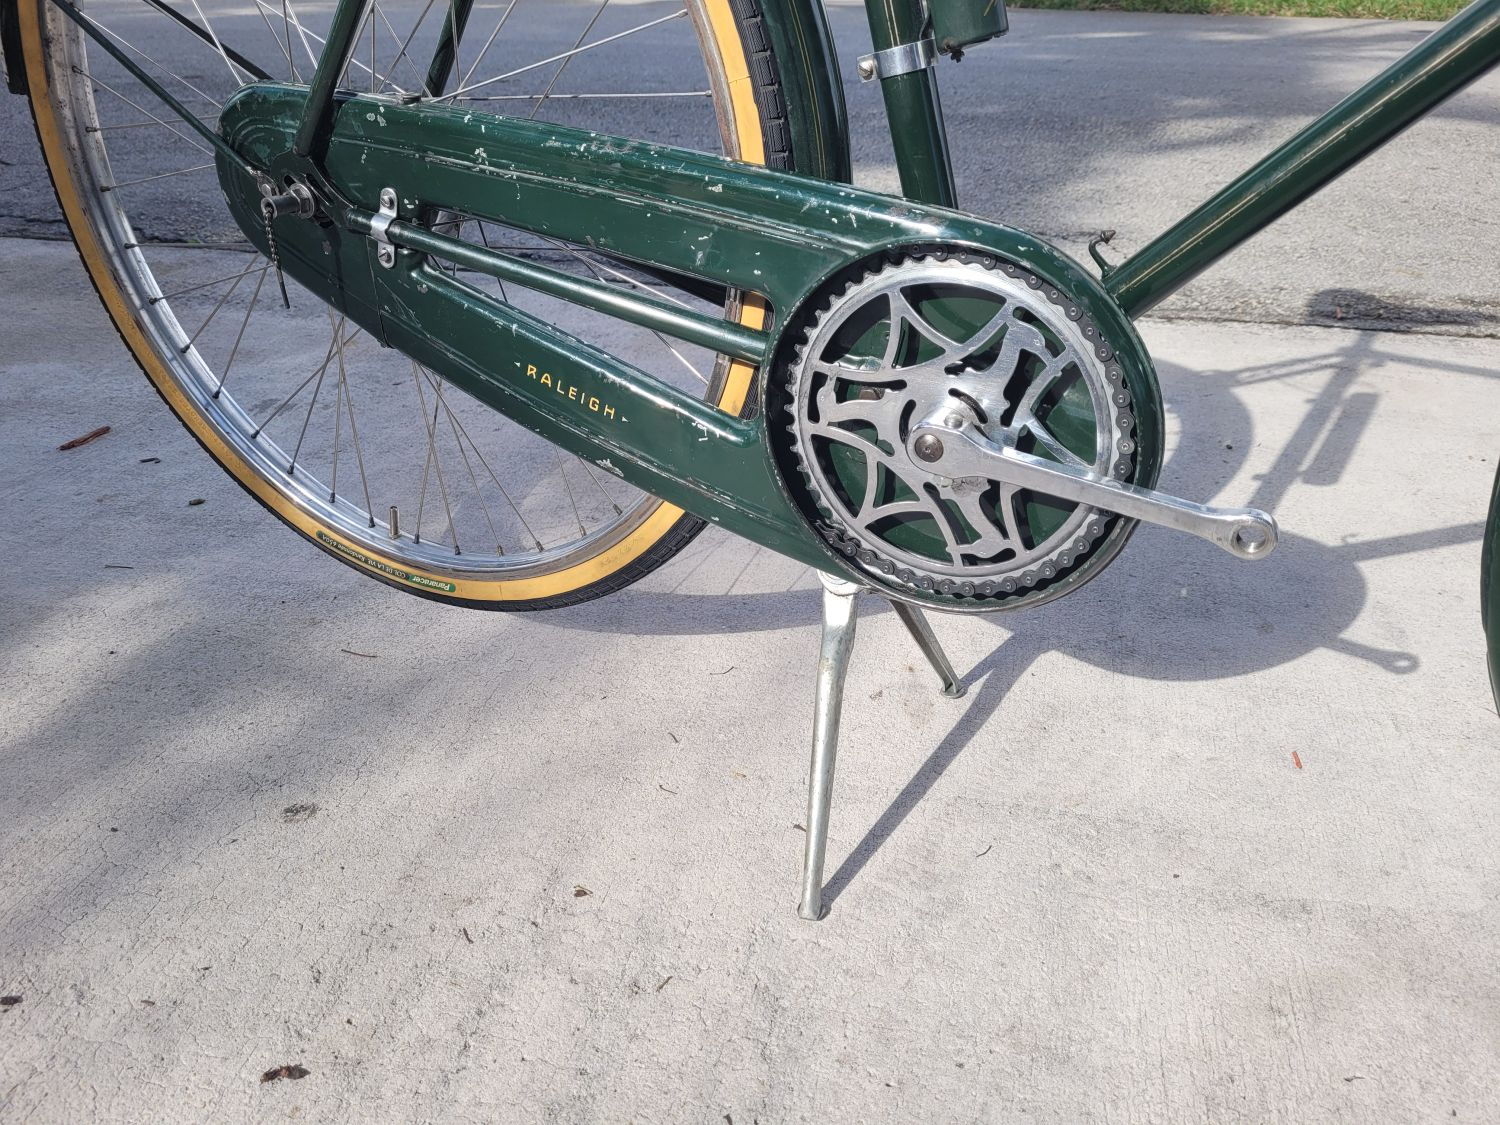
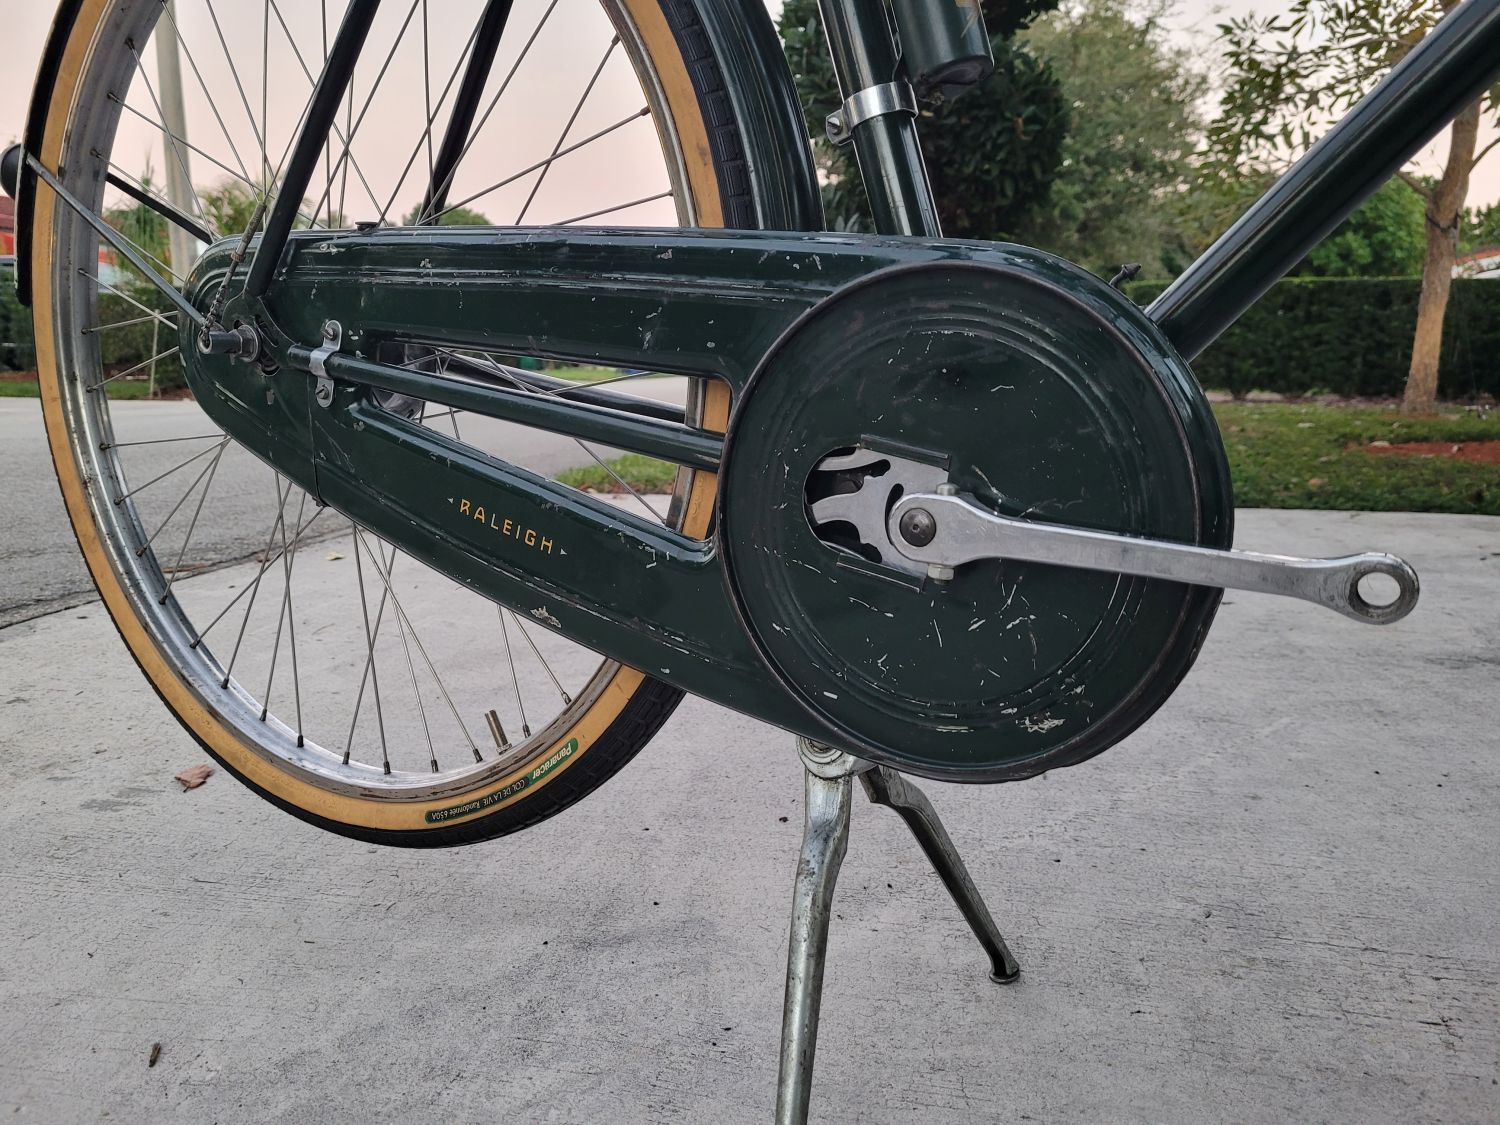
Chaincase cover is on!
Also soldered the end of the shifter cable. Unfortunately, I'm not sure if there is a practical method to sleeve the shifter cable in dark green, as original. No such thing as dark heat shrink tubing this small or long. I'm considering dark green Flex Seal sprayed on it, but I'd like to hear others' opinions about that first.

I don't have the crankarm sliding cover, but scouring eBay enough might net one. Eventually. In five years
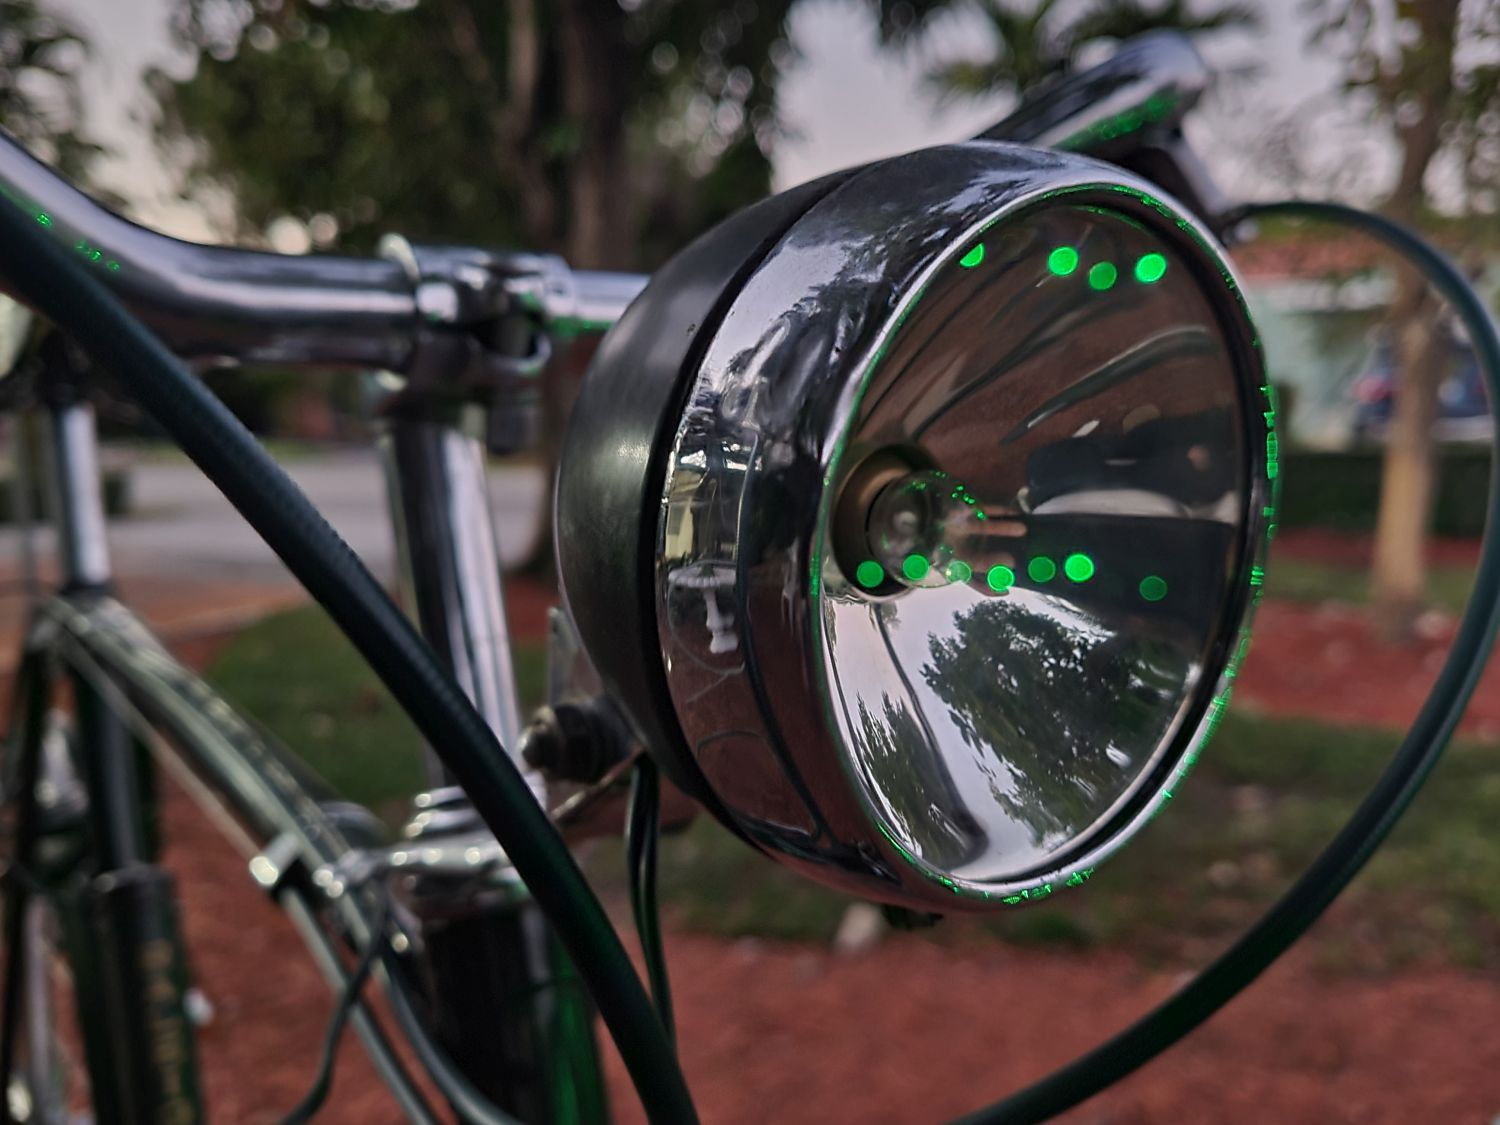
Holiday light reflection fun with the headlamp:
Also soldered the end of the shifter cable. Unfortunately, I'm not sure if there is a practical method to sleeve the shifter cable in dark green, as original. No such thing as dark heat shrink tubing this small or long. I'm considering dark green Flex Seal sprayed on it, but I'd like to hear others' opinions about that first.
I don't have the crankarm sliding cover, but scouring eBay enough might net one. Eventually. In five years
Holiday light reflection fun with the headlamp:
__________________
Likes For cudak888:
12-28-21, 11:46 PM
#39

Senior Member
Join Date: Apr 2005
Location: Ann Arbor, MI
Posts: 16,874
Bikes: 1980 Masi, 1984 Mondonico, 1984 Trek 610, 1980 Woodrup Giro, 2005 Mondonico Futura Leggera ELOS, 1967 PX10E, 1971 Peugeot UO-8
Mentioned: 49 Post(s)
Tagged: 0 Thread(s)
Quoted: 1856 Post(s)
Liked 664 Times
in
506 Posts
Much to report. I immediately unboxed everything and threw it in the stand once work was over.
First off...fork's bent. It wouldn't be a Raleigh if it wasn't bent
Easy fix.
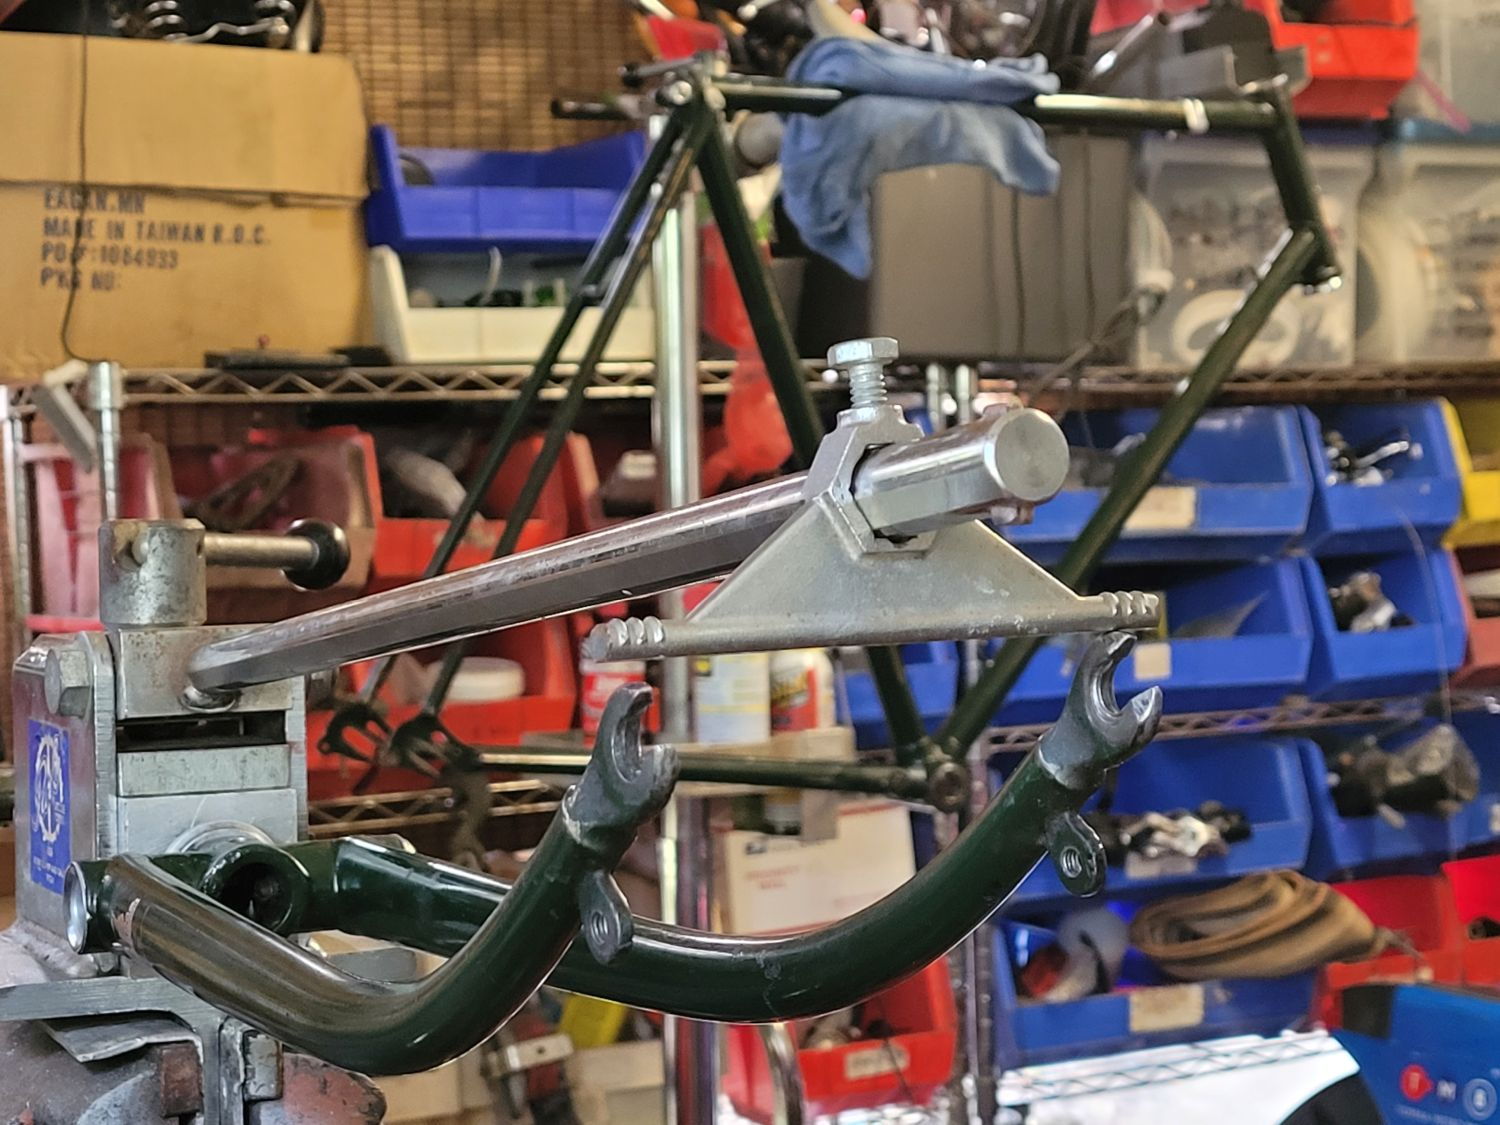
I left the fork straightening for another time, for I wanted to sort out the frame first.
Did I mention I'm contractually obligated never to acquire a Raleigh that doesn't have a tweaked rear triangle?

It's not unsurprising - the Cyclo 3-speed conversion apparently involved a lot of ill-advised rear triangle tinkering at one time.
Not anymore. Straight as an arrow based on a Park frame alignment gauge and set to the proper 120mm now.
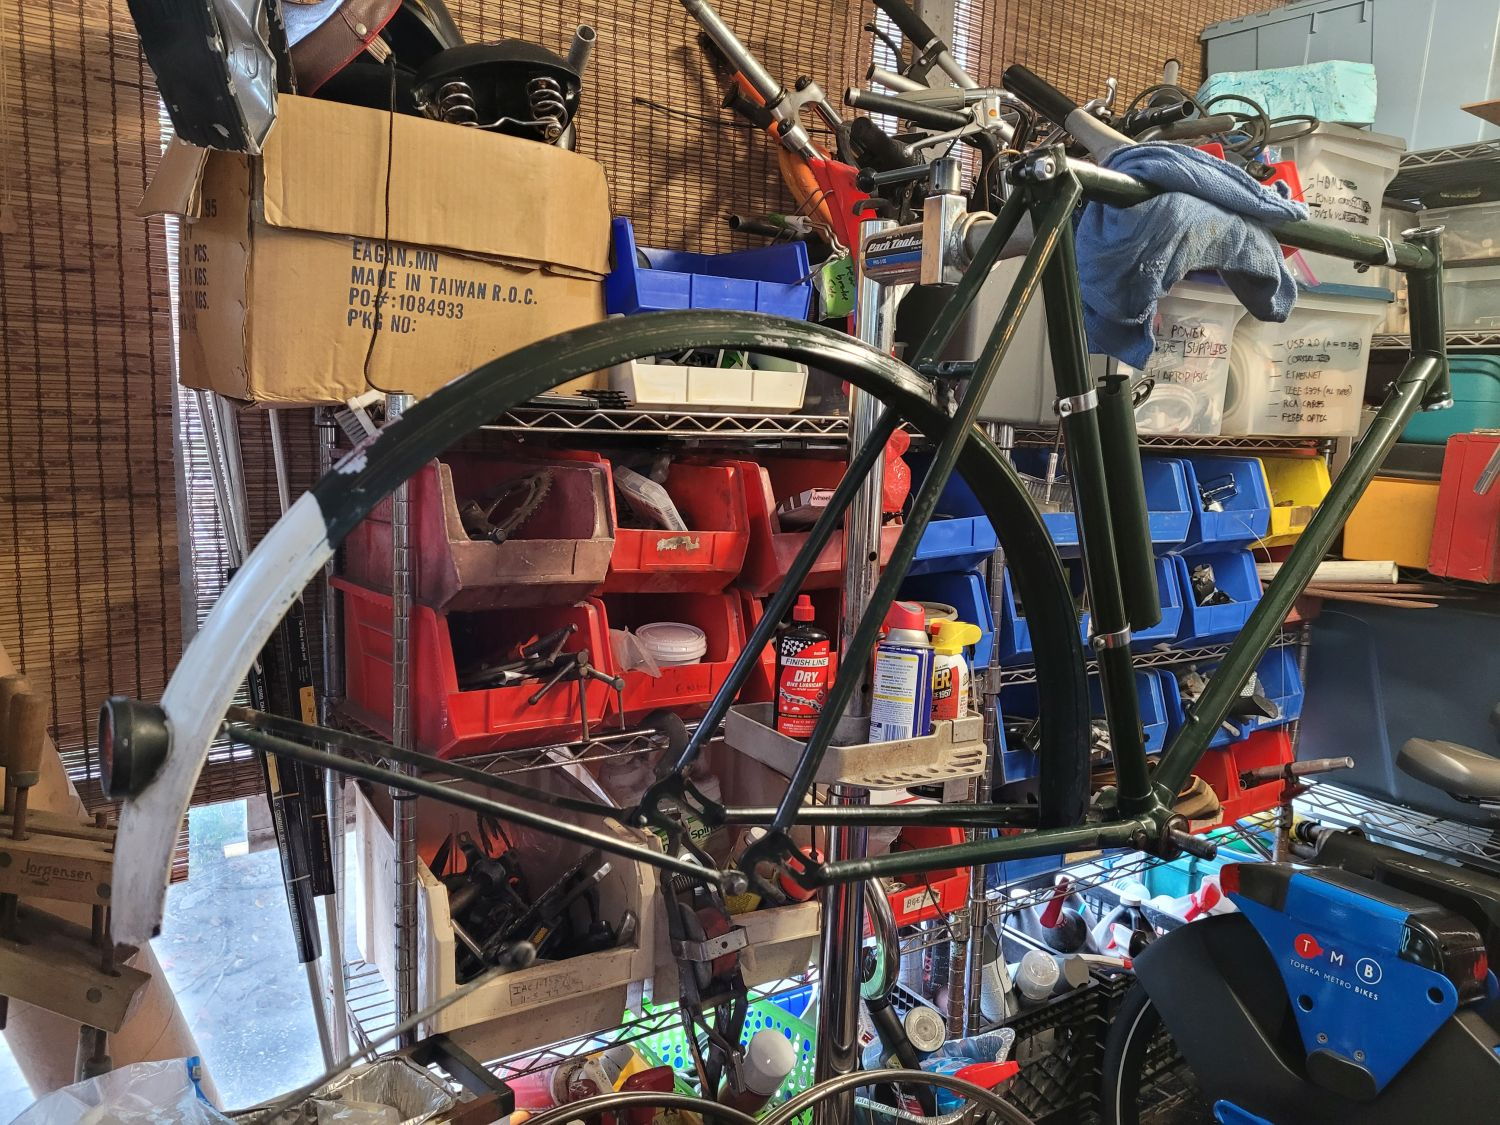
It's already a beautiful example, which means its cleanup has been exceptionally rewarding:

The tail has been touched up in the past. Debating whether to replace the rear reflector given the paint marks that are on it. We'll see.
Incidentally, I can't seem to get the braze-on Sturmey cable pulley wheel to bottom out. I think the bolt might be just a wee bit too long. That's for another time, anyway. In the meantime:

Fork lock. Because when you have a Superbe, you're required by law to post a picture of the thing.

Lots of Raleigh bits for lots of builds! I've never had two 1950's Superbes in the pipeline at once.

The wheels. That Cyclo 3-speed freewheel may or may not become my worst enemy, as I have a spare Sturmey threaded driver from a 1948 FW that I can drop right in. Look at how drop-dead beautiful that Brooks B.66 is!
While I have everyone's attention, I do have a shopping list for this thing:
It's been a whirlwind, that's for sure! Never thought I'd wind up with no less than three projects at once.
-Kurt
First off...fork's bent. It wouldn't be a Raleigh if it wasn't bent
Easy fix.
I left the fork straightening for another time, for I wanted to sort out the frame first.
Did I mention I'm contractually obligated never to acquire a Raleigh that doesn't have a tweaked rear triangle?
It's not unsurprising - the Cyclo 3-speed conversion apparently involved a lot of ill-advised rear triangle tinkering at one time.
Not anymore. Straight as an arrow based on a Park frame alignment gauge and set to the proper 120mm now.
It's already a beautiful example, which means its cleanup has been exceptionally rewarding:
The tail has been touched up in the past. Debating whether to replace the rear reflector given the paint marks that are on it. We'll see.
Incidentally, I can't seem to get the braze-on Sturmey cable pulley wheel to bottom out. I think the bolt might be just a wee bit too long. That's for another time, anyway. In the meantime:
Fork lock. Because when you have a Superbe, you're required by law to post a picture of the thing.
Lots of Raleigh bits for lots of builds! I've never had two 1950's Superbes in the pipeline at once.
The wheels. That Cyclo 3-speed freewheel may or may not become my worst enemy, as I have a spare Sturmey threaded driver from a 1948 FW that I can drop right in. Look at how drop-dead beautiful that Brooks B.66 is!
While I have everyone's attention, I do have a shopping list for this thing:
- Front handlebar is bent. It apparently took a hard hit on the right half at one point. I have an early 1970's bar on hand that would do, but the chrome just doesn't compare - I'd like to do it right. Only need the handlebar, stem is fine.
- The front wheel turns out to be a 1973+ replacement. Bright chrome throughout, galvanized spokes, and 36 holes. I'd like to find a correct 32h 1950's wheel (throwing out a hail mary here and paging the man of every old Raleigh part imaginable, nlerner). If you have a pair, I may be able to help, as dmark, who is helping me with my Humber purchase, has a Rudge that has a mismatched rear wheel.
- Even though I have a chaincase for it...I think I want to get another Superbe chaincase. I'm debating whether this one is nice enough for this bike.
- One 1950's Sturmey-Archer serrated hub washer - the serrated washer with knurling. It was used prior to the slotted anti-rotation type.
It's been a whirlwind, that's for sure! Never thought I'd wind up with no less than three projects at once.
-Kurt
Likes For Road Fan:
12-29-21, 08:18 AM
#40
Freewheel Medic

Join Date: Oct 2005
Location: An Island on the Coast of GA!
Posts: 12,882
Bikes: Snazzy* Schwinns, Classy Cannondales & a Super Pro Aero Lotus (* Ed.)
Mentioned: 140 Post(s)
Tagged: 0 Thread(s)
Quoted: 1452 Post(s)
Liked 2,194 Times
in
962 Posts
Looking really great Kurt! We all need to keep a watch out for the sliding chain case crank arm cover piece. Certainly one will turn up.
__________________
Bob
Enjoying the GA coast all year long!
Thanks for visiting my website: www.freewheelspa.com
Bob
Enjoying the GA coast all year long!
Thanks for visiting my website: www.freewheelspa.com
Likes For pastorbobnlnh:
12-29-21, 08:32 AM
#41
www.theheadbadge.com
Thread Starter
Join Date: Sep 2005
Location: Southern Florida
Posts: 28,513
Bikes: https://www.theheadbadge.com
Mentioned: 124 Post(s)
Tagged: 0 Thread(s)
Quoted: 2422 Post(s)
Liked 4,391 Times
in
2,092 Posts
I don't know what transpired in my head between straightening the frame and posting the pictures, but it must have been something with a 5-speed
-Kurt
__________________
02-05-24, 11:40 PM
#42
www.theheadbadge.com
Thread Starter
Join Date: Sep 2005
Location: Southern Florida
Posts: 28,513
Bikes: https://www.theheadbadge.com
Mentioned: 124 Post(s)
Tagged: 0 Thread(s)
Quoted: 2422 Post(s)
Liked 4,391 Times
in
2,092 Posts
As with my '52 Sports, I've been dragging my feet with this one, but lucked into some donor parts thanks to a rotted '53 Superbe Sports Tourist that showed up locally:

While it can be said that a fair amount of small bits on it ultimately benefitted the '52, it has also donated some small - but otherwise unobtanium parts - for the Superbe. Surprisingly enough, the chrome on some of the '53s small bits is really inferior in comparison to the '50, but none so much as to be a problem.
One of the donor parts became the original Dynohub-to-DBU cable that originally came with the '50 Superbe. The leads on the one that came with the bike were pulled out of the cable eyelets at one end, and the Dynohub ends had been repaired with modern, blue crimp-on connectors. Blech.
The '53 Superbe's donor cable? Mint. Guess where it resides now?


The front brake is now fastened as well; that all-important notched washer that keeps the front bolt from rotating was sourced off the '53 as well.

Suffice it to say that despite paying an eye-watering $100 for the rusted '53, it has paid itself back - literally and figuratively.
It's too late for any other updates, but I'll try to post a bit in the next few weeks. Have to get the wiring routed where I'm happy with it and fix down the taillight. Front brake cable also needs soldering.
-Kurt
While it can be said that a fair amount of small bits on it ultimately benefitted the '52, it has also donated some small - but otherwise unobtanium parts - for the Superbe. Surprisingly enough, the chrome on some of the '53s small bits is really inferior in comparison to the '50, but none so much as to be a problem.
One of the donor parts became the original Dynohub-to-DBU cable that originally came with the '50 Superbe. The leads on the one that came with the bike were pulled out of the cable eyelets at one end, and the Dynohub ends had been repaired with modern, blue crimp-on connectors. Blech.
The '53 Superbe's donor cable? Mint. Guess where it resides now?
The front brake is now fastened as well; that all-important notched washer that keeps the front bolt from rotating was sourced off the '53 as well.
Suffice it to say that despite paying an eye-watering $100 for the rusted '53, it has paid itself back - literally and figuratively.
It's too late for any other updates, but I'll try to post a bit in the next few weeks. Have to get the wiring routed where I'm happy with it and fix down the taillight. Front brake cable also needs soldering.
-Kurt
__________________
Last edited by cudak888; 02-05-24 at 11:44 PM.
02-08-24, 06:38 AM
#43
www.theheadbadge.com
Thread Starter
Join Date: Sep 2005
Location: Southern Florida
Posts: 28,513
Bikes: https://www.theheadbadge.com
Mentioned: 124 Post(s)
Tagged: 0 Thread(s)
Quoted: 2422 Post(s)
Liked 4,391 Times
in
2,092 Posts
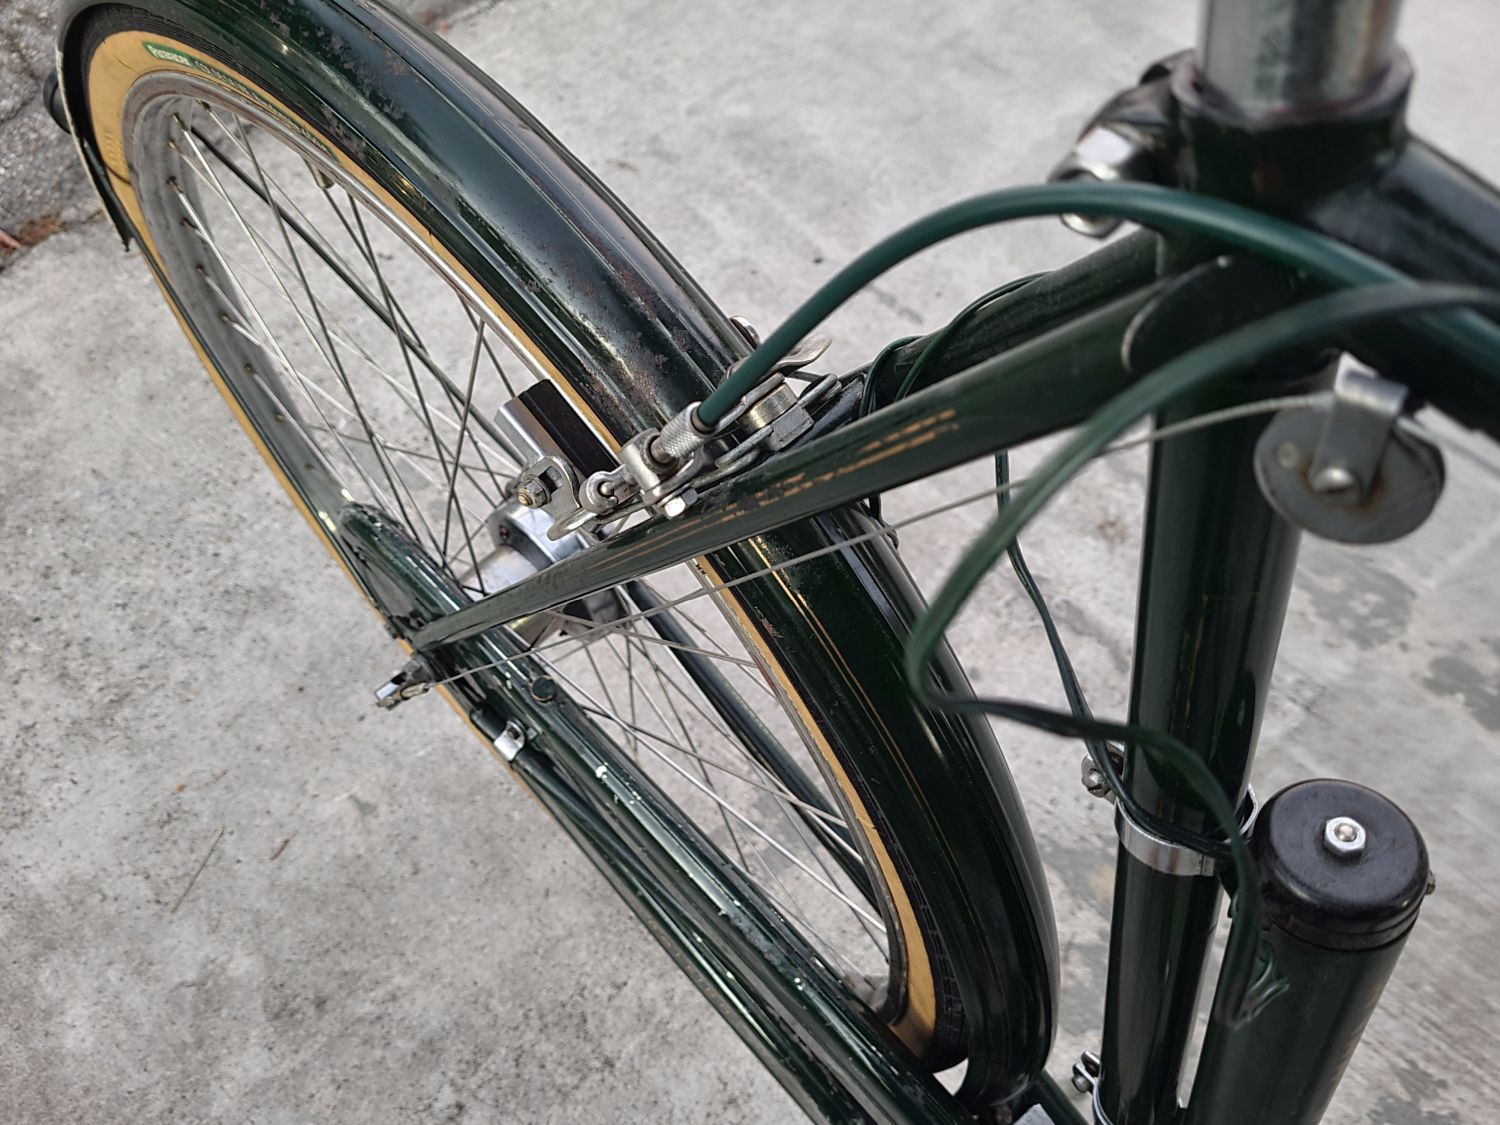
Finished wiring it up.
Took two hours to come up with a wiring scheme that worked with the factory length and didn�t look terrible.

It could do with two additional seatstay wire clamps to look truly organized though. Still messy.

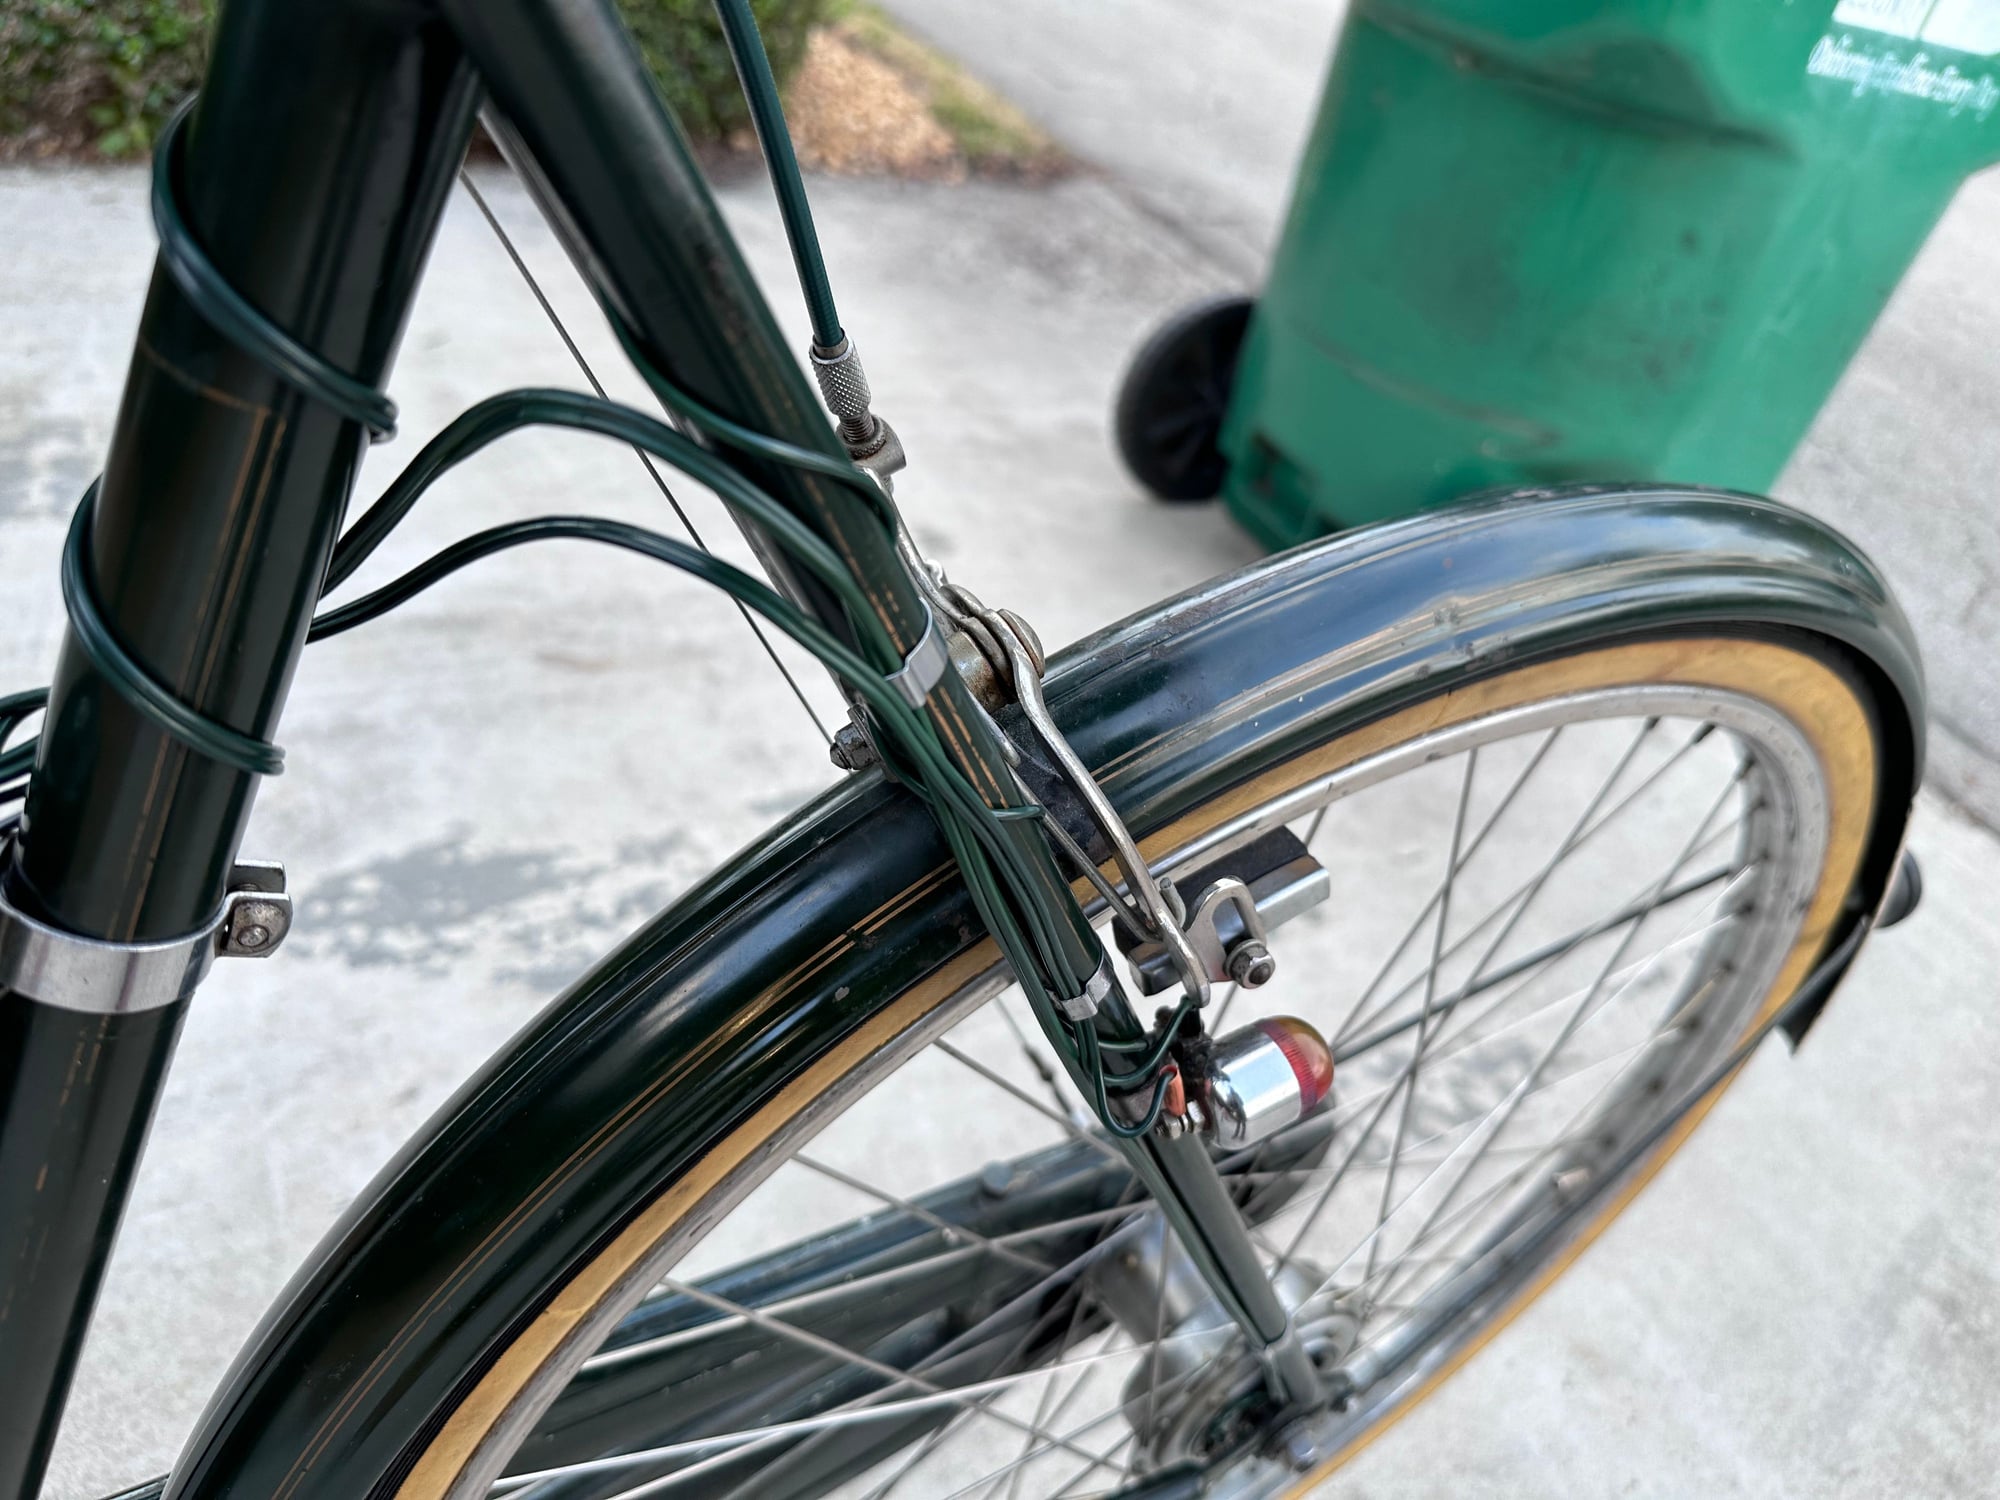
ICYMI - @Ged117
-Kurt
Took two hours to come up with a wiring scheme that worked with the factory length and didn�t look terrible.
It could do with two additional seatstay wire clamps to look truly organized though. Still messy.
ICYMI - @Ged117
-Kurt
Likes For cudak888:
