


What would you do? TT to ST tube diameters
 08-29-20, 11:34 PM
#76
Member
Thread Starter
Depends on what you want your joints to look like. Most want the smooth look, not the gobby one that is now what I see.
Reason i asked about prep, flux and cleaner is the amount of blackening in the flux. Could be from poor cleaning, too much heat or too long a heat cycle (or any combo). Andy
Reason i asked about prep, flux and cleaner is the amount of blackening in the flux. Could be from poor cleaning, too much heat or too long a heat cycle (or any combo). Andy
Yeah I definitely want to go with as smooth joints as I can manage. I guess my question was more about if it�s alright to actual heat it up again to fix it if I didn�t do a good enough job on the first try. I understand it�s not ideal but whatever makes it the most safe to ride in the long run is what I want. Thanks!
 08-30-20, 01:24 AM
#77
Senior Member
Join Date: Dec 2019
Posts: 954
Mentioned: 3 Post(s)
Tagged: 0 Thread(s)
Quoted: 321 Post(s)
Liked 263 Times
in
212 Posts
Right, I see. Most of the black stuff is as unterhausen are saying from the flux. I can post some pictures with the flux removed. I definitely went too hot so there�s some black spots etc for sure though 😊
Yeah I definitely want to go with as smooth joints as I can manage. I guess my question was more about if it�s alright to actual heat it up again to fix it if I didn�t do a good enough job on the first try. I understand it�s not ideal but whatever makes it the most safe to ride in the long run is what I want. Thanks!
Yeah I definitely want to go with as smooth joints as I can manage. I guess my question was more about if it�s alright to actual heat it up again to fix it if I didn�t do a good enough job on the first try. I understand it�s not ideal but whatever makes it the most safe to ride in the long run is what I want. Thanks!
How are you going to do the filing/sanding? I recently made a fake fillet brazed frame (TIG braze over TIG welds-- plenty of reheating involved!) and sanded/filed them as best I could but I wish I'd seen Paul Brodie's videos which hadn't come out yet. He uses a kind of christmas tree shaped thing on a dremel-like tool (his is probably air-powered) followed by a dynafile-style belt-sander. There was a thread on this recently but good advice is be super careful with the power tools not to gouge out the steel and if in doubt use a hand-file in the tighter spots.
The joints look pretty good to me but I've never done this style of brazing.
08-30-20, 02:58 AM
#78
Member
Thread Starter
Reheating is one of those things one worries about but I don't think it actually does much harm especially with Cromoly. Better to make sure there's enough filler, but I think it will be obvious if there is or not as you sand it down a bit. As I think you said the area of potential concern is the bit right under the TT which is a place where frames can fail sometimes.
How are you going to do the filing/sanding? I recently made a fake fillet brazed frame (TIG braze over TIG welds-- plenty of reheating involved!) and sanded/filed them as best I could but I wish I'd seen Paul Brodie's videos which hadn't come out yet. He uses a kind of christmas tree shaped thing on a dremel-like tool (his is probably air-powered) followed by a dynafile-style belt-sander. There was a thread on this recently but good advice is be super careful with the power tools not to gouge out the steel and if in doubt use a hand-file in the tighter spots.
The joints look pretty good to me but I've never done this style of brazing.
hehe yeah I saw Brodie�s video. He makes it look so easy as well
 I�m planning on attacking it with hand tools for now, don�t trust myself with the power tools just yet 😊 Not that I own any either but I guess a regular power drill with that cone abrasive tool would work.
 I�ll clean it up so we can have a proper look at the joint.
Likes For Aldatroid:
08-30-20, 08:28 AM
#79


Randomhead
Join Date: Aug 2008
Location: Happy Valley, Pennsylvania
Posts: 24,386
Mentioned: 0 Post(s)
Tagged: 0 Thread(s)
Quoted: 4 Post(s)
Liked 3,687 Times
in
2,510 Posts
Good choice not to use power tools. I always figure if I need to use a file, it's because the universe thought I needed to pay penance for not brazing that well.
08-30-20, 12:01 PM
#80

Senior Member
Join Date: Aug 2012
Location: Seattle
Posts: 507
Mentioned: 0 Post(s)
Tagged: 0 Thread(s)
Quoted: 103 Post(s)
Liked 144 Times
in
88 Posts
[QUOTE=Aldatroid;21668432]Right, I see. Most of the black stuff is as unterhausen are saying from the flux. /QUOTE]
I don't particularly like the Cycle Design LFB flux for this reason. The Gasflux "blue stuff" goes clear when up to temp which makes seeing through it while brazing easier.
I don't particularly like the Cycle Design LFB flux for this reason. The Gasflux "blue stuff" goes clear when up to temp which makes seeing through it while brazing easier.
__________________
https://www.flickr.com/photos/54319503@N05/
https://www.draper-cycles.com
https://www.flickr.com/photos/54319503@N05/
https://www.draper-cycles.com
08-30-20, 12:36 PM
#81
Randomhead
Join Date: Aug 2008
Location: Happy Valley, Pennsylvania
Posts: 24,386
Mentioned: 0 Post(s)
Tagged: 0 Thread(s)
Quoted: 4 Post(s)
Liked 3,687 Times
in
2,510 Posts
I have a sample and it got rock hard before I got a chance to use it. I keep intending to try it, maybe on a trial joint.
08-30-20, 08:17 PM
#82
Senior Member
Join Date: Feb 2012
Location: Rochester, NY
Posts: 18,056
Bikes: Stewart S&S coupled sport tourer, Stewart Sunday light, Stewart Commuting, Stewart Touring, Co Motion Tandem, Stewart 3-Spd, Stewart Track, Fuji Finest, Mongoose Tomac ATB, GT Bravado ATB, JCP Folder, Stewart 650B ATB
Mentioned: 0 Post(s)
Tagged: 0 Thread(s)
Quoted: 4195 Post(s)
Liked 3,837 Times
in
2,295 Posts
I would not suggest a power grinder or Dynafile type tool for the initial clean up due to the OP's lack of experience. A rat tail hand file that's smaller then the fillet's wanted size is what I would go to. The trick is to keep the file off the tubes, better to file away a tad too much brass then any tube at this point. Work the fillet's center then carefully out to the tubes. It won't take too long to see the highs and low points of the fillet. Long before anything getting close to a finished fillet I would expect the want to revisit the joint with the torch and filler. Of course till then more practice is always a good idea. There's a reason why even accomplished musicians do their scales frequently. Andy
__________________
AndrewRStewart
AndrewRStewart
08-30-20, 08:21 PM
#83
Team Beer
Join Date: Apr 2004
Location: Sacramento CA
Posts: 6,339
Bikes: Too Many
Mentioned: 3 Post(s)
Tagged: 0 Thread(s)
Quoted: 114 Post(s)
Liked 159 Times
in
104 Posts
If you haven't already, watch Paul Brodie's last video. While he is using power tools he does a good job of showing how to carve the initial grove to start the radius. Of course he makes it look really easy.
Edit: He just posted a new video so watch the second video in the series to rebuild the Romax.
Edit: He just posted a new video so watch the second video in the series to rebuild the Romax.
__________________
I'm not one for fawning over bicycles, but I do believe that our bikes communicate with us, and what this bike is saying is, "You're an idiot." BikeSnobNYC
I'm not one for fawning over bicycles, but I do believe that our bikes communicate with us, and what this bike is saying is, "You're an idiot." BikeSnobNYC
Last edited by Cynikal; 08-30-20 at 08:40 PM.
Likes For Cynikal:
08-31-20, 05:18 AM
#84
Randomhead
Join Date: Aug 2008
Location: Happy Valley, Pennsylvania
Posts: 24,386
Mentioned: 0 Post(s)
Tagged: 0 Thread(s)
Quoted: 4 Post(s)
Liked 3,687 Times
in
2,510 Posts
I thought the attaching the chainstays video was pretty interesting. Never seen a well-known framebuilder show his alignment process before.
Likes For unterhausen:
08-31-20, 05:47 AM
#85
Member
Thread Starter
Love it! Watched it during lunch and man he makes everything look so easy indeed and yeah, interesting with the alignment process. I need to get something sturdier in my garage, maybe bolted to the floor, so I can push and pull the frame at some point, heh.
08-31-20, 01:29 PM
#86
Senior Member
I use a chainsaw chain file -- thinner, and does a very nice job, easy to find that shape then fair it out to the tube. Also, you can drop some silver (Fillet Pro works well) in those low spots without causing much of a heat cycle.
Likes For David Tollefson:
08-31-20, 07:03 PM
#87
Senior Member
Join Date: Feb 2012
Location: Rochester, NY
Posts: 18,056
Bikes: Stewart S&S coupled sport tourer, Stewart Sunday light, Stewart Commuting, Stewart Touring, Co Motion Tandem, Stewart 3-Spd, Stewart Track, Fuji Finest, Mongoose Tomac ATB, GT Bravado ATB, JCP Folder, Stewart 650B ATB
Mentioned: 0 Post(s)
Tagged: 0 Thread(s)
Quoted: 4195 Post(s)
Liked 3,837 Times
in
2,295 Posts
I too use a chain saw sharpening file but more for final finishing the roughing out lumpy fillets. I too use silver for filling small pocks and low spots. But silver doesn't build up much (unless you have really nice heat control or go to 45%) Still good advise to try. Andy
__________________
AndrewRStewart
AndrewRStewart
Likes For Andrew R Stewart:
09-01-20, 06:08 PM
#88
Senior Member
Join Date: Aug 2012
Location: Seattle
Posts: 507
Mentioned: 0 Post(s)
Tagged: 0 Thread(s)
Quoted: 103 Post(s)
Liked 144 Times
in
88 Posts
Mine did the same and worked fine after adding water. I don't see any benefit over Gasflux.
__________________
https://www.flickr.com/photos/54319503@N05/
https://www.draper-cycles.com
https://www.flickr.com/photos/54319503@N05/
https://www.draper-cycles.com
09-01-20, 06:10 PM
#89
Senior Member
Join Date: Aug 2012
Location: Seattle
Posts: 507
Mentioned: 0 Post(s)
Tagged: 0 Thread(s)
Quoted: 103 Post(s)
Liked 144 Times
in
88 Posts
I thought the attaching the chainstays video was pretty interesting. Never seen a well-known framebuilder show his alignment process before.
https://www.youtube.com/watch?v=Wf0Zm0FBTFU
https://www.youtube.com/watch?v=Wf0Zm0FBTFU

__________________
https://www.flickr.com/photos/54319503@N05/
https://www.draper-cycles.com
https://www.flickr.com/photos/54319503@N05/
https://www.draper-cycles.com
09-01-20, 08:05 PM
#90
Randomhead
Join Date: Aug 2008
Location: Happy Valley, Pennsylvania
Posts: 24,386
Mentioned: 0 Post(s)
Tagged: 0 Thread(s)
Quoted: 4 Post(s)
Liked 3,687 Times
in
2,510 Posts
Likes For unterhausen:
09-03-20, 08:55 AM
#92
Senior Member
Join Date: Aug 2012
Location: Seattle
Posts: 507
Mentioned: 0 Post(s)
Tagged: 0 Thread(s)
Quoted: 103 Post(s)
Liked 144 Times
in
88 Posts
Wow! Real cliffhanger! I was on the edge of my seat! I can't wait for the seatstay episode! The videos are actually really well done and he's very enjoyable to watch. I'm hoping he does a couple episodes covering those motorcycles!
__________________
https://www.flickr.com/photos/54319503@N05/
https://www.draper-cycles.com
https://www.flickr.com/photos/54319503@N05/
https://www.draper-cycles.com
09-03-20, 09:10 AM
#93
Team Beer
Join Date: Apr 2004
Location: Sacramento CA
Posts: 6,339
Bikes: Too Many
Mentioned: 3 Post(s)
Tagged: 0 Thread(s)
Quoted: 114 Post(s)
Liked 159 Times
in
104 Posts
If you listen to the Cobra Framebuilding podcast, Paul did one where he goes into the motos in detail. Pretty cool stuff.
__________________
I'm not one for fawning over bicycles, but I do believe that our bikes communicate with us, and what this bike is saying is, "You're an idiot." BikeSnobNYC
I'm not one for fawning over bicycles, but I do believe that our bikes communicate with us, and what this bike is saying is, "You're an idiot." BikeSnobNYC
Likes For Cynikal:
09-08-20, 02:06 AM
#94
Member
Thread Starter
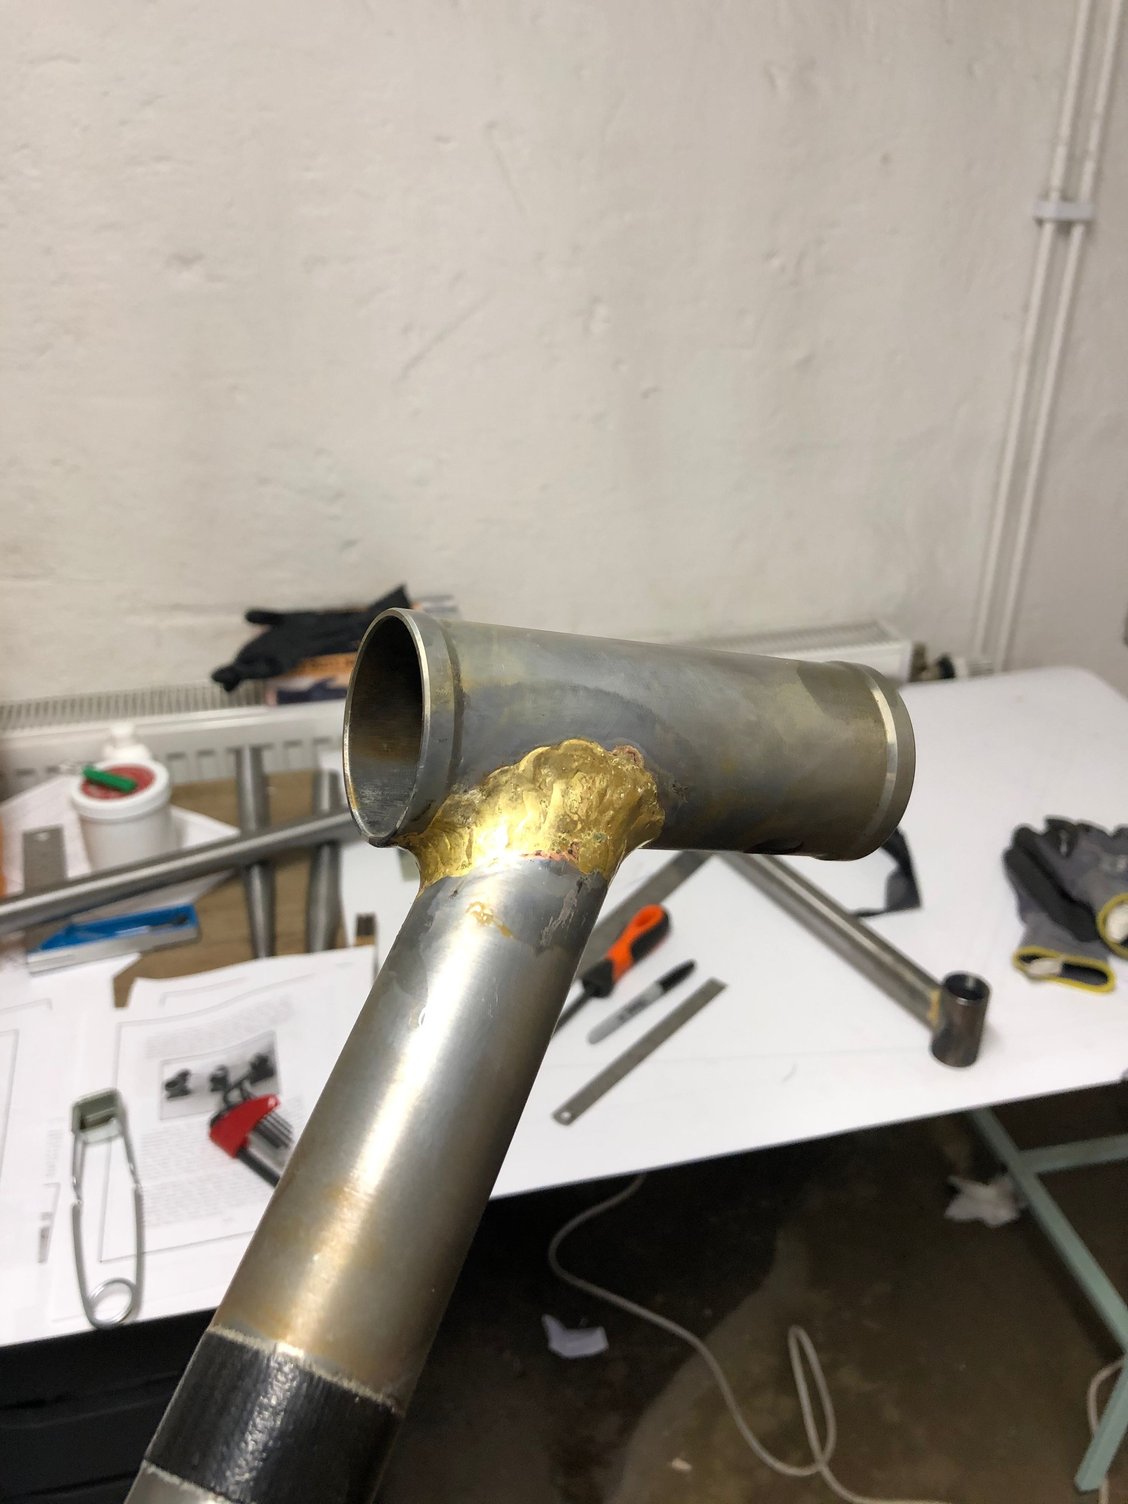
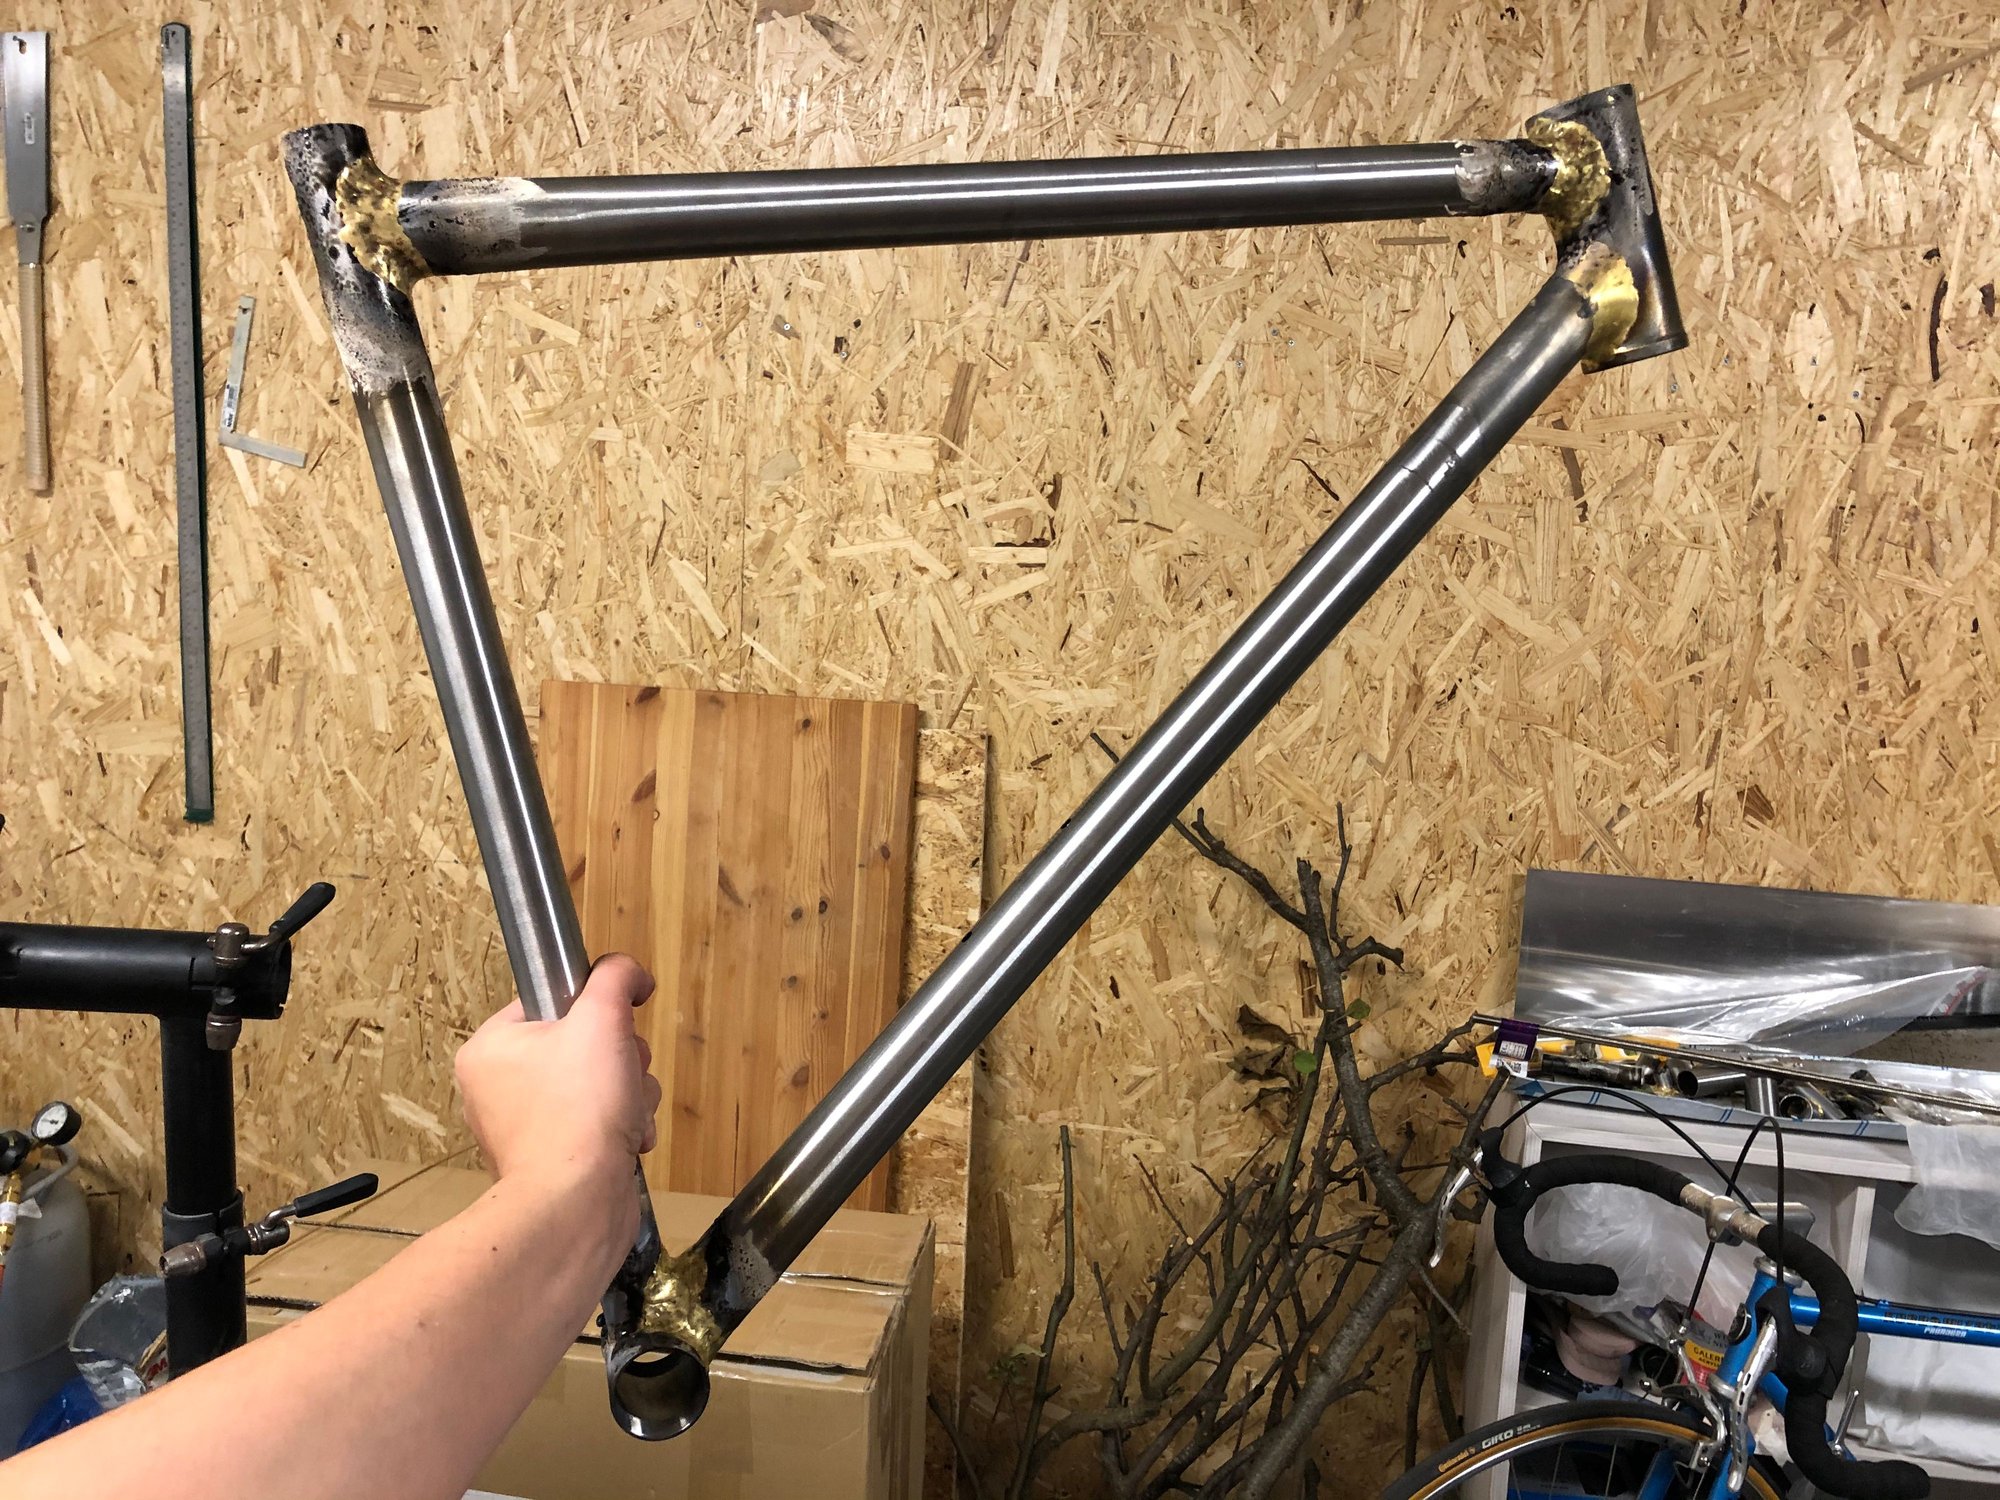
Cleaned it up and yes, it didn�t take more than five minutes or so to realize the fillet was way too small. Did take any pictures from that state but this is what it looks like now. Feels a lot better.
09-08-20, 09:49 AM
#95
Senior Member
Join Date: Dec 2019
Posts: 954
Mentioned: 3 Post(s)
Tagged: 0 Thread(s)
Quoted: 321 Post(s)
Liked 263 Times
in
212 Posts
That looks really good!
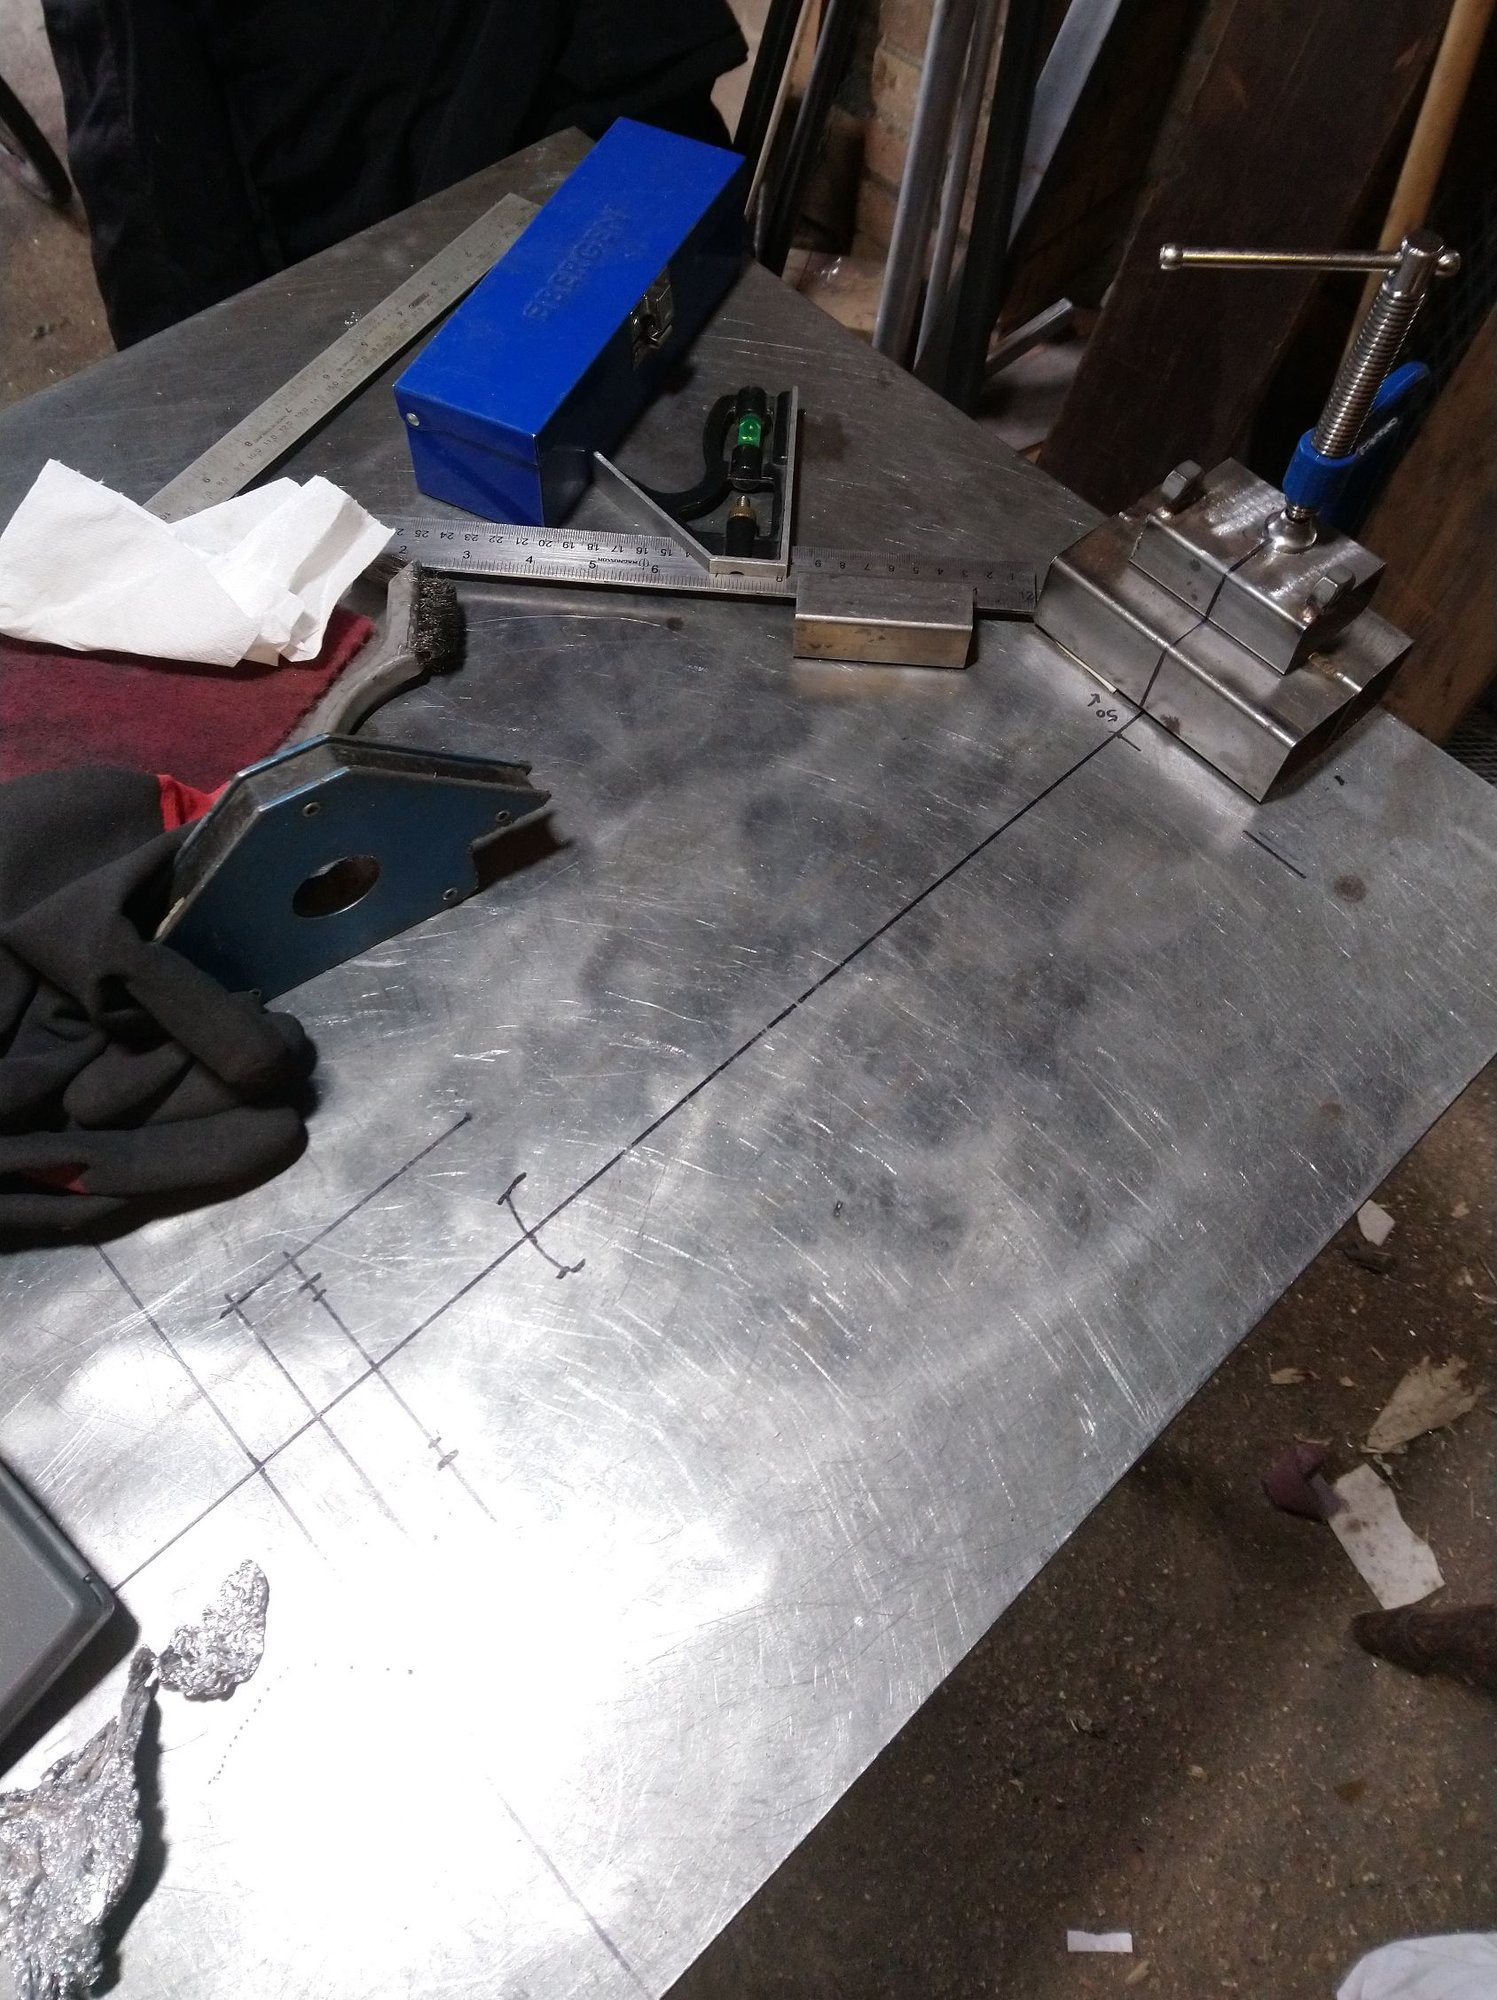
I was talking about my rear triangle "jig" earlier in this thread. I had this setup for another frame yesterday and took a picture. As you can see it's very simple, mainly just consisting of a couple of nuts brazed onto some square tube which gets clamped at one end of the table. That holds a bit of threaded rod that is pretending to be the axle. I've drawn the tyre and chainring on the table.
The long line across the table at the far end is where a piece of angle iron is clamped that the BB shell is butted up against. I should have taken a picture with the frame in there but I was in too much of a hurry to crack on with welding it
You have to do a bit of math to work out the angle the ST should be at. My CAD software tells me that the angle of the CS plane to the ST in this case was 10.16 degrees, and I could work that in the jig it was 6 degrees. So the ST needed to be at 73 + 4 (for a 73 degree seat angle).
Likes For guy153:
09-08-20, 10:56 AM
#96
Member
Thread Starter
Hey!
Thanks and thanks for showing your setup for the rear triangle!
My biggest hurdle right now is to figure out a way to get the DT and ST brazed together straight, with a straight HT et the end of that DT. I don�t have any v blocks etc so can�t do the Paterek setup but I�m doing something similar to the �almost jiggless framebuilding� on Instructable. I have two pieces of angle iron that I�ve tapped in a couple of places so I can adjust the height along the DT and ST. With the tube lying down I use a cross laser to make sure they�re straight. Super finicky but I think it�ll work. HT twist is the hardest to check with this setup but I haven�t optimized it yet so might figure something better out 😊
09-08-20, 12:12 PM
#97
Senior Member
Join Date: Dec 2019
Posts: 954
Mentioned: 3 Post(s)
Tagged: 0 Thread(s)
Quoted: 321 Post(s)
Liked 263 Times
in
212 Posts
Hey!
Thanks and thanks for showing your setup for the rear triangle!
My biggest hurdle right now is to figure out a way to get the DT and ST brazed together straight, with a straight HT et the end of that DT. I don�t have any v blocks etc so can�t do the Paterek setup but I�m doing something similar to the �almost jiggless framebuilding� on Instructable. I have two pieces of angle iron that I�ve tapped in a couple of places so I can adjust the height along the DT and ST. With the tube lying down I use a cross laser to make sure they�re straight. Super finicky but I think it�ll work. HT twist is the hardest to check with this setup but I haven�t optimized it yet so might figure something better out 😊
Thanks and thanks for showing your setup for the rear triangle!
My biggest hurdle right now is to figure out a way to get the DT and ST brazed together straight, with a straight HT et the end of that DT. I don�t have any v blocks etc so can�t do the Paterek setup but I�m doing something similar to the �almost jiggless framebuilding� on Instructable. I have two pieces of angle iron that I�ve tapped in a couple of places so I can adjust the height along the DT and ST. With the tube lying down I use a cross laser to make sure they�re straight. Super finicky but I think it�ll work. HT twist is the hardest to check with this setup but I haven�t optimized it yet so might figure something better out 😊
I guess if you put the DT onto the ST and tack it you can then fairly easily twist it a bit to make sure the HT and ST are parallel. But I would want to tack in the TT at that point and then braze the whole lot. With welding it's best to do the bits inside and outside the triangle first and then the edges at the end but I also put three or four tacks on each joint before welding anything fully.I also always leave a dummy axle bolted into the rear and on the front if making a fork. The better you can tie things down the less they move, although they will still move. But it's a compromise with the rear triangle of allowing for final adjustments. SS last is definitely the way to go. The CS will move more without the SS tacked in, but they're very easy to move back. The main triangle is not so easy to correct so it's much better not to have to (or only to make very minor changes).
09-15-20, 02:59 PM
#99
Member
Thread Starter
Hey!
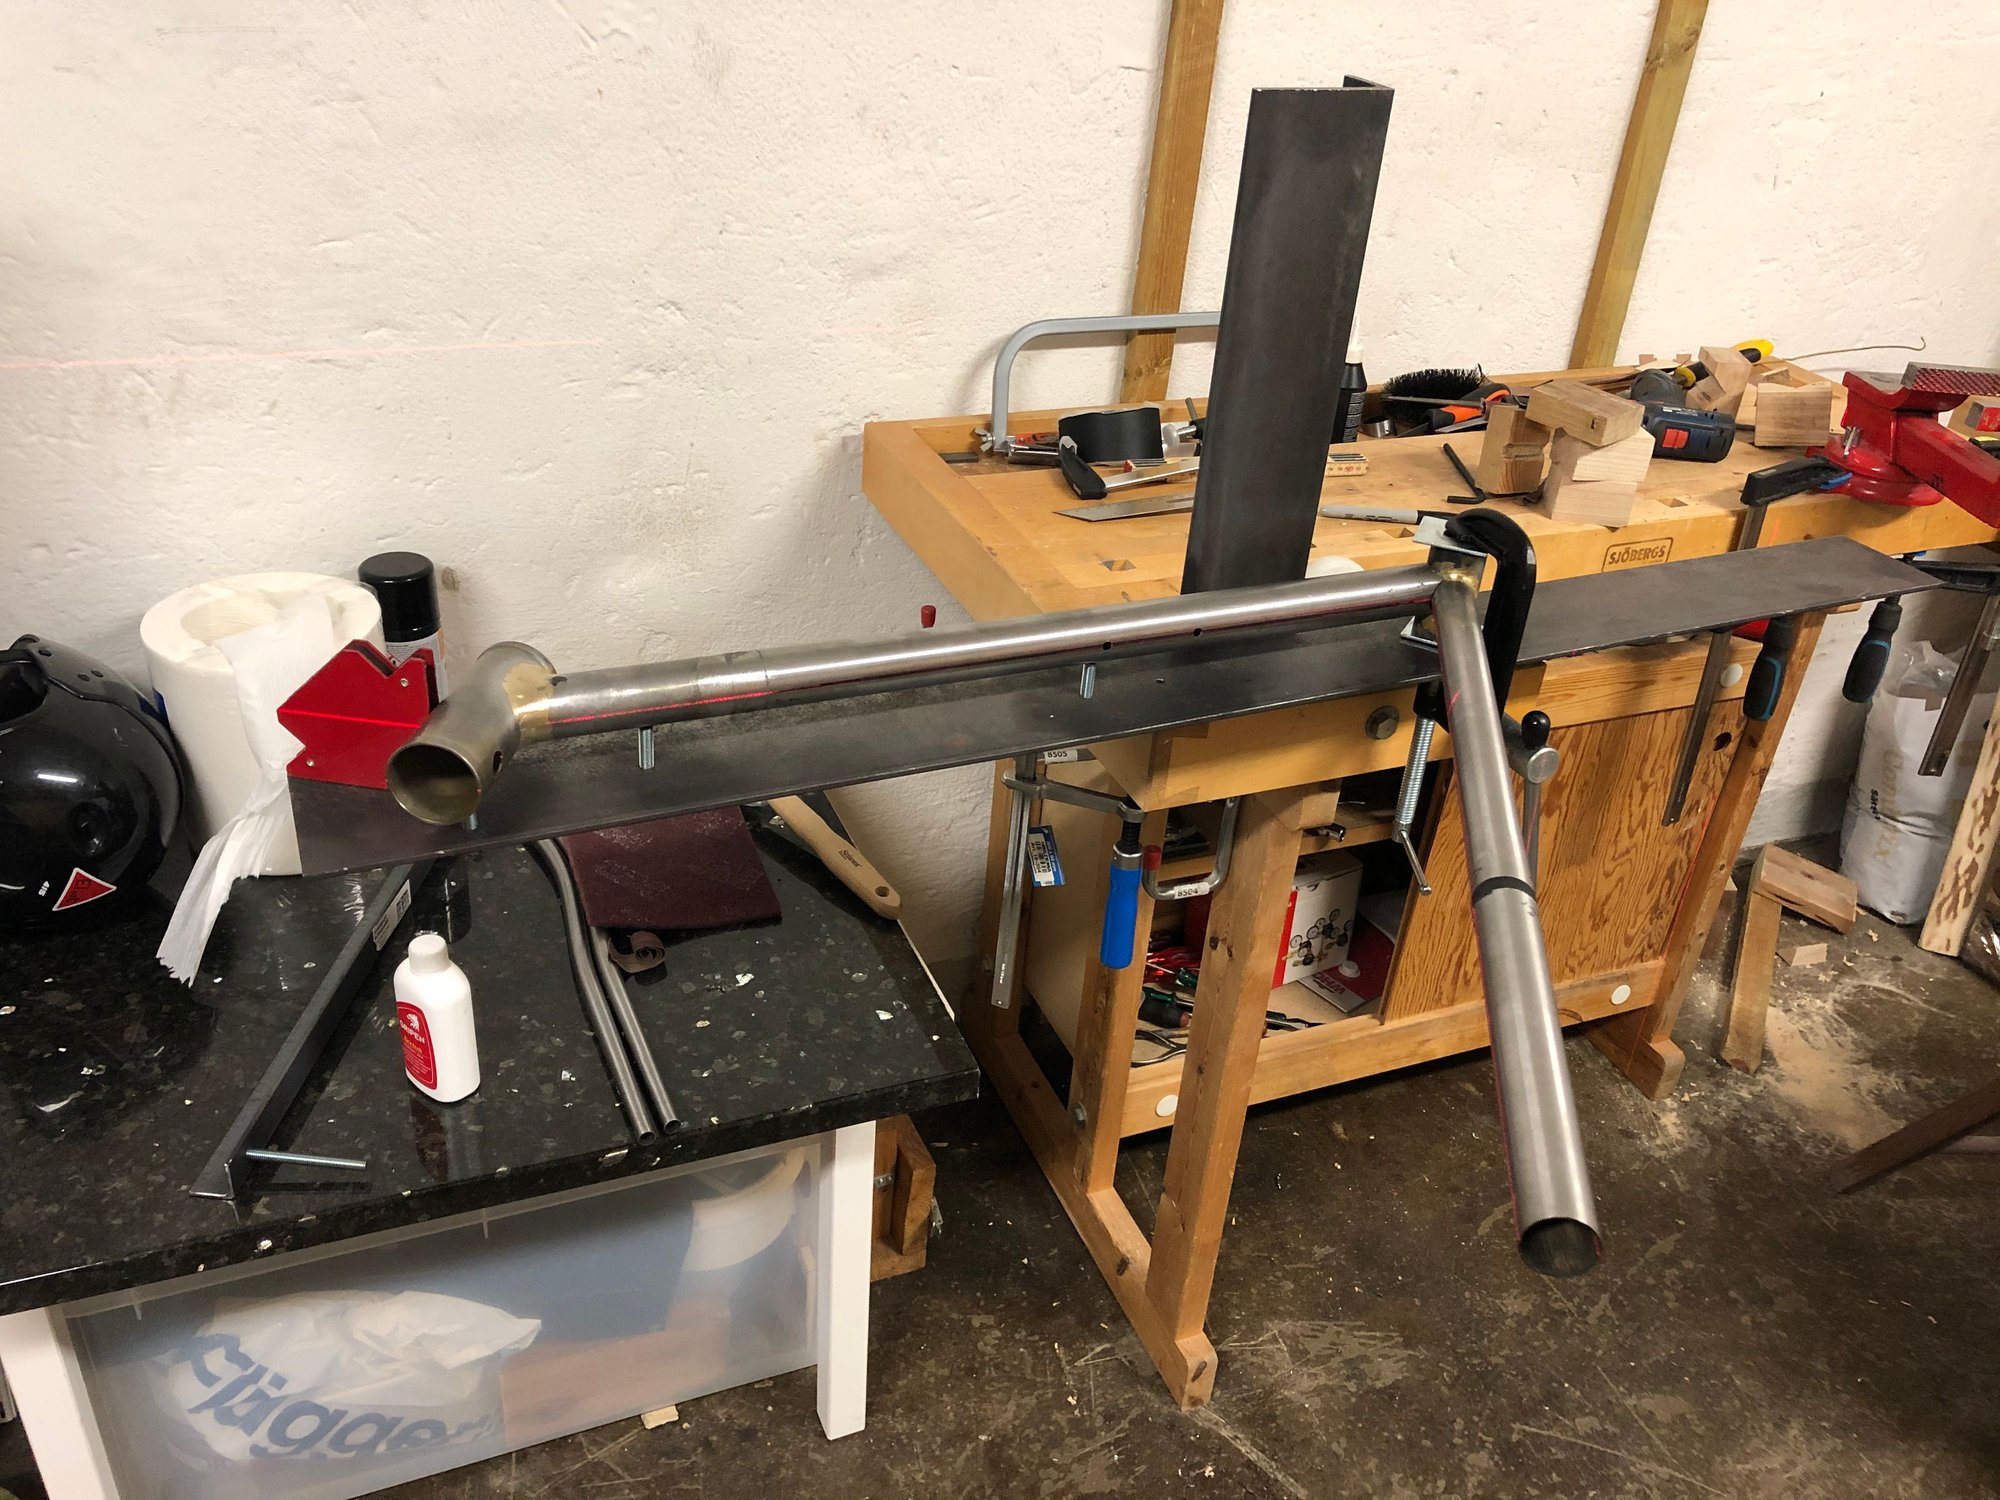
Spent some time garage the last couple
of days and managed to get the main triangle together and what looks to me to be fairly straight. The HT angle got pushed a little though... haven�t checked with how much but let�s just say that my trail will be larger than calculated 63.8.
The HT was also noticeable twisted after tacking but after that debacle I went ahead and brazed all the joints. Much trickier than I anticipated but I�m OK with the fillets for now. We�ll have to see what they look like after som filing. Heat control is obviously still an issue and I think I know what I�m doing wrong. Staying way too long in each area due to my inexperience brazing. I also forget to move the flame away from the tube more often then not etc :/ Anyway.... work in progress. Did a bunch of practice fillets with mixed result.
Here are a couple of pictures of my recent adventures 😊
Oh and I�m currently going through all the experience you guys shared in regards to the rear triangle now to set something up.
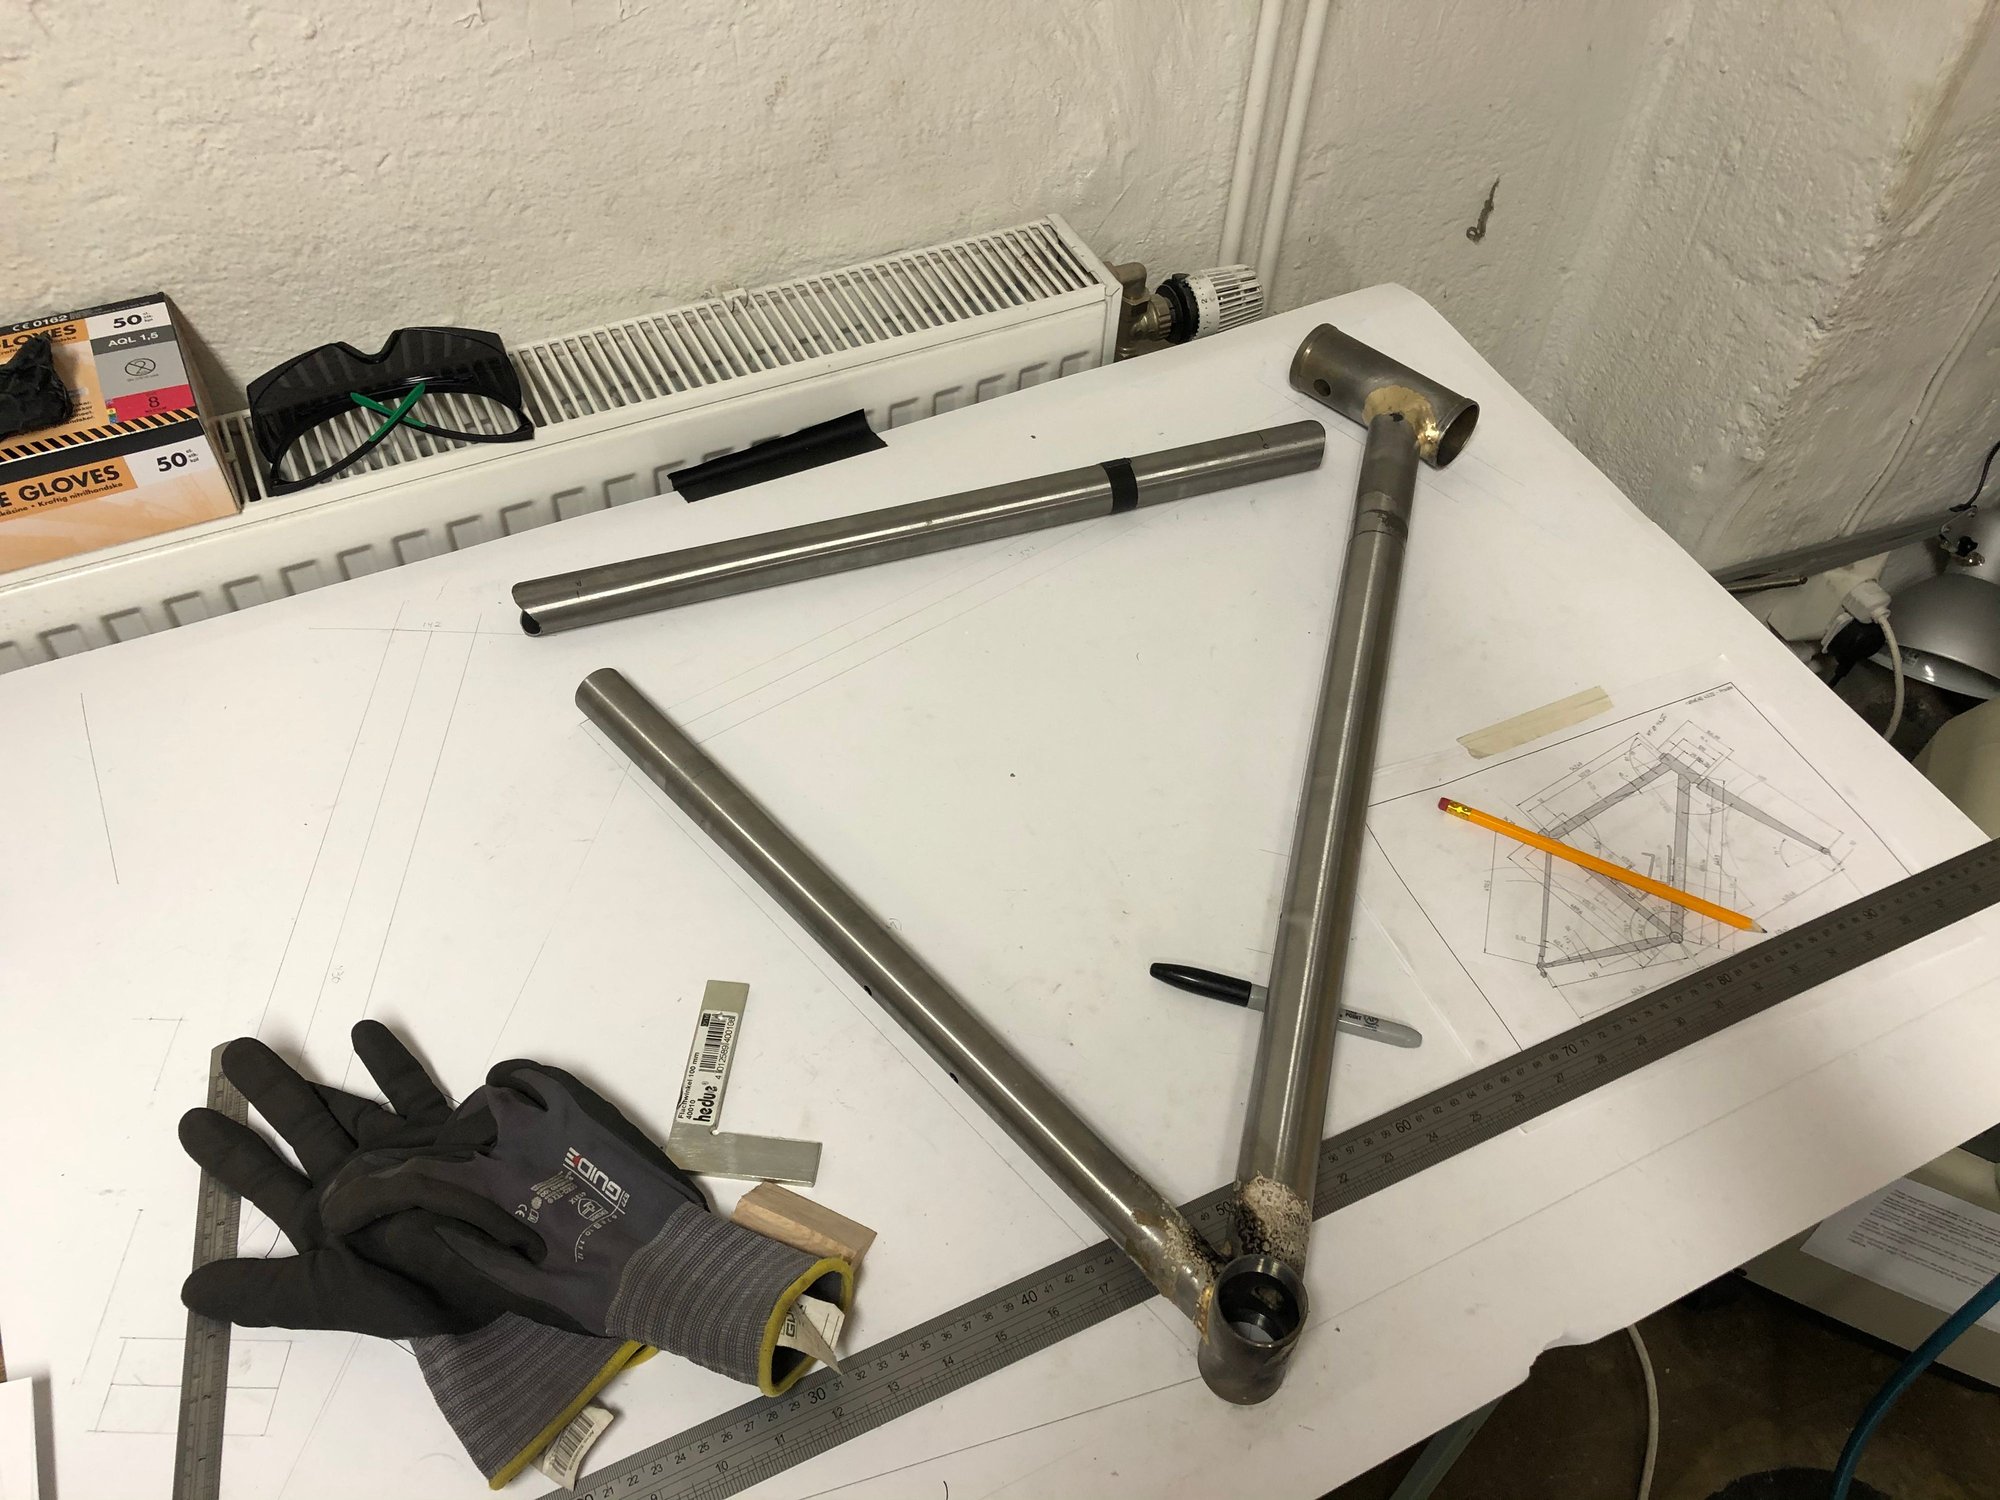
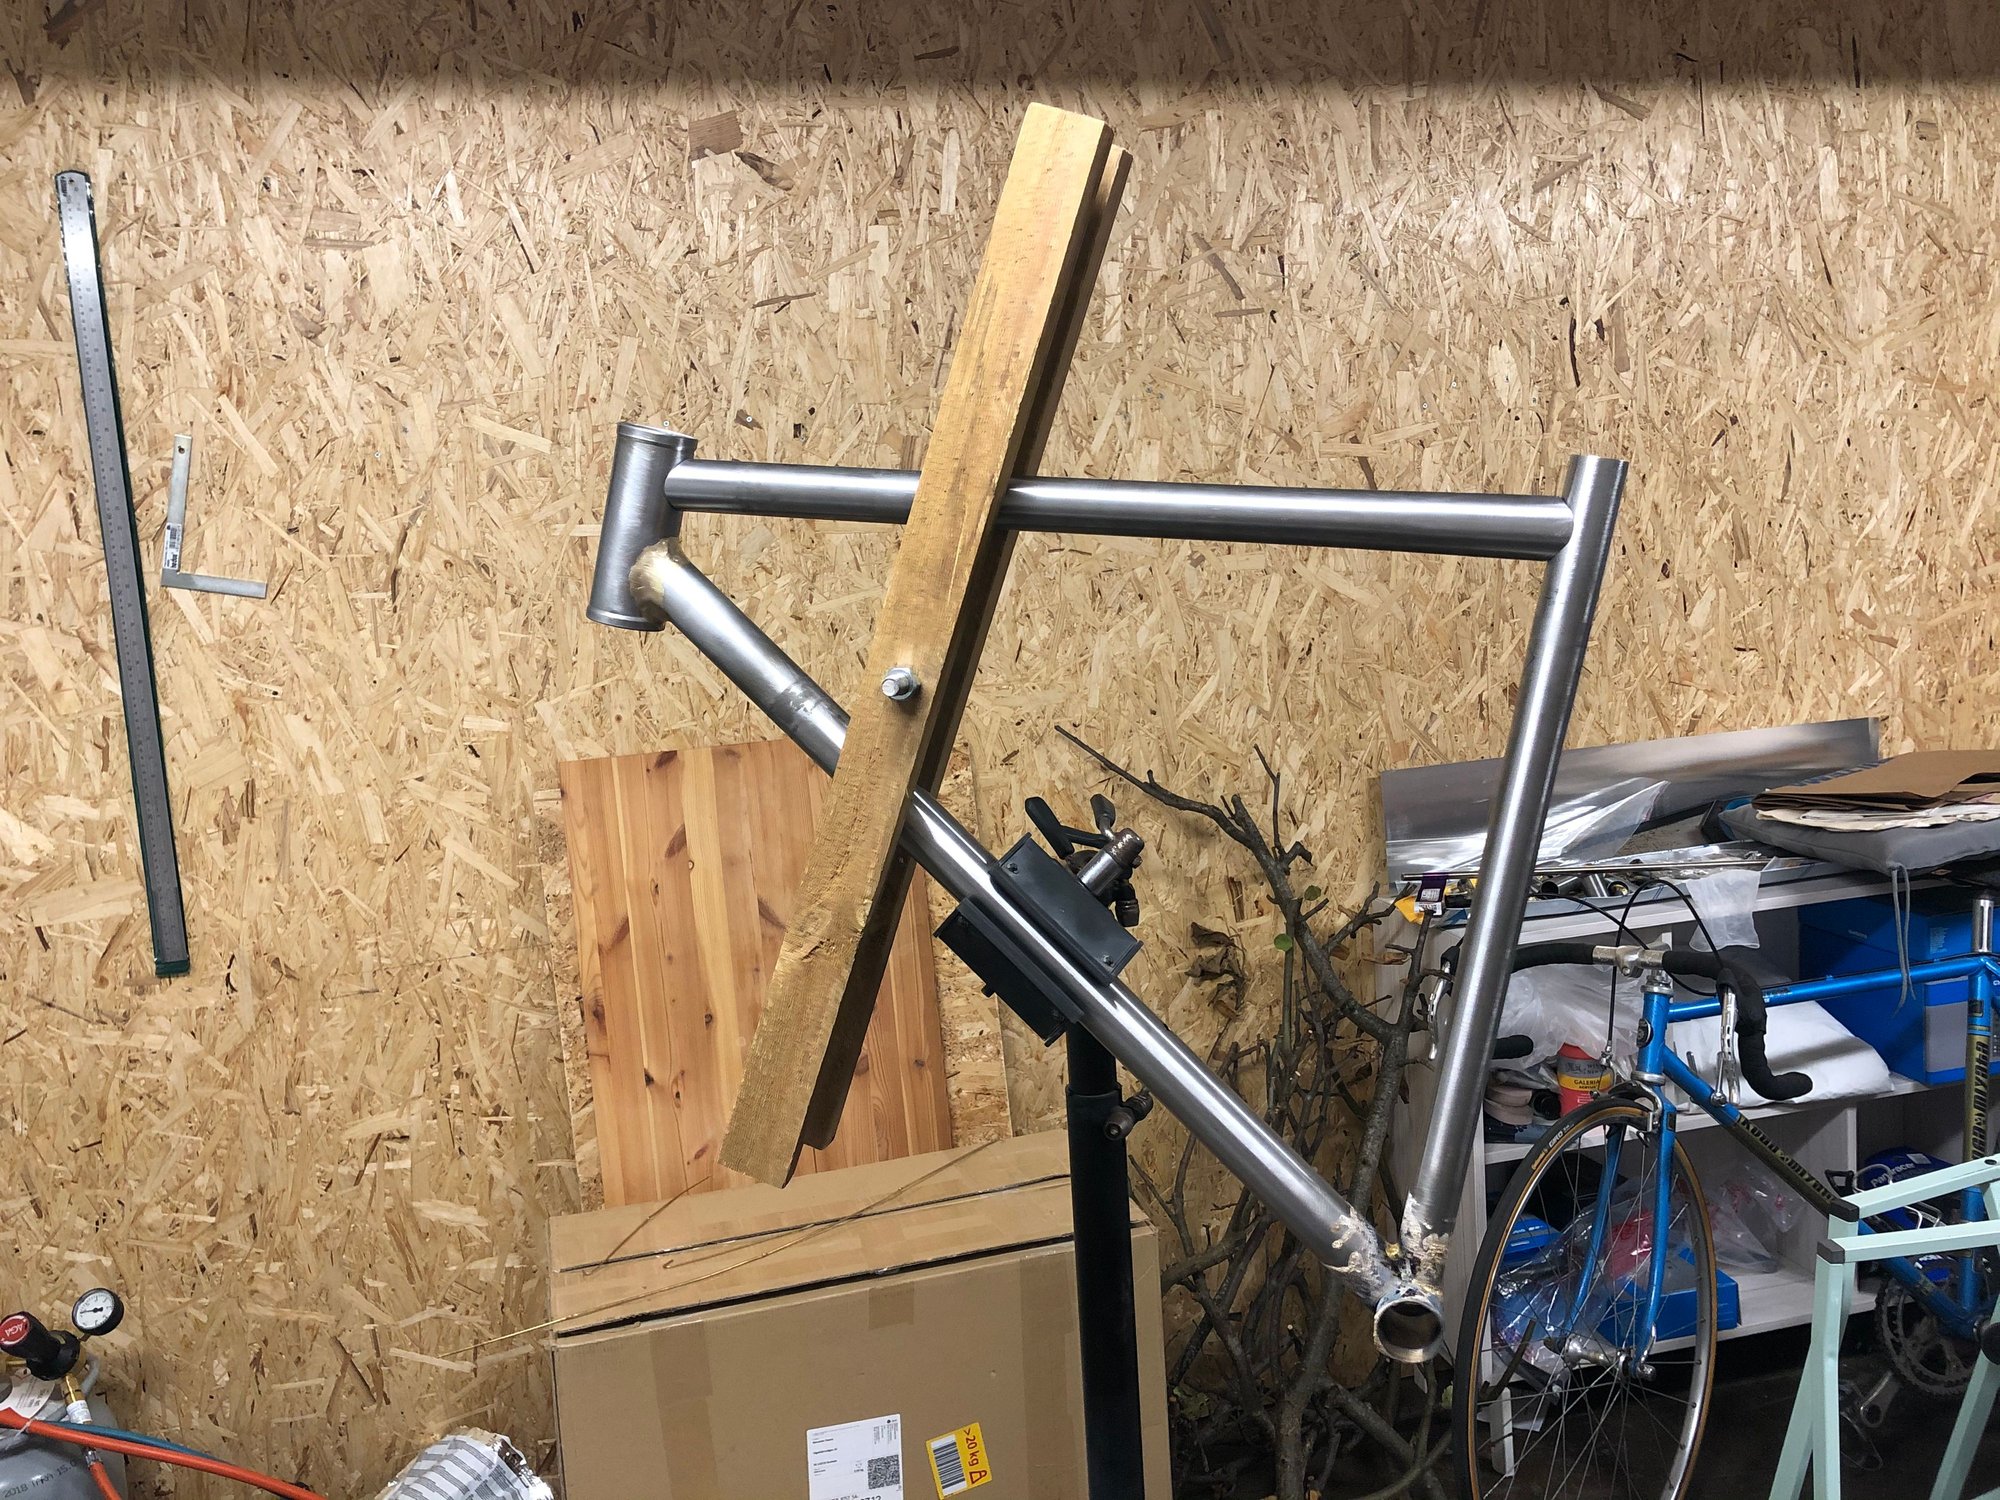

I do have one question regarding filing and sanding the joints. I�m really scared touching the tubes when I�m working on the fillets which in turn doesn�t produce anything near smooth
fillets. How should I approach that? You might be able to see in some of the pictures that the HT and HT joint is pretty lumpy still. Spent quite some time on it as well.... heh
Thanks for stopping by!
Spent some time garage the last couple
of days and managed to get the main triangle together and what looks to me to be fairly straight. The HT angle got pushed a little though... haven�t checked with how much but let�s just say that my trail will be larger than calculated 63.8.
The HT was also noticeable twisted after tacking but after that debacle I went ahead and brazed all the joints. Much trickier than I anticipated but I�m OK with the fillets for now. We�ll have to see what they look like after som filing. Heat control is obviously still an issue and I think I know what I�m doing wrong. Staying way too long in each area due to my inexperience brazing. I also forget to move the flame away from the tube more often then not etc :/ Anyway.... work in progress. Did a bunch of practice fillets with mixed result.
Here are a couple of pictures of my recent adventures 😊
Oh and I�m currently going through all the experience you guys shared in regards to the rear triangle now to set something up.
I do have one question regarding filing and sanding the joints. I�m really scared touching the tubes when I�m working on the fillets which in turn doesn�t produce anything near smooth
fillets. How should I approach that? You might be able to see in some of the pictures that the HT and HT joint is pretty lumpy still. Spent quite some time on it as well.... heh
Thanks for stopping by!
Likes For Aldatroid:
09-15-20, 05:22 PM
#100
Randomhead
Join Date: Aug 2008
Location: Happy Valley, Pennsylvania
Posts: 24,386
Mentioned: 0 Post(s)
Tagged: 0 Thread(s)
Quoted: 4 Post(s)
Liked 3,687 Times
in
2,510 Posts
It's pretty tricky, that's why many pros that use fillet a lot have worn out fingers. Got to keep the file from hitting the tube.
My goal when filleting is to produce a smooth edge that doesn't need to be touched with a file. It's not easy.
My goal when filleting is to produce a smooth edge that doesn't need to be touched with a file. It's not easy.