


Hollowtech II preload adjustment tool?
 07-08-22, 07:20 AM
#26
Senior Member
Thread Starter
Ok, I get everyone's point. But look at these instructions from the garden sprinkler I bought yesterday, in particular at the bottom:
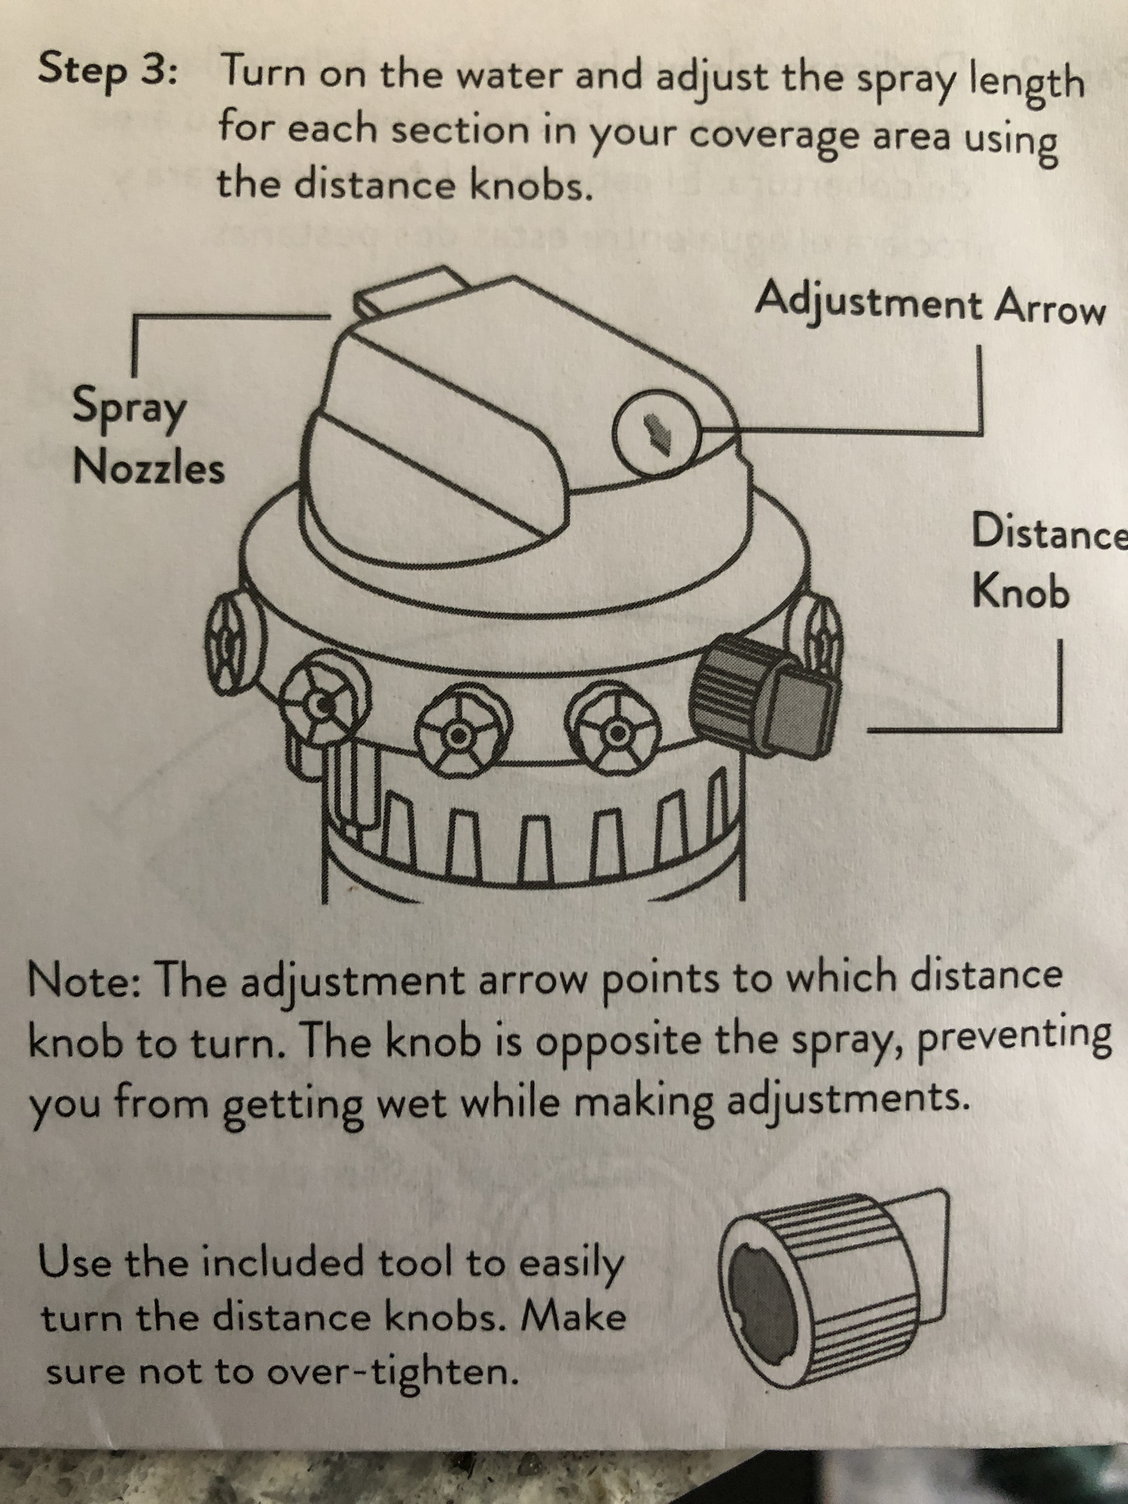
This was a $20 item, not a $200 one. They saw fit to include the tool.
This was a $20 item, not a $200 one. They saw fit to include the tool.

Likes For zacster:
07-08-22, 07:49 AM
#27

I'm good to go!
Join Date: Jul 2017
Location: Mississippi
Posts: 14,986
Bikes: Tarmac Disc Comp Di2 - 2020
Mentioned: 51 Post(s)
Tagged: 0 Thread(s)
Quoted: 6193 Post(s)
Liked 4,809 Times
in
3,317 Posts
What tools did they give you with your $40,000 car?
Likes For Iride01:
07-08-22, 08:14 AM
#28
I'm good to go!
Join Date: Jul 2017
Location: Mississippi
Posts: 14,986
Bikes: Tarmac Disc Comp Di2 - 2020
Mentioned: 51 Post(s)
Tagged: 0 Thread(s)
Quoted: 6193 Post(s)
Liked 4,809 Times
in
3,317 Posts
I know. I realized that after it was too late and the button pushed!
But none of those are useful. At least not to me. I haven't changed a fuse or a tire in many years.
I guess my only other argument would be how many of the "pre-load adjustment" tools would just be trash in the land fill because most cranks are installed by shops and very few by those of us that DIY our bikes.
Perhaps if the OP just went to one of the local shops they might just give him one of the extras they probably have laying around. That's how I've obtained several of the special Shimano tools in my tool box.
Likes For wheelreason:
07-11-22, 02:38 PM
#30
Senior Member
Thread Starter
This is what I built. I started with a Specialized Dolce Vita in a 44 size that was too small for my daughter, bought the frame, crank, BB, cables, tape and front derailleur and built it up with the rest of the parts from the Specialized. It is for my daughter so the saddle stays even though I find it uncomfortable for fast riding, I took it for a spin and it rides far better than my own carbon fiber bike. It makes me want a new one for myself, but my knee is telling me not to bother.
You may be asking why after spending that money I made a big deal about the $6 tool, well it was just the principle of needing a special tool that only fits one thing. Even my 16 point BB cup tool has been used on multiple bikes and BBs.

The yellow bottle is my TdF bottle from my own bike. I'll get her a nicer cage and bottle. There is also a plastic spoke protector on the rear that needs to go, but it isn't that important. She wants to ride it.
You may be asking why after spending that money I made a big deal about the $6 tool, well it was just the principle of needing a special tool that only fits one thing. Even my 16 point BB cup tool has been used on multiple bikes and BBs.
The yellow bottle is my TdF bottle from my own bike. I'll get her a nicer cage and bottle. There is also a plastic spoke protector on the rear that needs to go, but it isn't that important. She wants to ride it.
Last edited by zacster; 07-11-22 at 02:44 PM.
07-11-22, 03:11 PM
#31
Senior Member
Join Date: Jul 2013
Location: Nor-Cal
Posts: 3,767
Bikes: lots
Mentioned: 7 Post(s)
Tagged: 0 Thread(s)
Quoted: 1958 Post(s)
Liked 2,932 Times
in
1,489 Posts
This is what I built. I started with a Specialized Dolce Vita in a 44 size that was too small for my daughter, bought the frame, crank, BB, cables, tape and front derailleur and built it up with the rest of the parts from the Specialized. It is for my daughter so the saddle stays even though I find it uncomfortable for fast riding, I took it for a spin and it rides far better than my own carbon fiber bike. It makes me want a new one for myself, but my knee is telling me not to bother.
You may be asking why after spending that money I made a big deal about the $6 tool, well it was just the principle of needing a special tool that only fits one thing. Even my 16 point BB cup tool has been used on multiple bikes and BBs.
.
You may be asking why after spending that money I made a big deal about the $6 tool, well it was just the principle of needing a special tool that only fits one thing. Even my 16 point BB cup tool has been used on multiple bikes and BBs.
.
Likes For cxwrench:
07-11-22, 04:35 PM
#32
Method to My Madness
Join Date: Nov 2020
Location: Orange County, California
Posts: 3,659
Bikes: Trek FX 2, Cannondale Synapse, Cannondale CAAD4, Santa Cruz Stigmata GRX
Mentioned: 4 Post(s)
Tagged: 0 Thread(s)
Quoted: 1944 Post(s)
Liked 1,468 Times
in
1,017 Posts
The TL-FC16 is $6.03 + tax from Amazon.com; I just ordered one. It is a no win situation. If one was included with every HTII crankset, the environmental impact is too large. If one was not included, people who have not previously had an HTII crankset would complain. Apple went through the same thing with the little 5W USB power brick. Your principles maybe further disappointed to learn that 16 point BB cup sockets are available in at least 3 sizes (of which I am aware): 44 mm, 41 mm, and 39 mm, and it took me forever to figure out that the BB-R9100 I recently bought requires the 39 mm version.
Likes For SoSmellyAir:
07-11-22, 08:50 PM
#33
Senior Member
Thread Starter
I have one more thing to do on it and I'll take care of the housing too. The only problem is I'm out of green cable ends. The horror!
07-11-22, 09:01 PM
#34
Senior Member
Join Date: Feb 2012
Location: Rochester, NY
Posts: 18,078
Bikes: Stewart S&S coupled sport tourer, Stewart Sunday light, Stewart Commuting, Stewart Touring, Co Motion Tandem, Stewart 3-Spd, Stewart Track, Fuji Finest, Mongoose Tomac ATB, GT Bravado ATB, JCP Folder, Stewart 650B ATB
Mentioned: 0 Post(s)
Tagged: 0 Thread(s)
Quoted: 4201 Post(s)
Liked 3,860 Times
in
2,308 Posts
I thought it was too when I finally took it out. It is still much shorter than the factory housing on the bike it came from. I cut it down twice but it is still too long. It didn't affect the shifting though, it was crisp and precise. I never liked the shift cable coming out the side of the lever. After hiding brake cables for so many years why did they design it this way for 9sp?
I have one more thing to do on it and I'll take care of the housing too. The only problem is I'm out of green cable ends. The horror!
I have one more thing to do on it and I'll take care of the housing too. The only problem is I'm out of green cable ends. The horror!
BTW there are many images of TdF pro bikes with longer than fashionable casing lengths for a good reason. Those guys crash and need to keep going or their sponsor complains about lost views. Too long casings fair better than too short ones... Andy
__________________
AndrewRStewart
AndrewRStewart
 07-11-22, 09:28 PM
#35
Senior Member
Join Date: Jul 2013
Location: Nor-Cal
Posts: 3,767
Bikes: lots
Mentioned: 7 Post(s)
Tagged: 0 Thread(s)
Quoted: 1958 Post(s)
Liked 2,932 Times
in
1,489 Posts
I thought it was too when I finally took it out. It is still much shorter than the factory housing on the bike it came from. I cut it down twice but it is still too long. It didn't affect the shifting though, it was crisp and precise. I never liked the shift cable coming out the side of the lever. After hiding brake cables for so many years why did they design it this way for 9sp?
I have one more thing to do on it and I'll take care of the housing too. The only problem is I'm out of green cable ends. The horror!
I have one more thing to do on it and I'll take care of the housing too. The only problem is I'm out of green cable ends. The horror!
07-12-22, 04:58 AM
#36
Senior Member
Thread Starter
No I'm not. The brake housing is hidden in my 1982 Italian steel bike. The brake housing stayed hidden but then they stuck the derailleur housing out in front, but still hid the brake cables. It was a big deal back in the 80s that they could make the bikes more aero by hiding the cables. Apparently Shimano didn't get the memo with the shifter cables.
07-12-22, 06:02 AM
#37
SE Wis
Join Date: Apr 2005
Location: Milwaukee, WI
Posts: 10,513
Bikes: '68 Raleigh Sprite, '02 Raleigh C500, '84 Raleigh Gran Prix, '91 Trek 400, 2013 Novara Randonee, 1990 Trek 970
Mentioned: 40 Post(s)
Tagged: 0 Thread(s)
Quoted: 2746 Post(s)
Liked 3,393 Times
in
2,056 Posts
Likes For dedhed:
07-12-22, 09:28 AM
#38
Senior Member
Join Date: May 2005
Location: SFBay
Posts: 2,334
Bikes: n, I would like n+1
Mentioned: 0 Post(s)
Tagged: 0 Thread(s)
Quoted: 127 Post(s)
Likes: 0
Liked 133 Times
in
108 Posts
I�m waiting for the day when working on our bikes requires a scan tool plus several thousand dollar per year software license. I�d say that would usher in decent pay for bike mechanics, but it isn�t in line yet for auto mechanics, so I don�t see much hope there.
Likes For jccaclimber:
07-12-22, 10:29 AM
#39
Senior Member
Join Date: Jul 2013
Location: Nor-Cal
Posts: 3,767
Bikes: lots
Mentioned: 7 Post(s)
Tagged: 0 Thread(s)
Quoted: 1958 Post(s)
Liked 2,932 Times
in
1,489 Posts
No I'm not. The brake housing is hidden in my 1982 Italian steel bike. The brake housing stayed hidden but then they stuck the derailleur housing out in front, but still hid the brake cables. It was a big deal back in the 80s that they could make the bikes more aero by hiding the cables. Apparently Shimano didn't get the memo with the shifter cables.
12-30-23, 12:42 PM
#40
Newbie
Join Date: Dec 2023
Posts: 1
Mentioned: 0 Post(s)
Tagged: 0 Thread(s)
Quoted: 2 Post(s)
Likes: 0
Liked 0 Times
in
0 Posts
Same thoughts here
I've been wondering precisely the same f***ing thing. In the end, I improvised with some pliers: I opened them in the plastic thing and then kind of tried to turn it a bit. It didn't work great but it got the job done. As you said, it doesn't need to be particularly tight.
12-31-23, 02:36 AM
#41
Senior Member
Join Date: Apr 2019
Location: UK
Posts: 1,404
Mentioned: 3 Post(s)
Tagged: 0 Thread(s)
Quoted: 682 Post(s)
Liked 453 Times
in
338 Posts
I've been wondering precisely the same f***ing thing. In the end, I improvised with some pliers: I opened them in the plastic thing and then kind of tried to turn it a bit. It didn't work great but it got the job done. As you said, it doesn't need to be particularly tight.
Personally, I had one included in the �70 30+ piece toolkit I bought when I first tried to wrangle something on a bike. It�s had a lot of use. It also has a hex protrusion that lets you use a wrench on it but the knurled circular grip is a far better way to not knacker the component. I don�t want these included with cranks. More pointless plastic for the ocean.
01-01-24, 01:28 AM
#42
Senior Member
Join Date: Apr 2007
Posts: 6,760
Mentioned: 10 Post(s)
Tagged: 0 Thread(s)
Quoted: 1109 Post(s)
Liked 1,200 Times
in
760 Posts
I've been wondering precisely the same f***ing thing. In the end, I improvised with some pliers: I opened them in the plastic thing and then kind of tried to turn it a bit. It didn't work great but it got the job done. As you said, it doesn't need to be particularly tight.
01-01-24, 11:10 AM
#43
Mad bike riding scientist

Join Date: Nov 2004
Location: Denver, CO
Posts: 27,362
Bikes: Some silver ones, a red one, a black and orange one, and a few titanium ones
Mentioned: 152 Post(s)
Tagged: 1 Thread(s)
Quoted: 6219 Post(s)
Liked 4,218 Times
in
2,365 Posts
WHY WHY WHY WHY WHY? ? ? ? ? ? ?
Why does that require a special tool? Why isn't it a standard 8 or 10mm allen wrench that everybody already has, or is at least available at a hardware store? Why do I need to buy a tool just for this? It is just a piece of plastic, as is the tool. If it has to be a special tool, why don't they just include one?
I've bought my share of specialized bike tools over the years but as a home mechanic working mostly on my own bikes many if not most don't get used more than once. It's just crazy.
For this one I'm going to improvise, especially since it isn't even supposed to go tight. After all, it is just a plastic piece. I've got some very hard ipe scrap wood that I can chisel to a square that'll fit. Hmmm, I wonder if a square taper spindle would work???
One of my pet peeves about the preload bolt is that they get lost in co-ops. People either don�t understand what the piece does and just throw it into the ocean of trash that co-ops generate. If they do happen to keep them, they keep the wrong sized one. That�s another great Shimano idea�make the preload bolt different sizes for different cranksets.
You can find after market preload bolts that use 8mm allen wrenches which I have done in a number of cases. Just make sure you get the right size.
__________________
Stuart Black
Plan Epsilon Around Lake Michigan in the era of Covid
Old School�When It Wasn�t Ancient bikepacking
Gold Fever Three days of dirt in Colorado
Pokin' around the Poconos A cold ride around Lake Erie
Dinosaurs in Colorado A mountain bike guide to the Purgatory Canyon dinosaur trackway
Solo Without Pie. The search for pie in the Midwest.
Picking the Scablands. Washington and Oregon, 2005. Pie and spiders on the Columbia River!
Likes For cyccommute:
01-01-24, 12:39 PM
#44
Senior Member
Thread Starter
This thread is getting old already and I've moved on from any issue with it.
01-01-24, 03:28 PM
#45

don't try this at home.

Join Date: Jan 2006
Location: N. KY
Posts: 5,940
Mentioned: 10 Post(s)
Tagged: 0 Thread(s)
Quoted: 974 Post(s)
Liked 512 Times
in
352 Posts
It's obvious you don't have much experience with this system. The crank arm won't stay on if the plastic preload adjuster isn't installed. That is precisely why Shimano added the stopper plate/pin to the design, it didn't exist the first couple of years of HTll. The crank axle isn't tapered at all, just splined. You use the adjuster to pull the crank arm on and create the proper preload. You then tighten the crank arm bolts to the specified torque, this tightens the axle around the adjuster so it won't loosen up. The preload adjuster backs up the crank bolts, the crank bolts back up the adjuster. The tool was included with cranks for years, I guess Shimano now thinks there are so many around they don't need to make them anymore. There are also lots of aftermarket tools.
Are you saying that a mechanic or home mechanic wouldn't notice that there's a lot of play in the crank unless they had the stopper plate to indicate it? I tighten the preload until the crank starts dragging a little, then loosen it a bit.
01-02-24, 01:58 AM
#46
Senior Member
Join Date: May 2005
Location: SFBay
Posts: 2,334
Bikes: n, I would like n+1
Mentioned: 0 Post(s)
Tagged: 0 Thread(s)
Quoted: 127 Post(s)
Likes: 0
Liked 133 Times
in
108 Posts
That stopper plate is plastic, with a tiny metal pin inserted into it's edge. The two pinch bolts are torqued to 12-14 Nm, which is what really holds the crank arm onto the splines. The stopper plate is pretty useless as a security feature.
Are you saying that a mechanic or home mechanic wouldn't notice that there's a lot of play in the crank unless they had the stopper plate to indicate it? I tighten the preload until the crank starts dragging a little, then loosen it a bit.
Are you saying that a mechanic or home mechanic wouldn't notice that there's a lot of play in the crank unless they had the stopper plate to indicate it? I tighten the preload until the crank starts dragging a little, then loosen it a bit.
Likes For jccaclimber:
01-02-24, 06:03 PM
#47
Senior Member
That stopper plate is plastic, with a tiny metal pin inserted into it's edge. The two pinch bolts are torqued to 12-14 Nm, which is what really holds the crank arm onto the splines. The stopper plate is pretty useless as a security feature.
Are you saying that a mechanic or home mechanic wouldn't notice that there's a lot of play in the crank unless they had the stopper plate to indicate it? I tighten the preload until the crank starts dragging a little, then loosen it a bit.
Are you saying that a mechanic or home mechanic wouldn't notice that there's a lot of play in the crank unless they had the stopper plate to indicate it? I tighten the preload until the crank starts dragging a little, then loosen it a bit.
If you cannot place it through the hole in the crank, there is not enough spindle engaged to safely use it.
As a "retention feature", it won't stop the crank from coming off.
01-02-24, 09:02 PM
#48
Senior Member
Join Date: Apr 2011
Posts: 7,052
Mentioned: 41 Post(s)
Tagged: 0 Thread(s)
Quoted: 4399 Post(s)
Liked 1,556 Times
in
1,021 Posts
Shimano didn't include a tool because they were using every spare dollar to insure that the drive side crank would never delaminate.
01-09-24, 07:30 PM
#49
Full Member
Maybe I'm giving Shimano too much credit but I imagine it's designed not to use an Allen key on purpose so people don't crank it down way to hard. You just need to take out the slack. I printed one for a few pennies.
Likes For Ryan_M:
