


Reason for extraneous nut on my rear rack mounting screw?
 08-03-21, 12:56 PM
#1
Steel City, Steel Bike
Thread Starter

Reason for extraneous nut on my rear rack mounting screw?
I had one of the mounting screws at the bottom of my rear rack somehow work its way loose yesterday, and I’m going to the hardware store later to get a replacement screw and washer. When I looked closely at the mounting on the other side, I saw that I addition to the washer, the bike shop person who installed it years ago added a knurled nut that appears to be a valve stem nut. I don't know whether or not the same thing was on the other side.
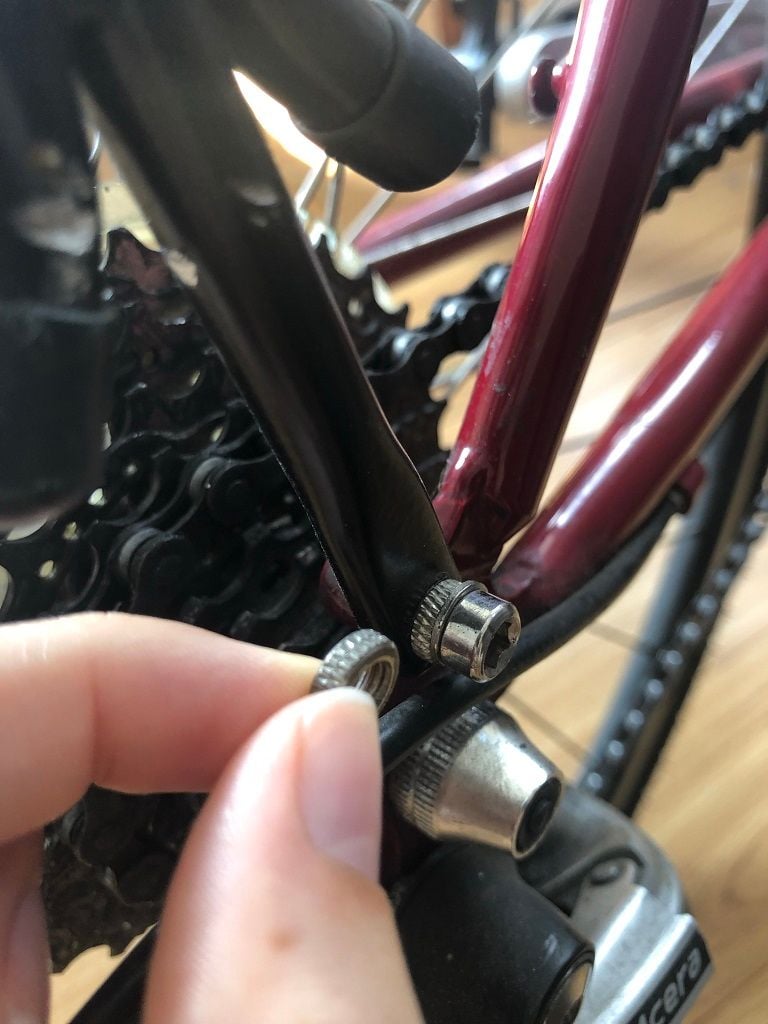
Note that it’s not acting as a spacer between the rack and the frame. It’s sitting on the outside of the rack serving no purpose I can tell except making the mounting screw not reach all the way through the frame eyelet. I thought possibly there was paint or something on the eyelet threads preventing it from screwing all the way in, and they did this instead of properly clearing the hole. But when I tried putting the screw back without the spacer it only took a slight amount more force to screw it in the rest of the way (and extrude a few years of grime out of the hole.)
So, any legitimate reason for the spacer? Can I just leave it off, or is this Chesterton’s valve nut?
 08-03-21, 01:03 PM
#2
Senior Member

Join Date: Feb 2014
Location: Pasadena, CA
Posts: 4,848
Bikes: Schwinn Varsity
Mentioned: 22 Post(s)
Tagged: 0 Thread(s)
Quoted: 1931 Post(s)
Liked 742 Times
in
422 Posts
This side... other side.... can't understand which side you are refferring too. Drive side or Non-drive side would be good to know.
Maybe it's acting as a spacer so the bolt (screw) doesn't go through and hit the chain.
Maybe it's acting as a spacer so the bolt (screw) doesn't go through and hit the chain.
Likes For trailangel:
08-03-21, 01:10 PM
#3
Senior Member
Join Date: Oct 2017
Location: Chapel Hill NC
Posts: 1,683
Bikes: 2000 Litespeed Vortex Chorus 10, 1995 DeBernardi Cromor S/S
Mentioned: 4 Post(s)
Tagged: 0 Thread(s)
Quoted: 645 Post(s)
Liked 797 Times
in
446 Posts
I had one of the mounting screws at the bottom of my rear rack somehow work its way loose yesterday, and I’m going to the hardware store later to get a replacement screw and washer. When I looked closely at the mounting on the other side, I saw that I addition to the washer, the bike shop person who installed it years ago added a knurled nut that appears to be a valve stem nut. I don't know whether or not the same thing was on the other side.
Note that it’s not acting as a spacer between the rack and the frame. It’s sitting on the outside of the rack serving no purpose I can tell except making the mounting screw not reach all the way through the frame eyelet. I thought possibly there was paint or something on the eyelet threads preventing it from screwing all the way in, and they did this instead of properly clearing the hole. But when I tried putting the screw back without the spacer it only took a slight amount more force to screw it in the rest of the way (and extrude a few years of grime out of the hole.)
So, any legitimate reason for the spacer? Can I just leave it off, or is this Chesterton’s valve nut?
 )
)
Likes For Litespud:
08-03-21, 01:12 PM
#4
Zip tie Karen
Join Date: Aug 2009
Location: Fair Oaks Ranch, TX
Posts: 7,004
Bikes: '13 Motobecane Fantom29 HT, '16 Motobecane Turino Pro Disc, '18 Velobuild VB-R-022, '21 Tsunami SNM-100
Mentioned: 26 Post(s)
Tagged: 0 Thread(s)
Quoted: 1465 Post(s)
Liked 1,542 Times
in
806 Posts
You got it. Either select a bolt that has the proper depth reach, or offset the bolt head (outward) to prevent the bolt from overhanding within the frame. It's cleaner that way.
Likes For Phil_gretz:
08-03-21, 01:17 PM
#5
Steel City, Steel Bike
Thread Starter
[Edit: And thanks to everyone for responding!]
Last edited by RobbiRobbi; 08-03-21 at 01:21 PM.
08-03-21, 01:32 PM
#6
SE Wis
Join Date: Apr 2005
Location: Milwaukee, WI
Posts: 10,509
Bikes: '68 Raleigh Sprite, '02 Raleigh C500, '84 Raleigh Gran Prix, '91 Trek 400, 2013 Novara Randonee, 1990 Trek 970
Mentioned: 40 Post(s)
Tagged: 0 Thread(s)
Quoted: 2746 Post(s)
Liked 3,390 Times
in
2,053 Posts
That's exactly what it is. A presta valve nut to keep a longer bolt from interfering with the drive train. Probably faster and easier than finding a shorter bolt.
08-03-21, 02:07 PM
#7
Senior Member
Join Date: Jan 2009
Location: San Diego, CA
Posts: 3,670
Mentioned: 10 Post(s)
Tagged: 0 Thread(s)
Quoted: 836 Post(s)
Liked 1,061 Times
in
745 Posts
Or.....the presta nut was put there to keep the bolt from hitting the chain while the rack was not being used. I've done this so I don't have to keep two different length bolts on hand for rack or no rack setup. The bolt keeps the threads in the eyelet from getting gunked up when not in use and you don't have to hunt for the bolt when you want to install the rack. OP, just remove the presta nut with the rack in place and the bolt should be the right length.
Last edited by Crankycrank; 08-03-21 at 02:47 PM.
Likes For Crankycrank:
08-03-21, 02:45 PM
#8

Old fart

Join Date: Nov 2004
Location: Appleton WI
Posts: 24,784
Bikes: Several, mostly not name brands.
Mentioned: 153 Post(s)
Tagged: 0 Thread(s)
Quoted: 3587 Post(s)
Liked 3,400 Times
in
1,934 Posts
Looks like a knurled nut from a presta valve stem. I agree with @trailangel; it's probably because the bolt is too long and without the spacer, it would extend through the eyelet and interfere with the chain.
08-03-21, 02:47 PM
#9
Senior Member
Join Date: Oct 2013
Location: Mich
Posts: 7,386
Bikes: RSO E-tire dropper fixie brifter
Mentioned: 0 Post(s)
Tagged: 0 Thread(s)
Quoted: 6 Post(s)
Liked 2,968 Times
in
1,917 Posts
use a stud & nut. That will enable the hardware to be left in place with or without the rack.
__________________
-Oh Hey!
-Oh Hey!
