


Adjusting Front Disc Brake 1st Time Setup
 11-10-20, 02:21 PM
#1
Member
Thread Starter
Adjusting Front Disc Brake 1st Time Setup
Hi,
I just received a pretty cheap, but brand new Gravity Basecamp LTD27 mountain bike. Everything was going smooth until I hit installing the front wheel. In the videos I watched, the disc on the wheel fit very easily between the front brake pads. However, the front brake pads out of the box on this bike are too close together and I can't fit the wheel disc (probably not the proper terminology for it) between the pads. I see the screws that should loosen them, but I think I need a star socket, instead of an allen wrench and I hope I didn't strip them. Was just curious if I'm doing something wrong before I go any further in trying to take the front brake apart just to get the wheel on


Would really appreciate any help. Looks like I stripped them, but it's not like they moved. Hopefully, there's another way to make those pads a bit wider. Otherwise, I'm screwed (pun intended)
Thanks,
I just received a pretty cheap, but brand new Gravity Basecamp LTD27 mountain bike. Everything was going smooth until I hit installing the front wheel. In the videos I watched, the disc on the wheel fit very easily between the front brake pads. However, the front brake pads out of the box on this bike are too close together and I can't fit the wheel disc (probably not the proper terminology for it) between the pads. I see the screws that should loosen them, but I think I need a star socket, instead of an allen wrench and I hope I didn't strip them. Was just curious if I'm doing something wrong before I go any further in trying to take the front brake apart just to get the wheel on
Would really appreciate any help. Looks like I stripped them, but it's not like they moved. Hopefully, there's another way to make those pads a bit wider. Otherwise, I'm screwed (pun intended)
Thanks,
 11-10-20, 02:32 PM
#2
Member
Thread Starter
Update:
I got the wheel on, but it's still rubbing when it turns. Just not sure how to adjust, but there's gotta be something on the internet, right?
I got the wheel on, but it's still rubbing when it turns. Just not sure how to adjust, but there's gotta be something on the internet, right?
11-10-20, 03:48 PM
#3

Senior Member
Join Date: Oct 2013
Location: Mich
Posts: 7,377
Bikes: RSO E-tire dropper fixie brifter
Mentioned: 0 Post(s)
Tagged: 0 Thread(s)
Quoted: 6 Post(s)
Liked 2,965 Times
in
1,915 Posts
you are adjusting the wrong hex. the larger one screws out.
__________________
-Oh Hey!
-Oh Hey!
11-10-20, 05:20 PM
#4
Senior Member
Join Date: Feb 2012
Location: Golden, CO and Tucson, AZ
Posts: 2,836
Bikes: 2016 Fuji Tread, 1983 Trek 520
Mentioned: 13 Post(s)
Tagged: 0 Thread(s)
Quoted: 675 Post(s)
Liked 741 Times
in
430 Posts
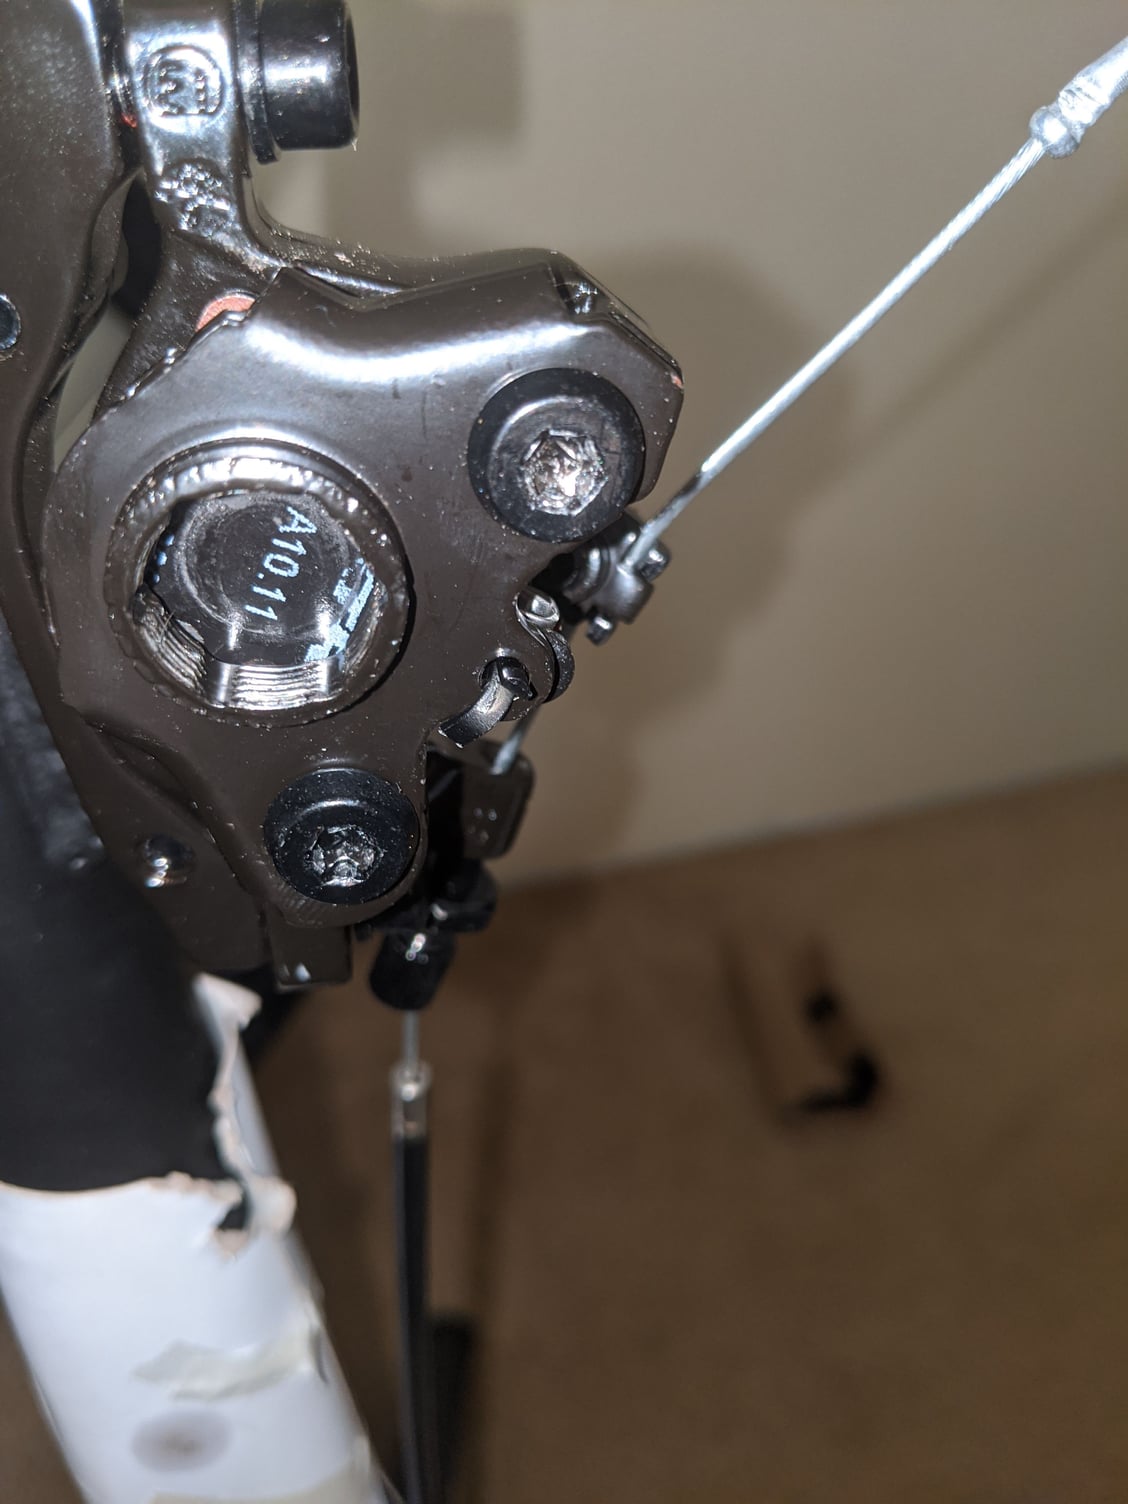
I'm trying to figure out what's happening in the second photo. It looks like the caliper is pulled all the way closed, but you can see the cable housing end, lying loose out of the barrel adjuster. The arm on the caliper should retract to an open position, nearly 90 degrees from the plane of the mounting bracket. Is it jammed?
Here's a picture from the manufacturer, showing the open, relaxed state:

Here's a picture from the manufacturer, showing the open, relaxed state:
Last edited by andrewclaus; 11-10-20 at 05:23 PM.
11-10-20, 07:27 PM
#5
Member
Thread Starter
Please forgive me it's my first time ever working on or putting together a bike and I know less than nothing about it.
Yes, I found the two bolts that loosen the calipers (they're not the one in my 2nd photo). I'm just not sure how smoothly the wheel should move. I would think you'd want zero friction, but I can hear the wheel rubbing slightly against something (I think it's the pads). But then I heard a similar sound on the back wheel and that was already on from the factory
Other than that, the bike is put together and I took it for a quick spin. Honestly it feels just like how much I paid for it.. Cheap.. It's only a $250 Gravity Basecamp LTD26 MTB, so I'm not sure it's ever gonna feel like a good ride
Lastly, I used a foot pump to inflate the tires. The front tire was no problem, but the back tire won't inflate? Think I just need to use a real air pump for a burst of stronger air to set the inner tube? What are the chances the bike came with a leaky inner tube?
11-10-20, 09:04 PM
#6
Clark W. Griswold
Join Date: Mar 2014
Location: ,location, location
Posts: 13,499
Bikes: Foundry Chilkoot Ti W/Ultegra Di2, Salsa Timberjack Ti, Cinelli Mash Work RandoCross Fun Time Machine, 1x9 XT Parts Hybrid, Co-Motion Cascadia, Specialized Langster, Phil Wood Apple VeloXS Frame (w/DA 7400), R+M Supercharger2 Rohloff, Habanero Ti 26
Mentioned: 54 Post(s)
Tagged: 0 Thread(s)
Quoted: 4346 Post(s)
Liked 3,982 Times
in
2,661 Posts
Please forgive me it's my first time ever working on or putting together a bike and I know less than nothing about it.
Yes, I found the two bolts that loosen the calipers (they're not the one in my 2nd photo). I'm just not sure how smoothly the wheel should move. I would think you'd want zero friction, but I can hear the wheel rubbing slightly against something (I think it's the pads). But then I heard a similar sound on the back wheel and that was already on from the factory
Other than that, the bike is put together and I took it for a quick spin. Honestly it feels just like how much I paid for it.. Cheap.. It's only a $250 Gravity Basecamp LTD26 MTB, so I'm not sure it's ever gonna feel like a good ride
Lastly, I used a foot pump to inflate the tires. The front tire was no problem, but the back tire won't inflate? Think I just need to use a real air pump for a burst of stronger air to set the inner tube? What are the chances the bike came with a leaky inner tube?
Yes, I found the two bolts that loosen the calipers (they're not the one in my 2nd photo). I'm just not sure how smoothly the wheel should move. I would think you'd want zero friction, but I can hear the wheel rubbing slightly against something (I think it's the pads). But then I heard a similar sound on the back wheel and that was already on from the factory
Other than that, the bike is put together and I took it for a quick spin. Honestly it feels just like how much I paid for it.. Cheap.. It's only a $250 Gravity Basecamp LTD26 MTB, so I'm not sure it's ever gonna feel like a good ride
Lastly, I used a foot pump to inflate the tires. The front tire was no problem, but the back tire won't inflate? Think I just need to use a real air pump for a burst of stronger air to set the inner tube? What are the chances the bike came with a leaky inner tube?
Likes For veganbikes:
11-10-20, 11:16 PM
#7
Member
Thread Starter
I would recommend paying your local shop to properly assemble and tune the bike. If you want to ride the thing safely (or as safely as a $250 bike could be) I would have a professional look at it. I would also save up money to buy an actual proper bike from that shop. I would be very careful if you decide to go on actual MTB trails wear plenty of safety gear and expect and prepare for issues.
I can already easily see now why you should stick with the top hierarchy of derailers, brakes, etc. The bike doesn't shift smoothly and just seems cheap. That said, I can also see how if turned properly and working well, it could have some giddy up and be enjoyable to ride
Thanks again,
11-11-20, 12:59 AM
#8
Senior Member

Join Date: Sep 2020
Location: Eastern Poland
Posts: 744
Bikes: Romet Jubilat x 4, Wigry x 1, Turing x 1
Mentioned: 3 Post(s)
Tagged: 0 Thread(s)
Quoted: 194 Post(s)
Liked 204 Times
in
151 Posts
Enjoying cheap is an artform in itself. I have a cheap bike with a coaster brake that often refuses to re-engage drive after using the brake, so I often have to push it and pedal for up to 200 m before the drive clunk's back in. I will swop the rear wheel for one with just a freewheel and already have a rear cantilever brake from a kids bike to fit.
It is fun, just not as many know it, and a good way to learn mechanics because a) things will go wrong, b) replacement parts are usually cheap, and c) if the frame breaks you have a whole set of parts to use on something else or sell.
It is fun, just not as many know it, and a good way to learn mechanics because a) things will go wrong, b) replacement parts are usually cheap, and c) if the frame breaks you have a whole set of parts to use on something else or sell.
Likes For Geepig:
11-11-20, 05:31 AM
#9
Senior Member
Join Date: Jan 2013
Location: South Jersey
Posts: 2,265
Mentioned: 18 Post(s)
Tagged: 0 Thread(s)
Quoted: 714 Post(s)
Liked 798 Times
in
475 Posts
Don't turn those bolts, they are what holds the caliper together. It looks like the brake is applied in the picture. The lever arm that the cable attaches to could have been bent in shipping and be wedged against the caliper, holding it closed. Try pulling that arm, so that the length of exposed cable is longer between the arm and the cable stop. That lever arm is what closes the pads and it must be free to spring open when you release the brake lever.
 11-11-20, 07:21 AM
#10
I think I know nothing.
Join Date: Aug 2004
Location: NE PA
Posts: 709
Mentioned: 6 Post(s)
Tagged: 0 Thread(s)
Quoted: 233 Post(s)
Liked 290 Times
in
204 Posts
A lot of people started their bicycle journey with an entry level bike and little knowledge of how to set up and fix their machines. Some of us jump in whole hog and learn everything we can, others pay a shop to do the work. Overall, fixing bikes is not that hard but when you don't know how you don't know how.
But we don't buy bikes to learn how to fix them, we buy them to ride. This is the main thing. As beginners we generally have just a vague idea what we want from this pastime. Most of us would confess that our participation in this hobby has evolved from what we thought we would do to what we are now doing, sometimes a big difference.
Once you get your bike set-up properly it will ride a lot better. Will it ride like a $2000 bike? No probably not but would you at this point know what a $2000 bike should ride like? My advice, free as it is, is if you have the desire to learn how to fix things then your bike is a great test bed for learning the basics. If you decide that riding bikes is for you, the next bike you get will be decided from the experience you gained from this one. But regardless, get out and ride that bike, ride the wheels off it and give it a fair trail.
11-11-20, 08:45 AM
#11
Member
Join Date: Sep 2017
Posts: 31
Mentioned: 0 Post(s)
Tagged: 0 Thread(s)
Quoted: 11 Post(s)
Likes: 0
Liked 3 Times
in
3 Posts
If you loosen the bolt on the caliper arm that grabs the cable so that the cable is freed up, the caliper arm should spring back to it's fully open position, and there should obviously be enough gap for the disc. Start here first.
Likes For Mounttesa:
11-11-20, 11:04 AM
#12
Member
Thread Starter
Enjoying cheap is an artform in itself. I have a cheap bike with a coaster brake that often refuses to re-engage drive after using the brake, so I often have to push it and pedal for up to 200 m before the drive clunk's back in. I will swop the rear wheel for one with just a freewheel and already have a rear cantilever brake from a kids bike to fit.
It is fun, just not as many know it, and a good way to learn mechanics because a) things will go wrong, b) replacement parts are usually cheap, and c) if the frame breaks you have a whole set of parts to use on something else or sell.
It is fun, just not as many know it, and a good way to learn mechanics because a) things will go wrong, b) replacement parts are usually cheap, and c) if the frame breaks you have a whole set of parts to use on something else or sell.

Sometimes the object wins, but this time it was me haha. I unmounted the assembly and figured out they had to have ran the cables wrong at the factory (or it got jumbled during packing/shipping). What was happening is that the brake cable was being pulled closed in its mount. I re-routed the cable to run along the same side as the calipers and re-mounted everything. The wheel now spins like a charm! Before it would spin for like a couple seconds maybe and you could hear it rubbing. Now it spins forever without a sound
So my first bike fix lol. Now I just gotta figure out why the back tire won't inflate. I'm going to take it to a gas station for a stronger force of air. I'm hoping that the inner tube isn't set right and somehow that will help. Otherwise, I did buy two extra tubes, but they are self seal and I'm not sure my tires are set up for them
Likes For Cacti:
11-11-20, 01:24 PM
#13
Senior Member
Join Date: Sep 2015
Location: Massachusetts
Posts: 763
Bikes: S-Works Stumpjumper HT Disc, Fuji Absolute, Kona Jake the Snake, '85 Cannondale SR900
Mentioned: 0 Post(s)
Tagged: 0 Thread(s)
Quoted: 219 Post(s)
Liked 217 Times
in
142 Posts
Thanks to all for the responses and help. You are so right! I got mad last night and just rolled up my sleeves to figure out what the heck the problem was. Who's smarter? Me? Or some inanimate object?
Sometimes the object wins, but this time it was me haha. I unmounted the assembly and figured out they had to have ran the cables wrong at the factory (or it got jumbled during packing/shipping). What was happening is that the brake cable was being pulled closed in its mount. I re-routed the cable to run along the same side as the calipers and re-mounted everything. The wheel now spins like a charm! Before it would spin for like a couple seconds maybe and you could hear it rubbing. Now it spins forever without a sound
So my first bike fix lol. Now I just gotta figure out why the back tire won't inflate. I'm going to take it to a gas station for a stronger force of air. I'm hoping that the inner tube isn't set right and somehow that will help. Otherwise, I did buy two extra tubes, but they are self seal and I'm not sure my tires are set up for them
"...a stronger force of air." vs. what? Do you have an air pump at home, a full-size floor standing pump or foot-pedal type? IF so, are you saying you are not able to get air in to inflate it at all, or that you inflate it and then it loses air pressure?
If you can't get air in, you may not be getting the pump head onto the valve stem correctly/fully. If you CAN get air in, but it's deflating, then stronger air from a gas station is NOT going to help you. Let us know what's going on there and people can suggest things about that.
11-11-20, 05:04 PM
#14
Member
Thread Starter
Congrats re: the brake, but hang on re: the rear tire...
"...a stronger force of air." vs. what? Do you have an air pump at home, a full-size floor standing pump or foot-pedal type? IF so, are you saying you are not able to get air in to inflate it at all, or that you inflate it and then it loses air pressure?
If you can't get air in, you may not be getting the pump head onto the valve stem correctly/fully. If you CAN get air in, but it's deflating, then stronger air from a gas station is NOT going to help you. Let us know what's going on there and people can suggest things about that.
Then I took it out for another short ride on paved paths and I have a question: How much glide should a bike have? I haven't ridden a bike since I was a kid, but remember them having more forward momentum than this! It's like you gotta earn every foot of distance with this bike. Once you get going, sure.. The bike will glide a bit. But even when I hit even a slight incline the bike just stopped and I have to really get on it to keep it going (I've learned to down shift well before I actually hit the incline)
I think I might be having the same problem with my rear brake as the front. I don't think the cables are routed wrong, but that the disks need to be recalibrated. If I push the bike forward (while not on it), it doesn't really move much. If I lift the back tire off the ground, the bike moves forward much more easily. Not sure if this is normal or not, but it leads me to believe that there's something needs adjusting on the back brake
I honestly can't tell how much of it is due to it being a cheap bike and how much has to do with my simply being out of shape and not remember what it's like to ride a bike
11-11-20, 08:36 PM
#15
Senior Member
Join Date: Sep 2015
Location: Massachusetts
Posts: 763
Bikes: S-Works Stumpjumper HT Disc, Fuji Absolute, Kona Jake the Snake, '85 Cannondale SR900
Mentioned: 0 Post(s)
Tagged: 0 Thread(s)
Quoted: 219 Post(s)
Liked 217 Times
in
142 Posts
It's a small foot pump (I don't think it's the stand kind). I easily filled the front tire using just my hands. When I tried the same with the rear tire, it just wasn't inflating. However, it did ride and I rode it over to a Firestone by my house and the guy filled it no problem. So I think you're right.. I wasn't getting the pump head onto the value stem correctly.
Then I took it out for another short ride on paved paths and I have a question: How much glide should a bike have? I haven't ridden a bike since I was a kid, but remember them having more forward momentum than this! It's like you gotta earn every foot of distance with this bike. Once you get going, sure.. The bike will glide a bit. But even when I hit even a slight incline the bike just stopped and I have to really get on it to keep it going (I've learned to down shift well before I actually hit the incline)
I think I might be having the same problem with my rear brake as the front. I don't think the cables are routed wrong, but that the disks need to be recalibrated. If I push the bike forward (while not on it), it doesn't really move much. If I lift the back tire off the ground, the bike moves forward much more easily. Not sure if this is normal or not, but it leads me to believe that there's something needs adjusting on the back brake
I honestly can't tell how much of it is due to it being a cheap bike and how much has to do with my simply being out of shape and not remember what it's like to ride a bike
So it�s either the rear brake needs
1. a fine-adjustment (use the little barrel to turn clockwise at the caliper arm where you can see the - above the T in the Tektro name in the factory pic above),
2. or a larger loosening: the cable on the rear brake needs to be let out a bit down by the clamp (and then retighten the bolt) as suggested by Mounttesa also
above.
11-11-20, 09:14 PM
#16
Clark W. Griswold
Join Date: Mar 2014
Location: ,location, location
Posts: 13,499
Bikes: Foundry Chilkoot Ti W/Ultegra Di2, Salsa Timberjack Ti, Cinelli Mash Work RandoCross Fun Time Machine, 1x9 XT Parts Hybrid, Co-Motion Cascadia, Specialized Langster, Phil Wood Apple VeloXS Frame (w/DA 7400), R+M Supercharger2 Rohloff, Habanero Ti 26
Mentioned: 54 Post(s)
Tagged: 0 Thread(s)
Quoted: 4346 Post(s)
Liked 3,982 Times
in
2,661 Posts
Thanks. I think I will take it to a bike shop and pay almost 50% of what the bike costs to get it properly tuned and set up correctly. I did a lot of research before I bought the bike and was told it would be fine. Getting out and riding is what's important
I can already easily see now why you should stick with the top hierarchy of derailers, brakes, etc. The bike doesn't shift smoothly and just seems cheap. That said, I can also see how if turned properly and working well, it could have some giddy up and be enjoyable to ride
Thanks again,
I can already easily see now why you should stick with the top hierarchy of derailers, brakes, etc. The bike doesn't shift smoothly and just seems cheap. That said, I can also see how if turned properly and working well, it could have some giddy up and be enjoyable to ride
Thanks again,
You don't need the top but you don't want the bottom or near the bottom. Deore is decent for the casual rider SLX or XT is good for a regular rider and enthusiast on the mountain side. Hydraulic brakes and things like thru axles are not absolutely needed but certainly will mark a higher quality bike and in many cases offer better performance. You also want to buy from a shop that offers support and service. If you are confident in your skills as a mechanic then online stuff can be great otherwise pay the piper and get it put together properly which adds more cost and still doesn't get you as far.
Ride this thing into the ground, save up some money and buy something more decent. You will learn all the things you dislike about the bike and maybe a few things you may like and can better inform you for the next bike and test riding before that.
11-12-20, 12:39 PM
#17
Member
Thread Starter
A lot of people started their bicycle journey with an entry level bike and little knowledge of how to set up and fix their machines. Some of us jump in whole hog and learn everything we can, others pay a shop to do the work. Overall, fixing bikes is not that hard but when you don't know how you don't know how..
The wheel turns, don't get me wrong. I can just hear a rubbing sound like every .5 to 1.5 rotations or so and it's bugging me. I think it's slowing the bike down. I should be able to fix this arrgggh!
11-12-20, 03:34 PM
#18
Senior Member
Join Date: Sep 2015
Location: Massachusetts
Posts: 763
Bikes: S-Works Stumpjumper HT Disc, Fuji Absolute, Kona Jake the Snake, '85 Cannondale SR900
Mentioned: 0 Post(s)
Tagged: 0 Thread(s)
Quoted: 219 Post(s)
Liked 217 Times
in
142 Posts
I agree, but what's frustrating is I'm 99% sure I know what the problem is. The disc is rubbing against the pads. If I take the assembly off the wheel turns smoothly with no rubbing noise. When I put it back on even with the pads far apart, the rubbing comes back. I checked the disc wheel and it is not bent or out of alignment. I just can't get it aligned in the center of the pads without rubbing. It went real smooth on the front tire, but this back tire just isn't working the same. I might have to take it in
The wheel turns, don't get me wrong. I can just hear a rubbing sound like every .5 to 1.5 rotations or so and it's bugging me. I think it's slowing the bike down. I should be able to fix this arrgggh!
The wheel turns, don't get me wrong. I can just hear a rubbing sound like every .5 to 1.5 rotations or so and it's bugging me. I think it's slowing the bike down. I should be able to fix this arrgggh!
11-12-20, 03:41 PM
#19
Senior Member
Join Date: Oct 2013
Location: Mich
Posts: 7,377
Bikes: RSO E-tire dropper fixie brifter
Mentioned: 0 Post(s)
Tagged: 0 Thread(s)
Quoted: 6 Post(s)
Liked 2,965 Times
in
1,915 Posts
loosen the caliper mounting from bicycle frame so it is easily free to float. slide a toothpick in between the pad & rotor on each side. tighten the caliper mounting hardware.
__________________
-Oh Hey!
-Oh Hey!
