


Motobecane C5 / C51 1979 / 1980 seatpost diameter
 10-20-21, 06:33 PM
#1
Senior Member
Thread Starter

Join Date: May 2021
Location: London
Posts: 559
Bikes: Motobecane C41, Matsu$hita Nashonaru
Mentioned: 7 Post(s)
Tagged: 0 Thread(s)
Quoted: 213 Post(s)
Liked 421 Times
in
246 Posts
Motobecane C5 / C51 1979 / 1980 seatpost diameter
I'm currently working on restoring Motobecane, probably C5 / 1979 (or C51 / 1980) and at this point pretty much gave up on getting the seized seatpost out of it undamaged (though will still try getting in some penetrating oil when I manage to get the cranks and BB off). The seatpost is pretty much standard SR Laprade, though surprisingly, not a fluted one. I started thinking about getting a replacement of some sort, grabbed my Vernier caliper and measured it. Now, it's not a digital caliper, but I think it gives me 26.8 mm. Which surprised me a bit, because checking in 1979 Motobecane catalog, it gives seatpost diameter for Team Champion (so C5) as 25.5 mm. For my Grand Sprint, the values given in the catalogue were correct, but in this case 25.5 seatpost would definitely result in seat tube collapse. Also, why would they use different sized seatpost for C5 and Team Champion models? Ok, there are some differences regarding components, but I would have thought at least diameters of the tubing are the same...
The other thing is that it's absolutely stuck and extremely snug, so I'm thinking, perhaps someone made a mistake and used a seatpost too wide for the seat tube? It would seem the bicycle was mostly, if not completely, with the components it had from new, but mistakes happen. The seat tube seems to be totally fine and not deformed one way or another, but perhaps it should be 26.6 mm instead?
So the first question: does anyone have a C5 of 1979 or C51 of 1980 and could measure their seatpost or the inner diameter of the seat tube? And the second question: what vintage fluted seatpost would you recommend to use as a replacement? Something that can be adjusted with Allen key from underneath and not too heavy?
 10-20-21, 06:46 PM
#2
Drip, Drip.
Join Date: Oct 2020
Location: Southern Ontario
Posts: 1,575
Bikes: Trek Verve E bike, Felt Doctrine 4 XC, Opus Horizon Apex 1
Mentioned: 8 Post(s)
Tagged: 0 Thread(s)
Quoted: 1034 Post(s)
Liked 193 Times
in
163 Posts
I'm currently working on restoring Motobecane, probably C5 / 1979 (or C51 / 1980) and at this point pretty much gave up on getting the seized seatpost out of it undamaged (though will still try getting in some penetrating oil when I manage to get the cranks and BB off). The seatpost is pretty much standard SR Laprade, though surprisingly, not a fluted one. I started thinking about getting a replacement of some sort, grabbed my Vernier caliper and measured it. Now, it's not a digital caliper, but I think it gives me 26.8 mm. Which surprised me a bit, because checking in 1979 Motobecane catalog, it gives seatpost diameter for Team Champion (so C5) as 25.5 mm. For my Grand Sprint, the values given in the catalogue were correct, but in this case 25.5 seatpost would definitely result in seat tube collapse. Also, why would they use different sized seatpost for C5 and Team Champion models? Ok, there are some differences regarding components, but I would have thought at least diameters of the tubing are the same...
The other thing is that it's absolutely stuck and extremely snug, so I'm thinking, perhaps someone made a mistake and used a seatpost too wide for the seat tube? It would seem the bicycle was mostly, if not completely, with the components it had from new, but mistakes happen. The seat tube seems to be totally fine and not deformed one way or another, but perhaps it should be 26.6 mm instead?
So the first question: does anyone have a C5 of 1979 or C51 of 1980 and could measure their seatpost or the inner diameter of the seat tube? And the second question: what vintage fluted seatpost would you recommend to use as a replacement? Something that can be adjusted with Allen key from underneath and not too heavy?
The other thing is that it's absolutely stuck and extremely snug, so I'm thinking, perhaps someone made a mistake and used a seatpost too wide for the seat tube? It would seem the bicycle was mostly, if not completely, with the components it had from new, but mistakes happen. The seat tube seems to be totally fine and not deformed one way or another, but perhaps it should be 26.6 mm instead?
So the first question: does anyone have a C5 of 1979 or C51 of 1980 and could measure their seatpost or the inner diameter of the seat tube? And the second question: what vintage fluted seatpost would you recommend to use as a replacement? Something that can be adjusted with Allen key from underneath and not too heavy?
If you really want to get that seatpost out, you will have to assess whether risking some frame bending will be worth it to you. If you saw what the auto body shop mechanics did to get the old seatpost out of my norco did, you'll cringe. But they got it done after taking a blowtorch to the seat tube and literally ripping the damn thing out with a hydraulic car frame puller. Hopefully you won't have to go to such extreme measures with yours.
10-20-21, 08:24 PM
#3

Friendship is Magic

Join Date: Nov 2010
Location: Sacramento, CA
Posts: 22,984
Bikes: old ones
Mentioned: 304 Post(s)
Tagged: 0 Thread(s)
Quoted: 26394 Post(s)
Liked 10,368 Times
in
7,198 Posts
.
...from prior experience, I would have guessed 26.6, but there are several things going on here. One is that posts really only came in designated intervals of .2 mm from SR in the 70's. At least that's all I've ever seen. The second is that often they can be off by .1mm. So sometimes you can fit several seat posts in a frame and discover that one seems to fit better than the others. Lastly, the final finishing work on a frame includes reaming the seat lug and the seat tube, to get a nice, even, cylindrical fit for whatever post is fitted to the bike. Sometimes, the manufacturing process distorts the seat lug enough off round, that reaming the thing (and the top 8 or 10 inches of the seat tube) a little oversized is the easiest and simplest fix.
So your bike might have left the manufacturer with a slightly larger post.
I use a lot of LaPrade posts in my own French bicycles here, because they are relatively common in the used parts stream, in sizes that fit French metric tubing, like 26.4 and 26.6. There are plenty of fluted ones around, and many of them use a single bolt from underneath setup. Personally, I think the ones with side plates that clamp onto the saddle rails are a little more solid, once installed, but they all work pretty well.
I've never found online charts of seat post sizes of particular help in all of this. By the time a bicycle gets to me from the 1970's, it has had many adventures, some of which can affect seat post fitting.
 10-21-21, 03:36 AM
#4
Senior Member
Thread Starter
Join Date: May 2021
Location: London
Posts: 559
Bikes: Motobecane C41, Matsu$hita Nashonaru
Mentioned: 7 Post(s)
Tagged: 0 Thread(s)
Quoted: 213 Post(s)
Liked 421 Times
in
246 Posts
Its more than likely to be a 25.5mm seatpost.
If you really want to get that seatpost out, you will have to assess whether risking some frame bending will be worth it to you. If you saw what the auto body shop mechanics did to get the old seatpost out of my norco did, you'll cringe. But they got it done after taking a blowtorch to the seat tube and literally ripping the damn thing out with a hydraulic car frame puller. Hopefully you won't have to go to such extreme measures with yours.
If you really want to get that seatpost out, you will have to assess whether risking some frame bending will be worth it to you. If you saw what the auto body shop mechanics did to get the old seatpost out of my norco did, you'll cringe. But they got it done after taking a blowtorch to the seat tube and literally ripping the damn thing out with a hydraulic car frame puller. Hopefully you won't have to go to such extreme measures with yours.
 The plan for now is to wait until I get the BB out (which is going to be a challenge of its own, as it's a Stronglight 105ter crankset I don't have the right crank puller for), soak the seat tube with penetrating oil from the BB side and see if that helps. If it doesn't allow me to remove the seat post without damaging it, the next step will be banging it out. If that doesn't help, I will cut the seat post and use the hack saw to cut the walls of it and collapse it.
10-21-21, 03:54 AM
The plan for now is to wait until I get the BB out (which is going to be a challenge of its own, as it's a Stronglight 105ter crankset I don't have the right crank puller for), soak the seat tube with penetrating oil from the BB side and see if that helps. If it doesn't allow me to remove the seat post without damaging it, the next step will be banging it out. If that doesn't help, I will cut the seat post and use the hack saw to cut the walls of it and collapse it.
10-21-21, 03:54 AM
#5
Senior Member
Thread Starter
Join Date: May 2021
Location: London
Posts: 559
Bikes: Motobecane C41, Matsu$hita Nashonaru
Mentioned: 7 Post(s)
Tagged: 0 Thread(s)
Quoted: 213 Post(s)
Liked 421 Times
in
246 Posts
.
...from prior experience, I would have guessed 26.6, but there are several things going on here. One is that posts really only came in designated intervals of .2 mm from SR in the 70's. At least that's all I've ever seen. The second is that often they can be off by .1mm. So sometimes you can fit several seat posts in a frame and discover that one seems to fit better than the others. Lastly, the final finishing work on a frame includes reaming the seat lug and the seat tube, to get a nice, even, cylindrical fit for whatever post is fitted to the bike. Sometimes, the manufacturing process distorts the seat lug enough off round, that reaming the thing (and the top 8 or 10 inches of the seat tube) a little oversized is the easiest and simplest fix.
So your bike might have left the manufacturer with a slightly larger post.
I use a lot of LaPrade posts in my own French bicycles here, because they are relatively common in the used parts stream, in sizes that fit French metric tubing, like 26.4 and 26.6. There are plenty of fluted ones around, and many of them use a single bolt from underneath setup. Personally, I think the ones with side plates that clamp onto the saddle rails are a little more solid, once installed, but they all work pretty well.
I've never found online charts of seat post sizes of particular help in all of this. By the time a bicycle gets to me from the 1970's, it has had many adventures, some of which can affect seat post fitting.
...from prior experience, I would have guessed 26.6, but there are several things going on here. One is that posts really only came in designated intervals of .2 mm from SR in the 70's. At least that's all I've ever seen. The second is that often they can be off by .1mm. So sometimes you can fit several seat posts in a frame and discover that one seems to fit better than the others. Lastly, the final finishing work on a frame includes reaming the seat lug and the seat tube, to get a nice, even, cylindrical fit for whatever post is fitted to the bike. Sometimes, the manufacturing process distorts the seat lug enough off round, that reaming the thing (and the top 8 or 10 inches of the seat tube) a little oversized is the easiest and simplest fix.
So your bike might have left the manufacturer with a slightly larger post.
I use a lot of LaPrade posts in my own French bicycles here, because they are relatively common in the used parts stream, in sizes that fit French metric tubing, like 26.4 and 26.6. There are plenty of fluted ones around, and many of them use a single bolt from underneath setup. Personally, I think the ones with side plates that clamp onto the saddle rails are a little more solid, once installed, but they all work pretty well.
I've never found online charts of seat post sizes of particular help in all of this. By the time a bicycle gets to me from the 1970's, it has had many adventures, some of which can affect seat post fitting.

I have SR CT-P6 with side plates type of saddle rails clamp on my other bicycle. Or something similar, it's not branded, but they sometimes used stickers instead of etching. I didn't have to adjust it even once last year with the saddle and bicycle in daily use. I sort of like this type for aesthetic reasons as well, the look is more unique. I'm wondering if any Italian brand used similar design.
 10-21-21, 09:19 AM
#6
Friendship is Magic
Join Date: Nov 2010
Location: Sacramento, CA
Posts: 22,984
Bikes: old ones
Mentioned: 304 Post(s)
Tagged: 0 Thread(s)
Quoted: 26394 Post(s)
Liked 10,368 Times
in
7,198 Posts
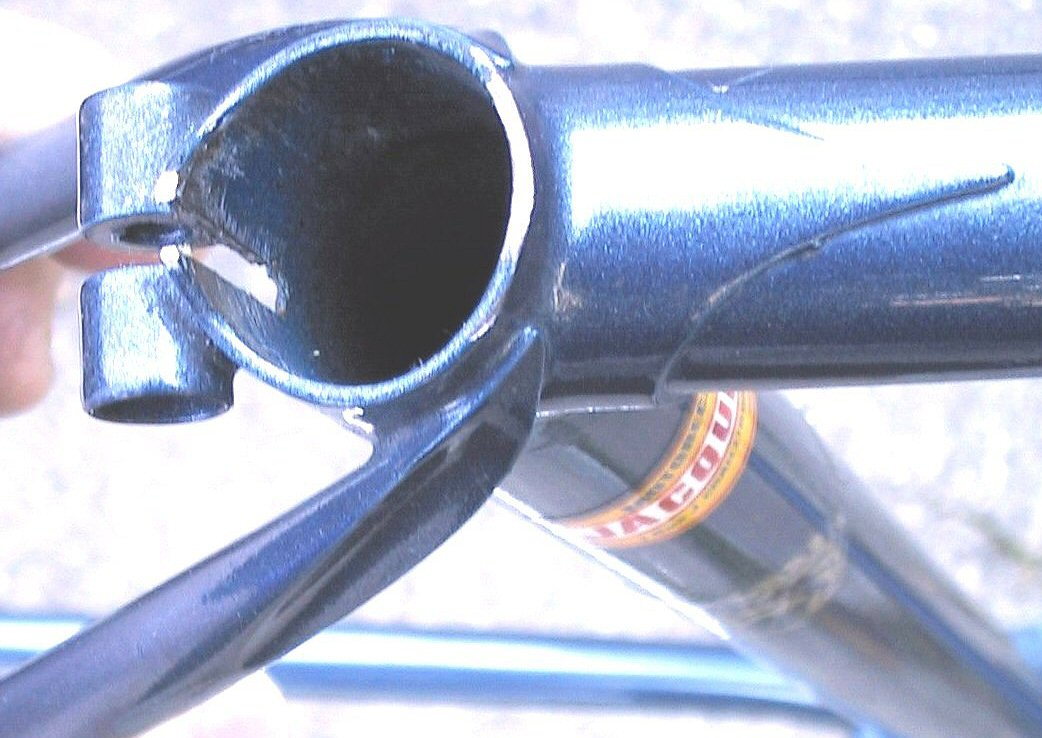
That's some interesting information there. Of course, it's a bit naive of me to assume the seat posts would be all manufactured with total precision. The reason why I decided to ask people for the measurements of their seatposts is primarily so I can make an "educated guess" as I couldn't find official information anywhere. Looking at the seat post today, I think the top of the seat tube slot / cut out goes a bit wider than the bottom (will have to measure that later). That would mean the seat post itself might be a bit too wide. Attached the photo (red bike).
But certainly many bicycles get something tooo big jammed in there, by owners who don't know any better. Best of luck in the removal. The best penetrating oil for this is a 50/50 mix of acetone and automatic transmission fluid.
And if you have, or can access, a large, firmly mounted bench vise, clamping the post in the vise and twisting the frame off (two people is better...one twists the frame, while the other pulls on it in the direction off extraction), works pretty well in many cases. The post will be ruined, but you wouldn't want to reuse that one anyway.
10-21-21, 09:55 AM
#7
Drip, Drip.
Join Date: Oct 2020
Location: Southern Ontario
Posts: 1,575
Bikes: Trek Verve E bike, Felt Doctrine 4 XC, Opus Horizon Apex 1
Mentioned: 8 Post(s)
Tagged: 0 Thread(s)
Quoted: 1034 Post(s)
Liked 193 Times
in
163 Posts
Very high chance that the soaking and bench vice method won't break that seatpost free.
10-21-21, 03:42 PM
#8
Senior Member
Thread Starter
Join Date: May 2021
Location: London
Posts: 559
Bikes: Motobecane C41, Matsu$hita Nashonaru
Mentioned: 7 Post(s)
Tagged: 0 Thread(s)
Quoted: 213 Post(s)
Liked 421 Times
in
246 Posts
...the other thing that happens, is that sometimes people will take a seat post that is a little oversized (in this case 26.8), and reduce the diameter of the inserted portion by sanding. I have done this myself, either because the only seat post I have handy is the slightly larger size, or to achieve a better fit in a seat tube that feels a little large, and the slip fit is a little loose, using the smaller size.
But certainly many bicycles get something tooo big jammed in there, by owners who don't know any better. Best of luck in the removal. The best penetrating oil for this is a 50/50 mix of acetone and automatic transmission fluid.
And if you have, or can access, a large, firmly mounted bench vise, clamping the post in the vise and twisting the frame off (two people is better...one twists the frame, while the other pulls on it in the direction off extraction), works pretty well in many cases. The post will be ruined, but you wouldn't want to reuse that one anyway.
Which is fine, because I prefer to make sure the frame stays intact, don't care that much about the seat post. I will be using acetone and transmission oil mix when I get off the crank. It did help with the stem (which was stuck as well), so here's hoping.With the previous bicycle the seatpost I received was rather dirty and scuffed, so I effectively shaved off a bit of its diameter whilst cleaning it and polishing it. On the bright side it did fit much better afterwards. I mean I will try to get the right size this time anyway, worst case scenario I can use a shim with it if polishing makes it too loose somehow.
10-21-21, 07:25 PM
#10
Senior Member
This guy says his 1980 C5 has a 26.6 seat post.
A Long Abandoned Motobecane C5 Le Champion Road Bike
A Long Abandoned Motobecane C5 Le Champion Road Bike
10-22-21, 06:17 PM
#11
Senior Member
Thread Starter
Join Date: May 2021
Location: London
Posts: 559
Bikes: Motobecane C41, Matsu$hita Nashonaru
Mentioned: 7 Post(s)
Tagged: 0 Thread(s)
Quoted: 213 Post(s)
Liked 421 Times
in
246 Posts
This guy says his 1980 C5 has a 26.6 seat post.
A Long Abandoned Motobecane C5 Le Champion Road Bike
A Long Abandoned Motobecane C5 Le Champion Road Bike
Today's attempt at getting the seat post out wasn't successful. It's still no rush, so I'll probably try a gentle approach a few more times before signing it off.
10-23-21, 08:51 PM
#12
verktyg

Join Date: Jul 2006
Location: SF Bay Area
Posts: 4,030
Bikes: Current favorites: 1988 Peugeot Birraritz, 1984 Gitane Super Corsa, 1980s DeRosa, 1981 Bianchi Campione Del Mondo, 1992 Paramount OS, 1988 Colnago Technos, 1985 RalieghUSA SBDU Team Pro
Mentioned: 207 Post(s)
Tagged: 0 Thread(s)
Quoted: 1036 Post(s)
Liked 1,237 Times
in
653 Posts
Guesses, Guesses, Guesses
Being snarky but there are tons of info on this subject including many posts that I wrote over the past 16 years.
1. VintageSteelEU "I started thinking about getting a replacement of some sort, grabbed my Vernier caliper and measured it. Now, it's not a digital caliper, but I think it gives me 26.8 mm. Which surprised me a bit, because checking in 1979 Motobecane catalog, it gives seatpost diameter for Team Champion (so C5) as 25.5 mm."
A. It's very easy to get an inaccurate reading with Vernier calipers. Even though they have markings showing increments of 0.1mm, a resolution of 0.5mm is more realistic. (over 50 years of experience using precision measuring tools)
B. Many seatposts were not accurately machined, including Campagnolo's. Many, no most seatposts that I've measured with digital calipers or micrometers are not uniformly round and or the diameter varies up and down the length of the post.
C. The 25.5mm spec is WRONG! That size seatpost would have been used on many low end Gas Pipe bikes. Some later carbon fiber frames used 25.0mm or 25.5mm seat posts. Almost all advertising literature like catalogs and so on were created by non-technical layout or graphic artists. Someone with knowledge about the bikes failed to check the copy!
D. Here are the seatpost diameter specs from the 1979 Motobecane US catalog with corrections: Grand Record - 26.2mm not 25.2mm, Le Champion - 26.6mm not 26.5mm and Team Champion (C5) with a Campagnolo 4051 Super Record Seatpost - 26.6mm not 25.5mm.

2. "For my Grand Sprint, the values given in the catalogue were correct, but in this case 25.5 seatpost would definitely result in seat tube collapse. Also, why would they use different sized seatpost for C5 and Team Champion models? Ok, there are some differences regarding components, but I would have thought at least diameters of the tubing are the same..."
Please read my comments above...
A. Background history: Almost all French bikes had Metric diameter tubing - 26mm top tubes and 28mm seat and down tunes. From the 1960's up through the early 1980's most "production" French bikes made with Reynolds 531 had 1.0mm x 0.7mm wall thicknesses in the 3 main tubes. The seat tubes were single butted, 1.0mm thick at the bottom and 0.7mm at the top. 26.4mm was the standard diameter seatposts for these frames.
B. Some of the better quality French production bikes used lighter gauge Reynolds 531 with 0.9mm x 0.6mm main tubes. The 0.9mm x 0.6mm seat tubes used 26.6mm seatposts. A few team replica models were made of Reynolds 531SL tubing - renamed 531C or Competition in 1983. Those seat tubes had wall thicknesses of 0.8mm x 0.5mm and they used 26.8mm seatposts.
C. In 1978 Motobecane changed from Reynolds 531 to Columbus SL tubing in the Champion Team /Team Champion bikes. They did the same with some European models too. The wall thickness of SL tubing was 0.9mm x 0.6mm, same as the lighter gauge Reynolds 531 tubing. They too used 26.6mm seatposts.
D. In 1978 Motobecane started using various flavors of Durifort and Vitus tubing. Straight gauge Durifort 888 and Vitus 888 had a seat tube wall thickness of 0.8mm. Butted Vitus 172 tubes used on the Grand Touring, Grand Jubilee, Grand Sprint and Grand Record models had a wall thickness of 1.1mm x 0.75mm. Motobecane used 26.2mm seatposts for all of the all those types of tubes regardless of the wall thickness. Probably because it was easier to stock one size of seatpost for all those models.
3. The REALITY!
A. Very few production bikes ever shipped with round, accurately sized seat tubes.
B. Why? A number of reasons: Seat lugs that were out of round or out of size from the factory. Seat tubes and lugs frequently distorted from the heat of brazing, especially when attaching the seat stays. The seat tube inside the lug bulged outward.


C. Bike manufactures rarely rounded out or reamed the seat tubes after brazing, even some of holy of holiest Italian builders. At our shop in the 70's we machined a set of steel mandrels in the correct seat post sizes to fix the factory problems.
When I got my early 80's DeRosa grail frame a few years ago, I was sorely disappointed in prep things like the seat tube/seat lug was out of round. I had to round it out, re-ream and hone it to get it to the proper 27.2mm size!
My handy dandy old steel MTB stem works great for rounding out seat tubes.

After re-work..

D. My all Campy 1972 Gitane Super Corsa came from the factory with an undersized 25.8mm Campy seatpost instead of the correct 26.4mm post. The seat tube was severely out of round! Rounded it out, reamed and honed it, voil�!
This is my NOS 1982 Motobecane Grand Record frame. Like many bikes an undersized hone is sometimes used to clean out paint over spray inside the seat tube so a seatpost could be forced in. The easy fix was just to supply an undersized seatpost with the bike. That happened a LOT!

4. Seatpost sizes: better quality alloy seatposts were made in increments of 0.2mm sizes - 26.2mm, 26.4mm, 26.6mm, 26.8mm, 27.0mm 27.2mm and so on. But read my post above about manufacturing variances.
One other thing, YMMV on the tubing thicknesses used on some larger sized frames 62cm and up. Some bike makers switched back to the heavier gauge Reynolds with 1.0mm x 0.7mm main tubes on larger frames. Same thing with Columbus SL to SP tubes.
5. I'm not going to get into stuck seatpost and stems - A glob of grease during assembly pretty much eliminates the problem....
My Centurion Iron Man that some TriAth fool rode hard and truly put away wet. Notice the tools of massive destruction required for extraction. Notice the amount of rust and electrolytic corrosion - why penetrating oils and other chemicals sometimes don't work:

One last thing that I forgot to mention... It didn't happen very much but BITD, more than a few frames were made with the seat tube upside. The thick section was at the top or a down tube was used instead of a seat tube. Not just French production bikes but I've seen this problem on even a few high end Italian bikes.
If the top of the seat tube ended up with a wall thickness of 1.0mm or even 0.9mm it would require a much smaller seat post.
Hope this answers some of your questions...
verktyg Drifting into Bruce Gordon's grouchy school of thought!
1. VintageSteelEU "I started thinking about getting a replacement of some sort, grabbed my Vernier caliper and measured it. Now, it's not a digital caliper, but I think it gives me 26.8 mm. Which surprised me a bit, because checking in 1979 Motobecane catalog, it gives seatpost diameter for Team Champion (so C5) as 25.5 mm."
A. It's very easy to get an inaccurate reading with Vernier calipers. Even though they have markings showing increments of 0.1mm, a resolution of 0.5mm is more realistic. (over 50 years of experience using precision measuring tools)
B. Many seatposts were not accurately machined, including Campagnolo's. Many, no most seatposts that I've measured with digital calipers or micrometers are not uniformly round and or the diameter varies up and down the length of the post.
C. The 25.5mm spec is WRONG! That size seatpost would have been used on many low end Gas Pipe bikes. Some later carbon fiber frames used 25.0mm or 25.5mm seat posts. Almost all advertising literature like catalogs and so on were created by non-technical layout or graphic artists. Someone with knowledge about the bikes failed to check the copy!
D. Here are the seatpost diameter specs from the 1979 Motobecane US catalog with corrections: Grand Record - 26.2mm not 25.2mm, Le Champion - 26.6mm not 26.5mm and Team Champion (C5) with a Campagnolo 4051 Super Record Seatpost - 26.6mm not 25.5mm.
2. "For my Grand Sprint, the values given in the catalogue were correct, but in this case 25.5 seatpost would definitely result in seat tube collapse. Also, why would they use different sized seatpost for C5 and Team Champion models? Ok, there are some differences regarding components, but I would have thought at least diameters of the tubing are the same..."
Please read my comments above...
A. Background history: Almost all French bikes had Metric diameter tubing - 26mm top tubes and 28mm seat and down tunes. From the 1960's up through the early 1980's most "production" French bikes made with Reynolds 531 had 1.0mm x 0.7mm wall thicknesses in the 3 main tubes. The seat tubes were single butted, 1.0mm thick at the bottom and 0.7mm at the top. 26.4mm was the standard diameter seatposts for these frames.
B. Some of the better quality French production bikes used lighter gauge Reynolds 531 with 0.9mm x 0.6mm main tubes. The 0.9mm x 0.6mm seat tubes used 26.6mm seatposts. A few team replica models were made of Reynolds 531SL tubing - renamed 531C or Competition in 1983. Those seat tubes had wall thicknesses of 0.8mm x 0.5mm and they used 26.8mm seatposts.
C. In 1978 Motobecane changed from Reynolds 531 to Columbus SL tubing in the Champion Team /Team Champion bikes. They did the same with some European models too. The wall thickness of SL tubing was 0.9mm x 0.6mm, same as the lighter gauge Reynolds 531 tubing. They too used 26.6mm seatposts.
D. In 1978 Motobecane started using various flavors of Durifort and Vitus tubing. Straight gauge Durifort 888 and Vitus 888 had a seat tube wall thickness of 0.8mm. Butted Vitus 172 tubes used on the Grand Touring, Grand Jubilee, Grand Sprint and Grand Record models had a wall thickness of 1.1mm x 0.75mm. Motobecane used 26.2mm seatposts for all of the all those types of tubes regardless of the wall thickness. Probably because it was easier to stock one size of seatpost for all those models.
3. The REALITY!
A. Very few production bikes ever shipped with round, accurately sized seat tubes.
B. Why? A number of reasons: Seat lugs that were out of round or out of size from the factory. Seat tubes and lugs frequently distorted from the heat of brazing, especially when attaching the seat stays. The seat tube inside the lug bulged outward.
C. Bike manufactures rarely rounded out or reamed the seat tubes after brazing, even some of holy of holiest Italian builders. At our shop in the 70's we machined a set of steel mandrels in the correct seat post sizes to fix the factory problems.
When I got my early 80's DeRosa grail frame a few years ago, I was sorely disappointed in prep things like the seat tube/seat lug was out of round. I had to round it out, re-ream and hone it to get it to the proper 27.2mm size!
My handy dandy old steel MTB stem works great for rounding out seat tubes.
After re-work..
D. My all Campy 1972 Gitane Super Corsa came from the factory with an undersized 25.8mm Campy seatpost instead of the correct 26.4mm post. The seat tube was severely out of round! Rounded it out, reamed and honed it, voil�!
This is my NOS 1982 Motobecane Grand Record frame. Like many bikes an undersized hone is sometimes used to clean out paint over spray inside the seat tube so a seatpost could be forced in. The easy fix was just to supply an undersized seatpost with the bike. That happened a LOT!
4. Seatpost sizes: better quality alloy seatposts were made in increments of 0.2mm sizes - 26.2mm, 26.4mm, 26.6mm, 26.8mm, 27.0mm 27.2mm and so on. But read my post above about manufacturing variances.
One other thing, YMMV on the tubing thicknesses used on some larger sized frames 62cm and up. Some bike makers switched back to the heavier gauge Reynolds with 1.0mm x 0.7mm main tubes on larger frames. Same thing with Columbus SL to SP tubes.
5. I'm not going to get into stuck seatpost and stems - A glob of grease during assembly pretty much eliminates the problem....
My Centurion Iron Man that some TriAth fool rode hard and truly put away wet. Notice the tools of massive destruction required for extraction. Notice the amount of rust and electrolytic corrosion - why penetrating oils and other chemicals sometimes don't work:
One last thing that I forgot to mention... It didn't happen very much but BITD, more than a few frames were made with the seat tube upside. The thick section was at the top or a down tube was used instead of a seat tube. Not just French production bikes but I've seen this problem on even a few high end Italian bikes.
If the top of the seat tube ended up with a wall thickness of 1.0mm or even 0.9mm it would require a much smaller seat post.
Hope this answers some of your questions...
verktyg
Drifting into Bruce Gordon's grouchy school of thought!
__________________
Don't believe everything you think! History is written by those who weren't there....
Chas. ;-)
Don't believe everything you think! History is written by those who weren't there....
Chas. ;-)
Last edited by verktyg; 10-24-21 at 01:34 AM.
Likes For verktyg:
10-23-21, 09:58 PM
#13
Senior Member

Join Date: May 2010
Location: Bastrop Texas
Posts: 4,467
Bikes: Univega, Peu P6, Peu PR-10, Ted Williams, Peu UO-8, Peu UO-18 Mixte, Peu Dolomites
Mentioned: 13 Post(s)
Tagged: 0 Thread(s)
Quoted: 957 Post(s)
Liked 1,619 Times
in
1,039 Posts
So after you get your seat post out don't be fooled by getting the standard size seat post its supposed to have. I have been fooled many times. Not only on the French bikes. Take a smaller sized pipe and wrap tape around it till you get a good fit from top to bottom of the seat tube. Now measure that diameter and get a post that size. Don't argue with it. Just get one that size. On some of my old French bikes I have had to get a post just slightly larger in diameter and then take it to a machine shop where it was turned down to the right size. The right size seat post matters and is well worth the trouble, especially on a nice Motobecane...
__________________
 No matter where you're at... There you are... Δf:=f(1/2)-f(-1/2)
No matter where you're at... There you are... Δf:=f(1/2)-f(-1/2)
10-24-21, 01:02 AM
#14
verktyg
Join Date: Jul 2006
Location: SF Bay Area
Posts: 4,030
Bikes: Current favorites: 1988 Peugeot Birraritz, 1984 Gitane Super Corsa, 1980s DeRosa, 1981 Bianchi Campione Del Mondo, 1992 Paramount OS, 1988 Colnago Technos, 1985 RalieghUSA SBDU Team Pro
Mentioned: 207 Post(s)
Tagged: 0 Thread(s)
Quoted: 1036 Post(s)
Liked 1,237 Times
in
653 Posts
Reinventing the Wheel?
So after you get your seat post out don't be fooled by getting the standard size seat post its supposed to have. I have been fooled many times. Not only on the French bikes. Take a smaller sized pipe and wrap tape around it till you get a good fit from top to bottom of the seat tube. Now measure that diameter and get a post that size. Don't argue with it. Just get one that size. On some of my old French bikes I have had to get a post just slightly larger in diameter and then take it to a machine shop where it was turned down to the right size. The right size seat post matters and is well worth the trouble, especially on a nice Motobecane...

As I mentioned above the most important part of the operation after cleaning out all the gunk, dirt, corrosion and other crap out of the inside the seat tube is rounding it out as much as possible, reaming then honing.
Not everyone has the tools to do this but...
Once a seat post has been removed, spreading the "ears" on the seat lug is a good first start.
With a proper or even close fitting seatpost the slot between the clamping bolt ears should be straight and parallel not like this one which is totally collapsed. GENTLY use a screwdriver or some other tool to pry from the rear and top to spread the clamp ears. Stop when the sides of slot are parallel as in the green frame below.


This whole operation is best done with the BB removed or the frame turned upward so the seat tube points down and the crud doesn't get into the BB.
Take some 100 or 120 grit abrasive cloth or metal working sand paper and wrap it around a 1" x 8" wooden dowel or similar object. Spin it around inside the seat tube until the surface is smooth. The dowel or what ever should be long enough to get at least 6" to 8" inside the tube.
After it's smooth use some solvent to clean out all of the grit and corrosion. Isopropyl or rubbing alcohol works good for this and it's safe to use.
Now find a standard size seatpost to fit. Alloy seatposts were/are made in metric sizes in 0.2mm increments: 26.2mm, 26.4mm, 26.6mm, 26.8mm, 27.0mm, 27.2mm and so on. The seatpost pictured in the red frame is a 26.4mm in a seat tube made for a 26.6mm post so find one with a close fit.
One reason for smoothing out the inside of the seat tube is for easy insertion. The other is to ease minor adjustments or easy removal. It also helps to prevent snake skin scratches in the soft aluminum seatpost shaft.
The snake marks on this post have been sanded down a little but besides being ugly they can make adjustment harder.

While you're at it use a small file to clean up any burrs inside the top of the seat tube:


If the seatpost is slightly oversize, rather than spend a bunch of money to have a machine shop turn down the shaft for boucou bucks, the 100-120 grit abrasive cloth or sand paper can be used to take a little materiel off. Seatposts are frequently slightly oversized at the bottom. Sanding that down helps insertion a whole lot!
Last thing, during assembly, take a glop of grease and spread it around inside the tube and also on the outside of the post. A little messy but it can prevent a stuck post or stem for that matter.
verktyg
__________________
Don't believe everything you think! History is written by those who weren't there....
Chas. ;-)
Don't believe everything you think! History is written by those who weren't there....
Chas. ;-)
Last edited by verktyg; 10-24-21 at 01:26 AM.
Likes For verktyg:
10-24-21, 10:50 AM
#15
Senior Member
Join Date: May 2010
Location: Bastrop Texas
Posts: 4,467
Bikes: Univega, Peu P6, Peu PR-10, Ted Williams, Peu UO-8, Peu UO-18 Mixte, Peu Dolomites
Mentioned: 13 Post(s)
Tagged: 0 Thread(s)
Quoted: 957 Post(s)
Liked 1,619 Times
in
1,039 Posts
Thank you for the instructions they are detailed and needed. I appreciate your time in doing this. I need to clarify my post in the need for taking a seat post to a machine shop. The bikes I have had the most trouble with have been the old UO series Peugeots. Mostly because the original seat posts are made of steel and have been rusted into the the seat tube, or forced by some yahoo taking a hammer to a nonstandard post. To be sure after I got them out I had to do major work just to get the seat tube back to looking normal. Then came the problem of finding a silver alloy 24.2 seat tube. WOW... those are getting increasingly rare. Here in Bastop Tx the closest machine shop is in Giddings Texas. Luckily turning a seat post costs a few beers, bottle of bourbon, or a nice vintage spare part, bicycle or otherwise. I don't know what it takes to get other machine shops interested in turning a seat post and it could be cost prohibitive. Turning a 25.4 alloy seat post to 24.2-24.6 has not been a problem and the end result is nice. Fixing up the old UO series has been fun and although timely the overall cost of lower grade components makes it possible.
__________________
No matter where you're at... There you are... Δf:=f(1/2)-f(-1/2)
No matter where you're at... There you are... Δf:=f(1/2)-f(-1/2)
10-24-21, 11:03 AM
#16
Edumacator
Join Date: Jan 2018
Location: Goose Creek, SC
Posts: 6,780
Bikes: '87 Crestdale, '87 Basso Gap, '92 Rossin Performance EL-OS, 1990 VanTuyl, 1980s Losa, 1985 Trek 670, 1982 AD SLE, 1987 PX10, etc...
Mentioned: 59 Post(s)
Tagged: 0 Thread(s)
Quoted: 2434 Post(s)
Liked 3,109 Times
in
1,958 Posts
verktyg
How do you use the MTB stem to round out the tube? Is it the 1 1/8 variety?
just tighten the quill a bit and spin the stem?
How do you use the MTB stem to round out the tube? Is it the 1 1/8 variety?
just tighten the quill a bit and spin the stem?
__________________
1987 Crest Cannondale, 1987 Basso Gap, 1992 Rossin Performance EL, 1990ish Van Tuyl, 1985 Trek 670, 1982 AD SLE, 2003 Pinarello Surprise, 1990ish MBK Atlantique, 1987 Peugeot Competition, 1987 Nishiki Tri-A, 1981 Faggin, 1996 Cannondale M500, 1984 Mercian, 1982 AD SuperLeicht, 1985 Massi (model unknown), 1988 Daccordi Griffe , 1989 Fauxsin MTB, 1981 Ciocc Mockba, 1992 Bianchi Giro, 1977 Colnago Super
1987 Crest Cannondale, 1987 Basso Gap, 1992 Rossin Performance EL, 1990ish Van Tuyl, 1985 Trek 670, 1982 AD SLE, 2003 Pinarello Surprise, 1990ish MBK Atlantique, 1987 Peugeot Competition, 1987 Nishiki Tri-A, 1981 Faggin, 1996 Cannondale M500, 1984 Mercian, 1982 AD SuperLeicht, 1985 Massi (model unknown), 1988 Daccordi Griffe , 1989 Fauxsin MTB, 1981 Ciocc Mockba, 1992 Bianchi Giro, 1977 Colnago Super
10-24-21, 05:16 PM
#17
Senior Member
Thread Starter
Join Date: May 2021
Location: London
Posts: 559
Bikes: Motobecane C41, Matsu$hita Nashonaru
Mentioned: 7 Post(s)
Tagged: 0 Thread(s)
Quoted: 213 Post(s)
Liked 421 Times
in
246 Posts
Well, my Vernier calipers are not very precise. But I am aware of production variations and things going slightly weird in manufacturing of any product. As for the Grand Sprint, which I wrote about before where the "catalogue diameter" fits, I didn't measure it recently and I might be wrong. When buying the seat post, I have measured the seat tube inside (several times at various places around it to arrive at some conclusion) and then got the seat post. Which was pretty tight when I got it, but luckily required some proper cleaning and polishing. I have also cleaned and scrubbed the seat tube itself inside before painting the frame. Whatever I got back then, it seems to fit perfectly. Not too loose, not too tight. The seat post got also greased, though my technique is to apply grease and then wipe it out. It's still on the stem, but a very thin layer of it. That bike has Vitus 888 tubing, I assume it is plain gauge. I'll need to measure the current seat post in there again out of curiosity, but in any case, it doesn't cause me any problems right now, whatever size it is, it works.
Thank you for pointing out inconsistencies in the catalogue info and the correct values. I felt something in there doesn't quite compute. The frame I'm working on now is Columbus SL with Huret tips.
That's a great rounding tool you have there. I'll have to have a look around the workshop tomorrow, I might have some metal pipes of the correct diameter, I can grab an off cut and add a handle to it when I finally get a chance to have a look inside the seat tube. Also, great advice on filing the edges of the seat tube. I'm definitely going to look into it as well.
That DeRosa frame looks like a nice find. I was eying some Italian frames before I got that C5, but I'm addicted to Motobecane now
 I blame that Grand Sprint, a lot of grief when building it up, but such a nice bicycle to ride! I don't know what they did with them in Saint Quentin, but there had to be some witchcraft involved. Now looking for some mixte frame for a friend and again, hell bent on finding a Motobecane one...
Yes, the frame I have has definitely been poorly used. The rust damage to the paint is in places where water and mud would splash on it when riding in the rain with no mudguards. And clearly the previous owner never bothered wiping it / drying the frame. I'm amazed the bicycle was still somehow still working with all the rust and grime. I was actually taking a gamble with it, judging the bicycle by the auction photos I was seriously afraid the frame will be rusted through in several places (which thankfully, it doesn't seem to be). The paint is beyond saving, which is a shame, as I like their paintwork. Anyhow... I expect the seat post will look similar to what you've shown in the photo in your post. It also shows the last resort solution I'm planning to use to get it out. I still hope I'll be able to soak it with some stuff when I take off the BB and get the seat post out intact, but there won't be much progress until I get Stronglight crank puller. I can't say I'm comfortable with forcing any components off the frame. I think I prefer patience and proper tools kind of approach.
