


Feedback on Brazing techniques and results
 03-27-23, 12:23 PM
#1
Newbie
Thread Starter
Feedback on Brazing techniques and results
Here is my second attempt at brazing braze-ons. I got my partner to take a video of the process so I hope you guys can give me some feedback.
Materials:
Tubing: 0.6mm thick Reynolds 631
Braze-on bottle boss: ~1mm thick chromoly
Filler Metal: Fillet Pro - https://www.cycledesignusa.com/silver/fillet-pro
Flux: Harris Stay-Silv white brazing flux - https://www.harrisproductsgroup.com/en/Products/sswf7
Torch setup:
Tip size: Little torch #5/AW202 (this is almost exactly the same size as a victor #00 -> Welding Tip Size Comparison Chart)
Acetylene pressure was 4 psi at the regulator. I opened up the valve on the handle until there was little to no soot coming off the flame.
Below is a photo of the end results, about 15 seconds after turning the torch off.
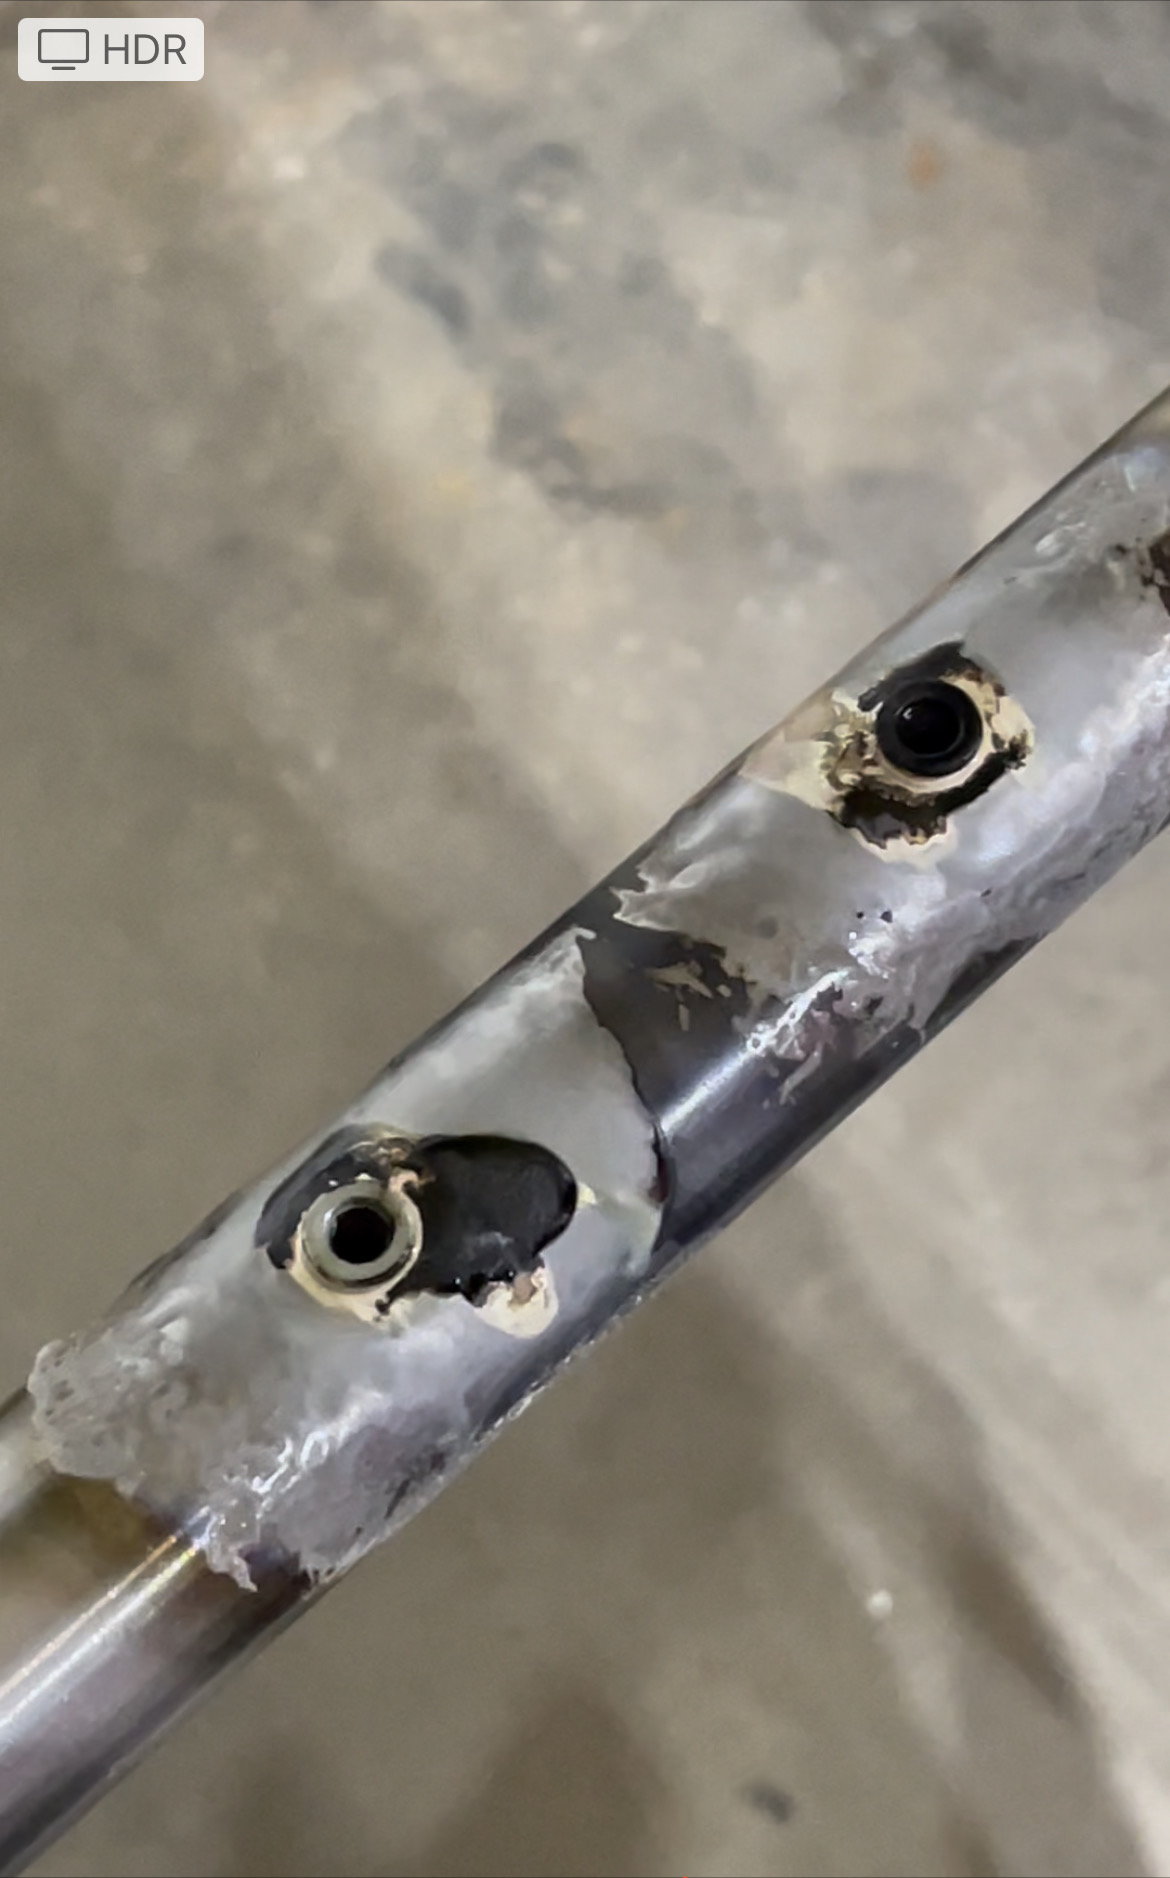
Self-reflection: I know the blackened charred bits is burnt flux, and that is generally to be avoided LOL. At 1:44 in the video I can see there is 1 spot that got white hot which matches the large blackspot on the lower-left boss in the photo above. I thought the first boss (upper-right in photo) went pretty well, but I was surprised to see some burnt flux after taking off my goggles. The black flux on the upper-right boss is still kind of shiny and glassy, whereas the large burnt sections on the lower-left is dull, and a bit sand-papery. Clearly charred. I've read that other framebuilders use a Victor #00 tip for small braze-ons (which is essentially what I used here), but the torch in their videos sounds less turbulent, so I wonder if I should just choke up the valves a bit.
Here is paul brodie showing how it is done. He is using a #0 tip, but his flame sounds much gentler than mine. He is also using a heat-sink/boss-leveler.
I was a bit surprised at how quickly the tubing went from a dull grey to white hot. I held the torch a few inches away waiting for the white flux to activate, then I went in and tried to melt a dab of filler. In less than 2 seconds the tube was overheated.
Materials:
Tubing: 0.6mm thick Reynolds 631
Braze-on bottle boss: ~1mm thick chromoly
Filler Metal: Fillet Pro - https://www.cycledesignusa.com/silver/fillet-pro
Flux: Harris Stay-Silv white brazing flux - https://www.harrisproductsgroup.com/en/Products/sswf7
Torch setup:
Tip size: Little torch #5/AW202 (this is almost exactly the same size as a victor #00 -> Welding Tip Size Comparison Chart)
Acetylene pressure was 4 psi at the regulator. I opened up the valve on the handle until there was little to no soot coming off the flame.
Below is a photo of the end results, about 15 seconds after turning the torch off.
Self-reflection: I know the blackened charred bits is burnt flux, and that is generally to be avoided LOL. At 1:44 in the video I can see there is 1 spot that got white hot which matches the large blackspot on the lower-left boss in the photo above. I thought the first boss (upper-right in photo) went pretty well, but I was surprised to see some burnt flux after taking off my goggles. The black flux on the upper-right boss is still kind of shiny and glassy, whereas the large burnt sections on the lower-left is dull, and a bit sand-papery. Clearly charred. I've read that other framebuilders use a Victor #00 tip for small braze-ons (which is essentially what I used here), but the torch in their videos sounds less turbulent, so I wonder if I should just choke up the valves a bit.
Here is paul brodie showing how it is done. He is using a #0 tip, but his flame sounds much gentler than mine. He is also using a heat-sink/boss-leveler.
I was a bit surprised at how quickly the tubing went from a dull grey to white hot. I held the torch a few inches away waiting for the white flux to activate, then I went in and tried to melt a dab of filler. In less than 2 seconds the tube was overheated.

Likes For Xyphota:
03-27-23, 01:44 PM
#2

Senior Member
Join Date: Feb 2012
Location: Rochester, NY
Posts: 18,056
Bikes: Stewart S&S coupled sport tourer, Stewart Sunday light, Stewart Commuting, Stewart Touring, Co Motion Tandem, Stewart 3-Spd, Stewart Track, Fuji Finest, Mongoose Tomac ATB, GT Bravado ATB, JCP Folder, Stewart 650B ATB
Mentioned: 0 Post(s)
Tagged: 0 Thread(s)
Quoted: 4195 Post(s)
Liked 3,837 Times
in
2,295 Posts
Try a smaller tip and/or flame. The trick is to control the preheat so that both the tube and the bit are up to temp at the same time. You will want to continue to adjusting the temp as you apply the filler. In the vid the flame stops being moved about as the filler is applied, it takes practice to be able to move both hands in somewhat different paths. It's easier for a beginner to practice on somewhat thicker walled tubes as the heat up rate will be slower.
BTW do you know the trick of getting a tube that's 1/8" larger in diameter and of a .058" wall to act as a sleeve or lug? As you develop comfort in brazing the small bits consider trying to flow the filler through a sleeve/lug. Andy
BTW do you know the trick of getting a tube that's 1/8" larger in diameter and of a .058" wall to act as a sleeve or lug? As you develop comfort in brazing the small bits consider trying to flow the filler through a sleeve/lug. Andy
__________________
AndrewRStewart
AndrewRStewart
Likes For Andrew R Stewart:
03-27-23, 03:20 PM
#3
Newbie
Thread Starter
In Paul Brodie's video, his flame sounds much less turbulent and generally just looks softer. This to me implies a slower gas flow out of the nozzle. My understranding is when lighting a torch is to open up the acetylene until the flame stops producing soot, then open up the oxygen to get your neutral flame. Additionally, if running too little gas flow there is potential for the flame to start combusting inside the tip, instead of at the tip. If I dial back the gas flow to get a softer flame, that would imply starting with a 'soot-ier' flame. Is that ok?
Thanks for the suggestions!
Thanks for the suggestions!
03-27-23, 03:33 PM
#4


Randomhead
Join Date: Aug 2008
Location: Happy Valley, Pennsylvania
Posts: 24,387
Mentioned: 0 Post(s)
Tagged: 0 Thread(s)
Quoted: 4 Post(s)
Liked 3,687 Times
in
2,510 Posts
I learned to braze with a torch that's the size of my forearm, so I think your torch setup is fine. You need to learn to move the flame off of the tube when it starts getting too warm. When I'm brazing, I constantly move the flame off of the workpiece. Paul Brodie in that video is mostly aiming his flame at his fixture, and he does the whole operation really quickly. He never really aims the torch at the tube. When you applied the filler, you just left the flame right on that spot on the tube. You can see the tube getting too red very quickly. You want to aim the flame at the thick part of whatever you are brazing and only go out to the thin sections if needed.
There is also a point in the video where you are aiming the flame at the tube past the braze on and the tube behind it gets really hot. The main problem with that is the filler might run out onto the tube. It's really annoying when that happens. You lucked out.
There is also a point in the video where you are aiming the flame at the tube past the braze on and the tube behind it gets really hot. The main problem with that is the filler might run out onto the tube. It's really annoying when that happens. You lucked out.
03-27-23, 04:01 PM
#5
Newbie
Thread Starter
Does the torch body size have an effect on the flame if the tip size is the same? I.e. if both your arm size torch and my little torch both have an equivalant Victor #1 tip on them, should the flame be about the same on both?
I can definitely see in Paul's video his torch angle is much shallower, his flame is more glancing across the tube, whereas I was pointing it more perpendicular, so that is a good observation, thanks.
However, Paul does hold his torch steady at the base of the boss for a solid 5-6 seconds when making the initial 'tack' without burning up his flux, so I think I'll whip up a similar heat sink and try again with his angle of attack. I still have a gut feeling that his torch has fewer BTU's coming out of it despite the larger tip size. This is counter-intuitive to me if his acetylene only flame is also soot-free after lighting.
Last edited by Xyphota; 03-27-23 at 04:05 PM.
03-27-23, 04:33 PM
#6
Randomhead
Join Date: Aug 2008
Location: Happy Valley, Pennsylvania
Posts: 24,387
Mentioned: 0 Post(s)
Tagged: 0 Thread(s)
Quoted: 4 Post(s)
Liked 3,687 Times
in
2,510 Posts
Even the smallest tip I had for my giant torch was bigger than the tips I use today. Fortunately, back then I could rent large tanks, because I would have been flowing too much acetylene to be safe with the tanks I have now.
I think trying to learn to copy Paul Brodie's technique may not be that great of an idea. He's obviously a master. I have been brazing on bike frames since the '70s and I don't think I could copy him. I'm not sure how the gasfluxer affects his technique. It makes it difficult for me to judge what's going on. Someone that is experienced at brazing can tell when the temperature is going up too fast and they do something about it. There is a light color of pink that is about as hot as you want to get the steel when you are using silver. Light red is okay, but it's too hot and you want to avoid it.
I think trying to learn to copy Paul Brodie's technique may not be that great of an idea. He's obviously a master. I have been brazing on bike frames since the '70s and I don't think I could copy him. I'm not sure how the gasfluxer affects his technique. It makes it difficult for me to judge what's going on. Someone that is experienced at brazing can tell when the temperature is going up too fast and they do something about it. There is a light color of pink that is about as hot as you want to get the steel when you are using silver. Light red is okay, but it's too hot and you want to avoid it.
Likes For unterhausen:
03-27-23, 05:09 PM
#7
Newbie
Thread Starter
Well unfortunately he has the only good bicycle brazing tutorials on youtube, so it is hard not to try and copy him LOL. I would love to get some in-person tutorials with the likes of Doug Fattic eventually, but that's not in the cards at the moment.
03-27-23, 06:42 PM
#8
Randomhead
Join Date: Aug 2008
Location: Happy Valley, Pennsylvania
Posts: 24,387
Mentioned: 0 Post(s)
Tagged: 0 Thread(s)
Quoted: 4 Post(s)
Liked 3,687 Times
in
2,510 Posts
Doug will probably respond, but I'm pretty sure the method he teaches is to learn to flick the flame away from the tube before it gets too hot. This is the method I settled upon decades ago, and it even works with a torch that's too big. The trick in any event is to notice that the color is increasing while you are concentrating on everything else. Maybe I'll make a video.
A common problem with teaching something you know really well is that there are many things that you don't know you are doing. I think this is one instance where Mr. Brodie is falling into this trap.
A common problem with teaching something you know really well is that there are many things that you don't know you are doing. I think this is one instance where Mr. Brodie is falling into this trap.
Likes For unterhausen:
03-27-23, 07:07 PM
#9
Senior Member
Join Date: Feb 2012
Location: Rochester, NY
Posts: 18,056
Bikes: Stewart S&S coupled sport tourer, Stewart Sunday light, Stewart Commuting, Stewart Touring, Co Motion Tandem, Stewart 3-Spd, Stewart Track, Fuji Finest, Mongoose Tomac ATB, GT Bravado ATB, JCP Folder, Stewart 650B ATB
Mentioned: 0 Post(s)
Tagged: 0 Thread(s)
Quoted: 4195 Post(s)
Liked 3,837 Times
in
2,295 Posts
It seems to me that the majority of OA torch guidelines are based on far thicker material than bikes use and seem more welding than brazing focused. I generally use a flame far less intense than what a "no soot light at light up" amount would produce after then opening the O to a neutral flame. Once my A is lit I open the O a bit and lower the A, then jiggle both valves to balance the flame size and it's neutral condition. Most of my small bit brazing is done with tip diameters between .025" and .037". Andy
__________________
AndrewRStewart
AndrewRStewart
Likes For Andrew R Stewart:
03-27-23, 08:39 PM
#10
Randomhead
Join Date: Aug 2008
Location: Happy Valley, Pennsylvania
Posts: 24,387
Mentioned: 0 Post(s)
Tagged: 0 Thread(s)
Quoted: 4 Post(s)
Liked 3,687 Times
in
2,510 Posts
I had been brazing for decades before I found out I was supposed to get rid of the soot. If it really can cause ignition inside the torch, maybe it's not a good idea. Generally I get rid of it now if I think of it. But I don't mind a flame that's too big.
03-27-23, 08:54 PM
#11
Newbie
Thread Starter
Well supposedly a symptom of the ignition inside the tip is that there is significantly more heat transfer to the torch and the torch becomes hot to hold, and also flashbacks up the lines become a possibility. Do you guys use flashback arrestors at the torch end or the bottle end?
If either of you haven't experienced this, then I'd wager that this is a case of best practice is to to do X so as to avoid a 1 in a million chance of Y, i.e. it is not that much of an issue and I'll stop worrying about it LOL. Or maybe that this only becomes problematic if the tip is significantly under-fed. In any case, a Newbie such as myself does not know which rules are written in blood and which are just general guidelines so it is safer to rigidly stick to the rules until informed otherwise. I'd love to hear Doug Fattic 's opinion too if and when he has the time. I'll post another video after some more practice in the coming weeks.
If either of you haven't experienced this, then I'd wager that this is a case of best practice is to to do X so as to avoid a 1 in a million chance of Y, i.e. it is not that much of an issue and I'll stop worrying about it LOL. Or maybe that this only becomes problematic if the tip is significantly under-fed. In any case, a Newbie such as myself does not know which rules are written in blood and which are just general guidelines so it is safer to rigidly stick to the rules until informed otherwise. I'd love to hear Doug Fattic 's opinion too if and when he has the time. I'll post another video after some more practice in the coming weeks.
Last edited by Xyphota; 03-27-23 at 10:37 PM.
03-27-23, 10:53 PM
#12
framebuilder
You have already received good advice from Andy and Eric. It isn't possible to give you adequate feedback with just a few suggestions. I saw a lot of issues in your brazing that need to be addressed. It isn't possible to deal with them all properly here. Learning to braze is a fairly complicated process and starts with selecting the right equipment and how to adjust it properly as well as picking the right practice materials. I would start with practice brazing materials that have much more mass than thin wall tubing and a light little boss. That slows down your read and react time. Your tip selection was okay but you had the volume turned up way too far. Your neutral flame should have only a gentle hissing sound.
The skills required of a good teacher are pretty complex and they involve not only good explanations and demonstrations but also methods on how to keep students from getting frustrated and discouraged. Many learners make the same beginner mistakes and an experienced teacher knows what they are and how to avoid them. For example your common mistake was moving your flame hand in as the silver started to melt. It is difficult for those starting out to move their hands independently from each other. Instead of following the natural instinct for your flame to go in at the same time our silver holding hand goes in as it melts, it is necessary to pull your flame back so it is further away and perhaps flick off to maintain the proper joint temperature. You need to lose your tinted googles because you apparently weren't seeing the bright red on the tube that should have told you to stop heating immediately. Red means stop heating when brazing with silver. Your heating pattern should have been more compact because your tube got too hot too far away from your boss.
Before starting to actually braze, the principles of brazing should be understood. My class manual has 3 pages on just that subject alone. These include how to watch the heat indicators like the 4 stages silver flux goes through as it is heated and the methods of how to control your heat at the joint with your flame (like its distance, speed, flicking off, etc.) Once a clear description of what exactly to do is provided, then a demonstration needs to be given so a student has a clearer understanding of what to do before he begins.
I recommend using 56% silver instead of Fillet Pro. Cycle Designs Stainless Lite flux has a 100� higher temperature range than the white flux you used. That can be helpful for beginners so it doesn't burn off as easily. You needed to apply a LOT more flux. For starting out, I recommend taking Andy's advice with 0.058" wall sleeve over a tube with 1/8" smaller OD.
Last edited by Doug Fattic; 03-27-23 at 10:56 PM.
Likes For Doug Fattic:
03-27-23, 11:46 PM
#13
Newbie
Thread Starter
Thanks for the in depth response! What about 56% silver is preferable over fillet pro? Is it just easier to use? I'm open to purchasing some but I already have 5 troy ounces of the fillet pro that I purchased from a friend for cheap so I'd rather just use up what I have first (which I probably never will LOL) before buying some more.
03-28-23, 06:40 AM
#14
framebuilder
Thanks for the in depth response! What about 56% silver is preferable over fillet pro? Is it just easier to use? I'm open to purchasing some but I already have 5 troy ounces of the fillet pro that I purchased from a friend for cheap so I'd rather just use up what I have first (which I probably never will LOL) before buying some more.
In your video you took extra time to try and get your Fillet Pro to flow out around the boss. That extra time led to burning off what little flux you had on the joint and scorching the tubing too. It didn't help that your flame pattern was too large of a circle. Your flame should have just been circling around the edge of the boss and a bit on the tubing. If you had used 56% silver with the right flame intensity and pattern, the silver would have like magic flowed around your boss and you would have cleared out of there long before your tube got red.
03-28-23, 09:45 AM
#15
Newbie
Thread Starter
Thanks for the info. Maybe I'll just bite the bullet and buy some 56% silver then. Also I liked your comment on losing the goggles, I've seen some recommendations on other forums to use didymium glasses. I've ordered a cheap pair to try them out.
I plan on trying to braze some dummy dropouts in the next couple days, and I do have some C-04 rod and Type B flux ready to go. The rest of my frame will be tig welded. I do have thin-walled tig welding experience so I'm less worried about that.
I plan on trying to braze some dummy dropouts in the next couple days, and I do have some C-04 rod and Type B flux ready to go. The rest of my frame will be tig welded. I do have thin-walled tig welding experience so I'm less worried about that.
03-28-23, 05:39 PM
#16
Randomhead
Join Date: Aug 2008
Location: Happy Valley, Pennsylvania
Posts: 24,387
Mentioned: 0 Post(s)
Tagged: 0 Thread(s)
Quoted: 4 Post(s)
Liked 3,687 Times
in
2,510 Posts
You can get cheap didymium glasses? I think you want a tint to them, but no more than level 3 shade for making bikes. Welding is different, that's where all the level 5 shade glasses come from.
I made a video of me brazing with brass. I need a filter for my camera, the flare from the flux really makes it look like the metal is yellow.
I am confused about why all the manufacturers call brass "bronze." By the textbook definition, we use brass. I'm sure they know something I don't though.
I made a video of me brazing with brass. I need a filter for my camera, the flare from the flux really makes it look like the metal is yellow.
I am confused about why all the manufacturers call brass "bronze." By the textbook definition, we use brass. I'm sure they know something I don't though.
03-28-23, 05:56 PM
#17
Newbie
Thread Starter
Well under $100. They are not technically didymium, but they have sodium flare and UV protection. I ordered a pair with and without tint, and I'll return whichever one is less preferable.
Where can I find your video?
Where can I find your video?
03-28-23, 06:31 PM
#18
Randomhead
Join Date: Aug 2008
Location: Happy Valley, Pennsylvania
Posts: 24,387
Mentioned: 0 Post(s)
Tagged: 0 Thread(s)
Quoted: 4 Post(s)
Liked 3,687 Times
in
2,510 Posts
It's uploading now. I was just laughing about the fact that it's 15 minutes long 
I did mention in the middle that you can stop any time, but it might be worth watching most of the way to the end. I need to edit it.
I did mention in the middle that you can stop any time, but it might be worth watching most of the way to the end. I need to edit it.
Last edited by unterhausen; 03-28-23 at 06:38 PM.
03-29-23, 06:59 AM
#20
Randomhead
Join Date: Aug 2008
Location: Happy Valley, Pennsylvania
Posts: 24,387
Mentioned: 0 Post(s)
Tagged: 0 Thread(s)
Quoted: 4 Post(s)
Liked 3,687 Times
in
2,510 Posts
There is a minute of wasted time at the beginning. I think the youtube editor just gives up when I try to clip it.
Likes For unterhausen:
03-29-23, 07:55 AM
#21
Senior Member
Join Date: Feb 2012
Location: Rochester, NY
Posts: 18,056
Bikes: Stewart S&S coupled sport tourer, Stewart Sunday light, Stewart Commuting, Stewart Touring, Co Motion Tandem, Stewart 3-Spd, Stewart Track, Fuji Finest, Mongoose Tomac ATB, GT Bravado ATB, JCP Folder, Stewart 650B ATB
Mentioned: 0 Post(s)
Tagged: 0 Thread(s)
Quoted: 4195 Post(s)
Liked 3,837 Times
in
2,295 Posts
Eric- Nice vid. It is reinsuring that others suffer from forgetting to do a step (glasses) before lighting up, like I do sometimes, or clean the torch tip
A few comments- I try to get the O opened up ASAP to reduce the amount of carbon floaters a pure A flame produces if it's valve isn't opened up a lot. I don't open up the A when lighting as much as the vid shows. I'll often reposition a joint during the brazing to gain better access, hopefully letting gravity help out the flow of the filler at the same time. Powered flux (and GasFlux does offer their type B in a powder) sprinkled onto the hot joint won't cool down the joint anywhere as quickly as paste flux will. I was told many years ago that the rapid rate of cooling (as in being too fast, think quenching of sorts) was a factor one wants to slow down. I also use more flux than many do. Flux is cheap compared to filing clean up time or having to toss the part and start over. I'll have a couple of inches of flux applied up the tube from the joint and use this as a reservoir to pull fresh flux from during the brazing, if needed. If I get the torch tip contaminated with a spot of flux and then the flame gets all wonky I will try to scrape off the flux spot with the filler rod. Sometimes this works, sometimes not so. I take a bit more time trying to get the complete joint up to temp and will move about the joint to try to maintain the joint temp to close to what will allow wet out. Again I was told long ago, that trying to keep the joint evenly heated is best as it will reduce heat induced warping. (And that hearth or oven brazing could be considered better at this than a OA torch flames are).
I've thought about making vids but I'd have to learn how to do that with my phone than down load off the phone the vid to my desk top PC. Too much trouble for me. Thanks for sharing this. Andy
__________________
AndrewRStewart
AndrewRStewart
03-29-23, 08:43 AM
#22
Randomhead
Join Date: Aug 2008
Location: Happy Valley, Pennsylvania
Posts: 24,387
Mentioned: 0 Post(s)
Tagged: 0 Thread(s)
Quoted: 4 Post(s)
Liked 3,687 Times
in
2,510 Posts
That's a good point about distortion. If it was going on a bike or something else that actually needed to be round, I would have done more to keep the backside up to heat. It's amazing how oval things can get when brazing something like this if it really needs to be round. I made a copy of the EVT dishing tool, and the center tube got pretty oval. I was trying to keep that from happening, but the center tube is short and the joints with the two chainstays are big. I went back and heated up the sides and that fixed it enough that I didn't have to make the end caps smaller.
I might delete this video later. It was mostly just practice making videos. And I desperately need to get my bike rack finished.
I was impressed by how much of an explosion I got when I lit the acetylene. Didn't even notice it in real time. No wonder my hearing is going bad.
I might delete this video later. It was mostly just practice making videos. And I desperately need to get my bike rack finished.
I was impressed by how much of an explosion I got when I lit the acetylene. Didn't even notice it in real time. No wonder my hearing is going bad.
03-29-23, 09:34 AM
#23
Newbie
Thread Starter
If you use a smart phone and have the youtube app installed, you can upload videos straight from the app so you don't need to figure out how to get the video from your phone to your computer. You can't do much editing as unterhausen noted, so you'll be limited to to one take videos like the ones in this thread. You should at the very least be able to trim some video from the beginning and end of the video on your phone before uploading to youtube.
Thanks for the video! I enjoyed your ramblings LOL.
Thanks for the video! I enjoyed your ramblings LOL.
03-30-23, 09:29 PM
#24
Newbie
Thread Starter
I received my new glasses today, and wow what a difference. I just did my first practice brass braze on a dummy dropout and 1/2" x 0.028" (~0.7mm) chromoly tubing from spruce aircraft. I'm overall pretty happy with the results for a first go. I took the mill scale off the parts with 320 grit sand paper (including inside the tube) and cleaned with acetone. I used the Type B flux, and the C-04 rod. I did the braze with a 0.037" tip (~Victor #1), with a much gentler sounding flame than what I tried the silver brazing with LOL.
I think I read on velocipedesalon to try and feed ~1/2 a rod into the joint. This was probably 2/3 of a rod of 1/16", although I think the slot for the dropout was a bit deeper than necessary. Question for you guys: Is there anything that helps with reducing bubbles? Maybe I fed the rod in too fast? I'm sure there are a million variables but if you had to guess, what would you recommend?


I think I read on velocipedesalon to try and feed ~1/2 a rod into the joint. This was probably 2/3 of a rod of 1/16", although I think the slot for the dropout was a bit deeper than necessary. Question for you guys: Is there anything that helps with reducing bubbles? Maybe I fed the rod in too fast? I'm sure there are a million variables but if you had to guess, what would you recommend?
Last edited by Xyphota; 03-30-23 at 09:41 PM.
03-31-23, 06:56 AM
#25
framebuilder
Your first step in getting rid of porosity is to clean your brass rod before using it. I use Scotchbrite and after making the rod nice and shinny I clean the residue off with alcohol or acetone (well actually I use lacquer thinner because it is convenient for me because I'm a painter).
My next recommendation for beginners is to not slot their chain stays. It is easier to braze if you are filling an upright hole with brass and it isn't leaking out the sides. It is possible to make the tab on the dropout longer if you like that look. You need to fill the chain stay only to the depth of the tab on the DO. That won't take as much brass as you indicated you thought you might need.
It isn't possible to give brazing pointers only looking at finished results. I can still tell however that you got the joint too hot. You want to keep the color of the steel on the joint red and avoid orange or even hotter. Here is a very common rookie mistake you might be making. Beginners have a strong tendency for their flame hand to move towards the joint as their hand holding the brass moves in as it melts. This overheats the joint. You have to fight this instinct and instead mvre you flame hand back as the other hand moves forward or flick the flame off the joint. It takes some real effort and concentration to move the flame and brass hand independent of each other.