


Why is this shifter cable tortuous?
 06-26-21, 09:48 PM
#1
Member
Thread Starter
Why is this shifter cable tortuous?
Hi guys!
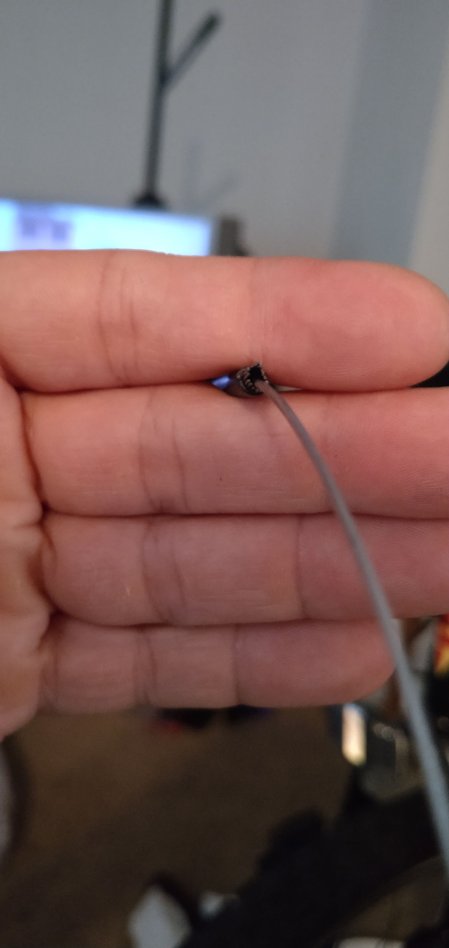
First time rebuilding a bike from the ground up. Many lessons have been learned. But one thing I can't figure out is why the front
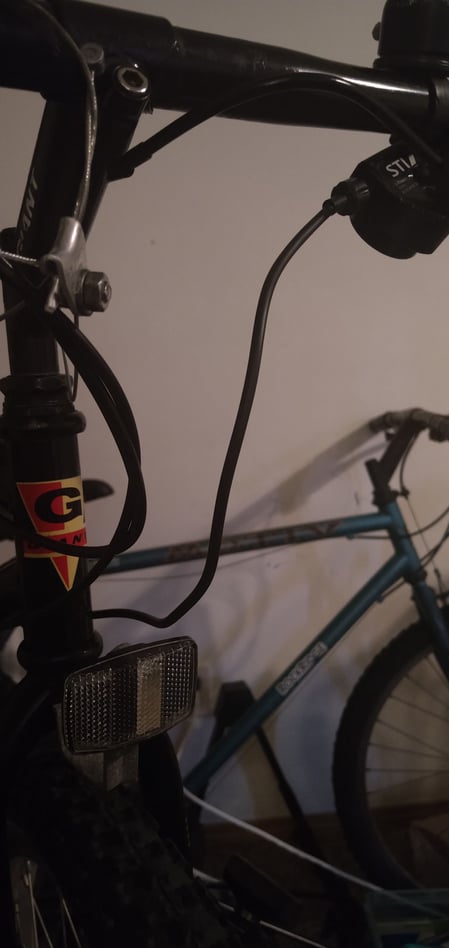
derailleur is requiring so much pressure to shift and why is the cable kinking under this pressure.. please see the picture of the cable to see what I'm talking about. Over and out!
First time rebuilding a bike from the ground up. Many lessons have been learned. But one thing I can't figure out is why the front
derailleur is requiring so much pressure to shift and why is the cable kinking under this pressure.. please see the picture of the cable to see what I'm talking about. Over and out!
 06-27-21, 03:30 AM
#2
Senior Member
Join Date: Oct 2007
Location: West Yorkshire, United Kingdom
Posts: 5,773
Mentioned: 5 Post(s)
Tagged: 0 Thread(s)
Quoted: 453 Post(s)
Liked 104 Times
in
87 Posts
Why have you got kinks in the cable??? you want as smooth as routing as possible, thinking start again with new outer, possibly new inner as well.
Likes For jimc101:
06-27-21, 04:05 AM
#3
Blamester
Hi guys!
First time rebuilding a bike from the ground up. Many lessons have been learned. But one thing I can't figure out is why the front
derailleur is requiring so much pressure to shift and why is the cable kinking under this pressure.. please see the picture of the cable to see what I'm talking about. Over and out!
Likes For blamester:
06-27-21, 04:53 AM
#4

Senior Member

Join Date: Jan 2005
Location: Baltimore, MD
Posts: 5,351
Mentioned: 15 Post(s)
Tagged: 0 Thread(s)
Quoted: 2468 Post(s)
Liked 2,944 Times
in
1,671 Posts
Check the kinked housing to determine whether you used derailleur cable housing or brake cable housing.
The strands of steel in brake cable inner housing (with a few esoteric exceptions) form a spiral: //////////////////.
The strands of steel in derailleur cable inner housing (generally speaking, except for bikes with derailleurs over 30 years old, from the pre-indexed-shifting era) are in linear form: =========.
If you used brake cables to route the gear wires to the derailleurs, discard the damaged (kinked) housing and replace it with linear gear wire housing.
If, by the way, you used linear (gear) housing to route the brake wires to the brakes, that housing must be replaced by (spiral) brake housing. (Linear housing used for bike brakes will eventually split and render the brakes inoperative, because linear housing is not designed to withstand the greater forces used in braking.)
Finally, also confirm that you used the correct (thicker) inner wire for the brakes and the correct (thinner) inner wire for the derailleurs.
Likes For Trakhak:
06-27-21, 12:49 PM
#5

Senior Member

Join Date: Feb 2004
Location: St Peters, Missouri
Posts: 30,225
Bikes: Catrike 559 I own some others but they don't get ridden very much.
Mentioned: 16 Post(s)
Tagged: 0 Thread(s)
Quoted: 1572 Post(s)
Liked 643 Times
in
364 Posts
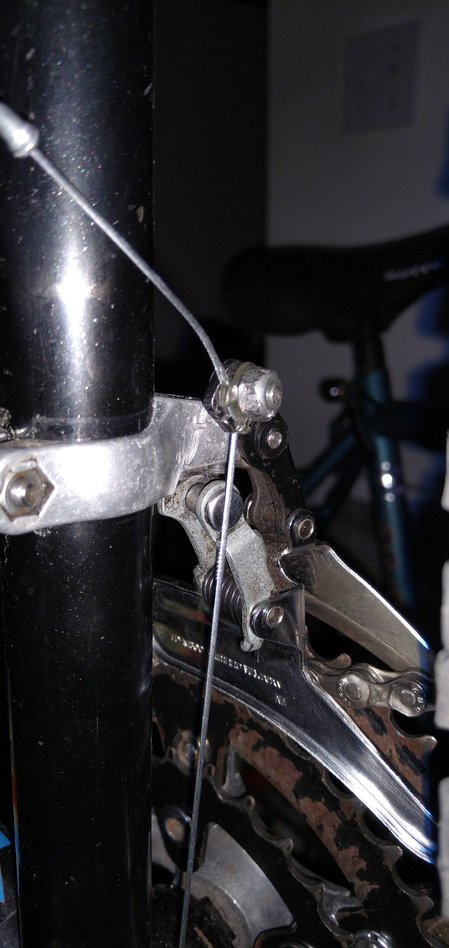
What does it look like where the shift cable attaches to your front derailleur?
Many Shimano front derailleurs have a little finger in the path to where it attaches to the derailleur arm. It's important that the shift cable passes OVER that finger which many people find non-intuitive. Routing the cable under that finger changes it's angle and greatly increases the amount of tension necessary to shift.
Many Shimano front derailleurs have a little finger in the path to where it attaches to the derailleur arm. It's important that the shift cable passes OVER that finger which many people find non-intuitive. Routing the cable under that finger changes it's angle and greatly increases the amount of tension necessary to shift.
__________________
My greatest fear is all of my kids standing around my coffin and talking about "how sensible" dad was.
My greatest fear is all of my kids standing around my coffin and talking about "how sensible" dad was.
Likes For Retro Grouch:
06-27-21, 01:29 PM
#6
I'm good to go!
Join Date: Jul 2017
Location: Mississippi
Posts: 14,931
Bikes: Tarmac Disc Comp Di2 - 2020
Mentioned: 51 Post(s)
Tagged: 0 Thread(s)
Quoted: 6163 Post(s)
Liked 4,782 Times
in
3,300 Posts
If you've run the cable all the way to the shifter with no cable stops, then it very likely won't work. At least not well.
I can't tell from the picture what shifter and derailleurs you have, nor can I tell how it's routed. And I'm not really certain I'm looking at a shifter cable. Looks more like some electric wire.
So maybe a list of the models of components involved and maybe some better lit pictures of the overall bike and cable run will help everyone guess less.
Likes For Iride01:
06-27-21, 03:17 PM
#7
Member
Thread Starter
Thanks for all the responses!
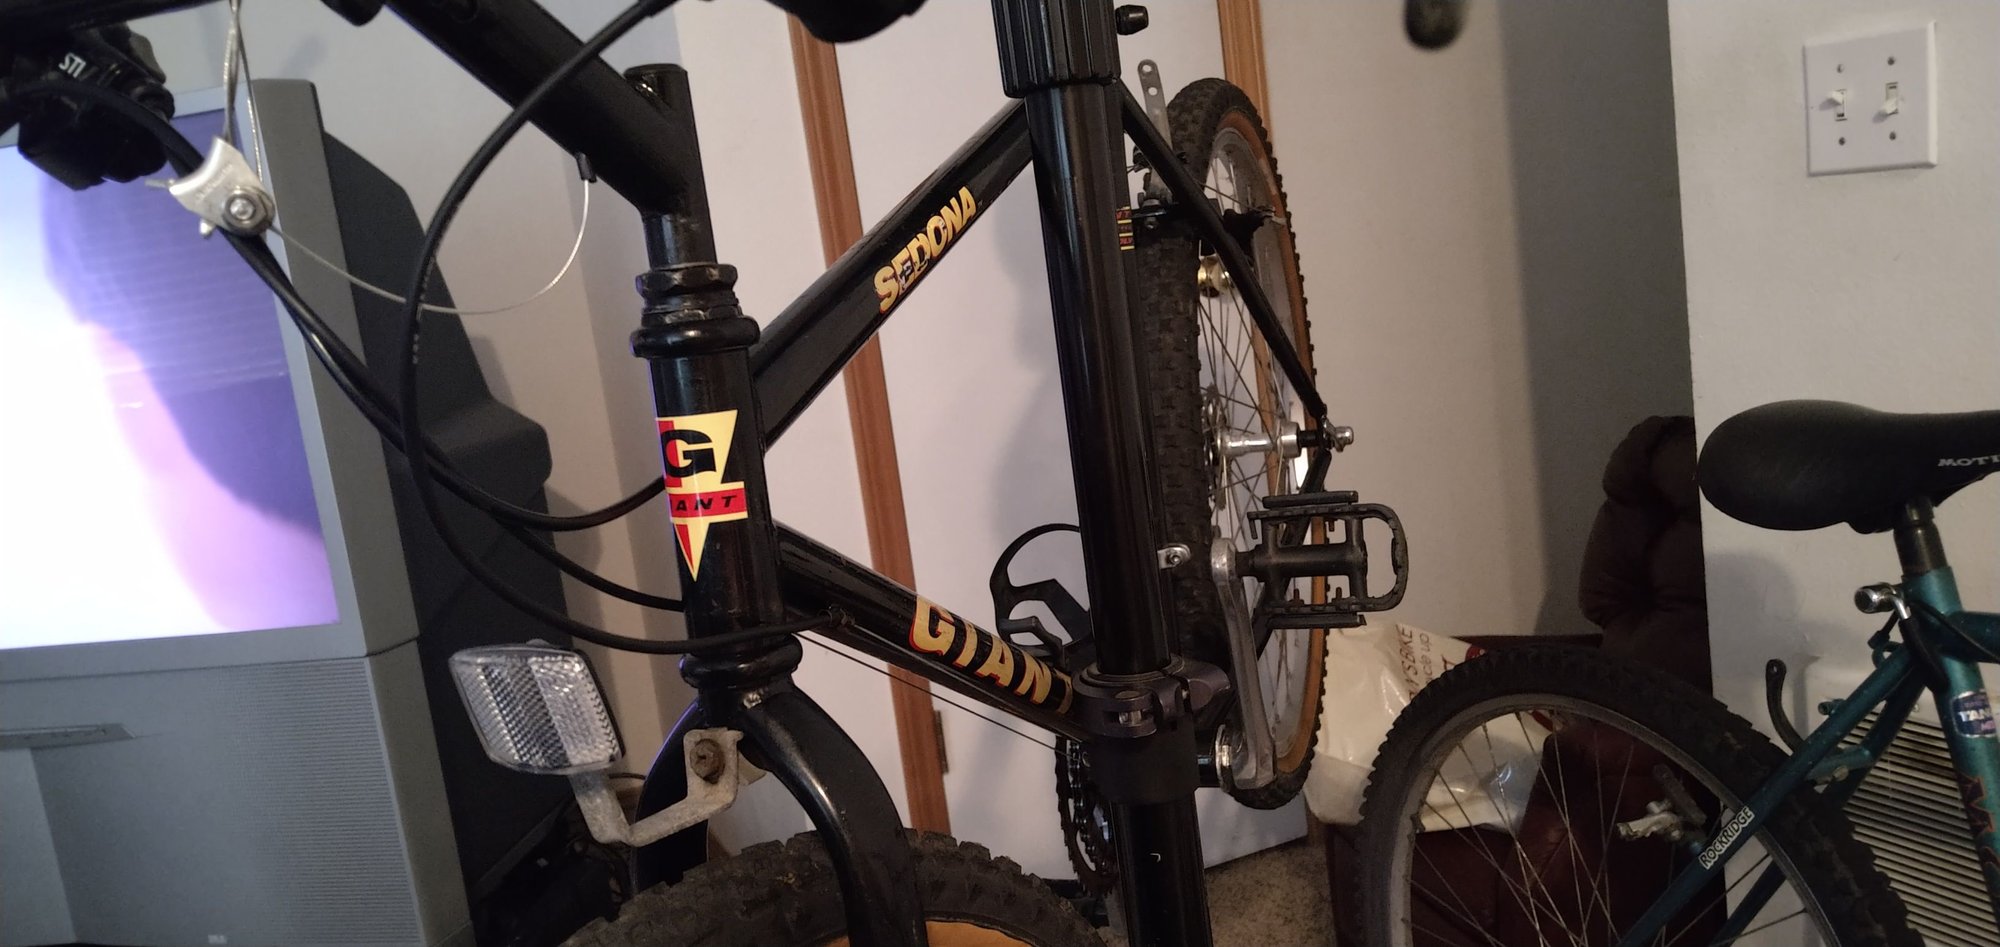
I think it's an '89 Giant Sedona mtb.
Exage LX300 front derailleur.
Jagwire lex cable housing.
Thinner shift cable.
Verified correct cable and housing. The cable slides smoothly through the housing when disconnected.
lubed shifter, when not wired, shifts smooth and easy.
OK so I diconnected for the 3rd time to verify the above and then put it back together and for whatever reason, it's shifting easier now. I wonder if I pulled the cable too tight at the fixing bolt.

The front derailleur cable still takes on a bit of a kinky angle when on the big chainwheel while the rear derailleur does not. I wonder if slightly shorter or longer housing would change that??
I think it's an '89 Giant Sedona mtb.
Exage LX300 front derailleur.
Jagwire lex cable housing.
Thinner shift cable.
Verified correct cable and housing. The cable slides smoothly through the housing when disconnected.
lubed shifter, when not wired, shifts smooth and easy.
OK so I diconnected for the 3rd time to verify the above and then put it back together and for whatever reason, it's shifting easier now. I wonder if I pulled the cable too tight at the fixing bolt.
The front derailleur cable still takes on a bit of a kinky angle when on the big chainwheel while the rear derailleur does not. I wonder if slightly shorter or longer housing would change that??
Last edited by 269523; 06-27-21 at 03:23 PM.
06-27-21, 04:38 PM
#8
Expired Member

Join Date: Jun 2007
Location: TN
Posts: 11,493
Mentioned: 37 Post(s)
Tagged: 0 Thread(s)
Quoted: 3646 Post(s)
Liked 5,378 Times
in
2,730 Posts
You could try routing the housing to the opposite side of the bike, then have the bare cables cross under the downtube. Will smooth out the curve from the shifters to the cable stops.
Likes For shelbyfv:
06-27-21, 06:12 PM
#9
Senior Member
Join Date: May 2005
Location: SFBay
Posts: 2,334
Bikes: n, I would like n+1
Mentioned: 0 Post(s)
Tagged: 0 Thread(s)
Quoted: 127 Post(s)
Likes: 0
Liked 133 Times
in
108 Posts
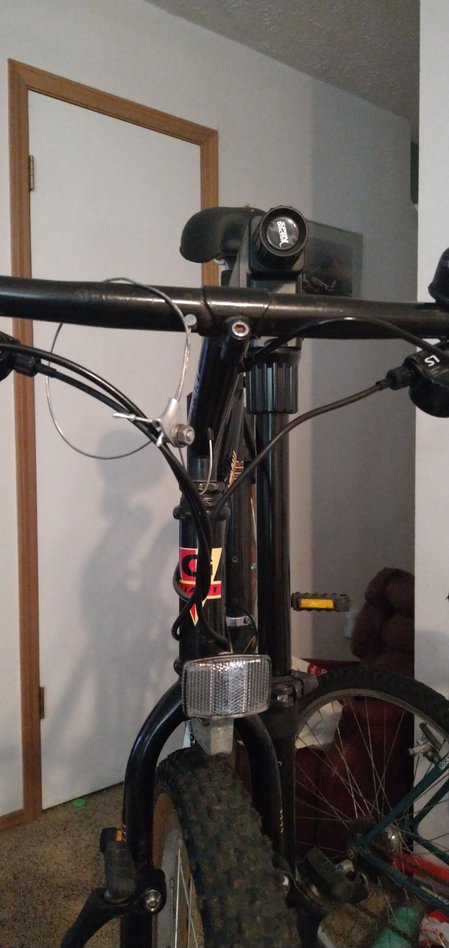
1. In the post #7 picture #6 the front shift housing is wrapped around the rear shift and rear brake housing. Those shouldn't cross, and if they do they should be loose through the full rotation of the front wheel, not pulling at each other as they are now. They don't look to be tangled up in post #7 picture #3, did something change between those two photos or is it just an illusion?
2. The housing end in post #7 picture #4 looks to be in poor shape. The outer housing seems to be missing in the last 1/4" leaving the steel strands of the shift housing sticking out. Normally there is a metal ferrule there to protect that and keep it all together. I also don't see the plastic liner in that picture. Is it still present, or all worn away at the end? On the plus side, that is a shift cable.
3. Is there a plastic cable guide under the bottom bracket? What condition is it in?
4. Post #7 picture 3 shows a sudden angle change where the housing meets the downtube frame stop. Something isn't right there. It may be that there is a missing adjustable frame stop (is that frame stop threaded inside?), or that the frame only fits 4 mm housing and you've tried to get 5 mm housing to fit without an adapting ferrule (just use 4 mm housing in that case). I'm guessing this is your biggest issue. The cable may now also have a kink at this location which will cause issues. If the cable kink causes issues you may need to replace it, but I'd deal with whatever is preventing it from interfacing nicely to the frame first and see if the issue goes away.
5. The picture in post #1 looks to have several kinks and bends. Is this a new or worn piece? It may be worth replacing that as it looks like it's taken some sort of wear/abuse.
6. Swapping which side of the frame the housing attaches at (then crossing them below the down tube so they still end up at the correct locations) is an option, but you shouldn't need to do that, especially on a frame of that vintage.
Likes For jccaclimber:
06-27-21, 11:26 PM
#10
Member
Thread Starter
1. In the post #7 picture #6 the front shift housing is wrapped around the rear shift and rear brake housing. Those shouldn't cross, and if they do they should be loose through the full rotation of the front wheel, not pulling at each other as they are now. They don't look to be tangled up in post #7 picture #3, did something change between those two photos or is it just an illusion?
2. The housing end in post #7 picture #4 looks to be in poor shape. The outer housing seems to be missing in the last 1/4" leaving the steel strands of the shift housing sticking out. Normally there is a metal ferrule there to protect that and keep it all together. I also don't see the plastic liner in that picture. Is it still present, or all worn away at the end? On the plus side, that is a shift cable.
3. Is there a plastic cable guide under the bottom bracket? What condition is it in?
4. Post #7 picture 3 shows a sudden angle change where the housing meets the downtube frame stop. Something isn't right there. It may be that there is a missing adjustable frame stop (is that frame stop threaded inside?), or that the frame only fits 4 mm housing and you've tried to get 5 mm housing to fit without an adapting ferrule (just use 4 mm housing in that case). I'm guessing this is your biggest issue. The cable may now also have a kink at this location which will cause issues. If the cable kink causes issues you may need to replace it, but I'd deal with whatever is preventing it from interfacing nicely to the frame first and see if the issue goes away.
5. The picture in post #1 looks to have several kinks and bends. Is this a new or worn piece? It may be worth replacing that as it looks like it's taken some sort of wear/abuse.
6. Swapping which side of the frame the housing attaches at (then crossing them below the down tube so they still end up at the correct locations) is an option, but you shouldn't need to do that, especially on a frame of that vintage.
2. The housing end in post #7 picture #4 looks to be in poor shape. The outer housing seems to be missing in the last 1/4" leaving the steel strands of the shift housing sticking out. Normally there is a metal ferrule there to protect that and keep it all together. I also don't see the plastic liner in that picture. Is it still present, or all worn away at the end? On the plus side, that is a shift cable.
3. Is there a plastic cable guide under the bottom bracket? What condition is it in?
4. Post #7 picture 3 shows a sudden angle change where the housing meets the downtube frame stop. Something isn't right there. It may be that there is a missing adjustable frame stop (is that frame stop threaded inside?), or that the frame only fits 4 mm housing and you've tried to get 5 mm housing to fit without an adapting ferrule (just use 4 mm housing in that case). I'm guessing this is your biggest issue. The cable may now also have a kink at this location which will cause issues. If the cable kink causes issues you may need to replace it, but I'd deal with whatever is preventing it from interfacing nicely to the frame first and see if the issue goes away.
5. The picture in post #1 looks to have several kinks and bends. Is this a new or worn piece? It may be worth replacing that as it looks like it's taken some sort of wear/abuse.
6. Swapping which side of the frame the housing attaches at (then crossing them below the down tube so they still end up at the correct locations) is an option, but you shouldn't need to do that, especially on a frame of that vintage.
2. What is the plastic liner you're referring to is it on the inside of the cable? I did have a feral on the end s of the cable they were plastic they had a slightly larger opening on the brake cable Farrell's then the shifter cables I might have confused the ferals which might have allowed some of the linear strands to escape. I'm not exactly sure what happened there but definitely were some strands hanging out and that was all new stuff. So I took it all off cut new cable and housing with the housing like couple centimeters longer just in case. Put it all back together and seems to be working significantly better now.
3. There is a plastic cable guide I took it off and clean it all up and it looks nice and fresh functional.
4. This is a good analysis I'm not exactly sure here I'm going to dig into this tomorrow measure it out and such.
5. All brand new.
6. Didn't have to do this.
Thank you so much for your succinct and thorough analysis. I am very grateful for you to take the time to write it up, and give me a lot to think about. Here's a couple of post repair pictures I was able to get it out on the road tonight and shift gears and break well with my one and only back brake. The only thing I really watched putting this bike back together was stripping the brake cable fixing bolt for the front brake cuz I work too late in the evening pushing it to try to get done got my little tiny Lefty Lucy's confused. Tomorrow I'm going to go to the hardware store and see if I can match up that part. It's a heavy bike and it runs like a tank. I think I'm going to enjoy it especially if I put some slicks and be surely sunrise bars that I'm sitting on. Thanks again a million to be continued.

 06-27-21, 11:59 PM
#11
Senior Member

Join Date: Sep 2020
Location: Eastern Poland
Posts: 743
Bikes: Romet Jubilat x 4, Wigry x 1, Turing x 1
Mentioned: 3 Post(s)
Tagged: 0 Thread(s)
Quoted: 194 Post(s)
Liked 204 Times
in
151 Posts
1. No nothing changed between those pictures it must be an optical illusion.
2. What is the plastic liner you're referring to is it on the inside of the cable? I did have a feral on the end s of the cable they were plastic they had a slightly larger opening on the brake cable Farrell's then the shifter cables I might have confused the ferals which might have allowed some of the linear strands to escape. I'm not exactly sure what happened there but definitely were some strands hanging out and that was all new stuff. So I took it all off cut new cable and housing with the housing like couple centimeters longer just in case. Put it all back together and seems to be working significantly better now.
3. There is a plastic cable guide I took it off and clean it all up and it looks nice and fresh functional.
4. This is a good analysis I'm not exactly sure here I'm going to dig into this tomorrow measure it out and such.
5. All brand new.
6. Didn't have to do this.
Thank you so much for your succinct and thorough analysis. I am very grateful for you to take the time to write it up, and give me a lot to think about. Here's a couple of post repair pictures I was able to get it out on the road tonight and shift gears and break well with my one and only back brake. The only thing I really watched putting this bike back together was stripping the brake cable fixing bolt for the front brake cuz I work too late in the evening pushing it to try to get done got my little tiny Lefty Lucy's confused. Tomorrow I'm going to go to the hardware store and see if I can match up that part. It's a heavy bike and it runs like a tank. I think I'm going to enjoy it especially if I put some slicks and be surely sunrise bars that I'm sitting on. Thanks again a million to be continued.
The trick is to allow the inner cables to cross over on the underside of the downtube.
Likes For Geepig:
06-28-21, 12:58 AM
#12
Senior Member
Join Date: May 2005
Location: SFBay
Posts: 2,334
Bikes: n, I would like n+1
Mentioned: 0 Post(s)
Tagged: 0 Thread(s)
Quoted: 127 Post(s)
Likes: 0
Liked 133 Times
in
108 Posts
Always good to get miles on a bike.
Most shifter housing made in the last decade or two is a plastic sleeve on the inside, a series of metal strands in the middle, and a plastic shell on the outside. You can see a cross section of your housing here:
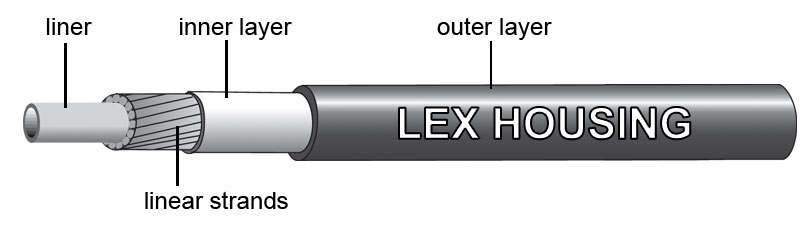
Source, scroll down to LEX at the very bottom: https://jagwire.com/guides/housing
In this case the inner and outer layers of the portion outside the steel strands may not be distinguishable, but that doesn't really matter. You want all of the portions of this to end at one point (ie, where you cut it). You don't want the wires sticking out farther than the liner or outer housing material like in the picture above.
It sounds like you're already doing so, but do get that front brake back into service as soon as is practical. You can stop much faster in an emergency (or any other time) with your front brake than with your rear. In the event of a sudden tube/tire blowout it's also nicer to do the braking on the wheel that's still fully functional. If you ride in inclement weather it may be worth paying the extra $ or two to get a stainless rather than normal fastener so that rust is less of an issue.
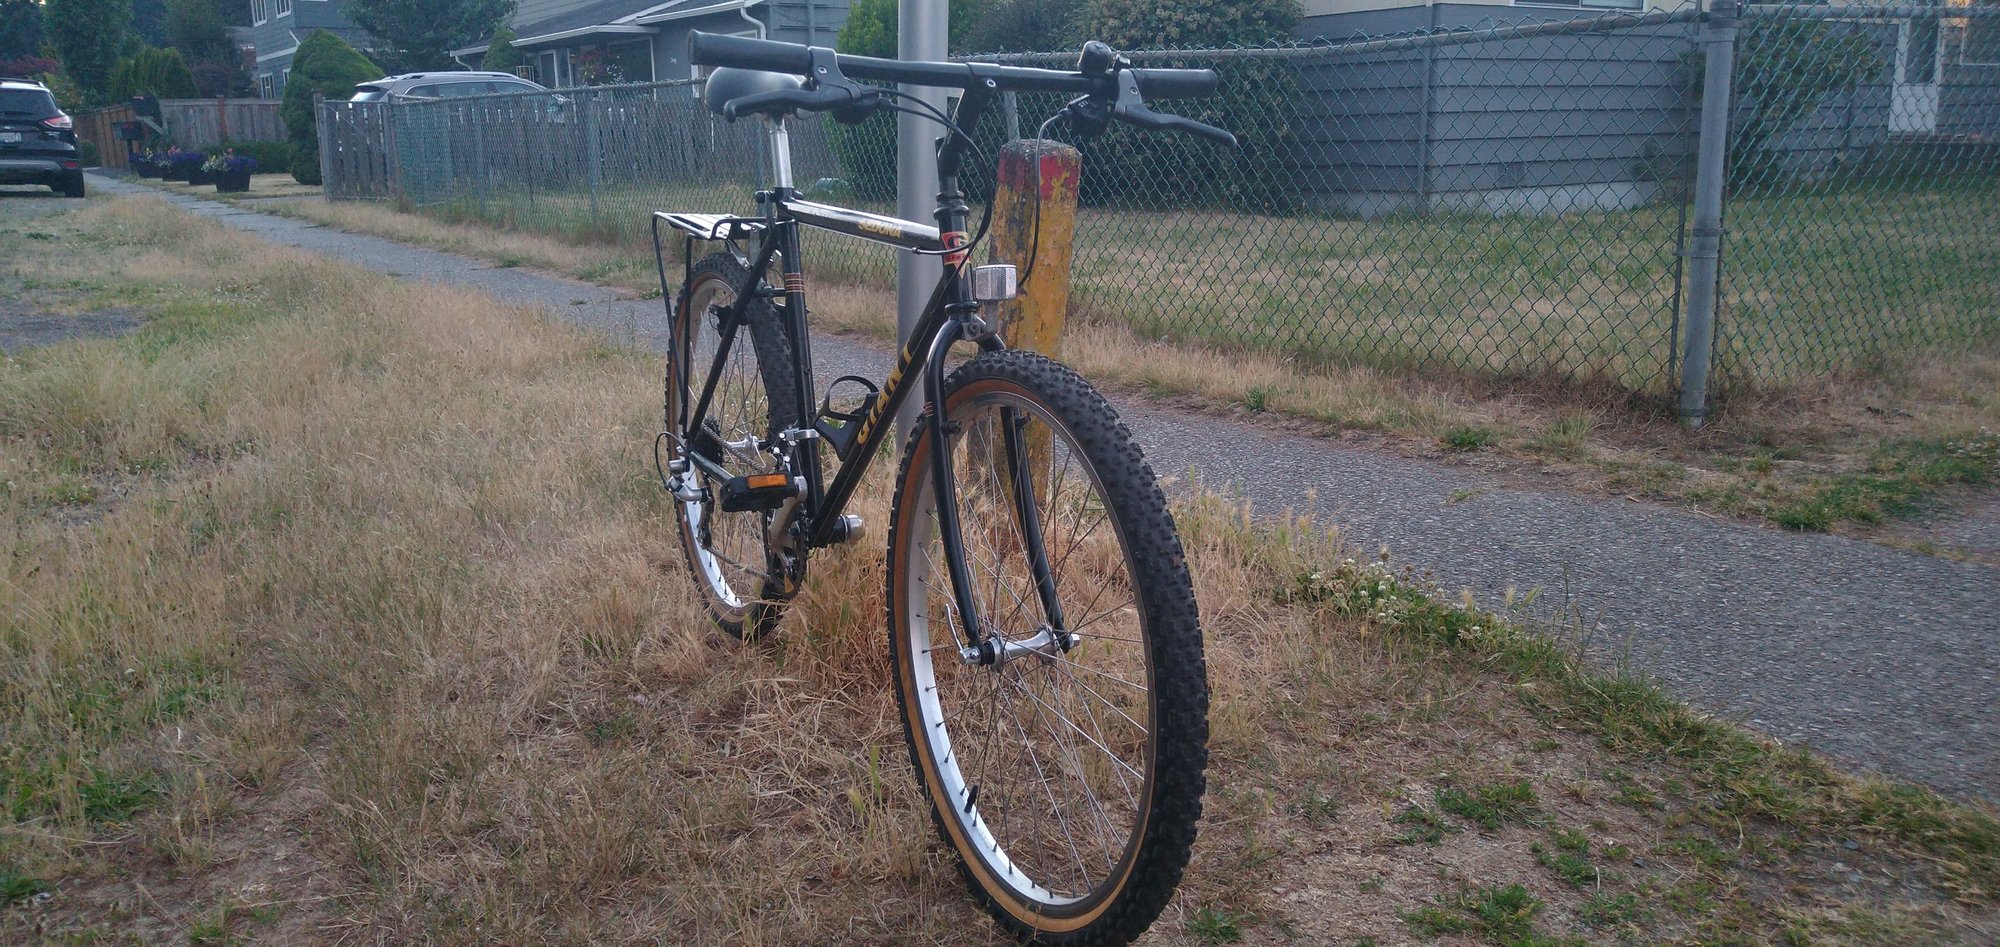
Since you seem to be soaking up all of our advice, I'll point out that your front wheel (or at least the quick release skewer) is on backwards. Does it really matter? No, not really, but convention is to put the front QR lever on the same side of the bike (left, non-drive) as the rear QR lever. The rear needs to be there so it stays out of the way of the derailer and one might as well make the front match. It is slightly helpful as many bicycle tires have a directional tread. Rather than looking for the rotation direction label when you put your front wheel back on you can just put the QR lever to the left and know all is right. Does tread direction matter? I don't know, but in cases where the manufacturer took the trouble of putting a label on, I try to follow it.
As one final note, I want to know what Shimano made those yellow chainring Biopace stickers from (material, adhesive, and ink). I understand the surviving ones have all had a gentle life, but for being 30 years old, every one I see on a bike seems to be in really good condition.
Most shifter housing made in the last decade or two is a plastic sleeve on the inside, a series of metal strands in the middle, and a plastic shell on the outside. You can see a cross section of your housing here:
Source, scroll down to LEX at the very bottom: https://jagwire.com/guides/housing
In this case the inner and outer layers of the portion outside the steel strands may not be distinguishable, but that doesn't really matter. You want all of the portions of this to end at one point (ie, where you cut it). You don't want the wires sticking out farther than the liner or outer housing material like in the picture above.
It sounds like you're already doing so, but do get that front brake back into service as soon as is practical. You can stop much faster in an emergency (or any other time) with your front brake than with your rear. In the event of a sudden tube/tire blowout it's also nicer to do the braking on the wheel that's still fully functional. If you ride in inclement weather it may be worth paying the extra $ or two to get a stainless rather than normal fastener so that rust is less of an issue.
Since you seem to be soaking up all of our advice, I'll point out that your front wheel (or at least the quick release skewer) is on backwards. Does it really matter? No, not really, but convention is to put the front QR lever on the same side of the bike (left, non-drive) as the rear QR lever. The rear needs to be there so it stays out of the way of the derailer and one might as well make the front match. It is slightly helpful as many bicycle tires have a directional tread. Rather than looking for the rotation direction label when you put your front wheel back on you can just put the QR lever to the left and know all is right. Does tread direction matter? I don't know, but in cases where the manufacturer took the trouble of putting a label on, I try to follow it.
As one final note, I want to know what Shimano made those yellow chainring Biopace stickers from (material, adhesive, and ink). I understand the surviving ones have all had a gentle life, but for being 30 years old, every one I see on a bike seems to be in really good condition.
06-28-21, 08:08 AM
#13
I'm good to go!
Join Date: Jul 2017
Location: Mississippi
Posts: 14,931
Bikes: Tarmac Disc Comp Di2 - 2020
Mentioned: 51 Post(s)
Tagged: 0 Thread(s)
Quoted: 6163 Post(s)
Liked 4,782 Times
in
3,300 Posts
What isn't moving? Can you pull on the bare cable going along the down tube and cause the FDR to shift? If so, your problem would seem to be on the other end and several of the things that jccaclimber mentioned. One might well be the slight bend where the cables in front of the head tube intertwine. S curves in cable runs can add to cable friction. The other being that it appears the plastic sheathing has been trimmed back from the housing ends which might let those strands pinch the cable in the ferrules when the cable is pulled.
And just to be sure.... you are turning the crank while trying to shift aren't you? Sorry, I feel compelled to ask as it has been a duh moment for others.
And just to be sure.... you are turning the crank while trying to shift aren't you? Sorry, I feel compelled to ask as it has been a duh moment for others.
Likes For Iride01:
06-28-21, 09:15 AM
#14
Senior Member
Join Date: Mar 2019
Posts: 1,606
Mentioned: 8 Post(s)
Tagged: 0 Thread(s)
Quoted: 581 Post(s)
Liked 921 Times
in
518 Posts
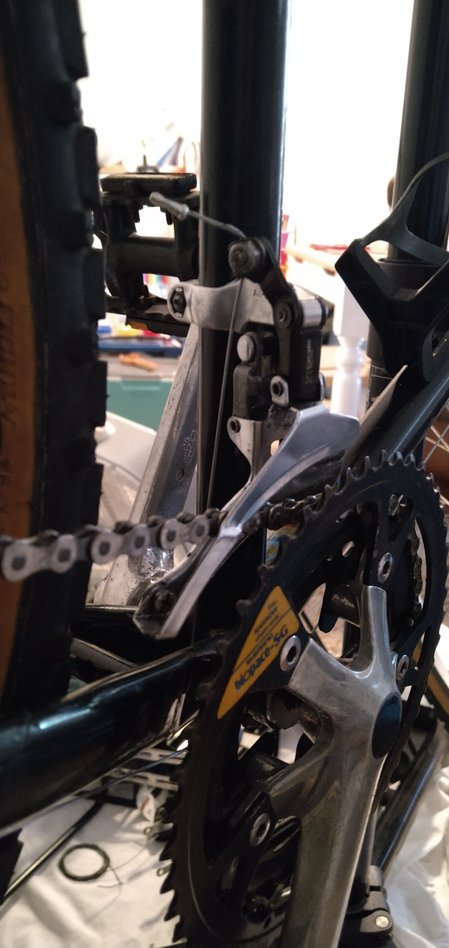
THe problem is visible in the pictures, and is mentioned in one of the first responses. OP has the cable routed incorrectly at the derailleur.
There is a washer under the pinch bolt that has a little tab facing the centre line of the bike. THe cable is supposed to go OVER this tab then pulled down between the washer and the actuation arm of the derailleur. The way it is set up now gives much less leverage for the cable to use to actuate the derailleur, so much higher tension than normal is in the cable, which has damaged the housing and given it that crazy deformed shape.
There is a washer under the pinch bolt that has a little tab facing the centre line of the bike. THe cable is supposed to go OVER this tab then pulled down between the washer and the actuation arm of the derailleur. The way it is set up now gives much less leverage for the cable to use to actuate the derailleur, so much higher tension than normal is in the cable, which has damaged the housing and given it that crazy deformed shape.
Likes For ClydeClydeson:
06-28-21, 06:30 PM
#15
Member
Thread Starter
Always good to get miles on a bike.
Most shifter housing made in the last decade or two is a plastic sleeve on the inside, a series of metal strands in the middle, and a plastic shell on the outside. You can see a cross section of your housing here:
Source, scroll down to LEX at the very bottom: https://jagwire.com/guides/housing
In this case the inner and outer layers of the portion outside the steel strands may not be distinguishable, but that doesn't really matter. You want all of the portions of this to end at one point (ie, where you cut it). You don't want the wires sticking out farther than the liner or outer housing material like in the picture above.
It sounds like you're already doing so, but do get that front brake back into service as soon as is practical. You can stop much faster in an emergency (or any other time) with your front brake than with your rear. In the event of a sudden tube/tire blowout it's also nicer to do the braking on the wheel that's still fully functional. If you ride in inclement weather it may be worth paying the extra $ or two to get a stainless rather than normal fastener so that rust is less of an issue.
Since you seem to be soaking up all of our advice, I'll point out that your front wheel (or at least the quick release skewer) is on backwards. Does it really matter? No, not really, but convention is to put the front QR lever on the same side of the bike (left, non-drive) as the rear QR lever. The rear needs to be there so it stays out of the way of the derailer and one might as well make the front match. It is slightly helpful as many bicycle tires have a directional tread. Rather than looking for the rotation direction label when you put your front wheel back on you can just put the QR lever to the left and know all is right. Does tread direction matter? I don't know, but in cases where the manufacturer took the trouble of putting a label on, I try to follow it.
As one final note, I want to know what Shimano made those yellow chainring Biopace stickers from (material, adhesive, and ink). I understand the surviving ones have all had a gentle life, but for being 30 years old, every one I see on a bike seems to be in really good condition.
As far as the sticker goes it is like a foil type material. I actually peeled it off and was considering leaving it off and then said no let's keep this bike all original. So I popped it back on but yeah it's it's like a foil thick reflective on the back with great adhesive.
Likes For 269523:
06-28-21, 06:33 PM
#16
Member
Thread Starter
What isn't moving? Can you pull on the bare cable going along the down tube and cause the FDR to shift? If so, your problem would seem to be on the other end and several of the things that jccaclimber mentioned. One might well be the slight bend where the cables in front of the head tube intertwine. S curves in cable runs can add to cable friction. The other being that it appears the plastic sheathing has been trimmed back from the housing ends which might let those strands pinch the cable in the ferrules when the cable is pulled.
And just to be sure.... you are turning the crank while trying to shift aren't you? Sorry, I feel compelled to ask as it has been a duh moment for others.
And just to be sure.... you are turning the crank while trying to shift aren't you? Sorry, I feel compelled to ask as it has been a duh moment for others.
06-28-21, 06:38 PM
#17
Member
Thread Starter
THe problem is visible in the pictures, and is mentioned in one of the first responses. OP has the cable routed incorrectly at the derailleur.
There is a washer under the pinch bolt that has a little tab facing the centre line of the bike. THe cable is supposed to go OVER this tab then pulled down between the washer and the actuation arm of the derailleur. The way it is set up now gives much less leverage for the cable to use to actuate the derailleur, so much higher tension than normal is in the cable, which has damaged the housing and given it that crazy deformed shape.
There is a washer under the pinch bolt that has a little tab facing the centre line of the bike. THe cable is supposed to go OVER this tab then pulled down between the washer and the actuation arm of the derailleur. The way it is set up now gives much less leverage for the cable to use to actuate the derailleur, so much higher tension than normal is in the cable, which has damaged the housing and given it that crazy deformed shape.
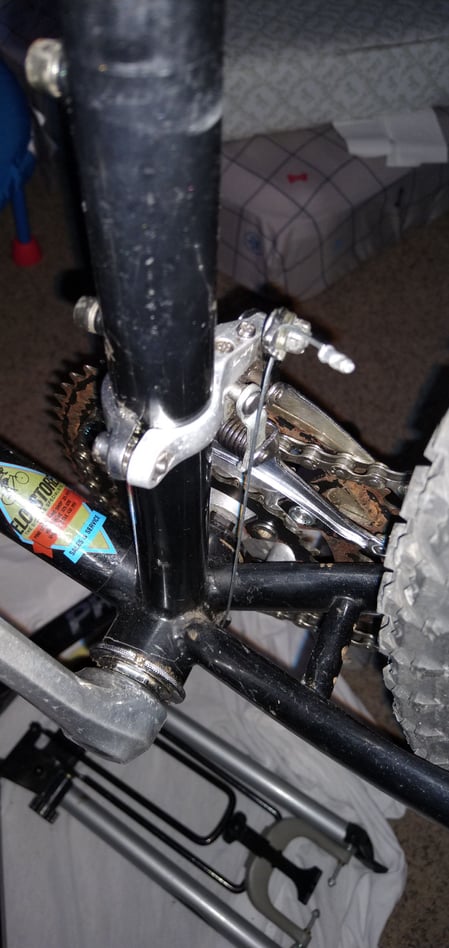
Here's a pic..
Last edited by 269523; 06-28-21 at 10:36 PM.
06-29-21, 12:38 AM
#18
Senior Member
Join Date: May 2005
Location: SFBay
Posts: 2,334
Bikes: n, I would like n+1
Mentioned: 0 Post(s)
Tagged: 0 Thread(s)
Quoted: 127 Post(s)
Likes: 0
Liked 133 Times
in
108 Posts
Get out of town. The cable is supposed to go over the tab? Wow, I didn't really expect that. To me it seemed like it should be pinched behind the tab. Okay well I might try to rearrange that routing. I'm sure there's not too many ways to do it incorrectly but if there is I'll find it as I apparently have. Any picture image diagram on the internet that you can point to I'm a bit of a visual learner. Thank you though cuz it is still a little harder to shift than I'm hoping for and if we can get any easier that would be advantageous. PS he's in the microphone to spell the stuff out on mobile is most helpful. Over.
Here's a pic..
<snip>
Here's a pic..
<snip>
It is worth holding the shifter in place and pulling on the downtube portion of the cable by hand to make sure that things are smooth from there down.
There are some marks on the seat tube just above the FD clamp. Are these from the derailer slipping (and does it now clear the large ring?), from protective tape, or just an old mounting position with perhaps a larger ring? You have a non-circular ring, so you'll want to make sure it clears at the points where the ring is largest.
Last edited by jccaclimber; 06-29-21 at 12:42 AM.
06-29-21, 08:29 AM
#19
Senior Member
Join Date: Mar 2019
Posts: 1,606
Mentioned: 8 Post(s)
Tagged: 0 Thread(s)
Quoted: 581 Post(s)
Liked 921 Times
in
518 Posts
Originally Posted by jccaclimber
IMO ClydeClydeson is incorrect, your front derailer cable is correctly affixed at the derailer. His proposed attachment would result in a rather nasty kink in the cable, may decrease its life, and would also change the actuation ratio.
You are right that it changes the actuation ratio. IT gives a longer lever arm, which drastically reduces tension in the cable (which would have prevented the cable from going all wonky in the first place), but this is the intended orientation. It changes the actuation ratio from the incorrect config the OP has to the correct configuration.
06-29-21, 08:40 AM
#20
Senior Member
Join Date: Mar 2019
Posts: 1,606
Mentioned: 8 Post(s)
Tagged: 0 Thread(s)
Quoted: 581 Post(s)
Liked 921 Times
in
518 Posts

Correct routing shown above. you will likely need to unscrew the pinch bolt most or all the way to get the cable out from underneath the tab, then you pull the end of the cable over the top of the tab and pinch bolt, and tighten the pinch bolt.
Likes For ClydeClydeson:
06-29-21, 08:43 AM
#21
I'm good to go!
Join Date: Jul 2017
Location: Mississippi
Posts: 14,931
Bikes: Tarmac Disc Comp Di2 - 2020
Mentioned: 51 Post(s)
Tagged: 0 Thread(s)
Quoted: 6163 Post(s)
Liked 4,782 Times
in
3,300 Posts
How the cable is routed and fastened in the pinch bolt for the DR might be an issue. Different models of Shimano have suffered poor performance and range because of the angle of the cable between the pinch bolt and BB guide. That is why how the cable is fastened makes a difference.
The authority on this is Shimano. You should look up your model of DR and Shifters on their tech doc site. https://si.shimano.com/
DM's give the most info. But for older stuff you'll probably only find UM's, SI's or other. Though some aren't quite explanatory in words, the pictograms give a lot of info when you get to understanding them.
I wouldn't expect the way it's fastened in the pinch bolt alone to give you such a hard pull. But it's a reasonable possibility.
Last time I had something that pulled that hard, my cable was sawing into the BB shell. You can tear up your shifter with such pull, so if it's anything more than easy..... stop.
06-29-21, 08:49 AM
#22
I'm good to go!
Join Date: Jul 2017
Location: Mississippi
Posts: 14,931
Bikes: Tarmac Disc Comp Di2 - 2020
Mentioned: 51 Post(s)
Tagged: 0 Thread(s)
Quoted: 6163 Post(s)
Liked 4,782 Times
in
3,300 Posts
ClydeClydeson Nice re-touch on the pic!
Likes For Iride01:
06-29-21, 08:52 AM
#23
Senior Member
Join Date: Mar 2019
Posts: 1,606
Mentioned: 8 Post(s)
Tagged: 0 Thread(s)
Quoted: 581 Post(s)
Liked 921 Times
in
518 Posts
Old Suntour derailleurs had the same cable anchor design, and their X-Press shifters, when coupled with this common incorrect FD cable routing, would violently snap back and try to tear your thumbnail off.
06-29-21, 09:01 AM
#24
I'm good to go!
Join Date: Jul 2017
Location: Mississippi
Posts: 14,931
Bikes: Tarmac Disc Comp Di2 - 2020
Mentioned: 51 Post(s)
Tagged: 0 Thread(s)
Quoted: 6163 Post(s)
Liked 4,782 Times
in
3,300 Posts
This is a long-known issue. The design of the old FDs was a definite 'error trap', and the resulting incorrect assembly causes known issues - heavy lever feel, bad indexing, and potential damage to the cable housing. The crazy kinked cable is sort of 'level 1' of housing damage. As the plastic jacket ages and becomes more brittle, the wire structure of the housing is likely to break through and create a 'squirrel cage' effect.
Old Suntour derailleurs had the same cable anchor design, and their X-Press shifters, when coupled with this common incorrect FD cable routing, would violently snap back and try to tear your thumbnail off.
Old Suntour derailleurs had the same cable anchor design, and their X-Press shifters, when coupled with this common incorrect FD cable routing, would violently snap back and try to tear your thumbnail off.
06-29-21, 03:56 PM
#25
Senior Member
Join Date: May 2005
Location: SFBay
Posts: 2,334
Bikes: n, I would like n+1
Mentioned: 0 Post(s)
Tagged: 0 Thread(s)
Quoted: 127 Post(s)
Likes: 0
Liked 133 Times
in
108 Posts
Does the cable still have a simple groove to sit in and show the correct orientation?

