


Brake Side High Pressure
 07-06-22, 07:15 PM
#1
Junior Member
Thread Starter
Brake Side High Pressure
Hi folks.
My front brakes need some attention. Both sides just greased, then tightened. They both move. Driver side is dead stuff and sits on the rim. Passenger side is allowed to separate from the rim. Not sure why driver side is so tight.
Anybody know what I need to do? Otherwise great brakes.
Watch here:
My front brakes need some attention. Both sides just greased, then tightened. They both move. Driver side is dead stuff and sits on the rim. Passenger side is allowed to separate from the rim. Not sure why driver side is so tight.
Anybody know what I need to do? Otherwise great brakes.
Watch here:
 07-06-22, 08:50 PM
#2
Really Old Senior Member

Did you try adjusting the screw?
Spring hooked into the hole?
What's it do if you disconnect the straddle cable? Just flop? If so, it would be a spring issue.
07-06-22, 09:33 PM
#3
Senior Member
Join Date: Jul 2013
Location: Nor-Cal
Posts: 3,767
Bikes: lots
Mentioned: 7 Post(s)
Tagged: 0 Thread(s)
Quoted: 1958 Post(s)
Liked 2,932 Times
in
1,489 Posts
It's not 'driver side' and 'passenger side'...it's drive side and non drive side. Please. As for your brakes, either one side is dirty/corroded, the spring needs to be adjusted or the spring leg isn't in the same hole on both sides.
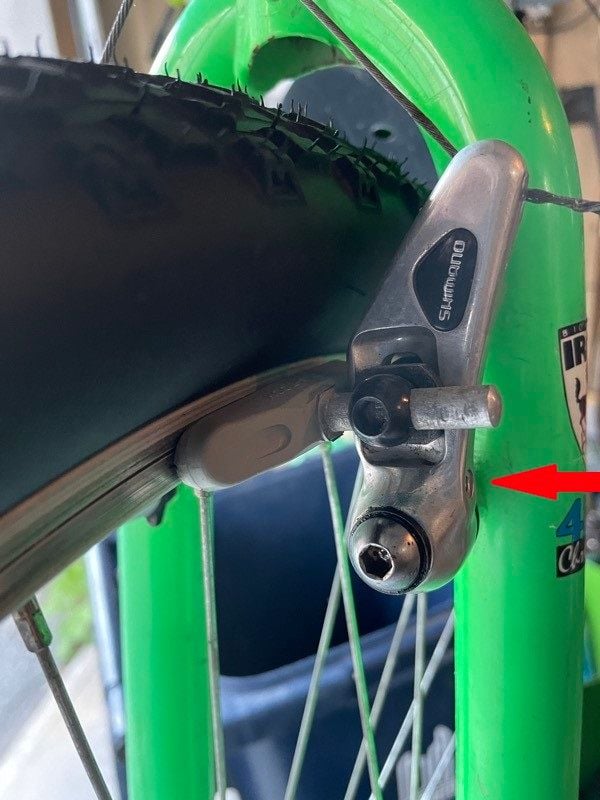
ETA: It looks like your rim is totally worn out and the pad may be getting caught under the lip of worn section.
ETA: It looks like your rim is totally worn out and the pad may be getting caught under the lip of worn section.
07-07-22, 06:36 AM
#4
Senior Member
Join Date: Feb 2012
Location: Golden, CO and Tucson, AZ
Posts: 2,837
Bikes: 2016 Fuji Tread, 1983 Trek 520
Mentioned: 13 Post(s)
Tagged: 0 Thread(s)
Quoted: 676 Post(s)
Liked 741 Times
in
430 Posts
You don't show the cable hanger. Some of them mount to the headset and can rotate. It looks like yours might be rotated too far to the drive side. Then you'll need to move the pivot point of the link wire. Slide it down closer to the cable pinch bolt on the non-drive side caliper.
See Sheldon Brown's article on cantilever brakes.
See Sheldon Brown's article on cantilever brakes.
Likes For andrewclaus:
07-07-22, 08:07 AM
#5

Senior Member
Join Date: Feb 2012
Location: Rochester, NY
Posts: 18,073
Bikes: Stewart S&S coupled sport tourer, Stewart Sunday light, Stewart Commuting, Stewart Touring, Co Motion Tandem, Stewart 3-Spd, Stewart Track, Fuji Finest, Mongoose Tomac ATB, GT Bravado ATB, JCP Folder, Stewart 650B ATB
Mentioned: 0 Post(s)
Tagged: 0 Thread(s)
Quoted: 4201 Post(s)
Liked 3,857 Times
in
2,305 Posts
Someone should take the RH side (any question as to which side that is???) off the post and see why the spring is not providing enough tension to rotate the pad away from the rim. It's possible that the pad has worn enough and unevenly so that it now has a lip along the bottom edge that's catching on the rim and keeping the pad there. Given the rather unevenly positioned pads and that the RH side's pad is not tangential to the rim (the rear end of that pad is close or is touching the tire) I would not be surprised if the spring was installed into the wrong tab holes.
Besides taking that side off the post to look at the spring ends positions and besides the poor pad alignment WRT the rim I would also position the pads further out on their shafts so the arms angle outwards a bit more. This will lower the straddle cable clip (yoke) and increase the leverage of the set up. As andrewclaus suggested check out the Sheldon Brown instructions. Andy
Besides taking that side off the post to look at the spring ends positions and besides the poor pad alignment WRT the rim I would also position the pads further out on their shafts so the arms angle outwards a bit more. This will lower the straddle cable clip (yoke) and increase the leverage of the set up. As andrewclaus suggested check out the Sheldon Brown instructions. Andy
__________________
AndrewRStewart
AndrewRStewart

Likes For Andrew R Stewart:
07-07-22, 10:19 AM
#6
Senior Member
Join Date: Dec 2020
Location: Wake Forest, NC
Posts: 5,790
Bikes: 1989 Cinelli Supercorsa
Mentioned: 11 Post(s)
Tagged: 0 Thread(s)
Quoted: 3511 Post(s)
Liked 2,925 Times
in
1,774 Posts
Looks to me like those brakes need to be completely readjusted from the ground up. So much looks wrong here.
07-07-22, 11:04 AM
#7
Junior Member
Thread Starter
Cheers
07-07-22, 11:06 AM
#8
Junior Member
Thread Starter
Wow I apologize. Did I offend you? The rim is not worn out, nor is the pad. It sits properly.
07-07-22, 01:31 PM
#9
Senior Member
Join Date: Jan 2009
Location: San Diego, CA
Posts: 3,671
Mentioned: 10 Post(s)
Tagged: 0 Thread(s)
Quoted: 836 Post(s)
Liked 1,061 Times
in
745 Posts
As Andrew mentioned, are you sure the spring ends were properly inserted into the holes of the brake mount and brake arm when you installed it after re-greasing?
Last edited by Crankycrank; 07-07-22 at 01:38 PM.
07-07-22, 01:59 PM
#10
Senior Member
It's possible that the retraction spring on the left side is broken internally. Otherwise I'm also thinking that the pin for the retraction spring is not in the proper matching hole on both sides. The other things like how the hanger is positioned also comes into the issue. But that's the finer detail stuff. You've got a major issue of the right (drive) side arm having strong retraction force and the left (non drive) side having very little or no retraction force at all. So either badly mismatched retraction pin hole selection or the left side arm has a broken spring. Especially when the adjuster screw has zero effect. That alone makes me think it's a broken spring on the left side.
Likes For BCRider:
07-07-22, 09:47 PM
#11
Junior Member
Thread Starter
It's possible that the retraction spring on the left side is broken internally. Otherwise I'm also thinking that the pin for the retraction spring is not in the proper matching hole on both sides. The other things like how the hanger is positioned also comes into the issue. But that's the finer detail stuff. You've got a major issue of the right (drive) side arm having strong retraction force and the left (non drive) side having very little or no retraction force at all. So either badly mismatched retraction pin hole selection or the left side arm has a broken spring. Especially when the adjuster screw has zero effect. That alone makes me think it's a broken spring on the left side.
Cheers
07-07-22, 09:48 PM
#12
Junior Member
Thread Starter
Wasn't a complete removal. Just a loosening to get the grease in there. I should be taking it apart as a full service. I'm going to look for new springs as well.
07-07-22, 09:50 PM
#13
Junior Member
Thread Starter
Which does nothing to address the issue.
If the screw turns, it works unless it's stripped.
If it's stripped, it should be obvious.
Remove that arm and see what's wrong.
First, back off the mounting screw slightly and see if the problem remains, before completely removing it.
The screw may have been so over tightened, that it "mushroomed" the end of the post, causing it to bind.
Listen to Andy. He gives you good advice.
The rest is up to you.
07-08-22, 12:23 AM
#14

Senior Member
Join Date: Jul 2005
Posts: 5,992
Mentioned: 26 Post(s)
Tagged: 0 Thread(s)
Quoted: 2494 Post(s)
Liked 738 Times
in
522 Posts
OK, but I never said the screw was stripped. Nothing is stripped. The cantilever moves and isn't tight. It's just forcing against the rim for some reason. I have to have a better look. The reason I'm asking in here is because it seems to assemble just fine. The mounting screw seats pretty solid against its seat, and it still pivots fine. It keeps the clamping from happening.
It is probably not the tiny adjustment screws. Set them halfway through their full adjustment and start all over. The posters saying the ends of the springs that fit in the small holes on the brake bosses are mismatched are probably right. There are usually three small holes vertically placed on a plate next to the boss. The middle hole is a safe one to start with. Make sure the ends of the spring on each side of the front brake is in the middle hole as you slide the caliper arm onto the boss. It is easy to get wrong.
There is no shame at all in taking this bike to a bicycle co-op where you are encouraged to watch while the tech works on your bike. You haven't offended anyone that I can see, but I can tell that you don't have the experience necessary to get your bike back to the factory defaults. Buying new brakes will only kick the can down the road because they WILL get out of adjustment as well. It's the way it is. Since there are bike stores and bike co-ops (that are practically free) you absolutely do not have to become a bike mechanic yourself. But it really, really, helps if when you bring an issue to a forum of bike wrenches if you can use the proper names for things, and follow the conventions of troubleshooting procedures. These days the easiest way to get up to speed with all of that is YouTube videos on the part of the bike you have an issue with.
07-08-22, 02:08 AM
#15
Junior Member
Thread Starter
We know you never said the screw was stripped. You said you tightened it and nothing happened. The other poster said, basically, that that is impossible unless the screw is stripped. They are not wrong. To be fair to you, however, that screw is very tiny and has a tiny range of adjustment. It's easy to miss the fact that something is in fact happening, just not enough of that something. Sadly, you need that kind of fiddly, one half turn is the difference between a pad dragging and not dragging, frustration, to make these brakes work optimally.
It is probably not the tiny adjustment screws. Set them halfway through their full adjustment and start all over. The posters saying the ends of the springs that fit in the small holes on the brake bosses are mismatched are probably right. There are usually three small holes vertically placed on a plate next to the boss. The middle hole is a safe one to start with. Make sure the ends of the spring on each side of the front brake is in the middle hole as you slide the caliper arm onto the boss. It is easy to get wrong.
There is no shame at all in taking this bike to a bicycle co-op where you are encouraged to watch while the tech works on your bike. You haven't offended anyone that I can see, but I can tell that you don't have the experience necessary to get your bike back to the factory defaults. Buying new brakes will only kick the can down the road because they WILL get out of adjustment as well. It's the way it is. Since there are bike stores and bike co-ops (that are practically free) you absolutely do not have to become a bike mechanic yourself. But it really, really, helps if when you bring an issue to a forum of bike wrenches if you can use the proper names for things, and follow the conventions of troubleshooting procedures. These days the easiest way to get up to speed with all of that is YouTube videos on the part of the bike you have an issue with.
Two screws here. There is the mounting bolt/screw, and there is a tiny limit type screw. The latter I tried and it did nothing, up and down. Taking the bike into a shop here in Toronto means I don't have my bike for a month. I've been working on my bike for 45 years, and I'm fixing a bunch of other things right now. I just wanted some suggestions as to what it could be. It's so out of whack that I thought it would be immediately assumed it was something that's common. I haven't taken it apart yet which I intend to get accomplished soon.
07-08-22, 07:52 AM
#16
Newbie
If you really want to understand how your brakes work, and how to troubleshoot them, I'd suggest getting one of Leonard Zinn's bicycle maintenance books. He goes into detail about different types of rim brakes, has exploded diagrams, and helpful repair tips.
07-08-22, 09:31 AM
#17
Senior Member
Join Date: Dec 2020
Location: Wake Forest, NC
Posts: 5,790
Bikes: 1989 Cinelli Supercorsa
Mentioned: 11 Post(s)
Tagged: 0 Thread(s)
Quoted: 3511 Post(s)
Liked 2,925 Times
in
1,774 Posts
Two screws here. There is the mounting bolt/screw, and there is a tiny limit type screw. The latter I tried and it did nothing, up and down. Taking the bike into a shop here in Toronto means I don't have my bike for a month. I've been working on my bike for 45 years, and I'm fixing a bunch of other things right now. I just wanted some suggestions as to what it could be. It's so out of whack that I thought it would be immediately assumed it was something that's common. I haven't taken it apart yet which I intend to get accomplished soon.
I know pictures can be deceiving, but from what I can see, your brakes need a bit of work. The shoes don't appear to be properly aligned, *to me.* Not that that is the issue here--but it could be.
Cantilever brakes are pretty simple. If you've been working on your bike for 45 years, the problem should be very apparent to you, since you are not looking at photos/videos of the problem from behind a computer monitor. I agree with the others. Either you didn't position the spring properly, or it's broken, or the arm is grabbing on the shaft for lack of lubrication, or maybe you even forgot to install the spring. Unlike the rest of us, you have the ability to disassemble the brake and see what the problem is.
07-08-22, 11:34 AM
#18
Senior Member
Join Date: Feb 2007
Posts: 1,437
Mentioned: 5 Post(s)
Tagged: 0 Thread(s)
Quoted: 624 Post(s)
Likes: 0
Liked 396 Times
in
274 Posts
I have had this problem before. I removed all crosion from both cantilever studs with drywall sandpaper. lubed the studs. Then I pulled out the wheel and twisted each brake arm to weaken or strengthen the springs so they are more equal in tension. This allowed the adjusters to fine tune.
07-08-22, 12:29 PM
#19
Senior Member
You don't even need to remove the arm to see which hole the spring tang is in. You should be able to look in from behind the legs and see the holes in the canti stud's base plate and see the tang sticking through. If they are not in matching holes then fix that to start.
If they are in matching holes or there's only the one hole and the tang is showing in both then it's highly likely that the left arm's spring is broken. You can check for this too. Unhook the straddle from both of the arms and remove the front wheel. You don't NEED to unhook the cable from the cable clamp on the left arm but if you are at all in doubt about it then I'd do so. It's only about 30 seconds to remove and re-set later.
With both arms totally free free they should both retract away with somewhat similar pressure. If the left side arm has a broken spring then the spring action will be either not there at all or it'll be very odd feeling when the ends touch to give you some spring but it's not the same or even a proper sort of feel.
For that age of brakes you simply won't find parts other than in the "Ye Olden Box of Parts" kept under the work bench. And since it sounds like you don't have that sort of box you'll need to go around to the local bike shops.
I'd say that if you like the bike enough that this might also be the time to switch over to a V brake setup. It'll cost more since you need to buy the brakes AND proper matching levers though. But if you enjoy the bike enough it would be a nice upgrade at the same time you fix the broken brake arm issue.
07-08-22, 02:35 PM
#20
Senior Member
Join Date: Feb 2018
Posts: 567
Mentioned: 1 Post(s)
Tagged: 0 Thread(s)
Quoted: 241 Post(s)
Liked 232 Times
in
153 Posts
May I suggest looking at this: Cantilever Smooth Post Brake Service | Park Tool
Likes For RGMN:
07-09-22, 01:07 PM
#21
Newbie
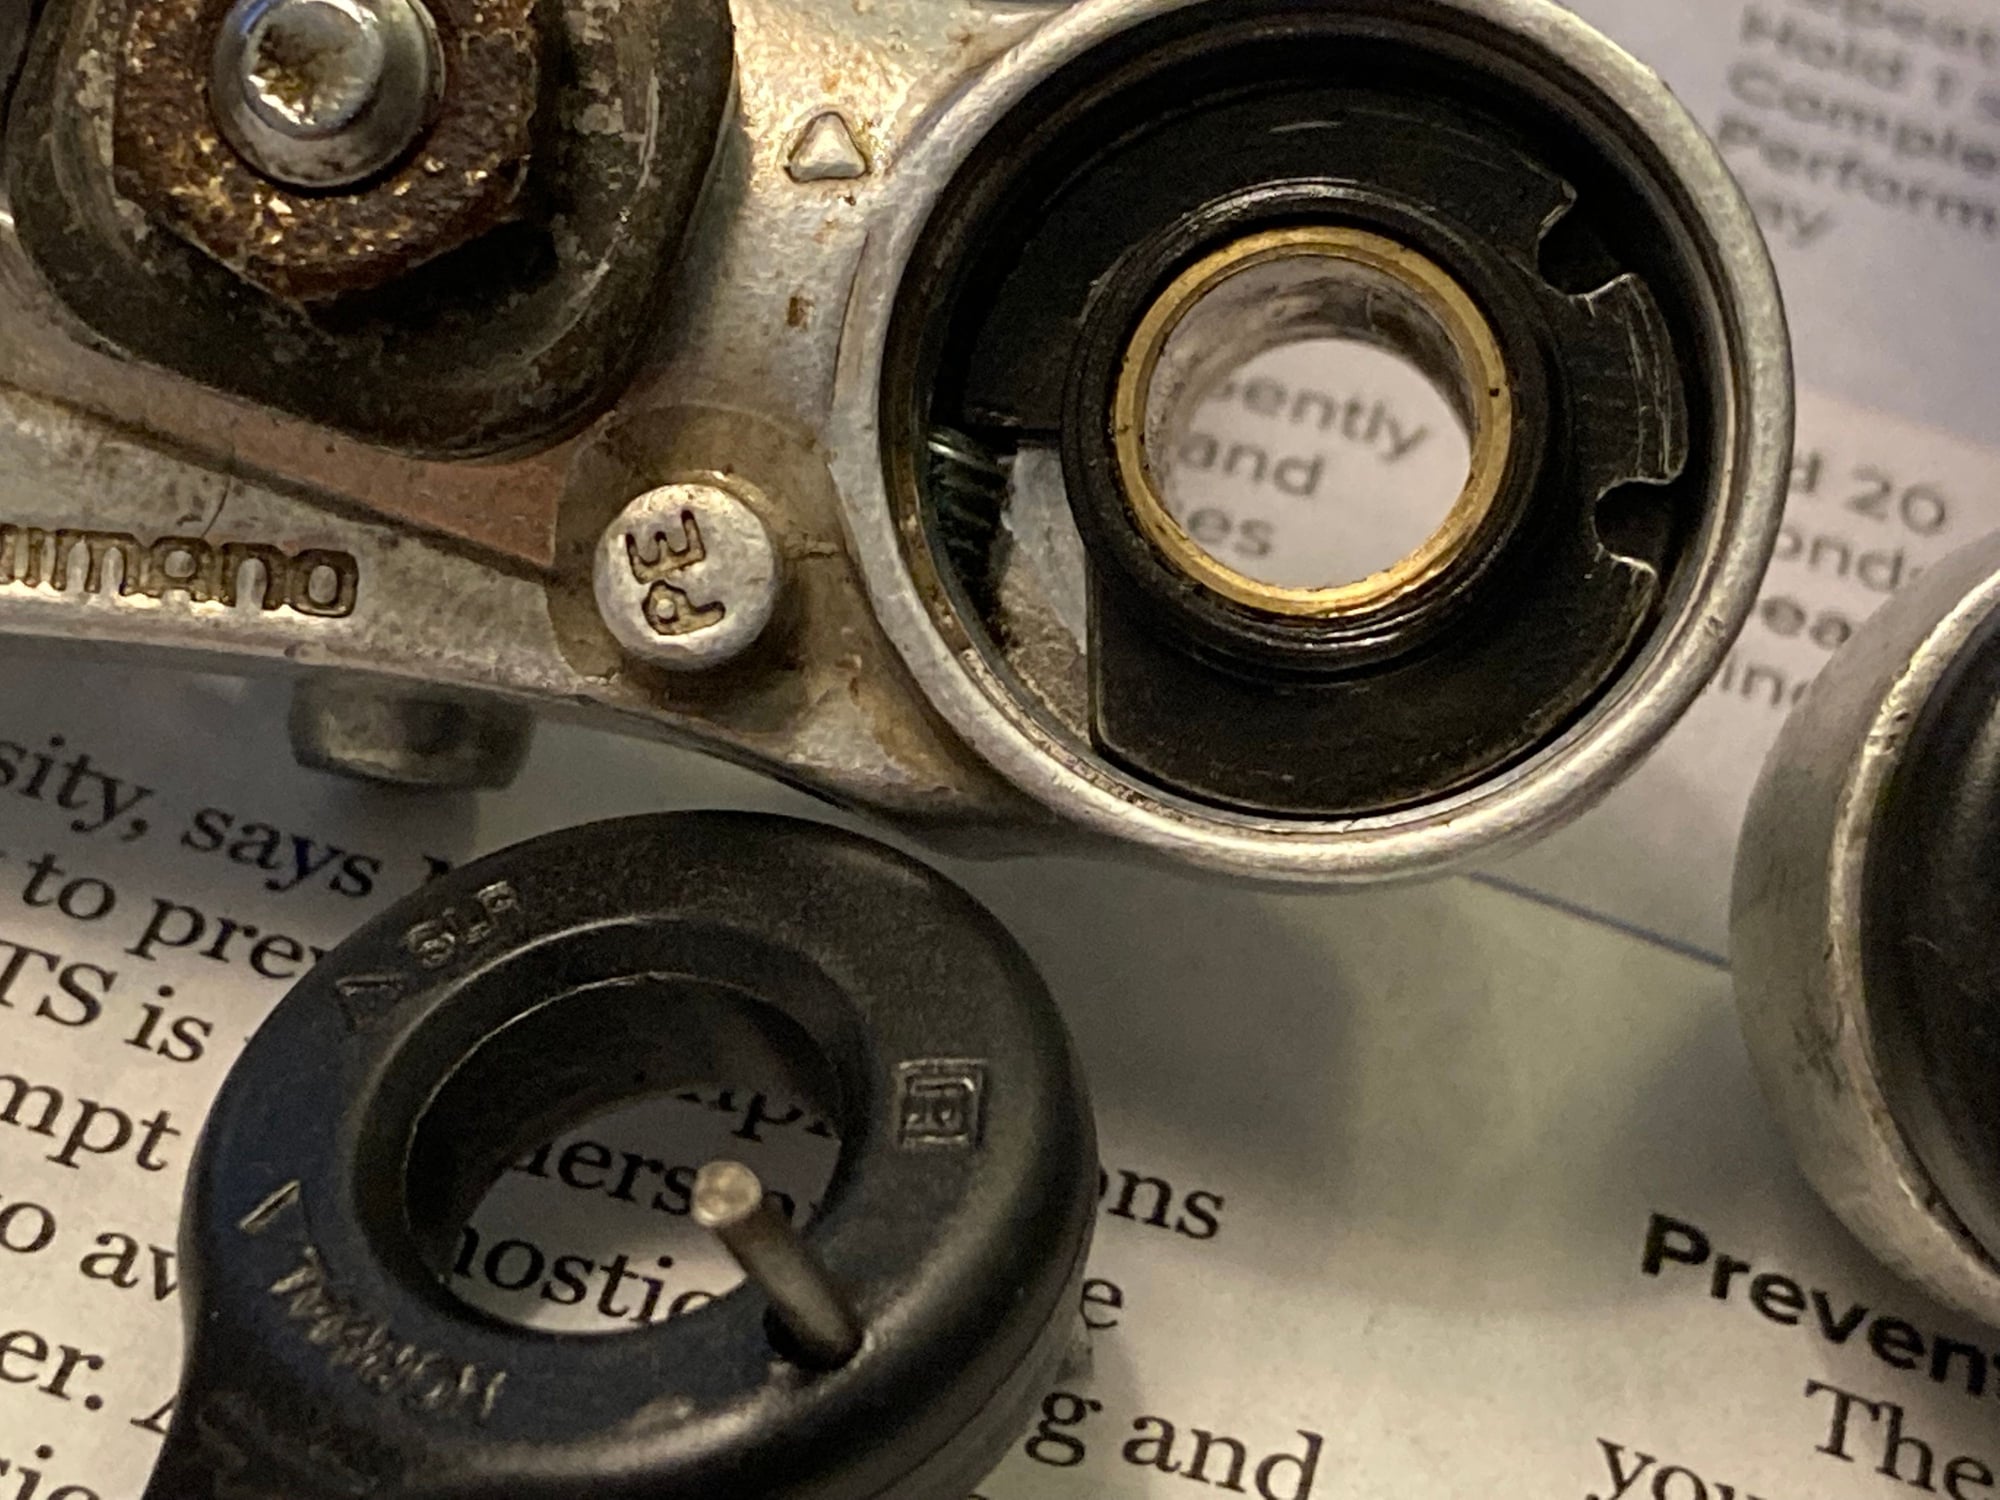
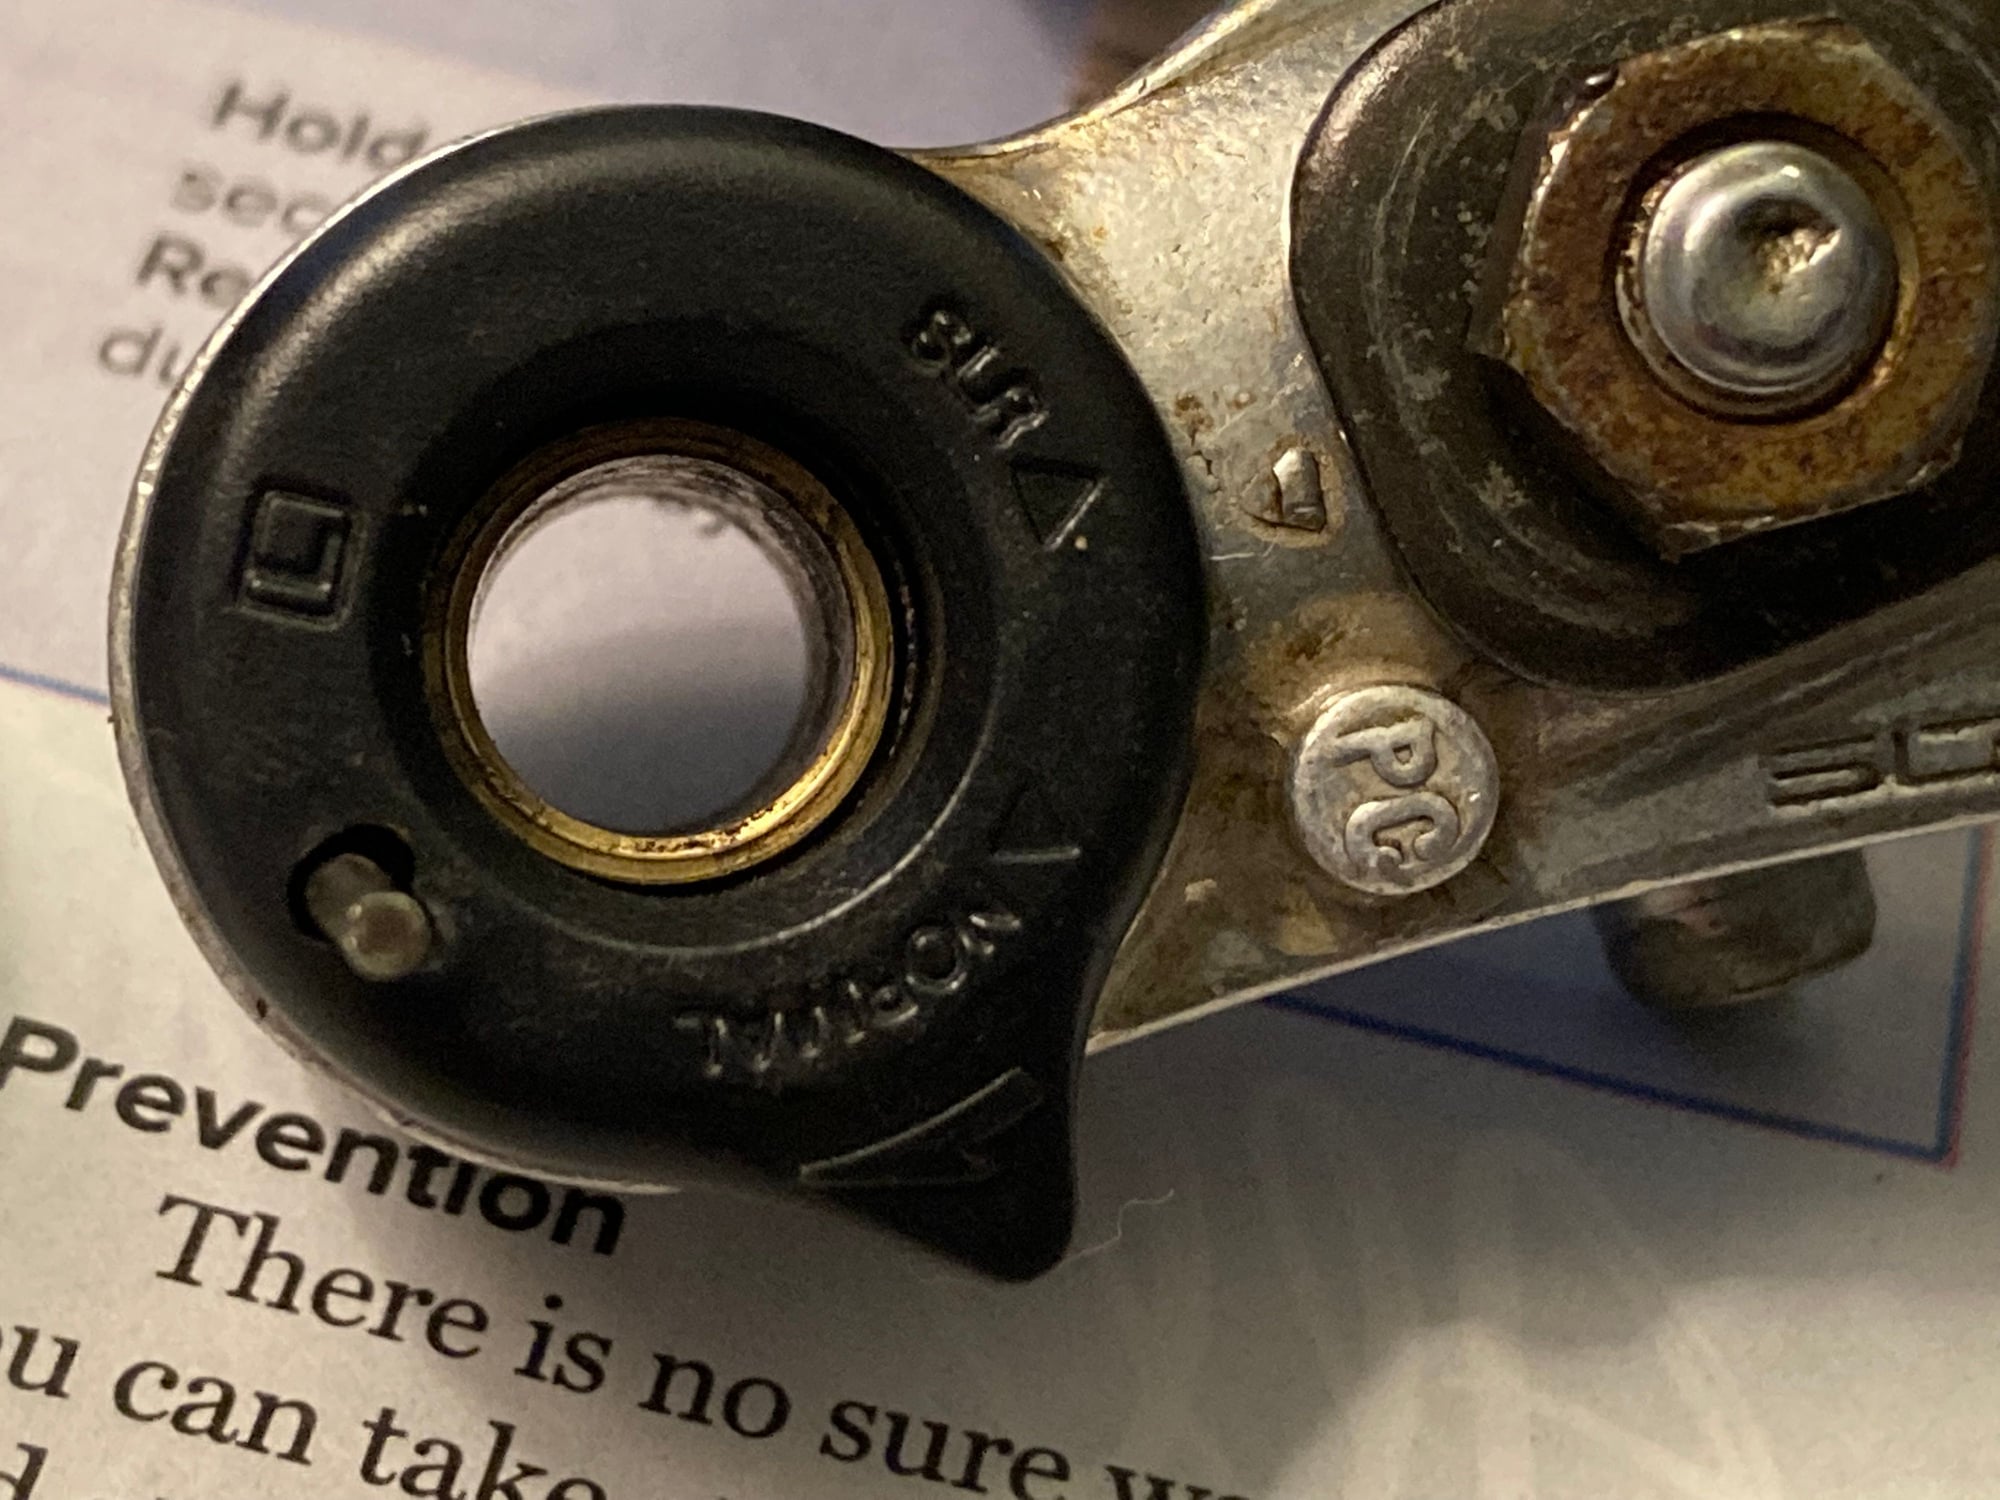
Hi. I hope this helps. Those particular era of Shimano cantilever brakes had 2 spring tension settings namely, "SLR" and "normal" settings. I think SLR stood for Shimano Linear Response? or something. Anyway, these settings are visible from behind the arms on the plastic caps that cover the tension springs. There should be 2 arrowheads on the plastic cap, one for "SLR" and one for "normal". I'm guessing that you might have one brake arm set to "SLR" and the opposite arm may be set to "normal". The settings should match meaning they should both be set to either "normal" or "SLR". You change the spring tension by inserting the hidden end of the tension spring into the appropriate hole so that when you put the plastic cap back on, it either points to SLR or normal.


Likes For jo_lacs:
07-09-22, 03:16 PM
#22
Junior Member
Thread Starter
May I suggest looking at this: Cantilever Smooth Post Brake Service | Park Tool
07-18-22, 06:44 AM
#23
Junior Member
Thread Starter
So it was the spring. It sat in the wrong hole. Corrected, with an alignment of the pads (service) and works like a charm.
Cheers
Cheers
Likes For BeeRich:
07-18-22, 10:50 PM
#24
Full Member
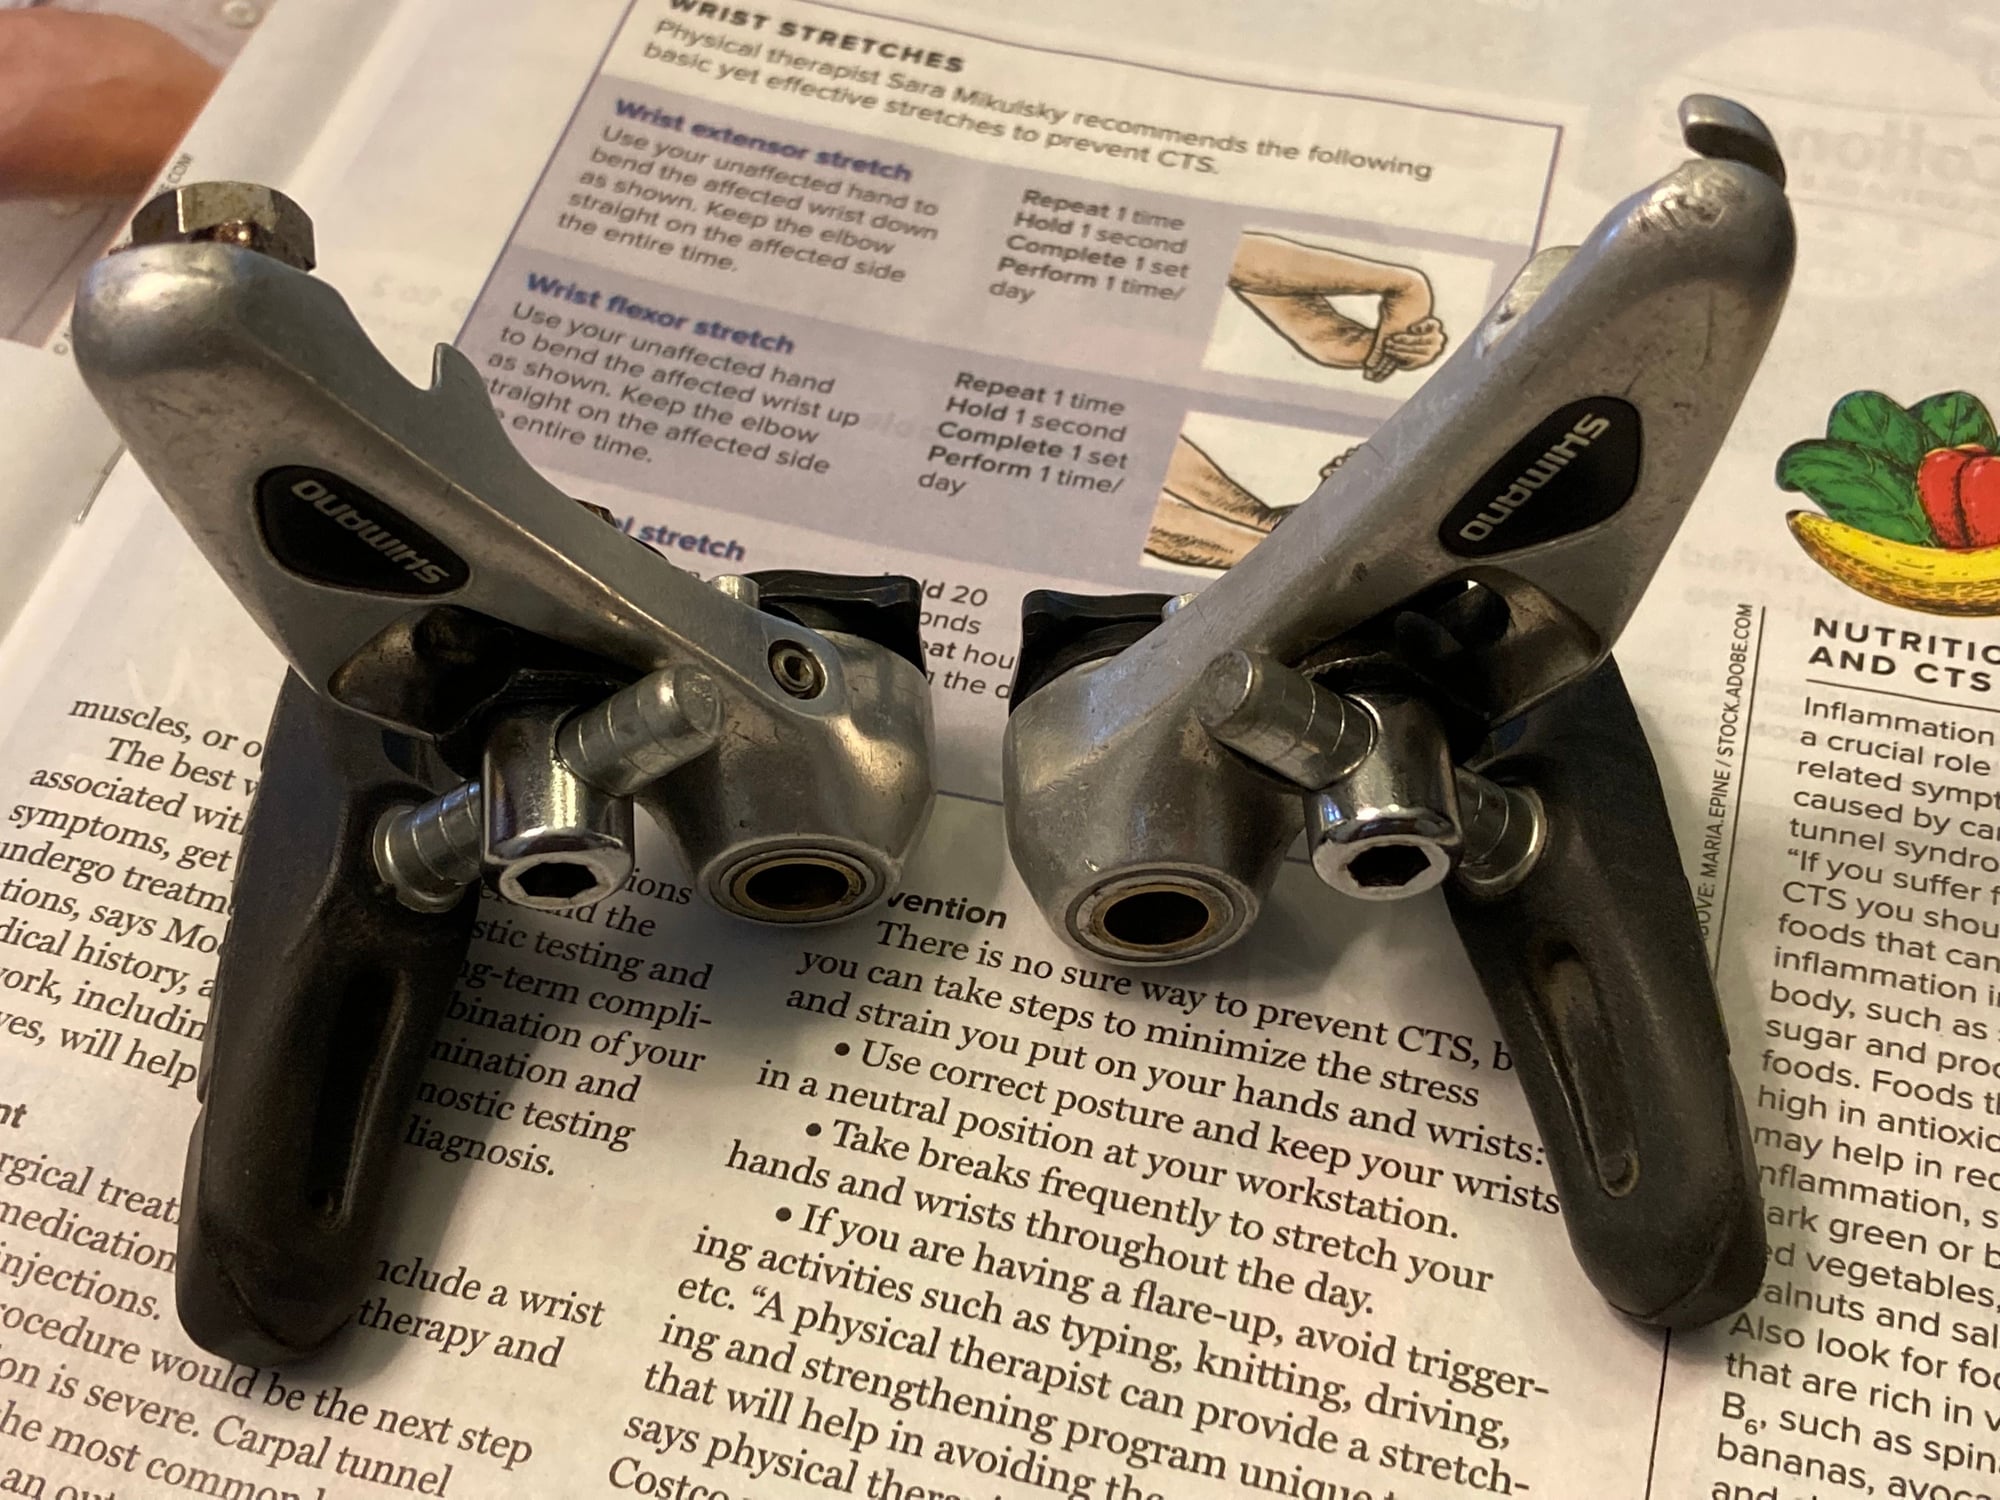
Those brakes first need to be set up correctly. Pic 1 shows the pad hitting low on the rim, and the lower edge of the pad may not even be contacting the rim. Pic 2 shows the pad hitting high on the rim, almost into the sidewall of the tire. Look at pic 3. One arm is more �vertical� than the other. The arms should be angled the same and should be symmetrical. If you look at the slots above the brake pad posts, one is showing 1-2 mm gap, and the other has about twice the gap. Again, needs to be symmetrical. You can mess around with the spring tensions all you want, but it�s in vain if the brakes aren�t set up correctly.
07-19-22, 04:34 AM
#25
Junior Member
Thread Starter
Yes, it got adjusted. I'm running tires that clip the top of the pads, but it's been serviced and is all fixed now.