


Trying to be a painter! (Urago content)
 08-24-22, 06:40 PM
#1

RUSA #3100
Thread Starter

Join Date: Feb 2012
Location: Oregon City
Posts: 836
Bikes: Yes
Mentioned: 20 Post(s)
Tagged: 0 Thread(s)
Quoted: 237 Post(s)
Liked 505 Times
in
181 Posts
Trying to be a painter! (Urago content)
Okay, so this is my first effort at trying to do a "quality" re-paint a a bicycle frame. The candidate is a mid-1950's Urago Debutante. Not a high end frame but one that is still worth doing nicely. I'm using automotive paint from Napa Auto and a spray gun from Harbor Freight. This is how the color coat came out. Next up will be placing the decals and clear coating everything with satin clear. I don't really like the super shiny look.
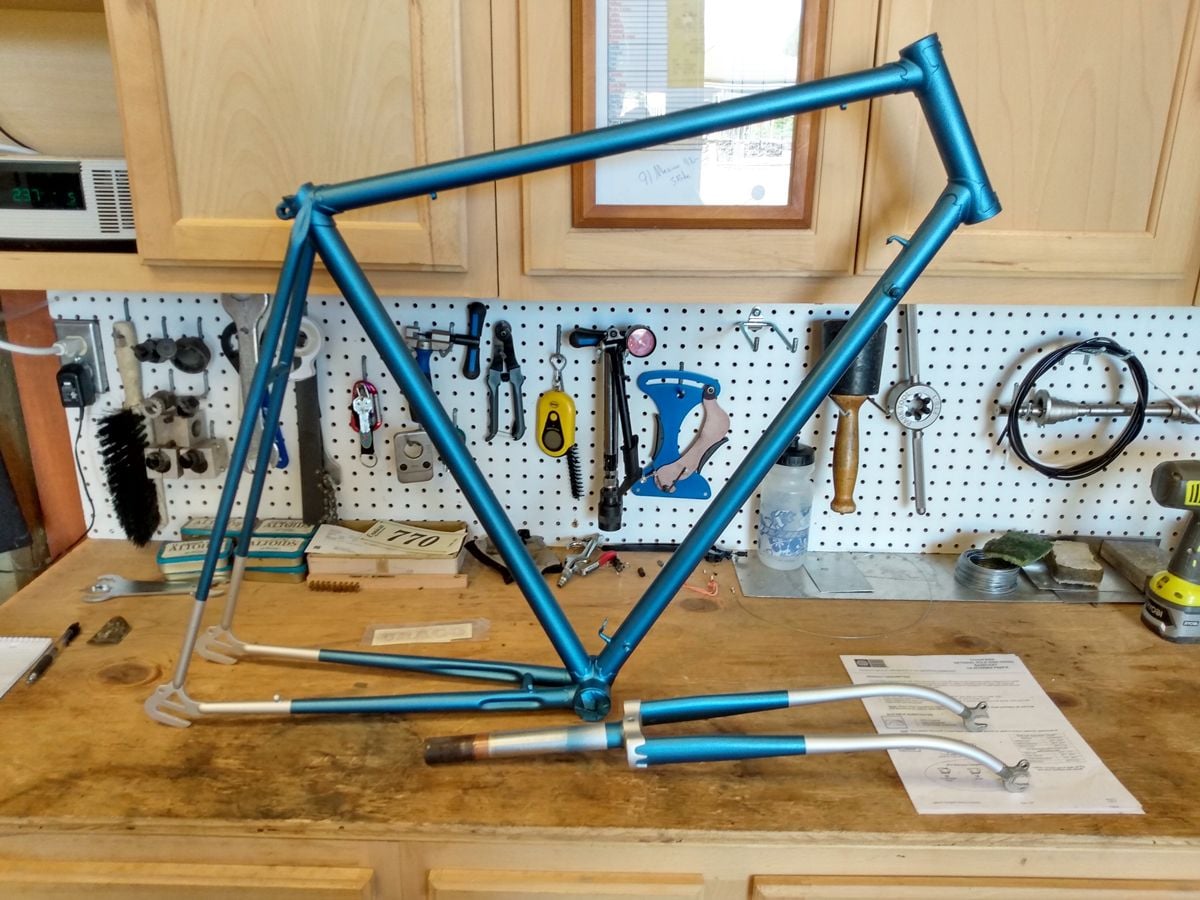
The chrome on the fork crown and socks was not salvage-able so I decided to do those in silver instead. I also did some silver on the rear to balance it out. It does not look like chrome but kind of represents what was there originally. The blue is pretty close to the original color so I am trying to keep it in character.
The Urago Debutante was a model that remained relatively unchanged for many years so I have a little latitude with the decal style as well as the rest of the build. Anyway, this is step one.
__________________
https://utahrandonneur.wordpress.com
https://utahrandonneur.wordpress.com
 08-24-22, 06:50 PM
#2
Senior Member

Join Date: Jun 2018
Location: The Urban Shores Of Michigami
Posts: 1,749
Bikes: ........................................ .....Holdsworth "Special"..... .......Falcon "Special".......... .........Miyata 912........... ........................................
Mentioned: 11 Post(s)
Tagged: 0 Thread(s)
Quoted: 702 Post(s)
Liked 672 Times
in
420 Posts
Very nice color, I like the matte finish
08-24-22, 10:12 PM
#4
vintage motor

Join Date: Sep 2008
Location: Tepic, Nayarit, Mexico
Posts: 1,595
Bikes: 48 Automoto, 49 Stallard, 50 Rotrax, 62 Jack Taylor, 67 Atala, 68 Lejeune, 72-74-75 Motobecanes, 73 RIH, 71 Zieleman, 74 Raleigh, 78 Windsor, 83 Messina (Villata), 84 Brazzo (Losa), 85 Davidson, 90 Diamondback, 92 Kestrel
Mentioned: 6 Post(s)
Tagged: 0 Thread(s)
Quoted: 164 Post(s)
Likes: 0
Liked 101 Times
in
78 Posts
Looks nice! Decals go best over a layer of glossy paint, you can then finish with whatever else you want.
 08-25-22, 02:06 AM
#6
Member
Join Date: Aug 2017
Location: Oregon
Posts: 185
Mentioned: 0 Post(s)
Tagged: 0 Thread(s)
Quoted: 61 Post(s)
Liked 254 Times
in
96 Posts
I agree. I�ve found I can get nice depth without cloudiness if I lay down some layers of gloss clear coat and then use satin for the final coat. In that case, per your suggestion, I can either put the decals on top of a gloss base coat or on one of the early gloss clear coats.
Likes For daywood:
08-25-22, 05:26 AM
#7
Full Member
Could you give some more details about the paint you have used, and will be using, and the spray gun you used? I have had some projects where I have wanted to do better than rattle can re-painting, but have been put off by the investment required, and the number of choices to make. make.
08-25-22, 05:31 PM
#8
Senior Member

Could you give some more details about the paint you have used, and will be using, and the spray gun you used? I have had some projects where I have wanted to do better than rattle can re-painting, but have been put off by the investment required, and the number of choices to make. make.
08-26-22, 06:01 PM
#9
Senior Member

Join Date: May 2012
Location: Point Reyes Station, California
Posts: 4,526
Bikes: Indeed!
Mentioned: 92 Post(s)
Tagged: 0 Thread(s)
Quoted: 1506 Post(s)
Liked 3,469 Times
in
1,131 Posts
Just wondering......I wonder if an auto body shop would spray a framed in addition to a car they are doing? Seems to me that silver, black, white, grey, are used a lot at most shops. I particularly loved the yellow on my 2003 Mazdaspeed Protege and the 2002 orange version. Three part paint, not cheap
I admire the OP for taking on this project. As an amateur who has painted a handful of frames I know the concentration and attention to a plethora of details that is required. I also know that I am learning from my mistakes, lots of mistakes!
Brent
Likes For obrentharris:
08-27-22, 04:11 AM
#10
Member
Join Date: Aug 2017
Location: Oregon
Posts: 185
Mentioned: 0 Post(s)
Tagged: 0 Thread(s)
Quoted: 61 Post(s)
Liked 254 Times
in
96 Posts
Could you give some more details about the paint you have used, and will be using, and the spray gun you used? I have had some projects where I have wanted to do better than rattle can re-painting, but have been put off by the investment required, and the number of choices to make. make.
I�ve used two-part (paint + hardener) urethane clear coat because of its exceptional hardness, but urethane is such nasty stuff that I�ve lately been willing to accept normal paint hardness for better peace of mind. I do use all the cross ventilation I can muster in my finishing area and I use a respirator mask.
I don�t have fancy paint guns. The one I use for base coats came from Home Depot and the one I use for top coats came from Harbor Freight. They are not fundamentally different. I just dedicate one to clear coats to avoid problems from colors I may have left in a nook or cranny of the gun from the previous job. I think learning how to set up the guns goes a long way toward better results. (This may be a lifetime endeavor :-)
I also try to remember that it�s just a bicycle. Stripping it down and starting over is not the end of the world if something goes wrong. It�s more important to experiment and have fun.
Likes For daywood:
08-27-22, 10:08 AM
#11
RUSA #3100
Thread Starter
Join Date: Feb 2012
Location: Oregon City
Posts: 836
Bikes: Yes
Mentioned: 20 Post(s)
Tagged: 0 Thread(s)
Quoted: 237 Post(s)
Liked 505 Times
in
181 Posts
Could you give some more details about the paint you have used, and will be using, and the spray gun you used? I have had some projects where I have wanted to do better than rattle can re-painting, but have been put off by the investment required, and the number of choices to make. make.

I did some practice runs with inexpensive paint from Home Depot and was not particularly happy with the result, but when I used the "good" paint it went on much better! The gun only takes a little bit of fiddling with to learn how to adjust it properly and it is better to do that with an inexpensive paint. I'll be putting a layer of clear on today and then the decals, then finish with another coat of clear in a day or so. Will post more pics then! I didn't make any progress yesterday as I was goofing around on the moto.

Bridge of the Gods, Cascade Locks, Oregon.
__________________
https://utahrandonneur.wordpress.com
https://utahrandonneur.wordpress.com
Last edited by Oldairhead; 08-27-22 at 10:13 AM.
08-27-22, 12:29 PM
#12
Senior Member
Join Date: Jun 2018
Location: The Urban Shores Of Michigami
Posts: 1,749
Bikes: ........................................ .....Holdsworth "Special"..... .......Falcon "Special".......... .........Miyata 912........... ........................................
Mentioned: 11 Post(s)
Tagged: 0 Thread(s)
Quoted: 702 Post(s)
Liked 672 Times
in
420 Posts
.
Thanks for the info on the gun and paint.
What pressure setting are you using? I'm assuming you are using a conventional air compressor rather than HVLP.
Thanks for the info on the gun and paint.
What pressure setting are you using? I'm assuming you are using a conventional air compressor rather than HVLP.
This is the spray gun I am using, $29.99 from Harbor Freight! It has a 4 ounce gravity feed paint cup which is more than enough to coat the frame and fork in a single batch. The paint is a house brand from Napa Auto. It is not cheap so I purchased two colors that will give me options for other projects. The clear coat will be a satin finish because I am generally not a fan of high gloss finishes. The primer coat is an "etching" base that bonds well to bare metal, This frame mostly had some paint remaining but there were bare patches as well. Another project I have is totally bare metal so I was buying for other jobs as well.
08-27-22, 06:05 PM
#13
Senior Member

Join Date: Mar 2014
Location: City of Angels
Posts: 4,870
Bikes: A few too many
Mentioned: 42 Post(s)
Tagged: 1 Thread(s)
Quoted: 1364 Post(s)
Liked 2,180 Times
in
1,183 Posts
OP,
Conceptually, I think going with the matte finish is quite interesting....in my opinion once the decals are in place it will have just the right amount of sheen that many of us like seeing on an as found unmolested/restored bike.
I can't wait to see the final result.
BTW, nothing wrong with the H.F. purple gun..all of their guns work well enough for general/hobby purpose small projects, just be sure the settings give a good spray distribution. I also remove the plastic strainer.
Best, Ben
__________________
"EVERY PERSON IS GUILTY OF ALL THE GOOD THEY DID NOT DO"
Voltaire
Voice recognition may sometimes create odd spelling and grammatical errors
"EVERY PERSON IS GUILTY OF ALL THE GOOD THEY DID NOT DO"
Voltaire
Voice recognition may sometimes create odd spelling and grammatical errors
Likes For xiaoman1:
08-28-22, 04:43 AM
#14
Member
Join Date: Aug 2017
Location: Oregon
Posts: 185
Mentioned: 0 Post(s)
Tagged: 0 Thread(s)
Quoted: 61 Post(s)
Liked 254 Times
in
96 Posts
I find I use between 20 and 30 PSI, but that is one of the things I fiddle with if I am not happy with the flow I�m getting. I�ll add that it�s good to have a compressor with a good size tank. My big one broke right before my last paint project and I had to use my portable one. It couldn�t keep up and I kept having to wait for the tank to refill.
Likes For daywood:
09-04-22, 07:03 PM
#15
RUSA #3100
Thread Starter
Join Date: Feb 2012
Location: Oregon City
Posts: 836
Bikes: Yes
Mentioned: 20 Post(s)
Tagged: 0 Thread(s)
Quoted: 237 Post(s)
Liked 505 Times
in
181 Posts
Well, this is how it looks after the clear coat and the decals applied. I'm not particularly happy with the finish surface of the clear. My excuse is that I had some flat lighting that made it harder to see the surface texture of the satin clear coat during application. Overall the result isn't bad, but not stellar either.

This is what it looked like before.

I'll keep working on this one, but the next one up for paint is a 1971 Lygie!
This is what it looked like before.
I'll keep working on this one, but the next one up for paint is a 1971 Lygie!
__________________
https://utahrandonneur.wordpress.com
https://utahrandonneur.wordpress.com
09-05-22, 04:46 AM
#16
Member
Join Date: Aug 2017
Location: Oregon
Posts: 185
Mentioned: 0 Post(s)
Tagged: 0 Thread(s)
Quoted: 61 Post(s)
Liked 254 Times
in
96 Posts
Well, this is how it looks after the clear coat and the decals applied. I'm not particularly happy with the finish surface of the clear. My excuse is that I had some flat lighting that made it harder to see the surface texture of the satin clear coat during application. Overall the result isn't bad, but not stellar either.
I don�t do this as much to bikes as I do to guitars I�ve sprayed, partly because it�s easier to flatten a flat surface without sanding through the top coat, and partly because I find minor orange peel less noticeable on the tubes of a bike.
But again, it�s only a bike and you can just lay on a couple of new coats of clear if you get carried away. But if you sand through a decal or the base coat, that�s a bigger redo . . .
Likes For daywood:
