


Laser cut gravel yokes
 07-06-21, 08:33 AM
#1
Senior Member
Thread Starter
Join Date: Jan 2013
Location: South Jersey
Posts: 2,262
Mentioned: 18 Post(s)
Tagged: 0 Thread(s)
Quoted: 713 Post(s)
Liked 796 Times
in
473 Posts
Laser cut gravel yokes
My personal preference for riding "Gravel" bikes on MTB trails, and other places that are not smooth gravel roads, has led me to use increasingly wider/higher volume tires on my gravel bikes. This has made it challenging to fit chainstays between those tires and the chainrings of a road width crankset with my preferred 420-425mm chainstay length. Yokes are a great way to deal with that challenge, but the current machined offerings are too expensive for my needs. I generally try to keep the costs down on my frames, so buying a yoke at nearly the cost of the rest of the materials for the frame seems a little silly. I had seen some impressive looking results from laser cutting at OSHcut, so I decided to try to design a laser cut yoke.
My initial plan was to have them cut from 3/4" steel, since I use 3/4" round stays and I could weld directly to the yoke. That plan didn't work out, since OSHcut won't cut anything that has a width of less than half the thickness and my design had sections that needed to be 6mm wide for the desired clearances. I had them cut from 1/2" material with the plan to stack and weld 2 of them together and machine away some excess. Having a single item laser cut can be expensive, due to set up fees, but the price goes down significantly with volume. The cost of having 10 cut was not much more than 2, so I opted to order 10 of them. They ended up being less than $20 each with the setup fees and shipping included. I ordered 10 and they sent me 12, so it actually cost less per piece. The cut edges of the parts have wavy cut lines that need to be smoothed out with a drum sander on a dremel.

The plan to weld 2 together was scrapped, because it was a ton of welding and the result was as heavy as a boat anchor. The single 1/2" thick piece seemed plenty strong for the task, so I decided to build a test frame. I failed to leave enough material for the bottom bracket miter, so I had to make a modification for chainring clearance. This was easily accomplished with a hole saw on the mill. The picture below shows a 50/34 road crankset and clearance for a 2" tire.
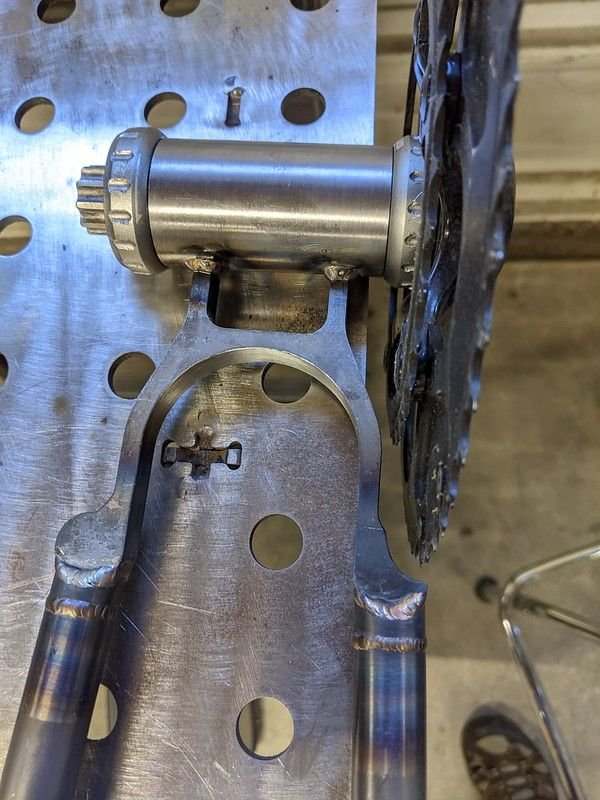
I had to get creative with attaching the 3/4" round stays to the 1/2" thick yoke. I turned a short insert out of 3/4" round bar and welded that into the end of the tube, so I could miter and weld that to the yoke.

I couldn't justify the expense of building myself an additional gravel bike, so I gifted this frame to a close friend that was willing to build it and be a test rider.
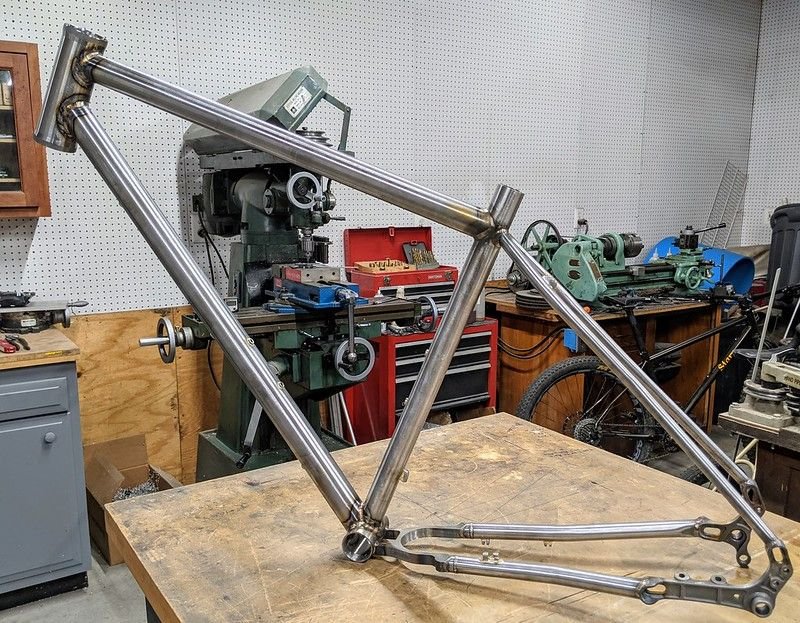
The finished frame.
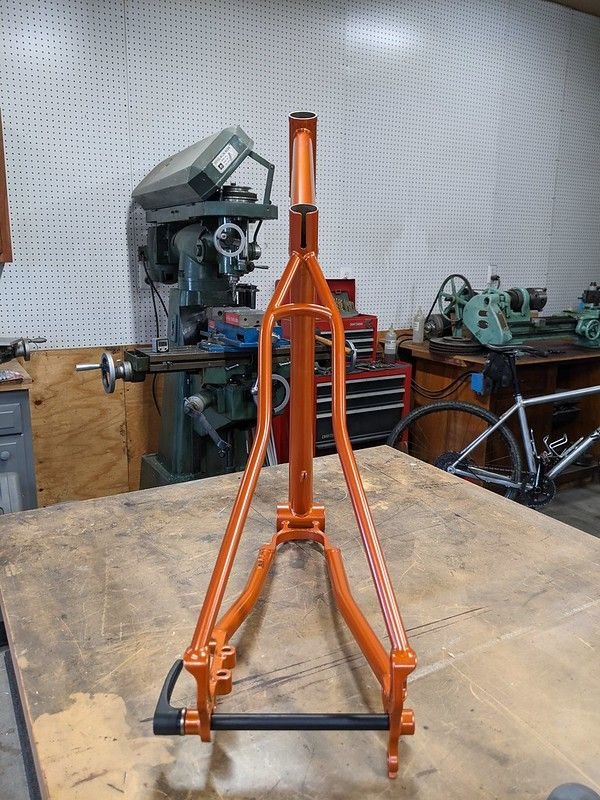
This frame has been ridden hard for a couple of months now and there are no signs of failure of the yoke. The test rider recently moved to Maine, so I look forward to his reports from riding there.
My initial plan was to have them cut from 3/4" steel, since I use 3/4" round stays and I could weld directly to the yoke. That plan didn't work out, since OSHcut won't cut anything that has a width of less than half the thickness and my design had sections that needed to be 6mm wide for the desired clearances. I had them cut from 1/2" material with the plan to stack and weld 2 of them together and machine away some excess. Having a single item laser cut can be expensive, due to set up fees, but the price goes down significantly with volume. The cost of having 10 cut was not much more than 2, so I opted to order 10 of them. They ended up being less than $20 each with the setup fees and shipping included. I ordered 10 and they sent me 12, so it actually cost less per piece. The cut edges of the parts have wavy cut lines that need to be smoothed out with a drum sander on a dremel.
The plan to weld 2 together was scrapped, because it was a ton of welding and the result was as heavy as a boat anchor. The single 1/2" thick piece seemed plenty strong for the task, so I decided to build a test frame. I failed to leave enough material for the bottom bracket miter, so I had to make a modification for chainring clearance. This was easily accomplished with a hole saw on the mill. The picture below shows a 50/34 road crankset and clearance for a 2" tire.
I had to get creative with attaching the 3/4" round stays to the 1/2" thick yoke. I turned a short insert out of 3/4" round bar and welded that into the end of the tube, so I could miter and weld that to the yoke.
I couldn't justify the expense of building myself an additional gravel bike, so I gifted this frame to a close friend that was willing to build it and be a test rider.
The finished frame.
This frame has been ridden hard for a couple of months now and there are no signs of failure of the yoke. The test rider recently moved to Maine, so I look forward to his reports from riding there.

Likes For dsaul:
07-06-21, 09:43 AM
#2


Randomhead
Join Date: Aug 2008
Location: Happy Valley, Pennsylvania
Posts: 24,386
Mentioned: 0 Post(s)
Tagged: 0 Thread(s)
Quoted: 4 Post(s)
Liked 3,687 Times
in
2,510 Posts
Those look great.
The place I have been using recently is Send Cut Send https://sendcutsend.com/
I had something I wanted cut that was too expensive for me at oshcut, but much cheaper at send cut send. YMMV
I wish it was as easy to get stuff machined as it is to get things laser cut.
The place I have been using recently is Send Cut Send https://sendcutsend.com/
I had something I wanted cut that was too expensive for me at oshcut, but much cheaper at send cut send. YMMV
I wish it was as easy to get stuff machined as it is to get things laser cut.
07-06-21, 10:06 AM
#3

Senior Member
Join Date: Aug 2007
Location: Evanston, IL
Posts: 5,084
Bikes: many
Mentioned: 63 Post(s)
Tagged: 0 Thread(s)
Quoted: 1442 Post(s)
Liked 1,388 Times
in
758 Posts
Looks nice.
My apologies for a maybe elementary question, but I know nothing about metallurgy and metal fabrication. In your first stack-of-yokes-pic, it looks like the material inside the boundary of the pieces is different. The pictures of the welded bbkt/yoke/stays doesn't show that. What is the reason for the difference?
My apologies for a maybe elementary question, but I know nothing about metallurgy and metal fabrication. In your first stack-of-yokes-pic, it looks like the material inside the boundary of the pieces is different. The pictures of the welded bbkt/yoke/stays doesn't show that. What is the reason for the difference?
07-06-21, 10:08 AM
#4
Senior Member
Thread Starter
Join Date: Jan 2013
Location: South Jersey
Posts: 2,262
Mentioned: 18 Post(s)
Tagged: 0 Thread(s)
Quoted: 713 Post(s)
Liked 796 Times
in
473 Posts
Looks nice.
My apologies for a maybe elementary question, but I know nothing about metallurgy and metal fabrication. In your first stack-of-yokes-pic, it looks like the material inside the boundary of the pieces is different. The pictures of the welded bbkt/yoke/stays doesn't show that. What is the reason for the difference?
My apologies for a maybe elementary question, but I know nothing about metallurgy and metal fabrication. In your first stack-of-yokes-pic, it looks like the material inside the boundary of the pieces is different. The pictures of the welded bbkt/yoke/stays doesn't show that. What is the reason for the difference?
Likes For dsaul:
07-06-21, 10:11 AM
#5
Disco Infiltrator

Join Date: May 2013
Location: Folsom CA
Posts: 13,446
Bikes: Stormchaser, Paramount, Tilt, Samba tandem
Mentioned: 72 Post(s)
Tagged: 0 Thread(s)
Quoted: 3126 Post(s)
Liked 2,102 Times
in
1,366 Posts
I saw on Peter Verdone's blog that his latest bike now has 3d printed parts, though he was set up to NC them at first. Someone pretty soon will figure out they can print the BB shell along with the yoke
__________________
Genesis 49:16-17
Genesis 49:16-17
07-06-21, 10:22 AM
#7
Disco Infiltrator
Join Date: May 2013
Location: Folsom CA
Posts: 13,446
Bikes: Stormchaser, Paramount, Tilt, Samba tandem
Mentioned: 72 Post(s)
Tagged: 0 Thread(s)
Quoted: 3126 Post(s)
Liked 2,102 Times
in
1,366 Posts
He said it "became a reality" but in his typical style did not elucidate
__________________
Genesis 49:16-17
Genesis 49:16-17
07-06-21, 10:57 AM
#8
Disco Infiltrator
Join Date: May 2013
Location: Folsom CA
Posts: 13,446
Bikes: Stormchaser, Paramount, Tilt, Samba tandem
Mentioned: 72 Post(s)
Tagged: 0 Thread(s)
Quoted: 3126 Post(s)
Liked 2,102 Times
in
1,366 Posts
never mind, found it. had to follow the links.
I can tell you from my day job, If you draw your CAD parts with datums for all the interfaces and then put material down, it's a really good basis for starting over with a 3d vs NC part
The more things change, the more they’ll never be the same | Peter Verdone Designs
I can tell you from my day job, If you draw your CAD parts with datums for all the interfaces and then put material down, it's a really good basis for starting over with a 3d vs NC part
The more things change, the more they’ll never be the same | Peter Verdone Designs
If you’re paying attention, you’ll notice that these were printed in SLM 316L Stainless Steel on a ZRapid SLM 3D Printer. While there are hundreds of powdered materials that can be used when printing metal, there are crowd favorites that tend to be loaded in machines and carbon steel is certainly not one of them. If you want exactly what you want, you’re probably going to have to pay to have the machined cleaned on both ends of production to get that. That adds a ton of cost to what is already expensive. 316SS is a common material that I can still weld into my frames so that really drove this decision. Weld-Mold 880 will fill the gaps.
__________________
Genesis 49:16-17
Genesis 49:16-17
07-06-21, 01:39 PM
#9
Randomhead
Join Date: Aug 2008
Location: Happy Valley, Pennsylvania
Posts: 24,386
Mentioned: 0 Post(s)
Tagged: 0 Thread(s)
Quoted: 4 Post(s)
Liked 3,687 Times
in
2,510 Posts
I get the impression PVD is not paying for those parts. Could be wrong.
07-06-21, 04:51 PM
#10
Disco Infiltrator
Join Date: May 2013
Location: Folsom CA
Posts: 13,446
Bikes: Stormchaser, Paramount, Tilt, Samba tandem
Mentioned: 72 Post(s)
Tagged: 0 Thread(s)
Quoted: 3126 Post(s)
Liked 2,102 Times
in
1,366 Posts
I don't get that from his writing. The parts are not big and if he's paying in the realm of a hundred apiece for them and not a thousand, not prohibitive. Anyhow, what brought it to mind in relation to this thread was that one of the parts he made was a yoke. It appears to be hollow and he added some cool shapes to it. But it's still a yoke. What could it be if you made the yoke, bb shell, and seat tube bend into one part? Probably needs a larger machine rendering it too expensive again, but the idea is there waiting
__________________
Genesis 49:16-17
Genesis 49:16-17
Last edited by Darth Lefty; 07-06-21 at 04:58 PM.
07-06-21, 07:12 PM
#11
Randomhead
Join Date: Aug 2008
Location: Happy Valley, Pennsylvania
Posts: 24,386
Mentioned: 0 Post(s)
Tagged: 0 Thread(s)
Quoted: 4 Post(s)
Liked 3,687 Times
in
2,510 Posts
That's not really that big of a machine.
