


Road bike, internal routing and outer casing
 09-05-21, 04:44 AM
#1
Member
Thread Starter
Road bike, internal routing and outer casing
Hi!
I’m currently building myself a new bike from a frame set I got really cheap (almost a steal)!
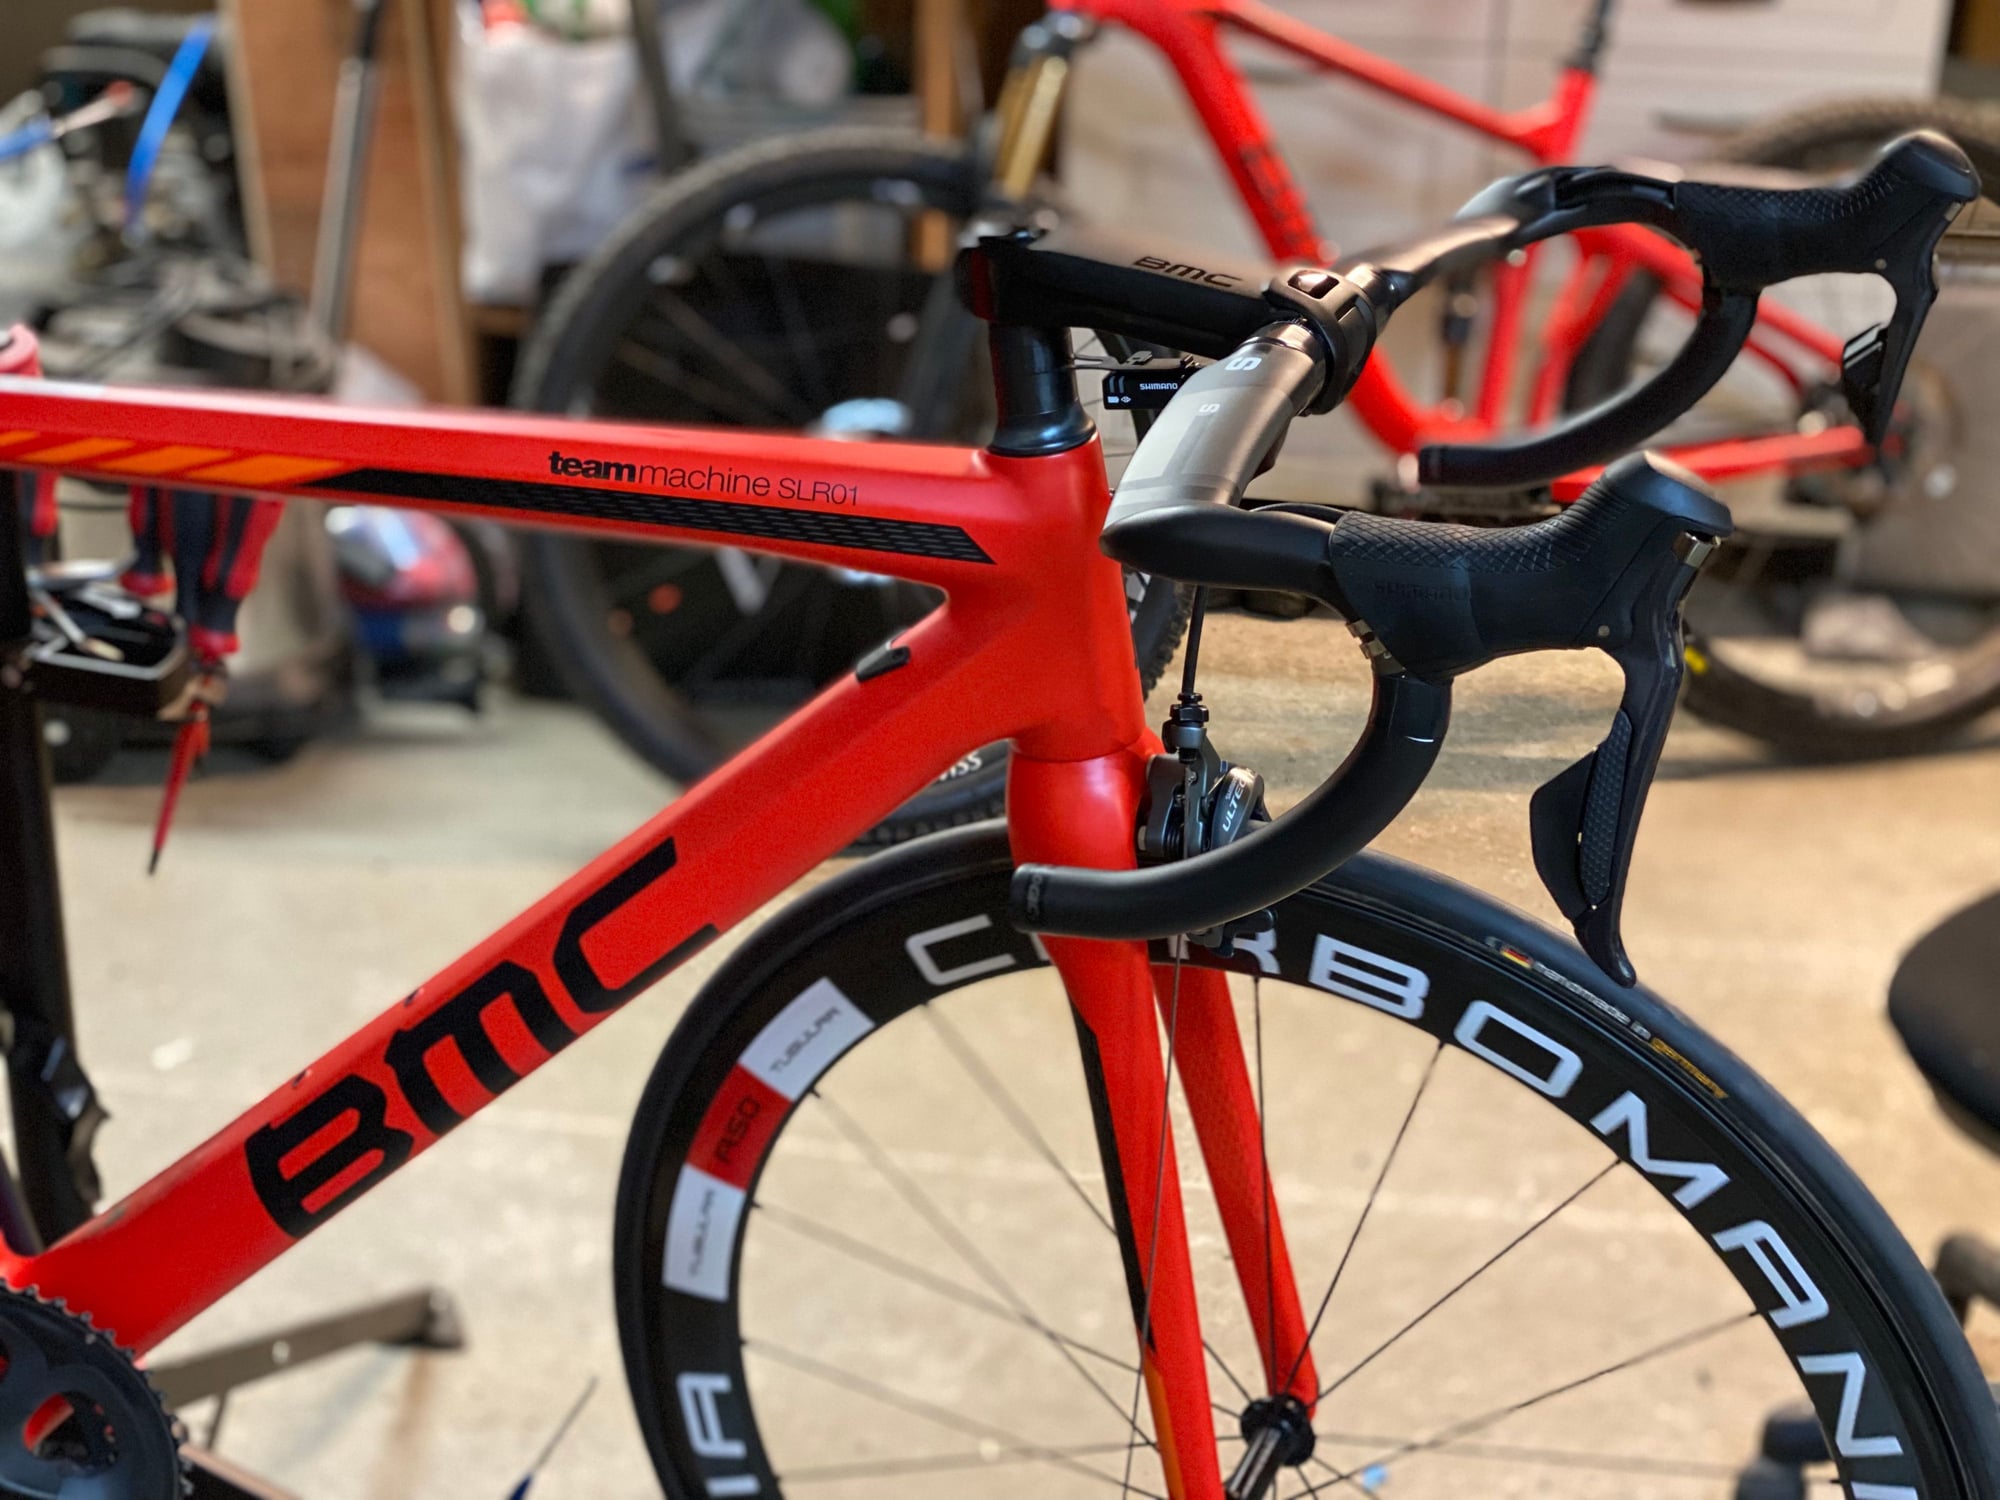
The frame is a BMC Teammachine SLR01 - 2017 model. I’ve now installed most of the components, and I’m currently working on routing the brake wires.
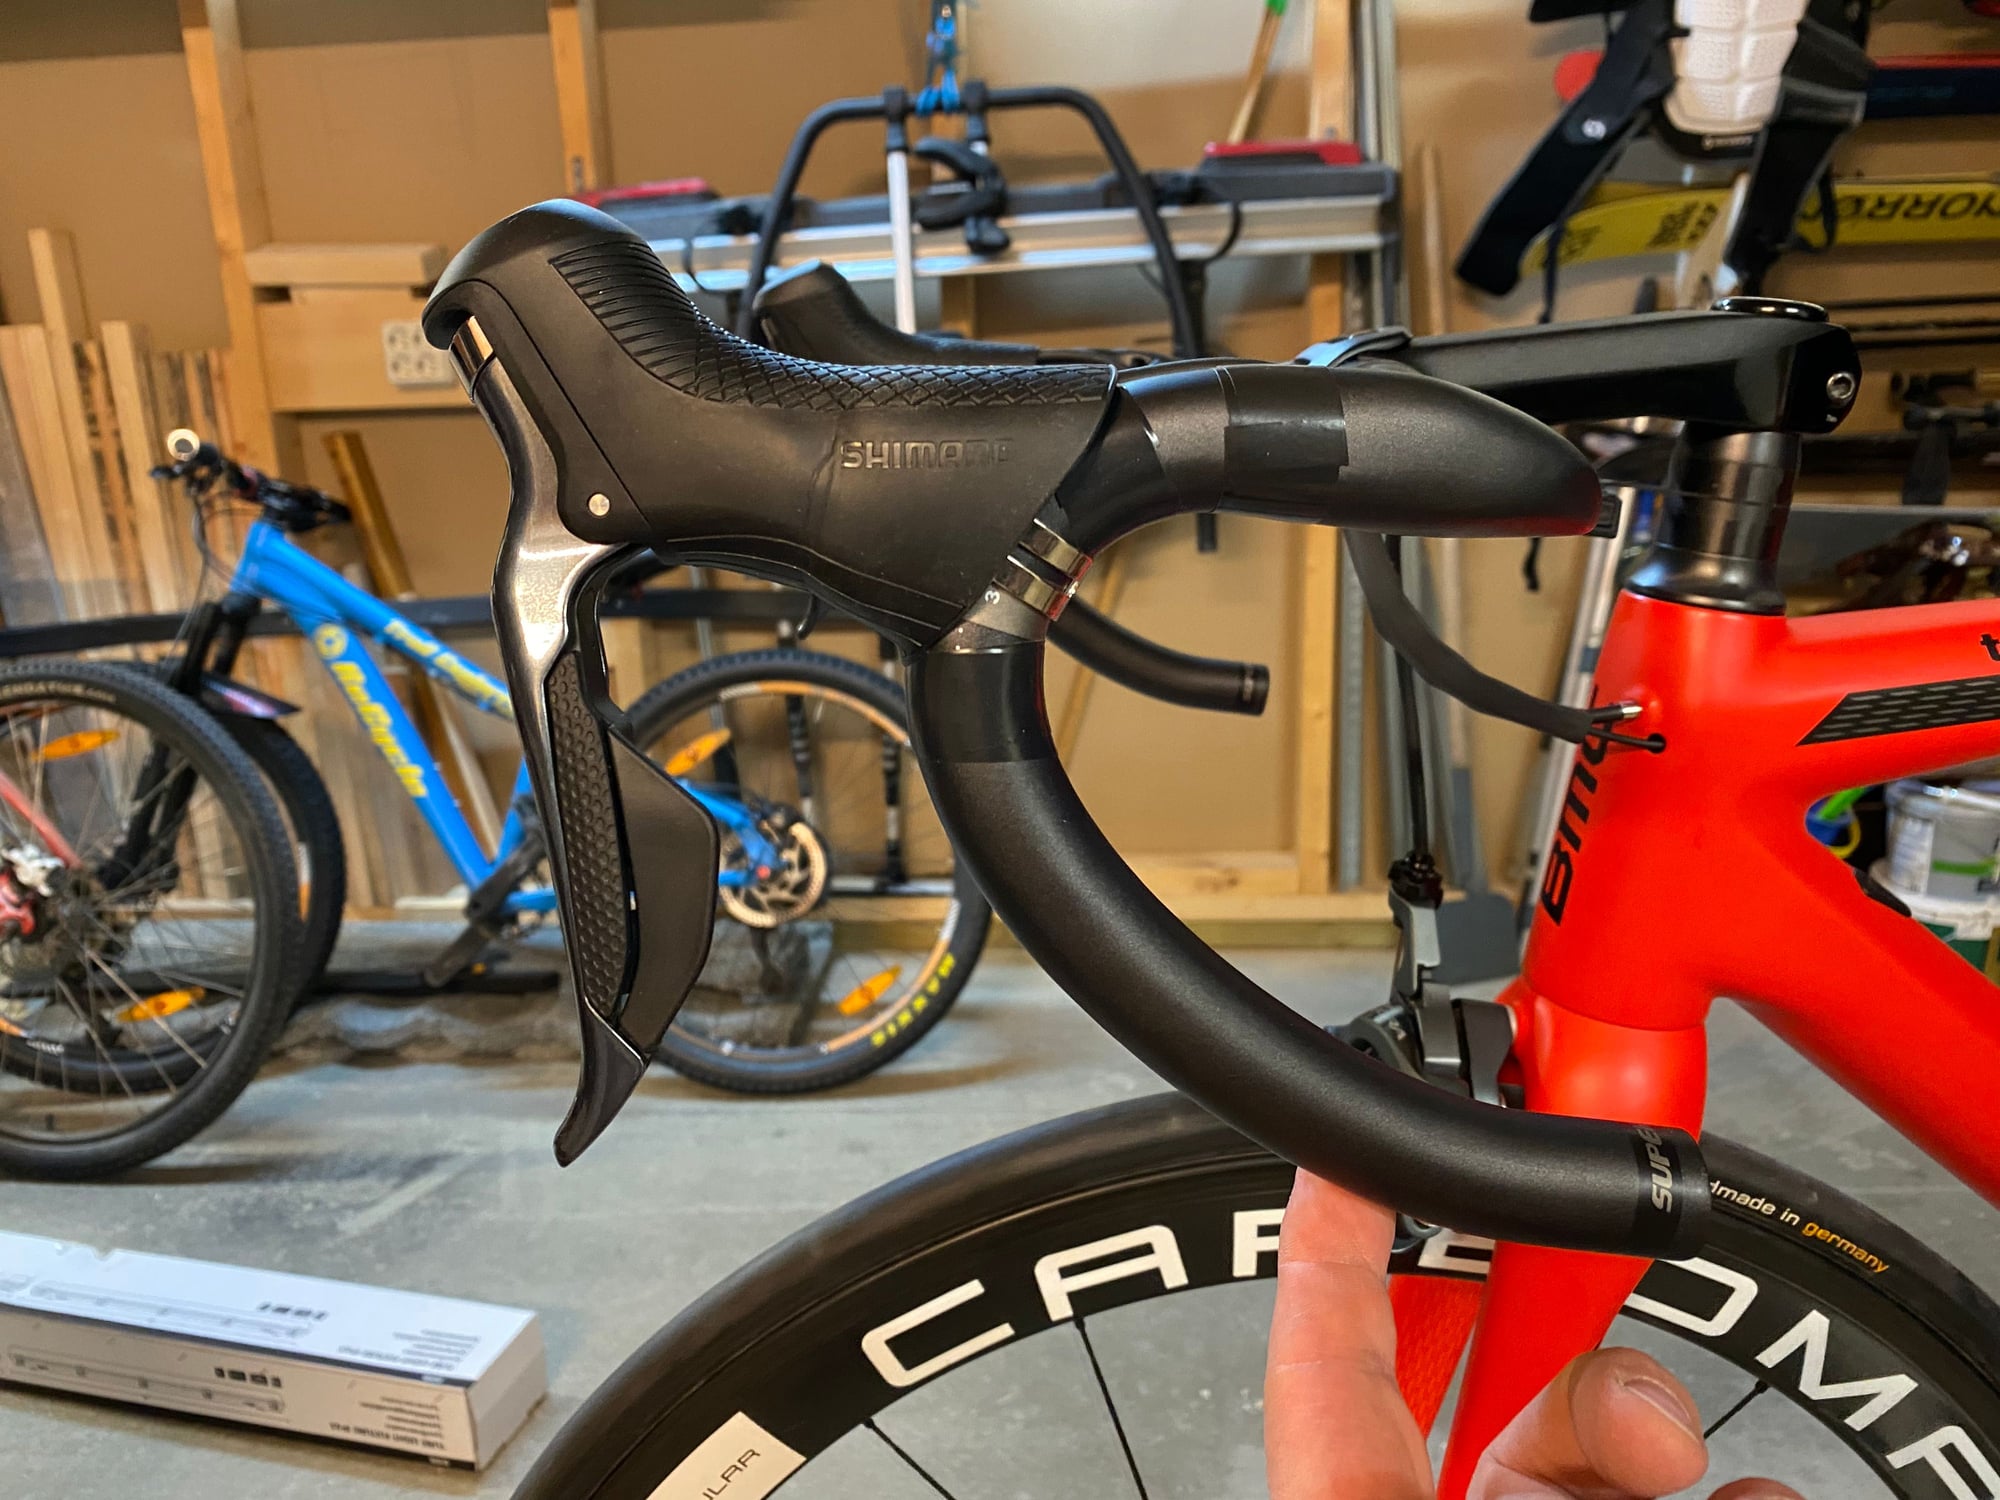
The front brake is no problem, but the rear brake is causing me some headache. The bike is equipped with internal routing for the rear brake, and I’m now pondering what length the outer casing from my drop bar to the entry of the head tube/top tube should have. This is my first road bike, so I have no reference on this…
As of now, the outer casing is as long as I would _think_ it should be, but the fork is now being pushed slightly to the right in a neutral position.
Should the fork/front wheel point straight forward in a neutral position, or is it normal that the outer casing is pushing it in one direction?
How much of a rotational angle should I consider enough when cutting the outer casing?
By the way, I’m in Europe, so the rear brake is located on the right brifter :-)


Anybody want to chip in? :-)
-Tom
I’m currently building myself a new bike from a frame set I got really cheap (almost a steal)!
The frame is a BMC Teammachine SLR01 - 2017 model. I’ve now installed most of the components, and I’m currently working on routing the brake wires.
The front brake is no problem, but the rear brake is causing me some headache. The bike is equipped with internal routing for the rear brake, and I’m now pondering what length the outer casing from my drop bar to the entry of the head tube/top tube should have. This is my first road bike, so I have no reference on this…
As of now, the outer casing is as long as I would _think_ it should be, but the fork is now being pushed slightly to the right in a neutral position.
Should the fork/front wheel point straight forward in a neutral position, or is it normal that the outer casing is pushing it in one direction?
How much of a rotational angle should I consider enough when cutting the outer casing?
By the way, I’m in Europe, so the rear brake is located on the right brifter :-)
Anybody want to chip in? :-)
-Tom
 09-05-21, 07:39 AM
#2
Senior Member
Join Date: Jan 2009
Location: San Diego, CA
Posts: 3,661
Mentioned: 10 Post(s)
Tagged: 0 Thread(s)
Quoted: 836 Post(s)
Liked 1,058 Times
in
742 Posts
It looks good to me. I'd say you have it just the right length. It's not all that unusual to have the cables force some movement on an unweighted bike. If they were shorter the cable housing end might kink when turning the bars all the way to the right. Not the ideal placing from the mfr. for all the cable routing holes on that particular bike but that's just the way it turns out sometimes and not a big deal.
09-05-21, 08:35 AM
#3

I'm good to go!
Join Date: Jul 2017
Location: Mississippi
Posts: 14,949
Bikes: Tarmac Disc Comp Di2 - 2020
Mentioned: 51 Post(s)
Tagged: 0 Thread(s)
Quoted: 6177 Post(s)
Liked 4,794 Times
in
3,306 Posts
Anybody want to chip in? :-)
Otherwise, for the issue you ask, I'll side with Crankycrank on the movement when unweighted.
Last edited by Iride01; 09-05-21 at 09:37 AM.
09-05-21, 09:26 AM
#4
Senior Member
Join Date: Jul 2013
Location: Nor-Cal
Posts: 3,767
Bikes: lots
Mentioned: 7 Post(s)
Tagged: 0 Thread(s)
Quoted: 1958 Post(s)
Liked 2,932 Times
in
1,489 Posts
Looks good to me. Don't worry about the housing pushing the bars over a bit in the stand. It looks like your shifters are a bit low on the bars to me. Don't put bar tape on til you can get it on the ground and make sure they're positioned correctly. Also put tires on those wheels before you do anything that might damage the rims.
09-05-21, 11:58 AM
#5
Member
Thread Starter
Are you going to have a grommet or something on the cable where it goes into the frame?
Otherwise, for the issue you ask, I'll side with Crankycrank on the movement when unweighted.
Otherwise, for the issue you ask, I'll side with Crankycrank on the movement when unweighted.
09-05-21, 12:05 PM
#6
Member
Thread Starter
Looks good to me. Don't worry about the housing pushing the bars over a bit in the stand. It looks like your shifters are a bit low on the bars to me. Don't put bar tape on til you can get it on the ground and make sure they're positioned correctly. Also put tires on those wheels before you do anything that might damage the rims.
I’m waiting for a pair of Conti’s to put on there - I’ve been watching YouTube videos on how to mount tubulars to be well prepared when they arrive 👍🏻
I thought that the shifters was fairly ok positioned, but there’s always a good idea to get the bike on the ground before committing to a placement, so I’ll follow your advice!
09-05-21, 12:21 PM
#7
Senior Member
Join Date: Jul 2013
Location: Nor-Cal
Posts: 3,767
Bikes: lots
Mentioned: 7 Post(s)
Tagged: 0 Thread(s)
Quoted: 1958 Post(s)
Liked 2,932 Times
in
1,489 Posts
Can't really tell for sure from the photo...those are tubulars? If so I will offer advice for Conti tires. I use Vittoria Mastik 1. 2 sorta thick coats on the tire making sure to get the edge of the tape covered in glue. Same for the rims, 2 coats, the FULL width of the rim. Let each coat dry either over night or all day. Last coat on the rims, then mount the tires right away. I also will stretch Conti tires after the 2nd coat of glue has dried as they shrink and will be super hard to mount.
09-05-21, 12:44 PM
#8
Member
Thread Starter
Can't really tell for sure from the photo...those are tubulars? If so I will offer advice for Conti tires. I use Vittoria Mastik 1. 2 sorta thick coats on the tire making sure to get the edge of the tape covered in glue. Same for the rims, 2 coats, the FULL width of the rim. Let each coat dry either over night or all day. Last coat on the rims, then mount the tires right away. I also will stretch Conti tires after the 2nd coat of glue has dried as they shrink and will be super hard to mount.
Yes, they’re tubulars - kinda shocking for me when I dismounted the old, worn-out tires that came with the rims. Coming from the trail/enduro side of biking, I’ve never ever seen a tubular tire, so that was really a new experience 😬
I’ve been looking for Vittoria Mastik glue, but all the LBS could supply was Conti carbon glue… would that be really bad?
Otherwise, your advice is completely in line with what I’ve understood is best practice when it comes to mounting tubulars – thanks!
09-05-21, 03:04 PM
#9
Senior Member
Join Date: Jul 2013
Location: Nor-Cal
Posts: 3,767
Bikes: lots
Mentioned: 7 Post(s)
Tagged: 0 Thread(s)
Quoted: 1958 Post(s)
Liked 2,932 Times
in
1,489 Posts
Conti glue is ok if it's all you can get. If it were me I'd order some Mastik online.
Likes For cxwrench:
09-05-21, 05:18 PM
#10
Senior Member
Join Date: Feb 2012
Location: Rochester, NY
Posts: 18,056
Bikes: Stewart S&S coupled sport tourer, Stewart Sunday light, Stewart Commuting, Stewart Touring, Co Motion Tandem, Stewart 3-Spd, Stewart Track, Fuji Finest, Mongoose Tomac ATB, GT Bravado ATB, JCP Folder, Stewart 650B ATB
Mentioned: 0 Post(s)
Tagged: 0 Thread(s)
Quoted: 4195 Post(s)
Liked 3,837 Times
in
2,295 Posts
Can't really tell for sure from the photo...those are tubulars? If so I will offer advice for Conti tires. I use Vittoria Mastik 1. 2 sorta thick coats on the tire making sure to get the edge of the tape covered in glue. Same for the rims, 2 coats, the FULL width of the rim. Let each coat dry either over night or all day. Last coat on the rims, then mount the tires right away. I also will stretch Conti tires after the 2nd coat of glue has dried as they shrink and will be super hard to mount.
__________________
AndrewRStewart
AndrewRStewart
Likes For Andrew R Stewart:
09-05-21, 07:01 PM
#11
Senior Member
Join Date: Jul 2013
Location: Nor-Cal
Posts: 3,767
Bikes: lots
Mentioned: 7 Post(s)
Tagged: 0 Thread(s)
Quoted: 1958 Post(s)
Liked 2,932 Times
in
1,489 Posts
^This^
09-06-21, 02:39 AM
#12
Senior Member

In the days when I had tubs I used to use tub tape. You'll see a lot of arguments for one vs the other but I think that applying glue is something of an art and I never mastered it. The only real argument against tape that I've seen is that on long descents where you're using the brakes a lot the heat can soften the glue somewhat allowing the tyre to rotate slightly on the rim.
Provided the tyres are in good condition you don't need either glue or tape as a get-you-home measure - something I've done many times. Just use sense when it comes to hard corners.
Provided the tyres are in good condition you don't need either glue or tape as a get-you-home measure - something I've done many times. Just use sense when it comes to hard corners.
Likes For jgwilliams:
09-06-21, 07:17 AM
#13
Senior Member
Join Date: Feb 2012
Location: Rochester, NY
Posts: 18,056
Bikes: Stewart S&S coupled sport tourer, Stewart Sunday light, Stewart Commuting, Stewart Touring, Co Motion Tandem, Stewart 3-Spd, Stewart Track, Fuji Finest, Mongoose Tomac ATB, GT Bravado ATB, JCP Folder, Stewart 650B ATB
Mentioned: 0 Post(s)
Tagged: 0 Thread(s)
Quoted: 4195 Post(s)
Liked 3,837 Times
in
2,295 Posts
As one who has heard the sound of an AL rim screeching across the road after the spare rolled off, twice, I would never suggest not using some sort of tire bonding when mounting a spare. If both the rim and spare have old glue on them the likelihood of rolling off a tire in a corner is less, but not zero. When I rode sew ups (for about 30+ years) I carried rim tape and would apply it before the spare went on. Andy
__________________
AndrewRStewart
AndrewRStewart
Likes For Andrew R Stewart:
09-06-21, 09:19 AM
#14
Senior Member
Join Date: Jul 2013
Location: Nor-Cal
Posts: 3,767
Bikes: lots
Mentioned: 7 Post(s)
Tagged: 0 Thread(s)
Quoted: 1958 Post(s)
Liked 2,932 Times
in
1,489 Posts
I've flatted a couple of times and put the spare on. Never any problems if you use common sense as jgwilliams posted. Both times it was surprisingly hard to remove the spare when I got back to the shop.
09-07-21, 08:22 PM
#15
Junior Member
Join Date: Jan 2021
Posts: 22
Mentioned: 0 Post(s)
Tagged: 0 Thread(s)
Quoted: 6 Post(s)
Likes: 0
Liked 6 Times
in
5 Posts
Ride the bike for an hour or so before you wrap the bars. I'll bet you'll want to change the lever positions one way or another after the ride and you'll be glad you didn't wrap the bars. Feel comes into play more when you ride the bike for awhile. Make the adjustments, then ride it again before wrapping the bars. Tubulars- wow! I haven't used those in years. It's labor intensive to mount a tire and get it on there straight. Most guys use them only for racing, if ever. It's so much easier to mount a clincher with little mess. Just sayin. Nice bike.
Likes For The MuffinMan:
09-07-21, 11:56 PM
#16
Member
Thread Starter
Ride the bike for an hour or so before you wrap the bars. I'll bet you'll want to change the lever positions one way or another after the ride and you'll be glad you didn't wrap the bars. Feel comes into play more when you ride the bike for awhile. Make the adjustments, then ride it again before wrapping the bars. Tubulars- wow! I haven't used those in years. It's labor intensive to mount a tire and get it on there straight. Most guys use them only for racing, if ever. It's so much easier to mount a clincher with little mess. Just sayin. Nice bike.
I’ve now put some temporary rubber on the rims, and I’ve taken the bike off the stand, and cxwrench and you were quite right about the shifters position!
I think the new position is more like it should be.


And yeah, I agree - it is becoming a nice bike 👍🏻😊
09-08-21, 08:17 AM
#17
Junior Member
Join Date: Jan 2021
Posts: 22
Mentioned: 0 Post(s)
Tagged: 0 Thread(s)
Quoted: 6 Post(s)
Likes: 0
Liked 6 Times
in
5 Posts
I've always admired BMC's for their special style and quality cutting edge technology. The shifter levers appear to be in a good position. At least for me, it takes a few rides to get the hoods to match up just right and are at the optimal position on the bar curve so my hands (and head) are happy, especially when climbing out of the saddle. It's very annoying when one lever is slightly higher than the other, even by a couple millimeters. It's common knowledge that the optimal position is unique for each person. Try a few different micro changes to find the position you like best. Then move on to bar height (I see a lot of spacers in there), seat height, tilt, and fore/aft position.😁 There's also cleat position on your shoes to dial in. Didn't mean to blow anybody away with these added "requirements". However, the sooner you can get the right positions for all said contact points to be in sinc, the sooner you'll get to a really comfy ride position and be able to obtain maximum benefit/riding experience from your awesome new machine. Here is a good thread to check out for videos with a pro bike fitter:
https://forums.thepaceline.net/showthread.php?t=256272
Take it slow and enjoy the process. It seems like you already are!
https://forums.thepaceline.net/showthread.php?t=256272
Take it slow and enjoy the process. It seems like you already are!
Likes For The MuffinMan:
09-08-21, 09:12 AM
#18
Senior Member
Join Date: Jul 2013
Location: Nor-Cal
Posts: 3,767
Bikes: lots
Mentioned: 7 Post(s)
Tagged: 0 Thread(s)
Quoted: 1958 Post(s)
Liked 2,932 Times
in
1,489 Posts
I've always admired BMC's for their special style and quality cutting edge technology. The shifter levers appear to be in a good position. At least for me, it takes a few rides to get the hoods to match up just right and are at the optimal position on the bar curve so my hands (and head) are happy, especially when climbing out of the saddle. It's very annoying when one lever is slightly higher than the other, even by a couple millimeters. It's common knowledge that the optimal position is unique for each person. Try a few different micro changes to find the position you like best. Then move on to bar height (I see a lot of spacers in there), seat height, tilt, and fore/aft position.😁 There's also cleat position on your shoes to dial in. Didn't mean to blow anybody away with these added "requirements". However, the sooner you can get the right positions for all said contact points to be in sinc, the sooner you'll get to a really comfy ride position and be able to obtain maximum benefit/riding experience from your awesome new machine. Here is a good thread to check out for videos with a pro bike fitter:
https://forums.thepaceline.net/showthread.php?t=256272
Take it slow and enjoy the process. It seems like you already are!
https://forums.thepaceline.net/showthread.php?t=256272
Take it slow and enjoy the process. It seems like you already are!
Likes For cxwrench:
09-08-21, 09:25 AM
#19
Member
Thread Starter
As you can see from the images, I've moved the saddle way up to get the bike into the stand, so the current seat height is not my preferred height at all.
I've been watching a few of the more serious bike fitting videos on YT, and I recon I'll be able to do the basic fitting myself (maybe with the help from a friend).
The crank arms on this bike is also a tad shorter than I usually ride (on my MTB's), as they're 170mm as opposed to 175mm that the other bikes is equipped with.
I guess that's also a parameter that will affect the fitting in some way.
Thanks to you and The MuffinMan for your valuable tips!
-Tom


