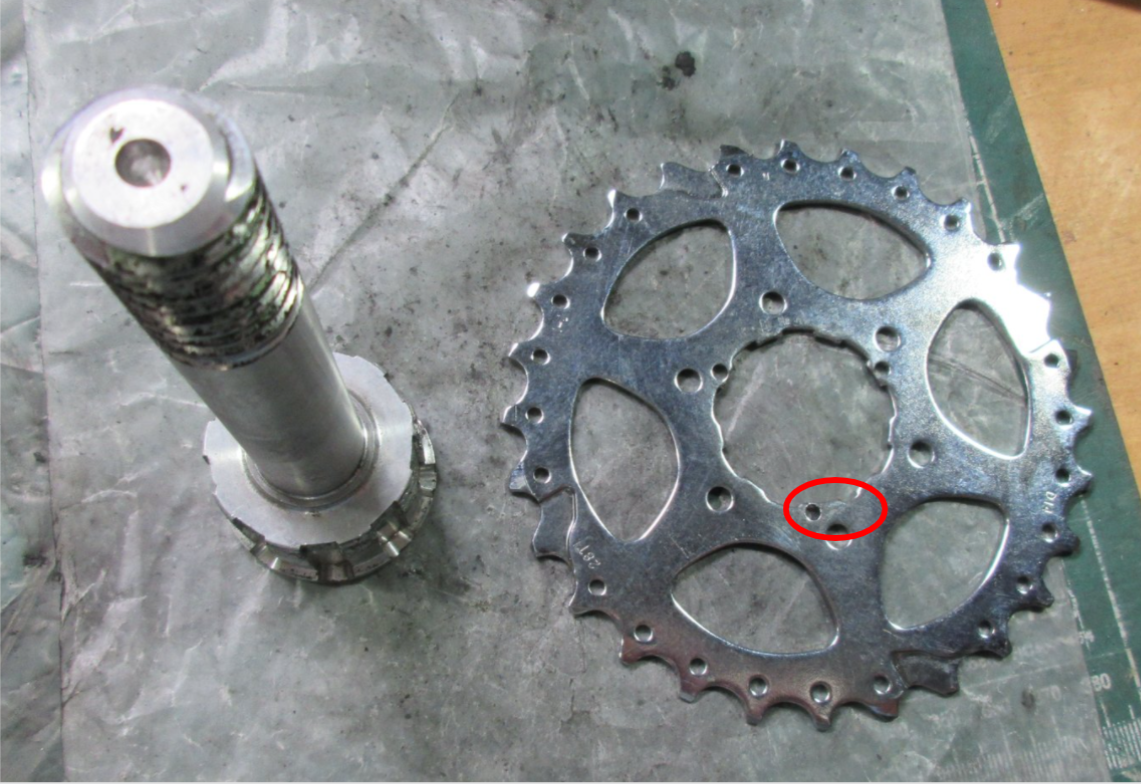
Intermediate Shaft on daVinci tandem
#1
Full Member
Thread Starter
Join Date: Jun 2016
Posts: 266
Mentioned: 1 Post(s)
Tagged: 0 Thread(s)
Quoted: 80 Post(s)
Likes: 0
Liked 39 Times
in
32 Posts
Intermediate Shaft on daVinci tandem
I am still trying to get our Grand Junction back in service. I have replaced the chains, chainrings, and cassette. I am trying to disassemble the intermediate shaft to replace the small chainrings on that shaft. I have the daVinci special tool (nice) and a chain whip. I was able to use the chain whip to remove and replace the cassette. But, I am having a problem loosening the intermediate shaft. The rings are small and the chain whip slips off. I am wondering if I need to turn the bike horizontal to keep the chain whip from coming off. Can anyone who has removed an intermediate shaft on a daVinci tandem offer any suggestions?
Thankfully, we kept our Trek T900 and we ride it everyday. But, I am looking forward to getting our Grand Junction back in service as we really like it. Our LBS is still only services what they sell, so that is not an option.
Thankfully, we kept our Trek T900 and we ride it everyday. But, I am looking forward to getting our Grand Junction back in service as we really like it. Our LBS is still only services what they sell, so that is not an option.
#2
Senior Member
Make sure you’re wrapping the chain whip around the largest “chainring” cog in order to get the most teeth engaged and the most mechanical advantage. I’ve done this several times and never had a problem getting the intermediate shaft loose. You might try using two people for the job. The chain whip should not slip if you keep it straight in line with the cog when applying force.
#3
Senior Member
Join Date: May 2005
Location: SFBay
Posts: 2,334
Bikes: n, I would like n+1
Mentioned: 0 Post(s)
Tagged: 0 Thread(s)
Quoted: 127 Post(s)
Likes: 0
Liked 133 Times
in
108 Posts
It might depend on the condition of the rings, but my chain whip seems to like hopping off of sprockets. I've found that having a helper gently press the chain in toward the sprocket prevents this issue.
If you happen to have the chain off you can also loop an open length of chain over the rear cassette as usual, then around the front chain ring, but from the bottom instead of the top. Basically an S shape instead of a wide O that the chain normally makes. This lets you use the rear brake to hold it, but there shouldn't be a need to do that if you have a chain whip.
If you happen to have the chain off you can also loop an open length of chain over the rear cassette as usual, then around the front chain ring, but from the bottom instead of the top. Basically an S shape instead of a wide O that the chain normally makes. This lets you use the rear brake to hold it, but there shouldn't be a need to do that if you have a chain whip.
#4
Senior Member
Another thought … make sure the the chain whip has a “modern” narrow chain on it. I had an old chain whip from the 5/6/7 speed days and found it slipped on 9/10 speed cogs, so I replaced the chain whip and no problems since, even on 11-speed cogs. Be advised though, that independent pedaling system intermediate shaft on a da Vinci does take a lot of force to remove! Of course, you’ll need to be rotating the chainrings forward (clockwise looking from the right side of the bike) with the chain whip while holding the double freewheel block in place with the da Vinci DFB tool. You can slide a pipe over the chain whip handle to apply more force by virtue of the longer lever.
NOTE: da Vinci does recommend putting the chain whip on the middle chainring, not the largest as I advised previously!
NOTE: da Vinci does recommend putting the chain whip on the middle chainring, not the largest as I advised previously!
Last edited by Joint Venture; 07-01-21 at 06:58 AM.
#5
Full Member
Thread Starter
Join Date: Jun 2016
Posts: 266
Mentioned: 1 Post(s)
Tagged: 0 Thread(s)
Quoted: 80 Post(s)
Likes: 0
Liked 39 Times
in
32 Posts
I put the Grand Junction on her side. I inserted the daVinci special tool into the double freewheel block (bottom side) and placed a 2x4 block of wood under the daVinci special tool to keep it from dropping out. I put a Crescent wrench on the daVinci special tool up against my foot. With the bike on its side, I was able to put the chain whip on the middle chainring and get a good grip. I was able to loosen and remove the spline drive. Looking at the 3 driving gear chainrings, and comparing them to the 3 new ones I have, it is hard to see that the driving gear chainrings are worn. That said, I have replaced the chains, all other chainrings, and the cassette. So, the 3 driving gear chainrings are about all that is left to replace and see if that solves the problem.
The problem now is getting the 3 driving gear chainrings off the spline drive. There is a locking holding them on the spline drive. It looks like I will need a Park Tool HCW-5 Bicycle Bottom Bracket Lockring Wrench to remove the lockring to get to the 3 driving gear chainrings. Before I order one from Amazon, is that the right tool? Also, do you use the chain whip to hold the middle chainring while using the locking wrench to loosen the lockring? Thanks.
The problem now is getting the 3 driving gear chainrings off the spline drive. There is a locking holding them on the spline drive. It looks like I will need a Park Tool HCW-5 Bicycle Bottom Bracket Lockring Wrench to remove the lockring to get to the 3 driving gear chainrings. Before I order one from Amazon, is that the right tool? Also, do you use the chain whip to hold the middle chainring while using the locking wrench to loosen the lockring? Thanks.
#6
Senior Member
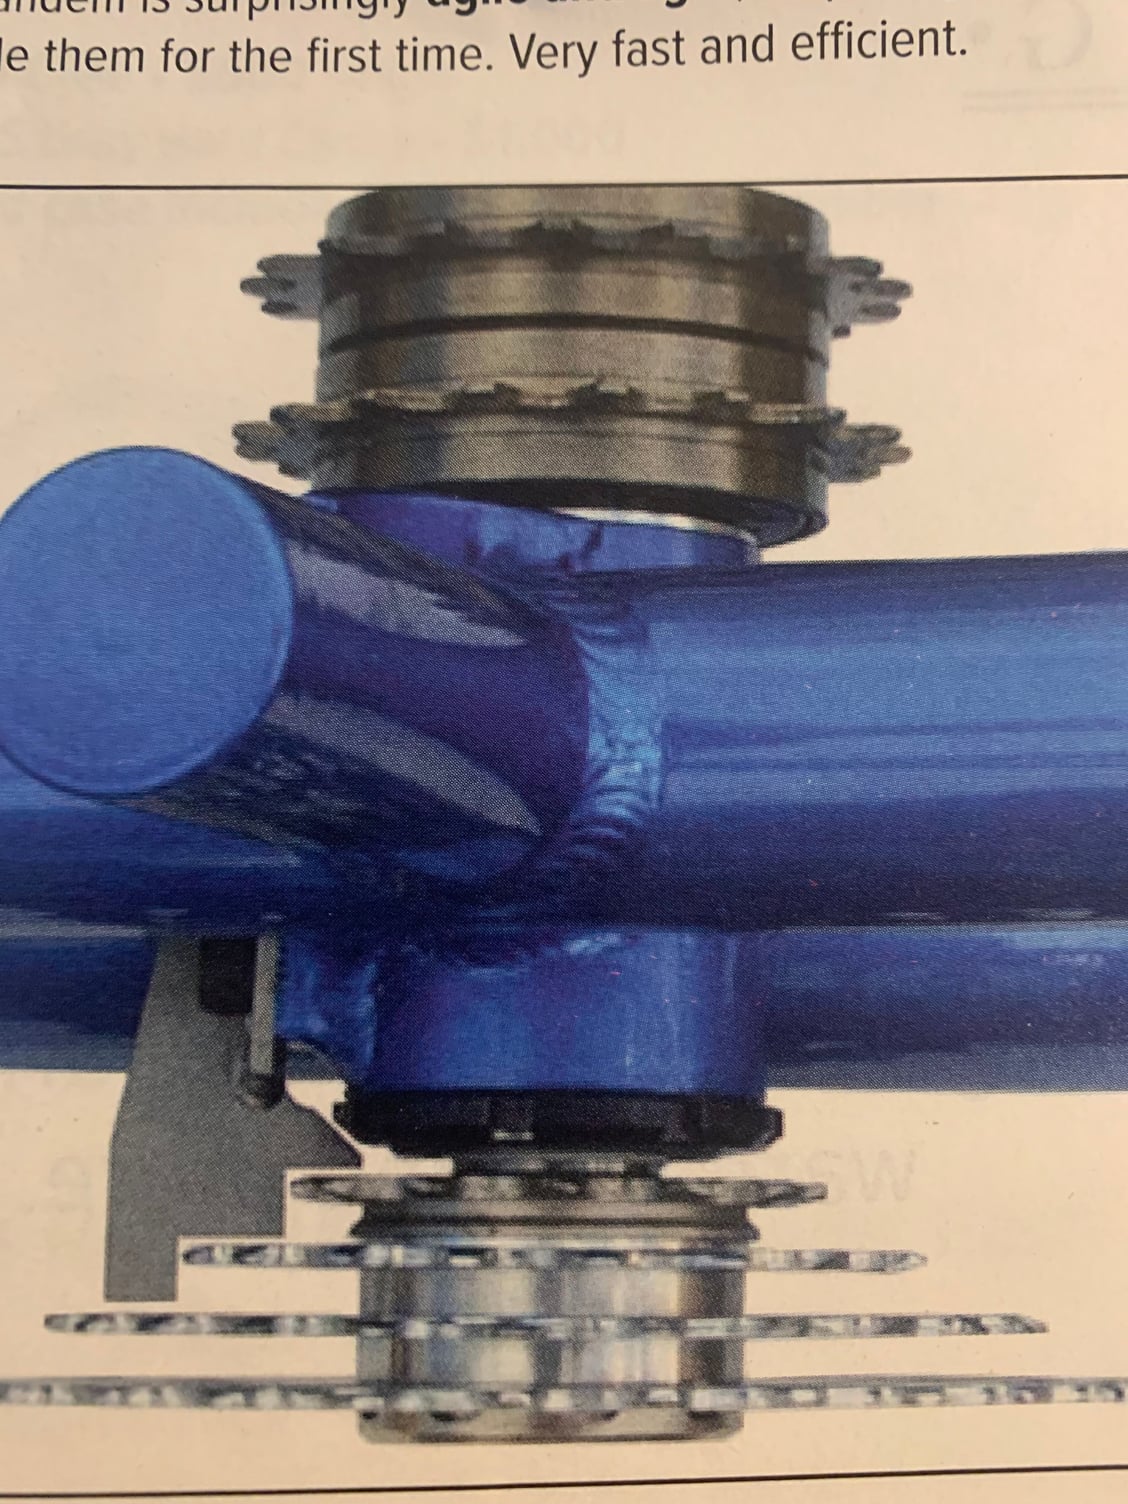
I was hoping someone with a 3x da Vinci would chime in to answer your question about the lockring securing the chainring cogs. Our old 2001 Joint Venture and our current 2016 both are 4x drivetrain like the photo. In that case, the chainrings are held in place by the threaded cog serving as the innermost chainring. Two chain whips are required in that case to remove the cogs. Certainly you will need to use a chain whip in conjunction with a tool for the lockring. As to what exactly that tool is, I don’t know as I’ve never worked on a 3x da Vinci. I would suggest an e-mail or call to Todd to get the correct info!

#7
Full Member
Thread Starter
Join Date: Jun 2016
Posts: 266
Mentioned: 1 Post(s)
Tagged: 0 Thread(s)
Quoted: 80 Post(s)
Likes: 0
Liked 39 Times
in
32 Posts
Joint Venture, thanks for the reply. I did email Todd, but have not heard back. So, I cut a hole in a piece of paper and then cut across the center of the hole. I put that on the spline drive shaft and used it to accurately measure the lockring diameter. It's 46 mm. So, the Park Tool HCW-5 Bicycle Bottom Bracket Lockring Wrench should work to remove the lockring. I have one coming. Two things I have learned from this process. 1) All those folks on this forum who advocate changing all the chainrings from time to time don't ride daVinci tandems  2) It's worthwhile to keep a backup tandem if you can do so. We ride every day and would really be unhappy if we were without a tandem to ride during all this down time with our Grand Junction.
 2) It's worthwhile to keep a backup tandem if you can do so. We ride every day and would really be unhappy if we were without a tandem to ride during all this down time with our Grand Junction.
Last edited by jethro00; 07-08-21 at 11:34 AM.
#8
Newbie
Join Date: Jul 2017
Location: Maryland
Posts: 54
Bikes: DaVinci Joint Venture Ti S&S, DaVinci Symbiosis 27.5", Trek Emonda SLR 7, Motobecane Century Ti ETap AXS, Motobecane Fantom Ti hardtail, Diamondback Haanjo Carbon, Motobecane Fantom 4x4 29'er, SE F@R fatbike
Mentioned: 0 Post(s)
Tagged: 0 Thread(s)
Quoted: 23 Post(s)
Likes: 0
Liked 8 Times
in
7 Posts
I haven't checked the forum in a while, so this advice may be a bit late, but as a multi-DaVinci owner (some 4x, some 3x drivetrains) I recommend that you upgrade from your chain whip to the Park Tool CP-1.2 Bicycle Cassette Pliers. These allow you to grab the smallest or middle 'chainring' cog from both sides so it doesn't slip and they're long enough to give you pretty good leverage. With these and the special DaVinci tool (and a 12" adjustable wrench) I no longer dread taking the intermediate shaft apart.
Edit: If I were buying a tool today I'd definitely consider the Pedros Cassette Removal Tool Vise Whip II which lock closed. They look like a regular set of vice grips with jaws that grab onto the cog. Or for a few $$ less the Feedback Sports Cassette Pliers look to be more adjustable than the Park CP 1.2.
Edit: If I were buying a tool today I'd definitely consider the Pedros Cassette Removal Tool Vise Whip II which lock closed. They look like a regular set of vice grips with jaws that grab onto the cog. Or for a few $$ less the Feedback Sports Cassette Pliers look to be more adjustable than the Park CP 1.2.
Last edited by Alan_F; 07-08-21 at 12:51 PM. Reason: Added info
Likes For Alan_F:
#9
Full Member
Thread Starter
Join Date: Jun 2016
Posts: 266
Mentioned: 1 Post(s)
Tagged: 0 Thread(s)
Quoted: 80 Post(s)
Likes: 0
Liked 39 Times
in
32 Posts
Alan F,
I am trying to remove the 3 driving gear chainrings from the spline drive to replace the 3 driving gear chainrings. Right now, I am looking at the threaded end of the spline drive, then the spline drive shaft, then a lockring, then the 3 driving gear chainrings separated by spacers. I need to remove the lockring to get to the 3 driving gear chainrings.
Grasping the middle driving gear chainring on the spline drive with the chain whip, I have not been able to get the lockring to loosen. I know the spline drive loosens clockwise. What about the lockring that holds the 3 driving gear chainrings on the spline drive? Does it loosen clockwise or counterclockwise? Thanks.
#10
Senior Member
Join Date: May 2005
Location: SFBay
Posts: 2,334
Bikes: n, I would like n+1
Mentioned: 0 Post(s)
Tagged: 0 Thread(s)
Quoted: 127 Post(s)
Likes: 0
Liked 133 Times
in
108 Posts
A picture of where you are stuck may help. It sounds like you have the DFB off and have removed the shaft from the frame?
#11
Full Member
Thread Starter
Join Date: Jun 2016
Posts: 266
Mentioned: 1 Post(s)
Tagged: 0 Thread(s)
Quoted: 80 Post(s)
Likes: 0
Liked 39 Times
in
32 Posts
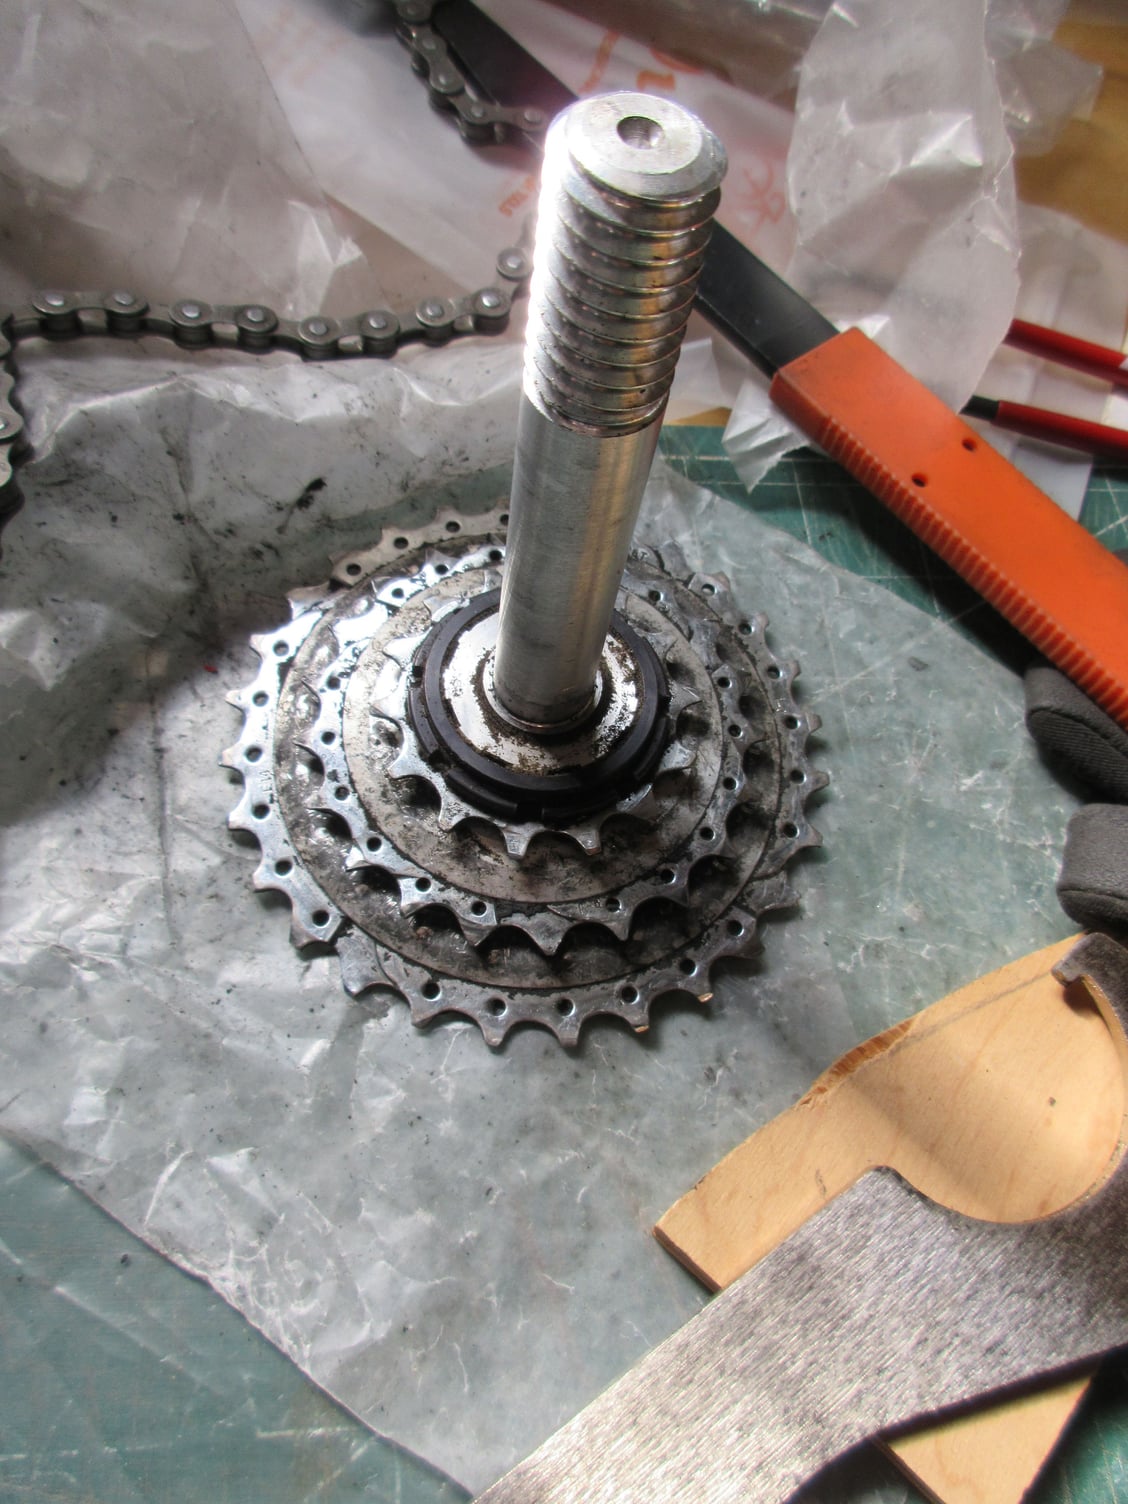
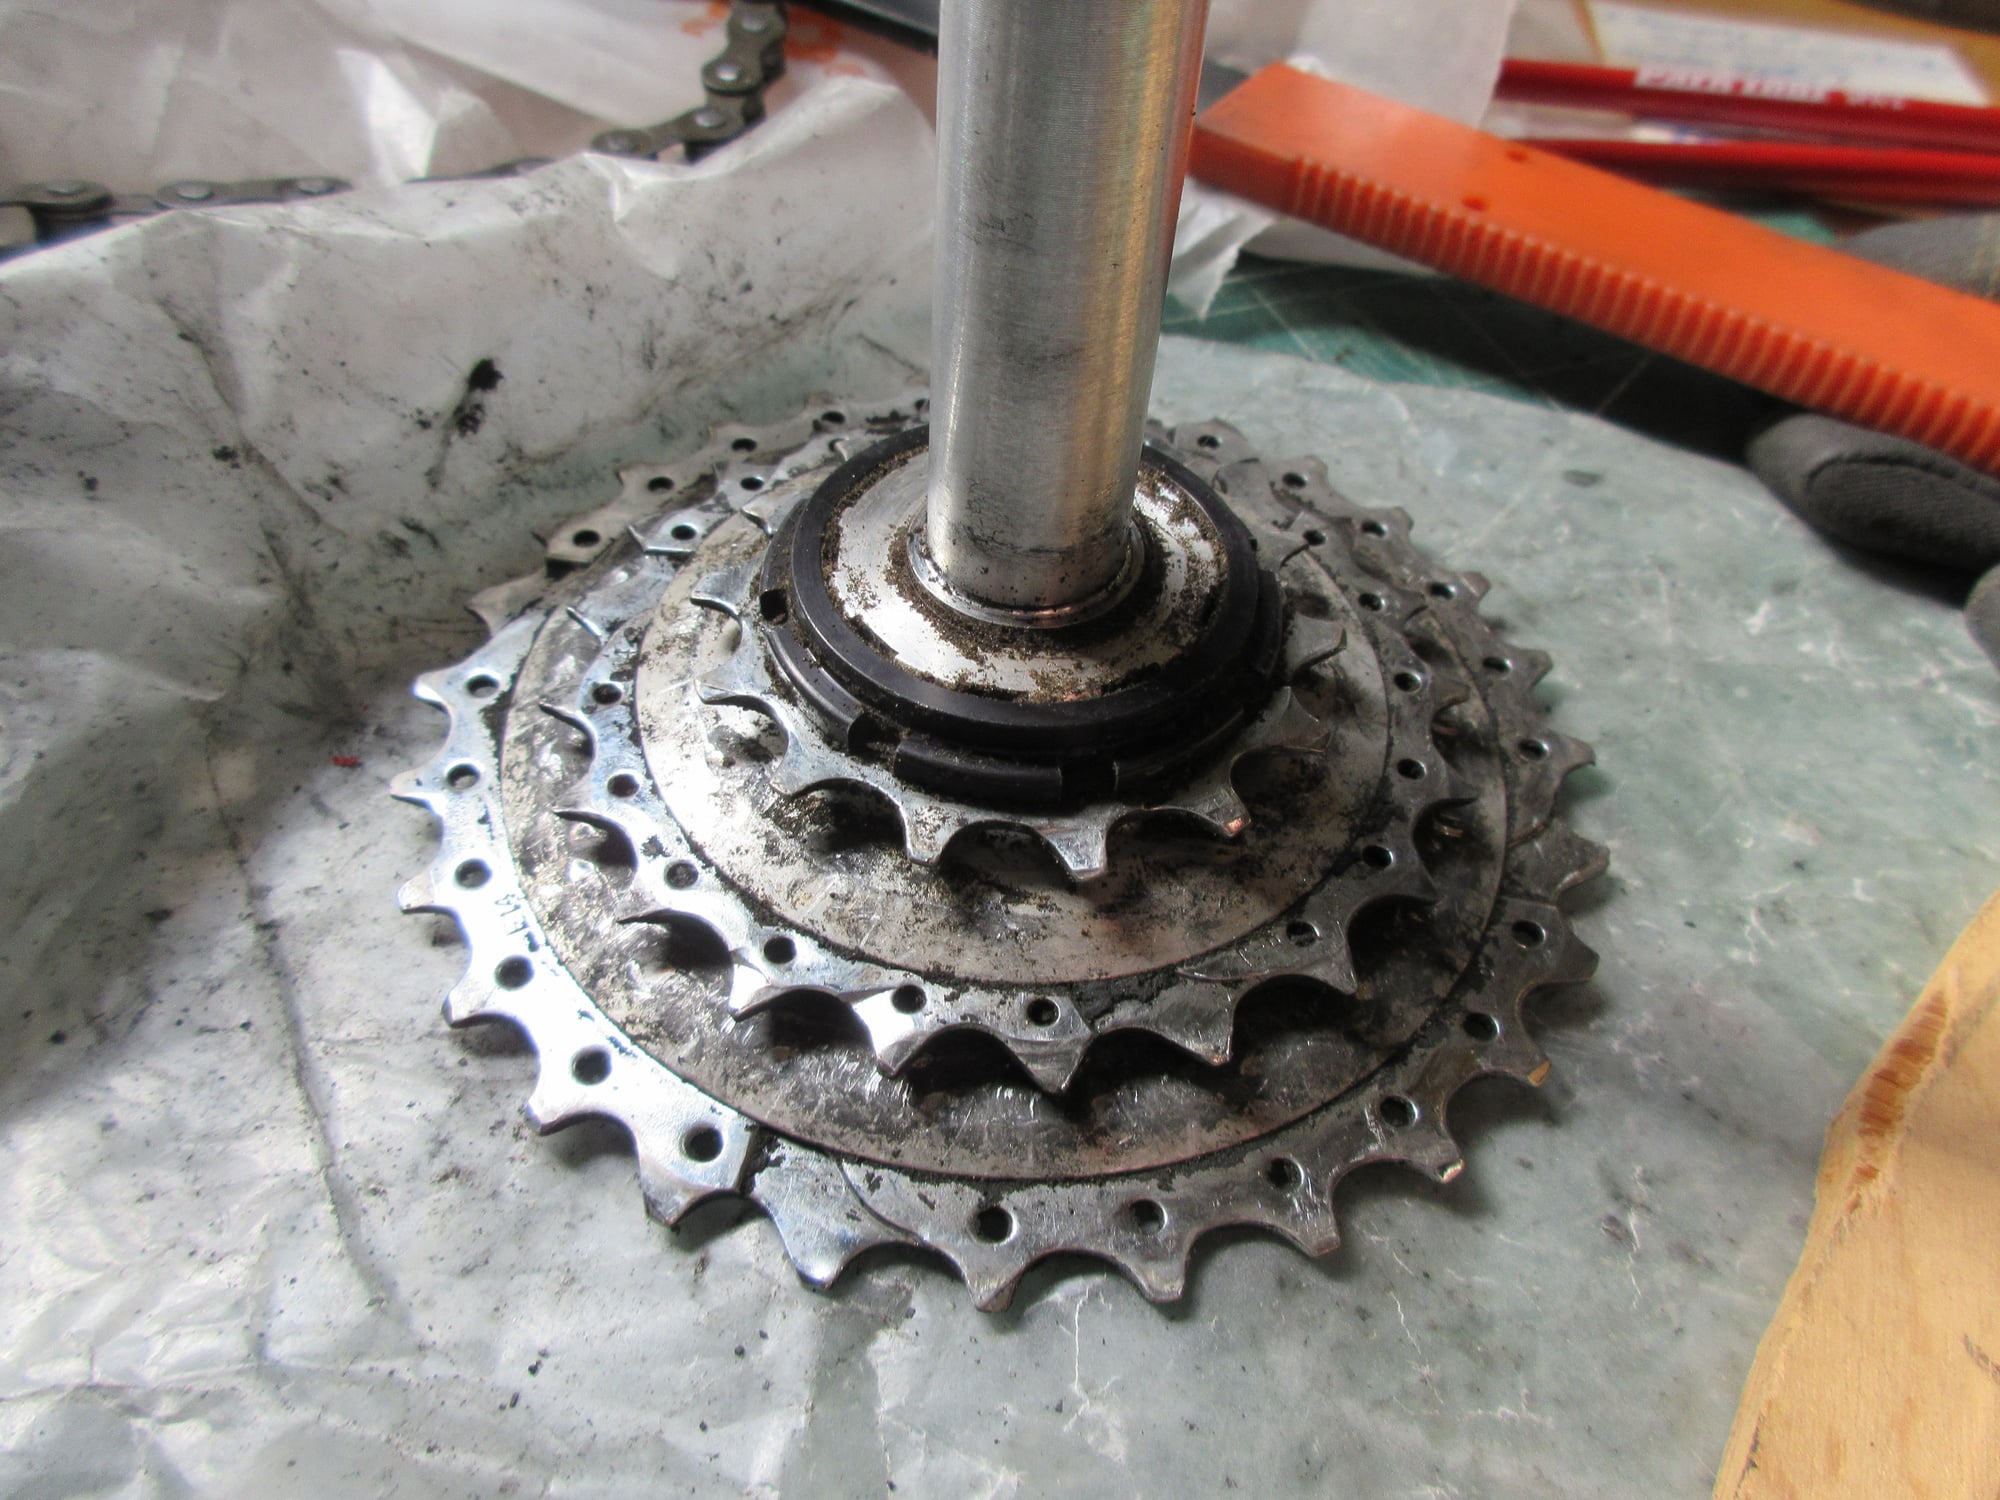
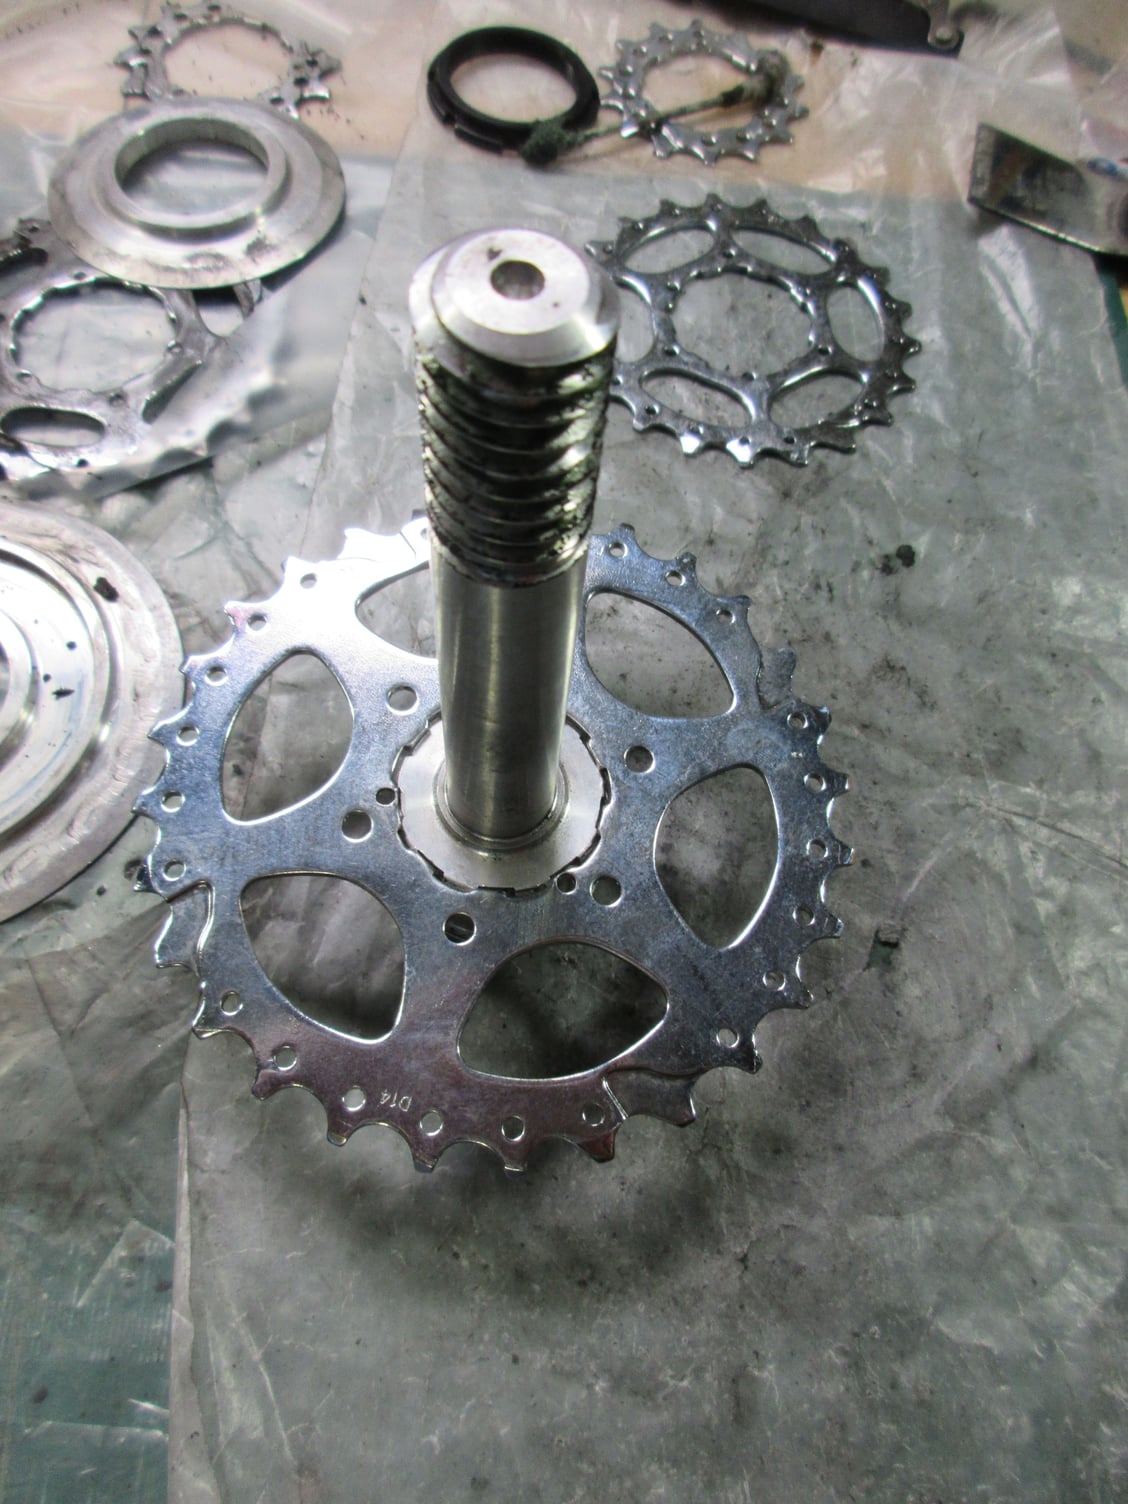
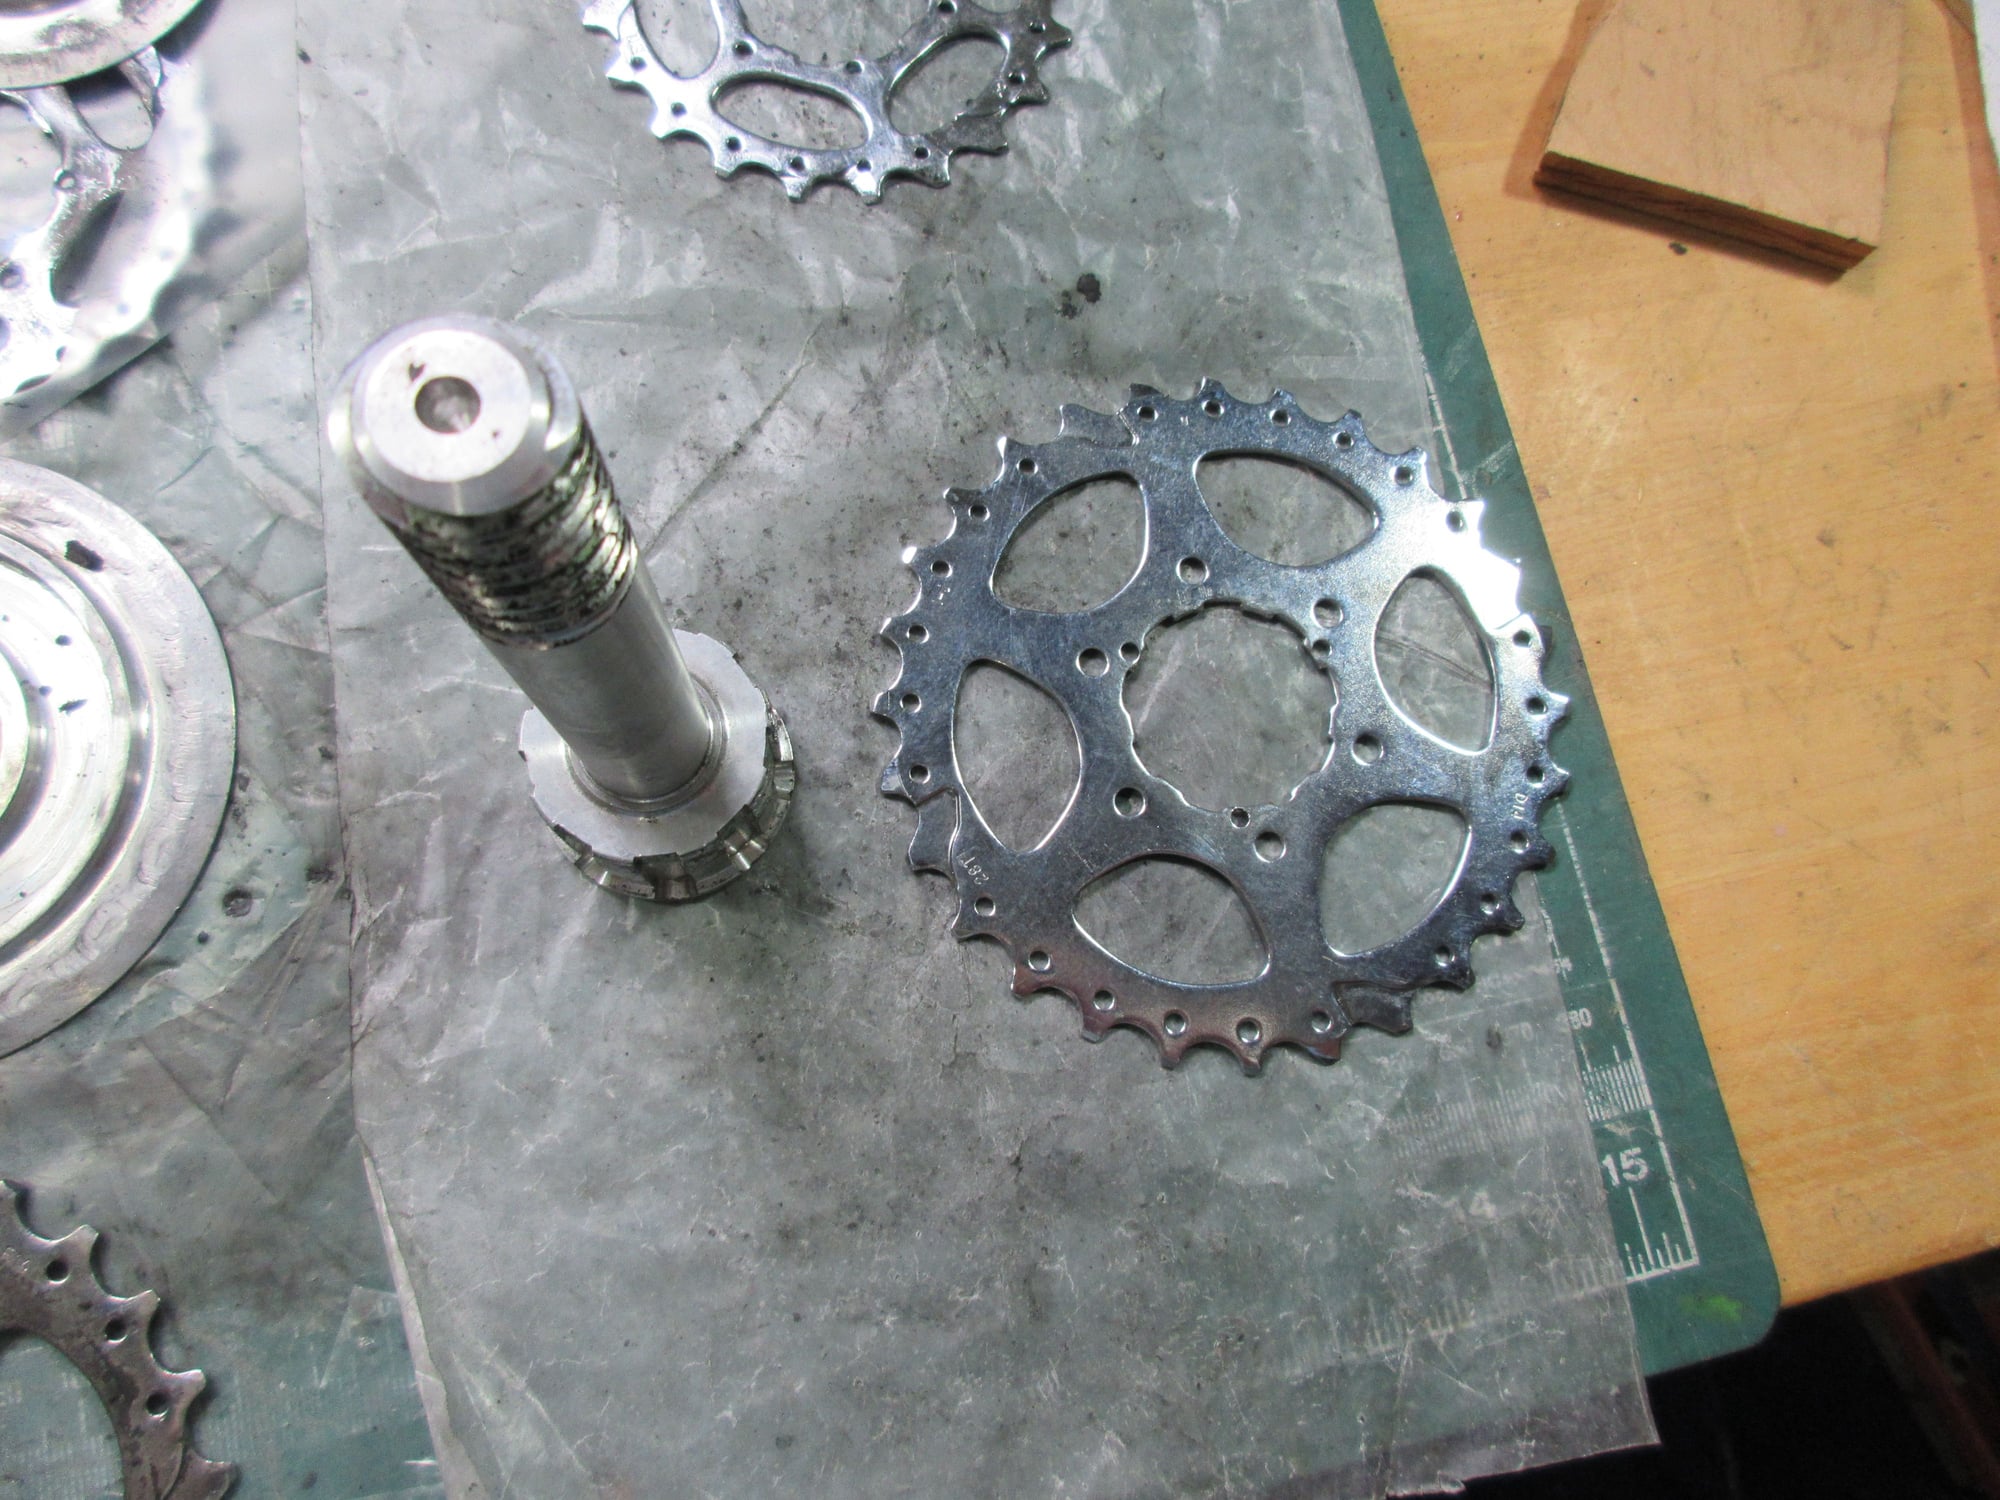
Here are 2 pics. Looking at the replacement granny ring, it has a series of holes like the middle and big rings. I am wondering if the lockring has prongs that fit into the holes in the granny ring and if the lockring has to be pried off, and not screwed off. If that is correct, how does one go about prying off the lockring? Thanks for any suggestions.
Last edited by jethro00; 07-13-21 at 01:11 PM. Reason: supplement text
#12
Senior Member
From the point of view of your photo, the lockring should loosen CCW. The spline drive is threaded. I think da Vinci uses the same spline drive for 3x and 4x drivetrains as Todd told me that I could convert to a 3x for a Di2 setup using my existing stuff and purchasing the 3x chainring/spacer setup and the lockring. Think of the spline drive as a freehub cassette body. The 4x uses an “old school” threaded 1st position cog (like in the old 7s freehub days) as the innermost chainring and lockring. Good luck!
Last edited by Joint Venture; 07-13-21 at 06:39 PM.
#13
Full Member
Thread Starter
Join Date: Jun 2016
Posts: 266
Mentioned: 1 Post(s)
Tagged: 0 Thread(s)
Quoted: 80 Post(s)
Likes: 0
Liked 39 Times
in
32 Posts
Joint Venture, thanks for the information. Before I ramp up the torque, I wanted to get confirmation that the lockring is threaded and which direction will loosen it. I'll give it another go.
Likes For jethro00:
#14
Newbie
Join Date: Jul 2017
Location: Maryland
Posts: 54
Bikes: DaVinci Joint Venture Ti S&S, DaVinci Symbiosis 27.5", Trek Emonda SLR 7, Motobecane Century Ti ETap AXS, Motobecane Fantom Ti hardtail, Diamondback Haanjo Carbon, Motobecane Fantom 4x4 29'er, SE F@R fatbike
Mentioned: 0 Post(s)
Tagged: 0 Thread(s)
Quoted: 23 Post(s)
Likes: 0
Liked 8 Times
in
7 Posts
As Joint Venture said, the threading on the lockring is standard 'lefty loosie, righty tighty'. Make sure you keep the lockring spanner lined up when you start increasing the torque as they can slip off the side easily... at least the spanner I use can do that if I'm not careful.
DaVinci probably has torque specs for the lockring on their website, but it doesn't need to be crazy tight. It is preventing the chainrings from moving laterally, but they are held in place against drive forces by their splines. Once you get it removed, cleaned, and greased it will probably be a lot easier to remove the next time you need to do it. I just had to replace a bent middle chainring and the lockring (last removed about 6 months prior) came off pretty easily.
I just replaced all 3 chains (and the damaged middle ring) and silenced a creak from the captain's bottom bracket (it needed the non-fixed cup tightened) and our drivetrain is pretty much like new right now. As we approach 10,000 miles on our current Joint Venture I'm still impressed by how well the 3x11 Di2 works.
#15
Full Member
Thread Starter
Join Date: Jun 2016
Posts: 266
Mentioned: 1 Post(s)
Tagged: 0 Thread(s)
Quoted: 80 Post(s)
Likes: 0
Liked 39 Times
in
32 Posts
Alan F, I hear you about not letting the locking spanner slide off. It is a challenge to keep the chain whip and lockring spanner level and in place at the same time. The Pedros Cassette Removal Tool Vise Whip II you referenced is starting to look good (a bit pricey, but good).
#16
Senior Member
Join Date: May 2005
Location: SFBay
Posts: 2,334
Bikes: n, I would like n+1
Mentioned: 0 Post(s)
Tagged: 0 Thread(s)
Quoted: 127 Post(s)
Likes: 0
Liked 133 Times
in
108 Posts
Not my first choice, but locking the sprocket down onto a pair of wood blocks with screws and washers (careful not to score up the sprockets) would allow you to do this with one tool instead of two. Just make sure to have a relief in whatever you secure it down to so you don't just bend the sprockets. It may be easier to elevate the ends with a pair of blocks rather than cut a relief.
It may also be easier to get that off with the shaft inserted 90% of the way back into the frame. You can even start to screw on the DFB if you need some help keeping it from sliding out.
It may also be easier to get that off with the shaft inserted 90% of the way back into the frame. You can even start to screw on the DFB if you need some help keeping it from sliding out.
#17
Full Member
Thread Starter
Join Date: Jun 2016
Posts: 266
Mentioned: 1 Post(s)
Tagged: 0 Thread(s)
Quoted: 80 Post(s)
Likes: 0
Liked 39 Times
in
32 Posts
Interesting that you mention locking the sprocket down onto a pair of wood blocks with screws and washers. I was thinking about trying that as a backup plan if I can't get the lockring to loosen with the chain whip and lockring spanner. I have also considered running pieces of wood dowel through the holes in the big ring and into a piece of 2x4 underneath and see if I can just use the lockring spanner. Hopefully, I can get it to loosen with the chain whip and lockring spanner. I shut that effort down until I got some input from this forum to make sure it really is threaded and I am turning in the correct direction. I did not want to risk damaging any parts. I'll give it a go this afternoon and report how it goes. I have already learned to wear gloves to do this 

#18
Full Member
Thread Starter
Join Date: Jun 2016
Posts: 266
Mentioned: 1 Post(s)
Tagged: 0 Thread(s)
Quoted: 80 Post(s)
Likes: 0
Liked 39 Times
in
32 Posts
Well, victory is mine over the lockring. I put the assembly vertical on my bench and got a good grip with the chain whip on the middle ring and the lockring spanner and she loosened. I am getting better with the chain whip. I cleaned the spacers and greased the threads. Now, I am having a hard time getting the big ring to go down over the threads for the lockring. What's the trick to that? I have tried rocking it back and forth. I am reluctant to tap it with a mallet lest I bend the ring or damage the threads. Also, does it matter which side of the rings go on first? Is there a front and back to the rings? Here are 2 pics.


#19
Senior Member
Join Date: May 2005
Location: SFBay
Posts: 2,334
Bikes: n, I would like n+1
Mentioned: 0 Post(s)
Tagged: 0 Thread(s)
Quoted: 127 Post(s)
Likes: 0
Liked 133 Times
in
108 Posts
One tooth on the spline is a different width than the others. Do you have it properly lined up?
See the picture of the free bodies 1/4 of the way down the page here: https://www.sheldonbrown.com/k7.html
See the picture of the free bodies 1/4 of the way down the page here: https://www.sheldonbrown.com/k7.html
Last edited by jccaclimber; 07-17-21 at 04:24 PM.
#21
Newbie
Join Date: Jul 2017
Location: Maryland
Posts: 54
Bikes: DaVinci Joint Venture Ti S&S, DaVinci Symbiosis 27.5", Trek Emonda SLR 7, Motobecane Century Ti ETap AXS, Motobecane Fantom Ti hardtail, Diamondback Haanjo Carbon, Motobecane Fantom 4x4 29'er, SE F@R fatbike
Mentioned: 0 Post(s)
Tagged: 0 Thread(s)
Quoted: 23 Post(s)
Likes: 0
Liked 8 Times
in
7 Posts
As the previous poster mentioned, there is one set of splines that are narrower/wider than the others to ensure the cogs always go onto the splines in the same relative positions. The cogs will only go on one way because of that. If you turn the cog around, reversing the inside and outside, it will not go over the splines.
The same is going to be true whenever you remove and reinstall the rear cassette. The freehub has the exact same spline arrangement and all of the cogs (the first few connected via a spider, and the rest individually) need to line up correctly with the splines.
The same is going to be true whenever you remove and reinstall the rear cassette. The freehub has the exact same spline arrangement and all of the cogs (the first few connected via a spider, and the rest individually) need to line up correctly with the splines.
#22
Full Member
Thread Starter
Join Date: Jun 2016
Posts: 266
Mentioned: 1 Post(s)
Tagged: 0 Thread(s)
Quoted: 80 Post(s)
Likes: 0
Liked 39 Times
in
32 Posts
Jccaclimber, thanks so much for the alignment tip. Yep, that was the problem. Once I rotated the sprockets until they were aligned properly, they slipped into place just fine. Thanks to all of you for helping with advice. Our LBS will not work on any bike they did not sell at this time. I doubt I could have disassembled and reassembled our intermediate shaft without your help. Our Grand Junction is finally back together. I have replaced the right grip shifter, all 3 chains, cassette, and all chainrings. The hope is that the grinding and slipping we were experiencing will disappear. I will test it later today or tomorrow and see how it goes.
For now, I will offer some take aways for anyone who happens upon this thread and is on the fence about taking on removal of their intermediate shaft. While it's not an easy task, it's doable once you learn how the parts work and have the right tools. If you get started and find things hard to take apart or reassemble, ask those on this group who have a daVinci tandem before you ramp up the torque or whack something with a rubber mallet. As far as tools go, a chain whip is adequate once you get used to using it. But, I will think about getting a Pedros Cassette Removal Tool Vise Whip II, which should be a lot easier to use with a second tool at the same time. The daVinci 4-pronged specialty tool that goes into the eccentric is well worth the cost. That is a well designed and handy tool. Finally, a pin spanner is inexpensive and makes rotating the eccentric really easy when you want to adjust the chain tension.
For now, I will offer some take aways for anyone who happens upon this thread and is on the fence about taking on removal of their intermediate shaft. While it's not an easy task, it's doable once you learn how the parts work and have the right tools. If you get started and find things hard to take apart or reassemble, ask those on this group who have a daVinci tandem before you ramp up the torque or whack something with a rubber mallet. As far as tools go, a chain whip is adequate once you get used to using it. But, I will think about getting a Pedros Cassette Removal Tool Vise Whip II, which should be a lot easier to use with a second tool at the same time. The daVinci 4-pronged specialty tool that goes into the eccentric is well worth the cost. That is a well designed and handy tool. Finally, a pin spanner is inexpensive and makes rotating the eccentric really easy when you want to adjust the chain tension.
#23
Full Member
Thread Starter
Join Date: Jun 2016
Posts: 266
Mentioned: 1 Post(s)
Tagged: 0 Thread(s)
Quoted: 80 Post(s)
Likes: 0
Liked 39 Times
in
32 Posts
I tested it. After I replaced the right grip shifter, all 3 chains, cassette, and 2 timing chainrings, a chain was still grinding and slipping. Now that I replaced the 3 sprockets on the intermediate shaft, it is not slipping. That suggests the sprockets on the intermediate shaft were worn. The bad news is that it is still making a grinding noise. The chains all look seated on chainrings and the cassette. What could cause the grinding sound?
#24
Senior Member
Join Date: May 2005
Location: SFBay
Posts: 2,334
Bikes: n, I would like n+1
Mentioned: 0 Post(s)
Tagged: 0 Thread(s)
Quoted: 127 Post(s)
Likes: 0
Liked 133 Times
in
108 Posts
You mentioned adjusting the EBBs (eccentric bottom brackets). It's in the manual, but make sure you have the bearing above center when adjusting those. That ensure the set screws are pushing into the thick part of the EBB, not the thin part near the bearings, which would result in premature bearing wear.
As for your grinding noise, it shouldn't be hard to track down, although we need a bit more information.
1. Is it coming from the front of the back or the rear?
2. Does it happen when both people pedal, when just one pedals, or when coasting?
3. Does it happen if you are not on the bike, ie with the rear wheel off the ground and you are turning one of the cranks by hand? I have a 2 sided kick stand that makes this very easy for me to test, but a stand, flipping the bike over, or having someone hold it up for a moment would all serve the same purpose.
4. Does it happen in every gear, or just some of them?
5. What if you spin the intermediate shaft backward by hand (on the output side), without the rear wheel moving?
6. Are all the bearings smooth? This is easier to check in the BBs if the chains (or drive side cranks) are not installed, but removal is not required.
Grinding is generally not good, but also usually easy to track down.
There are a lot of things that could grind
#25
Senior Member
“Grinding” makes me think of bearings too. There really are just three places that bearings would grind while pedaling: the front/rear BB’s and the intermediate shaft. Using the suggestions above it should not be hard to isolate the source(s). With the amount of wear you had on the rest of the drivetrain, it’s easy to think any of those bearings might need attention or replacement.


