


Intermediate Shaft on daVinci tandem
 08-01-21, 09:07 PM
#51
Junior Member
Join Date: Sep 2020
Posts: 75
Mentioned: 0 Post(s)
Tagged: 0 Thread(s)
Quoted: 18 Post(s)
Likes: 0
Liked 39 Times
in
24 Posts
And, just so you don't think we are all just rote fans of Todd at Davinci:
1) he seems like a nice guy willing to engage with people. (which I believe would be a massive time sink personally, but I'm thankful he will do it)
2) His prices seem very reasonable with minimal markup over a good mail order site. I think he charged me $80 for the 'normal' white freewheel. At the time the best online price I could find was universal cycles for $74.95. I'm sure a LBS would have been well more than $80.
Completely understand that he is out of stock. Along with everybody else in the world.
simon
 08-02-21, 07:23 AM
#52
Full Member
Thread Starter
Join Date: Jun 2016
Posts: 266
Mentioned: 1 Post(s)
Tagged: 0 Thread(s)
Quoted: 80 Post(s)
Likes: 0
Liked 39 Times
in
32 Posts
Likewise, I am a fan of Todd. We met a long time friend of his one day when she saw our Grand Junction. She recognized the bike and told us she knew Todd when he was first getting started. I have bought parts and tools from Todd and he even once took parts off a bike he was building to send them to me because that was all he had on hand. All of that said, Todd, like it seems everyone else, is dealing with a long term parts shortage and there is no guarantee he will be around forever to service our tandems. S-o-o-o-o, we do need to figure out what parts will work on our tandems and where to find them if need be.
08-02-21, 07:30 PM
#53
Senior Member
Join Date: Apr 2005
Location: Northern CA
Posts: 743
Bikes: Cannondale tandems: '92 Road, '97 Mtn. Mongoose 10.9 Ti, Kelly Deluxe, Tommaso Chorus, Cdale MT2000, Schwinn Deluxe Cruiser, Torker Unicycle, among others.
Mentioned: 5 Post(s)
Tagged: 0 Thread(s)
Quoted: 279 Post(s)
Liked 207 Times
in
129 Posts
JV is correct. For future reference there�s also the CWP-7 which does both, but it doesn�t have a built in handle so it isn�t as nice to use.
I know I keep repeating this point, but when I teach people to use a crank puller the first time I have them remove the outer threaded portion from the tool, install it on their crank (by hand most of the way to prevent cross threading the fine threads) then reinstall and use the handle. It may take quite a bit to get the cranks off the first time. People seem to have a way of having the inner portion in too far, which prevents the outer portion from fully threading in to the crank arm, and then leads to assorted sorrows.
I know I keep repeating this point, but when I teach people to use a crank puller the first time I have them remove the outer threaded portion from the tool, install it on their crank (by hand most of the way to prevent cross threading the fine threads) then reinstall and use the handle. It may take quite a bit to get the cranks off the first time. People seem to have a way of having the inner portion in too far, which prevents the outer portion from fully threading in to the crank arm, and then leads to assorted sorrows.
08-02-21, 11:29 PM
#54
Senior Member
Join Date: May 2005
Location: SFBay
Posts: 2,334
Bikes: n, I would like n+1
Mentioned: 0 Post(s)
Tagged: 0 Thread(s)
Quoted: 127 Post(s)
Likes: 0
Liked 133 Times
in
108 Posts
Not just ACS freewheels, preferably the same model. I (fuzzy recollection) think my new one is a PAWS (22T) and is enough wider than the originals (Crossfire?) that it needed the spacer.
That's what we're trying to say. A normal freewheel tool cannot access the second ACS freewheel on the DFB. Your options are a punch and some luck (I wasn't convinced I could do this without damaging the DFB threads), permanent disassembly of the old freewheel, and removal with a pipe wrench, the special tool from Todd, or rigging something up like I did.
That's what we're trying to say. A normal freewheel tool cannot access the second ACS freewheel on the DFB. Your options are a punch and some luck (I wasn't convinced I could do this without damaging the DFB threads), permanent disassembly of the old freewheel, and removal with a pipe wrench, the special tool from Todd, or rigging something up like I did.
08-14-21, 03:19 PM
#55
Full Member
Thread Starter
Join Date: Jun 2016
Posts: 266
Mentioned: 1 Post(s)
Tagged: 0 Thread(s)
Quoted: 80 Post(s)
Likes: 0
Liked 39 Times
in
32 Posts
I removed one of the front cranks (by the hardest). Park Tool has a good YouTube video that helped.
There is no noise upon rotating the spindle. Based on that, is there any point in removing the other crank?
A piece popped out of the eccentric mechanism. I see where it goes. But, I am not quite clear on which way that piece is supposed to fit in there. Can anyone clarify the proper orientation of that piece?
Pictures are below.
Many thanks.
08-14-21, 08:47 PM
#56
Senior Member
Join Date: May 2005
Location: SFBay
Posts: 2,334
Bikes: n, I would like n+1
Mentioned: 0 Post(s)
Tagged: 0 Thread(s)
Quoted: 127 Post(s)
Likes: 0
Liked 133 Times
in
108 Posts
I didn't mean to remove the EBB from the frame, just the crank from the spindle. On the plus side, now you know how. If you look at the piece that fell out you'll notice that it has a wedge shape on one side. That should mate up with the triangular slot in the EBB. If it has an allen at each end it probably works either way. If only at one end, just make sure it's accessible.
Too late at this point, but just as an FYI, if you're careful you can remove and re-install the timing side crank arm without changing the EBB adjustment if you put the chain on the crank arm before putting the crank arm on the spindle. This is a tad trickier on the stoker's crank, but still doable. If you're one who is concerned about torque specs (I typically am, but I'm picky like that), the specs are all available on the DaVinci page.
Too late at this point, but just as an FYI, if you're careful you can remove and re-install the timing side crank arm without changing the EBB adjustment if you put the chain on the crank arm before putting the crank arm on the spindle. This is a tad trickier on the stoker's crank, but still doable. If you're one who is concerned about torque specs (I typically am, but I'm picky like that), the specs are all available on the DaVinci page.
08-15-21, 09:56 AM
#57
Full Member
Thread Starter
Join Date: Jun 2016
Posts: 266
Mentioned: 1 Post(s)
Tagged: 0 Thread(s)
Quoted: 80 Post(s)
Likes: 0
Liked 39 Times
in
32 Posts
Thanks for the info. I got it back together without incident. The problem seems to be the freewheel. I'll contact Todd and see if he has anything available. If not, there are a few shops around the country that sell Grand Junctions who might possibly have parts.
Last edited by jethro00; 08-15-21 at 03:21 PM.
08-17-21, 06:43 PM
#58
Full Member
Thread Starter
Join Date: Jun 2016
Posts: 266
Mentioned: 1 Post(s)
Tagged: 0 Thread(s)
Quoted: 80 Post(s)
Likes: 0
Liked 39 Times
in
32 Posts
I spoke with Todd. Although he cannot say for sure that the captain's freewheel is causing the problem, that's about what is left to replace. So, freewheels and new bearings are in transit to me. I pulled the intermediate shaft and lock ring. I am ready when the parts arrive. Now that I know how to remove the intermediate shaft and have the right tools, I don't think it took 10 minutes.
Likes For jethro00:
08-18-21, 12:20 AM
#59
Senior Member
Join Date: May 2005
Location: SFBay
Posts: 2,334
Bikes: n, I would like n+1
Mentioned: 0 Post(s)
Tagged: 0 Thread(s)
Quoted: 127 Post(s)
Likes: 0
Liked 133 Times
in
108 Posts
We�re you able to get a freewheel removal tool from him or did you buy a new DFB as well? If not, how do you plan to remove the inner freewheel? I still haven�t gotten to calling him to ask about the tool again. We simply did our trip without regearing.
08-18-21, 07:25 AM
#60
Full Member
Thread Starter
Join Date: Jun 2016
Posts: 266
Mentioned: 1 Post(s)
Tagged: 0 Thread(s)
Quoted: 80 Post(s)
Likes: 0
Liked 39 Times
in
32 Posts
I am not sure what the "freewheel removal tool" is. I have the tool with the 4 prongs on one side and the tab on the other side for removing the intermediate shaft. That's a good tool and well worth the $25 or so it costs. I got a new DFB and 2 bearings. The next time I order something from Todd, I am going to send my DFB and old freewheels back to him so he can replace the freewheels and return it to me so I'll have a spare assembly. I may stockpile an extra set of parts that are hard to source elsewhere just in case Todd isn't around at some point.
08-18-21, 10:28 AM
#61
Senior Member
Join Date: May 2005
Location: SFBay
Posts: 2,334
Bikes: n, I would like n+1
Mentioned: 0 Post(s)
Tagged: 0 Thread(s)
Quoted: 127 Post(s)
Likes: 0
Liked 133 Times
in
108 Posts
A common freewheel tool interferes with the DFB and won�t be able to remove the inner freewheel. This isn�t an issue if you are getting a new DFB or are having Todd do the swap.
08-18-21, 03:04 PM
#62
Full Member
Thread Starter
Join Date: Jun 2016
Posts: 266
Mentioned: 1 Post(s)
Tagged: 0 Thread(s)
Quoted: 80 Post(s)
Likes: 0
Liked 39 Times
in
32 Posts
Well, now you've got me curious. What tool would be needed to remove the inner freewheel? I don't see any special tool for that on Todd's website.
08-18-21, 05:46 PM
#63
Senior Member
Join Date: May 2005
Location: SFBay
Posts: 2,334
Bikes: n, I would like n+1
Mentioned: 0 Post(s)
Tagged: 0 Thread(s)
Quoted: 127 Post(s)
Likes: 0
Liked 133 Times
in
108 Posts
The tool is not listed on his web page, but he mentioned it in an email to me. Unfortunately that email thread went dark, so I ended up making a temporary tool. This was discussed around post # 48 of this thread.
08-19-21, 07:42 PM
#64
Full Member
Thread Starter
Join Date: Jun 2016
Posts: 266
Mentioned: 1 Post(s)
Tagged: 0 Thread(s)
Quoted: 80 Post(s)
Likes: 0
Liked 39 Times
in
32 Posts
Got my new freewheels and tried to reinstall the intermediate shaft. After I tightened the assembly with the chain whip and the daVinci tool, it has some play side to side. By that I mean, if I hold the big ring and the freewheels and push horizontally, the intermediate shaft assembly will move horizontally a bit. Is this correct or is something not aligned or tightened properly?
Last edited by jethro00; 08-19-21 at 08:38 PM.
08-20-21, 07:24 AM
#66
Full Member
Thread Starter
Join Date: Jun 2016
Posts: 266
Mentioned: 1 Post(s)
Tagged: 0 Thread(s)
Quoted: 80 Post(s)
Likes: 0
Liked 39 Times
in
32 Posts
I'll measure. I am wondering if I installed the lockring backwards. The lockring that goes on the right side of the BB has a tapered side. I put the tapered side toward the BB. I am now wondering iff the tapered side is supposed to be on the outside toward the 3 rings.
Edit: On further review, looking at the intermediate shaft diagram on the daVinci web site, it looks like I installed the lockring in the correct orientation
Edit: On further review, looking at the intermediate shaft diagram on the daVinci web site, it looks like I installed the lockring in the correct orientation
Last edited by jethro00; 08-20-21 at 08:32 AM.
08-20-21, 11:25 AM
#67
Full Member
Thread Starter
Join Date: Jun 2016
Posts: 266
Mentioned: 1 Post(s)
Tagged: 0 Thread(s)
Quoted: 80 Post(s)
Likes: 0
Liked 39 Times
in
32 Posts
There is about 1/8" play from side to side. I can't recall whether there was any gap when I removed the assembly. Is this normal or is something not assembled correctly?
08-20-21, 11:28 AM
#68
Junior Member
Join Date: Sep 2020
Posts: 75
Mentioned: 0 Post(s)
Tagged: 0 Thread(s)
Quoted: 18 Post(s)
Likes: 0
Liked 39 Times
in
24 Posts
simon
08-20-21, 11:35 AM
#69
Junior Member
Join Date: Sep 2020
Posts: 75
Mentioned: 0 Post(s)
Tagged: 0 Thread(s)
Quoted: 18 Post(s)
Likes: 0
Liked 39 Times
in
24 Posts

Be sure to reference the manuals on the DaVinci site.
https://www.davincitandems.com/owner...mediate-shaft/
https://www.davincitandems.com/owner...haft-bearings/
I do recall assembling once and having some slop. There was something wrong with my cartridge bearing and bearing spacer assembly. The bearing spacer should prevent the bearings from being pressed 'in' too far, otherwise the shaft can have slop. Then make sure that your lockring and bottom bracket body are assembled correctly.
08-20-21, 11:38 AM
#70
Junior Member
Join Date: Sep 2020
Posts: 75
Mentioned: 0 Post(s)
Tagged: 0 Thread(s)
Quoted: 18 Post(s)
Likes: 0
Liked 39 Times
in
24 Posts
In my setup the intermediate shaft lockring is silver and the 'chainring' lockring is black so you can see the gap between the two.
This is my setup. Not even sure I could have slop - spacing is very tight.
This is my setup. Not even sure I could have slop - spacing is very tight.
08-20-21, 01:00 PM
#71
Full Member
Thread Starter
Join Date: Jun 2016
Posts: 266
Mentioned: 1 Post(s)
Tagged: 0 Thread(s)
Quoted: 80 Post(s)
Likes: 0
Liked 39 Times
in
32 Posts
Tonight, I am going to compare the new freewheel assembly to the old one. I wonder if the new one is a tad less thick. That could cause a gap.
Edit: I checked and they are the same thickness. I wonder if I tightened the lockring too much and it compressed the assembly.
<<I do recall assembling once and having some slop. There was something wrong with my cartridge bearing and bearing spacer assembly. The bearing spacer should prevent the bearings from being pressed 'in' too far, otherwise the shaft can have slop. >>
I got 2 new bearings from Todd, but chickened out on removing the old ones for now. The directions for removing the bearings refer to bad things that can happen if that does not go well . So, the cartridge bearing and bearing spacer assembly have not been altered.
Edit: I checked and they are the same thickness. I wonder if I tightened the lockring too much and it compressed the assembly.
<<I do recall assembling once and having some slop. There was something wrong with my cartridge bearing and bearing spacer assembly. The bearing spacer should prevent the bearings from being pressed 'in' too far, otherwise the shaft can have slop. >>
I got 2 new bearings from Todd, but chickened out on removing the old ones for now. The directions for removing the bearings refer to bad things that can happen if that does not go well
. So, the cartridge bearing and bearing spacer assembly have not been altered.
Last edited by jethro00; 08-20-21 at 01:19 PM.
08-20-21, 05:45 PM
#72
Senior Member
Join Date: May 2005
Location: SFBay
Posts: 2,334
Bikes: n, I would like n+1
Mentioned: 0 Post(s)
Tagged: 0 Thread(s)
Quoted: 127 Post(s)
Likes: 0
Liked 133 Times
in
108 Posts
Pictures in a bit, but I�ll bet your DFB just isn�t fully threaded in. Assuming the bearings are still flush with the outside of the shell (highly likely since you didn�t take them out and there�s a spacer between them), you just need to tighten it down.
Shift into the largest front sprocket, smallest rear sprocket, hold the rear brake, and stand on the captain�s pedal for a moment. The torque from the chain on the freewheel will thread it on the rest of the way.
Shift into the largest front sprocket, smallest rear sprocket, hold the rear brake, and stand on the captain�s pedal for a moment. The torque from the chain on the freewheel will thread it on the rest of the way.
08-20-21, 06:30 PM
#73
Senior Member
Join Date: May 2005
Location: SFBay
Posts: 2,334
Bikes: n, I would like n+1
Mentioned: 0 Post(s)
Tagged: 0 Thread(s)
Quoted: 127 Post(s)
Likes: 0
Liked 133 Times
in
108 Posts
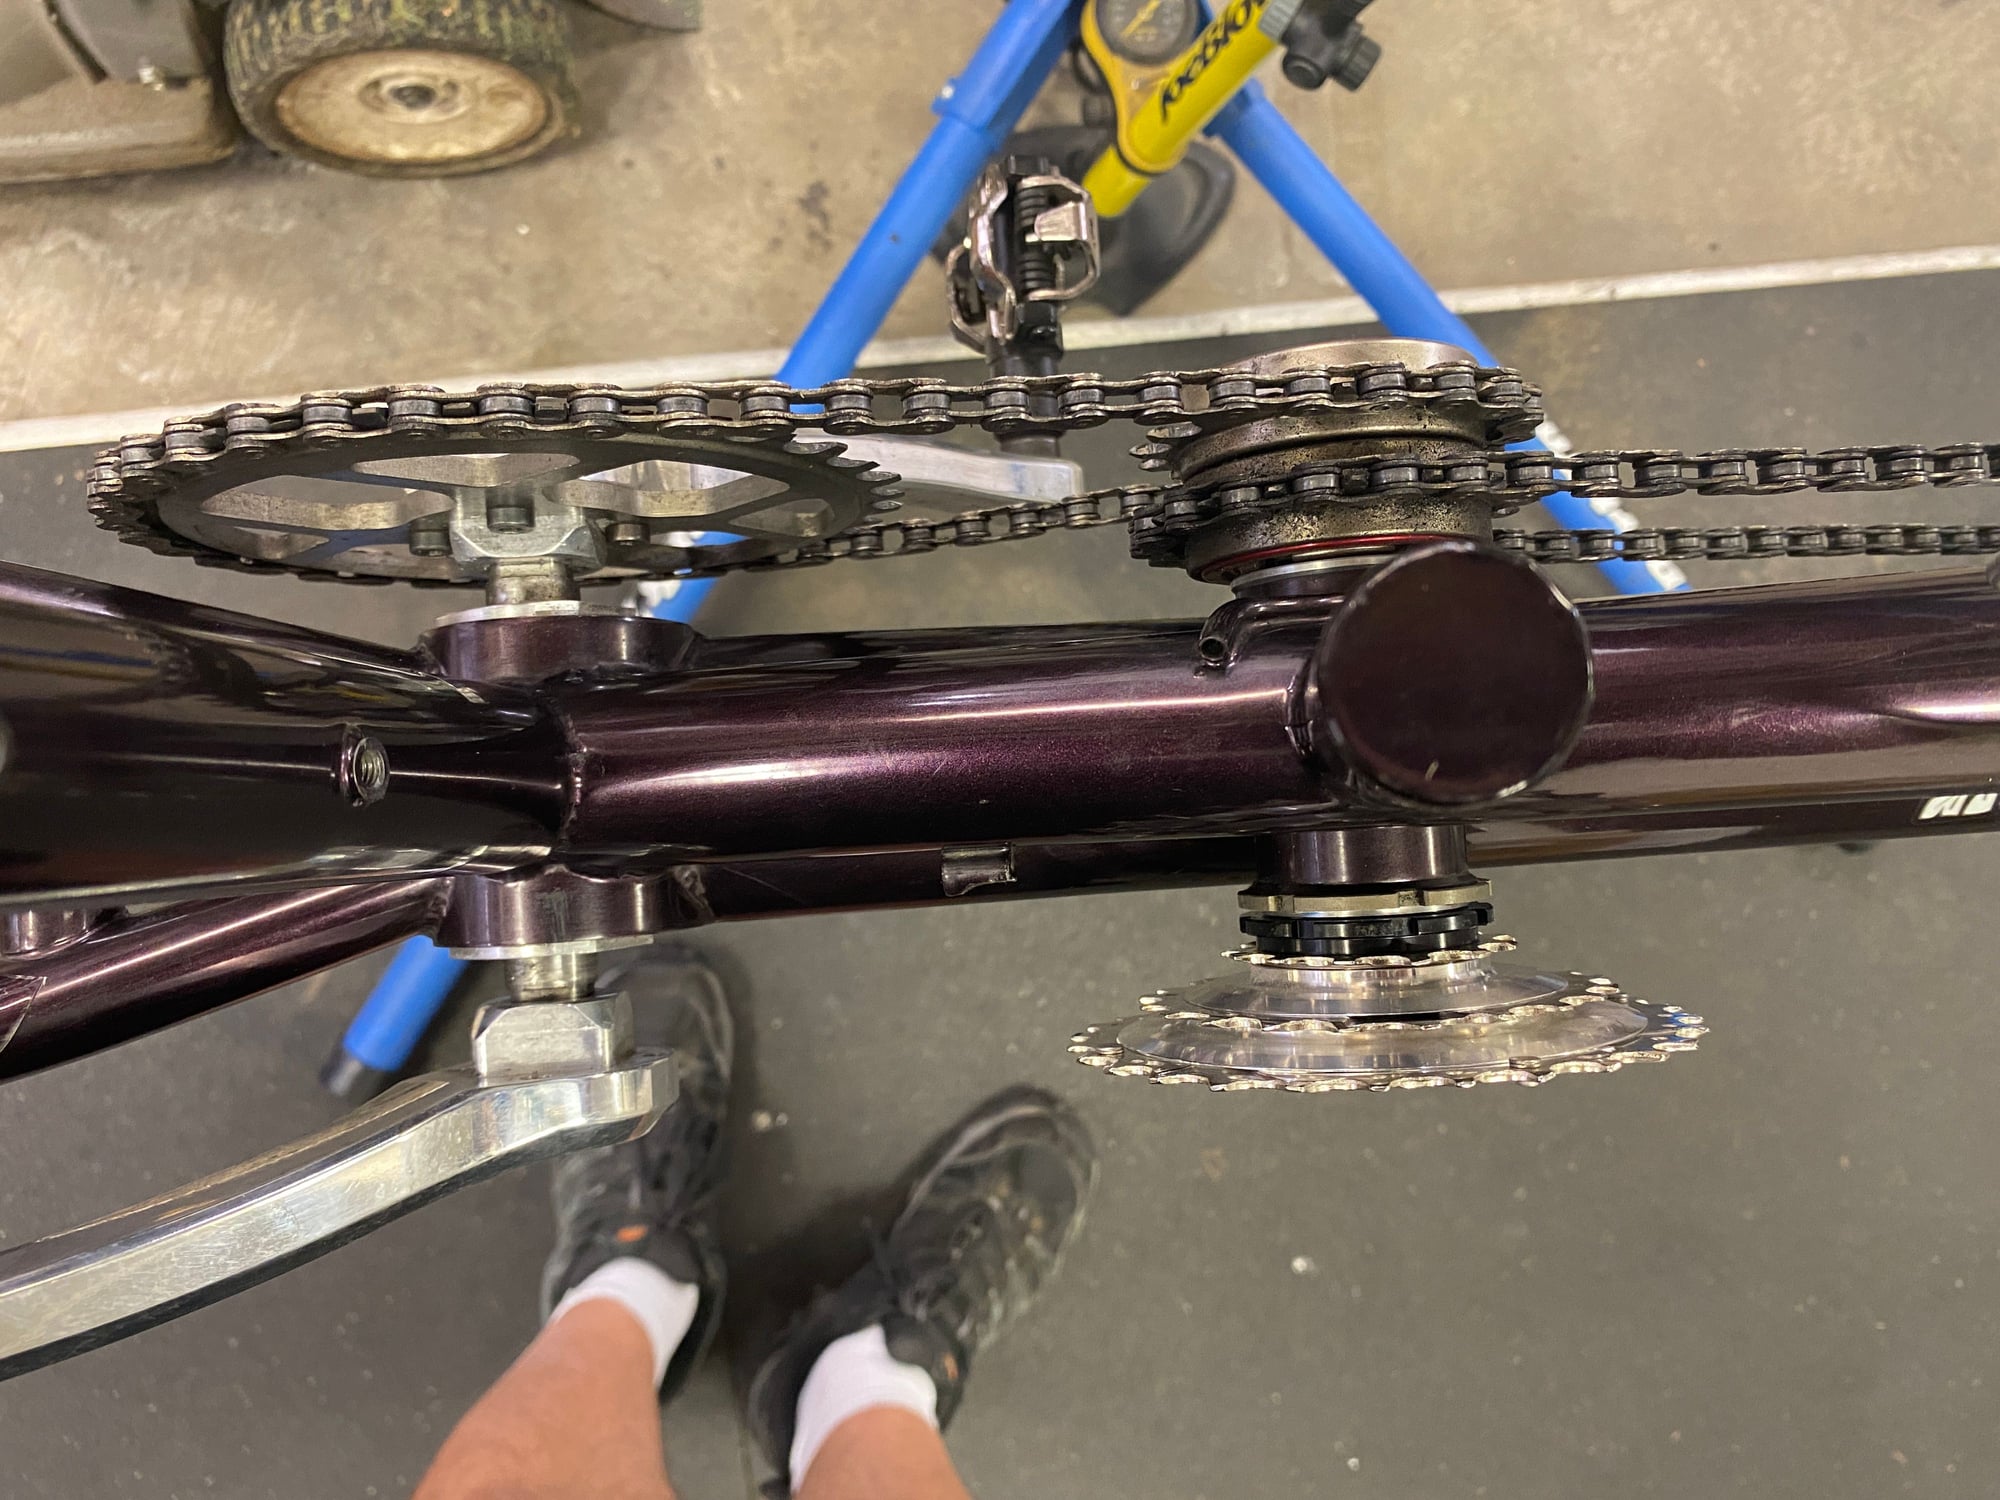
Ok, a few more pictures. You got me curious, so I quickly pulled min apart and reassembled it. If you want the part most relevant to you, skip to the text by the last picture.
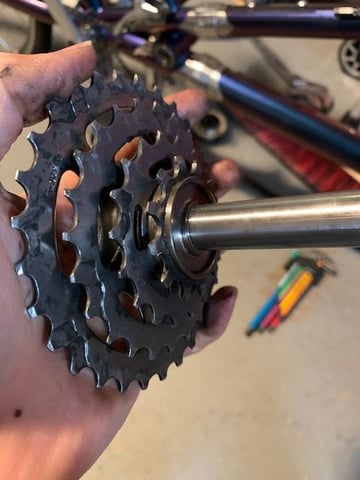
1. Mainly a note for my future self, here is the innermost sprocket orientation. While you wouldn't be able to shift to the smallest gear with this sprocket on backwards (and might have issues in #2), it still wouldn't prevent reassembly as the sprocket is ~0.15 mm shy of where the inside shoulder mates to the bearing inner race. This also tells you that it should be *very* close to the shell.
Here's the bearing it seats against. It is pretty much flush with the outside of the shell. I have not taken this portion apart since getting the bike.
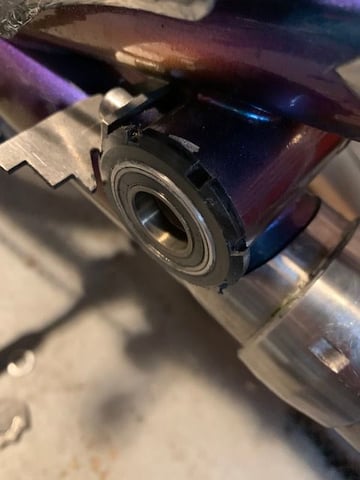
With the shaft installed, this is what it looks like sticking out the right side of the bike (bearing also near flush). I'm using this photo to point out that the threads (at least on my older bike) do extend past the bearing. This is ok because there's a relief for them in the DFB (next image).

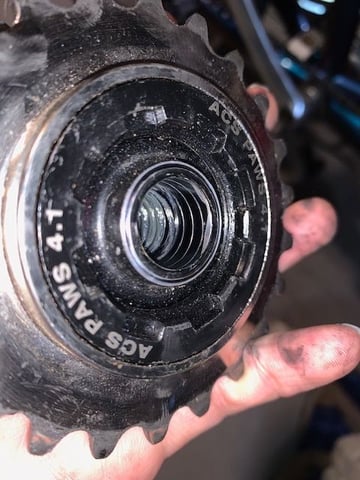
Here's the DFB. I'm using non-standard freewheels because 1. I want a much lower ratio than standard to get my wife and I up the hills around here. 2. They were available at my LBS. I mention this because these freewheels DO NOT FIT PROPERLY. They are just a bit too wide, so I ended up making a thin spacer to sit between them and the right side bearing inner race. Without doing that they would have rubbed the shell. These are just a bit wider than the ACS freeewheels that came off, which I think were Crossfire models, although don't quote me on that last part. That said, you can see the clearance diameter on the ID that the unthreaded portion goes in.
Finally the relevant part! I spun on the DFB on by hand until it stopped moving smoothly and as you can see there is still a gap. It's a bit of an odd thread profile to begin with, but for whatever reason it gets a bit stiff (at least ours) before being fully installed. As a result it gives that "getting stuck" sort of feeling at about this point. While I didn't look especially hard, it didn't have obvious contamination. It's possible with the sharp thread profile and being a used bike that there's a ding somewhere on the thread, but I didn't inspect it for that point. I'm not normally a fan of pushing harder when something doesn't go, but since it was stiff coming apart in that area, and freshly cleaned/regreased I went ahead and gave it a bit more shove. In my case this was done by holding the rear brake and standing on a pedal to tighten it down. It felt smooth as I did this, so I went with it (then pulled it apart and did it a couple more times to make sure the feel wasn't changing). Once I'd done that the gap closed right up.

1. Mainly a note for my future self, here is the innermost sprocket orientation. While you wouldn't be able to shift to the smallest gear with this sprocket on backwards (and might have issues in #2), it still wouldn't prevent reassembly as the sprocket is ~0.15 mm shy of where the inside shoulder mates to the bearing inner race. This also tells you that it should be *very* close to the shell.
Here's the bearing it seats against. It is pretty much flush with the outside of the shell. I have not taken this portion apart since getting the bike.
With the shaft installed, this is what it looks like sticking out the right side of the bike (bearing also near flush). I'm using this photo to point out that the threads (at least on my older bike) do extend past the bearing. This is ok because there's a relief for them in the DFB (next image).
Here's the DFB. I'm using non-standard freewheels because 1. I want a much lower ratio than standard to get my wife and I up the hills around here. 2. They were available at my LBS. I mention this because these freewheels DO NOT FIT PROPERLY. They are just a bit too wide, so I ended up making a thin spacer to sit between them and the right side bearing inner race. Without doing that they would have rubbed the shell. These are just a bit wider than the ACS freeewheels that came off, which I think were Crossfire models, although don't quote me on that last part. That said, you can see the clearance diameter on the ID that the unthreaded portion goes in.
Finally the relevant part! I spun on the DFB on by hand until it stopped moving smoothly and as you can see there is still a gap. It's a bit of an odd thread profile to begin with, but for whatever reason it gets a bit stiff (at least ours) before being fully installed. As a result it gives that "getting stuck" sort of feeling at about this point. While I didn't look especially hard, it didn't have obvious contamination. It's possible with the sharp thread profile and being a used bike that there's a ding somewhere on the thread, but I didn't inspect it for that point. I'm not normally a fan of pushing harder when something doesn't go, but since it was stiff coming apart in that area, and freshly cleaned/regreased I went ahead and gave it a bit more shove. In my case this was done by holding the rear brake and standing on a pedal to tighten it down. It felt smooth as I did this, so I went with it (then pulled it apart and did it a couple more times to make sure the feel wasn't changing). Once I'd done that the gap closed right up.
08-20-21, 06:47 PM
#74
Full Member
Thread Starter
Join Date: Jun 2016
Posts: 266
Mentioned: 1 Post(s)
Tagged: 0 Thread(s)
Quoted: 80 Post(s)
Likes: 0
Liked 39 Times
in
32 Posts
jccaclimber, thanks for all the info and pics.
<<Shift into the largest front sprocket, smallest rear sprocket, hold the rear brake, and stand on the captain’s pedal for a moment. The torque from the chain on the freewheel will thread it on the rest of the way.>>
I will do that tomorrow and report back. That's an easy fix if you're right.
<<You got me curious, so I quickly pulled min apart and reassembled it.>>
You did that "quickly"???
If you can do that quickly, you need to video that process and post it on Youtube and the daVinci web site.
08-20-21, 08:37 PM
#75
Senior Member
Join Date: May 2005
Location: SFBay
Posts: 2,334
Bikes: n, I would like n+1
Mentioned: 0 Post(s)
Tagged: 0 Thread(s)
Quoted: 127 Post(s)
Likes: 0
Liked 133 Times
in
108 Posts
jccaclimber, thanks for all the info and pics.
<<Shift into the largest front sprocket, smallest rear sprocket, hold the rear brake, and stand on the captain’s pedal for a moment. The torque from the chain on the freewheel will thread it on the rest of the way.>>
I will do that tomorrow and report back. That's an easy fix if you're right.
<<You got me curious, so I quickly pulled min apart and reassembled it.>>
You did that "quickly"???
If you can do that quickly, you need to video that process and post it on Youtube and the daVinci web site.
<<Shift into the largest front sprocket, smallest rear sprocket, hold the rear brake, and stand on the captain’s pedal for a moment. The torque from the chain on the freewheel will thread it on the rest of the way.>>
I will do that tomorrow and report back. That's an easy fix if you're right.
<<You got me curious, so I quickly pulled min apart and reassembled it.>>
You did that "quickly"???
If you can do that quickly, you need to video that process and post it on Youtube and the daVinci web site.