


di2 Hack
 01-01-22, 04:13 PM
#1
Junior Member
Thread Starter
Join Date: Jul 2020
Location: New Hampshire
Posts: 196
Bikes: 1984 homemade 531SL road bike; 1988 Ritchey TimberComp; 1997 Nashbar tandem; 1998 Kona Explosif; Specialized Epic, Scott CR1 Pro; Salsa Beargrease; Curtlo custom Tandem, Curtlo custom S3 steel gravel bike.
Mentioned: 1 Post(s)
Tagged: 0 Thread(s)
Quoted: 67 Post(s)
Liked 49 Times
in
37 Posts
di2 Hack
Is it possible to build a di2 system without junction B by just connecting all the wires together? I realize this is way more hassle than it is worth but want to do it for 2 reasons. One - fitting junction B into the downtime of a steel frame is challenging. Two - the fact that Shimano charges $27 for each eTube wire is ridiculous and I'd rather spend 5 hours figuring this out. My thinking is I can cut di2 wires in half and have 4 end connections to connect other wire to.
My understanding is that junction B simply connects 4 wires together. I guessed that inside the junction B the red wires all go together and the black wires all go together so that the one wire that goes to junction A is connected to all of the components.
I tried the following - I got 24 ga 2 conductor wire, stripped a bunch of that out to separate red and black wires. Then soldered a red 4-way and black 4-way junction, then joined red and black pairs to create a combined 4 way connection.
I tested this out and unfortunately it didn't work. Any ideas if this should work? Or what I might have done wrong in tying all of this together?
This is what I created. Red wires and black wires into separate 4 way connection, then paired off so that red and black remain separate.
 01-01-22, 04:54 PM
#2

I'm good to go!
Join Date: Jul 2017
Location: Mississippi
Posts: 14,947
Bikes: Tarmac Disc Comp Di2 - 2020
Mentioned: 51 Post(s)
Tagged: 0 Thread(s)
Quoted: 6174 Post(s)
Liked 4,794 Times
in
3,306 Posts
Since you've gone that far, just put the connectors on and see what happens. Or do you not have any Di2 stuff yet?
You are talking about the SM-JC41 SHIMANO - Junction B that I pictured below aren't you?

I don't know if there is anything to it other than it just allows for multiple wires to be joined at one place. It's just something to give you other wiring options.
You are talking about the SM-JC41 SHIMANO - Junction B that I pictured below aren't you?
I don't know if there is anything to it other than it just allows for multiple wires to be joined at one place. It's just something to give you other wiring options.
 01-01-22, 08:19 PM
#3
Senior Member
Join Date: Jul 2007
Location: South shore, L.I., NY
Posts: 6,857
Bikes: Flyxii FR322, Cannondale Topstone, Miyata City Liner, Specialized Chisel, Specialized Epic Evo
Mentioned: 18 Post(s)
Tagged: 0 Thread(s)
Quoted: 3221 Post(s)
Liked 2,043 Times
in
1,169 Posts
Lot of hassle.
You can put the B Junction in the bottom of the seat tube. Then you only need to route one cable from the bar area A Jubction to the B Junction, then out to battery, F detailer and R derailer.
You can put the B Junction in the bottom of the seat tube. Then you only need to route one cable from the bar area A Jubction to the B Junction, then out to battery, F detailer and R derailer.
01-01-22, 09:30 PM
#4
Senior Member
Join Date: Sep 2017
Posts: 7,840
Mentioned: 38 Post(s)
Tagged: 0 Thread(s)
Quoted: 6934 Post(s)
Liked 10,938 Times
in
4,673 Posts
I'm guessing that if you didn't need the junction box B, it would not be part of the system.
01-01-22, 10:06 PM
#5
Senior Member
Join Date: Jul 2007
Location: South shore, L.I., NY
Posts: 6,857
Bikes: Flyxii FR322, Cannondale Topstone, Miyata City Liner, Specialized Chisel, Specialized Epic Evo
Mentioned: 18 Post(s)
Tagged: 0 Thread(s)
Quoted: 3221 Post(s)
Liked 2,043 Times
in
1,169 Posts
The A Junction has 3 ports, usually for L & R shifters plus one to B Junction, which has 4 ports, A Junction, Battery, F Derailer and R Derailer. Splicing *might* replace a B Junction, hell you could splice to replace the A Junction as well, but when you are talking about $1000 in components, why try to save a few bucks on a junction box and introduce failure points in the splices. Really hard to trouble shoot, especially if you find yourself needing to unplug components to isolate an issue.
Likes For Steve B.:
01-02-22, 12:25 AM
#6

Senior Member

Join Date: Jul 2006
Location: San Jose (Willow Glen) Ca
Posts: 9,832
Bikes: Kirk Custom JK Special, '84 Team Miyata,(dura ace old school) 80?? SR Semi-Pro 600 Arabesque
Mentioned: 106 Post(s)
Tagged: 0 Thread(s)
Quoted: 2336 Post(s)
Liked 2,808 Times
in
1,534 Posts
The A Junction has 3 ports, usually for L & R shifters plus one to B Junction, which has 4 ports, A Junction, Battery, F Derailer and R Derailer. Splicing *might* replace a B Junction, hell you could splice to replace the A Junction as well, but when you are talking about $1000 in components, why try to save a few bucks on a junction box and introduce failure points in the splices. Really hard to trouble shoot, especially if you find yourself needing to unplug components to isolate an issue.
The key thing was OP tried this ...and it didn't work. that should be a big clue
__________________
Life is too short not to ride the best bike you have, as much as you can
(looking for Torpado Super light frame/fork or for Raleigh International frame fork 58cm)
Life is too short not to ride the best bike you have, as much as you can
(looking for Torpado Super light frame/fork or for Raleigh International frame fork 58cm)
01-02-22, 06:30 AM
#7
Senior Member
Get the SM-EW90-B, it�s a 5 port junction A box instead of a three port. That�ll save having to put everything together at the junction B. It will also mean longer cables overall as everything needs to be routed from the handle bars back.
01-02-22, 01:42 PM
#8
top
 01-02-22, 02:22 PM
#9
I'm good to go!
Join Date: Jul 2017
Location: Mississippi
Posts: 14,947
Bikes: Tarmac Disc Comp Di2 - 2020
Mentioned: 51 Post(s)
Tagged: 0 Thread(s)
Quoted: 6174 Post(s)
Liked 4,794 Times
in
3,306 Posts
Since they talk about wiring your bike up without a junction B box, I too think you can do this. If you can terminate the wires correctly with the proper connector.
The more practical approach is to include a Junction B and run one e-Tube wire from Junction A to Junction B, which then connects the front derailleur, rear derailleur and battery to the rest of the system. Like many other parts you can get an external or internal version, depending on what will fit your frame.
https://bettershifting.com/building-...s-do-you-need/
Do you have a source for the connectors? Or are you cannibalizing's Di2 cable?
Junction B
It is possible to build a Di2 system without a Junction B, but this involves running e-Tube wires from Junction A to both the battery and derailleurs, as well as the shifters. This means you’d need to have two or three long wires in your down tube (FD, RD and battery), or move the battery to your fork, stem or top tube.The more practical approach is to include a Junction B and run one e-Tube wire from Junction A to Junction B, which then connects the front derailleur, rear derailleur and battery to the rest of the system. Like many other parts you can get an external or internal version, depending on what will fit your frame.
Do you have a source for the connectors? Or are you cannibalizing's Di2 cable?
Likes For Iride01:
01-02-22, 08:45 PM
#10
Junior Member
Thread Starter
Join Date: Jul 2020
Location: New Hampshire
Posts: 196
Bikes: 1984 homemade 531SL road bike; 1988 Ritchey TimberComp; 1997 Nashbar tandem; 1998 Kona Explosif; Specialized Epic, Scott CR1 Pro; Salsa Beargrease; Curtlo custom Tandem, Curtlo custom S3 steel gravel bike.
Mentioned: 1 Post(s)
Tagged: 0 Thread(s)
Quoted: 67 Post(s)
Liked 49 Times
in
37 Posts
Thanks all for the input.
A bit more background - I recently built up a steel tandem with di2 and doing so pretty much required cutting and soldering di2 wire (the longest wire they make is not long enough to get to the rear BB on a tandem). Then I found out that there is a connector to make wires longer, but splicing and soldering to make the wires longer is so much more satisfying than paying Shimano $20 for a simple connector ;-). There was really no way to get the B junction into the downtube, so I ended up with it in the seat tube, but then that required even more long wires because then the B junction itself and the deraileur wires all need to be longer and doubled back on themselves be able to remove the seatpost.
Answers to some questions - I have all the components, junctions and wires for another di2 GRX setup. The plan is to cannibalize SD50 wires for the connectors. I have the EW-RS910 junction A which has 2, not 3 ports. I have a SM-JC41 junction B. The 5 port junction B doesn't solve the problems I want to solve.
I want to avoid the B junction in the seat tube in my gravel bike to avoid the long doubled up wires in a 27.2 seat tube. And I want to see if it is possible to bypass junction B altogether just to see if it possible not because it is a really good idea. It's not really about saving a few bucks - if I wanted to cut cost I would not have gone with di2!
I'll give it another try to see if I get it to work.
01-03-22, 02:09 AM
#11
Di2 fanatic

Join Date: Aug 2019
Location: The Netherlands
Posts: 149
Mentioned: 3 Post(s)
Tagged: 0 Thread(s)
Quoted: 53 Post(s)
Liked 65 Times
in
42 Posts
You can use as many B Junctions as you like.. 0, 1, 2, 3,.... 10... (up to a reasonable limit).
It is indeed just a basic splitter, just like the Y-splitter(JC130), and the inline junction (JC200).
Good luck with the project, sounds like fun!
It is indeed just a basic splitter, just like the Y-splitter(JC130), and the inline junction (JC200).
Good luck with the project, sounds like fun!
01-15-22, 10:55 PM
#12
Junior Member
Thread Starter
Join Date: Jul 2020
Location: New Hampshire
Posts: 196
Bikes: 1984 homemade 531SL road bike; 1988 Ritchey TimberComp; 1997 Nashbar tandem; 1998 Kona Explosif; Specialized Epic, Scott CR1 Pro; Salsa Beargrease; Curtlo custom Tandem, Curtlo custom S3 steel gravel bike.
Mentioned: 1 Post(s)
Tagged: 0 Thread(s)
Quoted: 67 Post(s)
Liked 49 Times
in
37 Posts
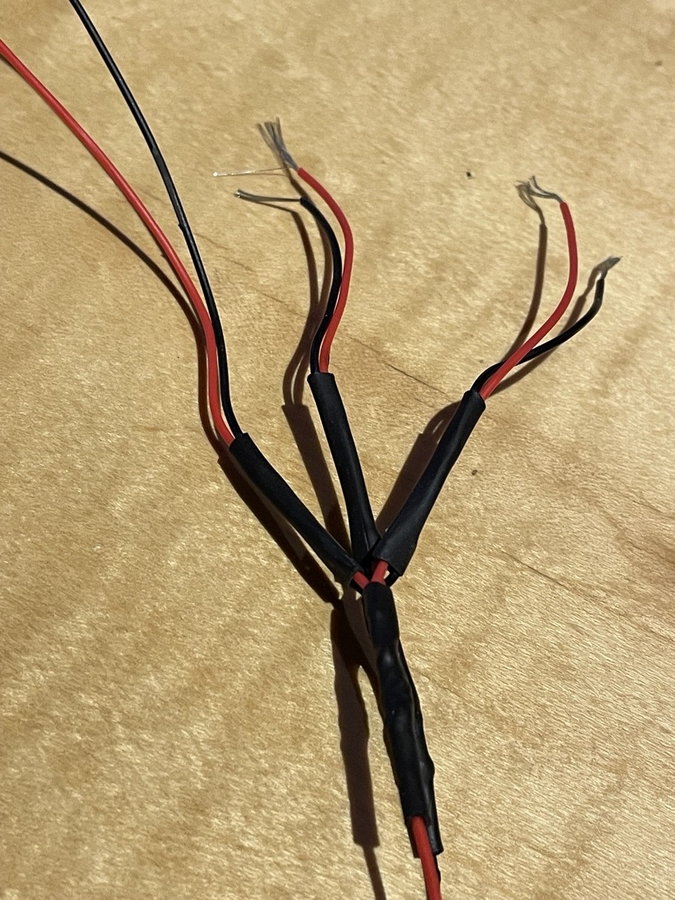
It works! Homemade B-junction made by soldering wires into a 4-way connection. Red wires are all connected to each other, black wires as well. di2 wires cut in half gives me 4 connectors, ultimately uses two less di2 wires and no B-junction.
It takes way too much time because the di2 wires are a bear to strip without destroying the tiny inner wires and there is no way around needing to separate them out.
It takes way too much time because the di2 wires are a bear to strip without destroying the tiny inner wires and there is no way around needing to separate them out.
01-16-22, 02:57 AM
#13
Likes to Ride Far
Thanks for sharing this. I've done quite a bit of hacking and re-soldering of Di2 wires, switches, etc., but hadn't thought about replacing the B junction in this way. I may use the idea on a future project. Thanks for trying, persevering and then proving that it works. Top work!
01-17-22, 10:43 AM
#14
Junior Member
Thread Starter
Join Date: Jul 2020
Location: New Hampshire
Posts: 196
Bikes: 1984 homemade 531SL road bike; 1988 Ritchey TimberComp; 1997 Nashbar tandem; 1998 Kona Explosif; Specialized Epic, Scott CR1 Pro; Salsa Beargrease; Curtlo custom Tandem, Curtlo custom S3 steel gravel bike.
Mentioned: 1 Post(s)
Tagged: 0 Thread(s)
Quoted: 67 Post(s)
Liked 49 Times
in
37 Posts
New improved version - I think this was easier and is a lot cleaner.
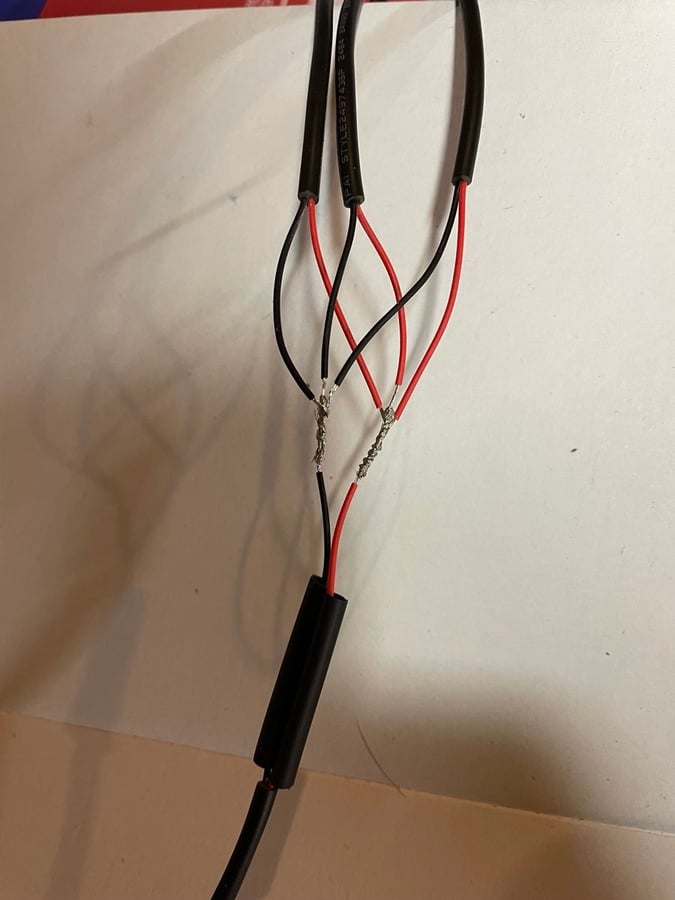
Four 2-conductor wires twisted together with heat shrink in place.
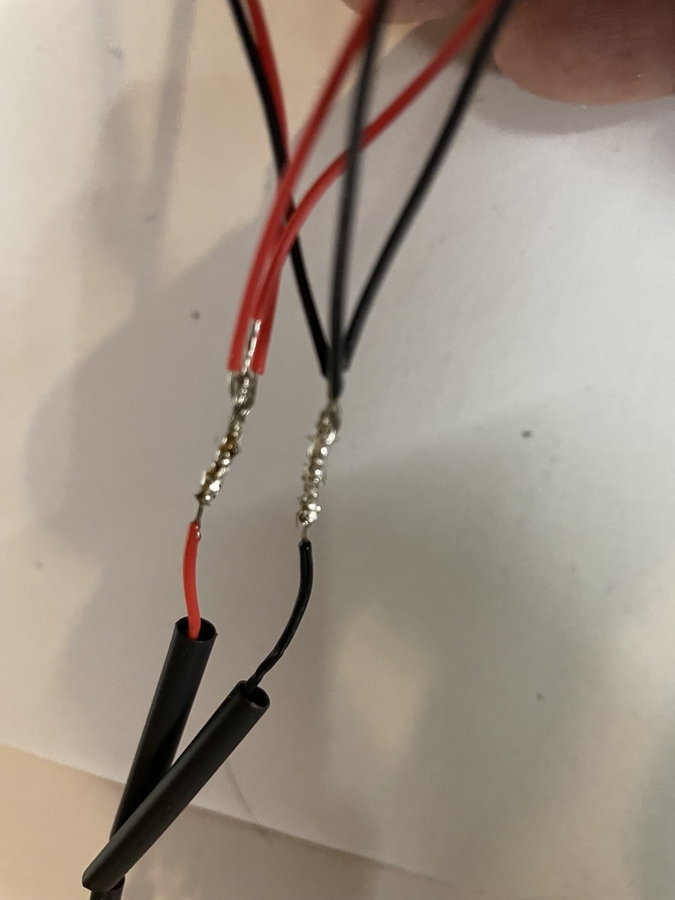
Soldered

Heat shrink over solder and covering the thin internal wire.
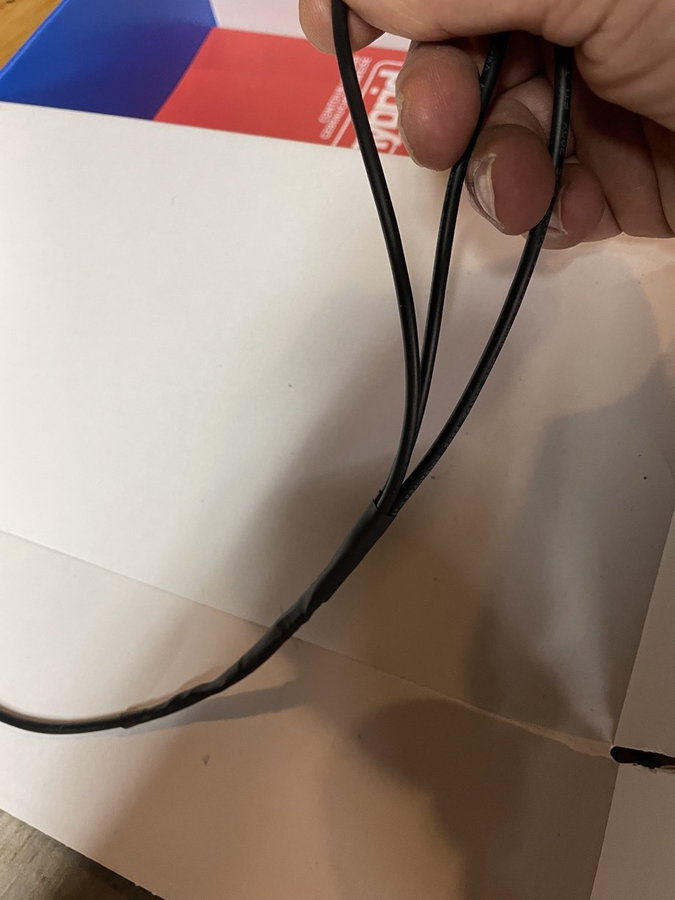
Final!
Four 2-conductor wires twisted together with heat shrink in place.
Soldered
Heat shrink over solder and covering the thin internal wire.
Final!
01-21-22, 02:01 PM
#15
Senior Member
Join Date: Apr 2015
Location: Georgia
Posts: 654
Mentioned: 0 Post(s)
Tagged: 0 Thread(s)
Quoted: 236 Post(s)
Liked 196 Times
in
130 Posts
Chilepines FYI for future projects:
I've long been a solder then shrink wrap kinda guy. Last year I learned that at some point in recent years some clever metallurgist figured out a solder that flows at heat-shrink tube temperatures.
I've had good success using these adhesive-lined (and thus waterproof) solder+shrink butt connectors in my boat and truck.
Really slick. Wish I'd known about them sooner.
https://www.crutchfield.com/S-vylEK7...auge-wire.html
Last edited by gpburdell; 01-21-22 at 02:19 PM.
Likes For gpburdell:
01-21-22, 09:04 PM
#16
Junior Member
Thread Starter
Join Date: Jul 2020
Location: New Hampshire
Posts: 196
Bikes: 1984 homemade 531SL road bike; 1988 Ritchey TimberComp; 1997 Nashbar tandem; 1998 Kona Explosif; Specialized Epic, Scott CR1 Pro; Salsa Beargrease; Curtlo custom Tandem, Curtlo custom S3 steel gravel bike.
Mentioned: 1 Post(s)
Tagged: 0 Thread(s)
Quoted: 67 Post(s)
Liked 49 Times
in
37 Posts
01-25-22, 11:16 AM
#17
Senior Member
Join Date: Apr 2015
Location: Georgia
Posts: 654
Mentioned: 0 Post(s)
Tagged: 0 Thread(s)
Quoted: 236 Post(s)
Liked 196 Times
in
130 Posts
I hadn't heard of the stuff before I was replacing the stereo in my boat a couple years ago and stumbled on it in the Crutchfield catalog.


