


Trek Ishiwata fork failure
 08-05-21, 11:14 AM
#51

Senior Member
Join Date: Jun 2006
Posts: 20,305
Mentioned: 130 Post(s)
Tagged: 0 Thread(s)
Quoted: 3464 Post(s)
Liked 2,828 Times
in
1,995 Posts
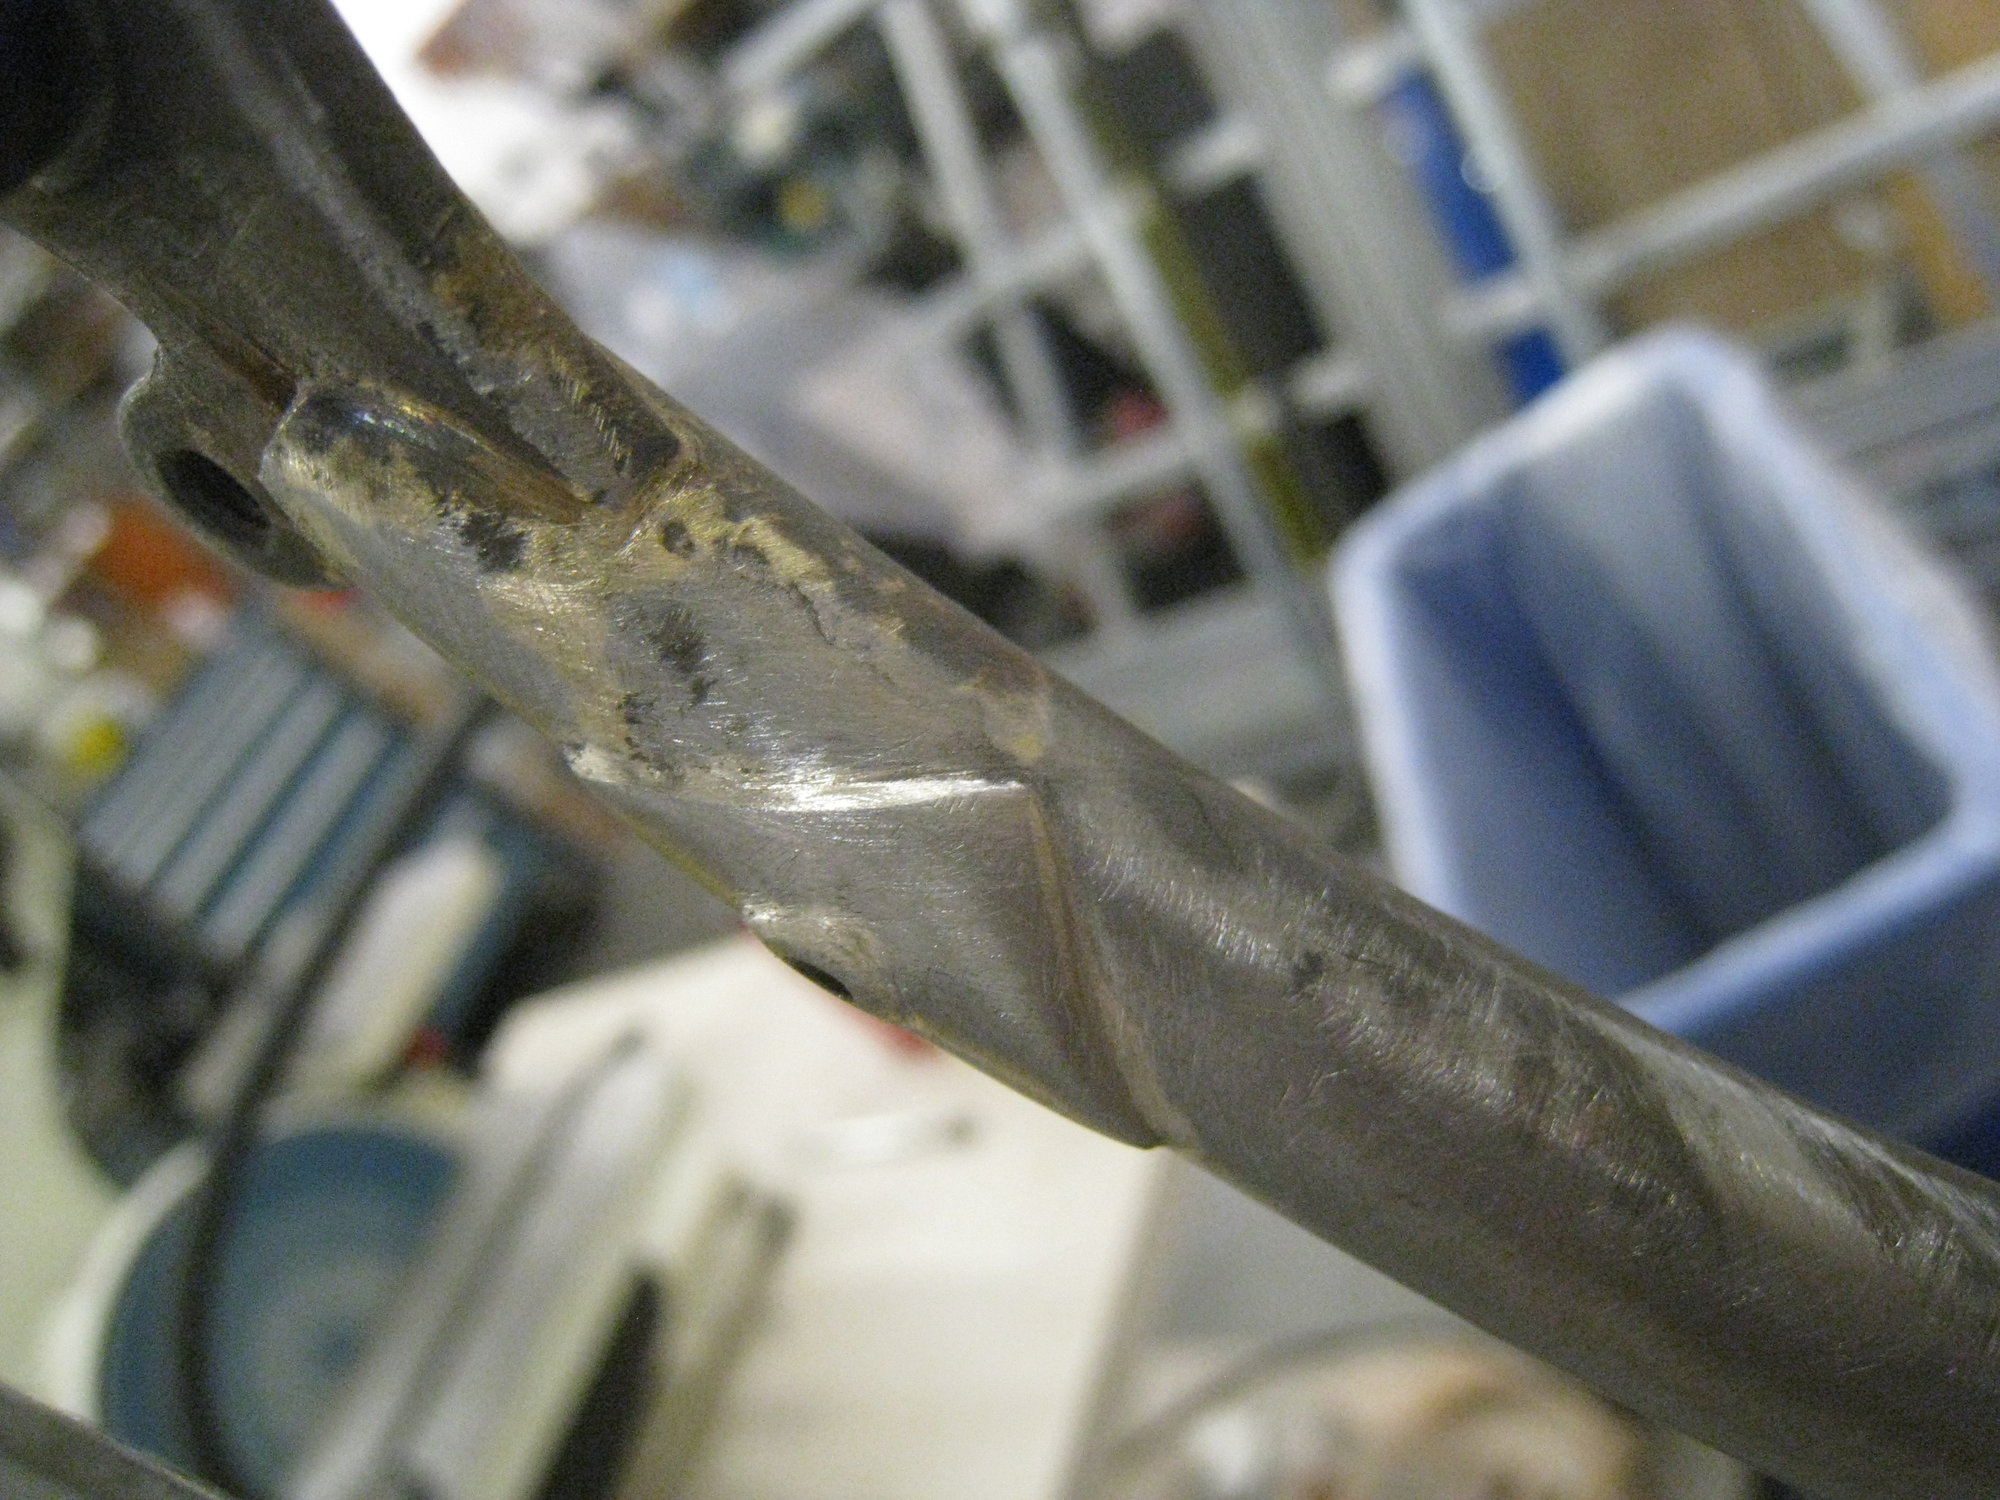
I had that happen with a Raleigh SuperCourse MkII. It had a stuck stem, so I clamped the stem into my vise, installed the front wheel, and figured I'd use the leverage of the wheel to try and rotate the fork. Right side dropout popped right off the blade. Didn't look like it had much brazing material on it at all:
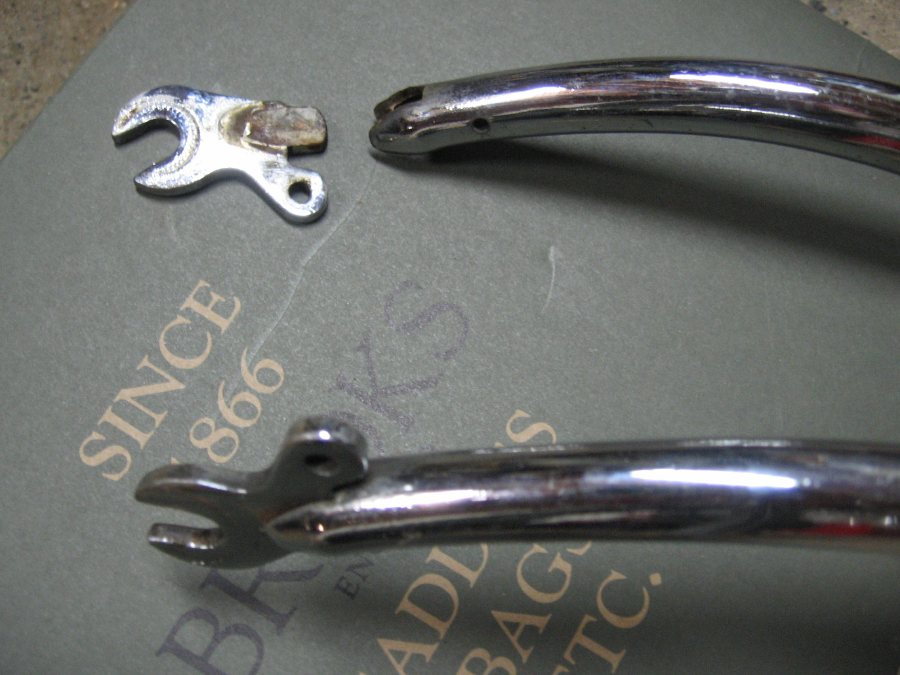
Remarkable that it held for about 40 years.
Remarkable that it held for about 40 years.

Likes For repechage:
08-05-21, 03:51 PM
#52

framebuilder
It is inevitable that if you are making a jig to braze a new fork, You'll eventually make yourself a new fork. I'm here to provide unsolicited and perhaps even unwanted advice. Kirk Pacenti did some twin plate drawings for me that I had laser cut and machined into real crowns in Ukraine. I'll attach a picture so you can see them. We also had our laser cutting company make some twin plate crowns for sturdy round fork blades. These are used on the solid transportation fillet brazed bicycles we provide to pastors in Ukraine. I was able to buy the blades cheap when True Temper had a sale. One of our goals was to have as much of the frame parts made in Ukraine as possible. I like their look. We also had little stainless steel crosses laser cut that we brazed onto the top of the crown. The idea was that a thief might think twice before he steels it. And it would be easier to identify if someone did.
However as someone who has trained hundreds of people how to braze, I wouldn't recommend using a twin plate fork crown. They are really challenging to braze properly. It will take practice for even an experienced builder to do it right. Another unexpected discovery was that brazing the twin plates so they weren't twisted a bit on each other proved difficult to do. I eventually made a tool to help keep the plates perfectly together while they are spotted up ready to braze. That tool turned out to be more complicated then I thought it needed to be in the beginning. It is in the back of my attached picture. I designed this with the help of one of my younger students that was recovering from cancer. Unfortunately and sadly he lost that battle. I remember him every time now I braze one of the forks.
Laying on one of my work benches is various forks and parts. I wouldn't recommend the Pacenti fork crowns either unless you are an experienced brazer. Even my good students need my help getting those crowns brazed successfully. It is the most difficult braze on the entire frame. The complete fork in the picture is one I made for my nephew. The unfinished fork in the alignment jig has a Rene Herse fork crown and Kaisai fork blades that are Reynolds shaped. They'll get SON dropouts so a generator hub can be used. Both of those forks have some kind of plug in the bottom of the crown for a threaded boss used to attach a fender.
I'll attach a 2nd picture of the round twin plate fork crowns we use in Ukraine. One nice thing about flat plate fork crowns is that some kind of decoration can be brazed on top.
The fork crown that is by far the easiest to braze is the one I posted a picture earlier on this subject thread in post #27. Students don't have any trouble brazing those. Highly recommended.
08-07-21, 01:07 PM
#53
Senior Member

I had that happen with a Raleigh SuperCourse MkII. It had a stuck stem, so I clamped the stem into my vise, installed the front wheel, and figured I'd use the leverage of the wheel to try and rotate the fork. Right side dropout popped right off the blade. Didn't look like it had much brazing material on it at all:
Remarkable that it held for about 40 years.
Remarkable that it held for about 40 years.
08-07-21, 09:05 PM
#54
Senior Member
Thread Starter

Join Date: Jun 2010
Location: Medford MA
Posts: 2,089
Bikes: Ron Cooper touring, 1959 Jack Taylor 650b ladyback touring tandem, Vitus 979, Joe Bell painted Claud Butler Dalesman, Colin Laing curved tube tandem, heavily-Dilberted 1982 Trek 6xx, Ren� Herse tandem
Mentioned: 80 Post(s)
Tagged: 0 Thread(s)
Quoted: 964 Post(s)
Liked 1,451 Times
in
723 Posts
It is inevitable that if you are making a jig to braze a new fork, You'll eventually make yourself a new fork. I'm here to provide unsolicited and perhaps even unwanted advice. Kirk Pacenti did some twin plate drawings for me that I had laser cut and machined into real crowns in Ukraine. I'll attach a picture so you can see them. We also had our laser cutting company make some twin plate crowns for sturdy round fork blades. These are used on the solid transportation fillet brazed bicycles we provide to pastors in Ukraine. I was able to buy the blades cheap when True Temper had a sale. One of our goals was to have as much of the frame parts made in Ukraine as possible. I like their look. We also had little stainless steel crosses laser cut that we brazed onto the top of the crown. The idea was that a thief might think twice before he steels it. And it would be easier to identify if someone did.
However as someone who has trained hundreds of people how to braze, I wouldn't recommend using a twin plate fork crown. They are really challenging to braze properly. It will take practice for even an experienced builder to do it right. Another unexpected discovery was that brazing the twin plates so they weren't twisted a bit on each other proved difficult to do. I eventually made a tool to help keep the plates perfectly together while they are spotted up ready to braze. That tool turned out to be more complicated then I thought it needed to be in the beginning. It is in the back of my attached picture. I designed this with the help of one of my younger students that was recovering from cancer. Unfortunately and sadly he lost that battle. I remember him every time now I braze one of the forks.
Laying on one of my work benches is various forks and parts. I wouldn't recommend the Pacenti fork crowns either unless you are an experienced brazer. Even my good students need my help getting those crowns brazed successfully. It is the most difficult braze on the entire frame. The complete fork in the picture is one I made for my nephew. The unfinished fork in the alignment jig has a Rene Herse fork crown and Kaisai fork blades that are Reynolds shaped. They'll get SON dropouts so a generator hub can be used. Both of those forks have some kind of plug in the bottom of the crown for a threaded boss used to attach a fender.
I'll attach a 2nd picture of the round twin plate fork crowns we use in Ukraine. One nice thing about flat plate fork crowns is that some kind of decoration can be brazed on top.
The fork crown that is by far the easiest to braze is the one I posted a picture earlier on this subject thread in post #27. Students don't have any trouble brazing those. Highly recommended.
I've just about placed the order from Framebuilders Supply, for the pre-bent blades and sloping crown you suggest. Just musing about other options, maybe for next time. I'm a good machinist, but I have much less torch time than I do machine time under my belt.
You mention silver a couple times in one of your replies. Do you always do/teach fork building with silver? If so, why not bronze (some call it brass)? I hate silver mainly because the flux I have (Harris Stay-Silv white flux) is easily "cooked" and cannot be reheated if I screw something up. The bronze brazing flux I have is much better in this regard.
__________________
Owner & co-founder, Cycles Ren� Hubris. Unfortunately attaching questionable braze-ons to perfectly good frames since about 2015. With style.
Owner & co-founder, Cycles Ren� Hubris. Unfortunately attaching questionable braze-ons to perfectly good frames since about 2015. With style.
08-08-21, 08:11 AM
#55
framebuilder
Thanks for the post with informative pictures! I always welcome your advice, and I intend to follow it.
I've just about placed the order from Framebuilders Supply, for the pre-bent blades and sloping crown you suggest. Just musing about other options, maybe for next time. I'm a good machinist, but I have much less torch time than I do machine time under my belt.
You mention silver a couple times in one of your replies. Do you always do/teach fork building with silver? If so, why not bronze (some call it brass)? I hate silver mainly because the flux I have (Harris Stay-Silv white flux) is easily "cooked" and cannot be reheated if I screw something up. The bronze brazing flux I have is much better in this regard.
The brass you want to use is Gasflux C-04 in 1/16" rod. It is superior to LWS brass. Also Gasflux makes a great flux for their bronze called Type B. Get that if you don't have it. By the way, Silver flux is much easier to remove than brass flux. I keep a tea pot water heater in my shop because boiling water takes off silver flux in seconds. Hot water out of the faucet works fine too. I think Framebuilders Supply carries Gasflux supplies. It is what everyone uses because it is superior. Well except for the Cycle Design stuff which is also great.
08-08-21, 09:45 AM
#56
Senior Member
Thread Starter
Join Date: Jun 2010
Location: Medford MA
Posts: 2,089
Bikes: Ron Cooper touring, 1959 Jack Taylor 650b ladyback touring tandem, Vitus 979, Joe Bell painted Claud Butler Dalesman, Colin Laing curved tube tandem, heavily-Dilberted 1982 Trek 6xx, Ren� Herse tandem
Mentioned: 80 Post(s)
Tagged: 0 Thread(s)
Quoted: 964 Post(s)
Liked 1,451 Times
in
723 Posts
Silver is easier for beginners to get right when they are inexperienced with a torch. The class is also taught how to use brass (I know it is really bronze but frame builders say brass anyway). The issue you are having with silver flux is because there are better fluxes for silver brazing. My preferences are Gasflux type G and Cycle Design stainless light. Both of these fluxes are still good up to 1700�. Most white fluxes go bad around 1600�. Also the Harris is too watery in my opinion. Similar Gasflux type U seems to have more flux in a pound and less water.
The other thing you should do is place more flux further up the joint that can be called on when the flux on the joint runs out. Before the joint starts to turn black, I melt the flux further away with my flame pointed towards the joint to run it into the joint. These reserves can save the braze. Well actually I don't need to do that but I always have my students put on that extra flux because they take a lot longer and aren't as good at keeping the joint within the proper temperature window.
The brass you want to use is Gasflux C-04 in 1/16" rod. It is superior to LWS brass. Also Gasflux makes a great flux for their bronze called Type B. Get that if you don't have it. By the way, Silver flux is much easier to remove than brass flux. I keep a tea pot water heater in my shop because boiling water takes off silver flux in seconds. Hot water out of the faucet works fine too. I think Framebuilders Supply carries Gasflux supplies. It is what everyone uses because it is superior. Well except for the Cycle Design stuff which is also great.
__________________
Owner & co-founder, Cycles Ren� Hubris. Unfortunately attaching questionable braze-ons to perfectly good frames since about 2015. With style.
Owner & co-founder, Cycles Ren� Hubris. Unfortunately attaching questionable braze-ons to perfectly good frames since about 2015. With style.
08-29-21, 07:31 PM
#57
Senior Member
Thread Starter
Join Date: Jun 2010
Location: Medford MA
Posts: 2,089
Bikes: Ron Cooper touring, 1959 Jack Taylor 650b ladyback touring tandem, Vitus 979, Joe Bell painted Claud Butler Dalesman, Colin Laing curved tube tandem, heavily-Dilberted 1982 Trek 6xx, Ren� Herse tandem
Mentioned: 80 Post(s)
Tagged: 0 Thread(s)
Quoted: 964 Post(s)
Liked 1,451 Times
in
723 Posts
Well, I bought some fork parts and here I go!
I bought the Nova steerer that @gugie recommended, the pre-raked forkblades and sloping crown that Doug Fattic recommended, and reused the old Suntour dropouts from the original fork, because I liked the way they looked. I am happy with the blades. They are certainly thinner-walled than the old Ishiwata ones the Trek came with!
Now, as @gugie advised, first I brazed the crown to the steerer.

Then I put the steerer in the lathe and cleaned up the crown race on the lathe and turned it to 26.4, because I don't think the lathe would fit the fork after the blades are on. I also turned down the proud bit of the steerer on the underside of the crown. It is nice to use the lathe for this job!
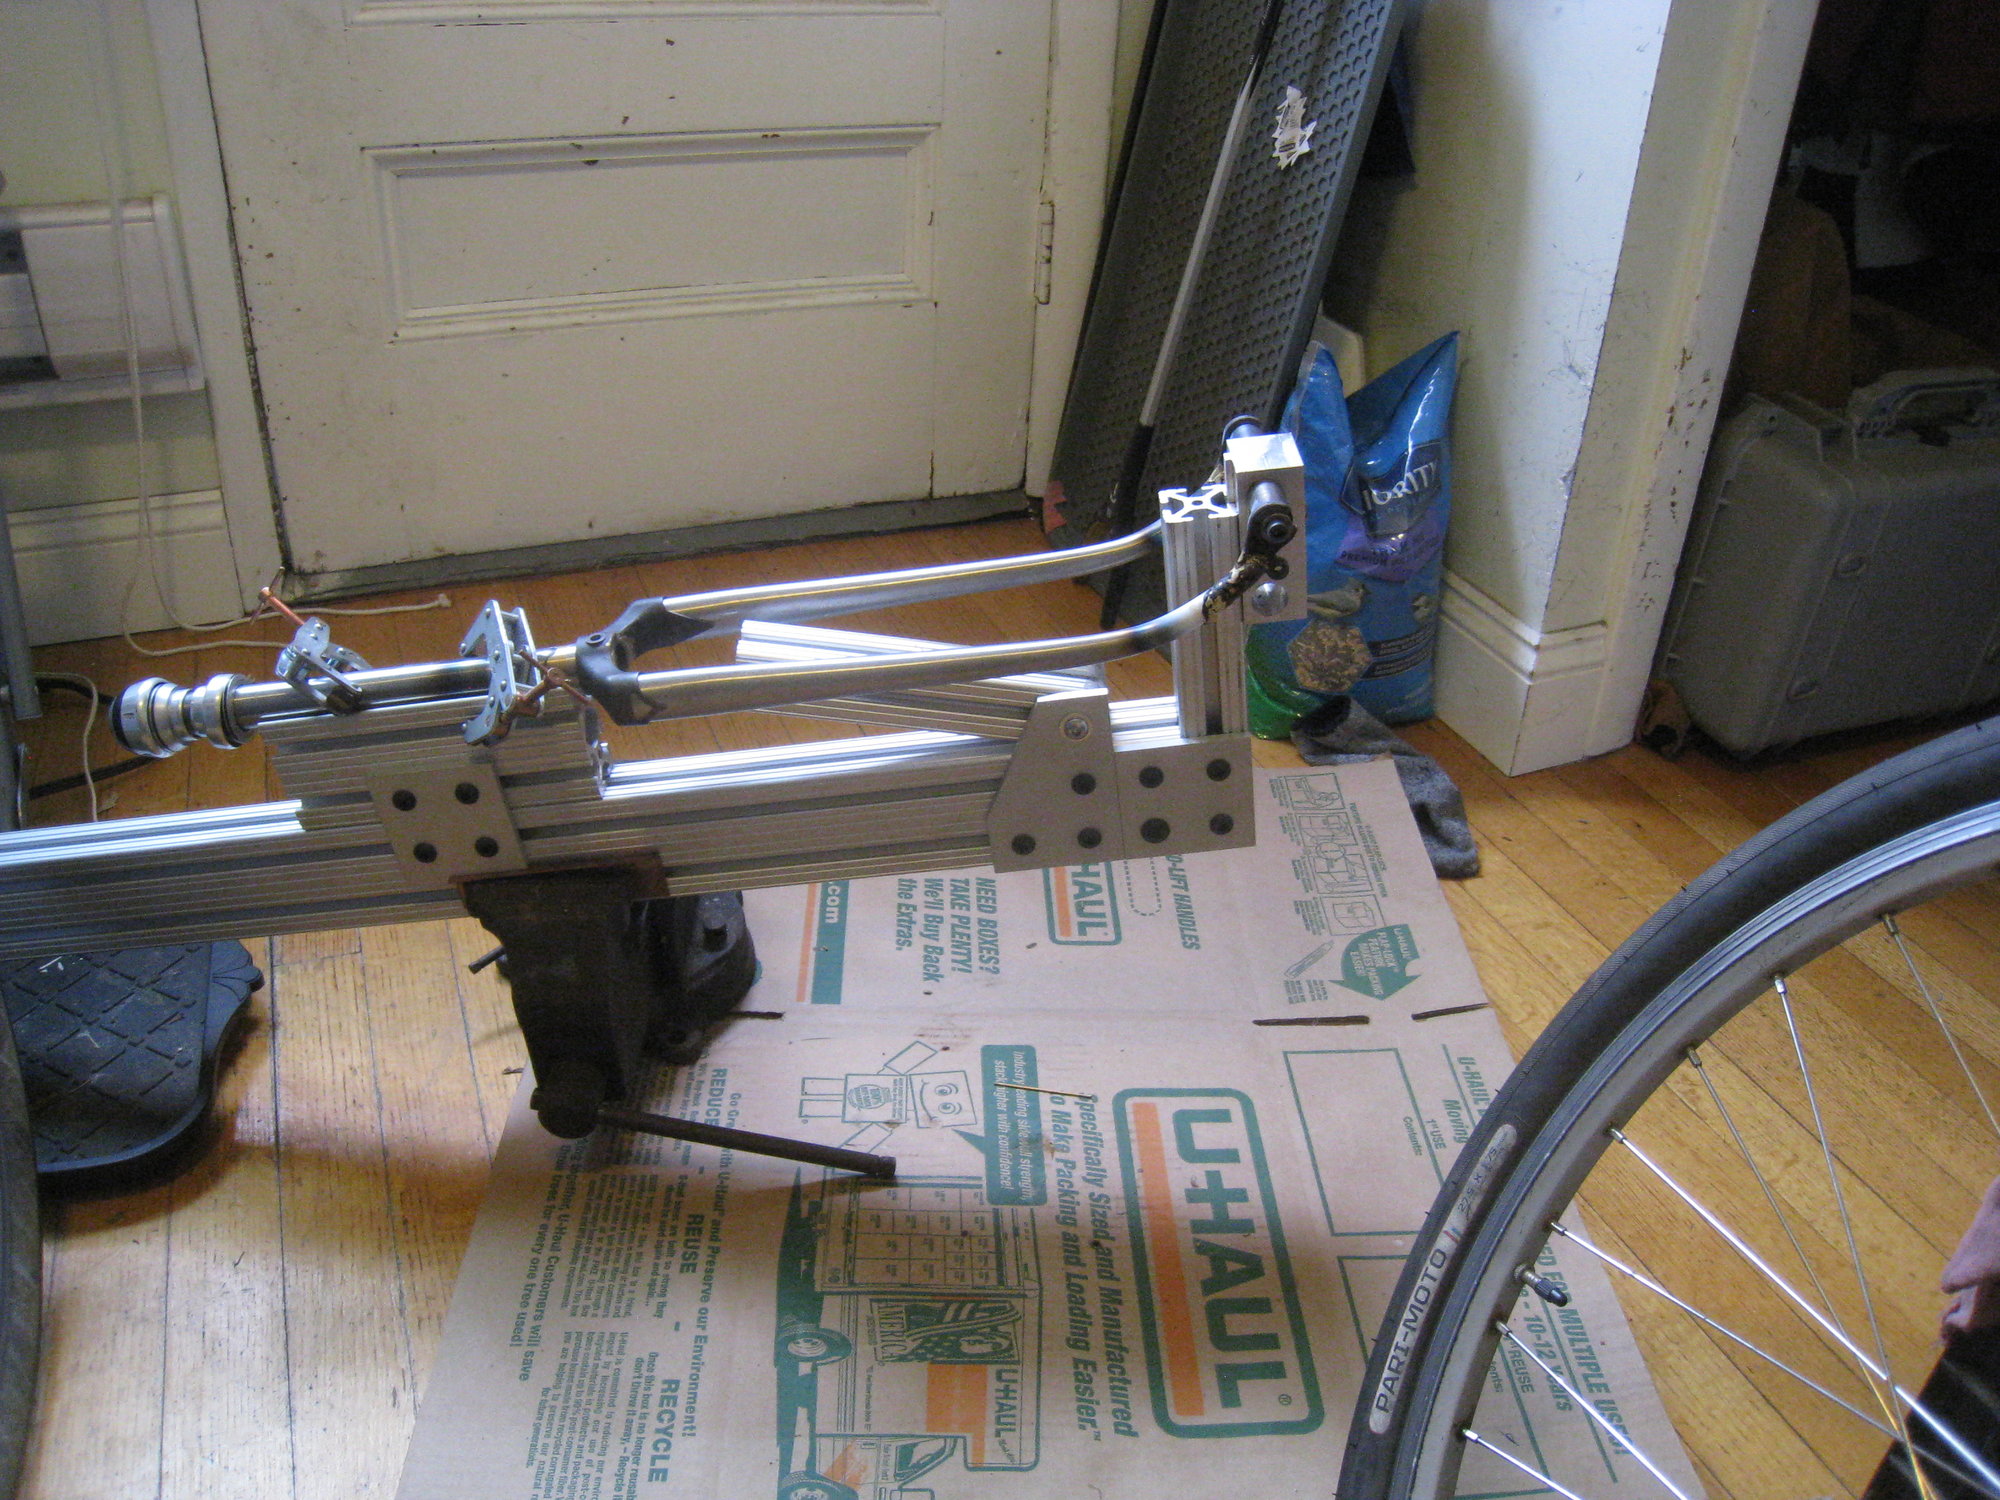
The jig is a bit of a variation on Alex Wetmore's jig. It cost me about $50 including shipping, built mostly with scavenged leftover 8020 from the science labs.
Not bad for a first timer brazing in a dropout, eh?
Second timer at this point!
Next up, I am going to put in an internal conduit for a dynamo wire! I have to decide whether to make it go into the crown, or just into the fender lip, and where to make it come out.
I bought the Nova steerer that @gugie recommended, the pre-raked forkblades and sloping crown that Doug Fattic recommended, and reused the old Suntour dropouts from the original fork, because I liked the way they looked. I am happy with the blades. They are certainly thinner-walled than the old Ishiwata ones the Trek came with!
Now, as @gugie advised, first I brazed the crown to the steerer.
Then I put the steerer in the lathe and cleaned up the crown race on the lathe and turned it to 26.4, because I don't think the lathe would fit the fork after the blades are on. I also turned down the proud bit of the steerer on the underside of the crown. It is nice to use the lathe for this job!
The jig is a bit of a variation on Alex Wetmore's jig. It cost me about $50 including shipping, built mostly with scavenged leftover 8020 from the science labs.
Not bad for a first timer brazing in a dropout, eh?
Second timer at this point!
Next up, I am going to put in an internal conduit for a dynamo wire! I have to decide whether to make it go into the crown, or just into the fender lip, and where to make it come out.
__________________
Owner & co-founder, Cycles Ren� Hubris. Unfortunately attaching questionable braze-ons to perfectly good frames since about 2015. With style.
Owner & co-founder, Cycles Ren� Hubris. Unfortunately attaching questionable braze-ons to perfectly good frames since about 2015. With style.
08-29-21, 08:08 PM
#58
Happy banana slug

Join Date: Sep 2015
Location: Arcata, California, U.S., North America, Earth, Saggitarius Arm, Milky Way
Posts: 3,695
Bikes: 1984 Araya MB 261, 1992 Specialized Rockhopper Sport, 1993 Hard Rock Ultra, 1994 Trek Multitrack 750, 1995 Trek Singletrack 930
Mentioned: 31 Post(s)
Tagged: 0 Thread(s)
Quoted: 1533 Post(s)
Liked 1,528 Times
in
916 Posts
 08-29-21, 08:39 PM
#59
framebuilder
Good to see progress! You can count on me to give unsolicited advice. Perhaps you can continue to work on your heat control? Maybe you can flick the flame off and then back on (sometimes frequently) so the top end of the temperature window is not breached I don't know how your metal got black but a characteristic of my students is that, as they are applying the brazing material, it is difficult for them to keep moving the flame with their other hand. They can move one hand or the other but have trouble doing both in a coordinated way at the same time. Another tip to control heat when applying brass to dropouts is instead of flicking the flame on and off (always a good technique) is to pull the flame back to lessen its intensity. Of course this widens the heat zone so you have to be careful not to let the heat go too low so you aren't putting in a ton of brass. It is typically problematic for students to move the filler rod hand forward as it melts and simultaneously bring the flame hand back. If your heat control was okay you should have applied a lot more flux.
Likes For Doug Fattic:
08-29-21, 09:57 PM
#60
Senior Member
Thread Starter
Join Date: Jun 2010
Location: Medford MA
Posts: 2,089
Bikes: Ron Cooper touring, 1959 Jack Taylor 650b ladyback touring tandem, Vitus 979, Joe Bell painted Claud Butler Dalesman, Colin Laing curved tube tandem, heavily-Dilberted 1982 Trek 6xx, Ren� Herse tandem
Mentioned: 80 Post(s)
Tagged: 0 Thread(s)
Quoted: 964 Post(s)
Liked 1,451 Times
in
723 Posts
Good to see progress! You can count on me to give unsolicited advice. Perhaps you can continue to work on your heat control? Maybe you can flick the flame off and then back on (sometimes frequently) so the top end of the temperature window is not breached I don't know how your metal got black but a characteristic of my students is that, as they are applying the brazing material, it is difficult for them to keep moving the flame with their other hand. They can move one hand or the other but have trouble doing both in a coordinated way at the same time. Another tip to control heat when applying brass to dropouts is instead of flicking the flame on and off (always a good technique) is to pull the flame back to lessen its intensity. Of course this widens the heat zone so you have to be careful not to let the heat go too low so you aren't putting in a ton of brass. It is typically problematic for students to move the filler rod hand forward as it melts and simultaneously bring the flame hand back. If your heat control was okay you should have applied a lot more flux.
The crown itself, I know I probably got it too hot and I also believe I didn't use enough flux.
Does too much heat also make pinholes in the bronze? I have noticed that if I heat the bronze too much, it develops more pinholes. Is this the zinc boiling away? Or something else?
Finally, a question. I want to run an internal conduit up the fork blade, like Jack Taylor did on his frames, for dynamo wiring. I have some 1/8" (3.2mm) OD stainless tubing I am planning on brazing in with silver. I did this operation on my commuting bike's frame, in the downtube, so I know the tubing works well. Never done it on a fork, though. Is it ok to drill a hole to have this exit the fork blade in the middle of the curved part, where a lot of flex would be happening? Or would this weaken it too much? I would drill this hole in the centerline of the blade, where theoretically the least deformation would be happening. But if you think it's unsafe, I won't do it. I don't want to get a crack. The dynamo I'm using has long connectors, meaning the hole for the wire to enter the blade farther away from the dropout, putting the ideal point right in the middle of the bend.
Thanks again for all your advice!
__________________
Owner & co-founder, Cycles Ren� Hubris. Unfortunately attaching questionable braze-ons to perfectly good frames since about 2015. With style.
Owner & co-founder, Cycles Ren� Hubris. Unfortunately attaching questionable braze-ons to perfectly good frames since about 2015. With style.
08-30-21, 07:50 AM
#61
framebuilder
Thanks for the tips! I think I didn't get the temperature very high way down there on the blade, where the black schmutz is, so maybe I didn't use enough flux. I may have cooked the tip of the blade. There were no sparks coming off anything, and no popping or crackling noises, which I know indicate way overtemp. The hottest part of the blade, judging by brightness of redness, was the very tip. As I said before, I typically don't use much flux, and I think you were telling me this before with regards to silver. I tried to use a little more this time, but it was probably not enough.
The crown itself, I know I probably got it too hot and I also believe I didn't use enough flux.
Does too much heat also make pinholes in the bronze? I have noticed that if I heat the bronze too much, it develops more pinholes. Is this the zinc boiling away? Or something else?
Finally, a question. I want to run an internal conduit up the fork blade, like Jack Taylor did on his frames, for dynamo wiring. I have some 1/8" (3.2mm) OD stainless tubing I am planning on brazing in with silver. I did this operation on my commuting bike's frame, in the downtube, so I know the tubing works well. Never done it on a fork, though. Is it ok to drill a hole to have this exit the fork blade in the middle of the curved part, where a lot of flex would be happening? Or would this weaken it too much? I would drill this hole in the centerline of the blade, where theoretically the least deformation would be happening. But if you think it's unsafe, I won't do it. I don't want to get a crack. The dynamo I'm using has long connectors, meaning the hole for the wire to enter the blade farther away from the dropout, putting the ideal point right in the middle of the bend.
Thanks again for all your advice!
One tip for getting less brass pinholes is to clean the rod 1st with scotch write and some cleaner afterwards. I don't have any knowledge about if it is a problem to drill a hole in the curve. When I drill an exit hole up further, I always put a supporting washer where the hole is going to be drilled. This morning i'm going to be finishing up a replacement fork that will be using a generator hub. I'll leave the inside of the connecting dropout unfilled so that creates a hole for the wire to run inside the blade. Because the fork crown does not have a reinforcing tang, I'll exit the wire by the fender and use a washer over the exit hole. I'll bend the washer so it fits flush against the fork blade.
Likes For Doug Fattic:
10-20-21, 09:59 PM
#62
Senior Member
Thread Starter
Join Date: Jun 2010
Location: Medford MA
Posts: 2,089
Bikes: Ron Cooper touring, 1959 Jack Taylor 650b ladyback touring tandem, Vitus 979, Joe Bell painted Claud Butler Dalesman, Colin Laing curved tube tandem, heavily-Dilberted 1982 Trek 6xx, Ren� Herse tandem
Mentioned: 80 Post(s)
Tagged: 0 Thread(s)
Quoted: 964 Post(s)
Liked 1,451 Times
in
723 Posts
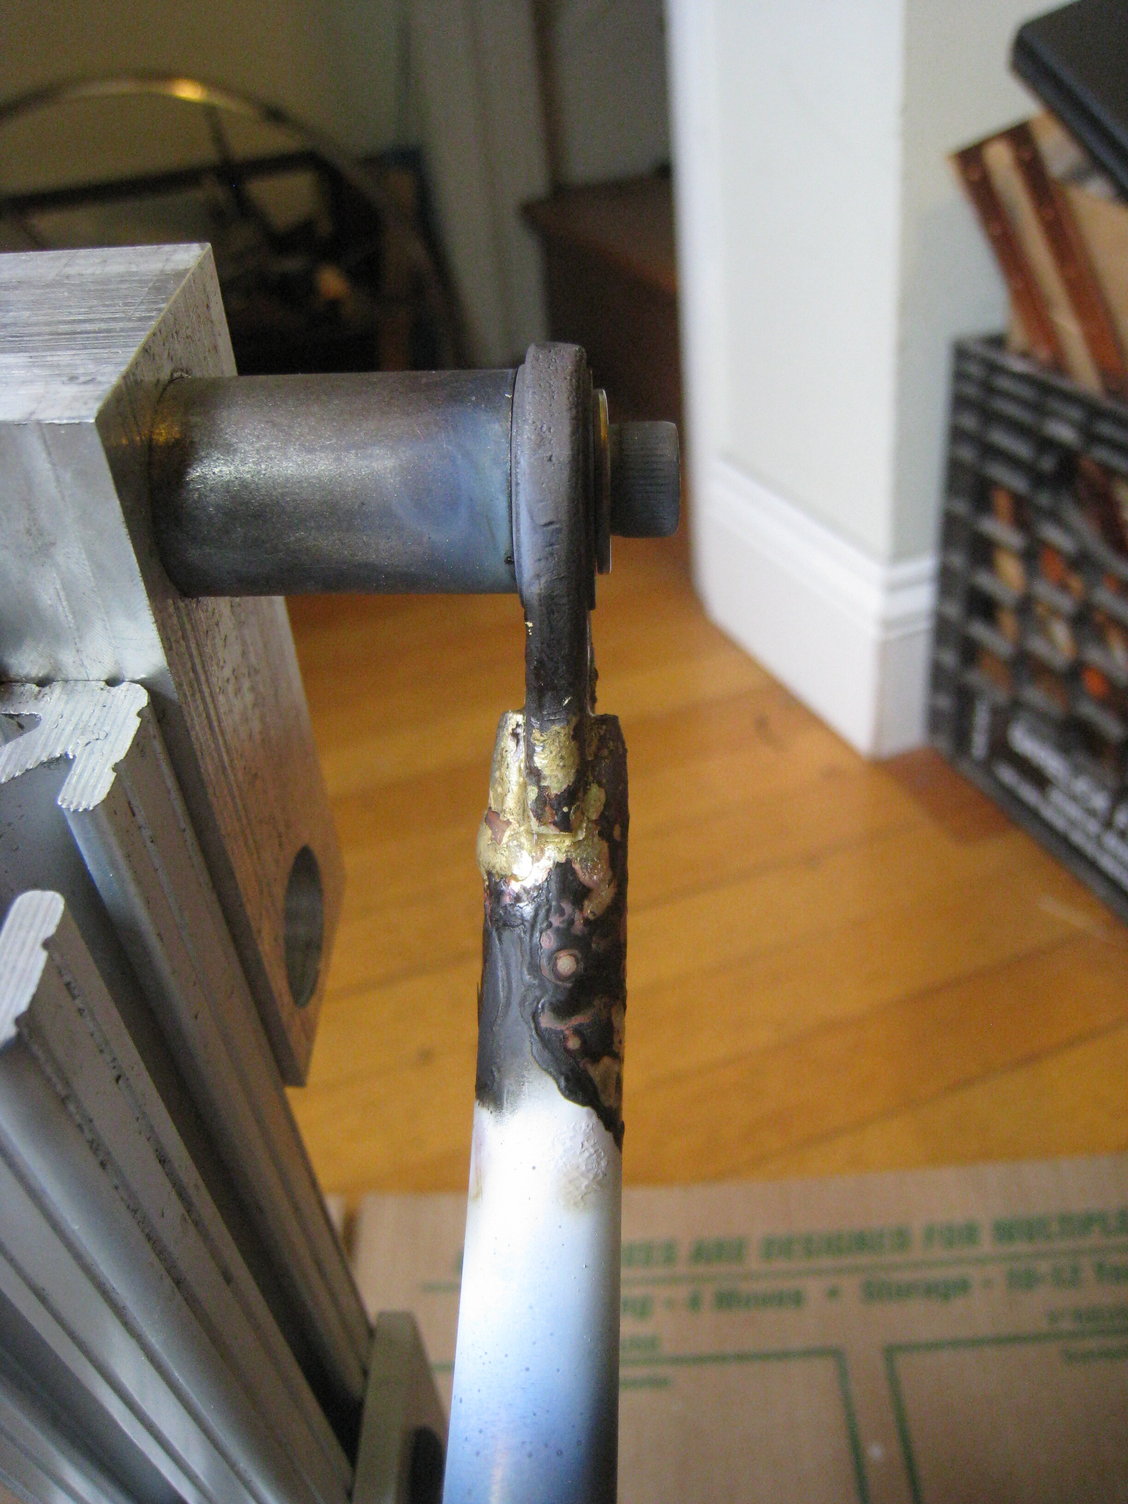
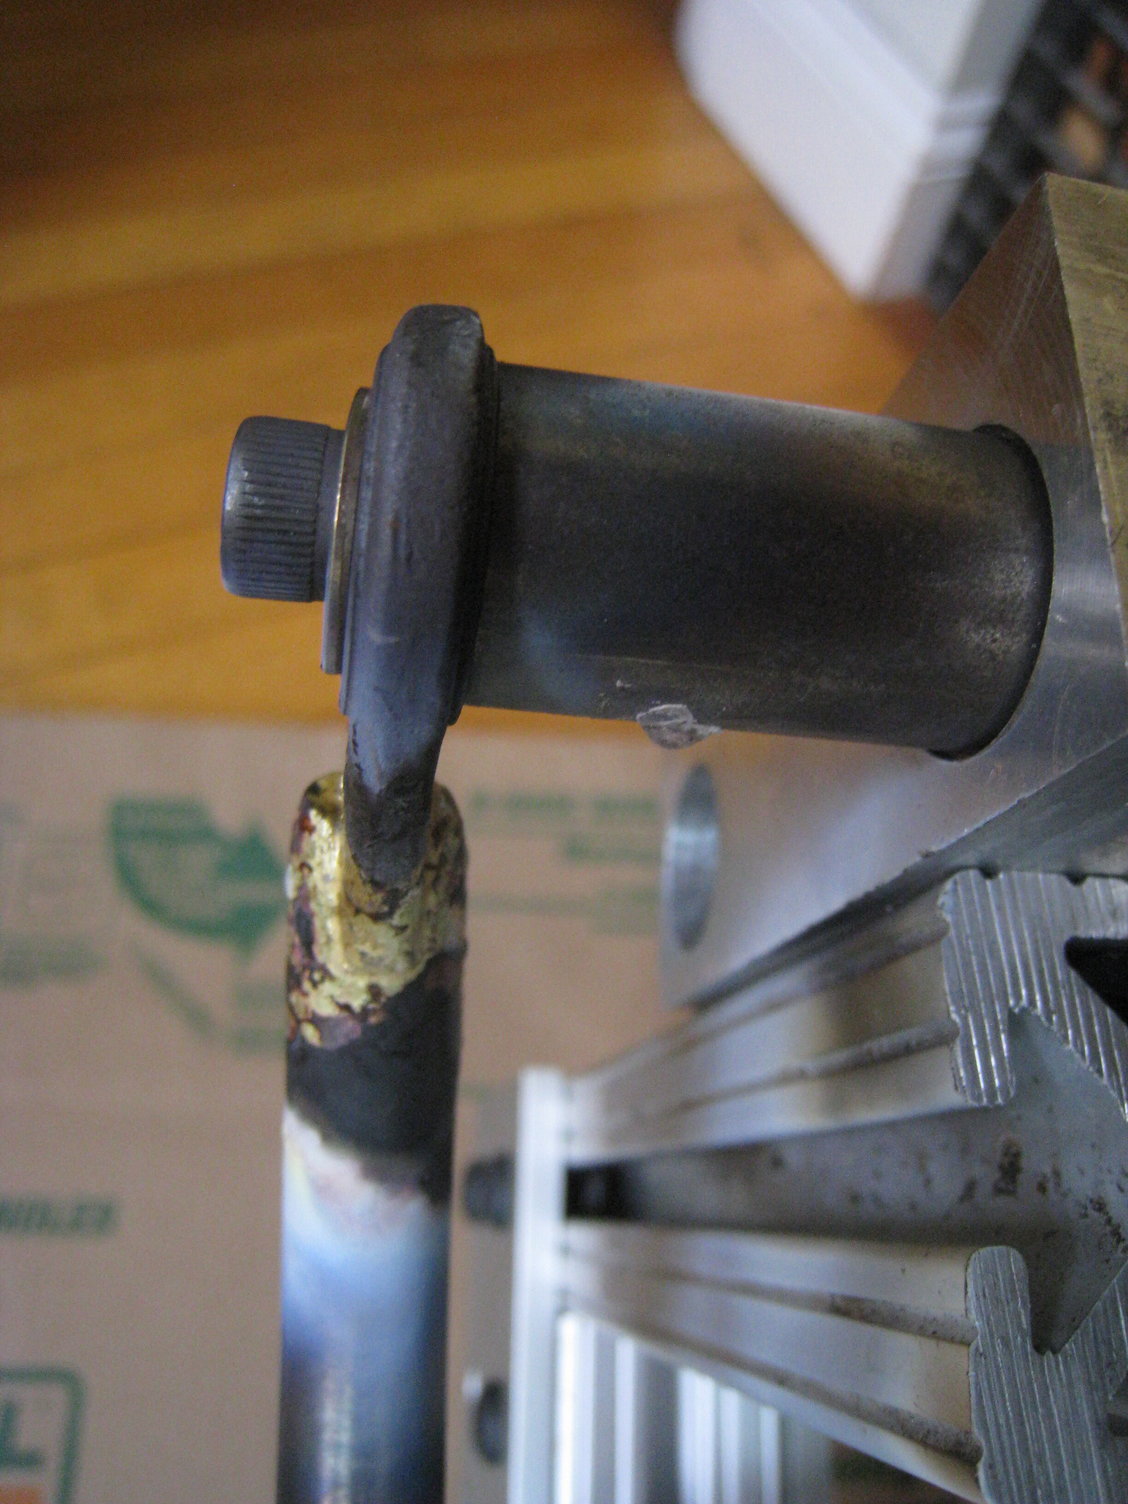
I did one side of the crown - and then ran out of silver!!
But, it was the side with the internal conduit. I rather like the way I did it, but it was somewhat hard to get everything to fit up correctly. If I had to do another one, it'd be easier now that I know how everything goes.
The conduit was some 1/8" OD (a hair over 1mm ID) stainless high-pressure seamless tubing I'd found in a dumpster. I believe @gugie uses refrigeration capillary tube, which is copper and easier to work with. The crown and upper exit for the conduit under the fender were brazed at the same time. That meant they had to be jigged at the same time, which wasn't easy. Basically had to get the conduit tubing ready in its hole in the forkblade, then get flux all over everything, then push the fork blade into its socket, then force the tubing through a hole I'd pre-drilled in the fork crown. Then put it in the jig. Hard!
I used Gasflux type H "black flux" which makes me braze like a freakin hero. That stuff can't ever be cooked! It is a miracle product, at least compared to the Harris Stay-Silv white flux I had been using. Compared to that stuff, Gasflux type H is like brazing in god mode. Like a video game with cheat codes. They say the stuff is dangerous, so I applied it wearing gloves and brazed under a powerful fume extractor. Afterwards, I thinned the edges of the fork crown a little. Felt good! I think I did a good job! I bet there are gobs of silver all over the inside, but I cannot see them!!


gugie said he'd done holes in the "neutral plane" of the forkblade (the centerline as viewed from the side, where the metal is neither under compression nor tension), so I made the internal conduit exit right there. I put a nice reinforcement star on it, too.


I'm doing the other side tomorrow.
But, it was the side with the internal conduit. I rather like the way I did it, but it was somewhat hard to get everything to fit up correctly. If I had to do another one, it'd be easier now that I know how everything goes.
The conduit was some 1/8" OD (a hair over 1mm ID) stainless high-pressure seamless tubing I'd found in a dumpster. I believe @gugie uses refrigeration capillary tube, which is copper and easier to work with. The crown and upper exit for the conduit under the fender were brazed at the same time. That meant they had to be jigged at the same time, which wasn't easy. Basically had to get the conduit tubing ready in its hole in the forkblade, then get flux all over everything, then push the fork blade into its socket, then force the tubing through a hole I'd pre-drilled in the fork crown. Then put it in the jig. Hard!
I used Gasflux type H "black flux" which makes me braze like a freakin hero. That stuff can't ever be cooked! It is a miracle product, at least compared to the Harris Stay-Silv white flux I had been using. Compared to that stuff, Gasflux type H is like brazing in god mode. Like a video game with cheat codes. They say the stuff is dangerous, so I applied it wearing gloves and brazed under a powerful fume extractor. Afterwards, I thinned the edges of the fork crown a little. Felt good! I think I did a good job! I bet there are gobs of silver all over the inside, but I cannot see them!!
gugie said he'd done holes in the "neutral plane" of the forkblade (the centerline as viewed from the side, where the metal is neither under compression nor tension), so I made the internal conduit exit right there. I put a nice reinforcement star on it, too.
I'm doing the other side tomorrow.
__________________
Owner & co-founder, Cycles Ren� Hubris. Unfortunately attaching questionable braze-ons to perfectly good frames since about 2015. With style.
Owner & co-founder, Cycles Ren� Hubris. Unfortunately attaching questionable braze-ons to perfectly good frames since about 2015. With style.
Last edited by scarlson; 10-20-21 at 10:07 PM.
