


Mitering Problem!
 12-15-21, 12:43 PM
#1
Senior Member
Thread Starter
Join Date: Dec 2011
Location: NE Ohio
Posts: 2,595
Bikes: 1992 Serotta Colorado II,Co-Motion Speedster, Giant Escape Hybrid, 1977 Schwinn Super Le Tour
Mentioned: 4 Post(s)
Tagged: 0 Thread(s)
Quoted: 455 Post(s)
Likes: 0
Liked 112 Times
in
85 Posts
Mitering Problem!
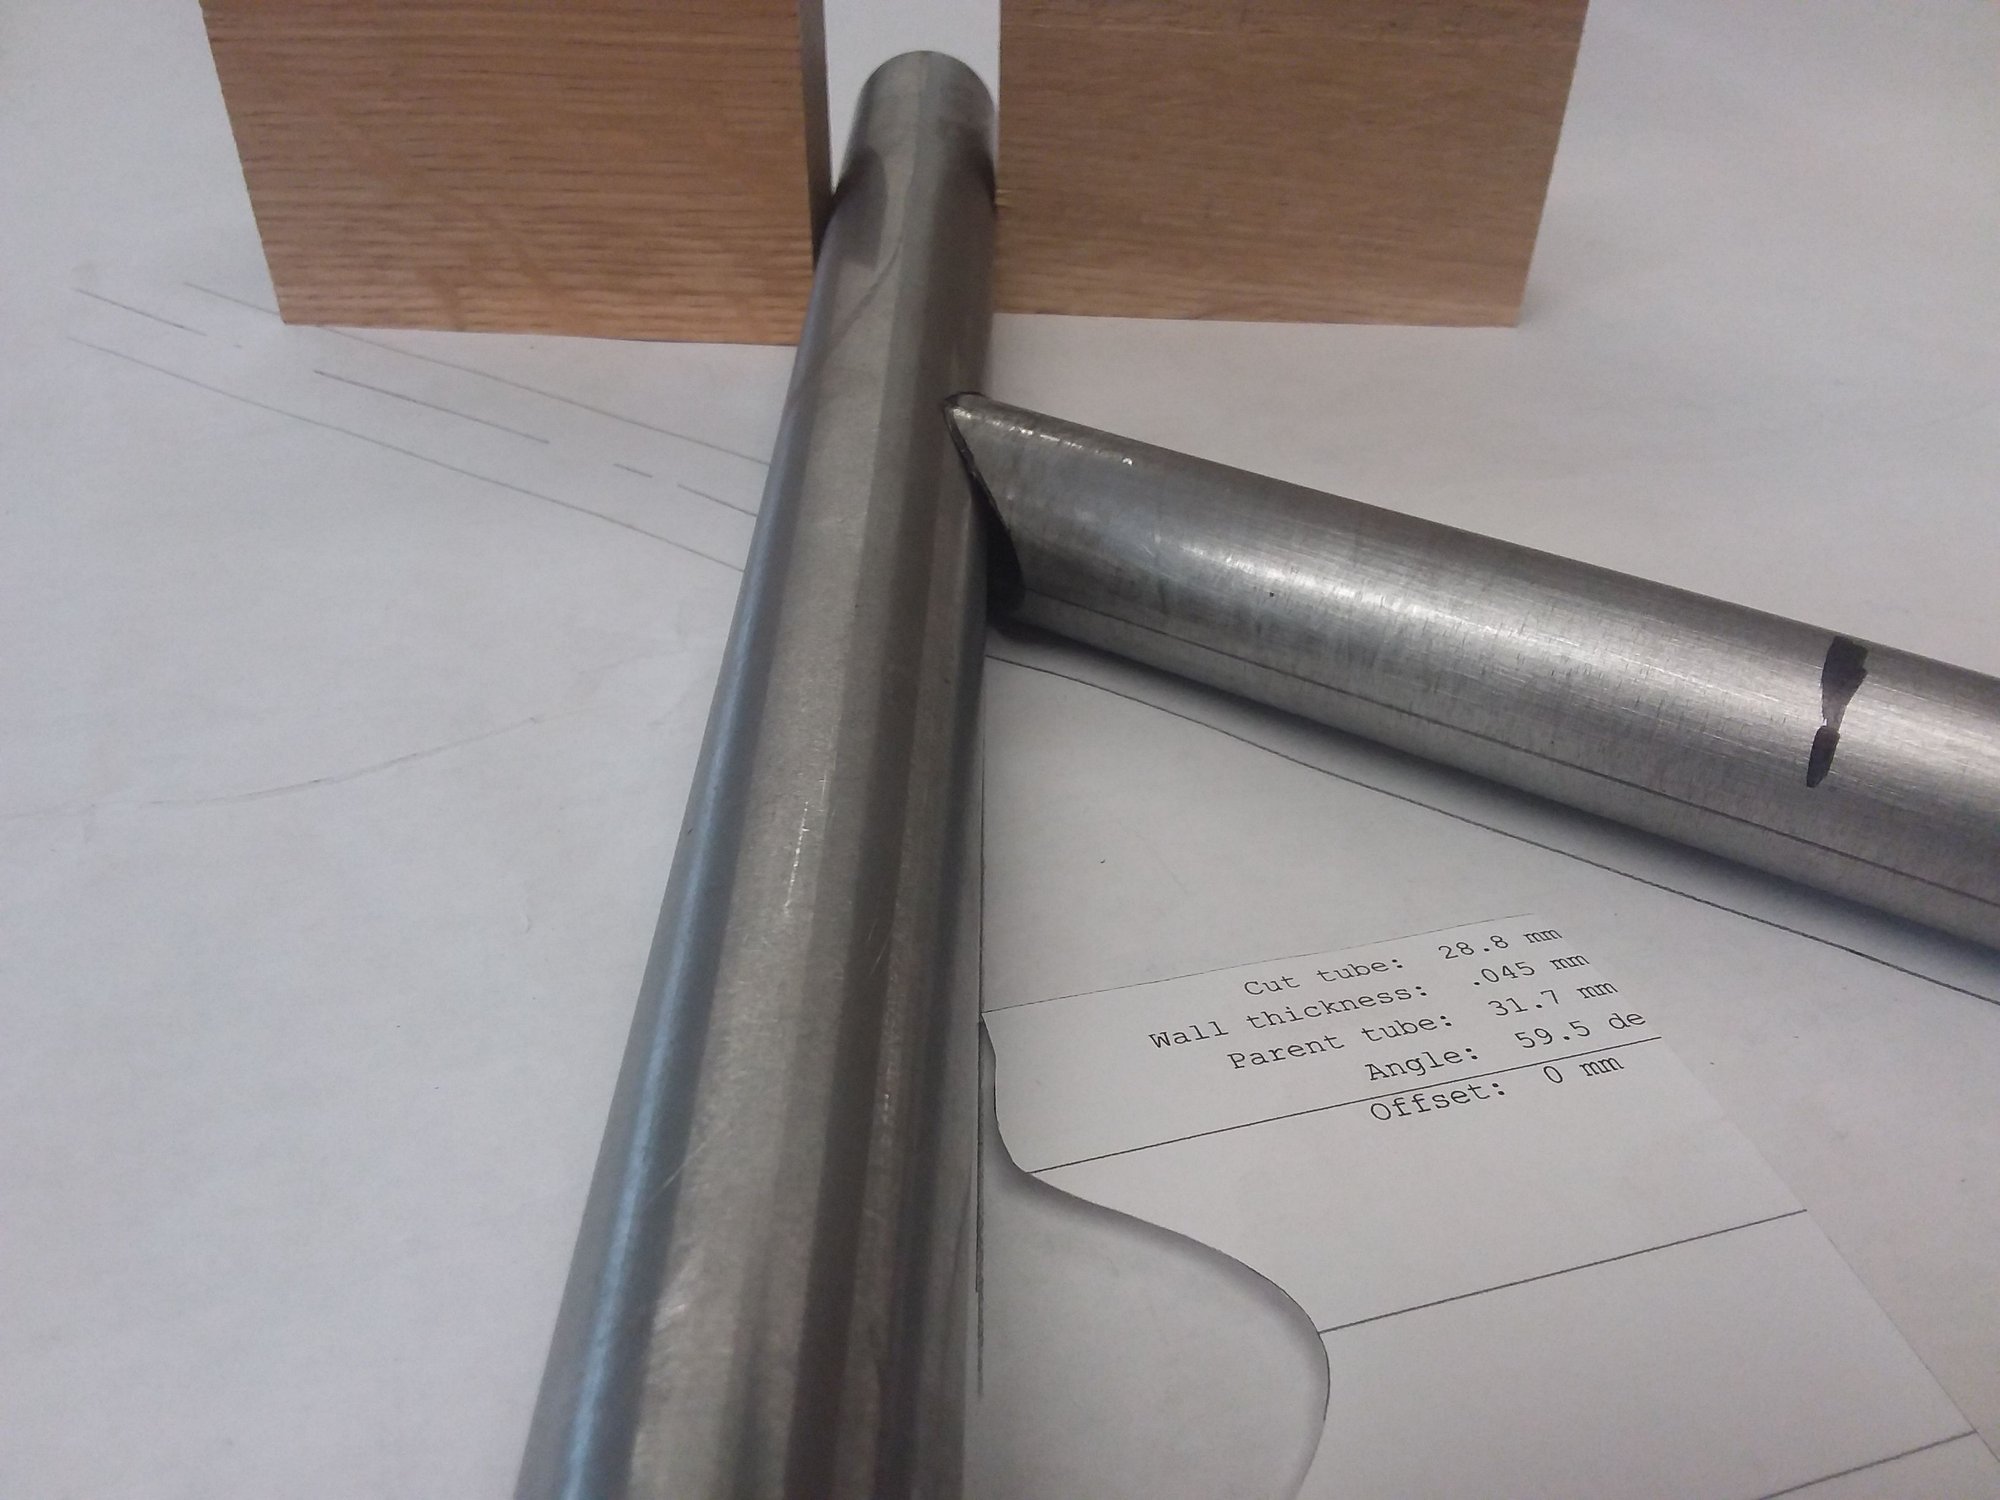
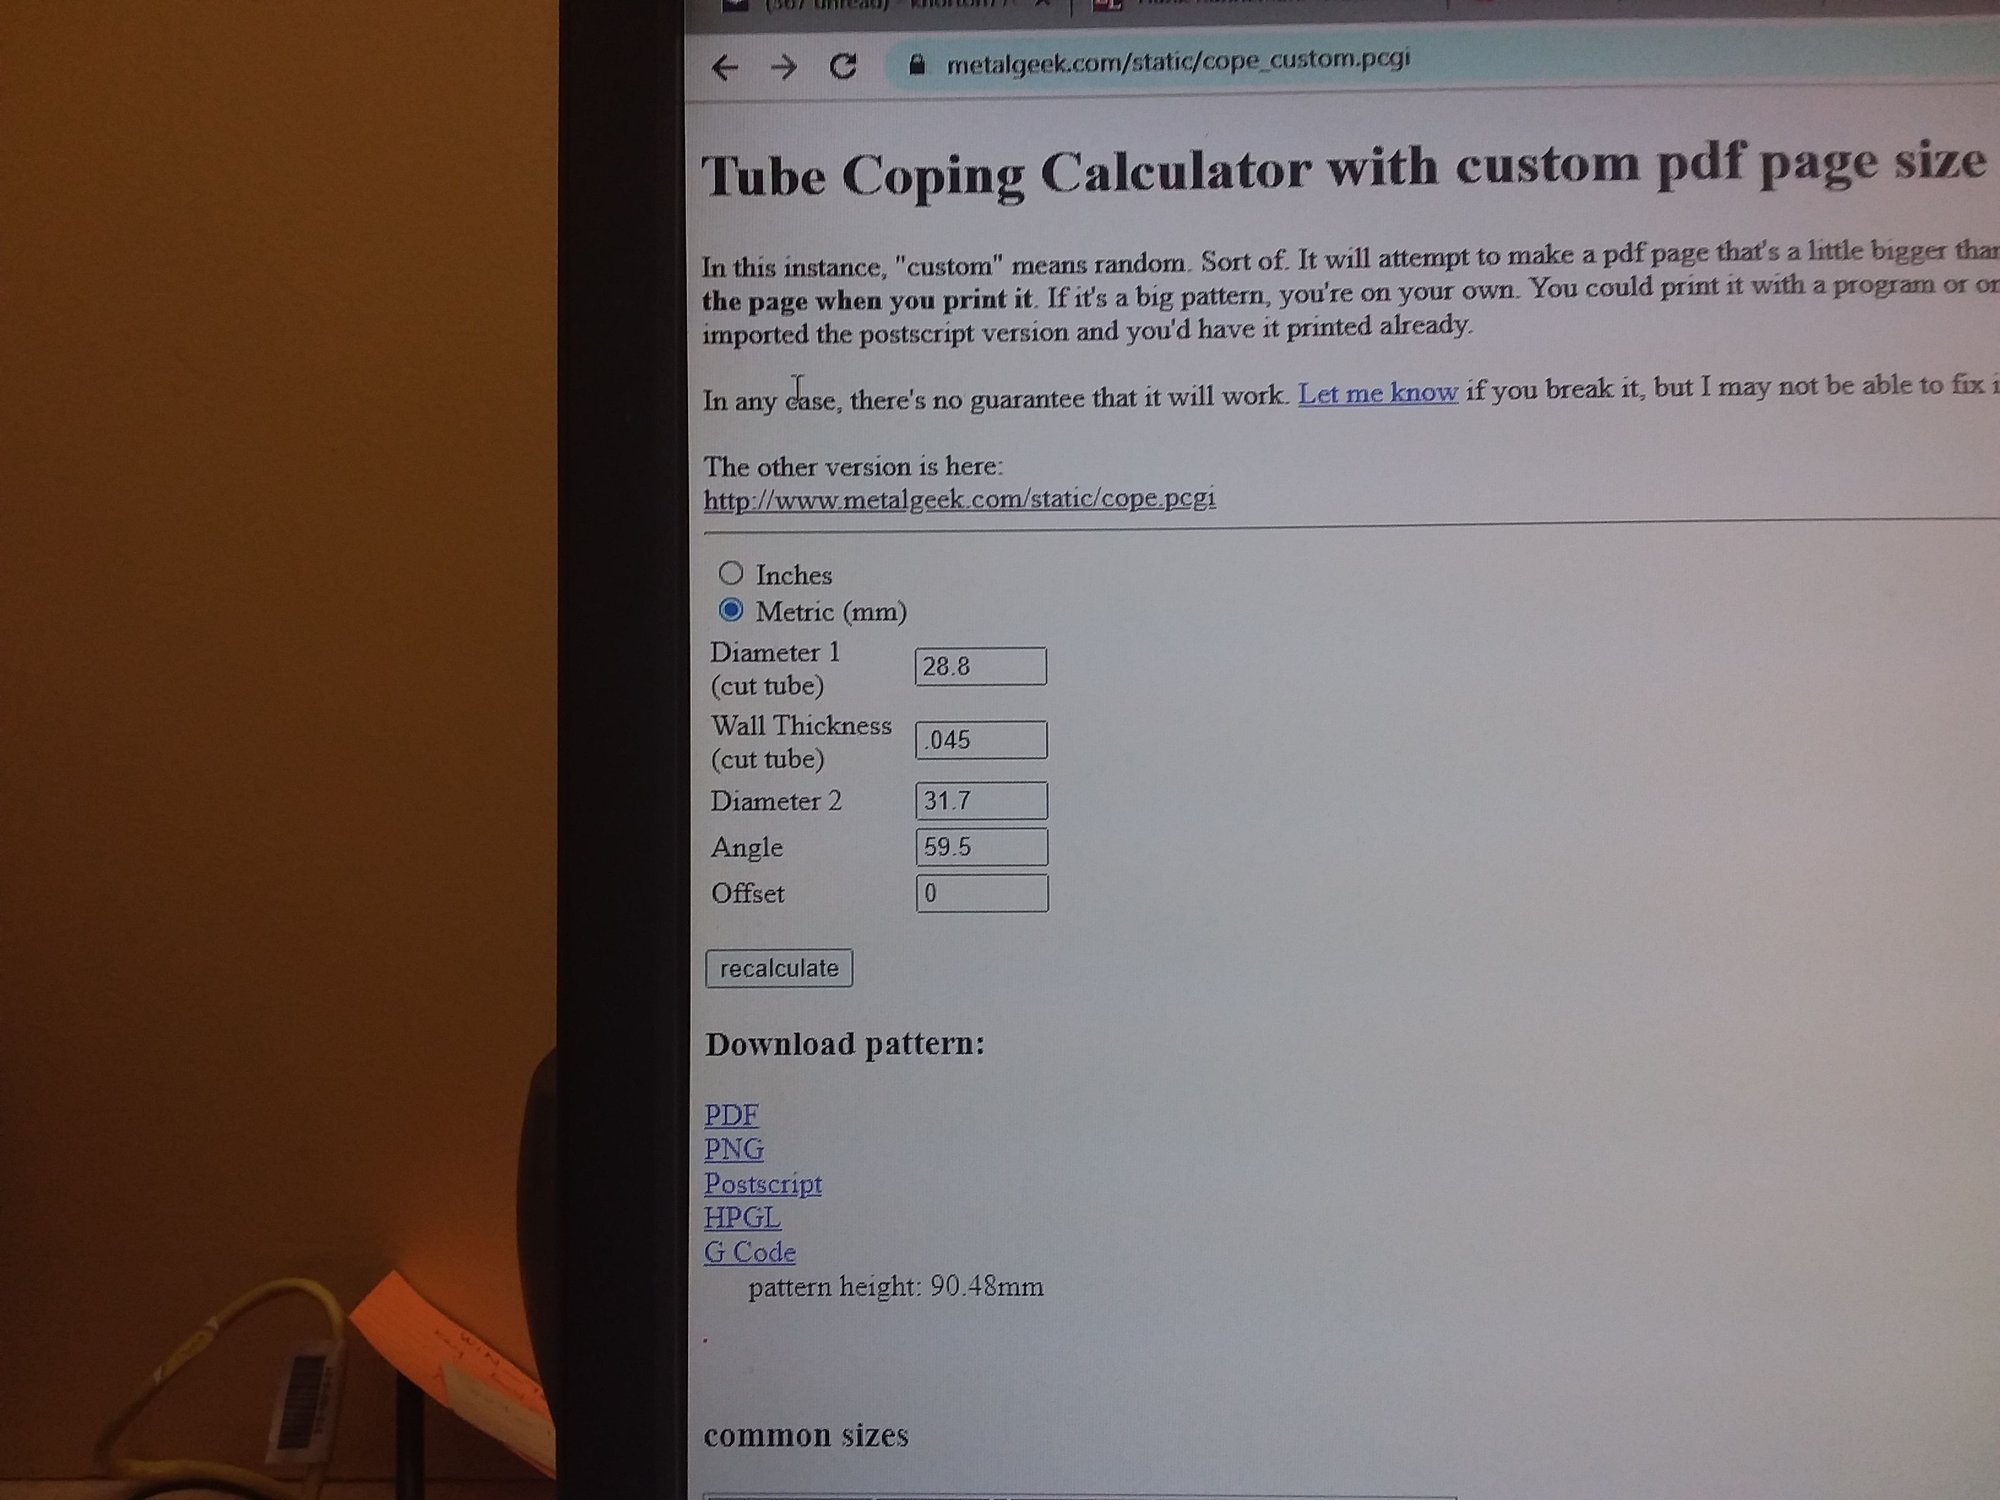
So was doing a test mitre using Metal Geek. I entered,what I thought was the correct info, but the mitre is not even close. It is roughly 5 degrees different.
Here are 2 pics.
Could really use some advice!
Thanks!!
Here are 2 pics.
Could really use some advice!
Thanks!!
 12-15-21, 02:08 PM
#2
Senior Member
Thread Starter
Join Date: Dec 2011
Location: NE Ohio
Posts: 2,595
Bikes: 1992 Serotta Colorado II,Co-Motion Speedster, Giant Escape Hybrid, 1977 Schwinn Super Le Tour
Mentioned: 4 Post(s)
Tagged: 0 Thread(s)
Quoted: 455 Post(s)
Likes: 0
Liked 112 Times
in
85 Posts
Figured it out!! I did not enter the tube wall thickness bin metric.
Operator error!
Operator error!
Likes For Tandem Tom:
12-15-21, 04:17 PM
#3


Randomhead
Join Date: Aug 2008
Location: Happy Valley, Pennsylvania
Posts: 24,386
Mentioned: 0 Post(s)
Tagged: 0 Thread(s)
Quoted: 4 Post(s)
Liked 3,686 Times
in
2,509 Posts
Where did you get that tube thickness from?
12-15-21, 04:26 PM
#4

blahblahblah chrome moly

Join Date: Apr 2009
Location: Seattle
Posts: 1,984
Mentioned: 92 Post(s)
Tagged: 0 Thread(s)
Quoted: 1172 Post(s)
Liked 2,566 Times
in
1,072 Posts
I can't even figure out why they would ask you the wall thickness � it's irrelevant.
Mark B
12-15-21, 05:16 PM
#5
Senior Member
Join Date: Dec 2019
Posts: 954
Mentioned: 3 Post(s)
Tagged: 0 Thread(s)
Quoted: 321 Post(s)
Liked 263 Times
in
212 Posts
How does the wall thickness affect the miter angle? (I think it doesn't.) It has effects, like how much the tube wall deflects under tool pressure, and how likely a tooth on your holesaw is to "catch". But nothing that could cause your angle to come out wrong.
I can't even figure out why they would ask you the wall thickness � it's irrelevant.
Mark B
I can't even figure out why they would ask you the wall thickness � it's irrelevant.
Mark B
 12-15-21, 06:58 PM
#6
blahblahblah chrome moly
Join Date: Apr 2009
Location: Seattle
Posts: 1,984
Mentioned: 92 Post(s)
Tagged: 0 Thread(s)
Quoted: 1172 Post(s)
Liked 2,566 Times
in
1,072 Posts
It shouldn't affect the angle but the program needs to know the thickness because it's trying to make the inside surface of the cut tube touch the parent tube. It's ID to OD (and how you bevel the tube walls between the ID and the OD is up to you). So although it doesn't affect the angle you can see that a very thin wall makes the throat much deeper on both sides which explains Tom's problem.
As I understand it, this program is sort of like training wheels for people who don't know how to miter. Or am I missing something big? Would a pro ever use this program? My gut feeling is, I can complete the miter with a hacksaw and a half-round file before you have even finished printing it on paper and cutting out along the line. Then you still have to cut the miter somehow.
Sorry if this seems confrontational, I don't feel that way. It's fine if it helps people. I have a suspicion though, that people like Tom might be better off just learning what size half-round file to use for cutting the needed radius. Then hacksaw it close, and file to scribe lines top and bottom. The scribe lines can be transferred from the drawing. I don't draw frames full-sized anymore (not since the '70s) but I recommend that hobbyists and/or beginners do so, because you learn a lot in the process and you can lay your parts right on the drawing for a sanity check. As I see Tom doing in his photo.
Once you have the drawing done, I don't see what the miter calculator does for you. Seems like it's just another place to introduce error, as in Tom's result.
Apologies for dragging this out if the question is already thoroughly answered.
Mark B
12-15-21, 07:47 PM
#7
Senior Member
Thread Starter
Join Date: Dec 2011
Location: NE Ohio
Posts: 2,595
Bikes: 1992 Serotta Colorado II,Co-Motion Speedster, Giant Escape Hybrid, 1977 Schwinn Super Le Tour
Mentioned: 4 Post(s)
Tagged: 0 Thread(s)
Quoted: 455 Post(s)
Likes: 0
Liked 112 Times
in
85 Posts
After I entered the correct info I printed the template. Cut and filed and it fit perfectly!
As a newbie I am more than willing to work toward "eyeballing" it but as an experienced woodworker I know that that skill takes time. So I am willing to use whatever tool is available to help me achieve that goal!
As a newbie I am more than willing to work toward "eyeballing" it but as an experienced woodworker I know that that skill takes time. So I am willing to use whatever tool is available to help me achieve that goal!
Likes For Tandem Tom:
12-16-21, 12:06 AM
#8
Randomhead
Join Date: Aug 2008
Location: Happy Valley, Pennsylvania
Posts: 24,386
Mentioned: 0 Post(s)
Tagged: 0 Thread(s)
Quoted: 4 Post(s)
Liked 3,686 Times
in
2,509 Posts
I also don't understand the tube thickness causing a problem now that you mention it. These programs plot out the interface shape at the ID, but I don't understand how that would be used. If it is used, that could definitely cause a problem.
I think this is misplaced. I use paper templates and I definitely could miter by eye if I wanted to, I just don't want to. Denigrating it is a bit of macho silliness really, I guess that's why all the beginners want to set up a bridgeport to miter, so nobody will make fun of their templates. It still takes a hell of a lot more skill to file to a line than to flip a switch on a bp and run a hole saw through a tube. But nobody cares how a miter is made once the frame is finished. I would much rather see people using templates and mitering by hand rather than investing thousands on fixtures and mills before they try to build their first frame and realize they really don't have the knack for that kind of fabrication. Some guys that miter with machines couldn't miter with a file, and like I said nobody cares. I won't even call those machines training wheels. Just like templates, they add certainty into the process which is never bad, especially for a beginner. I imagine that some of the frames I have had the misfortune to have seen the insides of because their miters were clocked were probably mitered by hand without much marking out. Nobody needs that.
Thanks for plotting this out, but I still fail to understand how the id affects the intersection of the od of the tube with the od of other tube, which is what a template program should be plotting. It just doesn't make sense, it could be a solid rod and the od (when projected onto a plane) would have exactly the same shape. As usual, I may be ignoring something obvious.
On further edit: bikecad prints templates and there is no way to tell the program what the id of the tube is as far as I can tell. It does plot the id for some unmentioned ID. I am not sure why really.
As I understand it, this program is sort of like training wheels for people who don't know how to miter. Or am I missing something big? Would a pro ever use this program? My gut feeling is, I can complete the miter with a hacksaw and a half-round file before you have even finished printing it on paper and cutting out along the line. Then you still have to cut the miter somehow.
It shouldn't affect the angle but the program needs to know the thickness because it's trying to make the inside surface of the cut tube touch the parent tube. It's ID to OD (and how you bevel the tube walls between the ID and the OD is up to you). So although it doesn't affect the angle you can see that a very thin wall makes the throat much deeper on both sides which explains Tom's problem.
On further edit: bikecad prints templates and there is no way to tell the program what the id of the tube is as far as I can tell. It does plot the id for some unmentioned ID. I am not sure why really.
Last edited by unterhausen; 12-16-21 at 12:24 AM.
12-16-21, 01:56 AM
#9
blahblahblah chrome moly
Join Date: Apr 2009
Location: Seattle
Posts: 1,984
Mentioned: 92 Post(s)
Tagged: 0 Thread(s)
Quoted: 1172 Post(s)
Liked 2,566 Times
in
1,072 Posts
OK I see now, that "training wheels" comment was out of line, and I apologize. Not having used the program at all, it was ignorant of me to cast aspersions on it. It wasn't macho though (I think...) more like laziness, since it seems like an unnecessary step to me. I'm definitely not fast, but I try to avoid things that slow me down... unless I just enjoy them for some reason! I see now the template has value, so it is not a wasted step.
On filing versus milling miters, sorry if I've told this story here before: I worked for Glenn Erickson, in about 1979 we got a small milling machine and set it up for mitering, but Glenn didn't like it, he kept on filing his. (We each made our own frames back then.) Anyway we raced once, he filed a miter and I milled mine, and he beat me. Even though the mill was already set up for mitering! I think mine may have been a little more precise, but his was in the range where it wouldn't matter a gnat's eyelash inside a lug, gaps that the filler would bridge instantly. Perfect for all practial purposes, in about a minute, maybe less.
If I had a mill I'd use it for mitering, but since I don't, I have to file, for now. I'm thinking of setting up for abrasive mitering, but I know a few guys who tried it and dropped it, too much dust and grit everywhere. But that's getting off the subject, sorry.
I agree that anything that helps beginners gain confidence and precision is good. I just had a feeling (mistaken, it turns out) that these printed templates were hindering more than helping. I guess I should try it!
Mark B
Likes For bulgie:
12-16-21, 03:33 AM
#10
Senior Member
Join Date: Dec 2019
Posts: 954
Mentioned: 3 Post(s)
Tagged: 0 Thread(s)
Quoted: 321 Post(s)
Liked 263 Times
in
212 Posts
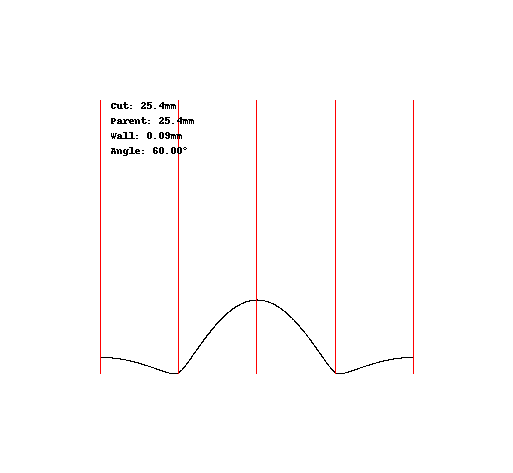
unterhausen : You're right that the wall thickness wouldn't be needed if the program was mapping OD to OD, which is indeed what you would do if you were mitring a solid rod. I wrote my own coping template program and that is how I did it to start with. But when I tested out some of the mitres the fit up was horrible (I was testing with 1.6mm wall 1 inch mild steel tube) and I figured out the problem was that you needed to match ID to OD. The templates my program creates (which I posted screenshots of above) do that, come out basically identical to the ones from metalgeek, and fit up nicely so I'm pretty sure they're doing the same. If you think of when it came to actually cutting the solid rod, at the two sharp ends of the mitre (the top and bottom of the "fish mouth") your cut would be sloping inwards towards the centre of the tube. If you used an OD to OD template you would have to angle your cuts like that, and if you did it perfectly the result would look like you had used a holesaw. But normally with a template you make a cut that's square to the walls. At least that's what I do, and I think it's better for welding than having a bevel that goes the wrong way as you get from a hole saw. Because I'm a bit of a redneck I rough cut it with a cut-off wheel and then go up to the sharpie line with a flap disk. It takes a few minutes and I get a really good fitup (or at least, as good as I can get by another means).
As for whether real men use mitre templates, if I have a bit of spare time and I'm outside I sometimes do a practice joint or two on offcuts and don't bother to go back into the hacienda to print out a template. I can do a 90 degree mitre pretty well that way but it's harder at different angles, and even harder if you have an offset like a SS to ST (see below), which is one of the features my program can do that metalgeek can't. So maybe one day I won't need the templates but they make good "training wheels".

As for whether real men use mitre templates, if I have a bit of spare time and I'm outside I sometimes do a practice joint or two on offcuts and don't bother to go back into the hacienda to print out a template. I can do a 90 degree mitre pretty well that way but it's harder at different angles, and even harder if you have an offset like a SS to ST (see below), which is one of the features my program can do that metalgeek can't. So maybe one day I won't need the templates but they make good "training wheels".
Likes For guy153:
12-16-21, 07:50 AM
#11
Randomhead
Join Date: Aug 2008
Location: Happy Valley, Pennsylvania
Posts: 24,386
Mentioned: 0 Post(s)
Tagged: 0 Thread(s)
Quoted: 4 Post(s)
Liked 3,686 Times
in
2,509 Posts
Okay, that's a difference in philosophy. I might or might not remove the really sharp edge, but it makes sense to do it that way if you are fusion welding.
12-16-21, 08:06 AM
#12
Senior Member
Join Date: Feb 2012
Location: Rochester, NY
Posts: 18,056
Bikes: Stewart S&S coupled sport tourer, Stewart Sunday light, Stewart Commuting, Stewart Touring, Co Motion Tandem, Stewart 3-Spd, Stewart Track, Fuji Finest, Mongoose Tomac ATB, GT Bravado ATB, JCP Folder, Stewart 650B ATB
Mentioned: 0 Post(s)
Tagged: 0 Thread(s)
Quoted: 4195 Post(s)
Liked 3,837 Times
in
2,295 Posts
So where does using a bench grinder fall into the spectrum of men and boys For years I scribed a rough line from the socket's ID and ground to that before finishing with a file. Now I have a "powered hammer" (mill) so I hit my tubes with is but still need to fine tune with a file.
Mark- If you are interested in trying an abrasive system let me know. I bought such a set up, made to employ a drill press, and never get it truely going for more than the initial trial miter or two. I'll be happy to sell it. It's all wrapped up on my shelves but can be unpacked to photo. Andy
For years I scribed a rough line from the socket's ID and ground to that before finishing with a file. Now I have a "powered hammer" (mill) so I hit my tubes with is but still need to fine tune with a file. Mark- If you are interested in trying an abrasive system let me know. I bought such a set up, made to employ a drill press, and never get it truely going for more than the initial trial miter or two. I'll be happy to sell it. It's all wrapped up on my shelves but can be unpacked to photo. Andy
__________________
AndrewRStewart
AndrewRStewart
Likes For Andrew R Stewart:
12-16-21, 12:28 PM
#13
Senior Member
Join Date: Dec 2019
Posts: 954
Mentioned: 3 Post(s)
Tagged: 0 Thread(s)
Quoted: 321 Post(s)
Liked 263 Times
in
212 Posts
Fusion welding is often done as a first pass on Ti frames and idk how they prefer to mitre. But if you want to fusion weld the fit-up has to be absolutely perfect.
12-16-21, 12:29 PM
#14
Senior Member
Join Date: Dec 2019
Posts: 954
Mentioned: 3 Post(s)
Tagged: 0 Thread(s)
Quoted: 321 Post(s)
Liked 263 Times
in
212 Posts
So where does using a bench grinder fall into the spectrum of men and boys For years I scribed a rough line from the socket's ID and ground to that before finishing with a file. Now I have a "powered hammer" (mill) so I hit my tubes with is but still need to fine tune with a file.
Mark- If you are interested in trying an abrasive system let me know. I bought such a set up, made to employ a drill press, and never get it truely going for more than the initial trial miter or two. I'll be happy to sell it. It's all wrapped up on my shelves but can be unpacked to photo. Andy
For years I scribed a rough line from the socket's ID and ground to that before finishing with a file. Now I have a "powered hammer" (mill) so I hit my tubes with is but still need to fine tune with a file.Mark- If you are interested in trying an abrasive system let me know. I bought such a set up, made to employ a drill press, and never get it truely going for more than the initial trial miter or two. I'll be happy to sell it. It's all wrapped up on my shelves but can be unpacked to photo. Andy
12-16-21, 03:43 PM
#15
Randomhead
Join Date: Aug 2008
Location: Happy Valley, Pennsylvania
Posts: 24,386
Mentioned: 0 Post(s)
Tagged: 0 Thread(s)
Quoted: 4 Post(s)
Liked 3,686 Times
in
2,509 Posts
I miter bridges with a sanding drum in a dremel. I have thought about making an abrasive system like some people have, but I don't want all those abrasives in my shop. If I wanted to be like the pros, I would set up my lathe for mitering again. I tried it before I fixed the nut in the cross slide.
I am again confused about Tom's issue because if you have a really thin tube there is almost no difference between the outside shape and the inside shape. Should work.
I am again confused about Tom's issue because if you have a really thin tube there is almost no difference between the outside shape and the inside shape. Should work.
Last edited by unterhausen; 12-16-21 at 03:50 PM.
12-16-21, 04:37 PM
#16
Senior Member
Join Date: Dec 2019
Posts: 954
Mentioned: 3 Post(s)
Tagged: 0 Thread(s)
Quoted: 321 Post(s)
Liked 263 Times
in
212 Posts
I miter bridges with a sanding drum in a dremel. I have thought about making an abrasive system like some people have, but I don't want all those abrasives in my shop. If I wanted to be like the pros, I would set up my lathe for mitering again. I tried it before I fixed the nut in the cross slide.
I am again confused about Tom's issue because if you have a really thin tube there is almost no difference between the outside shape and the inside shape. Should work.
I am again confused about Tom's issue because if you have a really thin tube there is almost no difference between the outside shape and the inside shape. Should work.
The error is more than 0.9mm, it's something like 0.9mm divided by the sine of the angle that a hole saw would be cutting through the wall at which is quite steep in places. Also the whole thing just doesn't fit together properly.
Likes For guy153:
12-17-21, 04:25 AM
#17
The Wheezing Geezer

Join Date: Oct 2021
Location: Espa�ola, NM
Posts: 1,043
Bikes: 1976 Fredo Speciale, Jamis Citizen 1, Ellis-Briggs FAVORI, Rivendell Clem Smith Jr.
Mentioned: 1 Post(s)
Tagged: 0 Thread(s)
Quoted: 411 Post(s)
Liked 895 Times
in
440 Posts
The only tricky part of hacksaw and file method for me was the other end of the top tube - if not approached carefully it can end up too short. Rumors were rife during the seventies bike boom that some manufacturers skipped the filing step, or just roughed it out.
12-17-21, 12:19 PM
#18
Senior Member
Join Date: Dec 2019
Posts: 954
Mentioned: 3 Post(s)
Tagged: 0 Thread(s)
Quoted: 321 Post(s)
Liked 263 Times
in
212 Posts
You have to start with it a little bit too long and sneak up on it. I guess if you were jigging everything super-accurately you'd do this with the DT as well. But I cut the DT to what it's supposed to be as close as I can measure it and then fit the TT into the space available with the DT in position and ST and HT at the correct angles.
12-17-21, 12:44 PM
#19
Randomhead
Join Date: Aug 2008
Location: Happy Valley, Pennsylvania
Posts: 24,386
Mentioned: 0 Post(s)
Tagged: 0 Thread(s)
Quoted: 4 Post(s)
Liked 3,686 Times
in
2,509 Posts
The thing I never worked out for myself is how to get the angle right when doing this freehand. Someone gave me a really long caliper, so I can mark the length no problem. Except maybe on a mountain bike where I would have to use a tape. I have a pretty good square that came with a protractor, so I guess I could use that, but it works a lot better if the miter is already done. I probably will move to machine tools eventually, because I own them and mitering is a bit tedious sometimes if I'm hungover or in a hurry. I'm sure Mark could miter things faster by hand, but he lives on the other side of the country so I guess you would have to factor the time for shipping if he was going to do it for me.
12-18-21, 01:35 PM
#20
Senior Member
Join Date: Dec 2019
Posts: 954
Mentioned: 3 Post(s)
Tagged: 0 Thread(s)
Quoted: 321 Post(s)
Liked 263 Times
in
212 Posts
I saw that post and I appreciate it, but it shouldn't throw the angle off. If you make the tube zero thickness, the ID method and the OD method will yield exactly the same result, so it shouldn't throw off the angle. I might do that and compare with the Bikecad template. It's only trees, but I'm sure they would be okay with dying for science.
The thing I never worked out for myself is how to get the angle right when doing this freehand. Someone gave me a really long caliper, so I can mark the length no problem. Except maybe on a mountain bike where I would have to use a tape. I have a pretty good square that came with a protractor, so I guess I could use that, but it works a lot better if the miter is already done. I probably will move to machine tools eventually, because I own them and mitering is a bit tedious sometimes if I'm hungover or in a hurry. I'm sure Mark could miter things faster by hand, but he lives on the other side of the country so I guess you would have to factor the time for shipping if he was going to do it for me.
12-18-21, 07:06 PM
#21
Randomhead
Join Date: Aug 2008
Location: Happy Valley, Pennsylvania
Posts: 24,386
Mentioned: 0 Post(s)
Tagged: 0 Thread(s)
Quoted: 4 Post(s)
Liked 3,686 Times
in
2,509 Posts
That's what I was wondering, it just didn't fit. Not that I can make sense of that either
12-19-21, 11:32 AM
#22
The Wheezing Geezer
Join Date: Oct 2021
Location: Espa�ola, NM
Posts: 1,043
Bikes: 1976 Fredo Speciale, Jamis Citizen 1, Ellis-Briggs FAVORI, Rivendell Clem Smith Jr.
Mentioned: 1 Post(s)
Tagged: 0 Thread(s)
Quoted: 411 Post(s)
Liked 895 Times
in
440 Posts
When filing freehand, just draw two lines on a marker board intersecting at the angle you want and hold the tubes up to the board to look for gaps, like in the first photo.
Last edited by Fredo76; 12-19-21 at 11:42 AM.
